![- Key Ingredients for Crust - 1 ½ cups graham cracker crumbs - ½ cup unsalted butter, melted - 1 tablespoon granulated sugar The crust gives your cheesecake a nice crunch. The graham crackers bring a sweet flavor. The butter helps hold everything together. - Essential Ingredients for Cheesecake Filling - 2 cups cream cheese, softened to room temperature - 1 cup granulated sugar - 1 teaspoon pure vanilla extract - 3 large eggs, at room temperature - 1 cup sour cream - 1 ½ cups all-purpose flour - 1 tablespoon unsweetened cocoa powder - 1 tablespoon red food coloring - ½ teaspoon baking soda - ½ teaspoon fine salt The cream cheese is the star of this dish. It gives the cheesecake its smooth texture and rich flavor. The red food coloring makes it pop, while the cocoa powder adds a touch of chocolate. - Optional Garnishes and Toppings - Whipped cream, for topping - Fresh raspberries or strawberries, for garnish Garnishes add a fun touch to your cheesecake. Whipped cream adds creaminess, while fresh berries bring a burst of fruity flavor. You can mix and match to suit your taste. For the full list of ingredients, check the Full Recipe. 1. Preheat the Oven: First, preheat your oven to 325°F (163°C). This step is key for even baking. 2. Prepare and Bake the Crust: In a large bowl, mix the graham cracker crumbs, melted butter, and sugar. This will give you a tasty base. Press this mixture into a 9-inch springform pan. Bake the crust for 10 minutes, then let it cool. 3. Create the Cheesecake Filling: In another bowl, beat the softened cream cheese until it is smooth. Gradually add the sugar and vanilla extract, mixing well. Then, add the eggs one by one, mixing after each. Now, fold in the sour cream, flour, cocoa powder, red food coloring, baking soda, and salt. Blend until it is lump-free and creamy. 4. Transfer to the Pan and Bake: Pour the cheesecake mix over the cooled crust. Tap the pan gently on the counter to get rid of air bubbles. Put the pan back in the oven for 55-60 minutes. The edges should be firm, and the middle should jiggle a little. 1. Proper Cooling Techniques: Once it’s baked, turn off the oven and crack the door. Let the cheesecake cool slowly for 1 hour. Then, move it to the fridge to chill for at least 4 hours, or ideally overnight. This helps the flavors come together. 2. How to Serve Effectively: When ready to serve, gently remove the cheesecake from the springform pan. Top with whipped cream and fresh berries for a pop of color. 3. Presentation Tips: To make it look fancy, place slices on individual plates. Drizzle with raspberry coulis or chocolate sauce before adding berries. This makes each slice a showstopper while tasting divine. For a complete guide, check out the Full Recipe. Enjoy your delicious Red Velvet Cheesecake! Ensuring a Smooth Batter To get a smooth batter, start with room-temperature cream cheese. Cold cream cheese will create lumps. Beat the cream cheese until it's creamy before adding sugar. Mix well after each egg to keep it smooth. Achieving the Right Bake Bake your cheesecake at 325°F (163°C). This lower temperature helps it cook evenly. Look for a slight jiggle in the center when you remove it from the oven. It will firm up as it cools. Avoiding Common Mistakes Avoid overmixing the batter. This can add too much air, causing cracks. Also, do not open the oven door while baking. A sudden temperature change may cause your cheesecake to sink. Creative Toppings Top your cheesecake with whipped cream and fresh berries. You can also drizzle chocolate or caramel sauce on top for extra flavor. For a fun twist, add crushed cookies or candy on top. Seasonal Variations In the fall, try adding a layer of spiced pumpkin puree. In the summer, a layer of lemon curd can brighten the flavor. Seasonal fruits like peaches or cherries are also great choices. Unique Serving Suggestions Serve individual slices on plates with a drizzle of raspberry coulis. Place fresh mint leaves beside each slice for a pop of color. You can even layer small pieces in a glass for a fun parfait style. For the full recipe, be sure to check the detailed instructions above! {{image_4}} Chocolate Red Velvet Cheesecake You can add chocolate to your red velvet cheesecake. Use cocoa powder in the filling. This gives it a rich, deep flavor. Mix it well to ensure even taste. Swirled Cheesecake Options Swirling different flavors into the cheesecake is fun. Try adding a layer of cream cheese or chocolate ganache on top. Use a knife to create a beautiful effect. This adds visual flair and different tastes. Adding Nuts or Fruits Adding nuts or fruits can change the texture and taste. Pecans or walnuts give a nice crunch. Fresh raspberries or strawberries add a fruity twist. Just mix them into the batter or place them on top. Mini Cheesecakes Mini cheesecakes are great for parties. Use a muffin tin instead of a springform pan. Bake them for less time, about 20-25 minutes. They are cute and easy to serve. No-Bake Option If you want to skip baking, try a no-bake version. Use cream cheese, sugar, and whipped cream. Mix and set it in the fridge. This makes a light and creamy dessert. Cheesecake Cupcakes Cheesecake cupcakes are another fun idea. They are portable and perfect for gatherings. Simply pour the batter into cupcake liners. Bake as you would mini cheesecakes. Each bite is a delightful treat. For the full recipe, check out [Full Recipe]. Long-Term Storage Tips After enjoying your red velvet cheesecake, you may have some left. To keep it fresh, wrap the cheesecake tightly in plastic wrap. This helps prevent it from drying out. Store it in the fridge for up to five days. Best Practices for Refrigeration Always place your cheesecake in an airtight container. This keeps out odors from other foods. If you want to save some for later, cut it into slices for easy access. How to Freeze Cheesecake To freeze the cheesecake, wrap each slice in plastic wrap, then place them in a freezer bag. Make sure to remove as much air as possible. You can freeze the slices for up to three months. When you're ready to eat, thaw them in the fridge overnight before serving. Best Method for Reheating If you want to warm your cheesecake, the oven is the best choice. Preheat it to 300°F (150°C). Place the cheesecake on a baking sheet for about 10 minutes. This warms it without making it too hot. Preserving Texture and Flavor Keep the cheesecake covered while reheating. This helps keep it moist and tasty. Avoid the microwave, as it may make the cheesecake too soft or rubbery. Enjoy your slice warm for a delightful treat! What makes red velvet cheesecake different from regular cheesecake? Red velvet cheesecake has a rich red color and cocoa flavor. This sets it apart from regular cheesecake, which is often plain or uses vanilla. The red food coloring gives it a unique look, while the cocoa adds a subtle depth. Can I use a different crust for this recipe? Yes, you can! Feel free to switch the graham cracker crust. You could use an Oreo crust or even a nut-based crust. Each type adds its own taste and texture to the cheesecake. How do I know when my cheesecake is done baking? Check for a slight jiggle in the center. The edges should look set. If the center still wobbles too much, it needs more time. Remember, it will firm up as it cools. Is it possible to make this recipe gluten-free? Absolutely! Replace all-purpose flour with a gluten-free blend. You can also use gluten-free graham crackers for the crust. This way, everyone can enjoy your cheesecake. What can I use instead of cream cheese? You can use mascarpone cheese or a vegan cream cheese. They both give a similar creamy texture and taste, making them great substitutes. Can I substitute Greek yogurt for sour cream? Yes, Greek yogurt works well as a substitute. Use the same amount. It adds creaminess and a tangy flavor, just like sour cream. How to replace eggs in this recipe? For each egg, use 1/4 cup of unsweetened applesauce or 1/4 cup of silken tofu. These alternatives keep your cheesecake moist and help it set. What drinks pair well with red velvet cheesecake? Coffee or a rich red wine complement the flavors of the cheesecake. You can also serve it with a cold glass of milk for a classic choice. Is red velvet cheesecake appropriate for special occasions? Definitely! Its vibrant color and creamy texture make it a showstopper at parties and holidays. It adds a festive touch to any gathering. Can I make this dessert ahead of time? Yes, you can! Make it a day or two before your event. Just store it in the fridge. This allows the flavors to meld for an even tastier treat. For the full recipe, check out the main article. This article covers all you need for the perfect red velvet cheesecake. You learned about key ingredients and step-by-step baking instructions. I shared tips to avoid common mistakes and ideas to personalize your cheesecake. Don't forget about storage and reheating options. You can customize flavors or serve mini versions too. Enjoy creating a delicious dessert that impresses everyone. Now you have the tools to ensure your cheesecake is a hit every time. Happy baking!](https://tossedflavors.com/wp-content/uploads/2025/04/0ba52014-3ea4-4dde-93c7-9fd99432cb01.webp)
Get ready to indulge in a dessert like no other: Red Velvet Cheesecake! This perfect blend of rich, creamy cheesecake and classic red velvet cake will delight your taste buds. In this post, I’ll share step-by-step instructions, tips for a flawless bake, and fun variations to try. Whether you’re a baking novice or a seasoned pro, you’ll find everything you need to make this divine dessert a showstopper. Let’s dive in!
Ingredients
Detailed List of Ingredients
– Key Ingredients for Crust
– 1 ½ cups graham cracker crumbs
– ½ cup unsalted butter, melted
– 1 tablespoon granulated sugar
The crust gives your cheesecake a nice crunch. The graham crackers bring a sweet flavor. The butter helps hold everything together.
– Essential Ingredients for Cheesecake Filling
– 2 cups cream cheese, softened to room temperature
– 1 cup granulated sugar
– 1 teaspoon pure vanilla extract
– 3 large eggs, at room temperature
– 1 cup sour cream
– 1 ½ cups all-purpose flour
– 1 tablespoon unsweetened cocoa powder
– 1 tablespoon red food coloring
– ½ teaspoon baking soda
– ½ teaspoon fine salt
The cream cheese is the star of this dish. It gives the cheesecake its smooth texture and rich flavor. The red food coloring makes it pop, while the cocoa powder adds a touch of chocolate.
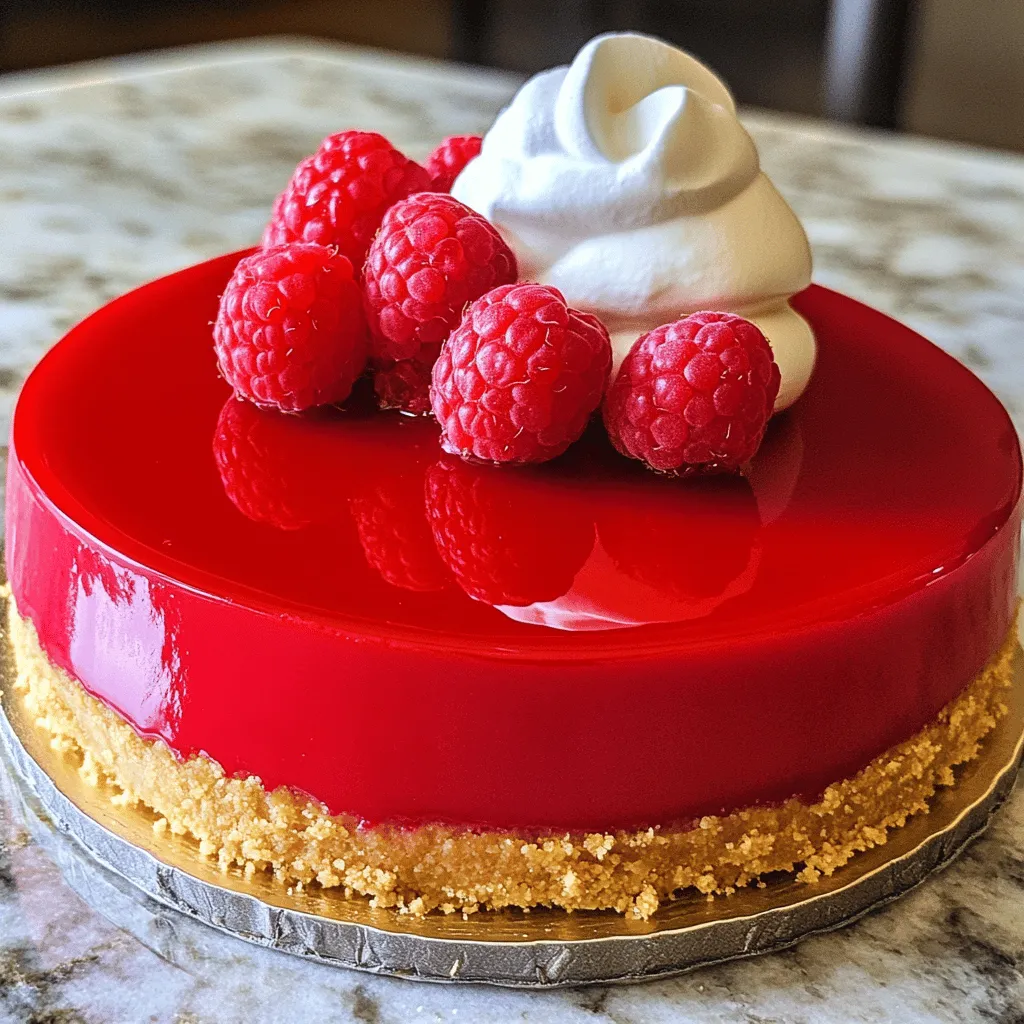
– Optional Garnishes and Toppings
– Whipped cream, for topping
– Fresh raspberries or strawberries, for garnish
Garnishes add a fun touch to your cheesecake. Whipped cream adds creaminess, while fresh berries bring a burst of fruity flavor. You can mix and match to suit your taste.
For the full list of ingredients, check the Full Recipe.
Step-by-Step Instructions
Preparation Steps
1. Preheat the Oven: First, preheat your oven to 325°F (163°C). This step is key for even baking.
2. Prepare and Bake the Crust: In a large bowl, mix the graham cracker crumbs, melted butter, and sugar. This will give you a tasty base. Press this mixture into a 9-inch springform pan. Bake the crust for 10 minutes, then let it cool.
3. Create the Cheesecake Filling: In another bowl, beat the softened cream cheese until it is smooth. Gradually add the sugar and vanilla extract, mixing well. Then, add the eggs one by one, mixing after each. Now, fold in the sour cream, flour, cocoa powder, red food coloring, baking soda, and salt. Blend until it is lump-free and creamy.
4. Transfer to the Pan and Bake: Pour the cheesecake mix over the cooled crust. Tap the pan gently on the counter to get rid of air bubbles. Put the pan back in the oven for 55-60 minutes. The edges should be firm, and the middle should jiggle a little.
Cooling and Serving
1. Proper Cooling Techniques: Once it’s baked, turn off the oven and crack the door. Let the cheesecake cool slowly for 1 hour. Then, move it to the fridge to chill for at least 4 hours, or ideally overnight. This helps the flavors come together.
2. How to Serve Effectively: When ready to serve, gently remove the cheesecake from the springform pan. Top with whipped cream and fresh berries for a pop of color.
3. Presentation Tips: To make it look fancy, place slices on individual plates. Drizzle with raspberry coulis or chocolate sauce before adding berries. This makes each slice a showstopper while tasting divine.
For a complete guide, check out the Full Recipe. Enjoy your delicious Red Velvet Cheesecake!
Tips & Tricks
Perfecting Your Cheesecake
Ensuring a Smooth Batter
To get a smooth batter, start with room-temperature cream cheese. Cold cream cheese will create lumps. Beat the cream cheese until it’s creamy before adding sugar. Mix well after each egg to keep it smooth.
Achieving the Right Bake
Bake your cheesecake at 325°F (163°C). This lower temperature helps it cook evenly. Look for a slight jiggle in the center when you remove it from the oven. It will firm up as it cools.
Avoiding Common Mistakes
Avoid overmixing the batter. This can add too much air, causing cracks. Also, do not open the oven door while baking. A sudden temperature change may cause your cheesecake to sink.
Decorating Ideas
Creative Toppings
Top your cheesecake with whipped cream and fresh berries. You can also drizzle chocolate or caramel sauce on top for extra flavor. For a fun twist, add crushed cookies or candy on top.
Seasonal Variations
In the fall, try adding a layer of spiced pumpkin puree. In the summer, a layer of lemon curd can brighten the flavor. Seasonal fruits like peaches or cherries are also great choices.
Unique Serving Suggestions
Serve individual slices on plates with a drizzle of raspberry coulis. Place fresh mint leaves beside each slice for a pop of color. You can even layer small pieces in a glass for a fun parfait style.
For the full recipe, be sure to check the detailed instructions above!
Variations
Flavor Variations
Chocolate Red Velvet Cheesecake
You can add chocolate to your red velvet cheesecake. Use cocoa powder in the filling. This gives it a rich, deep flavor. Mix it well to ensure even taste.
Swirled Cheesecake Options
Swirling different flavors into the cheesecake is fun. Try adding a layer of cream cheese or chocolate ganache on top. Use a knife to create a beautiful effect. This adds visual flair and different tastes.
Adding Nuts or Fruits
Adding nuts or fruits can change the texture and taste. Pecans or walnuts give a nice crunch. Fresh raspberries or strawberries add a fruity twist. Just mix them into the batter or place them on top.
Serving Variations
Mini Cheesecakes
Mini cheesecakes are great for parties. Use a muffin tin instead of a springform pan. Bake them for less time, about 20-25 minutes. They are cute and easy to serve.
No-Bake Option
If you want to skip baking, try a no-bake version. Use cream cheese, sugar, and whipped cream. Mix and set it in the fridge. This makes a light and creamy dessert.
Cheesecake Cupcakes
Cheesecake cupcakes are another fun idea. They are portable and perfect for gatherings. Simply pour the batter into cupcake liners. Bake as you would mini cheesecakes. Each bite is a delightful treat.
For the full recipe, check out [Full Recipe].
Storage Info
Storing Leftovers
Long-Term Storage Tips
After enjoying your red velvet cheesecake, you may have some left. To keep it fresh, wrap the cheesecake tightly in plastic wrap. This helps prevent it from drying out. Store it in the fridge for up to five days.
Best Practices for Refrigeration
Always place your cheesecake in an airtight container. This keeps out odors from other foods. If you want to save some for later, cut it into slices for easy access.
How to Freeze Cheesecake
To freeze the cheesecake, wrap each slice in plastic wrap, then place them in a freezer bag. Make sure to remove as much air as possible. You can freeze the slices for up to three months. When you’re ready to eat, thaw them in the fridge overnight before serving.
Reheating Instructions
Best Method for Reheating
If you want to warm your cheesecake, the oven is the best choice. Preheat it to 300°F (150°C). Place the cheesecake on a baking sheet for about 10 minutes. This warms it without making it too hot.
Preserving Texture and Flavor
Keep the cheesecake covered while reheating. This helps keep it moist and tasty. Avoid the microwave, as it may make the cheesecake too soft or rubbery. Enjoy your slice warm for a delightful treat!
FAQs
Common Questions about Red Velvet Cheesecake
What makes red velvet cheesecake different from regular cheesecake?
Red velvet cheesecake has a rich red color and cocoa flavor. This sets it apart from regular cheesecake, which is often plain or uses vanilla. The red food coloring gives it a unique look, while the cocoa adds a subtle depth.
Can I use a different crust for this recipe?
Yes, you can! Feel free to switch the graham cracker crust. You could use an Oreo crust or even a nut-based crust. Each type adds its own taste and texture to the cheesecake.
How do I know when my cheesecake is done baking?
Check for a slight jiggle in the center. The edges should look set. If the center still wobbles too much, it needs more time. Remember, it will firm up as it cools.
Is it possible to make this recipe gluten-free?
Absolutely! Replace all-purpose flour with a gluten-free blend. You can also use gluten-free graham crackers for the crust. This way, everyone can enjoy your cheesecake.
Ingredient Substitutions
What can I use instead of cream cheese?
You can use mascarpone cheese or a vegan cream cheese. They both give a similar creamy texture and taste, making them great substitutes.
Can I substitute Greek yogurt for sour cream?
Yes, Greek yogurt works well as a substitute. Use the same amount. It adds creaminess and a tangy flavor, just like sour cream.
How to replace eggs in this recipe?
For each egg, use 1/4 cup of unsweetened applesauce or 1/4 cup of silken tofu. These alternatives keep your cheesecake moist and help it set.
Serving Suggestions
What drinks pair well with red velvet cheesecake?
Coffee or a rich red wine complement the flavors of the cheesecake. You can also serve it with a cold glass of milk for a classic choice.
Is red velvet cheesecake appropriate for special occasions?
Definitely! Its vibrant color and creamy texture make it a showstopper at parties and holidays. It adds a festive touch to any gathering.
Can I make this dessert ahead of time?
Yes, you can! Make it a day or two before your event. Just store it in the fridge. This allows the flavors to meld for an even tastier treat. For the full recipe, check out the main article.
This article covers all you need for the perfect red velvet cheesecake. You learned about key ingredients and step-by-step baking instructions. I shared tips to avoid common mistakes and ideas to personalize your cheesecake. Don’t forget about storage and reheating options. You can customize flavors or serve mini versions too. Enjoy creating a delicious dessert that impresses everyone. Now you have the tools to ensure your cheesecake is a hit every time. Happy baking!
![- Key Ingredients for Crust - 1 ½ cups graham cracker crumbs - ½ cup unsalted butter, melted - 1 tablespoon granulated sugar The crust gives your cheesecake a nice crunch. The graham crackers bring a sweet flavor. The butter helps hold everything together. - Essential Ingredients for Cheesecake Filling - 2 cups cream cheese, softened to room temperature - 1 cup granulated sugar - 1 teaspoon pure vanilla extract - 3 large eggs, at room temperature - 1 cup sour cream - 1 ½ cups all-purpose flour - 1 tablespoon unsweetened cocoa powder - 1 tablespoon red food coloring - ½ teaspoon baking soda - ½ teaspoon fine salt The cream cheese is the star of this dish. It gives the cheesecake its smooth texture and rich flavor. The red food coloring makes it pop, while the cocoa powder adds a touch of chocolate. - Optional Garnishes and Toppings - Whipped cream, for topping - Fresh raspberries or strawberries, for garnish Garnishes add a fun touch to your cheesecake. Whipped cream adds creaminess, while fresh berries bring a burst of fruity flavor. You can mix and match to suit your taste. For the full list of ingredients, check the Full Recipe. 1. Preheat the Oven: First, preheat your oven to 325°F (163°C). This step is key for even baking. 2. Prepare and Bake the Crust: In a large bowl, mix the graham cracker crumbs, melted butter, and sugar. This will give you a tasty base. Press this mixture into a 9-inch springform pan. Bake the crust for 10 minutes, then let it cool. 3. Create the Cheesecake Filling: In another bowl, beat the softened cream cheese until it is smooth. Gradually add the sugar and vanilla extract, mixing well. Then, add the eggs one by one, mixing after each. Now, fold in the sour cream, flour, cocoa powder, red food coloring, baking soda, and salt. Blend until it is lump-free and creamy. 4. Transfer to the Pan and Bake: Pour the cheesecake mix over the cooled crust. Tap the pan gently on the counter to get rid of air bubbles. Put the pan back in the oven for 55-60 minutes. The edges should be firm, and the middle should jiggle a little. 1. Proper Cooling Techniques: Once it’s baked, turn off the oven and crack the door. Let the cheesecake cool slowly for 1 hour. Then, move it to the fridge to chill for at least 4 hours, or ideally overnight. This helps the flavors come together. 2. How to Serve Effectively: When ready to serve, gently remove the cheesecake from the springform pan. Top with whipped cream and fresh berries for a pop of color. 3. Presentation Tips: To make it look fancy, place slices on individual plates. Drizzle with raspberry coulis or chocolate sauce before adding berries. This makes each slice a showstopper while tasting divine. For a complete guide, check out the Full Recipe. Enjoy your delicious Red Velvet Cheesecake! Ensuring a Smooth Batter To get a smooth batter, start with room-temperature cream cheese. Cold cream cheese will create lumps. Beat the cream cheese until it's creamy before adding sugar. Mix well after each egg to keep it smooth. Achieving the Right Bake Bake your cheesecake at 325°F (163°C). This lower temperature helps it cook evenly. Look for a slight jiggle in the center when you remove it from the oven. It will firm up as it cools. Avoiding Common Mistakes Avoid overmixing the batter. This can add too much air, causing cracks. Also, do not open the oven door while baking. A sudden temperature change may cause your cheesecake to sink. Creative Toppings Top your cheesecake with whipped cream and fresh berries. You can also drizzle chocolate or caramel sauce on top for extra flavor. For a fun twist, add crushed cookies or candy on top. Seasonal Variations In the fall, try adding a layer of spiced pumpkin puree. In the summer, a layer of lemon curd can brighten the flavor. Seasonal fruits like peaches or cherries are also great choices. Unique Serving Suggestions Serve individual slices on plates with a drizzle of raspberry coulis. Place fresh mint leaves beside each slice for a pop of color. You can even layer small pieces in a glass for a fun parfait style. For the full recipe, be sure to check the detailed instructions above! {{image_4}} Chocolate Red Velvet Cheesecake You can add chocolate to your red velvet cheesecake. Use cocoa powder in the filling. This gives it a rich, deep flavor. Mix it well to ensure even taste. Swirled Cheesecake Options Swirling different flavors into the cheesecake is fun. Try adding a layer of cream cheese or chocolate ganache on top. Use a knife to create a beautiful effect. This adds visual flair and different tastes. Adding Nuts or Fruits Adding nuts or fruits can change the texture and taste. Pecans or walnuts give a nice crunch. Fresh raspberries or strawberries add a fruity twist. Just mix them into the batter or place them on top. Mini Cheesecakes Mini cheesecakes are great for parties. Use a muffin tin instead of a springform pan. Bake them for less time, about 20-25 minutes. They are cute and easy to serve. No-Bake Option If you want to skip baking, try a no-bake version. Use cream cheese, sugar, and whipped cream. Mix and set it in the fridge. This makes a light and creamy dessert. Cheesecake Cupcakes Cheesecake cupcakes are another fun idea. They are portable and perfect for gatherings. Simply pour the batter into cupcake liners. Bake as you would mini cheesecakes. Each bite is a delightful treat. For the full recipe, check out [Full Recipe]. Long-Term Storage Tips After enjoying your red velvet cheesecake, you may have some left. To keep it fresh, wrap the cheesecake tightly in plastic wrap. This helps prevent it from drying out. Store it in the fridge for up to five days. Best Practices for Refrigeration Always place your cheesecake in an airtight container. This keeps out odors from other foods. If you want to save some for later, cut it into slices for easy access. How to Freeze Cheesecake To freeze the cheesecake, wrap each slice in plastic wrap, then place them in a freezer bag. Make sure to remove as much air as possible. You can freeze the slices for up to three months. When you're ready to eat, thaw them in the fridge overnight before serving. Best Method for Reheating If you want to warm your cheesecake, the oven is the best choice. Preheat it to 300°F (150°C). Place the cheesecake on a baking sheet for about 10 minutes. This warms it without making it too hot. Preserving Texture and Flavor Keep the cheesecake covered while reheating. This helps keep it moist and tasty. Avoid the microwave, as it may make the cheesecake too soft or rubbery. Enjoy your slice warm for a delightful treat! What makes red velvet cheesecake different from regular cheesecake? Red velvet cheesecake has a rich red color and cocoa flavor. This sets it apart from regular cheesecake, which is often plain or uses vanilla. The red food coloring gives it a unique look, while the cocoa adds a subtle depth. Can I use a different crust for this recipe? Yes, you can! Feel free to switch the graham cracker crust. You could use an Oreo crust or even a nut-based crust. Each type adds its own taste and texture to the cheesecake. How do I know when my cheesecake is done baking? Check for a slight jiggle in the center. The edges should look set. If the center still wobbles too much, it needs more time. Remember, it will firm up as it cools. Is it possible to make this recipe gluten-free? Absolutely! Replace all-purpose flour with a gluten-free blend. You can also use gluten-free graham crackers for the crust. This way, everyone can enjoy your cheesecake. What can I use instead of cream cheese? You can use mascarpone cheese or a vegan cream cheese. They both give a similar creamy texture and taste, making them great substitutes. Can I substitute Greek yogurt for sour cream? Yes, Greek yogurt works well as a substitute. Use the same amount. It adds creaminess and a tangy flavor, just like sour cream. How to replace eggs in this recipe? For each egg, use 1/4 cup of unsweetened applesauce or 1/4 cup of silken tofu. These alternatives keep your cheesecake moist and help it set. What drinks pair well with red velvet cheesecake? Coffee or a rich red wine complement the flavors of the cheesecake. You can also serve it with a cold glass of milk for a classic choice. Is red velvet cheesecake appropriate for special occasions? Definitely! Its vibrant color and creamy texture make it a showstopper at parties and holidays. It adds a festive touch to any gathering. Can I make this dessert ahead of time? Yes, you can! Make it a day or two before your event. Just store it in the fridge. This allows the flavors to meld for an even tastier treat. For the full recipe, check out the main article. This article covers all you need for the perfect red velvet cheesecake. You learned about key ingredients and step-by-step baking instructions. I shared tips to avoid common mistakes and ideas to personalize your cheesecake. Don't forget about storage and reheating options. You can customize flavors or serve mini versions too. Enjoy creating a delicious dessert that impresses everyone. Now you have the tools to ensure your cheesecake is a hit every time. Happy baking!](https://tossedflavors.com/wp-content/uploads/2025/04/0ba52014-3ea4-4dde-93c7-9fd99432cb01-300x300.webp)