WANT TO SAVE THIS RECIPE?
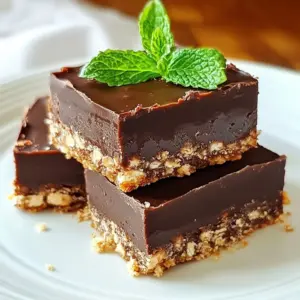
Craving a sweet treat but don’t want to turn on the oven? You’re in luck! These No-Bake Chocolate Mint Bars are a simple, delicious way to satisfy your sweet tooth without any baking. With a mix of wholesome ingredients like oats and almond flour, they’re perfect for a quick snack or dessert. Ready to whip up a batch? Let’s dive into the easy steps and tips for your new favorite treat!
Why I Love This Recipe
- Easy to Make: This recipe requires no baking, making it a quick and simple treat to whip up.
- Healthy Ingredients: With rolled oats, almond flour, and natural sweeteners, these bars are a nutritious dessert option.
- Minty Freshness: The peppermint extract adds a refreshing flavor that perfectly complements the rich chocolate.
- Customizable: You can easily swap ingredients to suit your dietary preferences, such as using different nut butters or sweeteners.
Ingredients
List of Ingredients
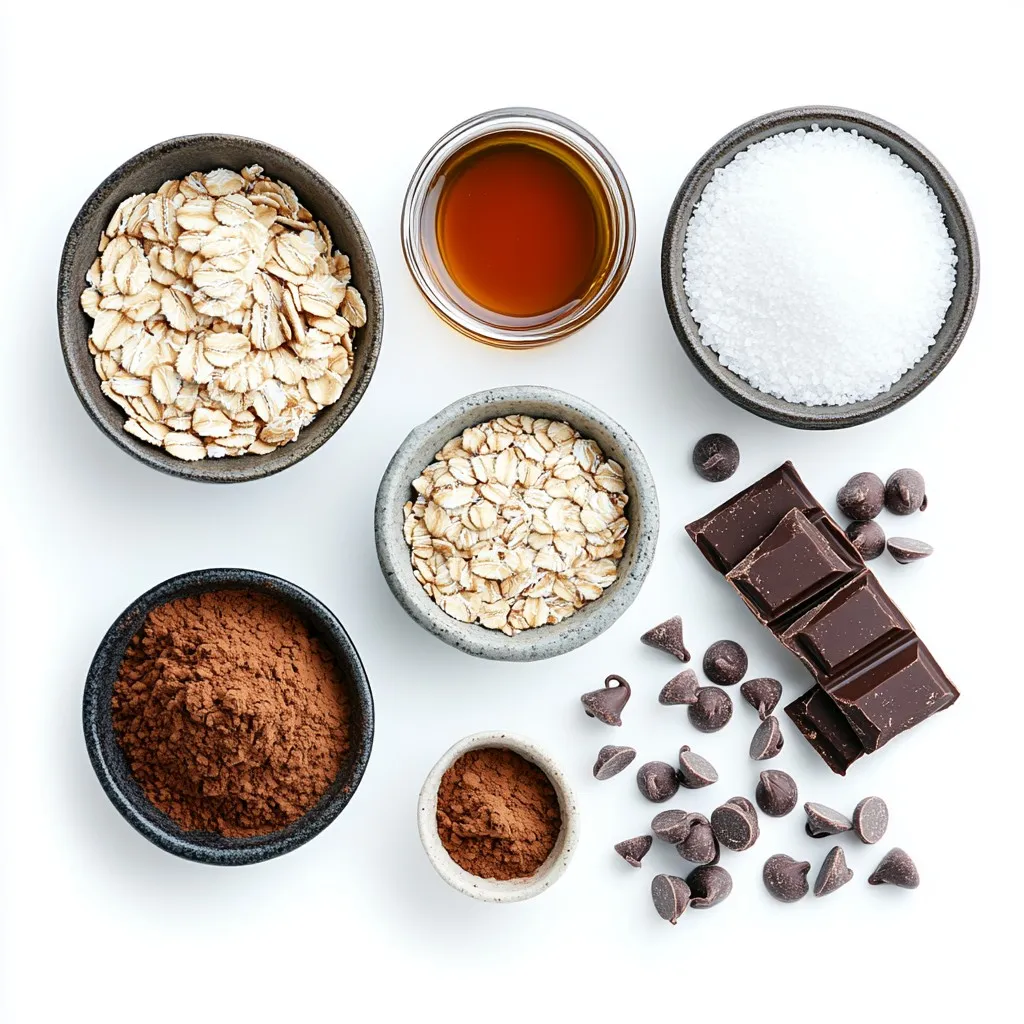
– 1 cup rolled oats
– 1 cup almond flour
– 1/2 cup maple syrup
– 1/2 cup natural peanut butter (or almond butter)
– 1/4 cup cocoa powder
– 1/4 teaspoon salt
– 1/2 teaspoon peppermint extract
– 1/2 cup dark chocolate chips
– 1 tablespoon coconut oil
To make No-Bake Chocolate Mint Bars, gather these ingredients. You will need rolled oats, almond flour, and maple syrup. Peanut butter adds creaminess, while cocoa powder gives rich chocolate flavor. A pinch of salt enhances all tastes, and peppermint extract adds that fresh mint kick.
You can choose dark chocolate chips for a more intense flavor. The coconut oil helps the chocolate melt smoothly. When you mix these ingredients, you create a tasty, no-bake dessert that is sure to please.
Nutritional Information
– Calories per serving: About 150
– Nutritional breakdown:
– Carbs: 20g
– Fats: 8g
– Proteins: 4g
– Potential allergens: Contains nuts (almond flour, peanut butter), and may have traces of gluten if not labeled gluten-free.
Knowing the nutritional facts helps you enjoy these bars while keeping health in mind. Each bar gives a nice balance of carbs, fats, and proteins. Remember to check for allergens before serving.
Step-by-Step Instructions
Preparation Steps
1. Mixing dry ingredients
Start by taking a large bowl. Add 1 cup of rolled oats, 1 cup of almond flour, 1/4 cup of cocoa powder, and 1/4 teaspoon of salt. Mix these dry ingredients well. Make sure there are no clumps.
2. Preparing the wet mixture
In a separate bowl, combine 1/2 cup of maple syrup, 1/2 cup of peanut butter, and 1/2 teaspoon of peppermint extract. Stir this mixture until it is smooth and creamy. This will give our bars a rich flavor.
3. Combining wet and dry ingredients
Pour the wet mixture into the bowl with the dry ingredients. Mix everything together until the dry ingredients are fully coated. You want it to form a sticky dough that holds together.
Assembling the Bars
1. Lining the baking dish
Grab an 8×8-inch baking dish. Line it with parchment paper, leaving some paper hanging over the edges. This will help you lift the bars out later.
2. Pressing down the mixture
Transfer the sticky mixture into the lined dish. Use a spatula or your hands to press it down firmly. Make sure it is even and packed tightly. This helps the bars hold their shape.
3. Melting the chocolate and coconut oil
In a microwave-safe bowl, add 1/2 cup of dark chocolate chips and 1 tablespoon of coconut oil. Microwave this in 30-second intervals. Stir in between until it is fully melted and smooth.
Setting and Serving
1. Refrigeration time
Pour the melted chocolate over the pressed mixture in the baking dish. Spread it evenly with a spatula. Place the dish in the fridge for at least 2 hours. This time allows the bars to set completely.
2. Cutting and serving suggestions
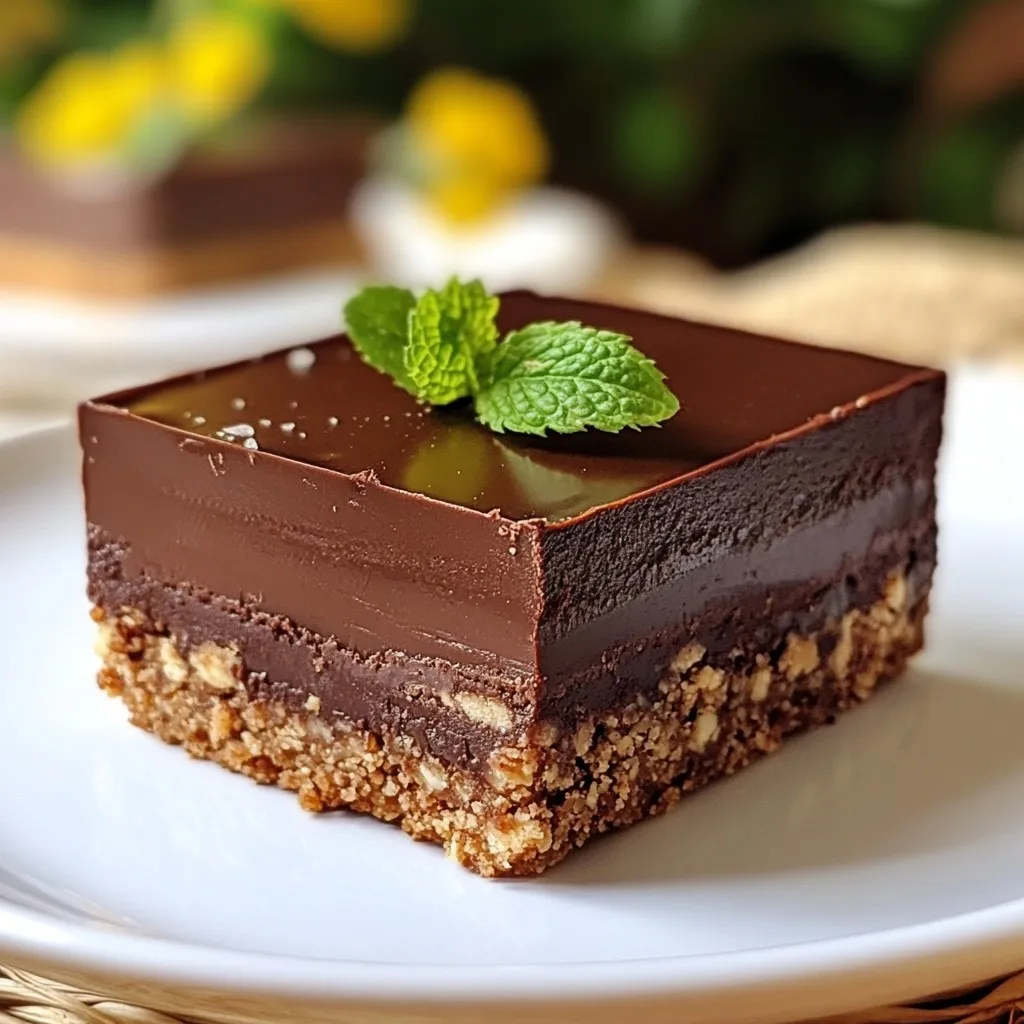
Once set, lift the bars from the dish using the parchment paper. Cut them into squares or bars. This is the fun part, and you can make them any size you like.
3. Optional garnishes
For an extra touch, drizzle some melted dark chocolate on top. You could also sprinkle some crushed mint leaves for added flavor. These garnishes make the bars look even more tempting.
Tips & Tricks
Making Perfect No-Bake Chocolate Mint Bars
To create perfect no-bake chocolate mint bars, I suggest adjusting the sweetness and flavors to suit your taste. You can add more maple syrup if you want it sweeter. For a stronger mint flavor, add an extra drop of peppermint extract. Just remember, a little goes a long way.
Ensure the right consistency by mixing the wet and dry ingredients well. The dough should be sticky but not too wet. If it feels too dry, you can add a splash of water or more maple syrup.
Common Mistakes to Avoid
One common mistake is overmixing the ingredients. This can change the texture of your bars. Mix just until everything is combined. Another mistake is not pressing the mixture firmly into the dish. Pressing down helps the bars hold together better. Use your hands or a spatula to press it evenly.
Tools & Equipment Needed
For this recipe, you need a few kitchen tools. A large mixing bowl is essential for combining the dry and wet ingredients. A spatula helps with mixing and pressing down the mixture.
You should also have a microwave-safe bowl for melting the chocolate and coconut oil. For storage, an airtight container is best. A baking dish lined with parchment paper makes it easy to lift out your bars later.
Pro Tips
- Store in the Fridge: These bars are best kept in the refrigerator to maintain their firmness and freshness. They can last up to a week when stored properly.
- Experiment with Nut Butters: Feel free to substitute peanut butter with almond butter or any nut butter of your choice for different flavor profiles.
- Add Texture: For added crunch, mix in some chopped nuts or seeds into the base before pressing it into the baking dish.
- Customize the Toppings: Get creative with your toppings! Consider adding crushed peppermint candies, coconut flakes, or even a sprinkle of sea salt for a unique touch.
Variations
Flavor Variations
You can change the taste of these bars in fun ways. Adding nuts or seeds can give a nice crunch. Chopped walnuts or sunflower seeds work great. You can also try different extracts. Vanilla or orange extract can add a new twist.
Dietary Substitutions
If you want vegan bars, swap the honey for maple syrup. Use almond butter for a nut-free option. For gluten-free bars, check that the oats are certified gluten-free. Almond flour is naturally gluten-free and works well.
Serving Suggestions
These bars taste great with ice cream. A scoop of vanilla or mint chocolate chip pairs perfectly. You can also serve them with fresh fruits like strawberries or bananas. The fruit adds a nice balance to the rich chocolate.
Storage Info
Best Storage Practices
To keep your No-Bake Chocolate Mint Bars fresh, store leftovers in the fridge. Use an airtight container to prevent moisture loss. You can also wrap the bars in plastic wrap before placing them in the container. This extra layer helps keep them safe.
Shelf Life
These bars last about one week in the fridge. If you want to keep them longer, you can freeze them. They can stay good in the freezer for up to three months. Just cut them into squares first, wrap each piece in plastic wrap, and place in a freezer bag.
Reheating Instructions
If you want to soften the bars, take them out of the fridge. Let them sit at room temperature for about ten minutes. You can also use the microwave for a few seconds. Make sure not to heat them too long, or they may melt. Avoid reheating in the oven, as it will change their texture.
FAQs
How long does it take to make No-Bake Chocolate Mint Bars?
Making these bars is quick and fun. The prep time is just 15 minutes. After that, you need to chill them for at least 2 hours. So, the total time is 2 hours and 15 minutes. This makes it easy to whip up a tasty treat without much waiting.
Can I use different sweeteners?
Yes, you can choose other sweeteners! If you want to swap out maple syrup, try honey or agave syrup. These options work well and add a unique taste. Just make sure to use the same amount for the best results. This way, you can enjoy the bars while staying true to your flavor preferences.
What is the best way to cut these bars?
Cutting the bars can be tricky. To avoid crumbling, chill them until they are firm. Use a sharp knife for clean cuts. For best results, warm the knife slightly before cutting. This makes slicing easier. You can also use a ruler to mark out even squares. Enjoy your neat, tasty bars!
In this blog post, we covered how to make no-bake chocolate mint bars. You learned about the simple ingredients, detailed preparation steps, and useful tips for success. I shared common mistakes to avoid and how to store your bars for later enjoyment. These delicious treats are easy to customize and perfect for any occasion. Enjoy your creation and share it with friends. You’ll love these bars, and so will other
No-Bake Chocolate Mint Bars
Delicious and easy-to-make chocolate mint bars that require no baking.
Course Dessert
Cuisine American
Servings 12
Calories 150 kcal
- 1 cup rolled oats
- 1 cup almond flour
- 1/2 cup maple syrup
- 1/2 cup natural peanut butter (or almond butter)
- 1/4 cup cocoa powder
- 1/4 teaspoon salt
- 1/2 teaspoon peppermint extract
- 1/2 cup dark chocolate chips
- 1 tablespoon coconut oil
In a large bowl, combine the rolled oats, almond flour, cocoa powder, and salt. Mix well until all the dry ingredients are fully combined.
In a separate bowl, stir together the maple syrup, peanut butter, and peppermint extract until smooth.
Pour the wet mixture into the dry ingredients and mix until everything is evenly coated and forms a sticky dough.
Line an 8x8-inch baking dish with parchment paper, leaving some overhang for easy removal.
Transfer the mixture into the lined dish and press it down firmly and evenly using a spatula or your hands.
In a microwave-safe bowl, combine the dark chocolate chips and coconut oil. Microwave in 30-second intervals, stirring in between, until fully melted and smooth.
Pour the melted chocolate over the pressed mixture in the baking dish, spreading it evenly with a spatula.
Refrigerate the bars for at least 2 hours, or until set completely.
Once set, lift the bars out of the dish using the parchment paper and cut them into squares or bars.
For extra mint flavor, drizzle some melted dark chocolate on top or sprinkle some crushed mint leaves before serving.
For extra mint flavor, drizzle some melted dark chocolate on top or sprinkle some crushed mint leaves before serving.
Keyword bars, chocolate, mint, no-bake
WANT TO SAVE THIS RECIPE?