Indulge in the creamy joy of a Neapolitan Ice Cream Cake! This delightful layered treat combines rich chocolate, sweet strawberry, and smooth vanilla for a sensational dessert experience. You’ll love how easy it is to create, making it perfect for any occasion. Join me as we explore simple steps, tasty tips, and creative ideas to craft a cake that’s not just beautiful but also bursting with flavor. Let’s get started!
Ingredients
Main Ingredients Needed
– 1 box of chocolate cake mix
– 2 cups vanilla ice cream
– 2 cups strawberry ice cream
– 2 cups chocolate ice cream
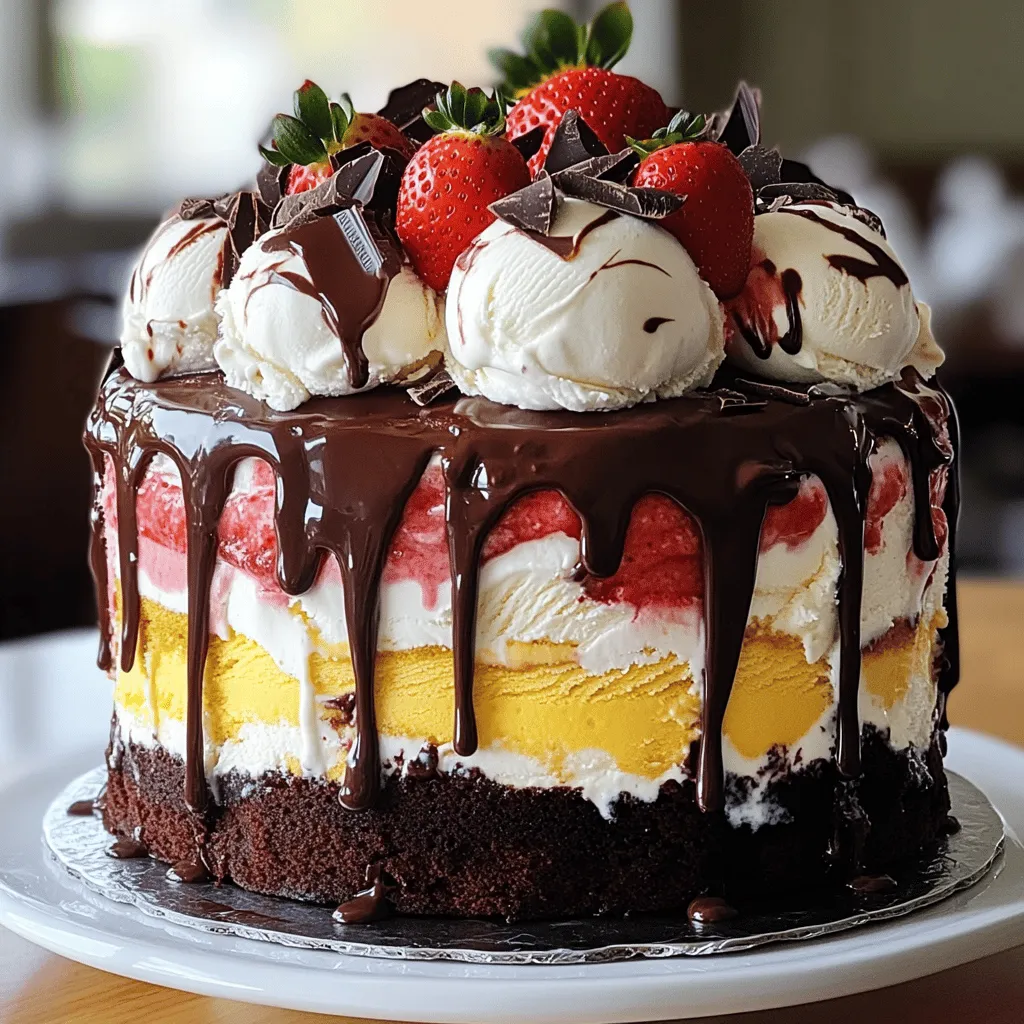
These ingredients create the delicious layers in your Neapolitan ice cream cake. The chocolate cake is the sturdy base, while the ice creams bring delightful flavors. You can use your favorite brands or even make homemade versions. The mix of chocolate, vanilla, and strawberry makes each bite a taste of nostalgia.
Additional Ingredients for Garnishing
– Fresh strawberries
– Chocolate shavings
These garnishes add a lovely touch to your cake. Fresh strawberries brighten up the cake and offer a fruity crunch. Chocolate shavings create a rich finish that looks great and tastes amazing. You can also get creative with other toppings like nuts or sprinkles.
Tools and Equipment
– 2 round 9-inch cake pans
– Plastic wrap
– Spatula
– Wire rack
Having the right tools makes baking easier. The cake pans help shape your cake perfectly, while plastic wrap helps with easy removal from the pan. A spatula is great for smoothing out ice cream layers, and a wire rack allows your cake to cool evenly. With these tools, you will set yourself up for success in making this delightful treat.
Remember, you can find the full recipe for Neapolitan Ice Cream Cake to help you through the process!
Step-by-Step Instructions
Baking the Cake
– Preheat your oven to 350°F (175°C). This step is key for a great cake.
– Prepare the chocolate cake mix by following the package instructions. Mix well with eggs, water, and oil.
– Divide the batter evenly into two round 9-inch cake pans. This ensures both layers bake evenly.
– Bake the cakes as per the time on the package. Check with a toothpick; it should come out clean.
– Once done, let the cakes cool completely on a wire rack. Cooling is important to avoid melting the ice cream later.
Layering the Ice Cream
– Take one cake pan and line the bottom with plastic wrap. This helps in easy removal.
– Spoon the softened vanilla ice cream into the lined pan. Use a spatula to flatten it evenly.
– Place the pan in the freezer for 30 minutes. This firms up the vanilla layer nicely.
– After 30 minutes, add the softened strawberry ice cream on top. Smooth it out evenly.
– Return the pan to the freezer for another 30 minutes. This ensures each layer is set before adding the next.
– Now, add the softened chocolate ice cream on top. Smooth it out once again.
– Freeze the entire ice cream layer for at least 1 hour. This makes sure everything is firm and ready.
Assembling the Cake
– When the ice cream layers are solid, carefully remove the second chocolate cake from its pan.
– Place it upside down onto a serving plate. This helps keep the top layer flat.
– Gently peel away the plastic wrap from the ice cream layer. Place it on top of the first cake layer.
– Generously drizzle chocolate fudge sauce over the ice cream layer. Let it cascade down the sides for a lovely look.
– Place the second chocolate cake layer on top of the fudge layer. Press down lightly to secure it.
– Cover the whole cake with whipped cream. Use a spatula to make it smooth and even.
– Place the assembled cake back in the freezer. Let it chill for 2-3 hours before serving.
– Before serving, add fresh strawberries and sprinkle chocolate shavings on top for a special touch.
You can find the full recipe for this delightful treat to ensure you have every detail covered.
Tips & Tricks
Perfecting the Layers
To get even layers of ice cream, you need to soften the ice cream first. Take it out of the freezer and let it sit for about 10 minutes. This makes it easier to spread. Use a spatula to smooth the ice cream in the pan. Start with vanilla, then add strawberry, and finish with chocolate. Each layer should be about the same thickness.
If your ice cream is too hard, it can crack when you try to spread it. Softening it properly is key. If you want to speed up the process, you can microwave it for about 10 seconds. Just be careful not to melt it.
Decorating Ideas
For a beautiful finish, add fresh strawberries and chocolate shavings on top. Place whole strawberries or slice them for style. You can also drizzle more chocolate sauce over the top before serving. This adds a nice touch and makes it look fancy.
To serve, consider putting some strawberry sauce on the side. Guests can add it to their slices if they want. This adds extra flavor and makes it more fun.
Ensuring Cake Stability
To keep your cake intact while slicing, use a sharp knife. Run the knife under hot water and then dry it before cutting. This helps the knife go through the layers without pulling them apart.
Make sure to freeze the cake for at least 2-3 hours before serving. This helps everything stay in place. When you take the cake out, let it sit for a few minutes before slicing. This makes it easier to cut and serve without losing any layers.

Variations
Alternative Ice Cream Flavors
You can mix it up with different ice cream flavors. Try mint chocolate chip or cookies and cream for a twist. If you prefer fruity flavors, consider mango or raspberry. This way, your cake stays fun and fresh! For dietary restrictions, look for dairy-free ice cream made from coconut or almond milk. Many brands make great vegan options now.
Cake Mix Substitutes
If you want to make your cake from scratch, it’s easy! Use flour, sugar, eggs, and cocoa powder to create a simple chocolate cake. You can also find gluten-free cake mixes in stores. These work well without sacrificing taste. For a vegan option, try a mix made with applesauce and plant-based milk.
Additional Layer Ideas
Adding a crunchy layer can make your cake even better. Use crushed cookies or nuts for texture. You can place this layer between the ice cream. Adding sliced fruit, like bananas or strawberries, gives a nice touch too. This adds flavor and freshness to each bite.
Storage Info
Refrigerating Leftovers
To store leftover cake, wrap it tightly with plastic wrap. This helps keep it fresh and moist. You can also use an airtight container for extra protection. I recommend eating the cake within three days for the best taste. The longer it sits, the more the layers may lose their texture.
Freezing Tips
If you want to keep the cake longer, freezing is a great option. First, wrap the cake in plastic wrap, then cover it with aluminum foil. This double protection helps prevent freezer burn. You can store the cake in the freezer for up to two months while maintaining its quality.
Re-thawing Instructions
When you’re ready to enjoy your cake again, remove it from the freezer. Place it in the fridge for several hours or overnight. This slow thawing helps keep the ice cream from melting too fast. Avoid using a microwave, as it can ruin the texture and taste. Once thawed, slice and serve your delicious Neapolitan Ice Cream Cake!
FAQs
Can I make Neapolitan Ice Cream Cake in advance?
Yes, you can make this cake ahead of time! I recommend preparing it a day before you plan to serve. This gives the layers time to set well in the freezer. Just remember to cover it tightly with plastic wrap. This keeps the cake fresh and tasty.
What can I do if my ice cream is too hard to layer?
If your ice cream is too hard, don’t worry! Set it out for about 10-15 minutes. This will soften it just enough to layer without melting. You can also use a warm spatula to help spread it smoothly. This way, you keep your layers neat and pretty.
How to customize Neapolitan Ice Cream Cake for events?
You can make this cake special for any event! Try adding fun toppings like sprinkles or edible glitter for a party. You could also mix in flavors like mint or coffee ice cream. Decorate with fruits or chocolate shapes to match your theme.
Where to buy ready-made Neapolitan Ice Cream Cake?
You can find ready-made Neapolitan Ice Cream Cake at many grocery stores. Look at brands like Baskin-Robbins or Cold Stone Creamery. Local bakeries may also sell their own versions. Just check the freezer section or ask the staff for help.
Nutritional information for Neapolitan Ice Cream Cake?
A slice of Neapolitan Ice Cream Cake has about 350 calories. This can vary based on the size of the slice and ingredients used. It’s a sweet treat, so enjoy it in moderation! Always check labels for more specific details if you need to watch your diet.
This article covered the delicious steps to make a Neapolitan Ice Cream Cake. We discussed the main and additional ingredients, necessary tools, and step-by-step instructions. I also shared tips for perfect layers, creative variations, and proper storage tips.
By following these guidelines, you can create a fun dessert that impresses everyone. Enjoy the process and let your creativity shine while making this tasty treat!
