
Are you ready to spice up your snacking game? My Hatch Chile Queso recipe is a creamy and flavorful dip that will make any gathering a hit. Using fresh roasted hatch chiles, creamy cheeses, and savory spices, this dip is perfect for chips or as a topping on your favorite dishes. Dive into this post and learn how to create the ultimate queso that your friends and family will love!
Ingredients for Hatch Chile Queso
Essential Ingredients
– 2 cups shredded sharp cheddar cheese
– 1 cup cream cheese, softened at room temperature
– 1 cup heavy cream
Additional Ingredients
– 1 cup roasted hatch chiles, chopped (either fresh or canned for convenience)
– 1/2 cup diced tomatoes (fresh or canned)
– 1/4 cup onion, finely chopped
– 2 cloves garlic, minced
Seasoning and Garnishing
– 1 teaspoon ground cumin
– 1/2 teaspoon smoked paprika
– Salt and pepper to taste
– Fresh cilantro, chopped (for garnish)
When making Hatch Chile Queso, the ingredients make all the magic happen. The sharp cheddar cheese gives it a rich, bold flavor. Cream cheese adds creaminess, while heavy cream makes it smooth and dreamy.
Don’t forget the roasted hatch chiles! They bring a mild heat that perfectly balances the cheese. Fresh or canned tomatoes add a nice touch of acidity. Onions and garlic build the base flavor that makes this dip so special.
To finish, use spices like ground cumin and smoked paprika. They add warmth and depth. A sprinkle of salt and pepper boosts all the flavors. Fresh cilantro on top adds a pop of color and freshness.
For the full recipe, check out the steps to create this creamy dip!
Step-by-Step Instructions
Cooking the Base
To start, you need to sauté the onions and garlic. In a medium saucepan over medium heat, add the finely chopped onion and minced garlic. Sauté for about 3-4 minutes. Stir occasionally until the onions are soft and fragrant.
Next, add the diced tomatoes and roasted hatch chiles. Mix them well with the onion and garlic. Let this cook for another 2-3 minutes. This step builds a strong flavor base for your dip.
Preparing the Queso
Now it’s time to incorporate the cream cheese and heavy cream. Lower the heat to a gentle simmer. Add the softened cream cheese to the mixture. Stir constantly until it melts and mixes well.
Gradually pour in the heavy cream while stirring. This will create a smooth and creamy sauce. Then, fold in the shredded cheddar cheese. Add the ground cumin and smoked paprika. Season with salt and pepper to taste. Keep stirring until the cheese fully melts and the queso is creamy and rich.
Final Touches
Once your queso is ready, adjust the seasoning if needed. Taste it and add more salt or spices based on your preference.
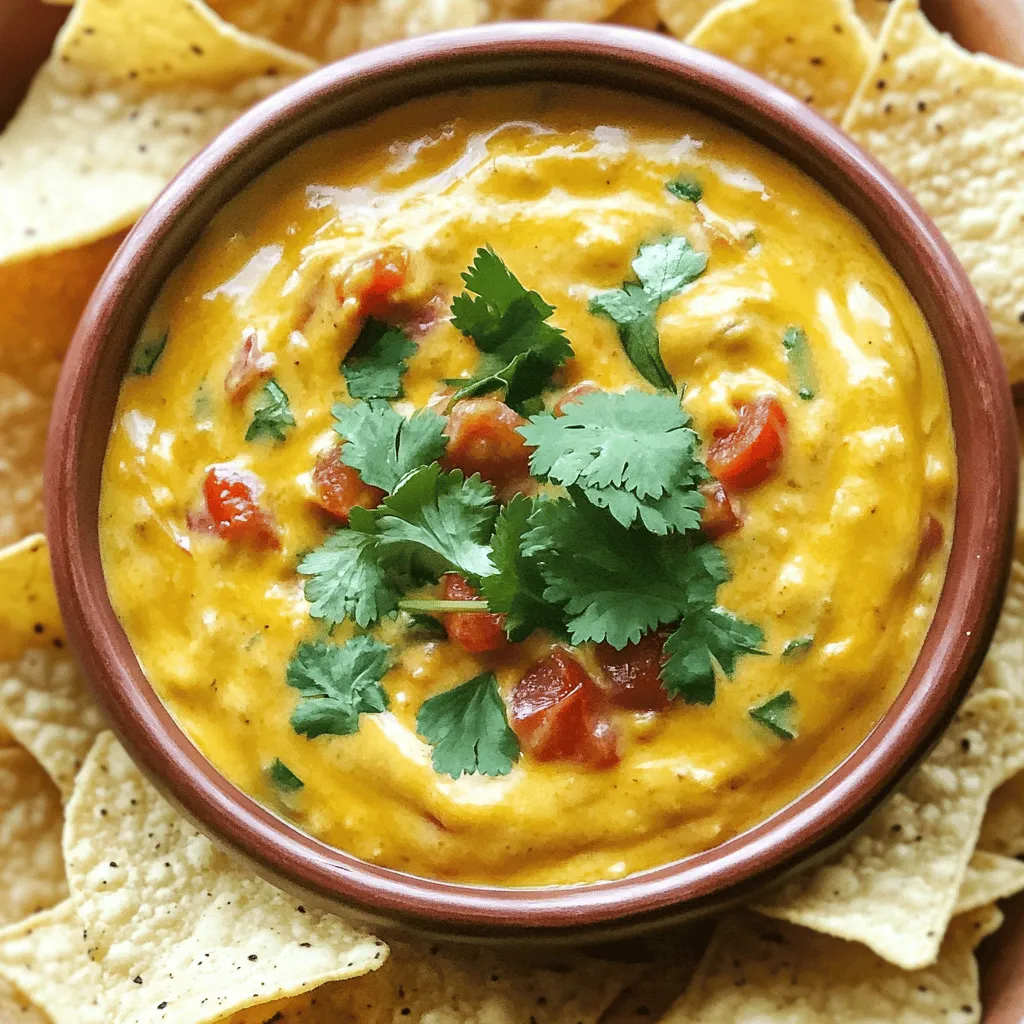
For serving, transfer the queso to a stylish bowl. Garnish it with fresh chopped cilantro. Serve it with crunchy tortilla chips. You can also add sliced jalapeños or extra cheese on top for a fun twist. Enjoy this delightful dip with your friends and family! For the full recipe, check out the detailed instructions above.
Tips & Tricks
Perfecting the Texture
To ensure a smooth queso, follow a few key steps. First, always use cream cheese at room temperature. This helps it melt evenly. Next, when you add the heavy cream, stir constantly. This keeps the mixture velvety. If you want to avoid lumps in the cheese, add it slowly. Let each addition melt before adding more. This makes for a creamy dip, free of clumps.
Flavor Enhancements
To add a kick, consider using extra seasonings. You can mix in some cayenne pepper or chili powder. This will elevate the flavor profile. Pair your queso with garnishes like fresh cilantro or sliced jalapeños. These add color and can enhance the taste. A squeeze of lime juice also brightens the dish, giving it a fresh vibe.
Presentation Tips
For a great serving idea, use a warm bowl for your queso. Place it in the center of a platter. Surround it with crunchy tortilla chips for easy dipping. Creative garnishing options include a sprinkle of extra cheddar on top. You could also add diced tomatoes or avocado. These make your dish pop and look inviting.
Variations of Hatch Chile Queso
Ingredient Swaps
You can switch up the cheese in Hatch Chile Queso. Try Monterey Jack for a milder taste. Pepper Jack adds heat and flavor. You can also use a mix of cheeses. Just keep in mind how each type melts.
If you want to change the peppers, try poblano or Anaheim. They offer a different taste and heat level. You can even use canned green chiles for ease. These swaps keep the dish exciting and tasty.
Dietary Adjustments
To make this dip dairy-free, use cashew cream. Blend soaked cashews with water for a creamy base. Nutritional yeast adds a cheesy flavor without dairy. Coconut cream also works well for a rich texture.
For a vegan version, skip the cream cheese and use vegan cheese instead. There are many great options available now. Ensure you check the labels for dairy content. This way, everyone can enjoy your Hatch Chile Queso.
Serving Suggestions
Hatch Chile Queso pairs well with tacos or burritos. Its creamy texture balances spicy flavors nicely. Use it as a topping for your favorite Mexican dishes.
You can also serve it as a nacho dip. Just pile crunchy tortilla chips high. Drizzle the queso on top or serve it on the side. This dip is great for parties or game days. You can find the Full Recipe to make this tasty dip in no time!
Storage Information
Storing Leftovers
To keep your Hatch Chile Queso fresh, store it in the fridge. Use an airtight container. This helps maintain its creamy texture. It will stay good for about four days. To freeze it, place the queso in a freezer-safe container. Leave some space at the top, as it will expand. You can freeze it for up to three months.
Reheating Guidelines
When you are ready to eat, reheating is easy. I recommend using the stovetop for best results. Warm it over low heat, stirring often. This helps keep the texture smooth. You can also use a microwave. Heat in short bursts, stirring in between. This keeps it creamy and flavorful.
Shelf Life
How long can you keep Hatch Chile Queso? In the fridge, it lasts up to four days. If frozen, it should be good for three months. Check for signs of spoilage before eating. If it smells off or has a strange texture, it’s better to toss it. Always trust your senses. You want to enjoy that creamy goodness!
FAQs about Hatch Chile Queso
What are Hatch chiles?
Hatch chiles are a type of green chili pepper. They come from Hatch, New Mexico. Their flavor is rich and smoky, with a mild to medium heat. They have a unique taste that adds depth to any dish. You can find them at local markets during the harvest season. You can also find them canned or frozen at grocery stores year-round.
Can I make Hatch Chile Queso in advance?
Yes, you can make Hatch Chile Queso ahead of time. To prepare it in advance, follow the recipe but stop before serving. Let the queso cool completely, then store it in an airtight container in the fridge. It will last for about three days. When you are ready to serve, reheat it on the stove or in the microwave. Stir it well to keep it creamy and smooth.
Is Hatch Chile Queso spicy?
Hatch Chile Queso can be spicy, but it depends on the chiles you use. Some Hatch chiles are mild, while others pack more heat. If you want less spice, choose mild chiles or use fewer of them in your dip. You can also add more cream cheese or heavy cream to tone down the heat. Adjust the spice to fit your taste!
Hatch Chile Queso is a creamy, flavorful dip packed with taste and texture. We covered essential ingredients like sharp cheddar, cream cheese, and roasted hatch chiles. The step-by-step guide helps you cook it perfectly. Remember the tips for smoothness and flavor boosts. With variations for diets and storage tips, this queso caters to all. Whether for a party or a cozy night, enjoy the warmth of homemade queso! Your taste buds will thank you. Dive in, create, and savor every creamy bite.
