. First, wash the fresh okra well. This step is key to remove any dirt. Next, trim the stems carefully. Avoid cutting into the pods so they stay whole. This helps the okra hold its shape while pickling. To make the brine, take a medium saucepan. Combine 2 cups of distilled white vinegar and 1 cup of water. Add in 3 tablespoons of kosher salt and 1 tablespoon of sugar. Heat this mixture over medium heat. Stir until both the salt and sugar dissolve completely. Once they dissolve, take the saucepan off the heat. Let it cool down to a mild temperature before using it. Now, grab your sterilized jars. I like to use pint-sized mason jars for this. Place 4 cloves of peeled garlic, 2 teaspoons of mustard seeds, 1 teaspoon of black peppercorns, 1 teaspoon of red pepper flakes, and 3-4 sprigs of fresh dill at the bottom of each jar. These spices will give the okra a great flavor. Next, pack the okra upright into the jars. Make sure to leave enough space for the brine. You don’t want to crush the pods. Pour the cooled brine over the okra, ensuring every piece is fully submerged. If the okra isn’t fully covered, add a bit more vinegar. Seal the jars tightly. This keeps air out and helps the okra pickle well. Allow the jars to cool to room temperature. After they cool, put them in the fridge. Let the okra pickle for at least 48 hours before tasting. They can stay in the fridge for up to 3 months. For a full recipe, check out the details above. To get that ideal crunch, choose fresh okra. Look for okra that is bright green and firm. Avoid any that feels soft or looks dull. Trim the stems carefully without cutting into the pods. This keeps them from getting mushy. When packing the jars, stand the okra upright. This helps them stay crisp by allowing the brine to flow around each pod evenly. One mistake is using old or overripe okra. This can lead to a soggy texture. Another error is not cooling the brine properly before pouring it over the okra. Hot brine can cook the okra slightly, ruining the crispness. Also, don’t skip the salt. It helps draw out moisture and keeps the okra crunchy. Lastly, ensure you seal the jars tightly to keep air out. Clean all your jars and lids with hot soapy water. This helps prevent spoilage. Use a vinegar with a high acidity level. This ensures safe pickling and great flavor. Let the okra pickle for at least 48 hours before tasting. The flavors deepen as they sit. For the best taste, try to use your pickled okra within three months. You can find the Full Recipe online for detailed steps. {{image_4}} To make your pickled okra spicy, add more heat. Use extra red pepper flakes or include sliced fresh jalapeños. A teaspoon of cayenne pepper can also boost the heat level. Mix these spicy ingredients with the garlic and mustard seeds in the jar. This will give each bite a fiery kick. For a sweet twist, increase the sugar in your brine. Try adding two tablespoons instead of one. You can also mix in brown sugar for a deeper flavor. Another option is to add sliced onions or bell peppers with the okra. They will add a nice sweetness and texture to the mix. Pickling is not just for okra. You can pickle other veggies too. Try adding carrots, cucumbers, or green beans. Make sure to cut them to size so they fit in the jars. Each vegetable will absorb the brine and add its unique flavor to the mix. This variety will make your pickled okra even more exciting. Check out the Full Recipe for more tips on combining flavors. To store crisp pickled okra, keep it in the fridge. Use clean, airtight jars. Make sure the okra is fully submerged in the brine to stay fresh. This helps maintain its crunch. Always choose a cool spot in your fridge for storage. Crisp pickled okra lasts about three months in the fridge. After that, it may start to lose its flavor and texture. Always check the date you made it. If you eat it within this time frame, it will taste best. Look for changes that mean your okra is spoiled. Signs include a sour smell, cloudy brine, or visible mold. If the okra looks mushy, it is time to throw it away. Always trust your senses. If it doesn’t seem right, don’t eat it. Pickled okra tastes best after it sits for at least 48 hours. This time allows the flavors to blend well. You can eat it after this period, but the taste improves the longer it sits. If you wait a week, it gets even better! The brine seeps into the okra, giving it a tangy kick. I do not recommend using frozen okra for pickling. Frozen okra has a different texture and can become mushy. Fresh okra stays crisp during the pickling process. If you want that crunchy bite, always choose fresh. It's worth the extra effort! Crisp pickled okra pairs well with many dishes. You can serve it as a side with fried chicken or barbecue. It also makes a great topping for salads. Try adding it to sandwiches for a tasty crunch. For a fun twist, use it in cocktails like a Bloody Mary. The options are endless! Crisp pickled okra is easy to make and full of flavor. You need the right ingredients, a well-prepared brine, and smart storage tips to get it just right. Remember to avoid common mistakes for that perfect crunch. Try different variations for fun flavors. With proper care, it’ll last a while. Enjoy this tasty treat in salads or on its own. Happy pickling!](https://tossedflavors.com/wp-content/uploads/2025/06/45a0bdfc-7792-41ff-9530-5e0ce4a2bf2e.webp)
If you crave a tangy snack that adds a punch to any meal, crisp pickled okra is your answer. This simple yet tasty treat boasts a delightful crunch and vibrant flavor. In this guide, I’ll walk you through the ingredients, prep steps, and tips to make perfect pickled okra every time. Get ready to impress your friends and family with this easy-to-make delight!
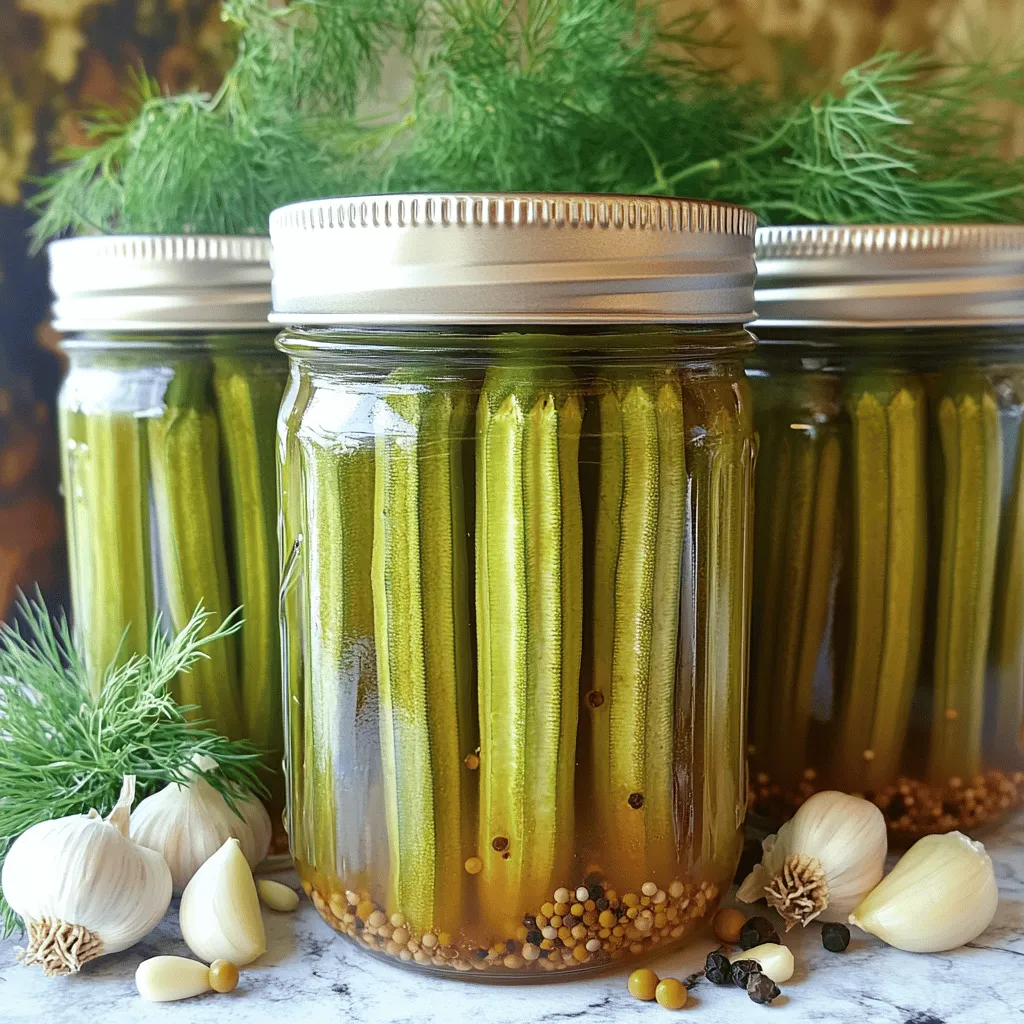
Ingredients
Required Ingredients for Crisp Pickled Okra
To make the best crisp pickled okra, you need a few key ingredients:
– 1 pound fresh okra, stems trimmed
– 2 cups distilled white vinegar
– 1 cup water
– 3 tablespoons kosher salt
– 1 tablespoon sugar
– 4 cloves garlic, peeled
– 2 teaspoons mustard seeds
– 1 teaspoon black peppercorns
– 1 teaspoon red pepper flakes
– 3-4 sprigs of fresh dill
These ingredients come together for a bright, tangy flavor. They also help keep the okra crunchy.
Optional Flavor Enhancements
You can add your own twist with extra spices. Consider these options:
– 1 teaspoon coriander seeds
– 1 teaspoon cumin seeds
– A few slices of fresh jalapeño for heat
– Lemon or lime zest for a citrus kick
These enhancements can elevate the taste. Feel free to explore different combinations to make it your own.
Best Types of Okra to Use
For crisp pickled okra, use fresh, young okra pods. Look for:
– Firm, bright green pods
– Pods that are no longer than 4 inches
Avoid large or tough pods. They can become mushy and less enjoyable. Freshness is key for the best results. You want every bite to be a burst of flavor and crunch.
You can find the full recipe [here](#).
Step-by-Step Instructions
Detailed Preparation Steps
First, wash the fresh okra well. This step is key to remove any dirt. Next, trim the stems carefully. Avoid cutting into the pods so they stay whole. This helps the okra hold its shape while pickling.
How to Prepare the Brine
To make the brine, take a medium saucepan. Combine 2 cups of distilled white vinegar and 1 cup of water. Add in 3 tablespoons of kosher salt and 1 tablespoon of sugar. Heat this mixture over medium heat. Stir until both the salt and sugar dissolve completely. Once they dissolve, take the saucepan off the heat. Let it cool down to a mild temperature before using it.
Packing and Storing the Okra
Now, grab your sterilized jars. I like to use pint-sized mason jars for this. Place 4 cloves of peeled garlic, 2 teaspoons of mustard seeds, 1 teaspoon of black peppercorns, 1 teaspoon of red pepper flakes, and 3-4 sprigs of fresh dill at the bottom of each jar. These spices will give the okra a great flavor.
Next, pack the okra upright into the jars. Make sure to leave enough space for the brine. You don’t want to crush the pods. Pour the cooled brine over the okra, ensuring every piece is fully submerged. If the okra isn’t fully covered, add a bit more vinegar.
Seal the jars tightly. This keeps air out and helps the okra pickle well. Allow the jars to cool to room temperature. After they cool, put them in the fridge. Let the okra pickle for at least 48 hours before tasting. They can stay in the fridge for up to 3 months.
For a full recipe, check out the details above.
Tips & Tricks
Achieving the Perfect Crispness
To get that ideal crunch, choose fresh okra. Look for okra that is bright green and firm. Avoid any that feels soft or looks dull. Trim the stems carefully without cutting into the pods. This keeps them from getting mushy. When packing the jars, stand the okra upright. This helps them stay crisp by allowing the brine to flow around each pod evenly.
Common Mistakes to Avoid
One mistake is using old or overripe okra. This can lead to a soggy texture. Another error is not cooling the brine properly before pouring it over the okra. Hot brine can cook the okra slightly, ruining the crispness. Also, don’t skip the salt. It helps draw out moisture and keeps the okra crunchy. Lastly, ensure you seal the jars tightly to keep air out.
Best Practices for Homemade Pickling
Clean all your jars and lids with hot soapy water. This helps prevent spoilage. Use a vinegar with a high acidity level. This ensures safe pickling and great flavor. Let the okra pickle for at least 48 hours before tasting. The flavors deepen as they sit. For the best taste, try to use your pickled okra within three months. You can find the Full Recipe online for detailed steps.
Variations
Spicy Crisp Pickled Okra Recipe
To make your pickled okra spicy, add more heat. Use extra red pepper flakes or include sliced fresh jalapeños. A teaspoon of cayenne pepper can also boost the heat level. Mix these spicy ingredients with the garlic and mustard seeds in the jar. This will give each bite a fiery kick.
Sweet and Savory Pickled Okra Options
For a sweet twist, increase the sugar in your brine. Try adding two tablespoons instead of one. You can also mix in brown sugar for a deeper flavor. Another option is to add sliced onions or bell peppers with the okra. They will add a nice sweetness and texture to the mix.
Other Vegetables to Pickle Together
Pickling is not just for okra. You can pickle other veggies too. Try adding carrots, cucumbers, or green beans. Make sure to cut them to size so they fit in the jars. Each vegetable will absorb the brine and add its unique flavor to the mix. This variety will make your pickled okra even more exciting. Check out the Full Recipe for more tips on combining flavors.
Storage Info
How to Properly Store Crisp Pickled Okra
To store crisp pickled okra, keep it in the fridge. Use clean, airtight jars. Make sure the okra is fully submerged in the brine to stay fresh. This helps maintain its crunch. Always choose a cool spot in your fridge for storage.
Shelf Life and Best Used By Date
Crisp pickled okra lasts about three months in the fridge. After that, it may start to lose its flavor and texture. Always check the date you made it. If you eat it within this time frame, it will taste best.
Signs of Spoilage
Look for changes that mean your okra is spoiled. Signs include a sour smell, cloudy brine, or visible mold. If the okra looks mushy, it is time to throw it away. Always trust your senses. If it doesn’t seem right, don’t eat it.
FAQs
How long does pickled okra need to sit before eating?
Pickled okra tastes best after it sits for at least 48 hours. This time allows the flavors to blend well. You can eat it after this period, but the taste improves the longer it sits. If you wait a week, it gets even better! The brine seeps into the okra, giving it a tangy kick.
Can I use frozen okra for pickling?
I do not recommend using frozen okra for pickling. Frozen okra has a different texture and can become mushy. Fresh okra stays crisp during the pickling process. If you want that crunchy bite, always choose fresh. It’s worth the extra effort!
What are the best dishes to serve with crisp pickled okra?
Crisp pickled okra pairs well with many dishes. You can serve it as a side with fried chicken or barbecue. It also makes a great topping for salads. Try adding it to sandwiches for a tasty crunch. For a fun twist, use it in cocktails like a Bloody Mary. The options are endless!
Crisp pickled okra is easy to make and full of flavor. You need the right ingredients, a well-prepared brine, and smart storage tips to get it just right. Remember to avoid common mistakes for that perfect crunch. Try different variations for fun flavors. With proper care, it’ll last a while. Enjoy this tasty treat in salads or on its own. Happy pickling!
. First, wash the fresh okra well. This step is key to remove any dirt. Next, trim the stems carefully. Avoid cutting into the pods so they stay whole. This helps the okra hold its shape while pickling. To make the brine, take a medium saucepan. Combine 2 cups of distilled white vinegar and 1 cup of water. Add in 3 tablespoons of kosher salt and 1 tablespoon of sugar. Heat this mixture over medium heat. Stir until both the salt and sugar dissolve completely. Once they dissolve, take the saucepan off the heat. Let it cool down to a mild temperature before using it. Now, grab your sterilized jars. I like to use pint-sized mason jars for this. Place 4 cloves of peeled garlic, 2 teaspoons of mustard seeds, 1 teaspoon of black peppercorns, 1 teaspoon of red pepper flakes, and 3-4 sprigs of fresh dill at the bottom of each jar. These spices will give the okra a great flavor. Next, pack the okra upright into the jars. Make sure to leave enough space for the brine. You don’t want to crush the pods. Pour the cooled brine over the okra, ensuring every piece is fully submerged. If the okra isn’t fully covered, add a bit more vinegar. Seal the jars tightly. This keeps air out and helps the okra pickle well. Allow the jars to cool to room temperature. After they cool, put them in the fridge. Let the okra pickle for at least 48 hours before tasting. They can stay in the fridge for up to 3 months. For a full recipe, check out the details above. To get that ideal crunch, choose fresh okra. Look for okra that is bright green and firm. Avoid any that feels soft or looks dull. Trim the stems carefully without cutting into the pods. This keeps them from getting mushy. When packing the jars, stand the okra upright. This helps them stay crisp by allowing the brine to flow around each pod evenly. One mistake is using old or overripe okra. This can lead to a soggy texture. Another error is not cooling the brine properly before pouring it over the okra. Hot brine can cook the okra slightly, ruining the crispness. Also, don’t skip the salt. It helps draw out moisture and keeps the okra crunchy. Lastly, ensure you seal the jars tightly to keep air out. Clean all your jars and lids with hot soapy water. This helps prevent spoilage. Use a vinegar with a high acidity level. This ensures safe pickling and great flavor. Let the okra pickle for at least 48 hours before tasting. The flavors deepen as they sit. For the best taste, try to use your pickled okra within three months. You can find the Full Recipe online for detailed steps. {{image_4}} To make your pickled okra spicy, add more heat. Use extra red pepper flakes or include sliced fresh jalapeños. A teaspoon of cayenne pepper can also boost the heat level. Mix these spicy ingredients with the garlic and mustard seeds in the jar. This will give each bite a fiery kick. For a sweet twist, increase the sugar in your brine. Try adding two tablespoons instead of one. You can also mix in brown sugar for a deeper flavor. Another option is to add sliced onions or bell peppers with the okra. They will add a nice sweetness and texture to the mix. Pickling is not just for okra. You can pickle other veggies too. Try adding carrots, cucumbers, or green beans. Make sure to cut them to size so they fit in the jars. Each vegetable will absorb the brine and add its unique flavor to the mix. This variety will make your pickled okra even more exciting. Check out the Full Recipe for more tips on combining flavors. To store crisp pickled okra, keep it in the fridge. Use clean, airtight jars. Make sure the okra is fully submerged in the brine to stay fresh. This helps maintain its crunch. Always choose a cool spot in your fridge for storage. Crisp pickled okra lasts about three months in the fridge. After that, it may start to lose its flavor and texture. Always check the date you made it. If you eat it within this time frame, it will taste best. Look for changes that mean your okra is spoiled. Signs include a sour smell, cloudy brine, or visible mold. If the okra looks mushy, it is time to throw it away. Always trust your senses. If it doesn’t seem right, don’t eat it. Pickled okra tastes best after it sits for at least 48 hours. This time allows the flavors to blend well. You can eat it after this period, but the taste improves the longer it sits. If you wait a week, it gets even better! The brine seeps into the okra, giving it a tangy kick. I do not recommend using frozen okra for pickling. Frozen okra has a different texture and can become mushy. Fresh okra stays crisp during the pickling process. If you want that crunchy bite, always choose fresh. It's worth the extra effort! Crisp pickled okra pairs well with many dishes. You can serve it as a side with fried chicken or barbecue. It also makes a great topping for salads. Try adding it to sandwiches for a tasty crunch. For a fun twist, use it in cocktails like a Bloody Mary. The options are endless! Crisp pickled okra is easy to make and full of flavor. You need the right ingredients, a well-prepared brine, and smart storage tips to get it just right. Remember to avoid common mistakes for that perfect crunch. Try different variations for fun flavors. With proper care, it’ll last a while. Enjoy this tasty treat in salads or on its own. Happy pickling!](https://tossedflavors.com/wp-content/uploads/2025/06/45a0bdfc-7792-41ff-9530-5e0ce4a2bf2e-300x300.webp)