Cider Braised Chicken with Caramelized Onions Delight

WANT TO SAVE THIS RECIPE?

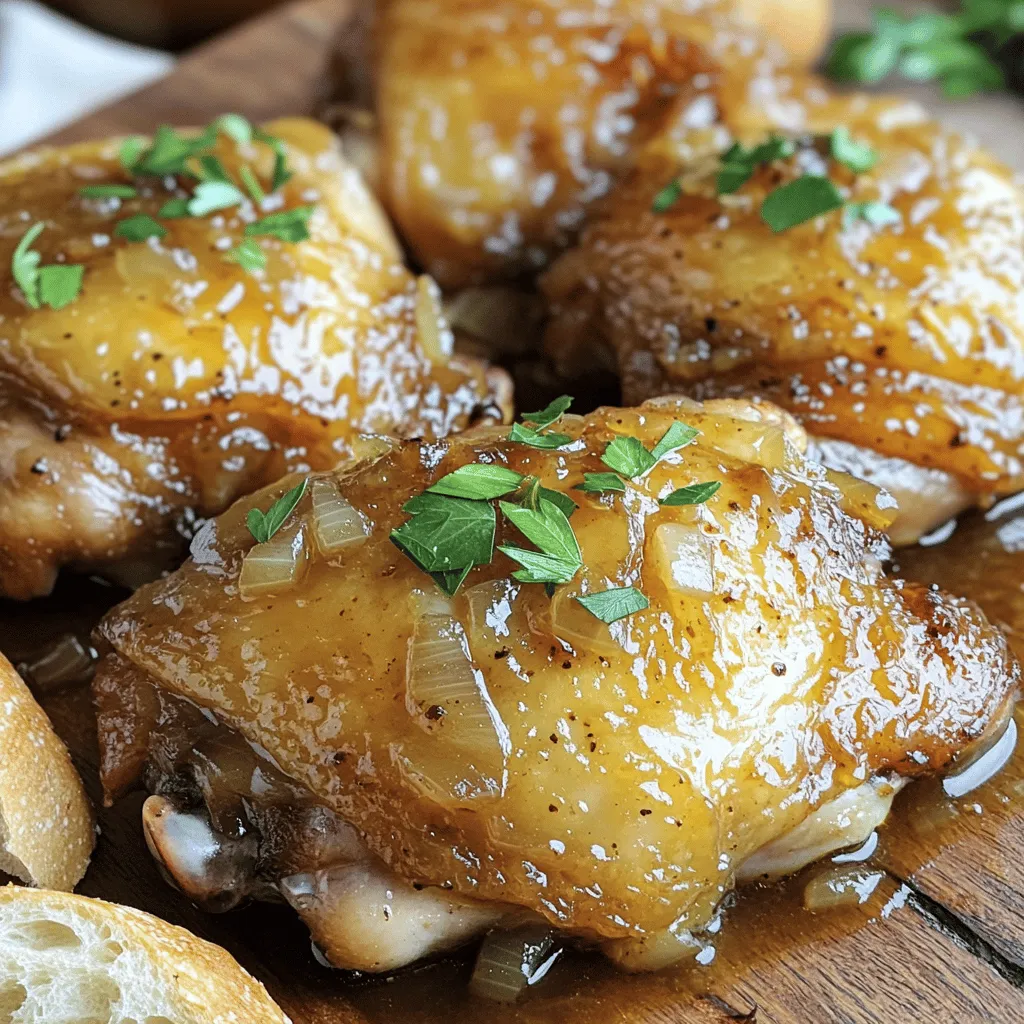
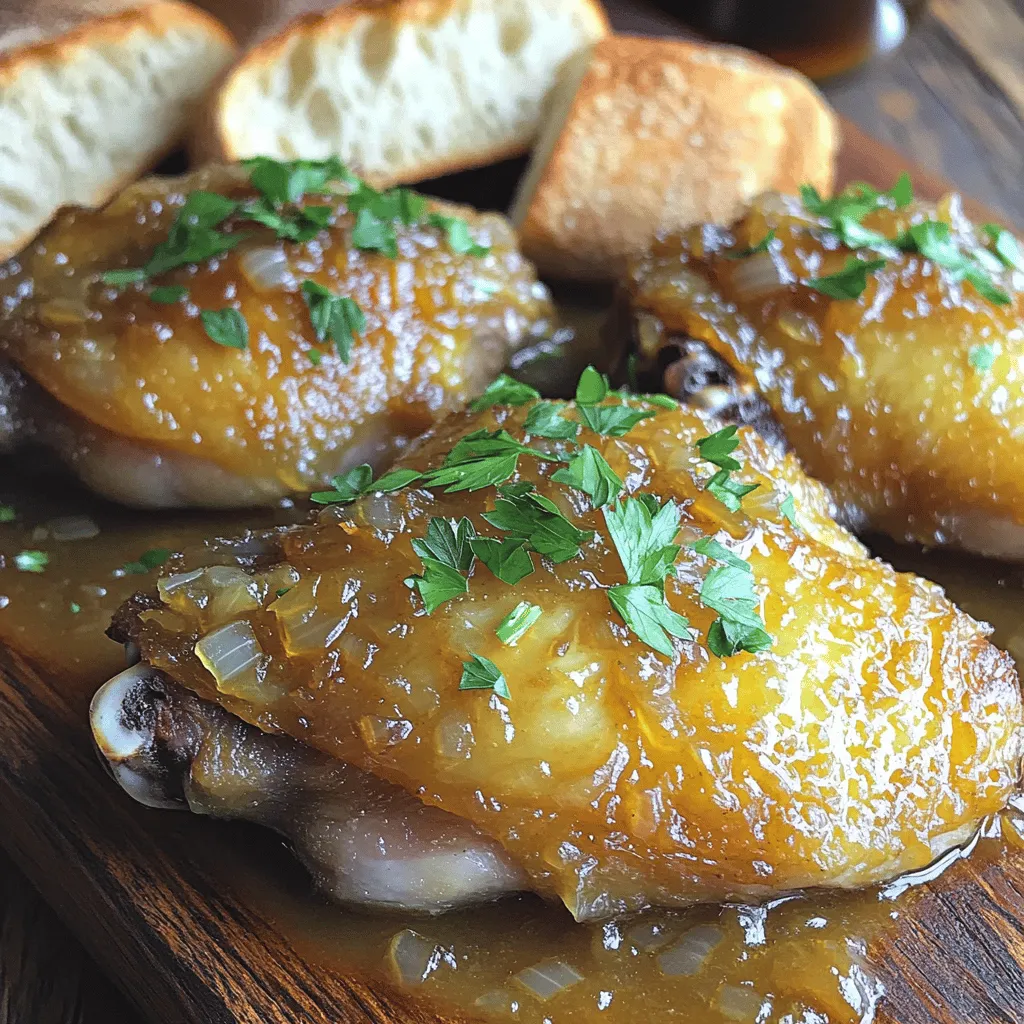
Welcome to a cozy dinner adventure! In this post, I’ll teach you how to make cider braised chicken with caramelized onions. This dish combines crispy chicken thighs, deep golden onions, and sweet apple cider for a rich flavor that delights everyone. Whether you’re cooking for family or friends, this is sure to impress. Let’s dive into the simple steps and tasty tips to create this mouthwatering meal!

Ingredients

Main Ingredients for Cider Braised Chicken

– 4 bone-in, skin-on chicken thighs

– 2 cups apple cider (non-alcoholic)

– 2 large onions, thinly sliced

Additional Ingredients

– 3 tablespoons olive oil

– 2 cloves garlic, minced

– 1 tablespoon fresh thyme leaves (or 1 teaspoon dried thyme)

– 1 teaspoon paprika

– Salt and pepper to taste

– Fresh parsley, chopped (for garnish)

Cider braised chicken is a dish that shines with simple ingredients. The chicken thighs bring a rich flavor. The skin adds a lovely crispiness. Apple cider gives a sweet, tangy twist. Onions caramelize beautifully, adding depth to the dish.

You can use fresh thyme for a bright taste. Paprika adds a smoky hint that enhances the chicken. Olive oil is key for cooking. It helps the chicken brown and the onions soften.

This dish is not just about the main ingredients. Each one plays a part in making the meal special. The garlic adds warmth, while the parsley gives a nice pop of color. Each bite offers a balance of flavors that makes your taste buds dance.

For a full list of the ingredients and how to prepare them, check the Full Recipe.

Step-by-Step Instructions

Searing the Chicken

First, heat 2 tablespoons of olive oil in a large pot. Season the chicken thighs with salt, pepper, and paprika. Once the oil shimmers, place the chicken skin-side down. Sear for about 5-7 minutes until the skin is golden brown. Flip the thighs and cook for another 3-4 minutes. Remove the chicken and set it aside.

Caramelizing the Onions

In the same pot, add the thinly sliced onions and a pinch of salt. Cook over medium-low heat, stirring often. This will take around 15-20 minutes. You want the onions to soften and turn a deep golden brown. This step brings out their sweet flavor.

Combining Flavors

Once the onions are ready, stir in 2 cloves of minced garlic and 1 tablespoon of fresh thyme leaves. Cook for another 1-2 minutes. This will make the kitchen smell amazing! Then, pour in the apple cider to deglaze the pot. Use a spoon to scrape up any bits stuck to the bottom.

Braising the Chicken

Return the seared chicken thighs to the pot, skin-side up. Make sure they are mostly submerged in the cider and onion mix. Cover the pot and reduce the heat to low. Let it simmer gently for about 30-35 minutes. The chicken will become tender and juicy.

Final Touches

After braising, taste the sauce. Adjust the seasoning with more salt and pepper if needed. If you want a thicker sauce, take the chicken out and let the sauce simmer uncovered for a few minutes. Finally, serve the chicken topped with the caramelized onions and sauce. Enjoy this delicious dish! For the complete recipe, check the Full Recipe section.

Tips & Tricks

Choosing the Right Chicken

For this dish, I love using bone-in, skin-on chicken thighs. These cuts stay juicy during cooking, and the skin adds flavor. The bones also help enhance the taste of the sauce. If you prefer, you can swap for chicken drumsticks or even a whole chicken cut into pieces. Just keep in mind that cooking times may change.

Perfecting Caramelization

To get the best caramelized onions, keep the heat low. Use medium-low heat and stir often. This helps them turn soft and sweet without burning. Aim for a nice, deep golden color. It can take 15 to 20 minutes, but the wait is worth it. The rich flavor will make your dish shine.

Enhancing Flavor Profiles

Adding spices can elevate your dish. Consider using fresh herbs like rosemary or sage besides thyme. You can also sprinkle in a pinch of cinnamon for warmth. For cider, feel free to try different types. A spiced apple cider can add a nice twist. Remember, the choice of cider can change the dish’s flavor, so choose one you enjoy.

For the full recipe and detailed instructions, check out the Full Recipe.

Variations

Different Ciders to Use

You can use many types of apple cider for this dish. Each cider offers a unique taste. For a sweeter dish, choose a fresh, sweet cider. If you like tart flavors, use a more acidic cider. You can also try fruit juices for a twist. Pear juice or cranberry juice can add a nice touch. Just remember to adjust the sweetness to match your choice.

Ingredient Swaps

If you want a leaner option, use boneless chicken breasts. They cook faster and still taste great. You can also make this dish vegetarian. Swap the chicken for hearty vegetables like mushrooms or eggplant. For extra protein, use chickpeas or tofu. Just cut them into bite-sized pieces and follow the same steps.

Serving Suggestions

When serving cider braised chicken, think about sides that balance the meal. Creamy mashed potatoes or rice work well. They soak up the tasty sauce. For a fresh touch, serve a crisp salad on the side.

Pair this meal with a light white wine, like a Sauvignon Blanc. If you prefer something non-alcoholic, try sparkling apple cider. It adds a fun fizz to your dinner. For the full recipe, check the link above.

Storage Info

Storing Leftovers

After enjoying your cider braised chicken, save the leftovers properly. Place the chicken and sauce in an airtight container. This keeps the flavors fresh. Refrigerate the container within two hours of cooking. Your dish stays safe and tasty in the fridge for up to three days. Just remember, the longer it sits, the less fresh it may taste.

Freezing Cider Braised Chicken

Want to save some for later? Freezing is a great option. First, let the chicken cool to room temperature. Then, place it in a freezer-safe container. Make sure to seal it tightly to prevent freezer burn. You can freeze the chicken for up to three months. When you are ready to eat, thaw it in the fridge overnight.

For reheating, you have a few choices. You can use the oven, stovetop, or microwave. If you use the oven, preheat it to 350°F (175°C). Place the chicken in a baking dish, cover it with foil, and warm for about 20 minutes. This method keeps it moist. If you want a quicker way, the microwave works too. Just heat it in short intervals, stirring occasionally. Enjoy your meal!

FAQs

How long does it take to cook cider braised chicken?

It takes about 50 minutes to cook cider braised chicken. This includes 15 minutes of prep time and 35 minutes of cooking time. The chicken needs time to absorb flavors and become tender.

Can I use hard cider instead of apple cider?

Yes, you can use hard cider. It adds a nice depth of flavor. However, it has alcohol, which may not be suitable for everyone. If you prefer a non-alcoholic option, stick with apple cider.

What is the best side dish to serve with cider braised chicken?

Creamy mashed potatoes or crusty bread pair well with cider braised chicken. They soak up the sauce and enhance the meal. You can also serve it with roasted veggies for a balanced plate.

How can I make the sauce thicker?

To thicken the sauce, let it simmer uncovered for a few minutes. This helps reduce the liquid and intensifies the flavor. You can also mix in a cornstarch slurry if you want a quicker option.

Is cider braised chicken suitable for meal prep?

Yes, cider braised chicken is great for meal prep. It stores well in the fridge for up to four days. You can also freeze it for longer storage. Just reheat it gently before serving.

For the full recipe, check out the detailed instructions above!

Cider braised chicken is a tasty dish made with simple ingredients. The rich flavors from the cider and onions create a meal everyone will love. Remember to choose the right cut of chicken for the best taste. You can also try fun variations to make this dish your own. Store leftovers well for later or even freeze them. I hope these tips and recipes make your cooking fun and easy. Enjoy your delicious cider braised chicken!

- 4 bone-in, skin-on chicken thighs - 2 cups apple cider (non-alcoholic) - 2 large onions, thinly sliced - 3 tablespoons olive oil - 2 cloves garlic, minced - 1 tablespoon fresh thyme leaves (or 1 teaspoon dried thyme) - 1 teaspoon paprika - Salt and pepper to taste - Fresh parsley, chopped (for garnish) Cider braised chicken is a dish that shines with simple ingredients. The chicken thighs bring a rich flavor. The skin adds a lovely crispiness. Apple cider gives a sweet, tangy twist. Onions caramelize beautifully, adding depth to the dish. You can use fresh thyme for a bright taste. Paprika adds a smoky hint that enhances the chicken. Olive oil is key for cooking. It helps the chicken brown and the onions soften. This dish is not just about the main ingredients. Each one plays a part in making the meal special. The garlic adds warmth, while the parsley gives a nice pop of color. Each bite offers a balance of flavors that makes your taste buds dance. For a full list of the ingredients and how to prepare them, check the Full Recipe. First, heat 2 tablespoons of olive oil in a large pot. Season the chicken thighs with salt, pepper, and paprika. Once the oil shimmers, place the chicken skin-side down. Sear for about 5-7 minutes until the skin is golden brown. Flip the thighs and cook for another 3-4 minutes. Remove the chicken and set it aside. In the same pot, add the thinly sliced onions and a pinch of salt. Cook over medium-low heat, stirring often. This will take around 15-20 minutes. You want the onions to soften and turn a deep golden brown. This step brings out their sweet flavor. Once the onions are ready, stir in 2 cloves of minced garlic and 1 tablespoon of fresh thyme leaves. Cook for another 1-2 minutes. This will make the kitchen smell amazing! Then, pour in the apple cider to deglaze the pot. Use a spoon to scrape up any bits stuck to the bottom. Return the seared chicken thighs to the pot, skin-side up. Make sure they are mostly submerged in the cider and onion mix. Cover the pot and reduce the heat to low. Let it simmer gently for about 30-35 minutes. The chicken will become tender and juicy. After braising, taste the sauce. Adjust the seasoning with more salt and pepper if needed. If you want a thicker sauce, take the chicken out and let the sauce simmer uncovered for a few minutes. Finally, serve the chicken topped with the caramelized onions and sauce. Enjoy this delicious dish! For the complete recipe, check the Full Recipe section. For this dish, I love using bone-in, skin-on chicken thighs. These cuts stay juicy during cooking, and the skin adds flavor. The bones also help enhance the taste of the sauce. If you prefer, you can swap for chicken drumsticks or even a whole chicken cut into pieces. Just keep in mind that cooking times may change. To get the best caramelized onions, keep the heat low. Use medium-low heat and stir often. This helps them turn soft and sweet without burning. Aim for a nice, deep golden color. It can take 15 to 20 minutes, but the wait is worth it. The rich flavor will make your dish shine. Adding spices can elevate your dish. Consider using fresh herbs like rosemary or sage besides thyme. You can also sprinkle in a pinch of cinnamon for warmth. For cider, feel free to try different types. A spiced apple cider can add a nice twist. Remember, the choice of cider can change the dish’s flavor, so choose one you enjoy. For the full recipe and detailed instructions, check out the Full Recipe. {{image_4}} You can use many types of apple cider for this dish. Each cider offers a unique taste. For a sweeter dish, choose a fresh, sweet cider. If you like tart flavors, use a more acidic cider. You can also try fruit juices for a twist. Pear juice or cranberry juice can add a nice touch. Just remember to adjust the sweetness to match your choice. If you want a leaner option, use boneless chicken breasts. They cook faster and still taste great. You can also make this dish vegetarian. Swap the chicken for hearty vegetables like mushrooms or eggplant. For extra protein, use chickpeas or tofu. Just cut them into bite-sized pieces and follow the same steps. When serving cider braised chicken, think about sides that balance the meal. Creamy mashed potatoes or rice work well. They soak up the tasty sauce. For a fresh touch, serve a crisp salad on the side. Pair this meal with a light white wine, like a Sauvignon Blanc. If you prefer something non-alcoholic, try sparkling apple cider. It adds a fun fizz to your dinner. For the full recipe, check the link above. After enjoying your cider braised chicken, save the leftovers properly. Place the chicken and sauce in an airtight container. This keeps the flavors fresh. Refrigerate the container within two hours of cooking. Your dish stays safe and tasty in the fridge for up to three days. Just remember, the longer it sits, the less fresh it may taste. Want to save some for later? Freezing is a great option. First, let the chicken cool to room temperature. Then, place it in a freezer-safe container. Make sure to seal it tightly to prevent freezer burn. You can freeze the chicken for up to three months. When you are ready to eat, thaw it in the fridge overnight. For reheating, you have a few choices. You can use the oven, stovetop, or microwave. If you use the oven, preheat it to 350°F (175°C). Place the chicken in a baking dish, cover it with foil, and warm for about 20 minutes. This method keeps it moist. If you want a quicker way, the microwave works too. Just heat it in short intervals, stirring occasionally. Enjoy your meal! It takes about 50 minutes to cook cider braised chicken. This includes 15 minutes of prep time and 35 minutes of cooking time. The chicken needs time to absorb flavors and become tender. Yes, you can use hard cider. It adds a nice depth of flavor. However, it has alcohol, which may not be suitable for everyone. If you prefer a non-alcoholic option, stick with apple cider. Creamy mashed potatoes or crusty bread pair well with cider braised chicken. They soak up the sauce and enhance the meal. You can also serve it with roasted veggies for a balanced plate. To thicken the sauce, let it simmer uncovered for a few minutes. This helps reduce the liquid and intensifies the flavor. You can also mix in a cornstarch slurry if you want a quicker option. Yes, cider braised chicken is great for meal prep. It stores well in the fridge for up to four days. You can also freeze it for longer storage. Just reheat it gently before serving. For the full recipe, check out the detailed instructions above! Cider braised chicken is a tasty dish made with simple ingredients. The rich flavors from the cider and onions create a meal everyone will love. Remember to choose the right cut of chicken for the best taste. You can also try fun variations to make this dish your own. Store leftovers well for later or even freeze them. I hope these tips and recipes make your cooking fun and easy. Enjoy your delicious cider braised chicken!

Cider Braised Chicken with Caramelized Onions

Savor the delicious flavors of cider-braised chicken with sweet caramelized onions in this easy recipe that’s perfect for any dinner. With tender chicken thighs simmered in apple cider and savory onions, this dish is a comforting delight. Discover step-by-step instructions to create a meal that's sure to impress. Click through to explore this mouthwatering recipe and elevate your cooking game today!

Ingredients
  

4 bone-in, skin-on chicken thighs

2 cups apple cider (non-alcoholic)

2 large onions, thinly sliced

3 tablespoons olive oil

2 cloves garlic, minced

1 tablespoon fresh thyme leaves (or 1 teaspoon dried thyme)

1 teaspoon paprika

Salt and pepper to taste

Fresh parsley, chopped (for garnish)

Instructions
 

Sear the Chicken: In a large, heavy-bottomed pot or Dutch oven, heat 2 tablespoons of olive oil over medium heat. Season both sides of the chicken thighs generously with salt, pepper, and paprika. Once the oil shimmers, carefully place the chicken thighs skin-side down in the pot. Sear for about 5-7 minutes until the skin is beautifully golden brown and crispy. Flip the thighs over and cook for an additional 3-4 minutes. Once done, remove the chicken from the pot and set it aside on a plate.

    Caramelize the Onions: In the same pot, if needed, add the remaining tablespoon of olive oil. Add the thinly sliced onions along with a pinch of salt. Cook over medium-low heat, stirring frequently, for approximately 15-20 minutes until the onions soften and turn a rich, deep golden brown, releasing their natural sweetness.

      Add Garlic and Thyme: Once the onions have caramelized, stir in the minced garlic and fresh thyme. Cook for an additional 1-2 minutes, allowing the flavors to meld and the garlic to become fragrant.

        Deglaze with Cider: Gradually pour in the apple cider, using a spoon or spatula to scrape up any browned bits stuck to the bottom of the pot. This will enhance the flavor of the sauce. Bring the mixture to a gentle simmer.

          Braise the Chicken: Carefully return the seared chicken thighs to the pot, placing them skin-side up. Make sure they are mostly submerged in the apple cider and onion mixture. Cover the pot with a lid and reduce the heat to low. Allow the mixture to simmer gently for about 30-35 minutes, or until the chicken is cooked through and tender.

            Final Touches: After the chicken has finished braising, taste the sauce and adjust the seasoning with additional salt and pepper if necessary. If you prefer a thicker sauce, remove the chicken once again and let the sauce simmer uncovered over medium heat for a few minutes to reduce.

              Serve: Plate the chicken thighs, generously topping them with the luscious caramelized onions and spooning the flavorful sauce over the top.

                Prep Time, Total Time, Servings: 15 mins | 50 mins | 4 servings

                  Presentation Tips: Serve the chicken beautifully arranged on a rustic wooden board or shallow dish. Garnish with freshly chopped parsley for a vibrant pop of color. Accompany the dish with crusty bread for dipping or creamy mashed potatoes to soak up the delicious sauce. Enjoy!

                    WANT TO SAVE THIS RECIPE?

                    Leave a Comment

                    Recipe Rating