Cheesy Garlic Chicken Wraps Quick and Flavorful Meal

WANT TO SAVE THIS RECIPE?

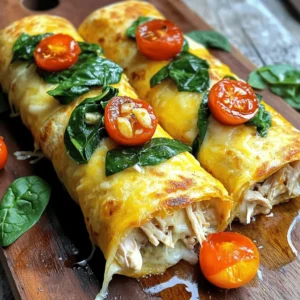
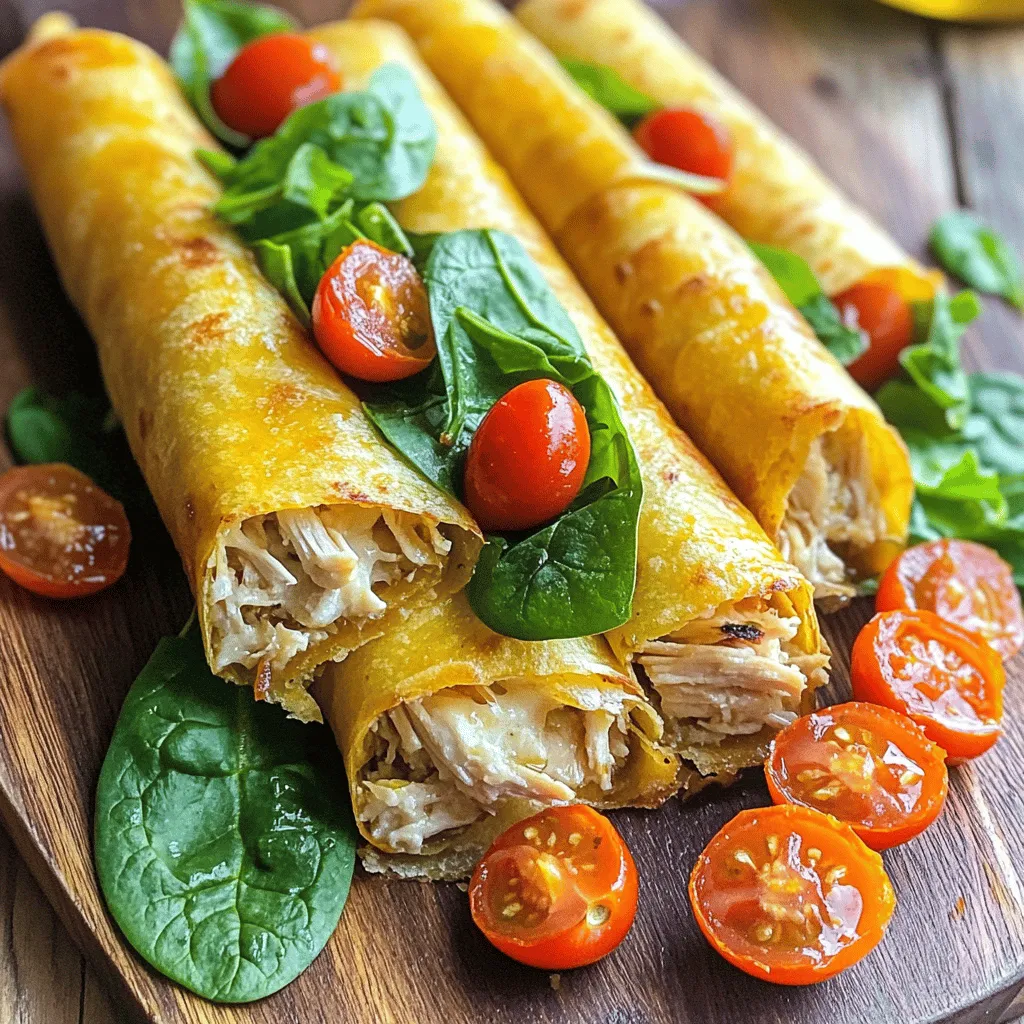
Are you craving a quick and tasty meal? Look no further than Cheesy Garlic Chicken Wraps! Packed with tender chicken, creamy cheese, and zesty garlic, these wraps are perfect for busy nights. In just a few simple steps, you’ll have a delicious dish ready to enjoy. Get ready to impress your family or friends with this easy recipe that brings big flavor in no time! Let’s dive in and get cooking!

Ingredients

To make Cheesy Garlic Chicken Wraps, you need a few simple ingredients. Here’s the list:

– 2 cups cooked chicken, shredded

– 1 cup cream cheese, softened

– 1 cup shredded cheddar cheese

– 4 cloves garlic, minced

– 1 teaspoon dried oregano

– 1 teaspoon paprika

– Salt and black pepper to taste

– 4 large flour tortillas

– 1 cup fresh spinach leaves, washed and dried

– 1/2 cup cherry tomatoes, halved

– 2 tablespoons olive oil

These ingredients blend to create a rich, cheesy filling that pairs perfectly with fresh veggies. The shredded chicken adds protein and flavor, while cream cheese and cheddar bring creaminess. Garlic adds a strong, savory kick that fills your wraps with taste. The spices, like oregano and paprika, enhance the overall flavor, making each bite delightful.

Using fresh spinach and cherry tomatoes adds crunch and freshness. The tortillas wrap everything together, making it easy to hold and eat. Olive oil is key for cooking the wraps, giving them a nice crisp.

For the full recipe, check out the detailed instructions that follow. Enjoy your cooking!

Step-by-Step Instructions

Preparation of the Cheesy Mixture

To start, take a large bowl. Add your shredded chicken and the softened cream cheese. Mix them well. Next, add minced garlic, shredded cheddar, dried oregano, paprika, salt, and black pepper. Stir until the mixture is creamy and all ingredients blend well together.

Cooking the Tortillas

Now, heat a dry skillet over medium heat. This step makes the tortillas soft. Place each flour tortilla in the skillet and warm them for about 10 to 20 seconds per side. They should be soft and flexible. Don’t overcook them.

Assembling the Wraps

Lay each warmed tortilla flat on a clean surface. Divide the cheesy mixture evenly among the tortillas. Make sure to place it slightly off-center. Then, add a handful of fresh spinach leaves and sprinkle halved cherry tomatoes on top.

Cooking the Wraps

Heat olive oil in the same skillet over medium heat. Place the wraps seam-side down in the skillet. Make sure not to crowd the pan. Cook each wrap for 2 to 3 minutes on each side. Look for a golden brown color and crispiness. Keep an eye on them to avoid burning. Once done, remove the wraps from the skillet and let them cool before slicing them diagonally.

For the full recipe, check out the details provided above.

Tips & Tricks

Presentation and Serving Suggestions

Serve your cheesy garlic chicken wraps with tasty dips like guacamole or salsa. These dips add flavor and fun. You can also garnish the wraps with fresh herbs like cilantro or parsley. A sprinkle of extra cheese on top makes them look even more appealing.

Cooking Tips

To get crispy wraps, make sure to cook them evenly. Heat your skillet to medium heat and don’t overcrowd the pan. This way, each wrap gets that nice golden color. When filling the wraps, don’t overstuff them. Leaving some space helps you roll them up snugly without any spills.

Enhancements for Flavor

To elevate the taste, try adding spices like cayenne for heat or smoked paprika for depth. You can also mix in optional ingredients like diced bell peppers or black olives for extra flavor. Adding these tweaks makes your wraps unique and delicious.

For the Full Recipe, check the instructions above to create this delightful dish.

Variations

Alternative Protein Options

You can switch up the protein in these wraps. Ground turkey or beef works great. Just cook the meat first. Then mix it with the other ingredients. For a vegetarian twist, try black beans. They add protein and taste. Drain and rinse them before mixing. This option is filling and delicious.

Cheese Alternatives

Not a fan of cream cheese? You have options! Try different cheeses like goat cheese or feta. They bring a unique flavor. You can also use shredded mozzarella for a milder taste. If you want dairy-free, look for cream cheese made from nuts. These options keep the wraps creamy and tasty.

Flavor Profile Adjustments

Want to spice things up? Add jalapeños for heat. Slice them thin and mix them in. You can also use roasted red peppers for a sweet twist. Adding different veggies can change the flavor too. Try bell peppers or zucchini for a fresh crunch. Each tweak makes your wrap special!

For the full recipe, check the earlier section.

Storage Info

Freezing Cheesy Garlic Chicken Wraps

To freeze your wraps, first cool them completely. Wrap each one tightly in plastic wrap. Then place them in a freezer-safe bag or container. This keeps them fresh and prevents freezer burn. You can freeze the wraps for up to three months. When you’re ready to eat, just take them out and let them thaw in the fridge overnight.

Reheating Tips

To reheat your wraps, the oven is a great choice. Preheat it to 350°F (175°C). Place the wraps on a baking sheet and heat for about 10-15 minutes. If you prefer a skillet, heat it over medium heat. Add a little oil and place the wraps seam-side down. Cook for 3-4 minutes on each side. This method helps keep the wraps crispy. Enjoy your Cheesy Garlic Chicken Wraps just as they were meant to be!

FAQs

How long do Cheesy Garlic Chicken Wraps last in the fridge?

Cheesy Garlic Chicken Wraps last about three to four days in the fridge. To keep them fresh, wrap them tightly in plastic wrap or store them in an airtight container. This method prevents them from drying out or absorbing other odors in the fridge. Always check for any signs of spoilage before eating.

Can I make these chicken wraps in advance?

Yes, you can make these chicken wraps in advance. To do this, prepare the cheesy chicken mixture and spread it on the tortillas. Roll them up, but do not cook them yet. Wrap the uncooked wraps tightly in plastic wrap. Store them in the fridge for up to a day. When you’re ready to eat, just cook them in the skillet until golden brown.

What sauces pair well with Cheesy Garlic Chicken Wraps?

Several sauces go great with these wraps. Here are some of my favorites:

– Ranch dressing: Creamy and rich, it adds great flavor.

– Salsa: Fresh and zesty, it complements the cheesy filling well.

– BBQ sauce: Sweet and smoky, it brings a nice twist.

– Sour cream: Cool and creamy, it balances the garlic taste.

Can I make these wraps gluten-free?

Yes, you can make these wraps gluten-free. Look for gluten-free tortillas made from rice or corn. Ensure that all other ingredients, like spices and cheeses, are gluten-free. This way, you can enjoy the same cheesy goodness without the gluten!

We covered how to make Cheesy Garlic Chicken Wraps, from ingredients to assembly. The mix of chicken, cheese, and spices creates a delicious meal. You can tweak this recipe to fit your taste, using different proteins or spices. Remember to keep your wraps crispy and pair them with tasty dips. Enjoy making these wraps for a fun and easy meal. They’ll impress everyone!

To make Cheesy Garlic Chicken Wraps, you need a few simple ingredients. Here’s the list: - 2 cups cooked chicken, shredded - 1 cup cream cheese, softened - 1 cup shredded cheddar cheese - 4 cloves garlic, minced - 1 teaspoon dried oregano - 1 teaspoon paprika - Salt and black pepper to taste - 4 large flour tortillas - 1 cup fresh spinach leaves, washed and dried - 1/2 cup cherry tomatoes, halved - 2 tablespoons olive oil These ingredients blend to create a rich, cheesy filling that pairs perfectly with fresh veggies. The shredded chicken adds protein and flavor, while cream cheese and cheddar bring creaminess. Garlic adds a strong, savory kick that fills your wraps with taste. The spices, like oregano and paprika, enhance the overall flavor, making each bite delightful. Using fresh spinach and cherry tomatoes adds crunch and freshness. The tortillas wrap everything together, making it easy to hold and eat. Olive oil is key for cooking the wraps, giving them a nice crisp. For the full recipe, check out the detailed instructions that follow. Enjoy your cooking! To start, take a large bowl. Add your shredded chicken and the softened cream cheese. Mix them well. Next, add minced garlic, shredded cheddar, dried oregano, paprika, salt, and black pepper. Stir until the mixture is creamy and all ingredients blend well together. Now, heat a dry skillet over medium heat. This step makes the tortillas soft. Place each flour tortilla in the skillet and warm them for about 10 to 20 seconds per side. They should be soft and flexible. Don’t overcook them. Lay each warmed tortilla flat on a clean surface. Divide the cheesy mixture evenly among the tortillas. Make sure to place it slightly off-center. Then, add a handful of fresh spinach leaves and sprinkle halved cherry tomatoes on top. Heat olive oil in the same skillet over medium heat. Place the wraps seam-side down in the skillet. Make sure not to crowd the pan. Cook each wrap for 2 to 3 minutes on each side. Look for a golden brown color and crispiness. Keep an eye on them to avoid burning. Once done, remove the wraps from the skillet and let them cool before slicing them diagonally. For the full recipe, check out the details provided above. Serve your cheesy garlic chicken wraps with tasty dips like guacamole or salsa. These dips add flavor and fun. You can also garnish the wraps with fresh herbs like cilantro or parsley. A sprinkle of extra cheese on top makes them look even more appealing. To get crispy wraps, make sure to cook them evenly. Heat your skillet to medium heat and don’t overcrowd the pan. This way, each wrap gets that nice golden color. When filling the wraps, don’t overstuff them. Leaving some space helps you roll them up snugly without any spills. To elevate the taste, try adding spices like cayenne for heat or smoked paprika for depth. You can also mix in optional ingredients like diced bell peppers or black olives for extra flavor. Adding these tweaks makes your wraps unique and delicious. For the Full Recipe, check the instructions above to create this delightful dish. {{image_4}} You can switch up the protein in these wraps. Ground turkey or beef works great. Just cook the meat first. Then mix it with the other ingredients. For a vegetarian twist, try black beans. They add protein and taste. Drain and rinse them before mixing. This option is filling and delicious. Not a fan of cream cheese? You have options! Try different cheeses like goat cheese or feta. They bring a unique flavor. You can also use shredded mozzarella for a milder taste. If you want dairy-free, look for cream cheese made from nuts. These options keep the wraps creamy and tasty. Want to spice things up? Add jalapeños for heat. Slice them thin and mix them in. You can also use roasted red peppers for a sweet twist. Adding different veggies can change the flavor too. Try bell peppers or zucchini for a fresh crunch. Each tweak makes your wrap special! For the full recipe, check the earlier section. To freeze your wraps, first cool them completely. Wrap each one tightly in plastic wrap. Then place them in a freezer-safe bag or container. This keeps them fresh and prevents freezer burn. You can freeze the wraps for up to three months. When you're ready to eat, just take them out and let them thaw in the fridge overnight. To reheat your wraps, the oven is a great choice. Preheat it to 350°F (175°C). Place the wraps on a baking sheet and heat for about 10-15 minutes. If you prefer a skillet, heat it over medium heat. Add a little oil and place the wraps seam-side down. Cook for 3-4 minutes on each side. This method helps keep the wraps crispy. Enjoy your Cheesy Garlic Chicken Wraps just as they were meant to be! Cheesy Garlic Chicken Wraps last about three to four days in the fridge. To keep them fresh, wrap them tightly in plastic wrap or store them in an airtight container. This method prevents them from drying out or absorbing other odors in the fridge. Always check for any signs of spoilage before eating. Yes, you can make these chicken wraps in advance. To do this, prepare the cheesy chicken mixture and spread it on the tortillas. Roll them up, but do not cook them yet. Wrap the uncooked wraps tightly in plastic wrap. Store them in the fridge for up to a day. When you’re ready to eat, just cook them in the skillet until golden brown. Several sauces go great with these wraps. Here are some of my favorites: - Ranch dressing: Creamy and rich, it adds great flavor. - Salsa: Fresh and zesty, it complements the cheesy filling well. - BBQ sauce: Sweet and smoky, it brings a nice twist. - Sour cream: Cool and creamy, it balances the garlic taste. Yes, you can make these wraps gluten-free. Look for gluten-free tortillas made from rice or corn. Ensure that all other ingredients, like spices and cheeses, are gluten-free. This way, you can enjoy the same cheesy goodness without the gluten! We covered how to make Cheesy Garlic Chicken Wraps, from ingredients to assembly. The mix of chicken, cheese, and spices creates a delicious meal. You can tweak this recipe to fit your taste, using different proteins or spices. Remember to keep your wraps crispy and pair them with tasty dips. Enjoy making these wraps for a fun and easy meal. They'll impress everyone!

Cheesy Garlic Chicken Wraps

Craving a quick and delicious meal? Try Cheesy Garlic Chicken Wraps! These tasty wraps combine tender chicken, creamy cheese, and zesty garlic for an irresistible flavor. Perfect for busy nights, each wrap is packed with protein and fresh veggies. In just a few easy steps, you can impress your family or friends with this quick recipe. Click through to discover the full recipe and enjoy a flavorful meal tonight!

Ingredients
  

2 cups cooked chicken, shredded

1 cup cream cheese, softened to room temperature

1 cup shredded cheddar cheese

4 cloves garlic, minced

1 teaspoon dried oregano

1 teaspoon paprika

Salt and black pepper to taste

4 large flour tortillas

1 cup fresh spinach leaves, washed and dried

1/2 cup cherry tomatoes, halved

2 tablespoons olive oil

Instructions
 

In a large mixing bowl, add the shredded chicken, softened cream cheese, shredded cheddar cheese, minced garlic, dried oregano, paprika, salt, and black pepper. Mix well using a spatula or wooden spoon until all ingredients are thoroughly combined into a creamy mixture.

    To make the tortillas pliable, heat a dry skillet over medium heat. Add the flour tortillas and warm them for about 10 to 20 seconds on each side, just until they become soft and flexible. Remove from heat.

      Place each warmed tortilla flat on a clean work surface or cutting board. Evenly divide the cheesy chicken mixture among the tortillas, placing it slightly off-center to allow for easier rolling.

        Top the cheesy chicken mixture with a handful of fresh spinach leaves and sprinkle halved cherry tomatoes over the top for freshness and color.

          Carefully fold in the sides of each tortilla, then roll it tightly from the bottom up to encase the filling and create a sealed wrap.

            Add the olive oil to the same skillet and heat it over medium heat. Place the wraps seam-side down in the skillet, making sure not to overcrowd the pan.

              Cook the wraps for 2 to 3 minutes on each side, or until they achieve a golden brown color and become crispy. Watch them closely to avoid burning.

                Once cooked, remove the wraps from the skillet. Let them cool for a few moments before slicing each wrap in half diagonally for easier serving.

                  Prep Time: 15 minutes | Total Time: 25 minutes | Servings: 4

                    - Presentation Tips: Serve the wraps alongside a bowl of guacamole or salsa for dipping. Garnish the wraps with fresh herbs like cilantro or parsley, or sprinkle a little extra cheese on top for an appealing finish.

                      WANT TO SAVE THIS RECIPE?

                      Leave a Comment

                      Recipe Rating