Cheesy Garlic Chicken Wraps Flavorful and Quick Meal

WANT TO SAVE THIS RECIPE?

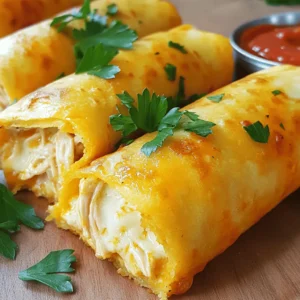
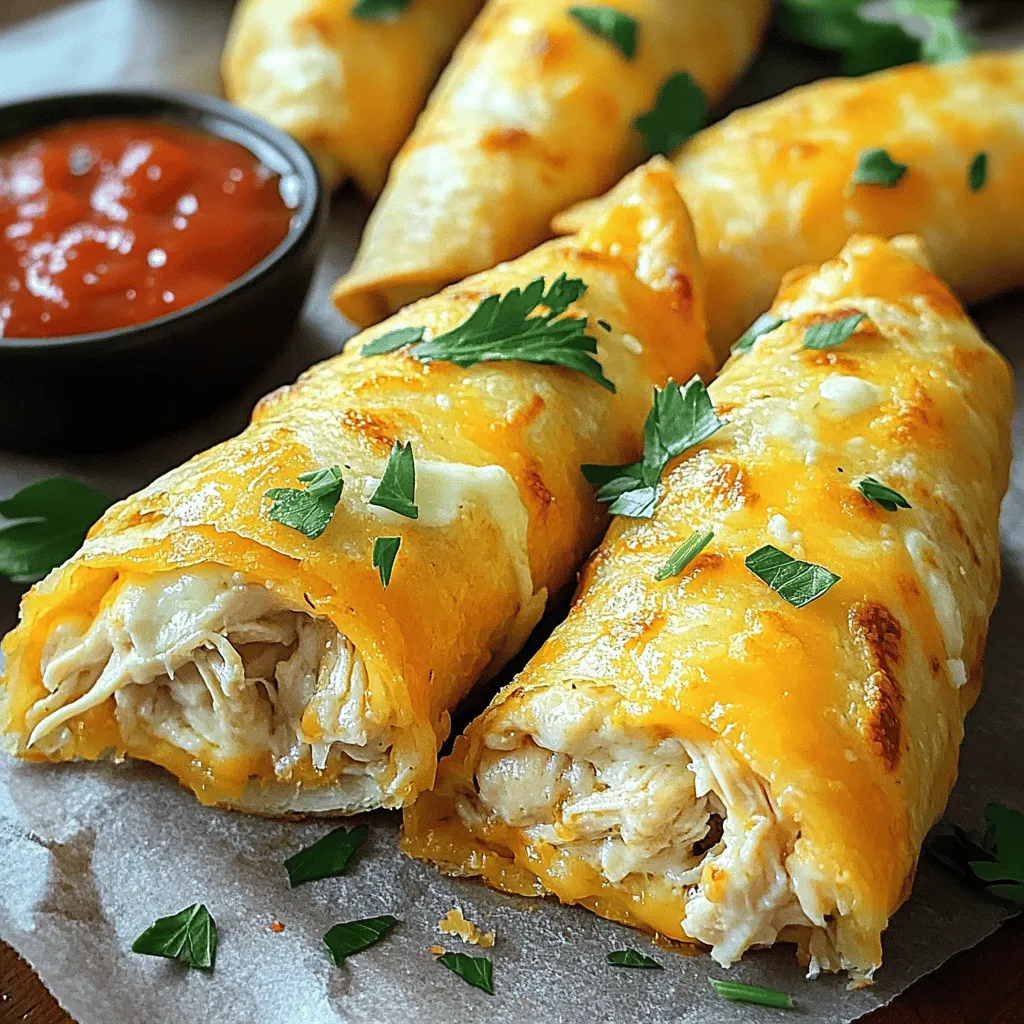
Looking for a quick meal that bursts with flavor? You’ve found it with cheesy garlic chicken wraps! These wraps combine tender chicken, gooey cheese, and tasty garlic in every bite. In this article, I’ll guide you step-by-step through the simple process of making these delicious wraps. With options for customization and tips to get it just right, you’ll impress your family or friends in no time. Let’s dive in!

Ingredients

Main Ingredients for Cheesy Garlic Chicken Wraps

To make Cheesy Garlic Chicken Wraps, you need these main ingredients:

– 1 lb (450g) chicken breast, cooked and shredded

– 1 cup shredded mozzarella cheese

– 1/2 cup cream cheese, softened

– 1/4 cup sour cream

– 3 cloves garlic, minced

– 1 teaspoon dried oregano

– 1 teaspoon garlic powder

– 1/2 teaspoon smoked paprika

– Salt and pepper to taste

– 4 large flour tortillas

– Fresh spinach leaves (optional)

– Olive oil for cooking

These ingredients create a rich and creamy filling that brings out bold flavors.

Optional Ingredients for Customization

You can add your own twist to the wraps. Here are some optional ingredients:

– Chopped bell peppers for crunch

– Diced onions for sweetness

– Jalapeños for heat

– Avocado for creaminess

– Fresh herbs like cilantro or parsley

Feel free to mix and match these options to suit your taste.

Dietary Substitutions

If you have dietary needs, consider these substitutions:

– Use rotisserie chicken for a quicker option.

– Swap cream cheese with dairy-free cheese for a vegan option.

– Choose whole wheat tortillas for added fiber.

– Use Greek yogurt instead of sour cream for a healthier choice.

These swaps make the recipe more accessible without losing flavor. For the complete recipe, check out the Full Recipe link.

Step-by-Step Instructions

Preparing the Cheesy Chicken Filling

To start, gather your ingredients for the cheesy chicken filling. In a large mixing bowl, combine these items:

– 1 lb cooked and shredded chicken breast

– 1 cup shredded mozzarella cheese

– 1/2 cup softened cream cheese

– 1/4 cup sour cream

– 3 cloves minced garlic

– 1 teaspoon dried oregano

– 1 teaspoon garlic powder

– 1/2 teaspoon smoked paprika

– Salt and pepper to taste

Mix these well until they form a creamy filling. The key is to blend the flavors completely, so each bite is packed with taste.

Assembling the Wraps

Next, lay out your large flour tortillas on a clean surface. If you want an extra crunch, add fresh spinach leaves to the center of each tortilla. This small step brightens up the dish. Then, spoon a generous amount of the cheesy chicken filling into the center of each tortilla.

Make sure to leave some space along the edges for folding. Now, fold in the sides of the tortilla toward the center. Start rolling from the bottom edge up to the top. This seals the filling inside snugly.

Cooking the Wraps

Now it’s time to cook! Heat a skillet over medium heat and drizzle in some olive oil. Once hot, place the wraps seam-side down in the skillet. Cook for about 3-4 minutes until the bottom is golden brown and crispy. Flip the wraps carefully, cooking for another 3-4 minutes on the other side.

When both sides are perfectly browned and the cheese inside melts, remove them from the skillet. Let the wraps cool for a minute, then slice in half for easy eating. Enjoy your cheesy garlic chicken wraps with your favorite dipping sauce. To see the full recipe, check out the details above!

Tips & Tricks

Perfecting the Cooking Technique

To make your wraps crispy, heat your skillet well. Use medium heat to avoid burning. Add a splash of olive oil to the pan. This helps create a golden crust. Cook each side for about 3-4 minutes. You want the cheese inside to melt perfectly. If you find the wraps browning too fast, lower the heat a bit.

Enhancing Flavor Profiles

You can boost the taste with some spices. Adding a pinch of cayenne pepper gives a nice kick. Fresh herbs like basil or parsley can add brightness. Consider mixing in sun-dried tomatoes for a tangy twist. You can also play with cheese types. Try using pepper jack for extra heat or goat cheese for creaminess.

Storage and Reheating Tips

For leftovers, store wraps in an airtight container. They can last up to three days in the fridge. To reheat, pop them in the skillet for a few minutes. This keeps them crispy. You can also use a microwave, but it may make them soggy. For freezing, wrap each one in foil. They can last up to a month in the freezer. When ready to eat, thaw in the fridge overnight before reheating.

Variations

Vegetarian Alternatives

If you want a meatless option, use roasted veggies. Zucchini, bell peppers, and mushrooms work great. You can also use canned black beans for protein. They add a nice texture and flavor. Replace the chicken with these veggies in the recipe. The creamy cheese mixture pairs well with any veggie choice.

Different Filling Ideas

Get creative with your fillings! Shredded turkey or beef adds a nice twist. You can also use smoked salmon for a gourmet touch. For a spicy kick, try adding jalapeños or hot sauce to your mix. Experiment with different cheeses too, like cheddar or pepper jack. Each option brings a new flavor and keeps the wraps fun.

Sauce Pairing Suggestions

Dipping sauces can elevate your wraps. Marinara sauce adds a classic touch. Ranch dressing offers a creamy option. For something bold, try a spicy aioli or chipotle sauce. These sauces not only add flavor but also make eating the wraps more fun. Customize your sauce choice to match your mood or meal theme.

Enjoy the full recipe to guide your cooking adventure!

Storage Info

Refrigeration Guidelines

After making your cheesy garlic chicken wraps, let them cool completely. Place the wraps in an airtight container. Store them in the fridge. They will stay fresh for about 3 days. If you want to keep them longer, consider freezing instead.

Freezing Instructions

To freeze your wraps, wrap each one in plastic wrap. Then, place them in a freezer bag. Be sure to remove as much air as possible. This helps prevent freezer burn. You can freeze these wraps for up to 2 months. When you’re ready to eat, simply thaw them in the fridge overnight.

How Long Do They Last?

When stored properly in the fridge, your wraps last about 3 days. In the freezer, they can last up to 2 months. Always check for signs of spoilage before eating. If they look or smell off, it’s best to toss them. For detailed storage and recipe information, check the full recipe.

FAQs

Can I use other types of cheese for the wraps?

Yes, you can use many types of cheese. Cheddar, pepper jack, or feta are great choices. Each will give a unique taste. Try mixing different cheeses for fun flavors. Just remember, the cheese should melt well for that gooey texture.

What is the best way to reheat leftovers?

To reheat your wraps, use a skillet over medium heat. This keeps the outside crispy while warming the inside. Cook for about 3-4 minutes on each side. You can also use an oven. Wrap them in foil and bake at 350°F (175°C) for 10-15 minutes. This method helps the cheese melt nicely.

How can I make these wraps healthier?

You can make these wraps healthier by using whole wheat tortillas. Add more veggies like bell peppers or zucchini. Swap the cream cheese for Greek yogurt to cut calories. You can also use grilled chicken instead of cooked chicken for a fresh taste. These small changes can boost nutrition without losing flavor.

Cheesy garlic chicken wraps are simple and fun to make. We covered key ingredients, step-by-step prep, and cooking tips. You can add your spin with optional ingredients or try vegetarian options.

These wraps store well and reheat easily. Feel free to experiment with different cheeses and sauces. Enjoy crafting a meal that fits your taste and diet. Wrap up your cooking adventure with these delicious ideas!

To make Cheesy Garlic Chicken Wraps, you need these main ingredients: - 1 lb (450g) chicken breast, cooked and shredded - 1 cup shredded mozzarella cheese - 1/2 cup cream cheese, softened - 1/4 cup sour cream - 3 cloves garlic, minced - 1 teaspoon dried oregano - 1 teaspoon garlic powder - 1/2 teaspoon smoked paprika - Salt and pepper to taste - 4 large flour tortillas - Fresh spinach leaves (optional) - Olive oil for cooking These ingredients create a rich and creamy filling that brings out bold flavors. You can add your own twist to the wraps. Here are some optional ingredients: - Chopped bell peppers for crunch - Diced onions for sweetness - Jalapeños for heat - Avocado for creaminess - Fresh herbs like cilantro or parsley Feel free to mix and match these options to suit your taste. If you have dietary needs, consider these substitutions: - Use rotisserie chicken for a quicker option. - Swap cream cheese with dairy-free cheese for a vegan option. - Choose whole wheat tortillas for added fiber. - Use Greek yogurt instead of sour cream for a healthier choice. These swaps make the recipe more accessible without losing flavor. For the complete recipe, check out the Full Recipe link. To start, gather your ingredients for the cheesy chicken filling. In a large mixing bowl, combine these items: - 1 lb cooked and shredded chicken breast - 1 cup shredded mozzarella cheese - 1/2 cup softened cream cheese - 1/4 cup sour cream - 3 cloves minced garlic - 1 teaspoon dried oregano - 1 teaspoon garlic powder - 1/2 teaspoon smoked paprika - Salt and pepper to taste Mix these well until they form a creamy filling. The key is to blend the flavors completely, so each bite is packed with taste. Next, lay out your large flour tortillas on a clean surface. If you want an extra crunch, add fresh spinach leaves to the center of each tortilla. This small step brightens up the dish. Then, spoon a generous amount of the cheesy chicken filling into the center of each tortilla. Make sure to leave some space along the edges for folding. Now, fold in the sides of the tortilla toward the center. Start rolling from the bottom edge up to the top. This seals the filling inside snugly. Now it’s time to cook! Heat a skillet over medium heat and drizzle in some olive oil. Once hot, place the wraps seam-side down in the skillet. Cook for about 3-4 minutes until the bottom is golden brown and crispy. Flip the wraps carefully, cooking for another 3-4 minutes on the other side. When both sides are perfectly browned and the cheese inside melts, remove them from the skillet. Let the wraps cool for a minute, then slice in half for easy eating. Enjoy your cheesy garlic chicken wraps with your favorite dipping sauce. To see the full recipe, check out the details above! To make your wraps crispy, heat your skillet well. Use medium heat to avoid burning. Add a splash of olive oil to the pan. This helps create a golden crust. Cook each side for about 3-4 minutes. You want the cheese inside to melt perfectly. If you find the wraps browning too fast, lower the heat a bit. You can boost the taste with some spices. Adding a pinch of cayenne pepper gives a nice kick. Fresh herbs like basil or parsley can add brightness. Consider mixing in sun-dried tomatoes for a tangy twist. You can also play with cheese types. Try using pepper jack for extra heat or goat cheese for creaminess. For leftovers, store wraps in an airtight container. They can last up to three days in the fridge. To reheat, pop them in the skillet for a few minutes. This keeps them crispy. You can also use a microwave, but it may make them soggy. For freezing, wrap each one in foil. They can last up to a month in the freezer. When ready to eat, thaw in the fridge overnight before reheating. {{image_4}} If you want a meatless option, use roasted veggies. Zucchini, bell peppers, and mushrooms work great. You can also use canned black beans for protein. They add a nice texture and flavor. Replace the chicken with these veggies in the recipe. The creamy cheese mixture pairs well with any veggie choice. Get creative with your fillings! Shredded turkey or beef adds a nice twist. You can also use smoked salmon for a gourmet touch. For a spicy kick, try adding jalapeños or hot sauce to your mix. Experiment with different cheeses too, like cheddar or pepper jack. Each option brings a new flavor and keeps the wraps fun. Dipping sauces can elevate your wraps. Marinara sauce adds a classic touch. Ranch dressing offers a creamy option. For something bold, try a spicy aioli or chipotle sauce. These sauces not only add flavor but also make eating the wraps more fun. Customize your sauce choice to match your mood or meal theme. Enjoy the full recipe to guide your cooking adventure! After making your cheesy garlic chicken wraps, let them cool completely. Place the wraps in an airtight container. Store them in the fridge. They will stay fresh for about 3 days. If you want to keep them longer, consider freezing instead. To freeze your wraps, wrap each one in plastic wrap. Then, place them in a freezer bag. Be sure to remove as much air as possible. This helps prevent freezer burn. You can freeze these wraps for up to 2 months. When you're ready to eat, simply thaw them in the fridge overnight. When stored properly in the fridge, your wraps last about 3 days. In the freezer, they can last up to 2 months. Always check for signs of spoilage before eating. If they look or smell off, it’s best to toss them. For detailed storage and recipe information, check the full recipe. Yes, you can use many types of cheese. Cheddar, pepper jack, or feta are great choices. Each will give a unique taste. Try mixing different cheeses for fun flavors. Just remember, the cheese should melt well for that gooey texture. To reheat your wraps, use a skillet over medium heat. This keeps the outside crispy while warming the inside. Cook for about 3-4 minutes on each side. You can also use an oven. Wrap them in foil and bake at 350°F (175°C) for 10-15 minutes. This method helps the cheese melt nicely. You can make these wraps healthier by using whole wheat tortillas. Add more veggies like bell peppers or zucchini. Swap the cream cheese for Greek yogurt to cut calories. You can also use grilled chicken instead of cooked chicken for a fresh taste. These small changes can boost nutrition without losing flavor. Cheesy garlic chicken wraps are simple and fun to make. We covered key ingredients, step-by-step prep, and cooking tips. You can add your spin with optional ingredients or try vegetarian options. These wraps store well and reheat easily. Feel free to experiment with different cheeses and sauces. Enjoy crafting a meal that fits your taste and diet. Wrap up your cooking adventure with these delicious ideas!

Cheesy Garlic Chicken Wraps

Craving a quick and flavorful meal? Try these cheesy garlic chicken wraps that are sure to impress! Packed with tender chicken, gooey cheese, and aromatic garlic, this recipe is easy to follow and customize to your taste. Whether you're cooking for family or friends, these wraps will be a hit. Discover the step-by-step guide and tips to make them perfect. Click through for the full recipe and start wrapping up deliciousness today!

Ingredients
  

1 lb (450g) chicken breast, cooked and shredded

1 cup shredded mozzarella cheese

1/2 cup cream cheese, softened to room temperature

1/4 cup sour cream

3 cloves garlic, minced

1 teaspoon dried oregano

1 teaspoon garlic powder

1/2 teaspoon smoked paprika

Salt and pepper to taste

4 large flour tortillas

Fresh spinach leaves (optional)

Olive oil for cooking

Instructions
 

In a large mixing bowl, combine the cooked and shredded chicken with the shredded mozzarella cheese, softened cream cheese, sour cream, minced garlic, dried oregano, garlic powder, smoked paprika, salt, and pepper. Stir the mixture until all ingredients are thoroughly combined and form a creamy filling.

    Prepare your tortillas by laying them out on a clean, flat surface. If you wish to add freshness, layer a few fresh spinach leaves in the center of each tortilla to provide a nice crunch and color.

      Take a generous spoonful of the cheesy chicken mixture and place an equal portion in the center of each tortilla, ensuring there is some space along the edges for folding.

        To wrap, fold in the sides of the tortilla toward the center, then start rolling it up tightly from the bottom edge to the top, sealing the filling inside securely.

          Heat a skillet over medium heat and drizzle in a splash of olive oil, allowing it to heat up.

            Carefully place the wraps seam-side down in the skillet. Cook for approximately 3-4 minutes, or until the bottom side turns golden brown and crispy. Flip the wraps and continue cooking the other side for another 3-4 minutes to achieve the same golden, crispy finish.

              Once both sides of the wraps are beautifully browned and the cheese inside has melted, remove them from the skillet. Let the wraps cool for a minute or two before slicing them in half for easier eating.

                Prep Time, Total Time, Servings: 15 min | 25 min | 4 servings

                  - Presentation Tips: Serve the wraps with small bowls of marinara sauce or ranch dressing for dipping. For an added touch, garnish the plates with fresh herbs such as parsley or basil, which will enhance both the color and flavor of the dish!

                    WANT TO SAVE THIS RECIPE?

                    Leave a Comment

                    Recipe Rating