Hungry for a snack that’s both cheesy and easy to make? You’re in the right place! In this guide, I’ll show you how to whip up delicious cheese breadsticks that are perfect for any occasion. With simple ingredients and straight-forward steps, you’ll impress your friends and family in no time. Get ready to savor rich flavors and enjoy crispy, golden treats right out of your oven! Let’s dive in!
Ingredients
Main Ingredients for Cheese Breadsticks
To make these cheese breadsticks, gather the following ingredients:
– 2 cups all-purpose flour
– 1 tablespoon baking powder
– 1 teaspoon garlic powder
– ½ teaspoon salt
– 3 tablespoons olive oil
– 3/4 cup milk (dairy or non-dairy)
– 1 cup shredded mozzarella cheese
– 1 tablespoon fresh parsley, finely chopped (optional)
– ½ teaspoon crushed red pepper flakes (optional, for added heat)
– Extra olive oil for brushing
– ¼ cup grated Parmesan cheese
The base of these breadsticks is simple yet delicious. The flour gives the breadsticks their structure, while baking powder helps them rise. Garlic powder adds a savory touch that pairs well with cheese. For cheese, I love using mozzarella for its meltiness. You can also try cheddar for a sharper taste or gouda for a smoky flavor.
Optional Ingredients
Feel free to enhance your breadsticks with these add-ins:
– Fresh herbs like rosemary or thyme
– Spices such as Italian seasoning or paprika
– Gluten-free flour blends like almond flour or coconut flour
Adding herbs or spices can bring new layers of flavor to your breadsticks. If you want a bit of heat, crushed red pepper flakes work great. For those needing gluten-free options, using a gluten-free flour blend can help you enjoy these treats without worry.
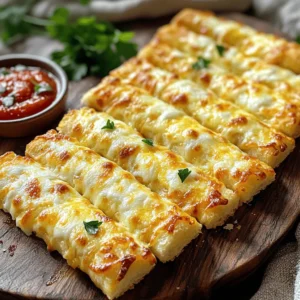
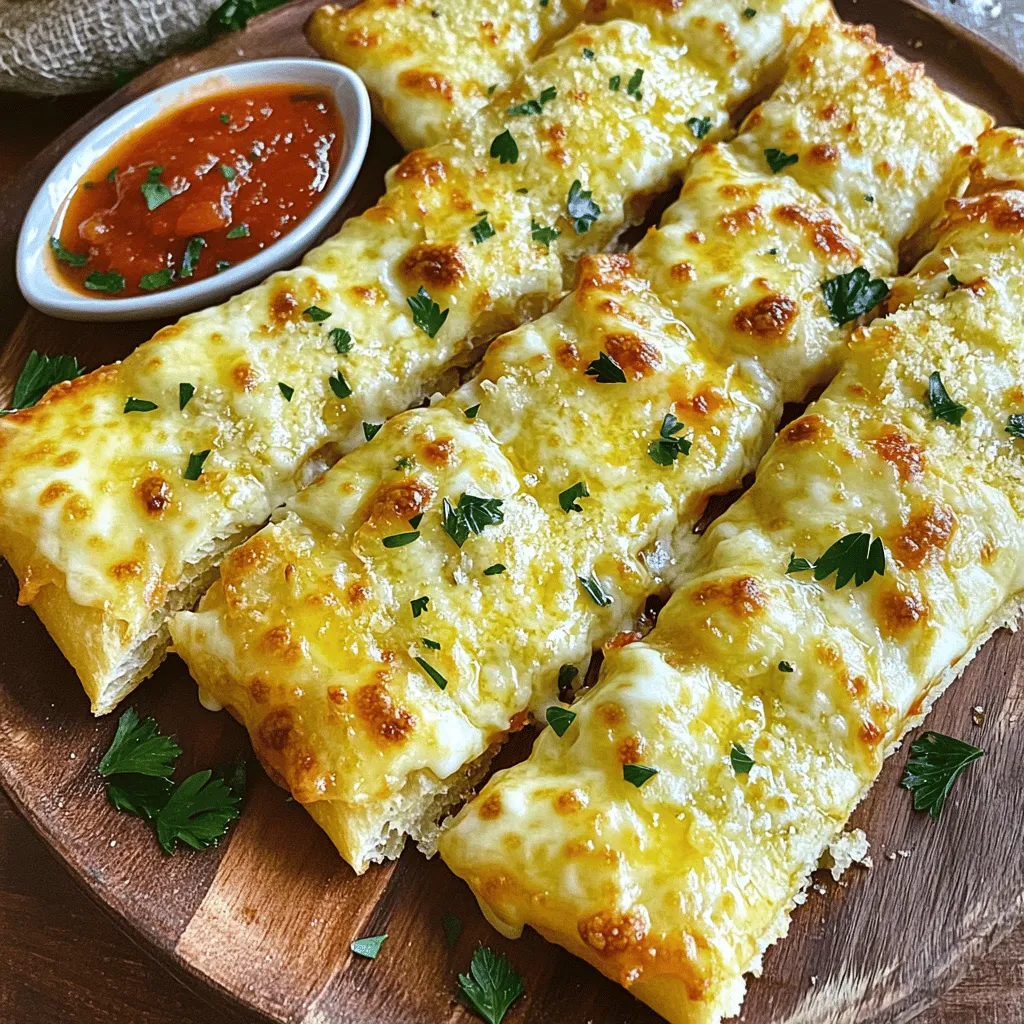
For the full recipe, check out the Cheesy Garlic Bliss Breadsticks!
Step-by-Step Instructions
Prepping the Dough
Start by mixing the dry ingredients. In a large bowl, combine the following:
– 2 cups all-purpose flour
– 1 tablespoon baking powder
– 1 teaspoon garlic powder
– ½ teaspoon salt
Whisk these together until they are well mixed. Look for no lumps in the mix.
Next, create a well in the center of your dry mix. Pour in:
– 3 tablespoons olive oil
– ¾ cup milk
Stir this mixture with a spoon or spatula. Stop when a sticky dough forms. Gently fold in 1 cup of shredded mozzarella cheese. If you like, add 1 tablespoon of chopped parsley and ½ teaspoon of crushed red pepper flakes for more flavor.
Shaping and Baking
Now it’s time to knead and roll the dough. Lightly flour your work surface. Turn the dough onto it. Knead the dough gently for about 1 minute. Aim for a smooth dough that feels cohesive.
Use a rolling pin to roll the dough into a rectangle. Make it about ½ inch thick. With a sharp knife or pizza cutter, cut the dough into strips. Choose the width you prefer.
Transfer the strips to your lined baking sheet. Space them about 1 inch apart. This gives them room to rise as they bake.
Final Touches
Before baking, brush the tops of each breadstick with extra olive oil. This adds flavor and gives them a nice sheen. Sprinkle ¼ cup of grated Parmesan cheese evenly over the tops.
Now, place the baking sheet in your preheated oven at 425°F (220°C). Bake for 12-15 minutes. Look for a golden brown color. Once they are done, remove them from the oven. Let them cool slightly on the baking sheet to enhance the flavor.
For the full recipe, check out the earlier section. Enjoy your cheesy breadsticks!
Tips & Tricks
Perfecting the Breadsticks
To make your cheese breadsticks great, kneading is key. I suggest kneading the dough gently for about one minute. This helps the dough become smooth but not tough. Over-kneading can make them chewy.
To get that perfect golden color, brush the tops with olive oil before baking. This step gives them a lovely shine and rich flavor. Bake at 425°F for 12-15 minutes. Keep an eye on them to avoid burning.
Serving Suggestions
For dips, marinara sauce is a classic choice. It adds a nice tang to the rich cheese. You could also try creamy garlic butter for a savory twist.
When serving, I love to arrange the warm breadsticks in a fanned-out position. This makes them look fancy on the plate. Sprinkle some fresh parsley on top for a pop of color. Enjoy your tasty breadsticks!
For the full recipe, check out the Cheesy Garlic Bliss Breadsticks.
Variations
Cheese Varieties
You can use many cheese types for your breadsticks. Each cheese brings a unique flavor. Here are some favorites:
– Cheddar: This cheese gives a sharp taste. It pairs well with garlic.
– Gouda: This cheese is creamy and nutty. It melts beautifully.
– Parmesan: This cheese adds a salty kick. Sprinkle it on top for extra flavor.
– Mozzarella: This cheese keeps it classic. It melts and stretches, making each bite fun.
Choosing the right cheese can change your breadsticks’ taste. Mix and match for fun flavors!
Dietary Alternatives
If you want to make cheese breadsticks fit your diet, here are some ideas:
– Vegetarian: All the cheeses listed are vegetarian-friendly. Use plant-based cheese for a dairy-free option.
– Gluten-Free: Substitute all-purpose flour with gluten-free flour blends. This keeps the texture light.
– Dairy-Free: Use non-dairy milk and cheese. Almond or oat milk works great.
For a twist, add spices like paprika or Italian herbs. You can also top with seeds like sesame or poppy for crunch. Experiment to find your favorite mix!
Storage Info
Storage Recommendations
To keep your cheese breadsticks fresh, store them in an airtight container. This helps keep moisture in but prevents them from getting soggy. Place a paper towel at the bottom of the container to absorb extra moisture.
If you have leftover breadsticks, you can freeze them. Wrap each one in plastic wrap. Then, place them in a freezer bag. This way, they stay fresh for up to three months. When you’re ready to enjoy them again, just take out as many as you need.
Reheating Instructions
Reheating your cheese breadsticks is easy. The best methods are using an oven or toaster oven. Preheat your oven to 350°F (175°C). Place the breadsticks on a baking sheet for about 5-10 minutes. This keeps them warm and crispy.
If you want to avoid sogginess, do not use the microwave. The microwave can make them soft and chewy. To keep them from drying out, cover them in foil while reheating. Enjoy them warm for the best flavor.
For the full recipe, check out the detailed instructions.
FAQs
What is the best type of cheese for cheese breadsticks?
The best cheese for cheese breadsticks is mozzarella. It melts well and gives a nice stretch. Other great options are cheddar and gouda. Cheddar adds sharpness, while gouda offers a sweet, nutty taste. Mixing cheeses can also enhance flavor and texture. Using a blend creates a more complex taste that keeps everyone guessing.
Can I make cheese breadsticks ahead of time?
Yes, you can make cheese breadsticks ahead of time! Prepare the dough and cut it into strips. Store the strips in an airtight container in the fridge for up to two days. When you’re ready to bake, just take them out and let them sit for a few minutes. This way, you save time when guests arrive or during busy weeknights.
How to make cheese breadsticks without yeast?
You can make cheese breadsticks without yeast by using baking powder instead. This helps the breadsticks rise and stay fluffy. Start by mixing your dry ingredients, like flour, baking powder, and salt. Then, add the wet ingredients and cheese. Knead the dough gently and roll it out. This method gives you quick and easy breadsticks without the wait for yeast to rise.
What dipping sauces pair well with cheese breadsticks?
Several tasty sauces pair well with cheese breadsticks. Marinara sauce is classic and always a hit. You can also try garlic butter for a rich flavor. To make garlic butter, simply melt butter and mix in minced garlic. For a zesty option, mix sour cream with ranch seasoning. These sauces add a fun twist to every bite.
How long do cheese breadsticks last?
Cheese breadsticks last about three days when stored properly. Keep them in an airtight container at room temperature. If you want to keep them longer, freeze them! Wrap each breadstick in plastic wrap, then place them in a freezer bag. They can last up to three months in the freezer. Just reheat them in the oven for fresh-tasting breadsticks.
Cheese breadsticks are simple and fun to make. We covered the key ingredients, how to prep the dough, and tips for baking. I shared variations to suit your taste and dietary needs. Remember, the right cheese and seasoning can elevate your breadsticks. Feel free to try different herbs, dips, and cheeses. Follow the storage advice to keep them fresh for later. Enjoy making these treats. Each bite will be worth it! Keep experimenting to find your perfect version.