Salads

To make a tasty BLT Chicken Salad, you need the following ingredients: - 2 cups cooked chicken, shredded or diced - 4 cups romaine lettuce, chopped into bite-sized pieces - 1 cup cherry tomatoes, halved - 1 cup crispy iceberg lettuce, chopped for added crunch - 1/2 cup cucumber, diced into small pieces - 1/4 cup red onion, thinly sliced for a sharp flavor - 4 slices of crispy turkey bacon, chopped into small bits (substitute with regular bacon if desired) - 1/2 cup mayonnaise for creaminess - 2 tablespoons Greek yogurt to lighten the dressing - 1 tablespoon freshly squeezed lemon juice for brightness - 1 teaspoon garlic powder for depth of flavor - Salt and pepper to taste for seasoning - Fresh chives, chopped, for a vibrant garnish You can easily swap some ingredients if needed. Here are a few ideas: - Use rotisserie chicken for quick prep. - Substitute regular bacon for turkey bacon for a richer taste. - Swap Greek yogurt with sour cream if you prefer. - Try spinach or mixed greens instead of romaine for a different green. - Add avocado for creaminess and healthy fats. To prepare this delicious salad, you will need: - A large mixing bowl for the salad - A separate small bowl for the dressing - A whisk for mixing the dressing - A cutting board and knife for chopping - A spatula or spoon for tossing the salad - Measuring cups and spoons for accuracy With these ingredients and tools, you can create a refreshing and flavorful BLT Chicken Salad. Enjoy the burst of flavors in every bite! For the full recipe, check out the [Full Recipe]. Start by getting a large mixing bowl. Add 2 cups of cooked chicken. You can shred or dice it. Next, toss in 4 cups of chopped romaine lettuce. This will be the base. Then, add 1 cup of halved cherry tomatoes for sweetness. Don’t forget 1 cup of crispy iceberg lettuce to add crunch. Now, chop 1/2 cup of cucumber into small pieces. Add that to the bowl. For a sharp flavor, slice 1/4 cup of red onion thinly and mix it in. Finally, chop 4 slices of crispy turkey bacon into small bits. This adds a salty bite. Gently toss everything to mix well. In a separate small bowl, combine 1/2 cup of mayonnaise and 2 tablespoons of Greek yogurt. This mix makes the dressing creamy. Add 1 tablespoon of freshly squeezed lemon juice for brightness. Next, sprinkle in 1 teaspoon of garlic powder for depth. Season with salt and pepper to taste. Whisk all these ingredients together. Keep whisking until the dressing is smooth. This creamy dressing will tie the salad together. Drizzle the dressing over your salad mix in the large bowl. Toss everything together gently. Make sure all the ingredients are coated well. Taste the salad and add more salt or pepper if you want. Now, cover the bowl and place it in the refrigerator. Let it chill for about 10 minutes. This helps the flavors blend. Before serving, sprinkle with freshly chopped chives. They add a nice color and flavor. You now have a tasty BLT chicken salad ready to enjoy! For the full recipe, check the complete details above. To make a great dressing, balance is key. Use creamy mayo for richness, but add Greek yogurt to lighten it. This combo gives you a smooth texture without being too heavy. Fresh lemon juice adds brightness, while garlic powder brings depth. Mix them well to ensure each bite is flavorful. Taste as you go! Adjust salt and pepper to fit your liking. Serve your BLT chicken salad cold for the best taste. I like to pile it on a bed of greens or in a wrap. You can add crunchy croutons for extra texture or serve it with pita chips. For a fun twist, try it in a lettuce wrap. This keeps it fresh and light! This recipe makes four servings. Each serving is about 1.5 cups. For nutrition, you get protein from chicken and bacon. The salad is also packed with veggies. Each serving has roughly 350 calories, depending on your dressing and bacon type. This makes it a tasty option that fits into a balanced meal plan. For the full recipe, check out the full recipe link. {{image_4}} You can switch up the protein in your BLT Chicken Salad. If you want a change, try using grilled shrimp or diced turkey. Both options add a nice flavor and texture. You can also use rotisserie chicken for a quick fix. It saves time and keeps the taste delightful. For a vegan or vegetarian version, replace chicken with chickpeas or tofu. Both ingredients absorb flavors well and add protein. Swap turkey bacon for crispy tempeh or coconut bacon. These choices keep the crunch and smoky taste in your salad. Use vegan mayonnaise to create a creamy dressing without animal products. Seasonal swaps can make your salad fresh and fun. In summer, add fresh corn or bell peppers for sweetness. In fall, try roasted squash or apples for a sweet touch. These ingredients keep your salad vibrant and exciting. They also add new flavors while staying true to the BLT spirit. For the complete recipe, check out the Full Recipe. To store leftovers, place the salad in an airtight container. This keeps it fresh and prevents odors. If you have extra dressing, store it separately. This helps the salad stay crisp. Always chill the container in the fridge. When properly stored, the BLT chicken salad lasts about 3 days in the fridge. After this time, the lettuce may wilt and the flavors fade. Always check for any signs of spoilage before eating. If it looks or smells off, it’s best to toss it. This salad is best enjoyed cold, so reheating is not recommended. If the salad seems a bit sad, add a splash of lemon juice or a bit more dressing. This will revive the flavors and freshness. Enjoy your salad's tasty crunch! For the full recipe, check the section above. The BLT Chicken Salad comes from the classic BLT sandwich. BLT stands for bacon, lettuce, and tomato. People wanted to enjoy these tasty flavors in a salad form. So, they added chicken to make it heartier. The chicken adds protein, making it a full meal. This salad blends freshness with comfort, making it loved by many. Yes, you can make this salad ahead of time. It’s great for meal prep! You can mix the chicken, lettuce, tomatoes, and bacon together. Just keep the dressing separate until you are ready to eat. This helps keep the greens crisp. You can store the salad in the fridge for up to two days. Just remember to add the dressing right before serving for the best taste. To keep your BLT Chicken Salad fresh, store it in an airtight container. This helps prevent air from wilting the greens. You can also place a paper towel in the container. This will soak up any extra moisture and keep your salad crisp. If you have leftovers, try to eat them within two days for the best flavor and texture. This blog post covered how to make a tasty BLT Chicken Salad. We shared the ingredients needed, how to prepare the salad, and tips for serving. You learned about ingredient swaps, storage tips, and how to keep your salad fresh. In summary, enjoy your salad by trying different variations. With these steps, you can create a dish everyone will love. Happy cooking!
Savory BLT Chicken Salad Easy and Tasty Recipe
If you’re on the hunt for a fresh, tasty meal, you’ve hit the jackpot! My Savory BLT Chicken Salad is easy to make and full
To make a Cowboy Salad, you need fresh and colorful ingredients. Here’s the full list: - 2 cups romaine lettuce, chopped - 1 cup cherry tomatoes, halved - 1 cup canned black beans, rinsed and drained - 1 cup corn kernels (fresh or canned) - 1 ripe avocado, diced - 1 cup bell peppers, diced - 1/2 red onion, finely chopped - 1/2 cup shredded cheddar cheese - 1/4 cup fresh cilantro, chopped - 1/4 cup extra virgin olive oil - 2 tablespoons freshly squeezed lime juice - 1 teaspoon cumin powder - Salt and freshly cracked pepper to taste - 1/2 cup tortilla chips, crushed Each ingredient brings its flavor and texture. The romaine lettuce serves as a crunchy base. Cherry tomatoes add sweetness and color. Black beans give protein and earthiness. Corn adds sweetness, while avocado brings creaminess. Bell peppers add a nice crunch. Red onion gives a little bite. Cheese adds richness. Cilantro brightens the dish. Lastly, the tortilla chips offer a fun crunch on top. Using fresh ingredients makes the salad vibrant and tasty. You can also mix and match based on what you have at home. For the complete Cowboy Salad recipe, check out the Full Recipe. 1. Start by layering the romaine lettuce in a large salad bowl. This makes a nice base. 2. Next, distribute the cherry tomatoes, black beans, and corn over the lettuce. This adds color and flavor. 3. Now, add the diced avocado, bell peppers, and red onion on top. These ingredients make the salad fresh and crunchy. 1. In a small bowl, whisk together the olive oil, lime juice, cumin, salt, and pepper. This dressing gives the salad a zesty kick. 1. Drizzle the dressing over the salad and toss gently. Be careful not to mash the avocado. 2. Finally, top the salad with shredded cheese, chopped cilantro, and crushed tortilla chips. This will create a delightful crunch and make it look beautiful. For the full recipe, check out the detailed instructions above! Enjoy your Cowboy Salad! - Store leftovers in an airtight container. - Use a glass or plastic container for easy stacking. - Keep salad dressing separate to maintain freshness. - Always refrigerate to keep ingredients crisp. - Pair Cowboy Salad with grilled chicken for extra protein. - Serve it alongside tacos for a fun meal. - Garnish with extra lime wedges for a zesty touch. - Add a sprinkle of chili powder for a kick. - If you dislike avocados, try using hummus for creaminess. - Swap cheddar cheese with a vegan cheese option. - For a nutty flavor, add sunflower seeds instead of cheese. - Use chickpeas instead of black beans for a different twist. You can find the Full Recipe of Cowboy Salad for more details. {{image_4}} You can boost the protein in your Cowboy Salad. Adding grilled chicken makes it hearty and filling. Just slice the chicken and toss it in. If you want a meatless option, try tofu. Simply cube it and pan-sear until golden. Shrimp is another tasty choice. Cook them with a bit of seasoning, then mix them in. These options make the salad more satisfying. Don’t be shy to change the flavors! You can use different dressings to keep things fresh. A honey mustard dressing adds a sweet kick. For a zesty twist, try a chipotle dressing. You can also add spices like paprika or chili powder for heat. Experimenting with dressings and spices can elevate your Cowboy Salad to new heights. Using seasonal ingredients can make your salad even better. In spring, add fresh peas or asparagus for a crunch. Summer is great for juicy fruits like peaches or strawberries. In fall, roasted squash or apples add warmth. Winter might call for hearty greens like kale. Adapting the salad to the season keeps it exciting and fresh. Each serving of Cowboy Salad has about: - Calories: 300 - Protein: 10 grams - Fat: 18 grams - Carbohydrates: 30 grams This salad packs a punch with fresh flavors and crunchy textures. You get healthy fats from avocados and cheese, plus fiber from beans and veggies. Cowboy Salad is not just tasty; it has many health perks: - Avocados: Great for heart health. They contain good fats and vitamins. - Beans: High in fiber and protein. They help you feel full longer. - Greens: Leafy greens boost your immune system. They are rich in vitamins A and C. These ingredients work together to support your overall health, making this salad a smart choice. Cowboy Salad is perfect for many diets: - Gluten-free: All ingredients are naturally gluten-free. - Vegetarian: The salad uses no meat or animal products. - Vegan: You can skip the cheese for a vegan option. This salad fits a variety of dietary needs, making it a great meal for everyone. For the full recipe, check out the Cowboy Salad section. Cowboy Salad is a hearty dish that blends fresh veggies and bold flavors. It often features ingredients like romaine lettuce, black beans, corn, and avocado. This salad has roots in Western cuisine, inspired by the flavors of the American Southwest. It reflects the rugged yet vibrant lifestyle of cowboys, who valued both nourishment and taste. The mix of colors and textures makes it fun and appealing to eat. Yes, you can make Cowboy Salad ahead of time. It is great for meal prep. Just cut and store the veggies in the fridge. Keep the dressing separate until you are ready to eat. This helps the salad stay fresh and crunchy. You can prep it a day in advance for a quick lunch or dinner. A simple olive oil and lime dressing works best with Cowboy Salad. You can whisk together olive oil, lime juice, cumin, salt, and pepper. This dressing adds a zesty kick that enhances the flavors. For a creamier option, try ranch or a yogurt-based dressing. Both choices complement the salad well. To make Cowboy Salad more filling, add protein. Grilled chicken, shrimp, or tofu are great options. You can also include quinoa or brown rice for extra carbs. Adding nuts or seeds can boost the texture too. These additions will turn your salad into a complete meal. For the full recipe, check out the Cowboy Salad details. Cowboy salad combines fresh ingredients into a delicious and healthy dish. We covered everything from the basic ingredients to preparation steps and variations. You can enjoy this salad any time of the year. With ideas for storage, protein additions, and dietary options, you can customize it to fit your needs. This salad is easy to make and full of flavor. Try it out and enjoy the many benefits it offers. You’ll find it satisfying and fun to share with friends and family.
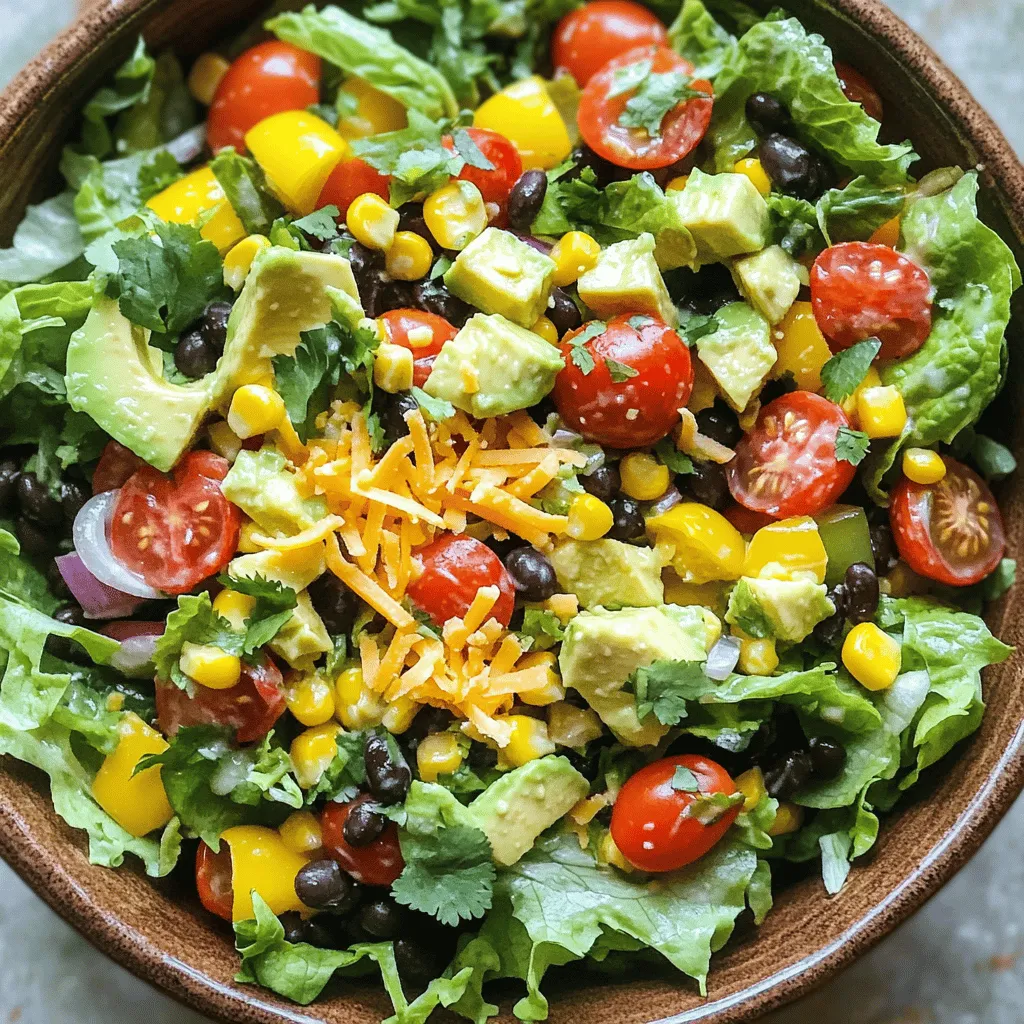
Cowboy Salad Crunchy and Flavorful Meal Idea
Looking for a fresh and exciting meal idea? Meet Cowboy Salad! This colorful dish bursts with flavor and crunch. Packed with veggies, protein, and a
To make the Honeycrisp Apple Broccoli Salad, gather these fresh and tasty items: - 2 cups fresh broccoli florets - 1 large Honeycrisp apple, cored and diced into bite-sized pieces - 1 cup shredded carrots (about 2 medium carrots) - 1/2 cup red onion, thinly sliced - 1/2 cup dried cranberries for a sweet touch - 1/2 cup toasted walnuts (or substitute with pecans for a different flavor) - 1/4 cup plain Greek yogurt for creaminess - 2 tablespoons apple cider vinegar to add tang - 1 tablespoon honey for natural sweetness - Salt and black pepper to taste This salad is not only delicious but also healthy. Here’s what you get per serving: - Calories: Approximately 180 - Protein: 5 grams - Carbohydrates: 27 grams - Fiber: 4 grams - Sugars: 10 grams - Fat: 7 grams The Honeycrisp apple adds vitamin C, while broccoli brings in vitamin K. The walnuts give healthy fats, making this salad a nutrient-packed choice. When picking fresh produce, look for vibrant colors and firm textures. For broccoli: - Choose florets that are bright green and tightly packed. - Avoid any with yellowing or wilting leaves. For apples: - Select Honeycrisp apples that feel firm and have smooth skin. - A sweet smell often means good flavor. Fresh ingredients make all the difference in your salad. To start, fill a pot with water and bring it to a boil. Next, add the fresh broccoli florets. Blanch them for about 2-3 minutes. This makes them bright green and slightly tender. Once done, quickly transfer the florets into an ice bath. This stops the cooking and keeps their color vibrant. After a few minutes, drain the broccoli and set it aside. In a large bowl, add the diced Honeycrisp apple, shredded carrots, thinly sliced red onion, dried cranberries, and toasted walnuts. These ingredients work well together, creating a crunch that you will love. Gently stir them to combine, making sure every piece is included. Now, grab a small bowl. Whisk together the plain Greek yogurt, apple cider vinegar, honey, salt, and black pepper. Mix until you have a smooth and creamy dressing. This will bring the salad together and add great flavor. Pour the dressing over the salad base. Use a spatula or a large spoon to toss everything gently. Make sure the fruits and vegetables are well coated with the dressing. This step is key to blending all the delicious flavors. After combining all the ingredients, cover the salad with plastic wrap. Place it in the refrigerator for at least 30 minutes. This chilling time allows the flavors to meld and intensify. Trust me, it makes a big difference! You can find the full recipe and details in the [Full Recipe]. Enjoy your fresh and crisp salad! To make the best Honeycrisp Apple Broccoli Salad, start with fresh ingredients. Choose bright green broccoli florets. They should feel firm and look vibrant. For the Honeycrisp apple, pick one that is crisp and fragrant. This ensures a sweet and juicy bite. When you prepare the broccoli, blanch it quickly. This keeps it crunchy and colorful. Use an ice bath right after cooking. It stops the cooking process and helps keep that bright green color. To boost the flavors, balance sweetness with tang. The Honeycrisp apple adds natural sweetness. The apple cider vinegar adds a nice tang. It’s important to mix the dressing well. This helps coat all the salad ingredients evenly. You can add spices for more depth. A pinch of cinnamon can bring warmth. If you like spice, try a dash of cayenne pepper. This adds a fun kick to your salad. Presentation makes food more appealing. Serve the salad in a bright bowl to draw the eye. Garnish it with extra walnuts and cranberries. This adds texture and color. You can also serve individual portions in cups. This makes it easy for guests to grab and enjoy. For a special touch, consider adding fresh herbs like parsley or mint on top. They add freshness and a pop of green. For the complete recipe, check out the Full Recipe section. {{image_4}} You can change ingredients for your taste. If you want a crunchier texture, try adding chopped celery. For a sweeter kick, diced pears work well too. If you don’t have Greek yogurt, use sour cream or a dairy-free option. You can swap walnuts with sunflower seeds for a nut-free salad. These substitutions can keep your salad fresh and exciting. To make your salad more filling, add proteins. Grilled chicken or turkey slices mix well with the flavors. For a vegetarian option, consider chickpeas or black beans. Both add protein and fiber. You can also sprinkle feta cheese for creamy goodness. These additions turn a light dish into a satisfying meal. Seasonal changes bring new flavors! In summer, add tomatoes or cucumbers for a refreshing twist. During fall, try roasted squash or pumpkin seeds for warmth. In winter, consider using Brussels sprouts or kale for a hearty base. These seasonal variations keep your Honeycrisp Apple Broccoli Salad fun and relevant all year round. Store leftover Honeycrisp apple broccoli salad in an airtight container. Use a container that fits the salad snugly. This helps keep it fresh and prevents the dressing from soaking in. Keep the salad in the fridge. It tastes best when cold. The salad lasts up to three days in the fridge. After three days, the veggies may get soggy. You can freeze the salad, but it won't taste as fresh. If you freeze it, only freeze the broccoli and the apples. The other ingredients do not freeze well. To revive leftover salad, add fresh ingredients. Chop up more apples or toss in fresh nuts. You can also add a splash of apple cider vinegar or a drizzle of honey. This will help refresh the flavors. Mixing in new ingredients makes it feel like a brand-new dish. For the full recipe, check out the Honeycrisp Apple Broccoli Salad. Yes, you can use other apples. Try Gala or Fuji apples for sweetness. They both add a nice crunch. Just remember that the flavor will change a bit. Honeycrisp apples are sweet and crisp. They balance the salad's flavors well. You can store this salad for about three days. Keep it in the fridge in an airtight container. The apples and broccoli stay fresh, but the dressing may soften the veggies over time. Enjoy it as soon as you can for the best taste. You can try several dressings. A simple vinaigrette works great. Mix olive oil and lemon juice for a zesty flavor. You can also use a creamy ranch or a tahini dressing. These options will give the salad a new twist. Yes, this salad is perfect for meal prep. You can make it ahead and store it. Just keep the dressing separate until you’re ready to eat. This way, the salad stays fresh and crunchy. Pack it in individual containers for easy lunches. To make this salad vegan, swap the Greek yogurt for a plant-based yogurt. You can use almond or coconut yogurt. Replace honey with maple syrup for sweetness. These changes keep the salad tasty and plant-based. Enjoy your wholesome meal! For the full recipe, check out the Honeycrisp Apple Broccoli Salad. This blog post covered how to make Honeycrisp Apple Broccoli Salad. We began with the key ingredients and their nutritional value. I shared tips for selecting fresh produce. Then, I provided detailed steps for preparation and mixing. I included effective tips for enhancing flavor and presentation. Variations let you customize with different ingredients or proteins. I also covered essential storage info and answered common questions. In short, this salad is healthy, easy, and fun to make. Enjoy your culinary journey with fresh ingredients!
Honeycrisp Apple Broccoli Salad Fresh and Crisp Dish
Looking for a fresh and crisp dish that pops with flavor? This Honeycrisp Apple Broccoli Salad checks all the boxes! With its crunchy broccoli and
To make tasty avocado egg salad lettuce wraps, gather these simple ingredients: - 4 hard-boiled eggs, chopped - 1 ripe avocado, mashed - 2 tablespoons Greek yogurt - 1 tablespoon Dijon mustard - 1 tablespoon fresh lemon juice - Salt and pepper to taste - 1/4 cup green onions, finely chopped - 1/4 cup celery, finely chopped - 1 head of romaine lettuce or butter lettuce, leaves separated If you run out of an ingredient, don't worry! Here are some substitutes you can use: - Replace Greek yogurt with sour cream for a creamier texture. - If you don’t have Dijon mustard, use yellow mustard instead. - Swap lemon juice with lime juice for a zesty twist. - For more crunch, use diced bell peppers instead of celery. This avocado egg salad lettuce wrap is not just tasty but also nutritious. Here’s what you get per serving (assuming 6 servings): - Calories: 150 - Protein: 7g - Fat: 10g - Carbohydrates: 8g - Fiber: 4g These wraps are high in healthy fats from avocado and packed with protein from eggs. They make a great low-carb option! Enjoy knowing you’re treating your body well while savoring each bite. {{ingredient_image_1}} 1. Start by chopping the hard-boiled eggs in a bowl. 2. Next, mash the ripe avocado and mix it with the eggs. 3. Then, add the Greek yogurt and Dijon mustard. Stir until smooth. 4. Squeeze in fresh lemon juice and mix well. 5. Now, season with salt and pepper to taste. 6. Fold in finely chopped green onions and celery. Make sure it’s even. 7. Take a lettuce leaf and spoon the mixture into the center. 8. Wrap the leaf around the filling to create a tasty handheld wrap. 9. Repeat this until you use all the mixture. Enjoy these wraps fresh! - Use ripe avocados for a creamy texture. - Fresh lemon juice brightens the flavors. - Adjust salt and pepper to your taste. - Mix the salad gently to avoid smashing the eggs. - Serve the salad immediately for the best taste. - Present the wraps on a wooden platter for a rustic look. - Add lemon wedges for a fresh garnish. - Sprinkle paprika or chili flakes for extra flavor and color. - Pair with a side of fresh veggies or fruit for balance. - Enjoy with a refreshing drink to complete the meal. One common mistake is over-mashing the avocado. You want some texture. If you mash it too much, the egg salad will turn mushy. Also, avoid adding too much salt at once. Start with a pinch and taste as you go. Another mistake is skipping the lemon juice. This adds freshness and keeps the avocado from browning. Lastly, don't forget to chop your green onions and celery finely. Big chunks can overpower the salad. To elevate the flavor, consider adding fresh herbs like dill or cilantro. These herbs pair well with the creamy avocado. You can also try using different mustards, like whole grain. This adds a nice crunch and depth. A dash of hot sauce can bring some heat if you enjoy spice. Lastly, a sprinkle of paprika or chili flakes on top gives a pop of color and flavor. For storing leftovers, place the egg salad in an airtight container. It stays fresh for about three days in the fridge. Be sure to keep it chilled. If the salad starts to look brown, that's just the avocado oxidizing. Stir it up again to refresh it. Avoid freezing the egg salad, as it changes the texture. Fresh is always best for this dish! Pro Tips Use Fresh Ingredients: Make sure your avocados are ripe and your vegetables are fresh for the best flavor and texture in your wraps. Customize Your Seasoning: Feel free to experiment with herbs and spices like dill, paprika, or even a dash of hot sauce for a unique twist on the classic salad. Chill Before Serving: For a refreshing bite, chill the egg salad mixture in the refrigerator for about 30 minutes before serving, allowing the flavors to meld. Perfect Lettuce Selection: Romaine or butter lettuce works well, but you can also use collard greens or cabbage leaves for a sturdier wrap alternative. {{image_2}} You can make your avocado egg salad even heartier by adding chicken or tuna. Simply use cooked, shredded chicken or canned tuna. Mix it in with the egg and avocado base. This adds protein and makes your wraps more filling. You can use about one cup of either chicken or tuna. Adjust the seasoning to fit your taste. This variation is great for meal prep or a quick lunch. For a vegetarian twist, try adding beans or chickpeas. These add protein without meat. You can mash them and mix them with the avocado and eggs. Another option is to add diced bell peppers or cucumbers for extra crunch. This keeps the salad fresh and vibrant. You can also try adding grated carrots for sweetness. These additions make your wraps colorful and tasty while keeping them meat-free. Herbs and spices can elevate your avocado egg salad. Fresh herbs like dill or cilantro add bright flavors. Simply chop them finely and mix them in. You can also use spices like paprika or cumin for a warm taste. A pinch of garlic powder can add depth without being too strong. Experiment with these options to find your favorite flavor combination. These small changes can make a big difference in taste. To keep your avocado egg salad lettuce wraps fresh, store them correctly. Place the wraps in an airtight container. This helps maintain their crunch. If you plan to eat them later, keep the egg salad and lettuce separate. This way, the lettuce won't get soggy. Use parchment paper between layers if stacking them. It helps absorb moisture. Your avocado egg salad wraps can last about 2-3 days in the fridge. After that, the lettuce may wilt, and the salad may lose flavor. Always check for any odd smells or changes in texture before eating. If you see any signs of spoilage, it’s best to toss them out. Freezing these wraps is not recommended. The lettuce does not freeze well and turns mushy. Instead, you can freeze the avocado egg salad itself. Store it in a sealed container or freezer bag. It can last up to 3 months in the freezer. When ready to eat, thaw it in the fridge overnight. Prepare fresh lettuce wraps the next day for the best taste. Yes, you can use many kinds of lettuce. Butter lettuce and romaine work best. You can also use green leaf or even iceberg for a crisper bite. Just pick lettuce that holds its shape well. This choice will make your wraps fun and easy to eat. To make this avocado egg salad vegan, swap the eggs and Greek yogurt. Use mashed chickpeas instead of eggs for protein. You can also try silken tofu for creaminess. Add a splash of lemon juice for a fresh taste. This way, you still get a tasty salad without any animal products. Try these great side dishes to enjoy with your wraps: - Fresh vegetable sticks like carrots and cucumbers - A light fruit salad with berries and melon - Crispy baked sweet potato fries - A simple green salad with lemon vinaigrette These sides add color and flavor, making your meal complete and fun. This blog explored how to make a tasty avocado egg salad. You learned about ingredients, including substitutes and nutrition. We shared step-by-step instructions and tips for a perfect dish. We also covered common mistakes and fun variations to try. Lastly, we discussed storage tips to keep your salad fresh. Enjoy experimenting with the recipe and making it your own!
Delicious Avocado Egg Salad Lettuce Wraps Recipe
Looking for a fresh, healthy meal option? Try my delicious Avocado Egg Salad Lettuce Wraps! This quick and easy recipe is packed with nutrients and
To make Lemon Garlic Orzo Salad, gather these fresh ingredients: - 1 cup orzo pasta - 2 cups vegetable broth (or water) - 1 cup cherry tomatoes, halved - 1 cucumber, diced - 1 bell pepper (red or yellow), diced - 1/4 red onion, finely chopped - 1/4 cup fresh parsley, chopped - 1/4 cup feta cheese, crumbled (optional) - 3 tablespoons olive oil - 2 tablespoons lemon juice - 2 cloves garlic, minced - Salt and pepper to taste You can add a few extras to boost flavor and nutrition: - Avocado for creaminess - Olives for a briny bite - Chickpeas for extra protein - Spinach for added greens - Nuts like pine nuts or almonds for crunch This salad is not just tasty; it’s good for you too! Here’s why: - Orzo pasta is a great source of carbs for energy. - Olive oil has healthy fats that support heart health. - Garlic can help boost your immune system. - Cherry tomatoes are rich in vitamins and antioxidants. - Cucumbers keep you hydrated and are low in calories. - Parsley is full of vitamins A, C, and K. Eating this salad gives you a mix of nutrients that support overall wellness. Enjoy making it fresh and colorful! {{ingredient_image_1}} To start, boil two cups of vegetable broth or water in a medium saucepan. This adds flavor to the orzo. Once boiling, add one cup of orzo pasta. Cook it for about eight to ten minutes. You want the orzo to be al dente, meaning it should still have a slight bite. After cooking, drain the orzo using a colander. Rinse it under cold water. This stops the cooking process and cools it down. Set the orzo aside. While the orzo cooks, prepare the vegetables. Take one cup of cherry tomatoes and cut them in half. Next, dice one cucumber and one bell pepper. You can choose either a red or yellow bell pepper for color. Then, finely chop a quarter of a red onion. Finally, chop a quarter cup of fresh parsley. Combine all these fresh veggies in a large mixing bowl. They will add color and crunch to the salad. In a small bowl, whisk together three tablespoons of olive oil and two tablespoons of lemon juice. Add two cloves of minced garlic, salt, and pepper to taste. Whisk until the dressing is well mixed. Now, add the cooled orzo to the bowl with the vegetables. Pour the lemon garlic dressing over the mix. Toss everything together gently until well combined. If you like, fold in a quarter cup of crumbled feta cheese for extra creaminess. Taste your salad and adjust the seasoning if needed. Cover it and refrigerate for at least thirty minutes. This allows the flavors to blend beautifully. To cook orzo well, follow these steps: - Boil water or vegetable broth in a medium pan. - Add your orzo pasta and stir. - Cook until al dente, which takes about 8-10 minutes. - Drain it in a colander and rinse with cold water. This quick rinse stops the cooking. It helps keep the orzo from getting mushy. To boost the flavor of your Lemon Garlic Orzo Salad, try these tips: - Add fresh herbs like basil or mint for a bright taste. - Mix in olives for a salty kick. - Use different types of vinegar for a unique twist. - Toast the garlic briefly in olive oil before mixing it in. These options can elevate the dish. Each will add a new layer of flavor. For a stunning presentation, consider these ideas: - Serve the salad in a large, colorful bowl. - Use individual cups for a fun, personal touch. - Garnish with extra parsley and lemon wedges. - Drizzle a little olive oil on top before serving. These simple touches make your dish look inviting. A beautiful salad can make any meal special. Pro Tips Use Fresh Ingredients: Opt for fresh, seasonal vegetables to enhance the flavor and nutrition of your salad. Perfectly Cooked Orzo: Ensure your orzo is al dente for the best texture; overcooked pasta can become mushy. Add Extra Flavor: Consider adding olives or sun-dried tomatoes for a unique twist on the classic recipe. Chill Before Serving: Allowing the salad to chill for at least 30 minutes enhances the flavors and makes for a refreshing dish. {{image_2}} You can easily make this salad vegetarian or vegan. Simply skip the feta cheese for a vegan option. Replace it with a handful of nuts or seeds for extra crunch. Try adding avocado for creaminess. You can also use nutritional yeast to give a cheesy flavor without dairy. This salad is great year-round. In summer, add fresh basil or zucchini. In fall, you might enjoy roasted butternut squash or Brussels sprouts. Winter calls for roasted root vegetables, like carrots or beets. Spring is perfect for fresh peas or asparagus. The key is to use what is fresh and in season. You can serve this salad in many ways. As a side dish, it pairs well with grilled chicken or fish. For a main course, add protein like chickpeas or grilled shrimp. You can also serve it in a wrap or pita for a fun twist. No matter how you serve it, this salad shines bright on the table. To keep your Lemon Garlic Orzo Salad fresh, store it in an airtight container. Make sure to let the salad cool completely before sealing. This helps prevent moisture buildup. Place the container in the fridge. It will stay fresh for up to three days. If you added feta cheese, eat the salad sooner for the best taste. You can freeze this salad, but it may change texture. To freeze, put the salad in a freezer-safe container. Leave some space at the top for expansion. Seal tightly and label it with the date. It’s best to eat frozen salad within a month. Thaw in the fridge overnight before serving. Lemon Garlic Orzo Salad lasts about three days in the fridge. When ready to eat, check for any off smells or colors. If it looks and smells good, it’s safe to eat. You can enjoy this salad cold, straight from the fridge. If you prefer it warm, gently reheat it on the stove. Use low heat to avoid cooking it further. Stir often to heat evenly. Orzo pasta is a small, rice-shaped pasta. It cooks quickly and absorbs flavors well. It works great in salads or soups. I love using it in this Lemon Garlic Orzo Salad. The texture adds a nice bite to the dish, making it feel hearty and satisfying. Yes, you can make this salad ahead of time. I often prepare it a few hours before serving. This allows the flavors to blend and deepen. Just keep it in the fridge until you are ready to serve. If you want to replace feta cheese, try goat cheese or mozzarella. You could also skip cheese altogether for a lighter dish. For a vegan option, use avocado or a sprinkle of nutritional yeast. Each option brings its own flavor and texture. Lemon Garlic Orzo Salad will last in the fridge for about three days. Make sure to store it in an airtight container. Over time, the veggies may lose some crunch, but the taste will still be great. Absolutely! You can use any dressing you like. A balsamic vinaigrette or a creamy yogurt dressing would work well. Just make sure it complements the fresh flavors of the salad. Experiment and find your favorite! This blog covers all you need to know about making Lemon Garlic Orzo Salad. We explored key ingredients, their health benefits, and quick cooking steps. You learned tips for perfect orzo, how to boost flavors, and present the dish well. We shared variations for all diets and best practices for storing leftovers. Now you can create a delicious, healthy dish any time. Enjoy trying new ingredients and make it your own!
Lemon Garlic Orzo Salad Fresh and Flavorful Delight
Are you looking for a fresh, vibrant dish that bursts with flavor? My Lemon Garlic Orzo Salad is not just a meal; it’s an experience!
- 2 boneless, skinless chicken breasts - 2 tablespoons Cajun seasoning - 1 tablespoon olive oil I love starting with the chicken. It’s the star of this dish. I use two boneless, skinless chicken breasts. This keeps the salad lean and tasty. The Cajun seasoning adds a nice kick. I use two tablespoons for a rich flavor. A tablespoon of olive oil helps the seasoning stick and adds moisture. - 6 cups mixed salad greens - 1 cup cherry tomatoes, halved - 1/2 red onion, thinly sliced - 1 avocado, diced - 1/2 cup corn - 1/4 cup feta cheese Now for the salad parts! I like a mix of greens, like romaine and spinach. Six cups give a good base. I add a cup of halved cherry tomatoes for sweetness. A half red onion, thinly sliced, gives a nice crunch. I toss in a diced avocado for creaminess. Corn adds a sweet pop, and the feta cheese brings a salty touch. - Juice of 1 lime - Salt and pepper to taste For dressing, I use the juice of one lime. It brightens the flavors. I also add salt and pepper to taste, which you can adjust to your liking. This part is simple but makes a big difference. {{ingredient_image_1}} - Preheat the grill to medium-high heat. This helps the chicken cook evenly. - Pat the chicken breasts dry with paper towels. This step is key for a good sear. - Rub the Cajun seasoning on both sides of the chicken. Make sure to cover it well. - Drizzle olive oil on the chicken. This keeps it moist and prevents sticking. - Place the chicken on the hot grill. Cook for 6-7 minutes without moving it. This creates a nice blackened crust. - Flip the chicken and grill for another 6-7 minutes. Use a meat thermometer to check that it hits 165°F (75°C). - Once cooked, remove the chicken from heat and let it rest for 5 minutes. This helps keep it juicy. - In a large bowl, place the mixed salad greens. Add cherry tomatoes, sliced red onion, diced avocado, and corn. - Toss everything gently to mix the salad ingredients well. This ensures each bite is full of flavor. - Slice the grilled chicken into strips and arrange it on top of the salad. - Squeeze fresh lime juice over the salad. Season with salt and pepper to taste. - Toss gently again to combine all the flavors. Serve right away or chill for 15 minutes. This allows the flavors to meld. Seasoning is key to great flavor. Use enough Cajun seasoning to coat the chicken well. This spice mix adds heat and depth. Don’t be shy with it! A good crust comes from dry chicken. Pat the chicken dry before seasoning. This helps the spices stick better and gives that crisp texture. To ensure a crispy crust, let the chicken sit after seasoning. This helps the spices meld into the meat. When grilling, don’t move the chicken around. This allows the crust to form nicely. You can add more toppings to your salad for extra flavor. Consider adding sliced bell peppers or cucumbers. Nuts like almonds or walnuts can add crunch. If you want a different cheese, try goat cheese or leave it out for a dairy-free option. For a vegan dish, swap the chicken with grilled tofu. You can also use a plant-based cheese for added flavor. You can prepare many elements ahead of time. Grill the chicken in advance and store it in the fridge. This makes meal time quick and easy. Always check the chicken's internal temperature. It should reach 165°F (75°C) for safety. Let the chicken rest after cooking for about five minutes. This keeps the juices inside and makes it tender. Pro Tips Season Generously: Don’t be shy with the Cajun seasoning! A generous coating will enhance the flavor of the chicken and give it that signature blackened taste. Rest the Chicken: Allowing the grilled chicken to rest for 5 minutes before slicing helps retain its juices, resulting in a more flavorful and moist chicken. Fresh Ingredients Matter: Use the freshest salad greens and vegetables for the best flavor and texture. Fresh ingredients will make your salad vibrant and delicious. Customize Your Salad: Feel free to add or substitute ingredients based on your preferences. Nuts, seeds, or different cheeses can elevate the salad even further! {{image_2}} You can swap chicken for other proteins. Shrimp makes a tasty choice. Just season and grill it for about 3-4 minutes per side. Tofu is another option. Press it to remove water, then cube and season. Sauté it until golden brown, about 8-10 minutes. Adjust cooking times based on what you choose. Feel free to mix in seasonal veggies. Try bell peppers in summer or roasted squash in fall. For a vegan salad, skip the feta. Instead, use a vegan cheese or chickpeas. They add protein and flavor. You can also add nuts like almonds or walnuts for crunch. Adding nuts or seeds gives your salad a nice texture. Try sunflower seeds or sliced almonds. They add a nutty taste. You can also change up the dressing. Use ranch for a creamy twist or a balsamic vinaigrette for a tangy kick. This keeps your salad fresh and exciting every time you make it. Store your Blackened Cajun Chicken Salad in an airtight container. This keeps it fresh and tasty. Leftovers can last in the fridge for three to four days. If you see any signs of spoilage, like a bad smell or color change, throw it away. To reheat chicken, use the oven or stovetop. The oven helps keep it juicy. Preheat the oven to 350°F (175°C) and heat for about 15 minutes. On the stovetop, heat in a skillet over low heat, adding a bit of water to help steam it. For leftover salad, enjoy it cold or let it come to room temperature. For meal prep, store the chicken and salad components separately. This keeps everything fresh. When you're ready to eat, quickly assemble the salad. Just slice the chicken, toss it with the greens, and add the other toppings. This makes for easy on-the-go meals. Cajun seasoning has bold and spicy flavors. It usually includes: - Paprika - Cayenne pepper - Garlic powder - Onion powder - Oregano - Thyme - Black pepper - Salt These spices mix well to create a zesty kick. You can find many blends at the store. You can also make your own at home for freshness. Yes, you can prep this salad ahead. Here are some tips: - Cook the chicken and cool it down. Slice it when ready to serve. - Mix the salad greens and veggies, but keep them separate from the chicken and dressing. - Store everything in airtight containers to keep flavors fresh. - Add lime juice just before serving to keep the salad crisp. This way, you can enjoy a quick and tasty meal later. If you want a cheese swap, here are some options: - Goat cheese for a creamy texture - Cotija cheese for a salty flavor - Vegan cheese for a dairy-free option - Olives for added saltiness These alternatives fit different diets and still taste great in the salad! In this article, we explored how to make a delicious blackened chicken salad. We covered the main ingredients, step-by-step cooking, and helpful tips for perfecting your dish. Remember, the key is great seasoning and cooking the chicken right. Feel free to get creative with toppings and protein swaps. With the right storage and meal prep, this salad can work for any day. Enjoy making this tasty and healthy meal that can please anyone.
Blackened Cajun Chicken Salad Fresh and Flavorful Dish
Are you ready to spice up your lunch? This Blackened Cajun Chicken Salad is a fiesta of flavors that combines juicy, seasoned chicken with fresh,
To make a tasty sautéed veggie medley, gather these ingredients: - 1 cup bell peppers (red, yellow, and green), sliced - 1 cup zucchini, sliced into half-moons - 1 cup broccoli florets - 1 cup cherry tomatoes, halved - 1 medium onion, thinly sliced - 2 cloves garlic, minced - 2 tablespoons olive oil - 1 tablespoon balsamic vinegar - Salt and pepper to taste - 1 teaspoon dried oregano - 1 teaspoon fresh basil, chopped for garnish Fresh vegetables give the best flavor and texture. They look bright and taste crisp. If you use frozen veggies, they are quick and easy. They may lose some crunch. Choose fresh when you can, but frozen works in a pinch. Seasonings make your dish pop! Use salt and pepper to taste. Dried oregano adds nice flavor. Fresh basil gives a bright touch. You can also try other spices, like thyme or paprika, to mix it up. Remember, always taste as you go. This helps you find your perfect flavor. {{ingredient_image_1}} Start by washing all your veggies. This step is key. Slice the bell peppers, zucchini, and onion. Cut the cherry tomatoes in half. Break the broccoli into small florets. Use a sharp knife for safety and ease. Set each type of veggie aside in bowls. This makes cooking easier and more fun. Heat your skillet over medium-high heat. Pour in the olive oil. Once the oil is warm, add the sliced onion. Cook for 2-3 minutes until the onion is clear. Then, add the minced garlic and stir it for 30 seconds. Be careful not to burn it. Next, toss in the bell peppers and zucchini. Cook them for 4-5 minutes until they soften a bit. Add the broccoli and cook another 3-4 minutes. Finally, stir in the cherry tomatoes and balsamic vinegar. Cook for 2 more minutes. Make sure your pan is hot before adding oil. This helps the veggies cook evenly. If you add them too soon, they may steam instead of sauté. Keep an eye on cooking times. Each vegetable cooks at a different rate. You want them all to be tender but still crisp. Stir gently to mix flavors. Always taste as you go. This way, you can adjust seasonings like salt and pepper. To get the best sautéed veggies, start with a hot pan. Heat the olive oil first. You want it to shimmer but not smoke. Add the onions and cook them until soft. Then, add garlic to bring out flavor. Add vegetables in stages. Start with those that take longer to cook. Bell peppers and zucchini go in first. Then, add broccoli and cherry tomatoes last. This way, they stay crisp and bright. One mistake is overcrowding the pan. If you add too many veggies, they won't cook well. They will steam instead of sauté. To fix this, cook in batches if needed. Also, don't skip the seasoning. Salt, pepper, and oregano enhance flavor. Finally, watch the heat. Too high can burn the garlic and veggies. Keep it medium-high for best results. For the best experience, serve your veggie medley warm. Use a colorful platter to make it pop. Garnish with fresh basil for a nice touch. If you want, add crumbled feta cheese on top. It gives a nice salty kick. Pair this medley with grains or protein for a full meal. Enjoy your healthy and tasty dish! Pro Tips Use Seasonal Veggies: Opt for vegetables that are in season for the best flavor and nutritional value. Experiment with Spices: Don’t hesitate to add different spices or herbs to create your unique flavor profile. Cooking Time Matters: Be mindful of the cooking time for each vegetable to ensure they maintain a tender-crisp texture. Presentation is Key: Serve the dish in a colorful platter and garnish with fresh herbs for an eye-catching presentation. {{image_2}} You can mix in many veggies for your medley. Try adding carrots for sweetness. Kale adds a nice crunch too. Snap peas give a lovely snap. Consider adding asparagus for a gourmet touch. You can even toss in mushrooms for an earthy flavor. Each veggie brings its own taste and texture. You can change the flavor by using different spices. For an Asian twist, add soy sauce and ginger. This makes the dish savory and bright. For a Mediterranean vibe, use lemon juice and fresh herbs. Oregano and thyme work well here. These changes will take your veggie medley to new heights. Want to make your medley heartier? Add some protein! Tofu is a great plant-based choice. Cut it into cubes and sauté until golden. You can also use chicken for a classic option. Cook it first, then add your veggies. This gives a satisfying meal that keeps you full. To keep your sautéed veggie medley fresh, place it in an airtight container. Make sure it cools down before sealing. Store it in the fridge for up to 3 days. If you want to enjoy it later, freezing is a great option. When reheating, use a skillet for the best results. Heat it over medium heat. Add a splash of olive oil to prevent sticking. Stir the veggies gently until they are heated through. You can also use the microwave, but be cautious. Microwaving may make the veggies soggy. For freezing, let the medley cool completely. Then, portion it into freezer bags. Remove as much air as possible before sealing. Label the bags with the date. You can freeze the veggie medley for up to 3 months. To eat, thaw it in the fridge overnight before reheating. Sautéed vegetables last about 3 to 5 days in the fridge. Store them in an airtight container. This keeps them fresh and tasty. Always check for any signs of spoilage before eating. Yes, you can use different oils for sautéing. Olive oil is great, but you can try avocado or coconut oil too. Each oil adds a unique flavor. Just make sure the oil can handle high heat. The best way to reheat sautéed veggies is on the stove. Use a non-stick pan over medium heat. Add a splash of water or oil to keep them moist. Stir occasionally until they are warm. Yes, you can prepare the veggie medley in advance. Cook it, let it cool, and store it in the fridge. This makes meal prep easy. Just reheat when you are ready to eat. Yes, this dish is great for meal prep! It stores well and offers good nutrition. You can pair it with grains or proteins for a complete meal. Enjoy it throughout the week! You now know how to make delicious sautéed vegetables. We covered key steps like prepping veggies, choosing fresh or frozen options, and using tasty spices. I shared tips for perfect sautéing and what to avoid. You can mix up flavors, add proteins, and learn storage tricks for leftovers. Take this knowledge into your kitchen. Enjoy cooking and exploring new tastes!
Sautéed Veggie Medley Flavorful and Simple Recipe
Are you ready to elevate your meals with a tasty and easy dish? My Sautéed Veggie Medley is packed with flavor and nutrition, making it
- Spinach: Use 4 cups of fresh spinach, washed and dried. Spinach adds a crisp texture and vibrant color. - Strawberries: You need 1 cup of strawberries, hulled and sliced. Strawberries bring sweetness and a pop of flavor. - Red onion: Use 1/4 cup of thinly sliced red onion. It adds a nice bite and balances the sweetness. - Feta cheese: You’ll need 1/2 cup of crumbled feta cheese. Feta adds creaminess and a salty kick. - Sunflower seeds: Add 1/4 cup of sunflower seeds. They give a crunchy texture and nutty flavor. - Poppy seeds: You also need 1/4 cup of poppy seeds. They add a delicate crunch and visual appeal. - Olive oil: Use 1/2 cup of olive oil. It acts as the base for your dressing and adds richness. - Apple cider vinegar: You’ll need 1/4 cup of apple cider vinegar. It gives a tangy contrast to the sweet elements. - Honey: Add 2 tablespoons of honey for sweetness. It helps balance the vinegar's tartness. - Salt and pepper: Use salt and pepper to taste. They enhance all the flavors in the salad. These ingredients come together to create a fresh and tasty salad. Enjoy the bright colors and flavors! {{ingredient_image_1}} First, you need to make the dressing. In a small bowl, add the olive oil, apple cider vinegar, honey, salt, and pepper. Use a whisk to mix the ingredients well. Whisking blends the flavors and keeps the dressing smooth. After mixing, set it aside. Letting it sit allows the flavors to blend for a better taste. Next, grab a large mixing bowl. Add the fresh spinach, sliced strawberries, crumbled feta cheese, and thinly sliced red onion. These ingredients work together to create a fresh and tasty salad. Drizzle the prepared dressing over the salad mix. Gently toss everything together. This step coats all the ingredients evenly with dressing. For the final touches, sprinkle the sunflower seeds and poppy seeds over the top. These seeds add a nice crunch to your salad. Toss lightly again to mix in the seeds. Serve the salad right away for the best taste. Enjoy the fresh flavors and vibrant colors! To make your salad shine, serve it in a large glass bowl. This lets the bright colors pop. You can add a few whole strawberries on top for a nice touch. This makes the dish look fresh and inviting. For added elegance, consider using a platter instead of a bowl. If you want to swap the spinach, try kale or arugula. Both add a different taste, yet still taste great. For those avoiding feta, you can use goat cheese or omit cheese entirely. If you need a vegan dressing, mix olive oil, lemon juice, and maple syrup. This keeps it light and tasty without dairy. Add fresh herbs like basil or mint for a burst of flavor. These herbs pair well with strawberries and add depth. You can also sprinkle in some cracked pepper for a bit of heat. If you want protein, try adding grilled chicken or chickpeas. These options make your salad more filling and satisfying. Pro Tips Use Fresh Ingredients: For the best flavor and texture, make sure to use the freshest spinach and strawberries available. Fresh produce not only enhances the taste but also adds vibrant color to your salad. Make Ahead Dressing: Prepare the dressing in advance and store it in the refrigerator. This allows the flavors to meld beautifully. Just give it a good shake before drizzling it on the salad. Customize Your Nuts: Feel free to swap the sunflower seeds with your favorite nuts like almonds or walnuts for a different crunch and flavor profile. This customization can make the salad more unique to your taste. Chill Before Serving: For a refreshing experience, chill the salad in the refrigerator for about 10 minutes before serving. This enhances the flavors and ensures a crisp bite! {{image_2}} You can change this salad with seasonal fruits. In summer, try adding blueberries or peaches. These fruits add a sweet touch. In fall, consider using sliced apples or pears. Both options keep the salad fresh and tasty. You can also mix in different nuts or seeds. For crunch, walnuts or almonds work well. They add flavor and texture. To turn this salad into a meal, add grilled chicken. It gives protein and makes it filling. You can also pair the salad with a whole grain. Quinoa or brown rice makes a great choice. This adds fiber and keeps you full longer. You can serve it as a main dish or a side. Try different vinegars or sweeteners in your dressing. Balsamic vinegar adds a rich taste. Maple syrup is a nice swap for honey if you prefer. You can also experiment with creamy poppy seed dressings. These can bring a smooth, rich flavor to the salad. Mix and match to find your perfect dressing! To keep your salad fresh, store it in an airtight container. This helps prevent wilting. I recommend using glass or plastic containers with tight lids. They work well for keeping air out. If you can, add the toppings just before serving. This keeps everything crispy and crunchy. The salad lasts about 3 days in the fridge. If you see any signs of spoilage, like brown spinach or mushy strawberries, toss it out. Always check for an off smell too. Freshness is key for the best taste. You can make parts of this salad ahead of time. Chop the spinach and slice the strawberries the night before. Store them in separate containers. Keep the dressing in a small jar in the fridge. This way, you can mix everything just before serving. It saves time and keeps the flavors bright. Yes, you can! To make a salad in advance, follow these tips: - Prep the ingredients: Wash and slice your spinach and strawberries. - Keep the dressing separate: Store the dressing in a jar. This keeps the salad fresh. - Assemble just before serving: Combine everything only when you are ready to eat. - Add crunchy toppings last: Sprinkle sunflower and poppy seeds right before serving for best texture. This way, your salad stays crisp and tasty! You can make this salad a complete meal easily! Here are some ideas: - Grilled chicken: Add sliced grilled chicken for protein. - Chickpeas: Toss in canned chickpeas for a plant-based option. - Quinoa: Stir in cooked quinoa for carbs and protein. - Avocado: Add avocado slices for healthy fats and creaminess. These additions will help fill you up while keeping the salad fresh and vibrant. Yes, this salad is gluten-free! Here’s what you need to check: - Ingredients: All ingredients like spinach, strawberries, and feta cheese are gluten-free. - Dressing components: Olive oil, apple cider vinegar, honey, salt, and pepper do not contain gluten. Always read labels if you use packaged products to ensure they are gluten-free. Enjoy this salad worry-free! This salad blends fresh produce with tasty ingredients for a satisfying meal. We started by discussing key components like spinach, strawberries, and feta cheese. You learned how to make a simple dressing and combine everything for a delightful dish. As you explore variations and tips, remember each ingredient adds its charm. Experiment with flavors and make it your own. This salad is not just a side—it's a chance to create something delicious. So, enjoy every bite and share your new favorite recipe!
Strawberry Spinach Poppy Seed Salad Fresh and Tasty
Looking for a fresh and tasty salad that’s simple to make? Let me introduce you to my Strawberry Spinach Poppy Seed Salad. This vibrant dish
- 4 cups fresh spinach leaves, washed and dried - 2 cups strawberries, hulled and sliced - 1/4 cup feta cheese, crumbled - 1/4 red onion, thinly sliced I love using fresh spinach leaves for this salad. They are crisp and full of vitamins. Strawberries add a sweet touch. You can slice them to fit well with the salad. Feta cheese brings a creamy texture and salty taste. The red onion gives a nice crunch and flavor balance. - 1/4 cup almonds, sliced or slivered - 1/4 cup balsamic vinegar - 2 tablespoons honey - 1/4 cup olive oil Sliced almonds add a nutty crunch. They also give healthy fats that are good for you. Balsamic vinegar adds a tangy zing to the dressing. Honey sweetens the dressing naturally. Olive oil helps blend all flavors together smoothly. - Salt - Pepper Season with salt and pepper to taste. These simple spices enhance all the fresh flavors. Use them wisely to boost the taste of your salad. {{ingredient_image_1}} First, grab a small bowl. In this bowl, whisk together the balsamic vinegar, honey, and olive oil. Mix until everything blends well. This step is key for great flavor. Next, taste the dressing. Add salt and pepper as needed. Adjust it to fit your taste buds. Now, take a large salad bowl. Combine the fresh spinach leaves, sliced strawberries, crumbled feta cheese, sliced almonds, and thinly sliced red onion. Gently mix these ingredients together. You want to see all the colors in your salad. After that, drizzle your prepared dressing over the salad. Toss everything gently until all the ingredients are coated. This helps the flavors mix well. For a great look, serve the salad in a large bowl for family-style sharing. You can also plate it individually. For an elegant touch, sprinkle extra feta and almonds on top. Add a few whole strawberries for a pop of color. Serve the salad right away to enjoy the fresh taste. If you want, you can refrigerate it for up to 30 minutes. This allows the flavors to meld nicely, but it’s best enjoyed fresh. - Alternatives for feta cheese: You can use goat cheese if you want a similar taste. Another option is ricotta for a creamier texture. For a dairy-free choice, try crumbled tofu, which soaks up flavors well. - Different nuts to consider: If you want a crunch without almonds, try walnuts or pecans. Both add unique flavors and textures. Sunflower seeds are a great nut-free option, too. - Adjusting sweetness or acidity: You can make the salad sweeter by adding more honey. If you want it tangier, add more balsamic vinegar. Balance is key! - Adding herbs for extra freshness: Fresh mint or basil can liven up the salad. Just a few leaves can add a burst of flavor. Cilantro also works well if you enjoy its taste. - Best practices for prep ahead: You can wash and slice strawberries a few hours before serving. Keep them in the fridge to stay fresh. Prepare the dressing in advance, too. Store it in a jar and shake before using. Mix all the salad ingredients just before serving for the best texture. Pro Tips Use Fresh Ingredients: Always opt for fresh spinach and ripe strawberries for the best flavor and texture in your salad. Customize Your Nuts: Feel free to substitute almonds with walnuts or pecans for a different crunch and flavor profile. Chill Your Salad: Let the salad sit in the refrigerator for 30 minutes before serving to enhance the flavors as they meld together. Presentation Matters: For an elegant touch, serve individual portions with extra feta and strawberries on top as a garnish. {{image_2}} You can add other fruits to your strawberry spinach salad. Blueberries, raspberries, or sliced peaches work well. These fruits bring a burst of flavor. You can also use seasonal fruits. In summer, try fresh peaches or nectarines. In fall, consider apples or pears. Each fruit adds its own sweetness and texture. Mixing fruits keeps the salad exciting. Adding protein makes the salad more filling. Grilled chicken or shrimp is a great choice. They add a nice texture and flavor. If you prefer vegetarian options, quinoa is a smart choice. It’s packed with protein and has a nutty taste. You can also add beans for extra fiber. These proteins make your salad a full meal. You can experiment with different dressings for your salad. A honey mustard dressing gives a sweet touch. A lemon vinaigrette adds a fresh zing. Store-bought dressings are quick but check the labels. Homemade dressings are often healthier and tastier. You can whisk together olive oil, vinegar, and your favorite herbs. This way, you control the flavors and ingredients. Store your salad in a clean, dry container. I recommend using an airtight container. This helps keep the salad fresh. Place it in the fridge right away. The salad stays fresh for about 2 days. However, the spinach may wilt over time. To keep it crisp, store the dressing separately. Add it just before you eat. You can freeze this salad, but I do not suggest it. Freezing changes the texture of fresh ingredients. If you must freeze it, do this: store the spinach and strawberries separately. Place them in freezer-safe bags. When ready to use, thaw them in the fridge overnight. After thawing, enjoy them in smoothies or as a topping, not as a salad. Spinach is rich in vitamins A and C. It also has iron, which helps your blood. Strawberries are full of antioxidants and fiber. They can aid digestion and improve heart health. Together, they create a tasty and healthy salad. You can prepare the salad ahead. Just mix the spinach, strawberries, and other ingredients. However, keep the dressing separate until you are ready to eat. This keeps the salad fresh and crisp. If you want a change from feta, use goat cheese. It has a similar texture but a creamier taste. You can also try ricotta or a vegan cheese for a different flavor. Yes, you can make this salad vegan easily. Just leave out the feta cheese. Use a vegan cheese or skip the cheese entirely. The salad will still taste great! To keep the salad fresh, store it in an airtight container. Keep the dressing in a separate container. This way, the salad won’t get soggy and can last longer in the fridge. This blog post outlined the key ingredients, instructions, tips, and variations for a fresh and delicious salad. You learned how to prepare a tasty dressing and assemble your salad with vibrant produce and nuts. I shared how to enhance flavors and suggested delicious mix-ins. Remember to store leftovers properly for the best taste. With these steps and tips, you can enjoy a healthy meal that's simple and satisfying. Embrace your creativity and have fun with this salad!
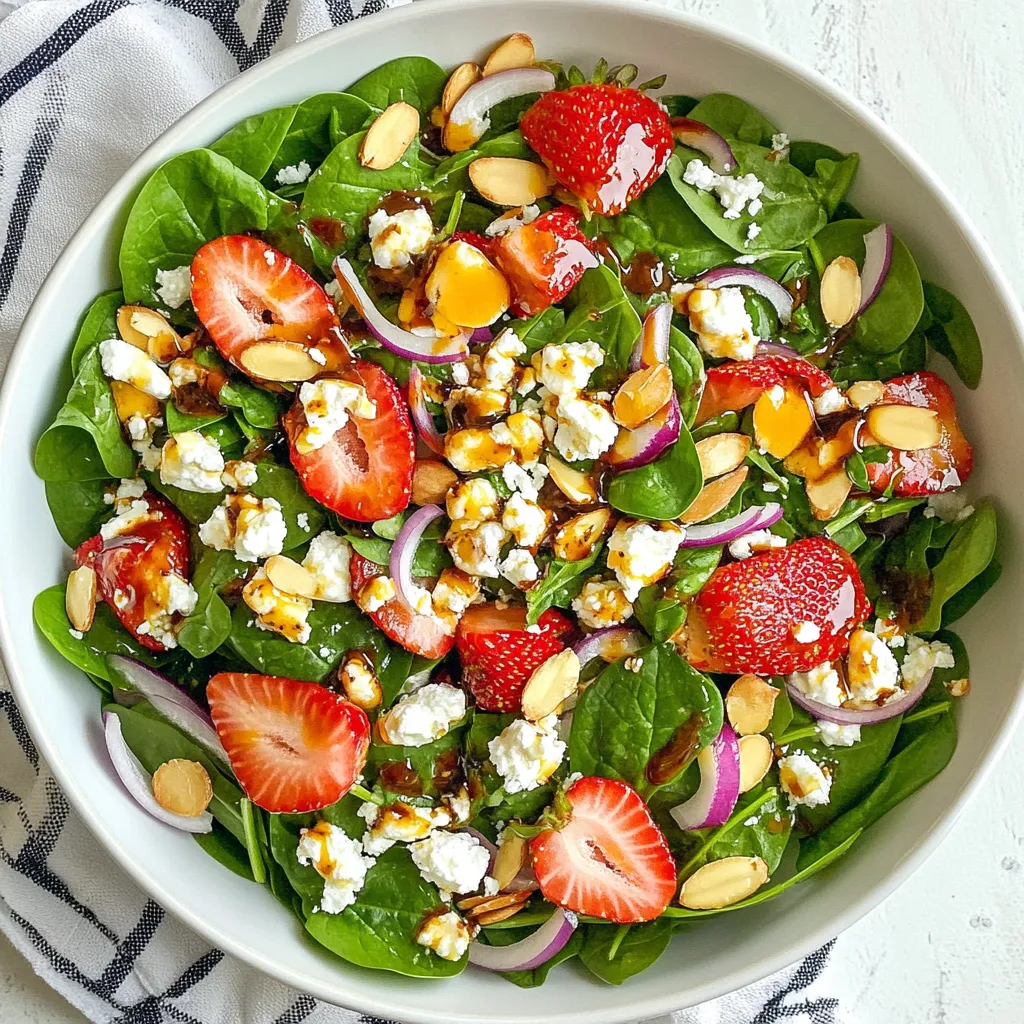
Strawberry Spinach Salad Nutrient-Packed Delight
Are you ready to enjoy a tasty and healthy dish? Our Strawberry Spinach Salad is a nutrient-packed delight that is both refreshing and colorful. This
To make avocado egg salad lettuce wraps, gather the following items: - 4 hard-boiled eggs, chopped - 1 ripe avocado, mashed - 1 tablespoon Greek yogurt - 1 tablespoon Dijon mustard - 1 tablespoon lemon juice - 1 green onion, finely chopped - 1/4 teaspoon garlic powder - Salt and pepper to taste - 1 head of romaine or butter lettuce, leaves separated This dish is not only tasty but also packed with health benefits. Here’s what each ingredient offers: - Hard-boiled eggs provide protein and essential vitamins. - Avocado is rich in healthy fats, fiber, and potassium. - Greek yogurt adds creaminess and probiotics for gut health. - Dijon mustard offers flavor with low calories. - Lemon juice boosts vitamin C and aids digestion. - Green onion adds flavor and contains antioxidants. - Garlic powder may help boost your immune system. - Lettuce is low in calories and high in water content, keeping you hydrated. When picking your ingredients, freshness is key. Here are some tips: - Eggs: Choose eggs with no cracks. Check the sell-by date for freshness. - Avocado: Look for avocados with a slight give when gently pressed. - Greek yogurt: Check the expiration date and ensure it’s creamy and smooth. - Mustard: Ensure it’s from a trusted brand without added preservatives. - Lemon: Pick firm lemons with smooth skin for juiciness. - Green onions: Choose firm green onions with fresh green tops. - Garlic powder: Ensure it’s stored in a cool, dry place for freshness. - Lettuce: Select crisp leaves without brown spots or wilting. These tips help ensure your avocado egg salad wraps taste great and stay healthy! {{ingredient_image_1}} 1. Start by chopping the four hard-boiled eggs into small pieces. 2. Next, mash the ripe avocado in a bowl until it's smooth. 3. Add the chopped eggs to the mashed avocado. 4. Mix in one tablespoon of Greek yogurt and one tablespoon of Dijon mustard. 5. Squeeze in one tablespoon of lemon juice for a fresh taste. 6. Chop one green onion finely and add it to the bowl. 7. Sprinkle in 1/4 teaspoon of garlic powder. 8. Season with salt and pepper to taste. 9. Stir the mixture gently, being careful not to mash the eggs too much. 10. Once well combined, take a lettuce leaf and spoon on the avocado egg salad. 11. Fold the sides of the lettuce over the filling. Serve right away! While I can't provide visuals, you can find many helpful videos online. Search for “Avocado Egg Salad Lettuce Wraps” for step-by-step guides. Watching a video can show you how to fold the wraps perfectly. - Over-mixing: Mixing too much can turn the eggs into mush. - Ignoring freshness: Use fresh ingredients for the best flavor. - Skipping seasoning: Always taste and adjust salt and pepper. - Wrong lettuce choice: Romaine or butter lettuce works best for wraps. - Letting it sit: Serve immediately to keep the lettuce crisp. To get a creamy texture for your avocado egg salad, use ripe avocados. They should feel soft but firm when you press them. Mash the avocado well, but mix gently with the hard-boiled eggs. This way, you keep some chunks of eggs for nice bites. You can add more flavor with fresh herbs. Chopped dill or cilantro works great. For a spicy kick, try a dash of hot sauce or a sprinkle of red pepper flakes. If you enjoy tanginess, mix in a bit more lemon juice. Taste as you go to find your perfect blend. For a beautiful presentation, arrange the lettuce wraps on a bright platter. Garnish with extra chopped green onions or lemon slices. This adds a pop of color. Serve the wraps right after you fill them to keep the lettuce crisp. Enjoy your tasty and healthy snack! Pro Tips Perfectly Boil Your Eggs: For the best hard-boiled eggs, place them in cold water, bring to a boil, cover, and remove from heat. Let them sit for 12 minutes before transferring to an ice bath. Choose Ripe Avocados: Ensure your avocados are ripe for a creamy texture. They should yield slightly to gentle pressure when squeezed. Customize Your Seasoning: Feel free to add spices like paprika or cayenne pepper for an extra kick, or fresh herbs like dill or cilantro for added flavor. Serve Fresh: Assemble the lettuce wraps just before serving to maintain crunch. If making in advance, store the egg salad mixture in the refrigerator and fill the lettuce leaves right before eating. {{image_2}} If you have dietary needs, you can change the recipe. For a dairy-free version, skip the Greek yogurt and use avocado alone. You can also try using a vegan mayo for creaminess. If you're allergic to eggs, you can swap in chickpeas. Mash them well for a similar texture. You can make this avocado egg salad even more exciting. For a spicy kick, add a pinch of cayenne pepper or a splash of hot sauce. If you like herbs, try fresh dill or cilantro. Both add a great taste and freshness. Lemon zest can also enhance the flavor, giving it a nice brightness. You can serve the avocado egg salad in many ways. Wrap it in lettuce leaves for a fun snack. You can also spread it on whole-grain toast for a meal. If you want a light lunch, place it in a bowl with mixed greens. This adds crunch and makes it more filling. To keep your avocado egg salad fresh, store it in an airtight container. Use a bowl that seals tightly. This helps prevent air from getting in. It keeps the salad creamy and tasty. If you have extra lettuce wraps, wrap them in plastic wrap or foil. Place your container in the fridge right after you make it. The cool temperature slows spoilage. Make sure to eat the salad within three days. Avocado can brown quickly, so check for color change. If it turns brown, mix it well before eating. It still tastes great! You don't need to reheat avocado egg salad. It’s best served cold in lettuce wraps. If you want to warm it, use low heat. Heat for just a few minutes until slightly warm. Avoid cooking it too long, or the eggs may dry out. Avocado egg salad lasts about 1 to 2 days in the fridge. Keep it in an airtight container. The avocado may darken, but it’s still safe to eat. Yes, you can prepare this recipe ahead of time. Make the salad and store it in the fridge. Just keep the lettuce wraps separate until you are ready to serve. This keeps the lettuce crisp. You can use romaine or butter lettuce for wraps. Both types are sturdy and hold the filling well. Romaine adds a nice crunch, while butter lettuce is tender and sweet. Yes, you can replace eggs with chickpeas for a vegan version. Mash the chickpeas and mix with avocado, vegan yogurt, mustard, and lemon juice. This keeps the creamy texture and flavor. In this article, we covered key ingredients for a tasty dish, their health perks, and how to pick the best ones. I shared step-by-step instructions, a visual guide, and tips to avoid common mistakes. You learned tricks for a creamy texture and ways to present your meal nicely. We also explored variations to fit dietary needs and how to store leftovers for later meals. Remember, simple meals can be fun and good for you. Enjoy creating and sharing this dish!
Avocado Egg Salad Lettuce Wraps Tasty and Healthy Snack
Looking for a snack that’s both tasty and healthy? You’ve found it! My Avocado Egg Salad Lettuce Wraps are a delicious twist on classic flavors.