Salads
Cowboy Salad Flavorful and Nutritious Dish Ideas
Are you ready to spice up your meal routine? Cowboy salad is a fun, tasty, and healthy option you’ll love! Packed with fresh ingredients, it’s
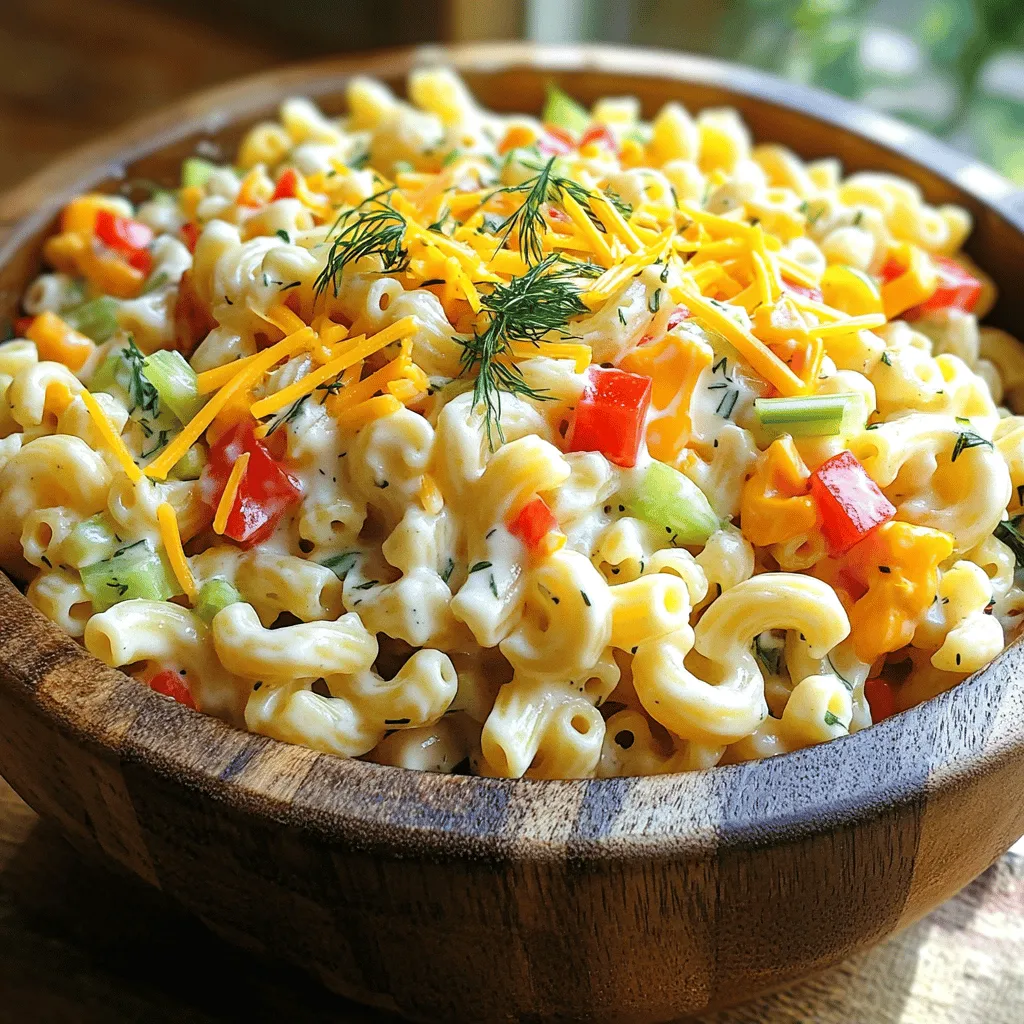
Guy Fieri’s Macaroni Salad Simple and Tasty Recipe
Are you ready to jazz up your lunch with Guy Fieri’s Macaroni Salad? This simple and tasty recipe will make your taste buds dance. With
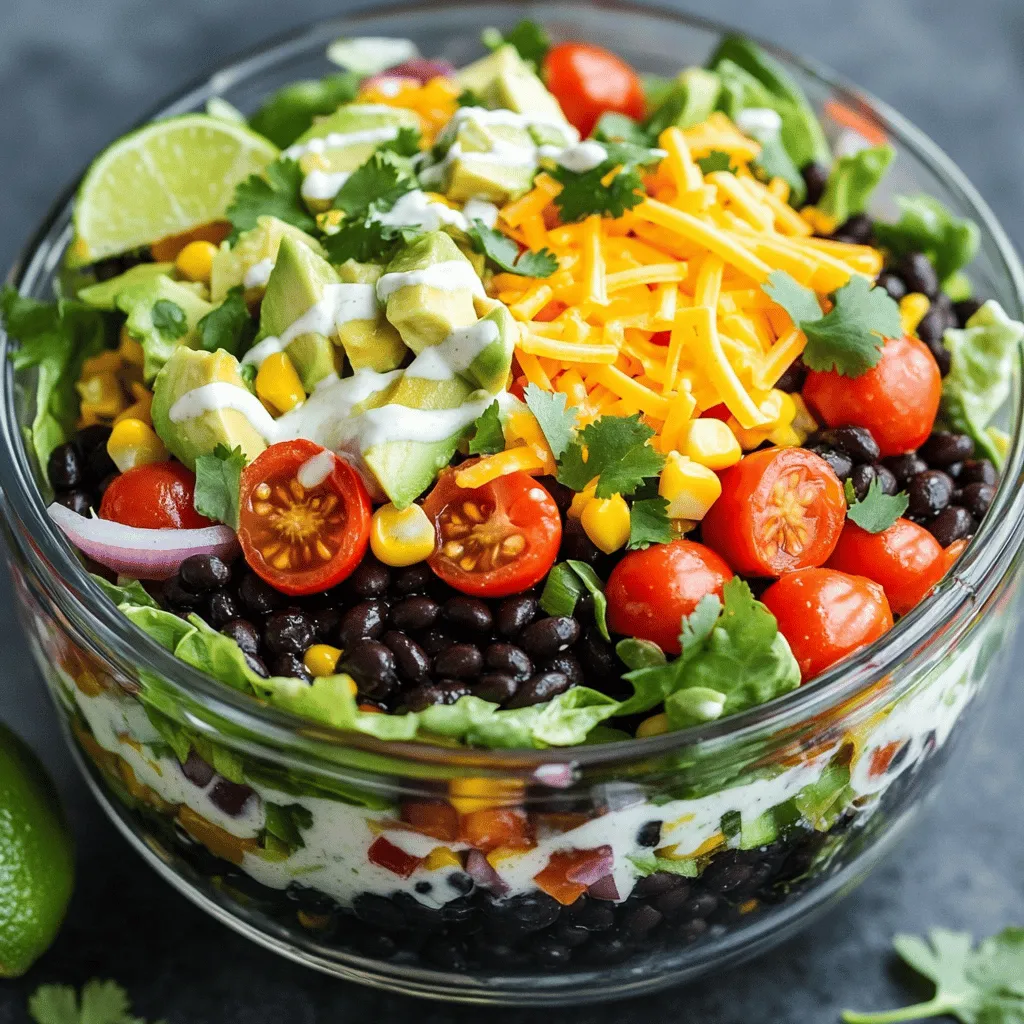
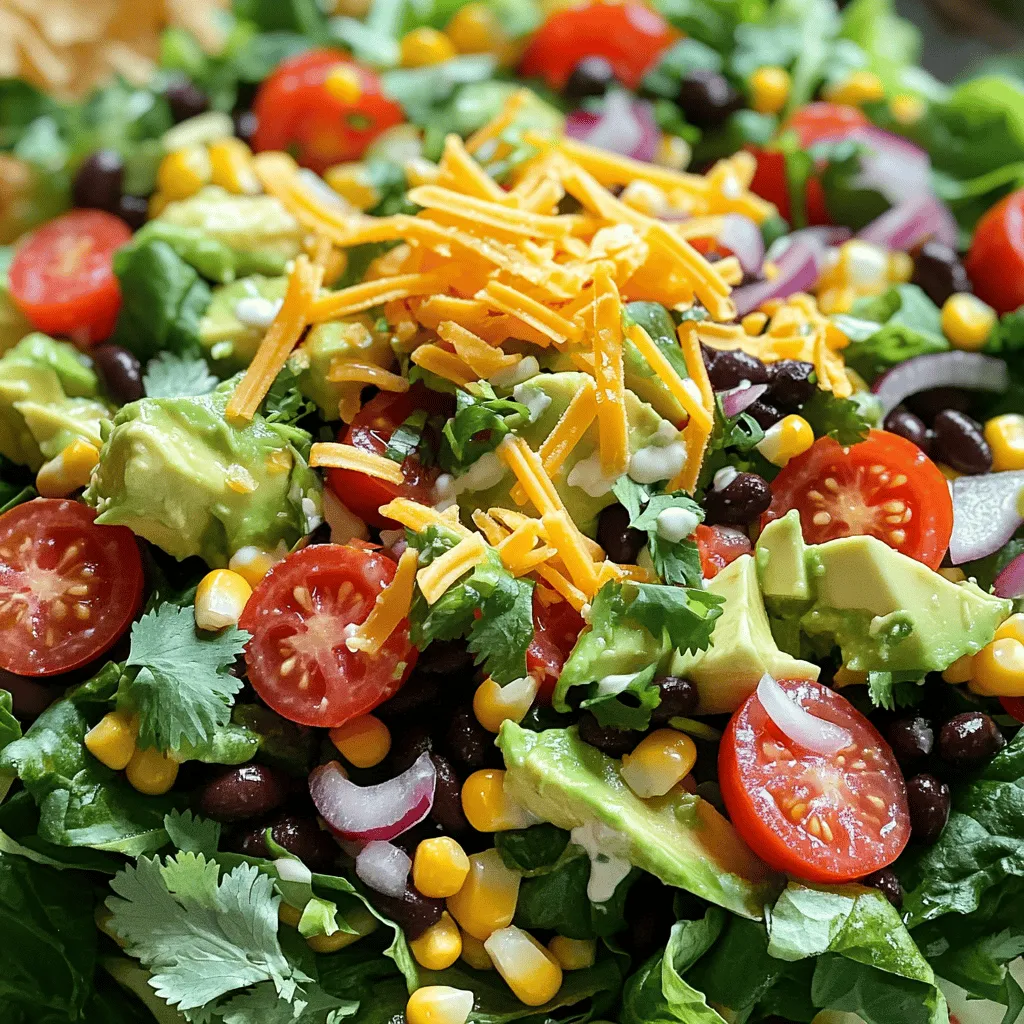
Black Bean Taco Salad with Creamy Salsa Dressing Delight
Get ready for a flavor explosion with my Black Bean Taco Salad with Creamy Salsa Dressing! This quick and healthy dish combines fresh ingredients like
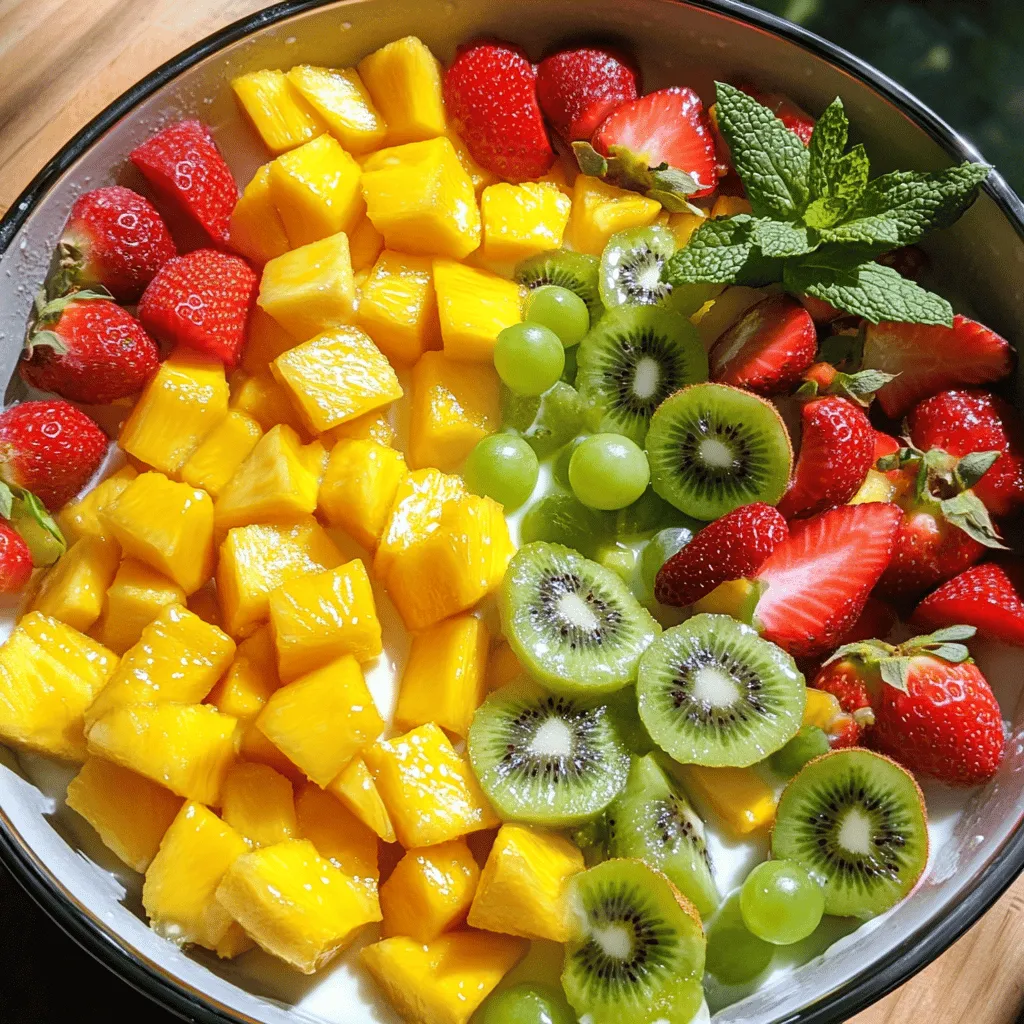
Fruit Salad With Condensed Milk Tasty and Refreshing
Welcome to the world of sweet and creamy delight! If you’re looking for a quick and refreshing treat, you’ve come to the right place. This
![- 2 cups pasta (fusilli or rotini recommended) - 1 cup cooked chicken breast, diced - 2 cups romaine lettuce, chopped - 1/2 cup cherry tomatoes, halved - 1/4 cup freshly grated Parmesan cheese - 1/4 cup Caesar dressing - 1/4 teaspoon garlic powder - 1/4 teaspoon freshly cracked black pepper - Crunchy croutons for topping - Fresh basil leaves for garnish (optional) In my Chicken Caesar Pasta Salad, I focus on fresh, easy-to-find ingredients. For the pasta, fusilli or rotini works best. They hold the dressing well. I always use cooked chicken breast. Dicing it into small pieces makes it mix easily. Romaine lettuce gives a nice crunch. You can chop it into small strips for better texture. Cherry tomatoes add a burst of color and flavor. They are sweet and juicy, making them a great addition. Parmesan cheese is a must! I like using freshly grated cheese. It melts slightly when mixed, adding a creamy touch. For dressing, choose your favorite Caesar dressing. You can buy it or make your own if you prefer. When it comes to seasoning, a little garlic powder and black pepper go a long way. They add depth without overpowering the other flavors. I love topping my salad with crunchy croutons for extra texture. If you want, add fresh basil leaves to brighten the dish. For the full recipe, check the [Full Recipe]. - Bring salted water to a boil. - Cook pasta until al dente, about 8-10 minutes. - Drain and rinse under cold water to stop cooking. Cooking pasta is simple. Use a large pot for boiling. Salted water adds flavor. Al dente means it’s firm yet tender. Rinsing under cold water cools the pasta and keeps it from sticking. - Combine chicken, romaine, tomatoes, and pasta in a bowl. - Add Caesar dressing and seasonings. - Toss the mixture until well-coated. Mixing is where the magic happens. Start with chicken, romaine, and tomatoes. The pasta should be cool by now. Pour the Caesar dressing over the mix. Use garlic powder, salt, and black pepper for a kick. Toss everything gently. Make sure every piece is coated well. - Add grated Parmesan cheese and toss again. - Rest the salad for about 10-15 minutes. - Top with croutons and basil before serving. Parmesan cheese adds a nice touch. Toss it in after mixing. Letting the salad rest helps the flavors blend. Croutons add crunch, and basil gives a fresh look. You can serve this dish at any time. It's perfect for lunch or dinner. For the full recipe, check out the details above. For the best texture, I recommend fusilli or rotini. Their shapes hold the dressing well. You can also use penne or farfalle if you prefer. If you need a gluten-free option, look for gluten-free pasta made from rice or chickpeas. These types still taste great and work well in this salad. Making your own Caesar dressing is fun and easy. You need garlic, anchovies, lemon juice, mayonnaise, and Parmesan cheese. Blend these ingredients for a fresh taste. However, store-bought dressing saves time. Many brands offer good flavors that work well in this salad. Choose a dressing you enjoy for the best results. Chicken Caesar Pasta Salad pairs well with crusty bread or a light soup. You can also serve it with a side of fresh fruit. If you have leftovers, try mixing in some grilled veggies or beans for a new meal. This salad is versatile and can adapt to your taste. {{image_4}} You can boost your Chicken Caesar Pasta Salad by adding veggies. Try bell peppers, cucumbers, or carrots. These will add crunch and color. You can also use broccoli or spinach for a fresh taste. When adding veggies, keep the flavors balanced. For example, if you add sweet bell peppers, use less dressing. This way, the salad won’t be too rich. If you want a change from chicken, many options work well. Shrimp or grilled steak can add a new twist. For a vegetarian option, try chickpeas or tofu. They soak up flavors nicely and add protein. You can also use hard-boiled eggs for a creamy touch. Just remember to cut them into small pieces for easy eating. To make this dish gluten-free, swap the pasta with rice or quinoa. You can also find gluten-free pasta in stores. If you’re vegan, skip the chicken and cheese. Use a plant-based Caesar dressing for flavor. Nutritional yeast can give a cheesy taste without dairy. Just be careful with croutons; they often contain gluten. Opt for gluten-free croutons or skip them altogether. For more details, check the Full Recipe. Store Chicken Caesar Pasta Salad in the fridge. Use an airtight container for best results. This keeps the salad fresh and tasty. You can enjoy it for up to three days. After three days, the lettuce may wilt and lose its crunch. You can freeze Chicken Caesar Pasta Salad, but with some caution. The lettuce and dressing do not freeze well. They can become soggy when thawed. If you choose to freeze, store only the pasta and chicken. To thaw, move the salad to the fridge overnight. Reheat gently on the stove if needed. If you like, add fresh lettuce and dressing after thawing. Use glass or BPA-free plastic containers with tight lids. These help prevent spoilage and keep your salad safe. Avoid using metal containers as they can react with the dressing. Proper storage means your Chicken Caesar Pasta Salad stays delicious for longer. Yes, you can prepare Chicken Caesar Pasta Salad ahead of time. It works great for meal prep or parties. - Tips for preparing in advance: Cook the pasta and chicken earlier. Mix them with the veggies. Add the dressing just before serving. This keeps everything fresh. - Flavor enhancement through marination: Let the salad sit for about 30 minutes. This helps the flavors blend well. If you need a substitute for Parmesan cheese, several options exist. - Cheese alternatives and their flavor profiles: Try Pecorino Romano for a sharper taste. Nutritional yeast is a great vegan choice. It adds a cheesy flavor without dairy. Chicken Caesar Pasta Salad can be healthy, depending on your choices. - Nutritional breakdown and calorie info: It provides protein from chicken and fiber from lettuce. The calories depend on the dressing used. - Healthier ingredient substitutions available: Use whole grain pasta for extra fiber. Opt for low-fat dressing to cut down on calories. In this post, we covered how to make a tasty Chicken Caesar Pasta Salad. You learned about the key ingredients like pasta, chicken, and romaine. I provided step-by-step instructions for cooking and mixing the salad. We also explored smart tips, fun variations, and best practices for storage. In the end, this salad is not only delicious but also adaptable. You can customize it to fit your tastes or dietary needs. Enjoy making this dish and impressing those around you!](https://tossedflavors.com/wp-content/uploads/2025/05/0975646d-f7ce-477f-ae3d-ee50a783580d.webp)
Chicken Caesar Pasta Salad Flavorful and Simple Dish
Looking for a tasty dish that’s quick to make? You’ll love this Chicken Caesar Pasta Salad! This flavorful recipe mixes pasta, chicken, lettuce, and tangy

Low Carb Italian Grinder Salad Fresh and Tasty Recipe
Looking for a fresh and flavorful dish that fits your low-carb lifestyle? I have the perfect recipe for you: the Low Carb Italian Grinder Salad!
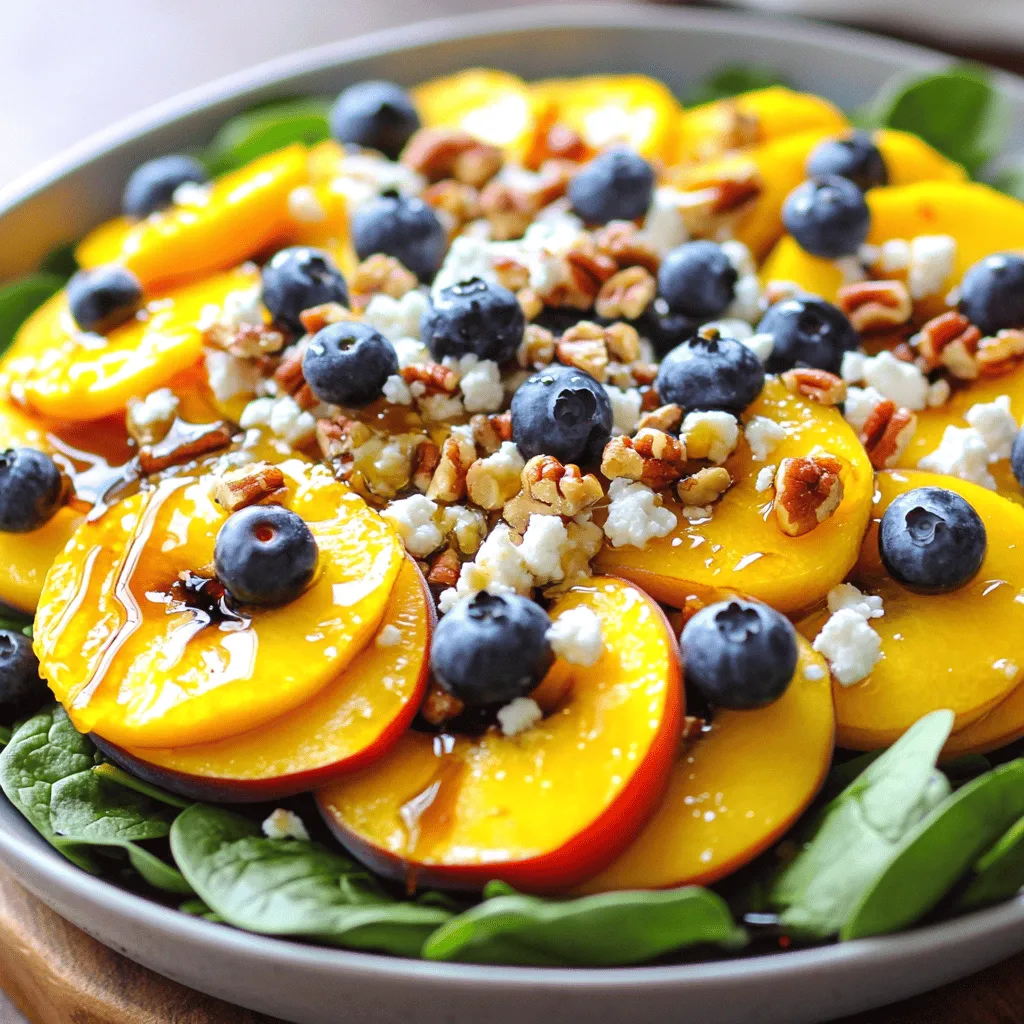
Blueberry Peach Feta Salad Fresh and Flavorful Dish
Discover a burst of summer flavor with my Blueberry Peach Feta Salad! This dish combines sweet peaches, juicy blueberries, and creamy feta to create a
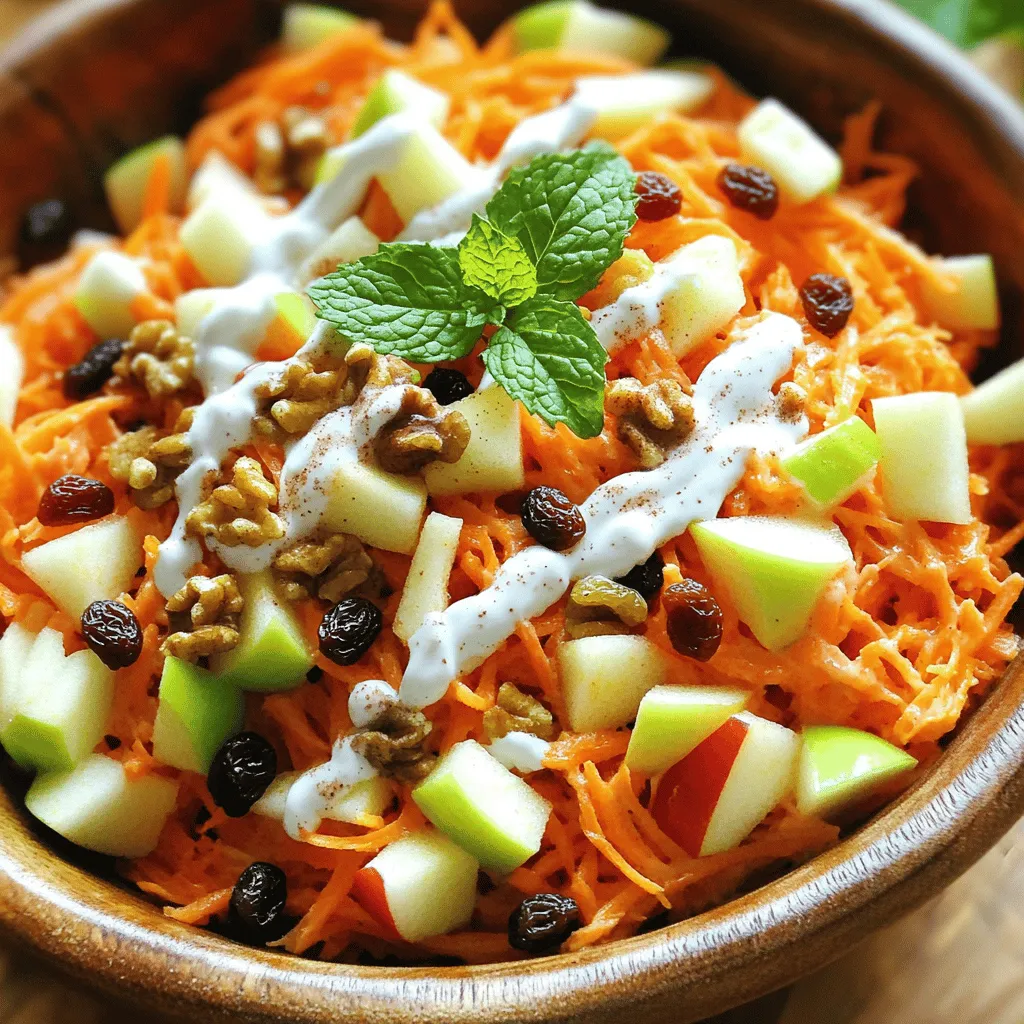
Carrot Apple Salad Fresh and Flavorful Recipe
Are you looking for a fresh and flavorful salad that bursts with crunch and sweetness? You’re in the right place! My Carrot Apple Salad combines
![To make a Mediterranean Chickpea Salad, you need the following: - 1 can (15 oz) chickpeas, drained and rinsed thoroughly - 1 cup cherry tomatoes, halved - 1 medium cucumber, diced - 1/2 medium red onion, finely chopped - 1/2 cup kalamata olives, pitted and sliced - 1/4 cup fresh parsley, finely chopped - 1/4 cup feta cheese, crumbled (optional) - 3 tablespoons extra virgin olive oil - 2 tablespoons fresh lemon juice - 1 teaspoon dried oregano - Salt and pepper to taste You can add these for extra flavor and texture: - Avocado for creaminess - Bell peppers for crunch - Fresh mint for a refreshing twist - Chickpea pasta for added heartiness This salad is not just tasty; it is also good for you. Here are some highlights: - Chickpeas provide protein and fiber. - Olive oil offers healthy fats. - Vegetables add vitamins and minerals. - Feta cheese gives calcium and flavor. Each serving has a balance of carbs, protein, and fats, making it a healthy choice for a meal. For more details, check the Full Recipe. Enjoy the fresh and vibrant flavors of this dish! Start with a clean workspace. Gather all your ingredients. You need a large mixing bowl for this. Open one can of chickpeas and drain it well. Rinse the chickpeas under cold water to remove extra salt. Next, cut the cherry tomatoes in half. Dice the cucumber into small pieces. Chop the red onion finely. Slice the kalamata olives and chop the parsley. If you like, you can crumble the feta cheese now. In your large bowl, add the chickpeas, cherry tomatoes, cucumber, red onion, olives, and parsley. Stir gently to mix them all together. If you used feta cheese, sprinkle it on top. This adds a creamy touch to your salad. Make sure everything is well combined. For the dressing, take a small bowl. Whisk together the extra virgin olive oil, fresh lemon juice, oregano, salt, and pepper. Mix until all the ingredients blend well. Drizzle this dressing over your salad. Toss everything together gently. You want every bite to be full of flavor. Let the salad sit for about 15 minutes. This helps the flavors mix better. Serve it chilled or at room temperature. Enjoy the fresh taste of your Mediterranean Chickpea Salad! You can find the full recipe [here]. You can serve this salad on its own or with pita bread. It pairs well with grilled chicken or fish. For a light meal, enjoy it with a glass of chilled white wine. You can also add it to a wrap for a tasty lunch. To enhance the flavors, let the salad rest. This allows the dressing to soak in. Use fresh ingredients when possible. Fresh herbs, like parsley, make a big difference. A sprinkle of lemon zest adds brightness. For extra depth, try marinating the chickpeas in lemon juice before mixing. One mistake is not rinsing the chickpeas. This can make the salad too salty. Another mistake is adding the dressing too soon. This can lead to a soggy salad. Don't skip the resting time—it helps the flavors blend. Lastly, be careful with salt; taste first before adding more. {{image_4}} You can easily change ingredients in the Mediterranean chickpea salad. If you don’t have chickpeas, use black beans or kidney beans. For tomatoes, try diced bell peppers for a sweet crunch. Instead of cucumber, use zucchini for a different texture. If you want a nutty taste, add diced avocado. You can also swap out the feta for goat cheese or leave it out for a dairy-free option. The dressing can change the flavor profile of your dish. If you want a creamier dressing, mix in some tahini or yogurt. For a spicy kick, add a splash of hot sauce or chili flakes to the olive oil and lemon juice. You can also use balsamic vinegar instead of lemon juice for a sweeter taste. Experiment with different herbs like basil or mint to give your salad a fresh twist. If you have dietary restrictions, there are easy ways to adapt this salad. For gluten-free diets, this salad is naturally safe. For vegan diets, skip the feta and use a vegan cheese alternative. If you’re watching your sodium intake, rinse the olives and use low-sodium chickpeas. You can also replace the olive oil with avocado oil for a heart-healthy option. For low-carb diets, skip the tomatoes and cucumbers, and add more leafy greens. For more details, check out the Full Recipe. To keep your Mediterranean Chickpea Salad fresh, place it in an airtight container. This helps maintain flavor and texture. Make sure to seal it well before storing it in the fridge. If you want to keep it for more than a day, add the dressing just before serving. This keeps the salad crisp and tasty. The salad stays good in the fridge for about 3 to 5 days. After that, the veggies may get soggy. Avoid freezing it if you want to keep the best taste. Freezing can change the texture of the chickpeas and veggies. If you do freeze it, store it in a freezer-safe container. Thaw it in the fridge before you eat it. You don't need to reheat Mediterranean Chickpea Salad. It tastes great cold or at room temperature. If you prefer it warm, microwave it for a short time. Use low power to prevent cooking the veggies. Enjoy the full flavors of your salad just the way you like it! For the full recipe, check the section above. To make your salad more filling, add cooked grains. Quinoa or farro works great. You can also mix in diced avocado for healthy fats. If you want protein, add grilled chicken or shrimp. These options keep your meal tasty and satisfying. Yes, you can make this salad ahead of time! Prepare it a few hours or even a day in advance. Store it in the fridge to keep it fresh. The flavors blend better when they sit. Just remember to add the feta cheese right before serving for the best taste. This salad pairs well with many dishes. Serve it with warm pita bread or crusty baguette. It also goes nicely with grilled meats or fish. For a light meal, serve it with a bowl of soup. You can even bring it to a picnic or potluck! Check out the Full Recipe for more ideas. This blog post covered how to make a tasty Mediterranean Chickpea Salad. We looked at key ingredients and optional ones for extra flavor. I shared steps for easy prep and mixing. Helpful tips can boost your meal's flavor and avoid mistakes. Variations let you customize for diet needs. I also discussed storage and reheating to keep leftovers fresh. Enjoy this salad as a meal or side. With a few tweaks, you’ll make it your own. Dive in and taste the difference!](https://tossedflavors.com/wp-content/uploads/2025/05/31507b82-cab5-43ed-a6ba-6937ac5a9cb8.webp)
Mediterranean Chickpea Salad Fresh and Flavorful Meal
Looking for a fresh and flavorful meal? Mediterranean Chickpea Salad packs a punch with vibrant ingredients that excite your taste buds. This dish is easy
![- 1 can (15 oz) chickpeas, rinsed and drained - 1 cup cherry tomatoes, halved - 1/2 cup cucumber, diced - 1/4 red onion, thinly sliced - 1/2 cup fresh basil, chopped - 1/4 cup feta cheese, crumbled - 2 tablespoons extra-virgin olive oil - 1 tablespoon balsamic vinegar - 1 teaspoon garlic powder - Salt and pepper to taste In this High Protein Chickpea, Basil & Tomato Salad, the main ingredients shine. Chickpeas are the star. They pack a punch with protein and fiber. Rinsing and draining them removes excess salt. Cherry tomatoes add sweetness and juiciness. The diced cucumber brings a nice crunch. Thinly sliced red onion adds a hint of sweetness. Fresh basil provides a burst of flavor that is hard to beat. Crumbled feta cheese gives it a creamy touch. For the dressing, I use simple ingredients. Extra-virgin olive oil adds richness. Balsamic vinegar offers a tangy kick. Garlic powder adds depth. Salt and pepper bring all the flavors together. Combine everything for a salad that is refreshing and satisfying. If you're ready to make this salad, check out the Full Recipe for all the details! - Combine chickpeas, tomatoes, cucumber, and red onion in a bowl. - Mix gently to ensure even flavor throughout. Start with a large mixing bowl. You want enough space to move the ingredients around. Add the rinsed chickpeas first. They give the salad its high protein punch. Next, toss in the halved cherry tomatoes. Their sweetness brightens the dish. Now, add diced cucumber. It adds crunch and freshness. Finally, include the thinly sliced red onion. This adds a nice sweetness. Stir gently so everything mixes well. - Incorporate basil and feta for freshness. - Stir gently to avoid breaking the feta. Next, add fresh basil leaves. Their aroma is simply wonderful. Chop them coarsely and mix them in. Then, add the crumbled feta cheese. It adds a creamy texture to the salad. Stir carefully so the feta stays intact. This helps keep the salad looking pretty. - Whisk together olive oil, balsamic vinegar, garlic powder, salt, and pepper. - Achieve a smooth, emulsified dressing. For the dressing, grab a small bowl. Combine olive oil and balsamic vinegar. This mix adds richness and tang. Then, add garlic powder, salt, and pepper. Whisk until the dressing is smooth. This step is key for a well-blended flavor. - Drizzle dressing over salad. - Toss gently to coat all ingredients evenly. Now, drizzle your dressing over the salad base. This helps enhance all the flavors. Toss the salad gently to coat everything well. You want each bite to be full of flavor. - Allow salad to sit for 10 minutes before serving. - Helps flavors meld together. Let the salad rest for about 10 minutes. This time allows the flavors to blend beautifully. The waiting is worth it for a tastier dish. Enjoy your high protein chickpea, basil, and tomato salad delight! For the full recipe, check the sections above. - Best served chilled for refreshing flavor - Use a clear glass bowl for visual appeal Serving this salad chilled makes it taste crisp and fresh. The vibrant colors of the ingredients shine when you use a clear glass bowl. This adds to the presentation, making it more inviting. It’s a great choice for summer picnics or light lunches. - Marinate salad overnight for deeper flavors - Experiment with herbs like parsley or mint Marinating this salad overnight helps the flavors blend together. It allows the chickpeas to soak up the dressing, creating a tasty bite. You can add other herbs like parsley or mint to change the taste. This gives your salad a twist and keeps it exciting. - High in protein and fiber from chickpeas - Fresh vegetables provide essential vitamins Chickpeas are a great source of protein and fiber. They help keep you full and satisfied. The fresh vegetables offer vitamins that are good for your health. Eating this salad supports energy and overall wellness. Enjoying this dish is not only delicious but also nourishing. {{image_4}} You can add grilled chicken or shrimp for extra protein. This boosts the meal and makes it more filling. Tossing in quinoa is another great option. Quinoa adds texture and keeps the salad hearty. If you're vegan, you can omit feta cheese or replace it with nutritional yeast. Nutritional yeast adds a cheesy flavor without dairy. For the dressing, use maple syrup instead of honey. This keeps the recipe sweet and vegan-friendly. Mix in seasonal vegetables like bell peppers or corn. These add color and crunch to your salad. You can also top with avocado for added creaminess. Avocado brings a rich texture that pairs well with the other flavors. For more details, check out the Full Recipe! Store your leftover salad in an airtight container in the fridge. This keeps it fresh and tasty. It’s best to eat it within 2-3 days. After this time, the flavors may change, and the veggies might lose their crunch. I don’t recommend freezing this salad. Freezing can change the texture of the chickpeas and tomatoes. When you want a fresh salad, make it as needed for the best taste and quality. You can enjoy this salad cold. If you prefer it at room temperature, let it sit out for about 15 minutes. Avoid microwaving it, as this will make the veggies soggy and change the taste. Enjoy each bite fresh! Chickpeas are a powerhouse of nutrition. They are high in protein and fiber, making them great for muscle and digestion. They are low in fat, which helps you stay healthy. A serving can keep you full and satisfied. Plus, they provide vitamins and minerals that are key for your body. Yes, you can make this salad a few hours ahead. Doing this allows the flavors to blend well. Just cover it and store it in the fridge. Enjoying it later gives you a tasty meal ready to go. If you don’t have feta cheese, don't worry! You can try avocado for creaminess. Nutritional yeast adds a cheesy flavor without dairy. Vegan feta also works well for a plant-based option. Each choice adds a unique taste to your salad. To make this salad more filling, add grains like quinoa or bulgur. These grains boost the protein and fiber even more. They make the salad heartier and perfect for a main meal. Absolutely! This salad is perfect for meal prep. It keeps well in the fridge for a few days. You can pack it in portions for easy lunches or dinners. Just remember to store it in a tight container to keep it fresh. For the full recipe, check out the [Full Recipe]. This salad combines tasty ingredients for a healthy meal. You learned how to mix chickpeas, fresh veggies, and a simple dressing. Remember to let it rest for better flavor! Consider adding proteins or trying seasonal veggies for more variety. Enjoy your salad cold, and store leftovers properly to keep them fresh. With these tips, you can create delicious meals that are good for you and easy to prepare. Happy cooking!](https://tossedflavors.com/wp-content/uploads/2025/05/92891ed5-b191-4952-9869-d3f392cfc9a2.webp)
High Protein Chickpea, Basil & Tomato Salad Delight
If you’re ready to amp up your meals with tasty nutrition, this High Protein Chickpea, Basil & Tomato Salad Delight is for you! Packed with