Salads

Loaded Potato Salad Simple and Creamy Delight
Get ready to elevate your BBQ spread with my Loaded Potato Salad, a simple and creamy delight! This dish combines tender potatoes, savory toppings, and
![- Fresh, frozen, or canned corn (2 cups) - Fritos corn chips (1 cup) - Cherry tomatoes, halved (1 cup) - Red bell pepper, diced (1/2 cup) - Green onions, sliced (1/2 cup) - Shredded cheddar cheese (1/2 cup) - Mayonnaise (1/2 cup) - Lime juice (1 tablespoon) - Chili powder (1 teaspoon) - Salt and pepper to taste These ingredients work together to make a crunchy and flavorful salad. Fresh corn adds sweetness, while Fritos bring the perfect crunch. Cherry tomatoes and red bell peppers add color and taste. Green onions give a fresh bite, and cheddar cheese adds richness. The mayonnaise and lime juice create a creamy dressing that ties it all together. - Avocado, diced - Black beans, rinsed and drained - Jalapeños, minced For those wanting to boost flavor, consider adding diced avocado for creaminess. Black beans add protein and texture, while minced jalapeños bring heat. These extras can make the salad even more delicious and satisfying. You can find the Full Recipe for this delightful dish included above. 1. Preparing the corn: If you use fresh corn, boil it. Bring water to a boil and add corn. Cook for 3-5 minutes until tender. Drain and let it cool. For frozen corn, just follow package instructions. Canned corn needs to be drained before using. 2. Mixing the vegetables: In a large bowl, add the cooled corn, halved cherry tomatoes, diced red pepper, sliced green onions, and shredded cheddar cheese. Toss gently to mix. 1. In a small bowl, whisk together mayonnaise, lime juice, chili powder, salt, and pepper. Mix until smooth. This dressing adds creaminess and a kick to the salad. 1. Pour the dressing over the vegetable mix. Fold gently to coat everything without smashing the Fritos. 2. Just before serving, add the Fritos corn chips. This keeps them crunchy. If you want extra crunch, sprinkle them on top instead of mixing. For the full recipe, check the complete instructions above! To make the best Fritos Corn Salad, you need to mix gently. When you combine the veggies and dressing, be careful not to crush the Fritos. Use a spatula and fold the mixture. This keeps your chips crunchy! For flavor boost, chill the salad for at least 30 minutes. This step lets all the tastes mix well. The cold salad feels fresh and ready to serve. Fritos Corn Salad is perfect for summer barbecues and picnics. It's also great for potlucks or game day snacks. People love the crunch and flavor! Pair this salad with grilled meats like chicken or burgers. It also goes well with spicy dishes or tacos. Try it as a side with your favorite main course! For the full recipe, check out the [Full Recipe]. {{image_4}} You can make Fritos Corn Salad your own. Adding protein can boost its flavor and nutrition. Grilled chicken or shrimp works great. Just chop the cooked meat and mix it in. This adds a tasty twist and makes it more filling. If you want a vegetarian option, try tofu. Use firm tofu, cut into cubes. Cook it in a pan until golden. Then, add it to the salad. This makes the dish hearty and satisfying for everyone. You can also change the flavor of your salad. For a Mexican-inspired taste, add taco seasoning. This gives the dish a bold kick. Just mix in about one tablespoon of seasoning with the dressing for a fun twist. If you want a Southwest vibe, try corn salsa. Mix in a scoop of your favorite corn salsa just before serving. This adds freshness and extra crunch. These variations make Fritos Corn Salad versatile and exciting. You can enjoy it in many ways! For more ideas, check out the Full Recipe. To keep your Fritos corn salad fresh, put it in the fridge right away. Use an airtight container. This helps keep the flavors intact. You can use glass or plastic containers. Just make sure they seal well. If you have leftovers, try to eat them within a few days. Fritos corn salad will stay fresh for about 3 to 5 days in the fridge. After that, the flavors fade. You may also notice some signs of spoilage. Watch for changes in smell or color. If it smells off or looks slimy, it’s best to throw it away. Keeping an eye on these signs helps ensure your meal stays safe and tasty. Enjoy your cooking and savor the crunch of those Fritos! Can I make this salad ahead of time? Yes, you can make Fritos corn salad ahead of time. Making it a few hours before serving lets the flavors mix well. Just wait to add the Fritos until you serve it. This keeps them crunchy. What can I use instead of mayonnaise for a healthier option? Greek yogurt works great instead of mayonnaise. It adds creaminess and has less fat. You can also try avocado for a rich taste. Both options keep your salad tasty and healthy. How do I make a vegan version of this salad? To make a vegan version, swap mayonnaise with vegan mayo or cashew cream. You can also use plant-based cheese. This keeps it creamy and delicious without animal products. Can I add different vegetables to the recipe? Absolutely! You can add vegetables like diced cucumbers, shredded carrots, or bell peppers. Feel free to mix in your favorites. This makes the salad more colorful and packed with nutrients. This blog post showed you how to make a tasty Fritos Corn Salad. We covered the needed ingredients, step-by-step instructions, and helpful tips. You learned about options for flavor, serving ideas, and proper storage. Remember, you can customize the salad to fit your taste. Enjoy making this fun dish for any gathering. With fresh veggies and crunchy Fritos, it will surely please everyone. Happy cooking!](https://tossedflavors.com/wp-content/uploads/2025/06/6201c401-377b-4701-9d27-7cb112bc64b4.webp)
Fritos Corn Salad Crunchy and Flavorful Delight
Are you ready to dive into a dish that combines crunch, color, and flavor? Fritos Corn Salad is your go-to recipe for any gathering! It’s
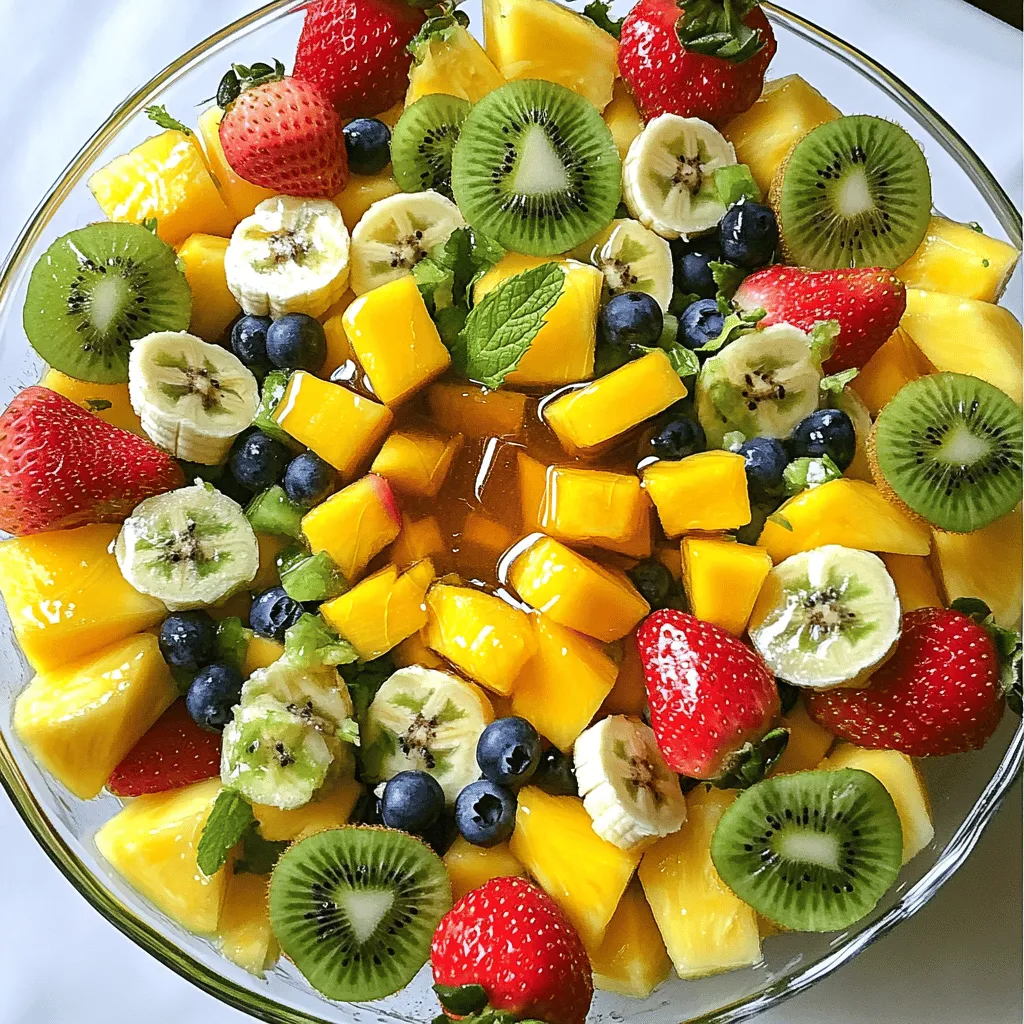
Easy Fruit Salad Recipe Quick and Simple Delight
Looking for a quick and tasty treat? This Easy Fruit Salad Recipe is your answer! With fresh fruits like pineapple, kiwi, and strawberries, you can
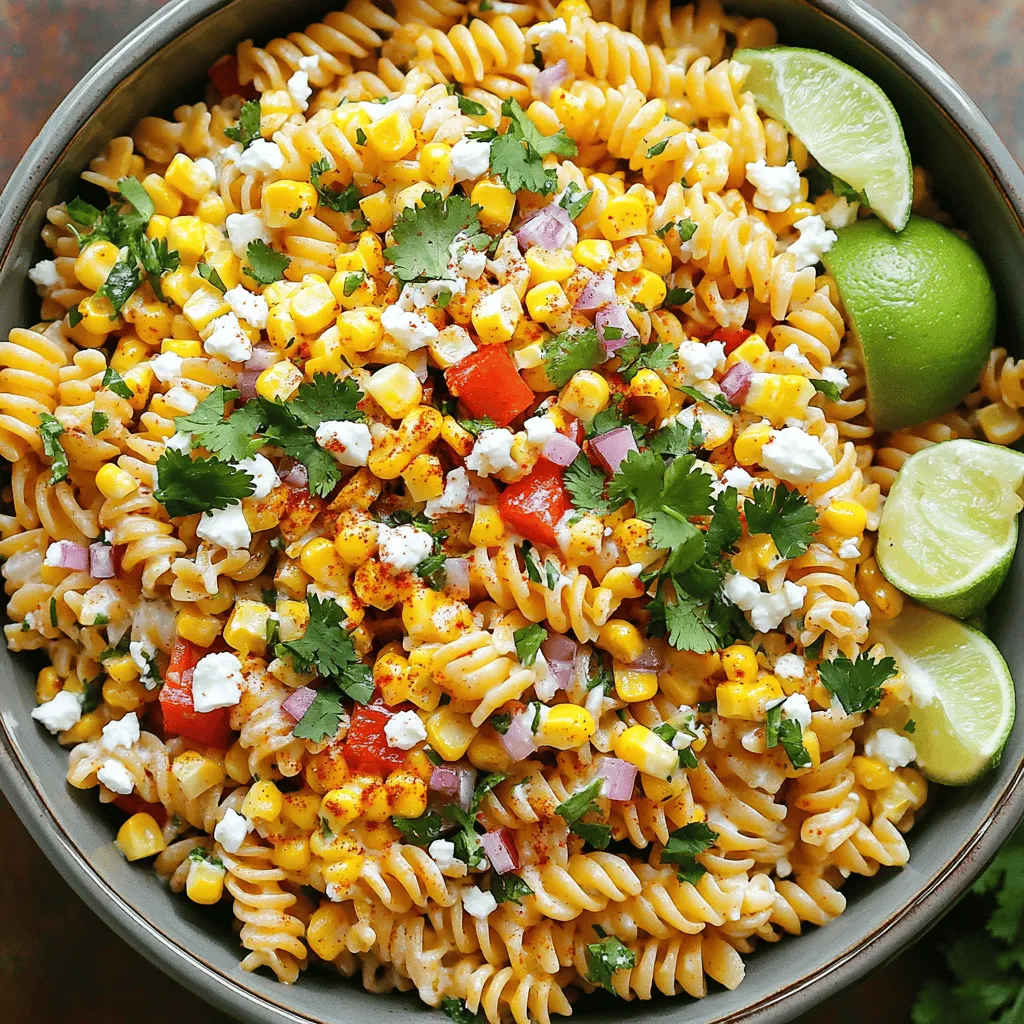
Mexican Street Corn Pasta Salad Bold and Flavorful Dish
Mexican Street Corn Pasta Salad brings vibrant flavors and fun to your table! This dish combines pasta, fresh corn, and zesty spices, perfect for summer
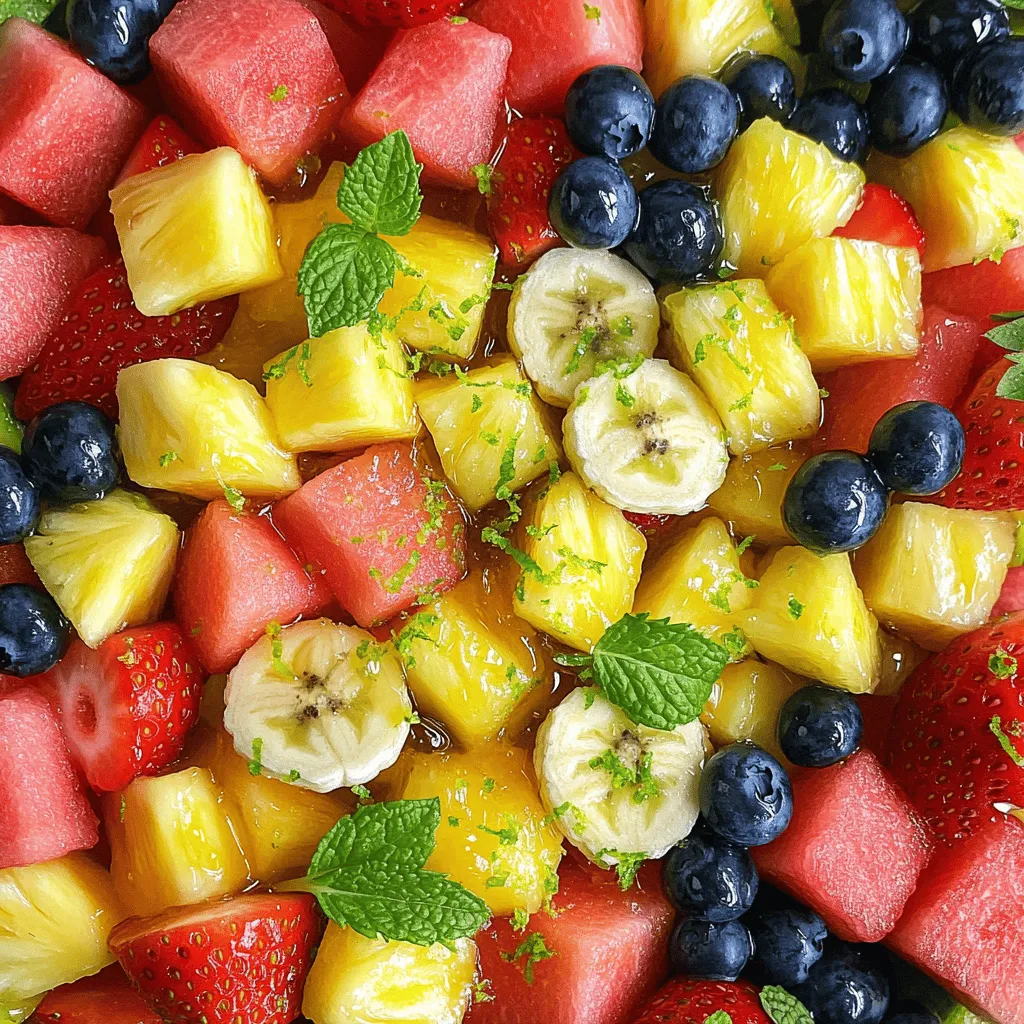
Honey Lime Fruit Salad Refreshing Summer Delight
Summer’s heat calls for a cool and tasty treat! This Honey Lime Fruit Salad mixes juicy fruits like watermelon, pineapple, and berries with a sweet
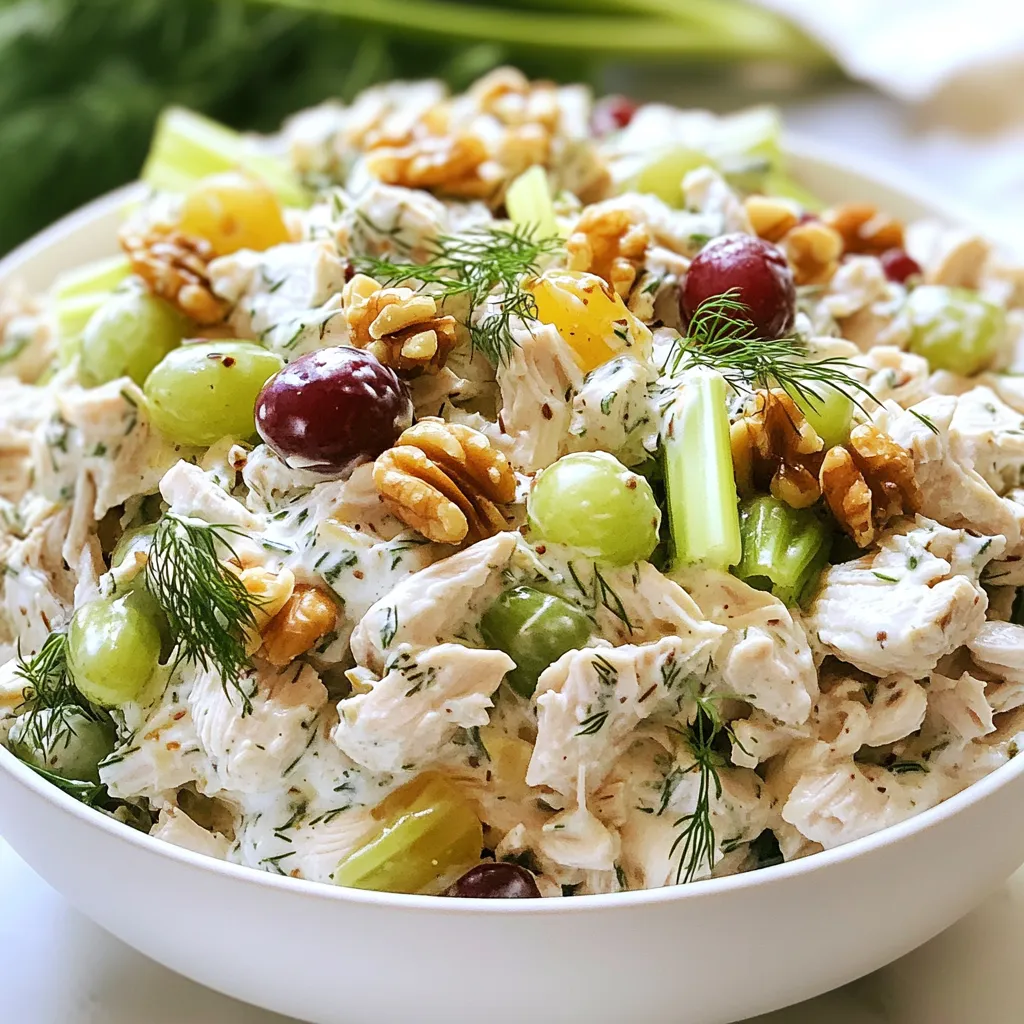
Greek Yogurt Chicken Salad Flavorful and Healthy Dish
Looking for a tasty and healthy dish? Greek yogurt chicken salad is your answer! This simple recipe combines fresh ingredients that are both delicious and
![- 1 cup orzo pasta - 1 cup cherry tomatoes, halved - 1 cucumber, diced The main stars of this salad are the orzo, cherry tomatoes, and cucumber. Orzo adds a fun shape and texture. Cherry tomatoes give sweetness, and cucumbers add a fresh crunch. - 1/2 red onion, finely chopped - 1/2 cup Kalamata olives, pitted and sliced - 1/2 cup feta cheese, crumbled The red onion gives a mild bite, while Kalamata olives add a salty flavor. Crumbled feta cheese brings creaminess and tang to the dish. These ingredients mix well with the pasta and veggies. - 4 tablespoons extra virgin olive oil - 2 tablespoons fresh lemon juice - 1 teaspoon dried oregano For the dressing, olive oil adds richness. Fresh lemon juice brightens the flavors. Dried oregano gives an earthy taste, making the salad feel Mediterranean. You will want to drizzle this dressing over the salad for a tasty finish. I recommend checking the [Full Recipe] for exact steps to bring all these ingredients together. Start by bringing a large pot of salted water to a boil. This is key for flavor. Once it boils, add 1 cup of orzo pasta. Cook it for about 8-10 minutes until it is al dente. You want it firm, not mushy. After cooking, drain the orzo in a colander. Rinse it under cold water to stop the cooking. This step cools the pasta and keeps it from sticking. Now, grab a large mixing bowl. Combine the cooled orzo with your veggies and cheese. Use 1 cup of halved cherry tomatoes, 1 diced cucumber, 1/2 finely chopped red onion, 1/2 cup sliced Kalamata olives, and 1/2 cup crumbled feta cheese. Toss in 1/4 cup of chopped fresh parsley too. Mix gently but well. Make sure every ingredient is evenly distributed. This ensures each bite is full of flavor. In a small bowl, whisk together 4 tablespoons of extra virgin olive oil, 2 tablespoons of fresh lemon juice, and 1 teaspoon of dried oregano. Add a pinch of salt and pepper for taste. Mix until the dressing is smooth and slightly thick. Drizzle this dressing over your salad. Toss gently again to coat all the ingredients. Taste the salad and adjust the seasoning. You can add more salt or pepper if you like. Let the salad sit for 15-20 minutes. This time helps the flavors blend well together. Check out the [Full Recipe] for more details! For a stunning presentation, serve your Mediterranean orzo pasta salad in a large, colorful bowl. You can also use individual plates for a personal touch. Add a few whole Kalamata olives on top, and sprinkle extra feta cheese for that vibrant look. Serve the salad chilled; it tastes best at a cool temperature. Letting your salad rest is key. After mixing, cover it and let it sit for about 15-20 minutes. This resting time helps the flavors blend well. If you have leftovers, you can enjoy them later. Just add a little olive oil or lemon juice to freshen up the taste. Be careful when cooking the orzo. If you overcook it, the pasta will become mushy. Always check for that perfect al dente texture. Also, don't skip the resting period. This step is crucial for developing the best flavor in your salad. Following these tips will enhance your dish and make it truly delightful. For the complete recipe, you can refer to the Full Recipe. {{image_4}} If you can't find orzo, use quinoa or couscous. Both options work well and add unique textures. For feta cheese, try goat cheese or a dairy-free alternative. These swaps change the taste but keep the dish fresh. Adding proteins can make this salad heartier. You can include grilled chicken or shrimp for a tasty boost. Chickpeas also work well for a vegetarian option. Make sure to balance the flavors. Season your proteins to match the salad's Mediterranean vibe. You can explore other dressings for variety. Balsamic vinaigrette adds a sweet touch. A yogurt-based dressing offers creaminess without heaviness. Adjust the flavors with fresh herbs like basil or mint. Each dressing option gives a new twist to the dish. For the full recipe, check out the Mediterranean Orzo Pasta Salad. To keep your Mediterranean orzo pasta salad fresh, use an airtight container. Glass containers work best as they do not retain odors. Store the salad in the fridge. It stays fresh for about three to five days. Make sure to cover it tightly to keep moisture in. You can freeze orzo pasta salad, but it's not the best option for taste. If you choose to freeze it, place the salad in a freezer-safe container. Keep it in the freezer for up to three months. When you thaw it, expect some texture changes. The vegetables may become a bit mushy, but the flavor will still be good. When warming up the salad, do it gently. You can use the microwave on low heat. Stir it every 30 seconds to keep everything even. Avoid high heat; it can ruin the pasta's texture. If you want to keep the fresh ingredients intact, serve it cold or at room temperature. It tastes best that way! You can keep this salad in the fridge for about three to five days. After that, the veggies may lose their crunch. Signs of spoilage include a bad smell or visible mold. Always check before eating. Yes, you can use whole wheat orzo. It adds a nutty flavor and more fiber. Whole wheat pasta cooks differently, so watch the cooking time. It may take a few minutes longer to reach al dente. To make it more filling, add ingredients like chickpeas, grilled chicken, or diced avocado. These options boost protein and healthy fats. You can also toss in more veggies like bell peppers or artichoke hearts. Absolutely! This salad is perfect for meal prep. Make it ahead of time and store it in the fridge. Just keep the dressing separate until you're ready to eat. This keeps everything fresh and tasty. For the full recipe, check the section above! Mediterranean Orzo Pasta Salad is a flavorful and easy dish to make. You start with orzo, fresh vegetables, and a simple dressing. You can customize it with proteins and other dressings. Remember, let the salad rest for the best flavor. Store leftovers in the fridge, and enjoy them for days. This salad is great for meal prep too. Serve it cold, and impress your guests with a beautiful presentation. Enjoy making your own version of this vibrant dish!](https://tossedflavors.com/wp-content/uploads/2025/05/f3b35c5d-ae84-44fc-a005-8d17cd30997c.webp)
Mediterranean Orzo Pasta Salad Flavorful and Fresh Dish
Looking for a bright, tasty dish that shines on any table? My Mediterranean Orzo Pasta Salad is the answer! Packed with fresh veggies, savory feta,
![- 1 cup strawberries, hulled and sliced - 1 cup blueberries - 1 ripe pineapple, diced into bite-sized pieces - 2 ripe peaches, diced - 1 cup cucumber, peeled and diced for a refreshing crunch - ¼ cup fresh mint leaves, finely chopped - 2 tablespoons honey, for natural sweetness - 2 tablespoons lime juice, to brighten the flavors - A pinch of sea salt, to enhance taste - Total Servings: 4 - Estimated Calories per Serving: About 120 - Health Benefits of Ingredients: - Strawberries are rich in vitamin C and antioxidants. - Blueberries help improve heart health and brain function. - Pineapples aid digestion and boost immunity. - Peaches provide vitamins A and C, along with fiber. - Cucumbers are hydrating and low in calories. - Mint leaves promote digestion and add freshness. This refreshing summer fruit salad is not just tasty; it's good for you too! You can enjoy it as a light snack or a dessert. The combination of fruits gives you a burst of flavor and nutrients. This salad helps keep you cool during hot days. For the full recipe, check out my Sunny Delight Summer Fruit Salad. 1. Hulling and slicing strawberries: Start by hulling the strawberries. This means you remove the green tops and the white core. After hulling, slice each strawberry into thin pieces. This makes them easy to eat. 2. Dicing pineapple and peaches: Next, take your ripe pineapple. Cut it into quarters, remove the core, and dice the flesh into bite-sized pieces. For the peaches, wash them, then slice into wedges. Remove the pit and chop them into small cubes. 3. Peeling and dicing cucumber: Grab a cucumber and peel off the skin. Then, slice it in half lengthwise. Remove the seeds with a spoon, and dice the cucumber into small chunks. This adds a nice crunch to your salad. 1. Whisking honey and lime juice: In a small bowl, pour two tablespoons of honey. Add two tablespoons of fresh lime juice. Whisk them together until smooth. This dressing will bring out the fruit's flavors. 2. Combining dressing with fruits: Drizzle the honey-lime mixture over the fruit and cucumber. This adds a sweet and tangy flavor to the salad. 1. Gently folding ingredients: With a spatula or large spoon, gently fold the fruits and cucumber together. Be careful not to mash the fruit. You want everything to be coated in the dressing. 2. Adding mint and seasoning: Finally, sprinkle finely chopped mint leaves over the salad. This adds a fresh taste. If you like, add a pinch of sea salt to enhance the flavors even more. Let the salad rest for about 10 minutes. This will help the flavors mix well. Enjoy your refreshing summer fruit salad! For the full recipe, check out the Sunny Delight Summer Fruit Salad. To pick ripe fruits, look for their color. Strawberries should be bright red, while blueberries should be deep blue. Pineapples should have a golden hue, and peaches should feel slightly soft. Next, check the texture and fragrance. Ripe fruits feel firm but yield to gentle pressure. Smell the fruit. A sweet aroma indicates ripeness. If it smells fresh, it is likely ready to eat. To adjust sweetness, add a bit more honey. Start with a teaspoon and mix well. Taste it after mixing. If you need more sweetness, add just a little more honey until it suits your taste. Balancing acidity is easy with lime juice. The tartness from lime juice brightens the flavors. Just a squeeze adds a zesty kick. It helps the fruit shine through in every bite. Serve your salad in clear bowls. This lets the bright colors of the fruits stand out. A clear bowl showcases the beauty of your creation. For garnishing, mint leaves add a fresh touch. Place a few leaves on top for color. You can also add thin lime slices around the edge for extra flair. This simple step makes your dish look even more inviting. For the full recipe, check out Sunny Delight Summer Fruit Salad. {{image_4}} You can add a fun twist to your summer fruit salad. Try including mango or kiwi for sweetness. Both fruits bring bright flavors and vibrant colors. You can also sprinkle some coconut flakes on top. They give a nice crunch and add a tropical touch. These changes make your salad feel like a sunny getaway. To give your salad a creamy feel, mix in yogurt or whipped cream. Greek yogurt adds protein and tanginess. You can also swap honey for flavored dressings like vanilla or coconut. This change makes the salad richer and adds depth to the taste. It’s a great way to transform a light dish into something more filling. For extra crunch, add nuts or seeds. Almonds, walnuts, or pumpkin seeds work well. They bring a nice texture and healthy fat. You can also include leafy greens like spinach or arugula. It boosts the salad's nutrition and makes it more filling. The greens balance the sweetness of the fruits, creating a delicious mix. Feel free to explore these variations to make your refreshing summer fruit salad even more delightful. Check the [Full Recipe] for the base you can modify! To keep your summer fruit salad fresh, store it right. Use an airtight container. This helps prevent air from making the fruit mushy. Glass or BPA-free plastic containers work best. Make sure to seal the lid tightly to lock in freshness. How long does the salad last in the fridge? Typically, it stays good for about 2 to 3 days. However, the sooner you eat it, the better it tastes. Watch for signs of spoilage. If the fruit looks slimy, smells sour, or changes color, it’s time to toss it. If you have leftover fruits, get creative! You can blend them into smoothies for a refreshing drink. Dice them and add to yogurt for a healthy breakfast. You could also freeze the extra fruit. Later, use it in desserts or smoothies. This way, you minimize waste and enjoy delicious snacks! To check if fruits are ripe, look for color and feel. For example, strawberries should be bright red. Their texture should be firm but slightly soft. Peaches should feel a bit soft and smell sweet. Pineapples should have a sweet aroma at the base. Blueberries should be deep blue with a powdery coating. Use these tips to pick the freshest fruits for your salad. Yes, you can prep this salad in advance. Simply cut the fruits and store them in the fridge. Keep the dressing separate until you are ready to serve. This way, the fruit stays fresh and does not get mushy. Mix everything together just before serving. It tastes best when fresh. Absolutely! This salad is both gluten-free and vegan. All the ingredients are plant-based. If you want to swap honey, use agave syrup or maple syrup. These options keep your salad sweet without any animal products. You can get creative with your salad! Consider adding tropical fruits like mango or kiwi for extra flavor. Nuts like almonds or walnuts can add a nice crunch. For a fun twist, try adding a sprinkle of chia seeds or a scoop of yogurt. Mix and match to find your favorite combination! This blog post covered a refreshing summer fruit salad. We explored fresh ingredients, tasty dressings, and fun serving tips. You learned how to prepare fruits and make a delicious dressing that brightens flavors. We also shared ideas for variations and storage. In the end, enjoy these fruits, get creative, and make your salad special. Embrace the joy of fresh produce and savor every bite!](https://tossedflavors.com/wp-content/uploads/2025/05/500a4a95-ba10-4d90-86ee-e85217d44a46.webp)
Refreshing Summer Fruit Salad for a Healthy Treat
Summer brings vibrant flavors and fresh fruits, making it the perfect time for a delicious fruit salad. I’ll guide you through creating a Refreshing Summer
![To make this easy Mexican coleslaw, gather these simple ingredients: - 4 cups green cabbage, finely shredded - 1 cup red cabbage, finely shredded - 1 cup carrots, freshly grated - 1 cup fresh corn kernels, cooked (you can use canned corn, drained) - 1/2 cup red onion, finely chopped - 1/2 cup fresh cilantro, chopped - 1 jalapeño pepper, finely diced (remove seeds for less heat) - 1/2 cup mayonnaise - 2 tablespoons fresh lime juice - 1 tablespoon agave nectar (or honey as a substitute) - Salt and black pepper, to taste You can easily adapt this recipe to fit what you have. Try these swaps: - Use green bell pepper instead of jalapeño for a milder taste. - Swap out mayonnaise for Greek yogurt for a lighter option. - Replace agave nectar with maple syrup for a different sweet note. - Add other veggies like bell peppers or radishes for extra crunch. Fresh ingredients make a huge difference in flavor. Crisp cabbage adds a satisfying crunch. Fresh corn gives sweetness and color. Using fresh herbs like cilantro brightens the dish. Always choose ripe and bright veggies for the best taste. When you use fresh, you create a vibrant coleslaw. This enhances every bite, making your meal more enjoyable. Remember, freshness is key to a delicious coleslaw. Check out the [Full Recipe] for more details. First, gather all your fresh veggies. You need 4 cups of green cabbage, 1 cup of red cabbage, and 1 cup of grated carrots. Also, have 1 cup of cooked corn, 1/2 cup of red onion, 1/2 cup of cilantro, and 1 jalapeño pepper ready. In a big mixing bowl, add the green cabbage, red cabbage, grated carrots, corn, red onion, cilantro, and jalapeño. Stir everything gently. Make sure each vegetable mixes well. This is key for a tasty coleslaw. Now, let’s make the dressing. In a small bowl, combine 1/2 cup of mayonnaise, 2 tablespoons of fresh lime juice, and 1 tablespoon of agave nectar. Add salt and black pepper to taste. Whisk these ingredients until the dressing is smooth. It should feel creamy and rich. Next, drizzle the creamy dressing over your vegetable mix. Toss everything together gently. Ensure the dressing coats all the veggies. Cover the bowl with plastic wrap or a lid. Place it in the fridge to chill for at least 30 minutes. This waiting time helps the flavors mix. Right before serving, stir the coleslaw again. Check if it needs more lime juice, salt, or pepper. Adjust to your taste. For the full recipe, check out the details provided earlier. Enjoy your refreshing and flavorful side! To make your coleslaw even better, try adding fruits. Diced mango or pineapple gives sweetness. You can also add nuts for crunch. Sliced almonds or chopped walnuts work well. Experiment with spices like cumin or chili powder. These add warmth and depth to your dish. Chilling your coleslaw is key. It helps the flavors blend well. After you mix the coleslaw, cover it tightly. Place it in the refrigerator for at least 30 minutes. This allows the dressing to soak into the veggies. If you can, chill it longer for even better taste. Serving is just as important as taste. Use a large, colorful bowl to show off the coleslaw. Garnish it with cilantro leaves for a pop of green. You can also add lime wedges around the bowl. This adds color and invites guests to dig in. For a fun touch, serve in small cups for individual portions. This makes your meal look fancy and fun! For the complete recipe, check out the Full Recipe section. {{image_4}} You can make your coleslaw even better by adding more veggies. Try adding bell peppers for a sweet crunch. Radishes bring a nice peppery taste. You can also use green onions for extra flavor. If you like it spicy, add some diced serrano peppers. The key is to keep the colors bright. It makes the dish more fun and appealing. While the creamy dressing is tasty, you can switch it up. Try using Greek yogurt instead of mayonnaise for a lighter version. A vinaigrette made with olive oil and vinegar gives a fresh taste. You can even mix in some salsa for added zest. This keeps the coleslaw exciting and new every time you make it. If you have dietary needs, don’t worry! Substitute mayonnaise with a plant-based option for a vegan version. You can also skip the corn if you need a low-carb dish. For gluten-free eaters, this coleslaw is already safe. Just check all your ingredients before you start. These changes let everyone enjoy this tasty dish. For the Full Recipe, check out the complete guide for preparation and tips! To keep your Easy Mexican Coleslaw fresh, use an airtight container. This will keep moisture out. Make sure the coleslaw is completely cool before sealing. If you have leftovers, store them right away. Keeping the dressing separate until you serve helps maintain the crunch of the veggies. When stored properly, this coleslaw lasts about 3 to 5 days in the fridge. The flavors will deepen over time, making it even tastier. However, if the veggies start to look wilty, it's time to toss it. Always give it a quick stir before serving to refresh the flavors. You can freeze coleslaw, but it's best to avoid the dressing. Instead, freeze just the veggies. Place them in a freezer bag, removing as much air as possible. They can last 2 to 3 months. When you're ready, thaw them overnight in the fridge. Make a fresh batch of dressing when you’re ready to eat. This way, you’ll enjoy the best texture and taste. For the full recipe, check the earlier sections. You can store Easy Mexican Coleslaw in the fridge for up to three days. It stays fresh and crunchy if you keep it in an airtight container. After three days, the veggies may become soggy. If you notice the coleslaw losing its texture, it’s time to toss it. Yes, you can make this coleslaw ahead of time! I recommend making it a day before you plan to serve it. This gives the flavors time to blend together. Just make sure to keep it covered in the fridge. When ready to serve, give it a good stir for even flavor. Mexican coleslaw pairs well with many dishes. Here are some great options: - Tacos - Grilled chicken - Pulled pork - Fish dishes - Barbecue meals This coleslaw adds a fresh and zesty touch to each meal. Absolutely! If you want a milder flavor, remove the seeds from the jalapeño. You can also use less jalapeño or skip it altogether. For more heat, add diced serrano peppers or a dash of hot sauce. Adjust the spice to fit your taste. If you’re not a fan of mayonnaise, you can substitute it with Greek yogurt. It gives a creamy texture without the heaviness. You can also try a vinaigrette made with olive oil and lime juice for a lighter option. Yes! Feel free to add more veggies to your coleslaw. Some great options include bell peppers, radishes, or even diced avocado. These additions can add more color and flavor, making your coleslaw even more delightful. To make this coleslaw vegan, replace the mayonnaise with a plant-based alternative, such as vegan mayo or tahini. Use agave nectar or maple syrup instead of honey. This way, you can enjoy the same great taste while keeping it plant-based. For the full recipe, check out the Zesty Mexican Coleslaw recipe above. This blog post covered the key parts of making Easy Mexican Coleslaw. You learned about fresh ingredients, step-by-step prep, and tips to enhance flavor. We explored variations and proper storage methods. Remember, using fresh veggies makes a big difference. Enjoy experimenting with different dressings and add-ins. Make this coleslaw your own! With simple steps, you can create a tasty side dish. Now, dive in and enjoy a quick, healthy meal.](https://tossedflavors.com/wp-content/uploads/2025/05/a12e1fd0-6bf1-4adb-bca5-fea9edb3ad2f.webp)
Easy Mexican Coleslaw Refreshing and Flavorful Side
Are you ready to spice up your meals with a refreshing twist? This Easy Mexican Coleslaw is packed with vibrant flavors and fresh ingredients that
Grinder Pasta Salad Fresh and Flavorful Delight
Are you ready to make a pasta salad that bursts with flavor? My Grinder Pasta Salad is the perfect dish for summer cookouts or a