Dinner

- 2 cups cooked white beans (cannellini or navy beans) - 1 cup cremini mushrooms, sliced - 1 medium onion, diced - 2 cloves garlic, minced - 2 medium carrots, diced - 2 celery stalks, diced - 4 cups low-sodium vegetable broth - 1 cup diced tomatoes (canned or fresh) - 1 teaspoon each of dried thyme and dried rosemary - 1 bay leaf - 2 tablespoons extra-virgin olive oil - Salt and pepper to taste - Fresh parsley for garnish Fresh ingredients make a big difference in flavor. They add bright notes and crisp textures. When you use fresh veggies, you get more nutrients. Fresh herbs also boost the taste. They bring out flavors in the stew. Always choose the best quality you can find. Seasonal produce is often fresher and tastier. - White beans are high in fiber and protein. They help you feel full and satisfied. - Cremini mushrooms provide B vitamins and antioxidants. They support your immune system. - Onions have compounds that may lower heart disease risk. They also add sweetness to the stew. - Garlic can help lower blood pressure and improve heart health. It adds a wonderful aroma. - Carrots are rich in beta-carotene. This supports eye health and boosts immunity. - Celery is low in calories and high in water content. It keeps you hydrated. - Vegetable broth adds flavor without heavy calories. It is a great base for any stew. - Diced tomatoes offer vitamin C and lycopene. They help protect against some cancers. - Thyme and rosemary are rich in antioxidants. They add unique flavors and health benefits. - Bay leaf enhances the stew's depth of flavor. Just remember to remove it before serving! - Olive oil is a healthy fat that supports heart health. It adds richness to the dish. - Salt and pepper enhance all the flavors. Adjust to your taste! - Fresh parsley adds a pop of color and freshness. It’s also full of vitamins. Using these ingredients creates a warm and nutritious meal. You can find the Full Recipe for Cozy White Bean Mushroom Stew in the previous sections. - Heating the Olive Oil Start by heating the extra-virgin olive oil in a large pot over medium heat. You want the oil to shimmer, showing it’s ready for cooking. - Sautéing the Onion and Garlic Add the diced onion to the hot oil. Stir it for about five minutes. The onion should turn soft and clear. Then, add the minced garlic. Stir for one more minute. Be careful not to let it burn. - Incorporating Carrots and Celery Next, toss in the diced carrots and celery. Cook these for four to five minutes, stirring often. They will start to soften, adding sweetness to the stew. - Cooking the Mushrooms to Tenderness Now, add the sliced cremini mushrooms. They need about five to seven minutes to cook. Watch as they release moisture and become tender. This step brings a rich, earthy flavor to the stew. - Stirring in Beans and Tomatoes Once the mushrooms are ready, stir in the cooked white beans and diced tomatoes. Make sure to include all the juices from the tomatoes. This adds depth to the stew. - Bringing to a Boil Now, add the vegetable broth along with dried thyme, dried rosemary, and the bay leaf. Bring the stew to a lively boil. This step helps all the flavors come together. - Reducing Heat and Covering After it boils, lower the heat to let it simmer. Cover the pot with a lid. Let it cook gently for about 20 to 25 minutes. This allows the flavors to meld beautifully. - Adjusting Seasoning Before Serving Once done, remove the bay leaf. Taste the stew and add salt and pepper as needed. This last step ensures the flavors are just right. For the full recipe, refer to the Cozy White Bean Mushroom Stew section. Enjoy your cooking adventure! To get the perfect texture for your stew, start with the right base. Use a heavy-bottomed pot. It helps to distribute heat evenly. When you sauté the vegetables, keep an eye on the heat. Too high, and they can burn; too low, and they may steam. Cook them until they are just tender. This makes a big difference in the final dish. You want a nice balance of creamy beans and tender veggies. - Adding Different Herbs and Spices Experimenting with herbs and spices can elevate your stew. While thyme and rosemary are classic, consider adding sage or oregano for a twist. A dash of smoked paprika can bring warmth. You can also add a pinch of red pepper flakes for heat. Taste as you go, and find your favorite blend. - Using Fresh vs. Canned Tomatoes Using fresh tomatoes gives a bright, vibrant taste. However, canned tomatoes are convenient and often packed with flavor. If using fresh, select ripe ones for the best results. For canned, choose whole tomatoes and crush them by hand. This adds a rustic feel to your stew. One common mistake is not seasoning enough. Add salt and pepper as you cook, not just at the end. This helps layers of flavor build. Another mistake is overcooking the beans. If you use canned beans, add them near the end. Lastly, don’t skip the garnishing step. Fresh parsley not only adds color but also enhances the flavor. For the full recipe, check out the Cozy White Bean Mushroom Stew section. {{image_4}} You can switch up the beans in this stew. Try using kidney beans or pinto beans. Each type adds its own flavor and texture. Black beans are a great choice too. They give a rich taste and a fun color. Mix and match based on what you have at home. Each bean makes the stew special in its own way. Want to make your stew even better? Add some greens! Spinach or kale works great in this recipe. Just toss them in during the last few minutes of cooking. They will wilt nicely and add a pop of color. Plus, they boost the nutrition. You’ll get extra vitamins and minerals without changing the taste much. If you love spice, try adding chili peppers. Fresh jalapeños or serranos can wake up the flavors. Chop them finely and add them with the onion. If you want a milder heat, try poblano peppers instead. They add flavor without too much kick. Adjust the amount to match your heat level. Enjoy the warmth and depth they bring to your cozy stew. For the full recipe, check out the Cozy White Bean Mushroom Stew section above! To keep your Cozy White Bean Mushroom Stew fresh, use these steps: - Refrigeration Tips: Let the stew cool before putting it in the fridge. Use an airtight container. It will stay good for about 4-5 days. Always check for any off smells or signs of spoilage before serving. - Freezing the Stew: If you want to store it longer, freezing is a great option. Place the cooled stew in a freezer-safe container. Leave some space at the top for expansion. It can last up to 3 months in the freezer. When you're ready to enjoy your stew again, there are easy ways to reheat it: - Stovetop Method: Pour the stew into a pot. Heat on medium until it simmers. Stir often to make sure it heats evenly. - Microwave Method: Place the stew in a microwave-safe bowl. Cover it with a microwave-safe lid or wrap. Heat in short intervals, stirring in between, until hot. Understanding the shelf life helps prevent waste: - In the fridge, the stew lasts about 4-5 days. - In the freezer, it can stay fresh for up to 3 months. Always label your containers with the date. This way, you can enjoy every delicious bite of your Cozy White Bean Mushroom Stew without worry. If you need the full recipe, check the earlier section! Yes, you can make this stew ahead of time. It tastes even better the next day! Just let it cool, then store it in the fridge. When you're ready, reheat it on the stove or in the microwave. You can use several beans instead of white beans. Great options include chickpeas, black beans, or kidney beans. Each type adds a unique taste and texture. Absolutely! This stew is flexible. You can add spinach, kale, or bell peppers. Just chop them up and toss them in when you add the carrots and celery. I recommend serving it with crusty bread or a fresh salad. The bread is perfect for soaking up the stew. A slice of avocado on the side also adds creaminess. Yes, this stew is gluten-free! All the ingredients are naturally gluten-free, making it a great choice for everyone. For the full recipe, including cooking tips, refer to the Cozy White Bean Mushroom Stew section. Don't forget to serve it hot and enjoy it with your favorite sides! This blog post covered the cozy white bean mushroom stew. We discussed key ingredients, cooking steps, and tips for a perfect dish. Using fresh ingredients enhances flavor and nutrition, making your meal healthier. In the end, experimenting with variations can make your stew unique. Whether you add greens, spice it up, or try different beans, the options are endless. Enjoy your cooking adventure!
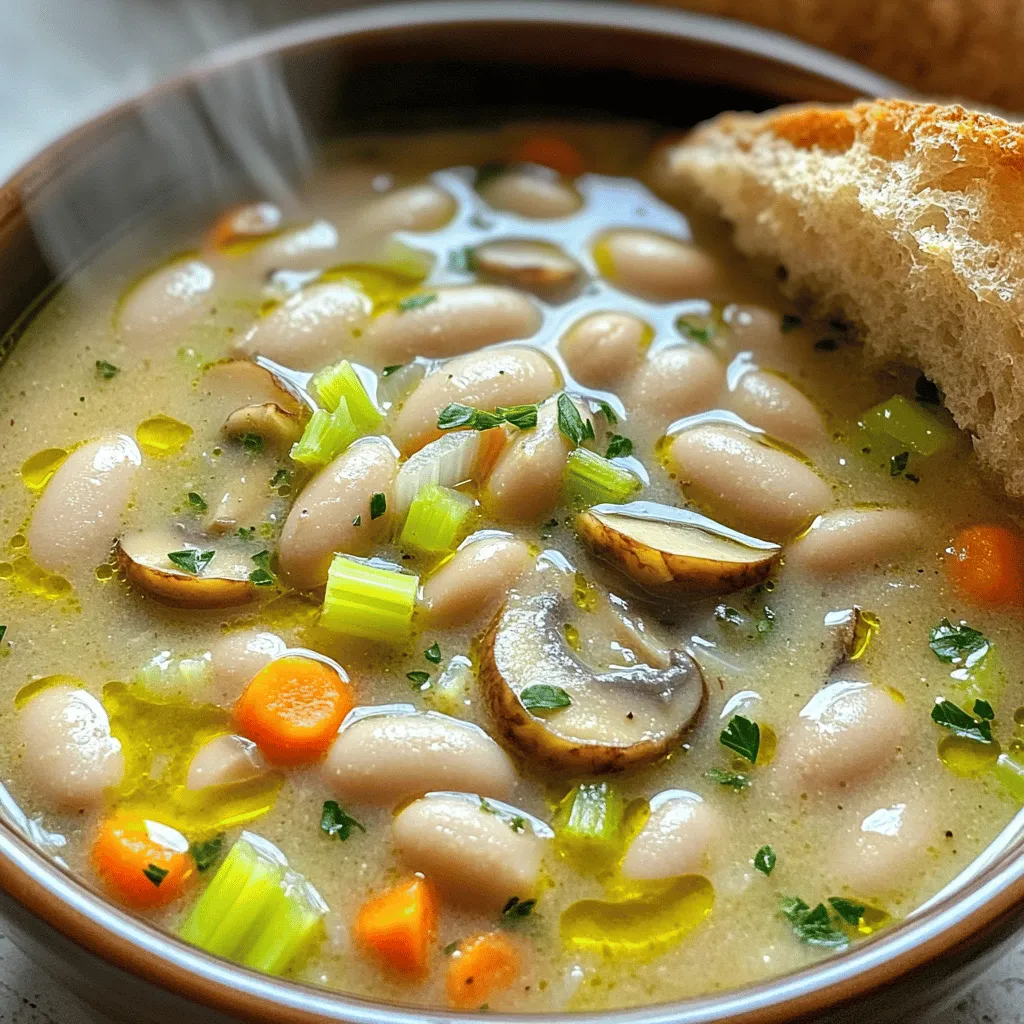
Cozy White Bean Mushroom Stew Flavorful Vegan Delight
Warm up your kitchen with my Cozy White Bean Mushroom Stew, a vegan delight that’s rich in flavor and nutrition. This comforting dish is easy
- 2 ripe avocados, pitted and peeled - 2 cups fresh basil leaves - 1/3 cup pine nuts (or walnuts for a twist) - 2 cloves garlic, peeled - 1/4 cup grated Parmesan cheese (or nutritional yeast for a vegan option) - 1/2 cup extra virgin olive oil - Juice of 1 lemon - Salt and pepper to taste - 12 oz spaghetti or your favorite pasta - Cherry tomatoes, halved (for garnish) - Fresh basil leaves (for garnish) - Sun-dried tomatoes for a tangy kick - Spinach for added greens - A pinch of red pepper flakes for heat - Lemon zest for extra brightness - Use gluten-free pasta if you avoid gluten. - Swap Parmesan with nutritional yeast for a vegan option. - Replace pine nuts with sunflower seeds for nut-free pesto. - Use avocado oil instead of olive oil for a different flavor. {{ingredient_image_1}} First, bring a large pot of salted water to a boil. Add 12 oz of spaghetti or your favorite pasta. Cook it according to the package instructions until it is al dente. This should take about 8 to 10 minutes. Before you drain the pasta, reserve one cup of the pasta water. This water will help make the sauce smoother later. While the pasta cooks, make the creamy avocado pesto. In a food processor, combine two ripe avocados, two cups of fresh basil leaves, one-third cup of pine nuts, and two peeled garlic cloves. Add a quarter cup of grated Parmesan cheese, the juice of one lemon, and salt and pepper to taste. Blend everything until it is smooth. While blending, slowly drizzle in half a cup of extra virgin olive oil. This will make the pesto creamy. Taste it, and adjust the seasoning if you want more flavor. Once your pasta is cooked and drained, return it to the pot. Add the creamy avocado pesto to the pasta. Toss everything together until the pasta is fully coated. If the sauce seems too thick, add some of the reserved pasta water a little at a time. This will help reach your desired consistency. Serve your pasta right away. For a nice touch, garnish with halved cherry tomatoes and fresh basil leaves. Enjoy your quick and easy creamy avocado pesto pasta! Choose avocados that feel slightly soft. Gently squeeze them in your palm. If they yield a bit, they are ripe. A dark green color can also indicate ripeness. Avoid avocados with large dark spots or cracks. These signs often mean they are overripe or bad. If your avocados are hard, let them sit at room temperature for a few days. You can speed up ripening by placing them in a paper bag with bananas. For smooth pesto, blend your ingredients well. Start with avocados, basil, and nuts in the food processor. Then, drizzle in olive oil slowly while blending. This helps to create a creamy texture. If your pesto is too thick, add reserved pasta water a little at a time. This water adds flavor and helps reach the right consistency. Always taste as you go, adjusting salt and pepper to your liking. Serve your creamy avocado pesto pasta hot. Garnish with halved cherry tomatoes for a pop of color. Fresh basil leaves add a nice touch and extra flavor. You can also sprinkle more Parmesan cheese on top. For a bit of heat, add red pepper flakes. Pair this dish with a light salad or crusty bread for a complete meal. Enjoy it fresh for the best taste! Pro Tips Use Ripe Avocados: Make sure your avocados are perfectly ripe for the creamiest pesto. They should yield slightly when gently squeezed. Adjust Consistency: If your pesto is too thick, gradually add reserved pasta water until you reach your desired creaminess. Experiment with Nuts: Try using different nuts like walnuts or pecans for a unique flavor twist in your pesto. Fresh Herbs Matter: Use fresh basil for the best flavor. If you want to add a touch of spiciness, consider mixing in some arugula or spinach. {{image_2}} You can easily make this dish vegan. Just swap out the Parmesan cheese for nutritional yeast. Nutritional yeast gives a cheesy flavor without any dairy. Use the same amount as the cheese. It blends well with the avocado and basil. While spaghetti is a classic choice, feel free to mix it up. You can use whole wheat pasta for more fiber. Zucchini noodles or gluten-free pasta also work great. Each option gives a different taste and texture, so choose what you like best. Want to make this dish heartier? Add some protein! Grilled chicken or shrimp pair well with the creamy pesto. You can also use chickpeas or white beans for a plant-based option. Just toss them in when you mix the pasta and pesto. This adds flavor and keeps you full longer. To store leftover pesto pasta, let it cool first. Place it in an airtight container. Make sure to remove as much air as possible. This keeps the pasta fresh for longer. It can last in the fridge for up to three days. If you want to keep it longer, consider freezing it. When you're ready to eat, reheating is simple. I recommend using the stove for best results. Add a splash of water or olive oil in a pan. Heat it over low to medium heat. Stir often to avoid sticking. If you're in a hurry, the microwave works too. Just cover it and heat in short bursts. Check and stir every 30 seconds. To freeze pesto, first, make the avocado pesto without mixing it with pasta. Pour it into ice cube trays or small containers. This way, you can use just what you need later. Seal the trays or containers tightly. It can last in the freezer for about three months. When ready to use, thaw it in the fridge overnight. Yes, you can make this pasta in advance. Cook your spaghetti and prepare the creamy avocado pesto. Toss them together, but leave out the garnishes. Store the pasta in an airtight container in the fridge. This way, it keeps fresh for a few days. When you are ready to enjoy it, warm it gently on the stove. Add a splash of reserved pasta water to keep it creamy. If you don’t have pine nuts, don’t worry! You can use walnuts as a great alternative. They add a nice, rich flavor. Other options include sunflower seeds or cashews. These nuts work well too and give your pesto a unique taste. Just remember to toast them lightly for a deeper flavor. Creamy avocado pesto lasts about 3 to 5 days in the fridge. To keep it fresh, store it in an airtight container. You can also press plastic wrap directly on the pesto's surface to reduce air exposure. This helps slow down browning. If you see any browning on top, just stir it in before using. This blog covered how to make a tasty creamy avocado pesto pasta. We discussed key ingredients, ways to customize, and how to ensure perfect texture. You learned tips for selecting avocados, serving ideas, and how to store leftovers effectively. Remember, you can always adapt this recipe to fit your diet. Enjoy experimenting with flavors and variations. Cooking should be fun, and this dish is a great way to elevate your meals!
Creamy Avocado Pesto Pasta Quick and Easy Recipe
Looking for a quick, tasty meal? You’ve come to the right place! This Creamy Avocado Pesto Pasta is easy to whip up and bursting with
- 4 large yellow onions - 3 cloves garlic - 4 cups beef or vegetable broth The main stars of this dish are the onions. They add sweetness and depth of flavor. I like to use yellow onions for the best results. Their natural sugars caramelize beautifully, creating that rich taste. Garlic adds an aromatic touch that complements the onions perfectly. You can use either beef or vegetable broth for your base, depending on your preference. - 1 teaspoon sugar - 1 teaspoon salt - 1 teaspoon black pepper For seasoning, a bit of sugar balances the flavors and enhances the sweetness of the onions. Salt and black pepper are essential. They bring out the natural taste of the ingredients. You can also add balsamic vinegar and fresh thyme for an extra layer of flavor. - 1 baguette - 2 cups shredded Gruyère cheese - Optional garnishes A crusty baguette is perfect for this soup. It adds texture and is great for dipping. Gruyère cheese melts wonderfully, creating a rich and gooey topping. You can also use Swiss cheese if you prefer. For added flair, consider garnishing with fresh thyme or parsley. This gives your soup a pop of color and freshness. You can find the full recipe for more detailed steps to make this comforting dish. To start, we need to sauté the onions. Heat olive oil in a skillet over medium heat. Once hot, add the thinly sliced onions. Cook for about 5-7 minutes. Stir them occasionally until they soften and become translucent. Next, add minced garlic and sugar to the skillet. Cook for another 2 minutes. Stir continuously to release the garlic's aroma. This step adds a sweet touch to the soup. Now, carefully transfer the cooked onion and garlic mixture into your slow cooker. Pour in 4 cups of beef broth or vegetable broth if you prefer. Then, add salt, black pepper, balsamic vinegar, fresh thyme, and the bay leaf. Mix all the ingredients well. Cover your slow cooker with its lid. Set it to cook on low for 6-8 hours or on high for 3-4 hours. This long cooking time helps all the flavors meld beautifully. When the cooking time is up, take out the bay leaf and taste the soup. Adjust the seasoning with more salt or pepper if needed. Next, preheat your oven to broil. Arrange sliced baguette on a baking sheet and toast lightly for 2-3 minutes on each side. To serve, ladle the hot soup into oven-safe bowls. Add a toasted baguette slice on top of each bowl. Sprinkle shredded Gruyère cheese generously over the bread. Finally, broil the bowls for 2-3 minutes until the cheese melts and bubbles. Keep a close eye to prevent burning. Enjoy your Slow Cooker French Onion Soup with its rich, comforting flavors. For the complete recipe, check [Full Recipe]. For a rich flavor, choose beef broth. It adds depth and umami. If you prefer a lighter taste, vegetable broth works well too. You can also mix both for a unique twist. Taste is key! Adjust seasoning as you cook. A pinch of salt can enhance flavors, while a dash more pepper adds a kick. Remember, you can always add, but you can't take away. To store leftovers, let the soup cool first. Transfer it to an airtight container. It lasts in the fridge for up to five days. For longer storage, consider freezing. Just make sure to leave space in the container. When reheating, do it slowly. Use a saucepan over low heat. Stir to avoid hot spots. If the soup thickens, add a splash of broth to bring it back to life. Garnish your soup for a special touch! Finely chopped parsley or fresh thyme adds color. Place it on top before serving. Pair this soup with a crisp green salad. A light salad complements the rich flavors. You can also serve it with crusty bread for dipping. Enjoy your warm bowl of comfort! {{image_4}} You can easily make this soup vegetarian or vegan. Just use vegetable broth instead of beef broth. This swap keeps the rich taste while making it plant-friendly. For cheese, try using a vegan cheese that melts well. There are many good options available now. Nutritional yeast can also add a cheesy flavor without dairy. You can add more depth to your soup by changing up the herbs and spices. Fresh rosemary or sage can bring a unique twist to the classic taste. A pinch of cayenne pepper adds a nice kick. Want to brighten the flavors? Add a splash of white wine or a squeeze of lemon juice. Both bring a fresh layer that contrasts nicely with the sweetness of the onions. Serving this soup in bread bowls is a fun twist. Just hollow out some small sourdough loaves and fill them with soup. The bread soaks up the flavor, making each bite delicious. You can also serve the soup in individual bowls for a fancy touch. This works well for dinner parties. For family-style, ladle the soup into one big pot and let everyone serve themselves. For the full recipe, check out Slow Cooker French Onion Bliss. To keep your soup fresh, use airtight containers. Glass or plastic will work well. Let the soup cool before sealing the container. Store it in the fridge for up to three days. For longer storage, you can freeze the soup. Use freezer-safe containers or bags. Leave some space at the top to allow for expansion. When ready to eat, thaw it overnight in the fridge. Reheat on the stove or in the microwave until hot. In the fridge, your soup lasts about three days. If you freeze it, it can last up to three months. Check for signs of spoilage. If it smells off or has strange colors, toss it out. Always trust your senses when it comes to food safety. It takes about 15 minutes to prep. Cooking takes 6-8 hours on low or 3-4 hours on high. This long cooking time helps all the flavors blend well. You can smell the aroma as it cooks, making your kitchen feel warm and cozy. Yes, you can use vegetable broth instead. This option keeps the soup vegetarian. The taste will still be rich and satisfying. You can also add a splash of soy sauce for extra flavor. A fresh baguette works great. It gets crispy when toasted and holds the cheese well. You can also use sourdough or ciabatta for a different twist. These breads add a nice crunch to each bite. Yes, this soup freezes well. To freeze, let it cool first. Store it in airtight containers. When you want to eat it, thaw it in the fridge overnight. Reheat it on the stove or in the microwave, stirring well. Enjoy it as if it were freshly made! In this article, I covered the essential ingredients for Slow Cooker French Onion Soup, including onions, garlic, and broth. I shared step-by-step instructions for preparation and cooking. Plus, I offered tips for perfect flavor and storage. Making this soup can be fun and rewarding. With simple swaps, you can cater to different diets. Enjoy your homemade soup, and remember, the key is in the details!
Slow Cooker French Onion Soup Flavorful Comfort Food
Looking for a warm, hearty dish that brings comfort? Slow Cooker French Onion Soup is the answer! With its rich flavors and melty cheese, this
- 4 bone-in, skin-on chicken thighs - 2 tablespoons olive oil - 2 large yellow onions, thinly sliced - 2 cups non-alcoholic apple cider - 1 cup chicken broth - 3 cloves garlic, minced - 1 tablespoon Dijon mustard - 1 teaspoon dried thyme - 1 teaspoon salt - ½ teaspoon black pepper - 2 tablespoons apple cider vinegar - Fresh parsley, chopped, for garnish To make this dish, you will need a few key tools: - A large skillet or Dutch oven - A mixing bowl for the braising liquid - A wooden spoon or spatula for stirring - A meat thermometer to check the chicken - A sharp knife for slicing onions and garlic You can make some swaps if you don't have an ingredient on hand: - Chicken Thighs: Use chicken breasts or drumsticks instead. - Olive Oil: Substitute with canola oil or butter. - Apple Cider: Use apple juice or a mix of apple juice and vinegar. - Chicken Broth: Vegetable broth works well too. - Dijon Mustard: Yellow mustard can be a good alternative. These substitutions can help you create a tasty dish with what you have at home. For the full recipe, check the detailed instructions in the article. Start by patting dry the chicken thighs with a paper towel. This helps the skin get crispy when you cook it. Season both sides of the chicken with salt and black pepper. Heat the olive oil in a large skillet over medium heat. Once the oil is hot, place the chicken skin-side down in the skillet. Sear the chicken for about 4-5 minutes until the skin turns golden brown. Flip the chicken over and cook for another 4-5 minutes. Then, take the chicken out of the skillet and set it aside. In the same skillet, add the thinly sliced onions. Cook the onions over medium heat while stirring often. This will take about 10 minutes. You want them to become soft and start to caramelize. In the last minute, add the minced garlic. Stir the garlic in well, but be careful not to let it burn. This will add a great flavor to your dish. In a medium bowl, mix together the apple cider, chicken broth, Dijon mustard, dried thyme, and apple cider vinegar. Whisk these ingredients until they blend well. This mixture will create a rich sauce for your chicken. Pour the apple cider mixture over the caramelized onions in the skillet. Place the seared chicken thighs back into the pan, skin-side up. Make sure they are nicely nestled in the sauce. Bring everything to a gentle simmer. The bubbling will help the flavors meld together. Cover the skillet with a lid and reduce the heat to low. Let the chicken braise for 30-35 minutes. This cooking time makes the chicken tender and juicy. You want it to reach an internal temperature of 165°F (75°C) to ensure it is fully cooked. Once the chicken is done cooking, carefully take it out of the skillet. Cover the chicken with foil to keep it warm. Turn the heat up to medium-high and let the sauce simmer for another 5-10 minutes. Stir it occasionally. This will thicken the sauce. When ready, plate the chicken and pour the caramelized onion sauce over the top. Finish with a sprinkle of fresh parsley for a nice touch. For a complete meal, serve it with mashed potatoes or crusty bread to soak up the sauce. For the full recipe, check out the detailed instructions above! Caramelizing onions takes time and patience. Start by slicing the onions thinly. Use a large skillet for even cooking. Heat the pan over medium heat and add olive oil. Once the oil is hot, add the onions. Stir them often to prevent burning. Cook for about 10-15 minutes. You want them to turn a nice golden brown color. If they stick to the pan, add a splash of water. This helps release the flavor. For deeper sweetness, add a pinch of sugar. You can boost the flavor of your cider braised chicken with spices. Try adding a dash of smoked paprika or a pinch of cayenne. Both spices add warmth and depth. You can also use fresh herbs like rosemary or sage. These herbs work well with the chicken and onions. Experiment with your favorite spices to find what you like best. Remember, a little goes a long way. To keep chicken thighs juicy, start with skin-on pieces. The skin helps lock in moisture. Pat the chicken dry before seasoning. This step ensures a nice sear. Always sear the thighs skin-side down first. Cook them until they are crispy and golden. Avoid overcrowding the pan; this helps with even cooking. After braising, let the chicken rest for a few minutes before serving. This step helps the juices redistribute and keeps the meat tender. For the full recipe, check out the details above. {{image_4}} You can use various chicken cuts for this dish. Chicken thighs are great because they stay juicy. You can also try bone-in breasts for a leaner option. If you prefer, use drumsticks for a fun twist. Just remember, cooking times may change. Always check the internal temperature to ensure it’s safe. To simplify the cooking, make it a one-pot meal. After searing the chicken, add the onions directly in the same pot. Follow the same steps to caramelize them. Then, pour in the braising liquid and nestle the chicken back. This method saves time and makes cleanup easier. You can cook this dish on the stove or in the oven. If you use the oven, preheat it to 350°F (175°C). After searing the chicken and caramelizing the onions, transfer everything to a baking dish. Cover with foil and cook for 30-35 minutes. This method gives you even cooking and allows the flavors to blend well. You can find the full recipe in the main article. After enjoying your cider braised chicken with caramelized onions, you can store leftovers easily. First, let the chicken cool down to room temperature. Place it in an airtight container. This helps keep the chicken moist and fresh. You can store it in the fridge for up to 3 days. Ensure you cover the sauce well to prevent it from drying out. To reheat your chicken, you can use a skillet or the oven. If using a skillet, add a splash of water or broth to keep it moist. Heat over medium-low heat. Cover the skillet to trap steam and warmth. If using the oven, preheat it to 350°F (175°C). Place the chicken in an oven-safe dish. Cover with foil and heat for about 20 minutes or until warmed through. Make sure it reaches an internal temperature of 165°F (75°C). Freezing is a great option for longer storage. To freeze, let the chicken cool completely. Place it in freezer-safe bags or containers. Remove as much air as possible to prevent freezer burn. Your cider braised chicken can last up to 3 months in the freezer. When ready to eat, thaw it overnight in the fridge. Reheat as mentioned above for the best taste. If you want the full recipe, check the section above. Yes, you can use hard cider. It adds a nice depth of flavor. The alcohol will cook off, leaving a rich taste. If you prefer a non-alcoholic option, stick with apple cider. Both options create a delicious dish. You can serve this chicken with several sides. Mashed potatoes work great for soaking up the sauce. Crusty bread is another excellent choice. A fresh salad or roasted vegetables adds a nice balance too. These sides complement the rich flavors well. To check if the chicken is done, use a meat thermometer. The internal temperature should reach 165°F (75°C). The meat should also be tender and easy to pull apart. If it’s not, let it cook a bit longer. This ensures your chicken is juicy and safe to eat. Yes, this recipe is great for meal prep. You can store leftovers in the fridge for up to four days. Just make sure to keep the chicken and sauce separate until ready to eat. This way, the chicken stays moist and flavorful. For longer storage, you can freeze it. Just thaw before reheating for a quick meal. You can find the full recipe in this article. This article covered how to make Cider Braised Chicken with Caramelized Onions. We discussed the ingredients, tools, and substitutes. You learned step-by-step instructions, tips for perfect caramelization, and cooking techniques for juicy chicken. I also shared variations and storage tips to keep your meal fresh. By following these steps, you can enjoy a flavorful and satisfying dish. Experiment with the recipe to make it your own!
Cider Braised Chicken with Caramelized Onions Delight
Looking for a mouthwatering dish that’s both simple and impressive? Cider Braised Chicken with Caramelized Onions serves up tender chicken with rich flavors. You’ll love
- 2 flatbreads (store-bought or homemade) - 1 cup cooked chicken breast, shredded - 1/2 cup pesto sauce - 1 cup mozzarella cheese, shredded - 1/4 cup sun-dried tomatoes, chopped - 1/4 cup feta cheese, crumbled - 1/4 cup fresh basil leaves, chopped - 1/2 teaspoon garlic powder - Salt and pepper to taste - Olive oil for brushing - Additional vegetables or proteins When I make pesto chicken flatbread, I love using fresh ingredients. The flatbreads are the base. You can use store-bought or make your own. I often choose store-bought for ease, but homemade adds a nice touch. Shredded chicken is the star here. I use cooked chicken breast for a tender bite. The pesto sauce brings all the flavors together. It’s fresh, green, and full of taste. For toppings, I always add mozzarella cheese. It melts beautifully and creates a lovely crust. Sun-dried tomatoes add a sweet and tangy burst. Feta cheese gives a salty kick that I adore. Fresh basil leaves bring a bright note. I finish with garlic powder, salt, and pepper for depth. If you want to elevate your flatbread, consider brushing it with olive oil. You can also add extra veggies like bell peppers or mushrooms. These options make the dish even better. Enjoy experimenting with your toppings! {{ingredient_image_1}} - Preheat your oven to 400°F (200°C). This helps the flatbreads cook evenly. - Place the flatbreads on a baking sheet. Brush each with a little olive oil. This gives a nice golden color and flavor. - Grab a bowl and combine the shredded chicken with the pesto sauce. - Add garlic powder, salt, and pepper to taste. Mix well to coat the chicken. This mixture is the heart of your flatbread. - Spread the pesto chicken mixture evenly over each flatbread. Make sure to cover every inch. - Sprinkle the shredded mozzarella cheese on top. This makes it melty and delicious. - Add chopped sun-dried tomatoes and crumbled feta cheese on top. These toppings add burst and creaminess. - Bake in the oven for 12-15 minutes. Look for the cheese to melt and bubble. The edges should be golden brown. - Once done, remove the flatbreads from the oven and let them cool a bit. - Garnish with fresh basil leaves before slicing into pieces. This adds a lovely touch and flavor. To get the best texture and flavor, use fresh ingredients. Fresh basil adds bright notes. Choose high-quality mozzarella for rich, gooey goodness. You can make your own pesto for a unique taste. Simply blend fresh basil, garlic, nuts, olive oil, and cheese. This way, you control the flavor and texture. Pair your flatbread with a simple salad. A light arugula or spinach salad works well. You can also serve it with a side of crispy roasted vegetables. For drinks, try a chilled white wine or sparkling water with lemon. These beverages complement the rich flavors of the flatbread. You can prepare some components in advance. Cook and shred the chicken a day before. Make your pesto ahead too, and store it in the fridge. Assemble the flatbreads just before baking. This saves time and keeps everything fresh. Enjoy the ease of meal prep! Pro Tips Use fresh ingredients: Fresh basil and high-quality pesto can elevate the flavor of your flatbread significantly. Experiment with proteins: Try using different proteins like grilled shrimp or roasted vegetables for a unique twist. Customize your toppings: Feel free to add other toppings such as olives, artichokes, or bell peppers to suit your taste. Watch the baking time: Keep an eye on the flatbreads as they bake, as oven temperatures can vary and you want them golden, not burnt. {{image_2}} You can swap out proteins in this flatbread. Try turkey or even veggies for a nice twist. Grilled mushrooms or roasted bell peppers work great. These swaps keep the meal fun and fresh. Cheese also offers options. Instead of mozzarella, you can use goat cheese or a vegan cheese. Each choice gives a new taste. Goat cheese adds a tangy flavor, while vegan cheese is great for plant-based diets. To change up the taste, add spices or herbs. A pinch of red pepper flakes gives a kick. Fresh oregano or thyme adds depth. You can also try garlic or onion powder for more flavor. If you want to switch sauces, consider sun-dried tomato spread or hummus. These options add different layers to your flatbread. Each sauce brings its unique twist to the dish. Flatbreads come in many styles. You can use naan for a soft base. Pita bread also works well. Each type gives a different texture and taste. You can even use tortillas for a crispy option. The possibilities are endless, so have fun experimenting with what you like best! After enjoying your pesto chicken flatbread, you might have some left. To store it, let the flatbread cool. Wrap each piece in plastic wrap or foil. Place them in an airtight container. You can refrigerate them for up to three days. If you want to keep them longer, freeze them. Just make sure to wrap them well to avoid freezer burn. To enjoy your flatbread again, you need to reheat it right. Preheat your oven to 350°F (175°C). Place the flatbread on a baking sheet. Heat it for about 10 minutes. This way, the cheese melts nicely. The flatbread will stay crisp, and the flavors will shine. When stored properly, your pesto chicken flatbread lasts for about three days in the fridge. If frozen, it can last up to three months. Just remember, the sooner you eat it, the better it tastes! How long does it take to bake pesto chicken flatbread? It takes about 12 to 15 minutes to bake pesto chicken flatbread. You want the cheese to melt and get bubbly. The edges of the flatbread should turn golden brown. Can I make it gluten-free? Yes, you can make this dish gluten-free. Just use gluten-free flatbreads or even cauliflower pizza crust. They both work well with the toppings. What is a good substitute for pesto sauce? If you don't have pesto, try using sun-dried tomato spread or a simple garlic and herb mix. These options still add great flavor. Can I use raw chicken instead of cooked? I do not recommend using raw chicken. Raw chicken needs to cook longer. This recipe works best with cooked, shredded chicken for quick baking. How can I customize the toppings? You can customize the toppings easily. Add your favorite veggies like bell peppers or spinach. You can also swap out the cheeses, using goat cheese or cheddar for a twist. This blog post outlined a simple yet tasty pesto chicken flatbread recipe. You learned about the main ingredients, step-by-step instructions, and helpful tips. I shared ways to customize the flavors and add your favorite toppings. Remember, meal prep can make this dish quick and easy. Enjoy your cooking and feel free to experiment with variations. The joy of crafting your flatbread awaits!
Pesto Chicken Flatbread Tasty and Simple Delight
Are you ready for a quick and tasty meal? This Pesto Chicken Flatbread is simple and sure to impress. With just a few key ingredients,
- 2 boneless, skinless chicken breasts, diced - 2 medium sweet potatoes, peeled and cubed - 1 red bell pepper, chopped - 1 green bell pepper, chopped - 1 medium onion, diced - 3 cloves garlic, minced - 2 tablespoons Cajun seasoning - 2 tablespoons olive oil - 1 cup chicken broth - Fresh parsley, chopped for garnish - Salt and pepper to taste To get the best results, you need to measure your ingredients correctly. Use dry measuring cups for solid items like sweet potatoes. For liquids like chicken broth, use liquid measuring cups. Always level off dry ingredients with a straight edge. This helps ensure your dish turns out just right. You can swap out ingredients if you need to. Instead of chicken, try shrimp or tofu for a different protein. If you don’t have sweet potatoes, regular potatoes work well too. For the Cajun seasoning, you can use a mix of paprika and chili powder if you're out. These swaps can keep your dish tasty and fun! {{ingredient_image_1}} First, heat 1 tablespoon of olive oil in a large skillet over medium-high heat. Once the oil is hot, add the diced chicken breasts. Sprinkle Cajun seasoning, salt, and pepper over the chicken. Cook for about 5-7 minutes. Stir often until the chicken is browned and cooked through. This step locks in the flavor and keeps the chicken juicy. After cooking, remove the chicken from the skillet and set it aside. In the same skillet, add another tablespoon of olive oil. Heat it up, then add cubed sweet potatoes, diced onions, and minced garlic. Sauté these for about 5 minutes. You want the onions to turn translucent. This step enhances the sweetness of the sweet potatoes and brings out the flavors. Next, add the chopped red and green bell peppers. Stir well and cook for an additional 5-7 minutes. The sweet potatoes should be tender but not mushy. Now it's time to bring everything together. Pour in 1 cup of chicken broth and let it simmer gently. This allows the flavors to meld beautifully. Cook for about 3-4 minutes. After that, return the cooked chicken to the skillet. Toss everything together to combine well. Cook for another 2-3 minutes until the chicken is heated through. You should notice the mixture thickening slightly. The final step is to garnish with fresh parsley before serving. This adds a pop of color and freshness to your dish. To boost the taste of your Cajun chicken sweet potato skillet, consider adding more spices. Try smoked paprika for a deeper flavor. A pinch of cayenne can add heat if you like spice. You could also add a splash of lime juice for a bright note. Fresh herbs like thyme or oregano can add earthiness. These small tweaks can make your dish even more delicious. For even cooking, cut the sweet potatoes into uniform pieces. This helps them cook at the same rate. Make sure your skillet is hot before adding oil and chicken. This sears the chicken well and locks in juices. Stir often to prevent burning, especially while sautéing the veggies. If things start to stick, add a little more chicken broth or oil. For a great presentation, serve the skillet right from the pan. It looks rustic and inviting. Garnish with chopped parsley for color and freshness. A lemon wedge on the side adds a nice touch. You can pair this dish with a simple green salad or crusty bread. These sides balance the rich flavors and add freshness to your meal. Pro Tips Use Fresh Ingredients: Fresh vegetables and herbs enhance the flavor of the dish significantly. Aim for the freshest sweet potatoes and bell peppers you can find. Customize the Heat: Adjust the amount of Cajun seasoning according to your preference. If you like it spicier, add more, or consider using a milder version for a less intense flavor. Cook Sweet Potatoes Thoroughly: Ensure that the sweet potatoes are cooked until tender. You can check this by piercing them with a fork; they should break apart easily. Garnish for Flavor: Fresh parsley not only adds a pop of color but also enhances the dish's flavor. Consider adding a squeeze of lemon juice for brightness just before serving. {{image_2}} You can switch up the protein in this dish. Shrimp works great! Just cook it until it turns pink. Sausage is another tasty choice. Slice it up and sauté it with the veggies. If you want a plant-based option, try tofu. Press and cube the tofu, then cook it until golden. It adds nice texture and flavor. Want a meatless meal? Use lentils or quinoa instead of chicken. They soak up all the Cajun spices. Cook the lentils until soft. For quinoa, rinse it first, then cook it in the broth. Both options give you a hearty dish without meat. You still get that great Cajun flavor! Feel free to get creative with spices and veggies. Add some corn or zucchini for color and crunch. You can also try different spices like smoked paprika or cayenne for extra heat. Experiment with herbs, too. Fresh thyme or oregano can change the whole vibe! Each twist gives you a new dish to enjoy. To store leftovers, let the dish cool first. Place it in an airtight container. You can keep it in the fridge for up to three days. For longer storage, freeze it in a freezer-safe container. Make sure to label the container with the date. When you're ready to eat, reheat in a skillet over medium heat. Stir often to heat evenly. You can also use the microwave. Heat in short bursts, stirring in between, to avoid hot spots. In the fridge, the Cajun Chicken Sweet Potato Skillet lasts about three days. If frozen, it can last up to three months. Just remember to thaw it in the fridge before reheating. This way, you keep the best flavor and texture. Yes, you can prepare Cajun Chicken Sweet Potato Skillet in advance. Start by cooking the chicken and veggies as directed. Let them cool completely before storing. You can keep it in the fridge for up to three days. When you are ready to eat, reheat it on the stove or in the microwave. Add a splash of chicken broth to keep it moist. This saves time on busy nights! To make this meal even better, serve it with some tasty sides. Here are a few ideas: - Steamed green beans: Their crunch pairs well with the skillet. - Cornbread: This adds a sweet, fluffy touch to your plate. - Simple salad: A fresh side salad with vinaigrette brightens the meal. - Rice or quinoa: These grains soak up the flavors nicely. Absolutely! If you prefer less heat, you can adjust the Cajun seasoning. Start with half the amount. Taste as you cook, and add more if you like. You can also mix in some mild spices like paprika or oregano. If you want to add flavor without the spice, try adding a little lemon juice or fresh herbs. This keeps the dish tasty but toned down. In this blog post, we explored a delicious Cajun chicken sweet potato skillet. We covered essential ingredients, measuring tips, and fun substitutes. I provided step-by-step instructions for cooking and sautéing, along with tips to enhance flavor and serving ideas. You can even try variations with different proteins or spice levels. Remember, storing leftovers properly keeps them fresh. With these insights, you can enjoy this tasty dish anytime. Cooking is about creativity and fun, so enjoy making it your own!
Cajun Chicken Sweet Potato Skillet Flavorful Dish
Looking to spice up your dinner routine? This Cajun Chicken Sweet Potato Skillet blends tender chicken, vibrant veggies, and zesty Cajun seasoning into one easy
To make creamy chicken enchilada soup, gather these key items: - 2 tablespoons of olive oil - 1 medium onion, finely diced - 3 cloves of garlic, minced - 1 bell pepper (any color), diced into small pieces - 1 jalapeño, minced (optional, based on desired spice level) - 2 cups of cooked chicken, shredded into bite-sized pieces - 4 cups of rich chicken broth - 1 can (15 oz) black beans, rinsed thoroughly and drained - 1 can (15 oz) sweet corn, drained - 1 can (10 oz) red enchilada sauce - 1 cup heavy cream (or substitute with coconut cream for a dairy-free option) - 1 teaspoon ground cumin - 1 teaspoon chili powder - Salt and black pepper, to taste - Fresh cilantro, chopped (for garnish) - Avocado, diced (for garnish) - Tortilla strips, crispy (for garnish) Want to make the soup even tastier? Try adding these ingredients: - Fresh lime juice for a zesty kick - Shredded cheese like cheddar or Monterey Jack - Sour cream or Greek yogurt for creaminess - Sliced green onions for a fresh crunch You can swap ingredients to fit your diet: - Use vegetable broth instead of chicken broth for a vegetarian option. - Replace heavy cream with cashew cream for a vegan choice. - Use quinoa or lentils instead of chicken for a protein boost without meat. - Omit the jalapeño for a milder soup. This soup is flexible and can fit many dietary needs. You can find the full recipe to guide you through the cooking process. Start by gathering all your ingredients. This makes cooking smooth and fun. You need: - 2 tablespoons of olive oil - 1 medium onion, finely diced - 3 cloves of garlic, minced - 1 bell pepper (any color), diced - 1 jalapeño, minced (optional) - 2 cups of cooked chicken, shredded - 4 cups of chicken broth - 1 can of black beans, rinsed - 1 can of sweet corn, drained - 1 can of red enchilada sauce - 1 cup heavy cream (or coconut cream) - 1 teaspoon ground cumin - 1 teaspoon chili powder - Salt and black pepper - Fresh cilantro and avocado for garnish - Crispy tortilla strips Chop the onion, bell pepper, and jalapeño. Mince the garlic. Shred the chicken if needed. Set these aside for easy access. In a large pot, warm the olive oil over medium heat. Once hot, add the diced onion. Sauté until the onion is clear, about 4 to 5 minutes. Then, add the minced garlic, diced bell pepper, and jalapeño. Cook until the veggies are soft, about 3 to 4 minutes. Add the shredded chicken, chicken broth, black beans, corn, and red enchilada sauce. Stir well to mix everything. Bring the soup to a gentle simmer. Let it cook uncovered for 10 to 15 minutes. This helps the flavors blend together. After simmering, lower the heat and stir in the heavy cream (or coconut cream). Add the cumin, chili powder, and season with salt and black pepper. Taste and adjust as needed. Let it simmer for 5 more minutes for extra creaminess. To get the perfect soup, keep an eye on the heat. If it's too hot, it may not thicken as you want. If it's too cool, it might not cook through. Stir regularly to prevent sticking. If the soup is too thick, add more chicken broth until you reach your desired texture. For a heartier soup, add more beans or chicken. You can find the full recipe for creamy chicken enchilada soup. Enjoy making this dish! To boost the taste of your creamy chicken enchilada soup, try these tips: - Use fresh herbs like cilantro for bright flavor. - Add a squeeze of lime juice for a zesty kick. - Experiment with smoked paprika for a deeper taste. - Top your soup with crumbled queso fresco or feta cheese. Each of these additions brings a unique twist, making the soup even more delicious. Avoid these common pitfalls for the best results: - Don’t skip sautéing the onion and garlic. This step builds a strong base flavor. - Be careful not to add too much cream too early. You want the soup to thicken gradually. - Avoid overcooking the chicken. It can become dry and tough. Ensure it remains tender and juicy. Staying mindful of these mistakes can help you create a perfect dish every time. Pair your creamy chicken enchilada soup with these tasty options: - Serve with warm, crusty bread for dipping. - Offer a side of simple green salad for a fresh contrast. - Add tortilla chips for crunch and extra flavor. These pairings complement your soup and create a well-rounded meal. For more ideas, check out the Full Recipe. {{image_4}} You can easily make Creamy Chicken Enchilada Soup vegetarian or vegan. To do this, swap the chicken for beans or tofu. Use vegetable broth instead of chicken broth for a rich flavor. You can add extra veggies like zucchini or mushrooms for added texture and taste. For a vegan twist, replace heavy cream with coconut cream. This keeps the soup creamy while making it plant-based. If you like heat, add more jalapeños or a dash of hot sauce. You can also include diced green chilies for a different spice level. For an extra kick, top your soup with sliced fresh chili peppers. These toppings will bring bold flavors and heat to your bowl. Consider a sprinkle of cayenne pepper in the soup base for a deeper spice. To make this soup low-carb, replace corn with diced cauliflower. This keeps the soup hearty without the carbs. You can also skip the beans or use black soybeans as a low-carb option. Opt for heavy cream to add richness without extra carbs. This way, you get a creamy soup that fits your low-carb diet while still tasting amazing. For even more ideas, check the Full Recipe for variations! After enjoying your creamy chicken enchilada soup, let any leftovers cool. Store the soup in an airtight container. This keeps it fresh and tasty. Be sure to refrigerate within two hours. Proper storage helps prevent spoilage. Enjoy your leftovers within three to four days for the best flavor. Reheating is easy! Pour your soup into a pot. Heat over medium-low heat. Stir often to avoid sticking. It should warm up in about 5 to 10 minutes. You can also microwave it. Place the soup in a microwave-safe bowl. Heat for 1 to 2 minutes, stirring halfway through. Check the temperature before serving. Want to save some for later? Freezing works well! Let the soup cool completely first. Then, transfer it to freezer-safe containers. Leave some room at the top for expansion. You can freeze the soup for up to three months. When ready to eat, thaw it in the fridge overnight before reheating. For detailed steps, check the Full Recipe. To reheat leftover soup, use a pot on the stove. Heat over medium and stir often. This warms the soup evenly and keeps it from burning. You can also use the microwave. Place the soup in a bowl and cover it loosely. Heat in 30-second bursts, stirring in between. Make sure it’s hot all the way through before serving. Yes, you can make this soup ahead of time. It tastes even better the next day! Just store it in an airtight container in the fridge. When you are ready to eat, simply reheat it as described above. If you plan to freeze it, do so before adding the cream. Add the cream when you reheat for the best taste. You can adjust the spice level easily. For a milder soup, skip the jalapeño. Use less chili powder too. If you love heat, add more jalapeño or chili powder. You can also add a pinch of cayenne for extra kick. Taste as you go to find your perfect level. You can find the full recipe [here](#). This link will guide you to all the details you need to make this creamy chicken enchilada soup. Enjoy cooking! This blog post covered the key ingredients for making a great soup. I shared essential and optional ingredients, plus substitutions for dietary needs. The step-by-step instructions guide you from prep to perfect cooking. I included tips to boost flavor and avoid mistakes. You can try fun variations, store leftovers wisely, and easily reheat them later. As you explore creative options and storage ideas, I hope you enjoy making this soup your own. Keep experimenting with flavors and ingredients to find what you love most!
Creamy Chicken Enchilada Soup Delicious and Easy Meal
Are you craving a comforting bowl of soup that thrills your taste buds? Look no further than this creamy chicken enchilada soup. It’s easy to
To make Mexican Street Corn Soup, you need the following ingredients: - 4 ears of fresh corn, husked - 1 tablespoon olive oil - 1 medium onion, finely chopped - 2 cloves of garlic, minced - 1 bell pepper (choose red or yellow), diced - 4 cups vegetable broth - 1 cup heavy cream or coconut milk - 1 teaspoon chili powder - 1 teaspoon ground cumin - Salt and black pepper to taste - 1/2 cup cotija cheese, crumbled (feta can be used as an alternative) - 1/4 cup fresh cilantro, chopped - Juice of 1 lime You can enhance your soup with some tasty toppings: - Diced avocado - Extra cilantro - Your favorite hot sauce If you run out of any ingredients, here are some swaps: - Use frozen corn if fresh is not available. - Swap heavy cream for coconut milk to make it dairy-free. - For a different flavor, try a different cheese, like feta. - If you want less spice, reduce the chili powder. This list keeps your cooking simple and flexible. You can adapt it to your tastes and what you have on hand. Enjoy making your Mexican Street Corn Soup! For the complete recipe, check the Full Recipe section. How to Prep the Corn To start, you need to prep the corn. Take 4 ears of fresh corn. Use a sharp knife to cut the kernels off each cob. Slice down the sides carefully to catch all the kernels. Set the kernels aside for later. Sautéing Vegetables Next, grab a large pot and heat 1 tablespoon of olive oil over medium heat. Once the oil is hot, add 1 medium onion, chopped finely, and 1 diced bell pepper. Sauté these for about 5 minutes. Stir them often until they soften and become fragrant. Combining Corn and Broth Now it’s time to combine everything. Add the corn kernels you prepped into the pot. Pour in 4 cups of vegetable broth. Turn up the heat and bring this mix to a boil. Once boiling, reduce the heat. Let it simmer for 10 to 15 minutes to blend the flavors. Blending the Soup For a smooth texture, use an immersion blender. Blend the soup until you reach your desired consistency. If you like some texture, blend half the soup, leaving the rest chunky. After blending, stir in 1 cup of heavy cream or coconut milk. Let it simmer for another 5 minutes. Season with salt and black pepper to taste. Check out the Full Recipe for more details! - Seasoning Recommendations: Start with salt and black pepper. They enhance all flavors. Add chili powder for warmth and cumin for depth. Adjust to your taste. You can try smoked paprika for a different twist. - Boosting Creaminess: Use heavy cream for rich flavor. Coconut milk adds a nice twist for dairy-free eaters. If you want an extra touch, mix in a bit of cream cheese. This makes the soup even richer. - Best Pot for Cooking: A large, heavy-bottom pot works best. It helps heat evenly and prevents burning. Use a pot that holds at least 6 quarts. This ensures enough space for all ingredients. - Tools for Blending: An immersion blender is perfect for this soup. It allows you to blend right in the pot. If you don’t have one, a regular blender works too. Just be careful when transferring hot soup. These tips will help you make a flavorful and smooth Mexican street corn soup. For more detailed steps, check the Full Recipe. {{image_4}} To add heat, use more chili powder or fresh jalapeños. You can also stir in some diced chipotle in adobo for a smoky flavor. Blend these spicy ingredients into the soup to ensure even heat. Adjust based on your taste. Always remember, you can add heat but can't take it away! For vegetarian or vegan versions, you can easily swap ingredients. Here are two simple ideas: - Using Coconut Milk Substitute heavy cream with coconut milk. This adds a rich, creamy texture while keeping the dish vegan. Coconut milk brings a hint of sweetness that pairs well with the spices. It makes the soup feel indulgent without using dairy. - Substituting Vegetable Broth If you want a lighter version, use vegetable broth instead of chicken broth. This keeps everything plant-based while adding depth to the flavor. You can also use homemade broth for a fresher taste. Just simmer some veggies and herbs to create your broth before adding it to the soup. Explore these variations to find your perfect bowl of Mexican street corn soup. For the full recipe, check the earlier sections. After enjoying your Mexican Street Corn Soup, let it cool down. Pour the soup into an airtight container. Make sure to seal it well to keep it fresh. Store it in the fridge for up to 4 days. If you want to enjoy it later, freezing is a great option. When you're ready to eat, take the soup out of the fridge. Pour it into a pot. Heat it over medium heat. Stir often to ensure even warming. If the soup seems thick, add a little vegetable broth or water. You can also microwave it in a safe bowl. Heat it in short bursts, stirring in between, until it’s hot. To freeze your soup, use a freezer-safe container. Leave some space at the top for expansion. You can also use freezer bags to save space. When ready to eat, thaw it overnight in the fridge. You can also use the microwave on the defrost setting. Reheat as mentioned earlier, and enjoy your delicious soup! Mexican Street Corn Soup is a creamy and flavorful dish. It takes the classic street food, elote, and turns it into a soup. You get sweet corn, spices, and creamy goodness in every spoonful. The soup often has lime juice, cotija cheese, and fresh cilantro. It’s a warm and comforting meal, perfect for any day. Yes, you can use frozen corn. Frozen corn is just as good and saves time. It cooks quickly and adds sweetness to the soup. Just add it to the pot when you would add fresh corn. You may want to adjust cooking time as frozen corn may need less time to heat through. To make the soup spicier, add more chili powder or fresh jalapeños. You can mix in hot sauce to your taste. Another option is to add diced chipotle peppers for a smoky flavor. Adjust the spice level to suit your preference, and enjoy the heat! The main difference is the form. Elote is grilled corn on the cob, coated in toppings. This soup combines those flavors into a creamy blend. You still get the same sweet corn, lime, and cheese, but in a warm bowl. The soup is easier to share and enjoy on cool days. For the complete recipe, check out the [Full Recipe]. You learned about making Mexican Street Corn Soup. We discussed essential ingredients, optional toppings, and substitutions. I provided a clear cooking method from prepping corn to blending the soup. Tips on flavor and cooking gear will help you create the best dish. We also explored tasty variations and storage tips. Now, dive in and enjoy your warm, creamy soup! You have the tools to try new flavors and make it your own. Happy cooking!
Mexican Street Corn Soup Flavorful and Easy Recipe
Are you ready to spice up your dinner routine? This Mexican Street Corn Soup brings bold flavors and comfort in every bowl. With fresh corn,
To make tasty chicken tortilla wraps, gather these key ingredients: - 2 cups cooked chicken, shredded - 4 large flour tortillas - 1 cup black beans, drained and rinsed - 1 cup corn (fresh or canned) - 1 red bell pepper, diced - 1 avocado, sliced - 1 cup shredded lettuce - ½ cup fresh cilantro, chopped - ½ cup plain Greek yogurt - 2 tablespoons lime juice - 1 teaspoon chili powder - Salt and pepper to taste These ingredients blend together to create a flavorful meal. The chicken provides protein, while the veggies add crunch and freshness. You can boost the taste of your wraps with these optional ingredients: - Jalapeños for heat - Sour cream for creaminess - Shredded cheese for richness - Hot sauce for a spicy kick Feel free to mix and match these options. They let you personalize your wraps to suit your taste. Understanding the nutrition in your wraps can help you make better choices: - Chicken: High in protein, low in fat. - Black beans: Great source of fiber and protein. - Corn: Provides essential vitamins and minerals. - Avocado: Packed with healthy fats. - Greek yogurt: Offers calcium and probiotics. This meal is not only tasty but also full of nutrients. Enjoying chicken tortilla wraps can fit well into a balanced diet. You can find the full recipe to make these delicious wraps easily. First, let's prepare the chicken mixture. In a large bowl, mix together the shredded chicken, black beans, corn, diced red bell pepper, lime juice, chili powder, and a pinch of salt and pepper. Use a spatula to blend these ingredients well. This step takes about 5 minutes. Next, warm the tortillas. Heat a dry skillet on medium heat. Place each tortilla in the skillet for about 30 seconds on each side. This makes them soft and easy to wrap. This step also takes around 5 minutes. For the chicken, use cooked chicken. You can shred it from a rotisserie chicken or boil chicken breasts. If you boil, cook them for about 15 minutes until they are no longer pink inside. After cooking, let them cool, then shred them with two forks. This ensures tender and juicy chicken for your wraps. Now, let's assemble the wraps. Lay a warm tortilla flat on a plate. Spoon about a quarter of the chicken mixture into the center. Add a few slices of avocado and a handful of shredded lettuce on top. Next, add a spoonful of Greek yogurt and sprinkle fresh cilantro. This adds flavor and freshness. Now, gently fold the sides of the tortilla in. Starting from the bottom, roll it up tightly. Make sure the filling stays tucked in while you roll. Finally, slice each wrap in half diagonally for serving. Arrange the halves on a platter. To make it even prettier, add a small bowl of salsa or guacamole for dipping. Enjoy your zesty chicken tortilla wraps! For the full recipe, check out the section above. To make your chicken tortilla wraps taste amazing, focus on fresh ingredients. Fresh herbs like cilantro add a burst of flavor. Lime juice brightens the dish and balances the taste. Try marinating your chicken for a few hours with lime juice and spices to boost flavor. Adding spices, like chili powder, gives a nice kick. Always taste as you go, adjusting seasoning to your liking. One common mistake is overfilling the tortilla. Too much filling makes it hard to wrap. It can also lead to spills. Make sure to warm the tortillas first. This helps them bend easily without tearing. Also, don’t forget to chop your veggies evenly. This makes for a better texture and flavor in every bite. Lastly, don’t skip the toppings. They add layers of taste, making your wraps even better. You don’t need fancy tools for these wraps, but a few key items help. A large mixing bowl is essential for mixing ingredients. Use a spatula for easy mixing and serving. A skillet is great for warming tortillas. A good knife and cutting board will help you chop veggies quickly. If you want to make wrapping easier, try using parchment paper to hold the wrap until ready to eat. For the full recipe, check the detailed instructions above. {{image_4}} You can easily change up the chicken tortilla wraps. Swap the chicken for turkey or beef. Use grilled shrimp for a seafood twist. Instead of black beans, try pinto beans or lentils. If you want a kick, add jalapeños or diced green chilies. For a sweeter taste, mix in some pineapple chunks. These changes can make each wrap unique. Making vegetarian or vegan wraps is simple. For a vegetarian option, use extra veggies like mushrooms or zucchini. You can also add cheese or sour cream if you eat dairy. For a vegan option, replace the chicken with chickpeas or tofu. Use avocado or a vegan yogurt for creaminess. These swaps keep the wraps tasty and satisfying. Chicken tortilla wraps fit many events. For a casual lunch, serve with fruit and chips. If it’s a party, cut them into smaller pieces for easy snacking. Add colorful dips like salsa or guacamole on the side. For a picnic, pack them with a salad. They are also great for meal prep. You can make them ahead and store them for busy days. You can find the full recipe for these delicious wraps above. To keep your chicken tortilla wraps fresh, place them in an airtight container. Make sure to seal it well to avoid air getting in. You can also wrap each one tightly in plastic wrap. Store them in the fridge. They will last for about three days. If you want to keep them longer, freezing is a great option. To freeze chicken tortilla wraps, first, let them cool completely. Then wrap each one in plastic wrap, followed by aluminum foil. This extra layer helps prevent freezer burn. Label the wraps with the date. You can freeze them for up to three months. When you're ready to eat, just thaw them in the fridge overnight. To reheat your wraps, unwrap them first. You can use a microwave, but I prefer the oven for crispness. Preheat your oven to 350°F (175°C). Place the wraps on a baking sheet and heat for about 10-15 minutes. This way, they stay warm and the tortillas get a little crispy. Enjoy your zesty chicken tortilla wraps just like they were fresh! For the complete recipe, check out the Full Recipe section. To wrap a tortilla well, start with a warm tortilla. Place your filling in the center. Leave space at the edges. Fold in the sides first. Then, roll from the bottom upwards. Keep the filling snug inside. This method helps hold everything together. Yes, you can make Chicken Tortilla Wraps in advance! Prepare the filling and store it in the fridge. You can warm the tortillas just before serving. This keeps the wraps fresh and tasty. Just be careful not to fill them too early. Too much moisture can make the tortillas soggy. Many sides work great with Chicken Tortilla Wraps. Here are some ideas: - Fresh salsa - Guacamole - Chips - Corn salad - A light green salad These sides add flavor and color. They make your meal more fun. Kids love simple flavors. You can make wraps more kid-friendly by: - Using plain chicken without spices - Adding favorite veggies like carrots or cucumber - Swapping Greek yogurt for a mild ranch dressing - Offering cheese as an option This way, kids can create their own tasty wraps! In this blog post, we explored how to make tasty chicken tortilla wraps. We discussed key ingredients, cooking steps, and tips for success. You learned about storage methods and creative variations to try. Remember, these wraps are versatile and easy. With practice, you can make them just right for any meal. Experiment with flavors and have fun! Enjoy your delicious chicken tortilla wraps.
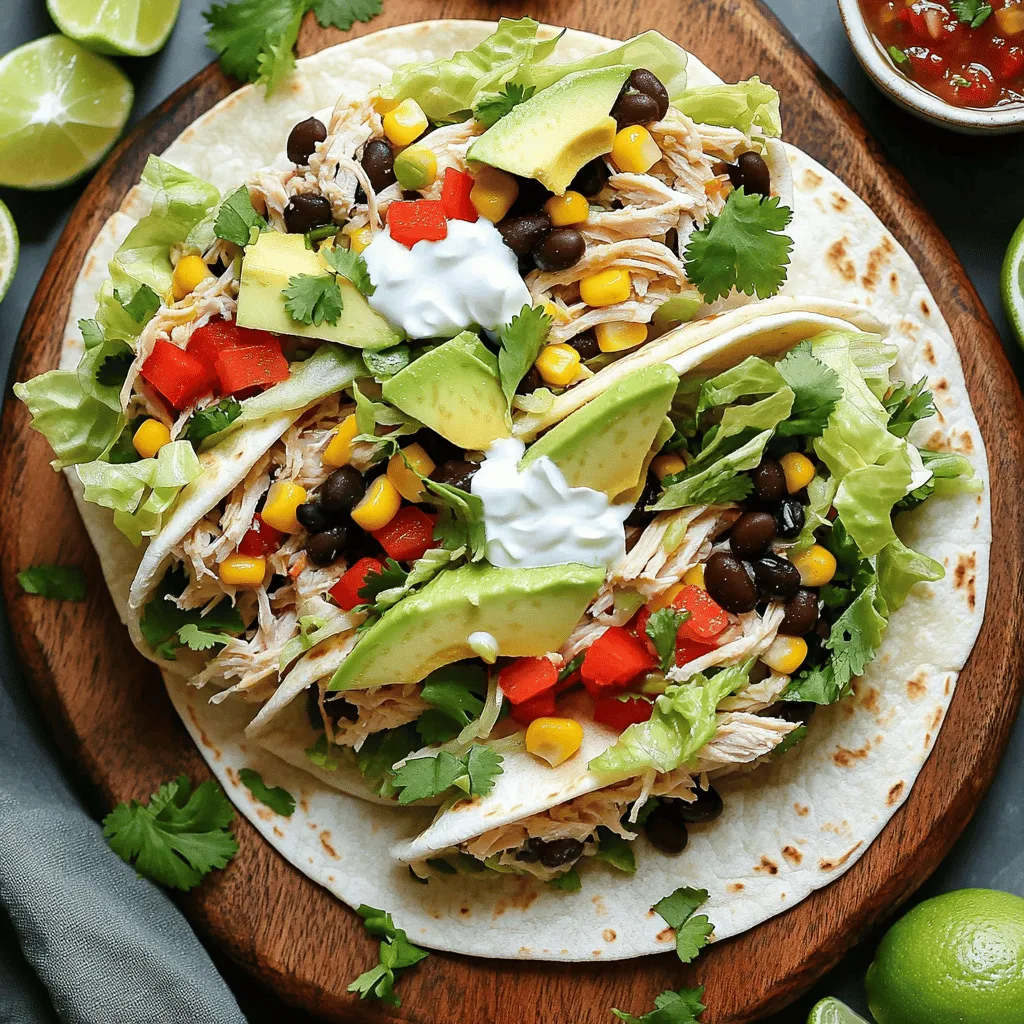
Chicken Tortilla Wraps Quick and Flavorful Meal
Looking for a quick and tasty meal? Chicken tortilla wraps are your answer! In this post, I’ll share a simple recipe bursting with flavor. You’ll
- 1 cup cooked rice - 1 can black beans, rinsed and drained - 1 cup shredded cheddar cheese - 1/2 cup corn kernels - 1 small red onion, diced - 2 cloves garlic, minced - Ground spices: cumin and chili powder - Fresh cilantro, avocado, salsa, salt, and pepper To make Cheesy Bean and Rice Burritos, you need simple, fresh ingredients. The rice adds bulk, while black beans provide protein. Cheddar cheese brings a rich flavor and melty goodness. Corn adds sweetness and texture. Diced red onion and minced garlic give the filling a kick. Cumin and chili powder spice things up, making the burritos really tasty. Make sure to rinse the black beans well. This helps remove extra sodium. Fresh cilantro, avocado, and salsa are great for serving. They add freshness and flavor to each bite. Now that you know what you need, gather these ingredients to create a fantastic meal! Check the Full Recipe for more details on cooking and assembling these delicious burritos. 1. Start by heating a large skillet over medium heat. Pour in a small amount of olive oil. 2. Add the finely diced red onion and minced garlic. Sauté them for about 3-4 minutes. 3. You want the onion to be soft and clear. The garlic should smell great. 4. Next, stir in the cooked rice, black beans, and corn. 5. Sprinkle in the ground cumin and chili powder. Season generously with salt and pepper. 6. Cook everything for about 5 minutes. This helps all the flavors mix well. 1. Lay out each flour tortilla on a flat surface. This makes filling them easier. 2. Spoon a generous portion of the rice and bean mixture into the center of each tortilla. 3. Don’t forget the cheese! Sprinkle half of the shredded cheese over the filling. 4. Fold the edges of the tortilla inward. Then roll it up tightly from the bottom. 5. Make sure to tuck in the filling as you roll. This keeps everything inside. 1. Preheat a non-stick skillet or griddle over medium heat. 2. Place each burrito seam-side down in the skillet. 3. Cook for 2-3 minutes on each side. You want them golden brown and crispy. 4. This step melts the cheese inside and makes the burrito nice and warm. 5. Once done, take them out and let them cool for about a minute before slicing. For the full recipe with all the details, check out the [Full Recipe]. Choosing the right tortilla is key. I recommend large flour tortillas. They are soft and easy to roll. Corn tortillas work too, but they may crack. Heat the tortillas briefly in a dry skillet. This makes them more pliable and less likely to tear. To ensure the perfect cheese melt, use a good quality cheddar or a blend. Shred the cheese yourself for the best melt. Preheating the skillet also helps. Cook the burritos seam-side down first. This seals them and keeps the filling inside. To add more flavor, try spices or hot sauce. A pinch of smoked paprika adds depth. If you like heat, add cayenne pepper or your favorite hot sauce. Mix these into the filling for a spicy kick. Don't hesitate to adjust the ingredients for your taste. Swap black beans for pinto beans if you prefer. You can add diced peppers or jalapeños for extra crunch. Also, consider using brown rice for a nuttier flavor. The Full Recipe offers many options to explore! {{image_4}} For a vegetarian version, you can swap cheese for plant-based options. Look for vegan cheese made from nuts or soy. These substitutes melt well and add flavor. You can also use nutritional yeast for a cheesy taste without dairy. To boost the veggie content, add more colorful vegetables. Bell peppers, spinach, or zucchini work great. Just chop them small and sauté them with the onions and garlic. This gives your burritos extra nutrition and flavor. If you want more protein, ground meat or chicken is a tasty option. Cook the meat in the skillet before adding the rice and beans. Season it the same way for great flavor. You can also use leftover proteins. Shredded chicken or beef works well. Just mix it in with the rice, beans, and spices. This way, you can enjoy a hearty meal without wasting food. These simple changes keep your Cheesy Bean and Rice Burritos fresh and exciting. Check out the Full Recipe for more ideas! To keep your Cheesy Bean and Rice Burritos fresh, refrigerate them right away. Place the burritos in an airtight container. This helps prevent them from drying out. If you have extra filling, store it separately. Use glass or plastic containers that close tightly. This keeps your food safe and tasty. When it’s time to enjoy leftovers, you want them warm and tasty. The best method is to use a skillet. Heat it over medium heat. Place your burrito in the skillet. Cook for about 3-4 minutes on each side. This helps keep the outside crispy and the inside warm. If you prefer the microwave, wrap your burrito in a damp paper towel. Heat it for 30-60 seconds. Check if it’s hot enough; if not, heat it for another 30 seconds. This way, it will stay soft and moist. Enjoy your delicious meal again! How do you make sure the burrito doesn’t fall apart? To keep your burrito intact, use large, soft tortillas. When you fill the tortilla, don’t overstuff it. Leave space at the edges to fold in. Tuck the filling in tightly as you roll. This will help hold everything together. Can I freeze Cheesy Bean and Rice Burritos for later use? Yes, you can freeze these burritos. Allow them to cool completely. Wrap each burrito in foil or freezer-safe bags. They can last up to three months in the freezer. Just reheat in the oven or microwave when you're ready to enjoy. How many calories are in a typical burrito? A typical Cheesy Bean and Rice Burrito has about 400 to 500 calories. This depends on the ingredients used and portion sizes. Always check the specific brands for exact numbers. What is the protein content in these burritos? Each burrito contains around 15 to 20 grams of protein. This comes from the black beans and cheese. If you add meat, the protein content will increase. What can I use instead of black beans? You can use pinto beans, kidney beans, or chickpeas. Each of these options adds a different flavor but will still work well in the burrito. Alternatives for cheddar cheese? If you want to swap cheddar cheese, try Monterey Jack or mozzarella. You could also use a dairy-free cheese if you prefer. These options will melt nicely and taste great in your burrito. For the full recipe, check the complete instructions to make these delicious options! This post covered how to make cheesy bean and rice burritos from scratch. You learned about key ingredients, cooking methods, and helpful tips for perfecting your burrito. I shared variations to suit different diets and explained how to store your leftovers. My final thought is simple: making burritos at home is fun and tasty. Explore your creativity, adjust flavors, and enjoy every bite. Happy cooking!
Cheesy Bean and Rice Burritos Simple and Tasty Meal
Looking for a quick, tasty meal? You’ve found it! Cheesy Bean and Rice Burritos are simple to make and loaded with flavor. With just a