Dinner

Here’s what you need for Caprese chicken skillet: - 4 boneless, skinless chicken breasts - 1 tablespoon olive oil - Salt and pepper to taste - 2 cups cherry tomatoes, halved - 1 cup fresh mozzarella balls (bocconcini), sliced or halved - 1 cup fresh basil leaves, roughly chopped - 2 tablespoons balsamic glaze - 1 teaspoon garlic powder - 1 teaspoon dried oregano You can mix it up with these ideas: - Add crushed red pepper for heat. - Use fresh garlic instead of garlic powder. - Try Italian seasoning for an added flavor boost. To make this dish, gather these tools: - A large skillet for cooking. - A sharp knife for chopping. - A cutting board for prep work. - A spatula for flipping the chicken. - Measuring spoons for precise amounts. These simple ingredients and tools make it easy to whip up a tasty meal. Enjoy cooking! {{ingredient_image_1}} First, take the chicken breasts out of the package. Pat them dry with paper towels. This step helps the chicken brown better. Next, sprinkle salt, pepper, garlic powder, and dried oregano on both sides of each chicken breast. This seasoning adds great flavor. Heat 1 tablespoon of olive oil in a large skillet over medium heat. Once the oil is hot, carefully place the chicken in the skillet. Cook each side for about 6-7 minutes. Look for a nice golden brown color. Use a meat thermometer to check the chicken’s temperature. It should reach 165°F or 75°C. After cooking, remove the chicken from the skillet and place it on a plate. Let it rest for a moment. In the same skillet, add 2 cups of halved cherry tomatoes. Cook for about 3-4 minutes until they soften. This step brings out the tomatoes' sweetness. Lower the heat and return the chicken to the skillet. Top each chicken piece with the cooked tomatoes and 1 cup of fresh mozzarella. Cover the skillet with a lid for 2 minutes. This helps the cheese melt nicely. After 2 minutes, remove the lid and add 1 cup of roughly chopped fresh basil on top. Finally, drizzle 2 tablespoons of balsamic glaze over the chicken and serve hot. To make your chicken juicy, start with good quality meat. I prefer boneless, skinless chicken breasts for this dish. Before cooking, season both sides well with salt, pepper, garlic powder, and oregano. This adds flavor and helps keep moisture in. Cook the chicken on medium heat for 6-7 minutes on each side. This allows the chicken to brown nicely while cooking through. Always check the internal temperature; it should be 165°F or 75°C. Rest the chicken for a few minutes after cooking to lock in juices. For that gooey, melty mozzarella, add it at the right time. After cooking the chicken and tomatoes, place mozzarella on top of the chicken. Cover the skillet with a lid to trap heat. This helps the cheese melt without burning. Keep the heat low to avoid overcooking. The mozzarella should be soft and slightly gooey in about 2 minutes. Fresh ingredients make a big difference in flavor. Choose ripe cherry tomatoes for sweetness and juiciness. Look for smooth, firm mozzarella balls; they should feel slightly springy. Fresh basil adds a bright taste. Cut or tear the leaves just before serving to keep them vibrant. Always wash your produce well. Using high-quality, fresh ingredients ensures a tasty dish every time. Pro Tips Use Fresh Ingredients: Fresh basil and high-quality mozzarella can elevate the flavor of your dish significantly. Opt for fresh ingredients whenever possible for the best results. Don’t Overcook the Chicken: To keep the chicken juicy, make sure you do not overcook it. Use a meat thermometer to check for doneness at 165°F (75°C). Customize the Toppings: Feel free to add other toppings like sautéed spinach or roasted red peppers for extra flavor and nutrition. Get creative! Serve with a Side: This dish pairs wonderfully with a simple green salad or garlic bread to soak up the juices. Make it a complete meal! {{image_2}} If you're watching carbs, you can still enjoy this dish. Swap the cherry tomatoes for zucchini noodles or spiralized cucumber. This keeps the dish light and fresh. You can also replace the balsamic glaze with vinegar. It adds flavor without the extra sugar. This Caprese Chicken Skillet is naturally gluten-free. Just make sure your balsamic glaze is gluten-free as well. Most brands are safe, but check the label. You can serve this dish with a side of rice or quinoa for a hearty meal. For a vegetarian version, replace the chicken with eggplant or portobello mushrooms. They have a nice texture and soak up flavors well. Cook the vegetables the same way as you would the chicken. Add the mozzarella and basil for that classic Caprese taste. After you finish your meal, let the Caprese chicken cool. Then, place it in an airtight container. Store it in the fridge for up to four days. This helps keep the flavors fresh. If you need to separate the chicken from the toppings, do it. This way, the tomatoes and cheese stay tasty. When you want to eat your leftovers, reheat them gently. Use a skillet on low heat. This helps keep the chicken juicy. You can also use a microwave. Heat in short bursts, around 30 seconds. Check often so you don’t overcook it. If you want to save some for later, freezing works well. Wrap the chicken tightly in plastic wrap, then place it in a freezer bag. Make sure to remove as much air as possible. You can freeze it for up to three months. When you’re ready to eat, thaw it in the fridge overnight before reheating. You can serve Caprese Chicken Skillet with various sides. A fresh green salad pairs nicely. Garlic bread is also a great option. You might like to add some pasta. The flavors mix well with a light sauce. If you want something simple, steamed veggies work too. These sides will enhance the meal's taste and feel. Yes, you can use different cheeses. Provolone or gouda adds a nice twist. Feta cheese gives a tangy flavor. If you want a creamier texture, try ricotta. Each cheese will change the dish's taste. Stick with mild flavors to complement the tomatoes and basil. Cooking chicken in a skillet takes about 12 to 14 minutes. Cook for 6-7 minutes on each side. Make sure the chicken is golden brown. Check the internal temperature; it should be 165°F or 75°C. This ensures your chicken is safe to eat. Cooking times may vary with different chicken sizes. This blog post covered how to make a Caprese Chicken Skillet. We discussed the key ingredients, options for seasoning, and tools you might need. You learned step-by-step instructions for prepping and cooking the chicken, plus adding tasty Caprese elements. We shared tips for juicy chicken, melting cheese, and using fresh ingredients. You saw variations for low-carb, gluten-free, and vegetarian diets. We also looked at storage tips for leftovers and answered common questions. Enjoy making this dish your own!
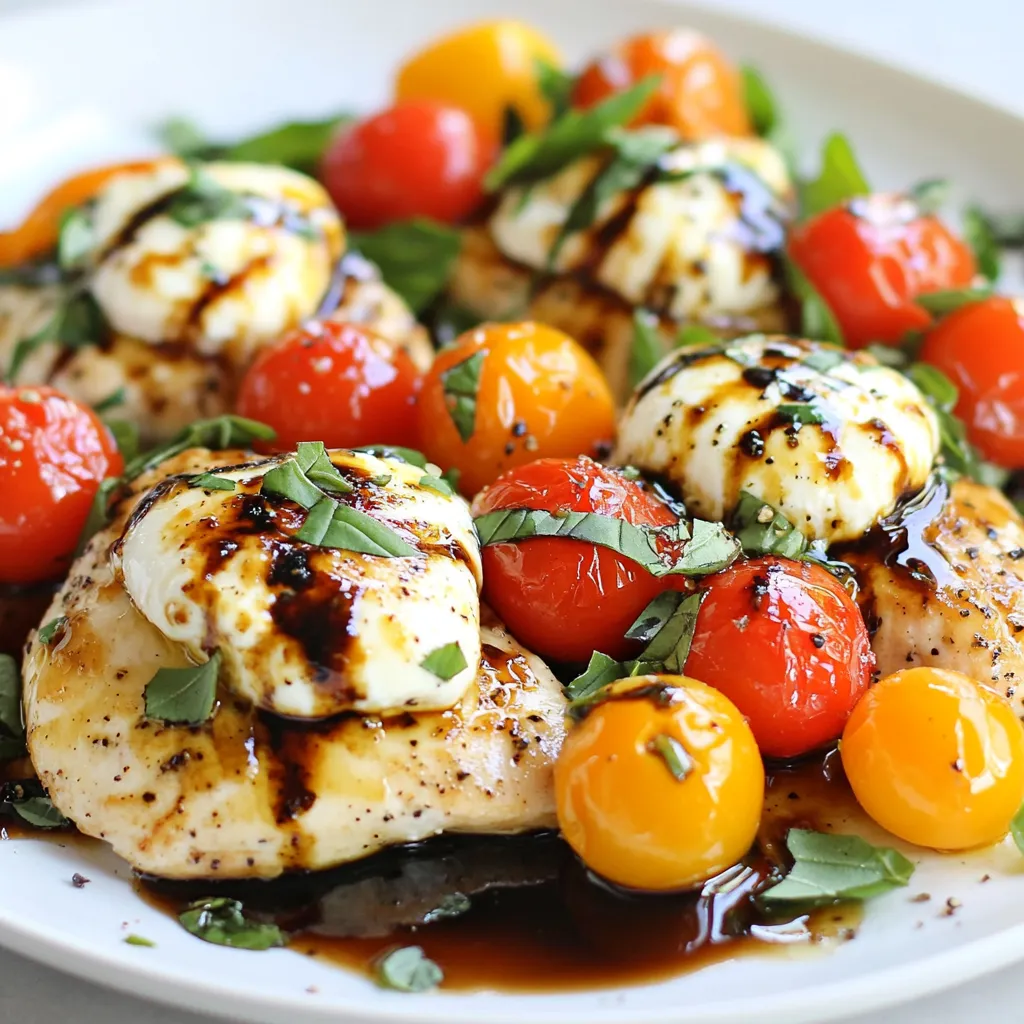
Caprese Chicken Skillet Delightful and Easy Recipe
If you’re looking for a quick and tasty dinner, the Caprese Chicken Skillet is your answer. This dish combines juicy chicken with fresh tomatoes, mozzarella,
- 4 boneless, skinless chicken breasts - 2 tablespoons olive oil - 1 teaspoon garlic powder - 1 teaspoon onion powder - Salt and pepper to taste - 1 can (14 oz) crushed tomatoes - 1 cup heavy cream - 2 cups fresh spinach - 1 teaspoon dried basil - 1 teaspoon Italian seasoning - Grated Parmesan cheese for garnish Each ingredient in this dish plays a key role. The chicken is the star, providing protein and texture. Olive oil adds richness and helps cook the chicken. Garlic and onion powders give depth and warmth to the flavor. Crushed tomatoes bring acidity and sweetness, balancing the cream. Heavy cream makes the sauce rich and smooth. Fresh spinach adds color and a slight earthiness. Dried basil and Italian seasoning infuse herbs into the dish. Finally, Parmesan cheese adds a salty finish that ties everything together. You can easily adjust ingredients to fit your needs. For a lighter version, use chicken thighs instead of breasts. To avoid dairy, swap heavy cream for coconut milk. If you're vegan, replace chicken with tofu and use plant-based cream. For a gluten-free option, this recipe is naturally gluten-free. Always check labels to ensure no hidden gluten in canned products. Enjoy making this dish your own while still capturing its essence! {{ingredient_image_1}} Start by gathering all your ingredients. You need chicken, olive oil, spices, and tomatoes. The heavy cream and spinach will make the dish creamy and rich. This recipe is easy and quick. You will spend about 10 minutes prepping and 30 minutes cooking. 1. Heat 2 tablespoons of olive oil in a large skillet over medium-high heat. 2. Season 4 boneless, skinless chicken breasts with 1 teaspoon of garlic powder, 1 teaspoon of onion powder, salt, and pepper. 3. Place the seasoned chicken in the skillet. Sear it for 6-7 minutes on each side. The chicken should turn golden brown and be fully cooked. Remove the chicken and set it aside. 4. In the same skillet, add 1 can of crushed tomatoes. Bring it to a gentle simmer for 3-4 minutes, stirring now and then. 5. Turn the heat down to medium-low. Stir in 1 cup of heavy cream until the sauce is creamy. 6. Add 2 cups of fresh spinach, 1 teaspoon of dried basil, and 1 teaspoon of Italian seasoning to the sauce. Stir until the spinach wilts, which takes about 2-3 minutes. 7. Return the chicken breasts to the skillet. Coat them in the creamy tomato sauce. Let everything cook together for 2-3 minutes to meld the flavors. 8. Serve hot and sprinkle grated Parmesan cheese on top for garnish. To make sure your chicken is cooked, use a meat thermometer. The inside should reach 165°F (75°C). If you don’t have a thermometer, cut into the chicken. The meat should be white, not pink. Always check both thick and thin parts of the chicken. Cook it longer if needed. This will keep your meal safe and tasty. To make the sauce creamy, use heavy cream. This adds richness and smoothness. Stir it in slowly to avoid curdling. Adding crushed tomatoes first gives the sauce a nice base. Don’t forget to season with salt and pepper. Taste as you go, and adjust the flavors to your liking. For tender chicken, start with boneless, skinless breasts. Sear them well on medium-high heat. This gives a nice color and locks in the juices. Cook for about 6-7 minutes on each side. Make sure they reach an internal temperature of 165°F (74°C) for safety. This dish pairs well with several sides. Consider serving it with garlic bread for a classic touch. A simple green salad adds freshness and crunch. You could also serve it over rice or pasta to soak up the creamy sauce. For a low-carb option, try zucchini noodles or cauliflower rice. Pro Tips Perfectly Seasoned Chicken: Ensure to season your chicken breasts generously with salt and pepper to enhance their flavor before cooking. Fresh Spinach Alternative: If fresh spinach is unavailable, you can substitute it with frozen spinach. Just make sure to thaw and drain it before adding to the sauce. Customize the Creaminess: For a lighter version, you can use half-and-half instead of heavy cream, but the sauce will be less rich. Garnish for Extra Flavor: Besides Parmesan cheese, feel free to add fresh basil or a squeeze of lemon juice before serving for an added burst of freshness. {{image_2}} You can boost this dish with more veggies. Try adding bell peppers, mushrooms, or zucchini. Just chop them and add them to the skillet. Sauté them for a few minutes before adding the spinach. If you want to use other proteins, shrimp or tofu work well. Cook shrimp until they turn pink. For tofu, use firm or extra-firm. Cut it into cubes and sauté until golden. If you like spice, add red pepper flakes or diced jalapeños. This will give the dish a nice kick. For a low-carb version, swap heavy cream with coconut cream. You can also use cauliflower rice instead of regular rice. This keeps your meal light and full of flavor. To make this dish dairy-free, use coconut milk instead of heavy cream. It keeps the creaminess without dairy. For cheese, use nutritional yeast for a cheesy flavor. You can also try vegan Parmesan for a great topping. These swaps let everyone enjoy this tasty meal. After your meal, let the chicken cool. Place it in an airtight container. This keeps your dish fresh. Store it in the fridge for up to three days. Make sure to cover the sauce well to avoid drying out. To reheat, use a skillet over medium heat. Add a splash of water or cream. This helps keep the sauce creamy. Stir often, and heat until warm. You can also use a microwave. Heat in short bursts, stirring in between for even warmth. If you want to freeze this dish, let it cool fully. Use a freezer-safe container. Remember to leave room for expansion. It can last up to three months in the freezer. To use, thaw it in the fridge overnight. Reheat gently, as mentioned earlier. This way, you enjoy a tasty meal later! Yes, you can use frozen chicken. However, it’s best to thaw it first. If you cook it from frozen, the chicken will take longer to cook. Make sure the center reaches 165°F for safety. The chicken is fully cooked when it is no longer pink inside. Use a meat thermometer to check the thickest part. It should read 165°F. This ensures the chicken is safe to eat. This dish pairs well with many sides. You can serve it with rice, pasta, or crusty bread. A fresh salad also makes a great side. Enjoy your meal with something that complements the creamy sauce. This blog post covered key ingredients and their roles in flavor, plus smart substitutions. We went through step-by-step cooking instructions to ensure your chicken is perfect every time. I shared tips for a creamy sauce and the best chicken texture. You also learned fun variations and proper storage methods for leftovers. Remember, good cooking is about creativity and balance. Use these insights to make your dish your own. Enjoy your cooking journey!
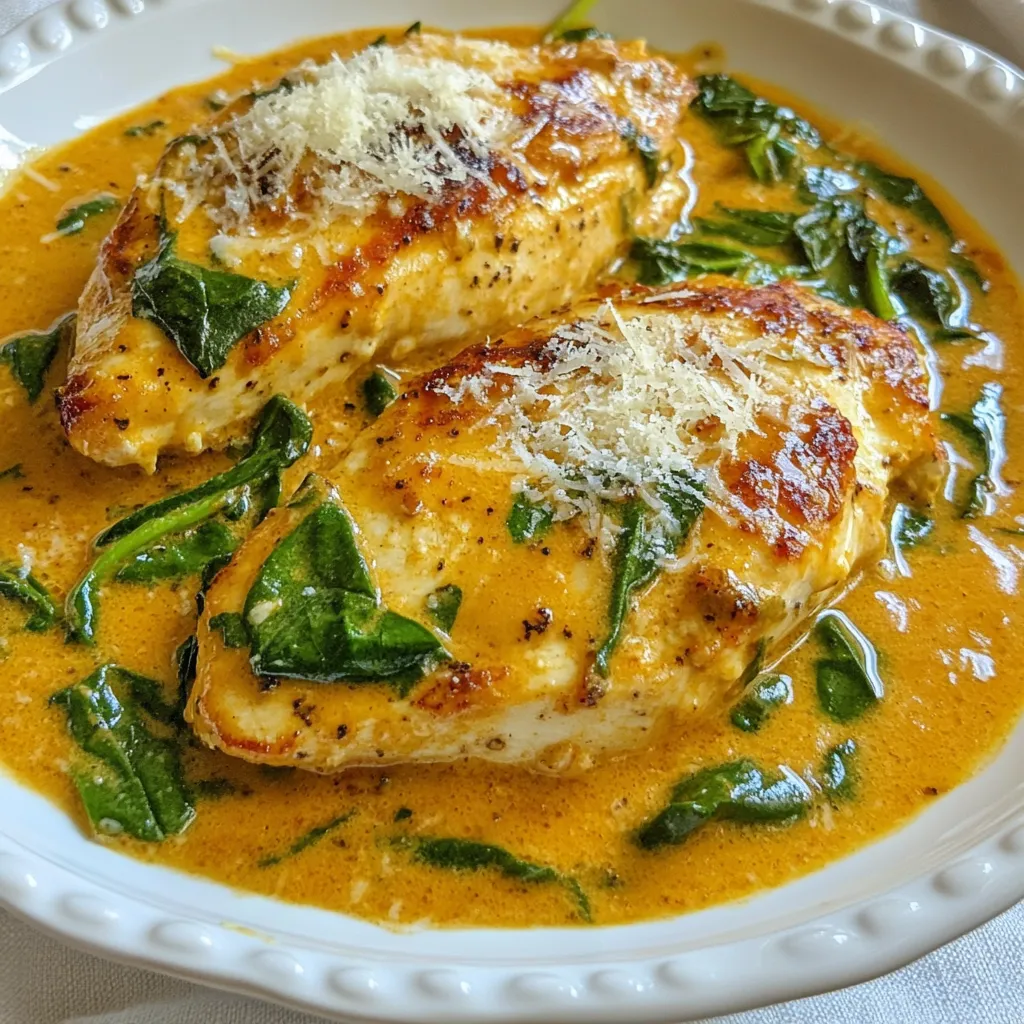
One-Pan Creamy Tomato Spinach Chicken Delight
Are you ready to make dinner simpler and more delicious? I’ve got just the recipe for you! This One-Pan Creamy Tomato Spinach Chicken combines tender
For this bold and spicy dish, you will need: - 200g rice noodles - 2 tablespoons vegetable oil - 4 cloves garlic, minced - 1 tablespoon fresh ginger, minced - 1 red bell pepper, sliced - 1 carrot, julienned - 1 cup snap peas - 3 green onions, sliced - 3 tablespoons soy sauce - 1 tablespoon chili paste (adjust according to spice preference) - 1 tablespoon sesame oil - 1 tablespoon honey or maple syrup These ingredients create a perfect blend of flavors and textures. The rice noodles provide a soft base. Garlic and ginger add depth. The bell pepper, carrot, and snap peas bring a crisp crunch. To enhance your dish, consider using these garnishes: - Fresh cilantro - Sesame seeds These add fresh notes and crunch. They also make the dish look beautiful. For the best results, I suggest using: - Vegetable oil - Sesame oil Vegetable oil is great for frying. It has a high smoke point. Sesame oil adds a nutty flavor that elevates the dish. You can mix them for a balanced taste. {{ingredient_image_1}} First, boil a pot of water. Add the rice noodles and cook them as the package says. This usually takes about 3 to 5 minutes. Once done, drain the noodles. Rinse them under cold water. This step keeps them from sticking together. Set your noodles aside for later. Next, heat 2 tablespoons of vegetable oil in a large skillet or wok. Use medium-high heat for this. Add 4 minced garlic cloves and 1 tablespoon of minced ginger. Sauté these for about 30 seconds. You want to smell that great aroma. This step adds a nice kick to your dish. Now it’s time for the fun part—add your veggies! Toss in 1 sliced red bell pepper, 1 julienned carrot, and 1 cup of snap peas. Stir-fry them for about 3 to 4 minutes. You want them tender but still crisp. This keeps your stir-fry colorful and crunchy. Add your cooked rice noodles into the skillet. In a small bowl, mix 3 tablespoons of soy sauce, 1 tablespoon of chili paste, 1 tablespoon of sesame oil, and 1 tablespoon of honey or maple syrup. Pour this sauce over the noodles. Toss everything together well. You want all the flavors to blend nicely. Finally, add 3 sliced green onions to the skillet. Stir-fry for another 1 to 2 minutes. This adds freshness to your dish. The green onions will soften just a bit but will still add a nice crunch. Once everything is mixed well, remove the skillet from heat. Plate your stir-fry neatly. You can garnish it with fresh cilantro and a sprinkle of sesame seeds if you like. Serve it hot and enjoy your bold and spicy delight! You can control the heat in your chili garlic noodle stir-fry. Start with one tablespoon of chili paste. If you love spice, add more. Remember, you can always add spice, but you can't take it away. Taste the dish as you cook. This way, you find the perfect balance for your palate. To boost flavor, think about adding more ingredients. Try adding some sliced mushrooms for earthiness. You can also use baby bok choy for a nice crunch. A splash of lime juice brightens the dish. Consider incorporating nuts like cashews or peanuts for added texture. Fresh herbs like basil or mint can bring a refreshing twist. Stir-frying is all about speed and high heat. Use a large skillet or wok. Heat the oil until it shimmers but does not smoke. Add ingredients in stages. Start with garlic and ginger for aroma, then add veggies. This keeps everything crisp and vibrant. Always keep the food moving in the pan. This ensures even cooking and prevents burning. Pro Tips Perfectly Cooked Noodles: To ensure your rice noodles are not overcooked, keep an eye on them while boiling. They should be slightly undercooked, as they will continue to cook in the stir-fry. Customize the Heat: Adjust the amount of chili paste based on your spice tolerance. Start with a small amount, and you can always add more to the pan if needed. Fresh Ingredients Matter: Use fresh vegetables for the best flavor and texture. Crisp, seasonal veggies will elevate your stir-fry and make it more nutritious. Garnish for Flavor: Don’t skip the garnish! Fresh cilantro and sesame seeds not only add visual appeal but also enhance the overall flavor of your dish. {{image_2}} You can add protein to change the dish. Tofu is a great choice. It absorbs flavors well. Cut it into cubes and sauté until golden. Chicken is another option. Slice it thin and cook it until no longer pink. Shrimp cooks fast and adds a nice taste. Just toss it in during the last few minutes. Feel free to swap in your favorite veggies. Broccoli florets add crunch and color. Steam or stir-fry it for a few minutes. Zucchini is another tasty swap. Slice it thin and add it just before the noodles. You can also mix in bell peppers or baby corn. The key is to keep it colorful and fresh. You can change the noodles to fit your taste. Egg noodles are soft and hearty. They work well with the sauce. Soba noodles are made from buckwheat. They add a nutty flavor. Make sure to cook them according to package instructions. This keeps them from getting mushy. Each noodle type brings its own flavor and texture. After enjoying your chili garlic noodle stir-fry, store leftovers in an airtight container. Let the stir-fry cool before sealing it. This helps keep flavors fresh. You can keep it in the fridge for up to three days. Make sure to label the container with the date. To reheat, you have a few options. The best way is to use a skillet. Heat a little oil over medium heat. Add the stir-fry and cook until it’s hot. You can also use the microwave. Place the stir-fry in a bowl and cover it with a damp paper towel. Heat in short bursts, stirring in between. If you want to keep it longer, consider freezing the stir-fry. Place it in a freezer-safe container. It can last up to two months in the freezer. When ready to eat, thaw it overnight in the fridge. Then reheat it using the skillet method for the best taste. You can use many noodles instead of rice noodles. Egg noodles work well. You can also try udon or even whole wheat spaghetti. Each option gives a different taste and texture. Yes, you can easily make this dish vegetarian or vegan. Just use soy sauce that is labeled vegan. Swap honey for maple syrup or agave syrup. For protein, add tofu or tempeh. To make more servings, simply double or triple the ingredients. Keep the same cooking steps. This way, you maintain the great flavors while feeding more people. The spice level depends on how much chili paste you use. One tablespoon adds a nice kick. If you want it spicier, add more. Start with less if you prefer milder tastes. Yes, you can use other sauces in this dish. Try teriyaki sauce for a sweet twist. Hoisin sauce adds depth and sweetness too. Just remember to adjust the flavors accordingly. This blog post covered how to create a delicious Chili Garlic Noodle Stir-Fry. We explored key ingredients, step-by-step cooking instructions, and helpful tips to enhance flavor. You learned about optional garnishes, protein variations, and how to store leftovers correctly. Experiment with ingredients to make the dish your own. Enjoy the process and remember, good cooking takes practice. Keep it fun and tasty!
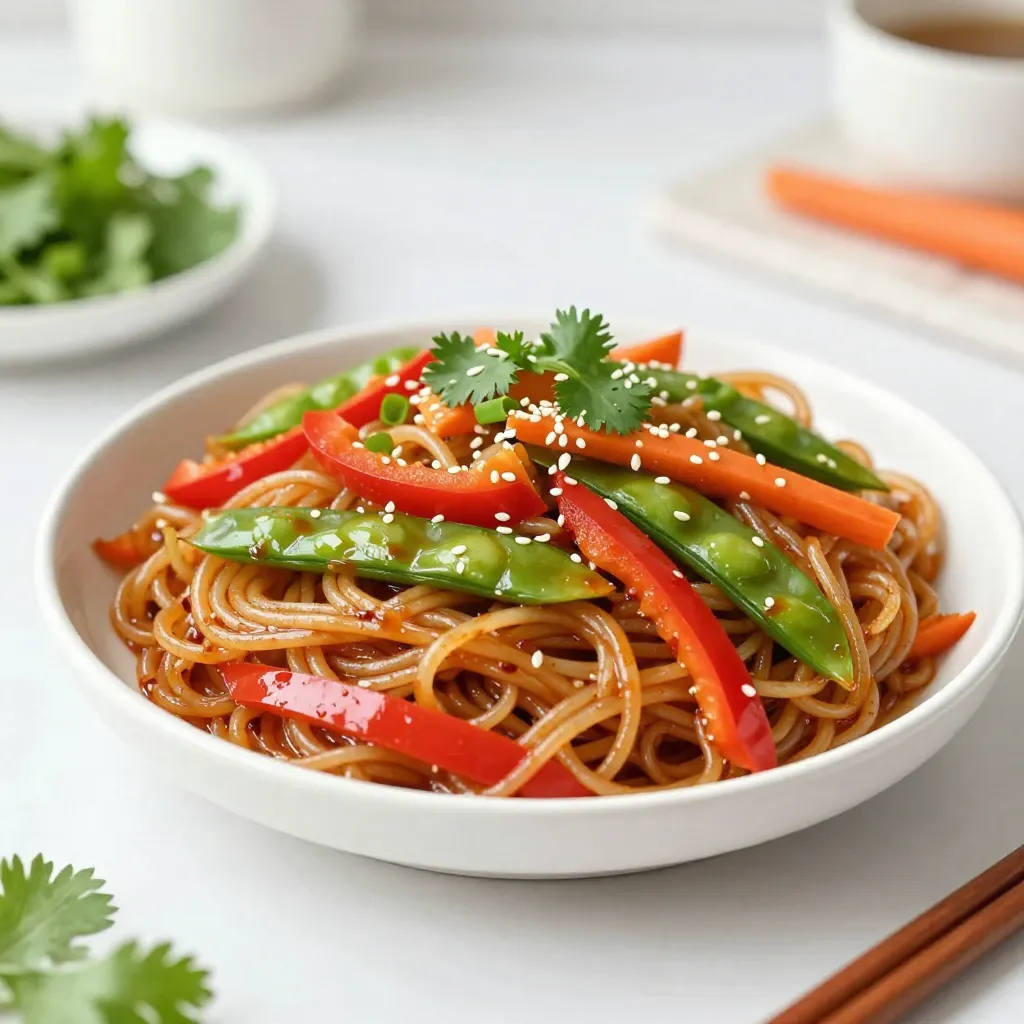
Chili Garlic Noodle Stir-Fry Bold and Spicy Delight
Are you ready for a flavor explosion? My Chili Garlic Noodle Stir-Fry brings bold heat and spice to your table. With just a few simple
- 1 pound ground beef or turkey - 1/2 cup breadcrumbs - 1/4 cup grated Parmesan cheese - 1 large egg - 2 cloves garlic, minced - 1 teaspoon onion powder - 1 teaspoon Italian seasoning - Salt and pepper to taste - 1/4 cup honey - 1/4 cup soy sauce (low sodium) - 1 tablespoon apple cider vinegar These ingredients come together to create a tasty dish. The ground meat gives the meatballs their base, while breadcrumbs help them stay together. Parmesan adds a nice flavor. The egg binds everything well. Garlic and spices bring in great taste. - 1 teaspoon cornstarch (for thickening sauce) - 1 tablespoon sesame seeds (for garnish) - Sliced green onions (for garnish) Cornstarch helps thicken the sauce for a rich texture. Sesame seeds and green onions make the dish look nice. They also add extra flavor. You can choose to use them or leave them out based on your taste. {{ingredient_image_1}} - Preheat the oven to 400°F (200°C). - Prepare the baking sheet with parchment paper. Start by preheating your oven. This step gets it nice and hot for the meatballs. Next, line your baking sheet with parchment paper. This helps to keep the meatballs from sticking. - Combine ground meat, breadcrumbs, cheese, egg, and spices. In a large bowl, mix the ground beef or turkey with breadcrumbs. Add grated Parmesan cheese, the egg, and minced garlic. Sprinkle in onion powder, Italian seasoning, salt, and pepper. Stir until everything is blended well. - Form the mixture into meatballs. - Bake for 15-20 minutes until cooked through. Now, take small portions of the mixture and shape them into balls, about 1 inch wide. Place them on the baking sheet. Bake the meatballs for 15 to 20 minutes. They should be browned and cooked through, reaching an internal temperature of 160°F (70°C). This gives you tender and flavorful meatballs every time. To make sure your meatballs hold together, you need to bind the ingredients well. Use 1/2 cup breadcrumbs and 1 large egg to help with this. The egg acts like glue. Mix everything until combined, but don’t overdo it. For the right meatball size, aim for 1 inch in diameter. This size cooks evenly and stays juicy. If you want a larger meatball, adjust the cooking time. To make the sauce thick, whisk the honey, soy sauce, and apple cider vinegar in a saucepan. Add 1 teaspoon cornstarch if you like it thicker. Heat it on medium and stir until it simmers. This should take about 3-5 minutes. If your sauce is too sweet, add a dash of soy sauce. For more sweetness, just add a bit more honey. Always taste as you go to find the perfect balance. Pro Tips Use Fresh Ingredients: Fresh garlic and high-quality ground meat can significantly enhance the flavor of your meatballs. Always opt for fresh over pre-packaged when possible. Adjust the Sweetness: If you prefer a less sweet sauce, reduce the amount of honey or add more soy sauce to balance the flavors according to your taste. Keep Meatballs Uniform: Make sure your meatballs are the same size for even cooking. Using a cookie scoop can help achieve uniformity. Serve with a Side: These meatballs pair beautifully with rice or noodles. Consider serving them over steamed jasmine rice or alongside stir-fried vegetables for a complete meal. {{image_2}} You can use different types of meat for your meatballs. Ground chicken or pork works great. They both bring a lighter flavor. If you prefer, you can also try plant-based meat. This option is perfect for vegetarians. It gives you the same texture and taste, minus the meat. Adding spices or herbs can boost the flavor of your meatballs. Try mixing in some smoked paprika or fresh parsley. These will add depth and freshness. You can also sneak in some veggies. Finely chopped carrots or zucchini make a great addition. They add moisture and nutrients. Another fun idea is to incorporate cheese. A bit of mozzarella or feta inside the meatballs adds a nice surprise. It melts as they cook, making each bite creamy and tasty. These small changes can turn a simple meal into something special. To keep your honey garlic glazed meatballs fresh, first let them cool. Place the meatballs and sauce in an airtight container. Refrigerate them for up to three days. If you have sauce left over, store it separately. This prevents the meatballs from getting soggy. When you’re ready to eat, just reheat them on the stove or in the microwave. If you want to save some for later, freezing is a great option. Place the cooled meatballs in a single layer on a baking sheet. Freeze them for about an hour. Once frozen, transfer them to a freezer-safe bag. This way, they won’t stick together. You can store them for up to three months. To reheat, thaw the meatballs in the fridge overnight. Then, warm them in a skillet over medium heat. Adding a splash of water or broth keeps them moist. You can also microwave them in short bursts. This helps keep the texture just right. Enjoy your delicious meatballs anytime! You can pair these meatballs with many sides. Here are my favorites: - Rice: Serve over white or brown rice for a filling meal. - Noodles: Try them with lo mein or rice noodles. - Vegetables: Steamed broccoli or green beans add color and crunch. - Salad: A fresh salad balances the sweet and savory flavors. - Bread: Garlic bread or dinner rolls soak up the extra sauce. Yes, you can make these meatballs ahead of time. Here are some easy tips: - Prepare and Cook: Make and bake the meatballs. Let them cool completely. - Storage: Place them in an airtight container. They can last about 3 days in the fridge. - Freezing: Freeze cooked meatballs in a single layer on a baking sheet. Once frozen, transfer to a freezer bag. They last up to three months. - Reheating: To reheat, bake at 350°F until warm or use the microwave. If you want a thicker sauce, here’s how: - Cornstarch: Mix 1 teaspoon of cornstarch with a bit of water. Stir it into the sauce while it simmers. - Simmer Longer: Cook the sauce for an extra few minutes to reduce it naturally. - Add Honey: A little extra honey can also help thicken and sweeten the sauce. In this blog post, we've explored the delicious recipe for honey garlic glazed meatballs. We covered key ingredients, including ground beef, breadcrumbs, and flavorful sauces. You learned the step-by-step process for mixing, shaping, and baking the meatballs. We shared tips on perfecting their texture and provided options for flavor variations. Lastly, we discussed how to store and reheat leftovers effectively. Enjoy experimenting with this recipe to suit your tastes. Every bite promises to be tasty and satisfying.
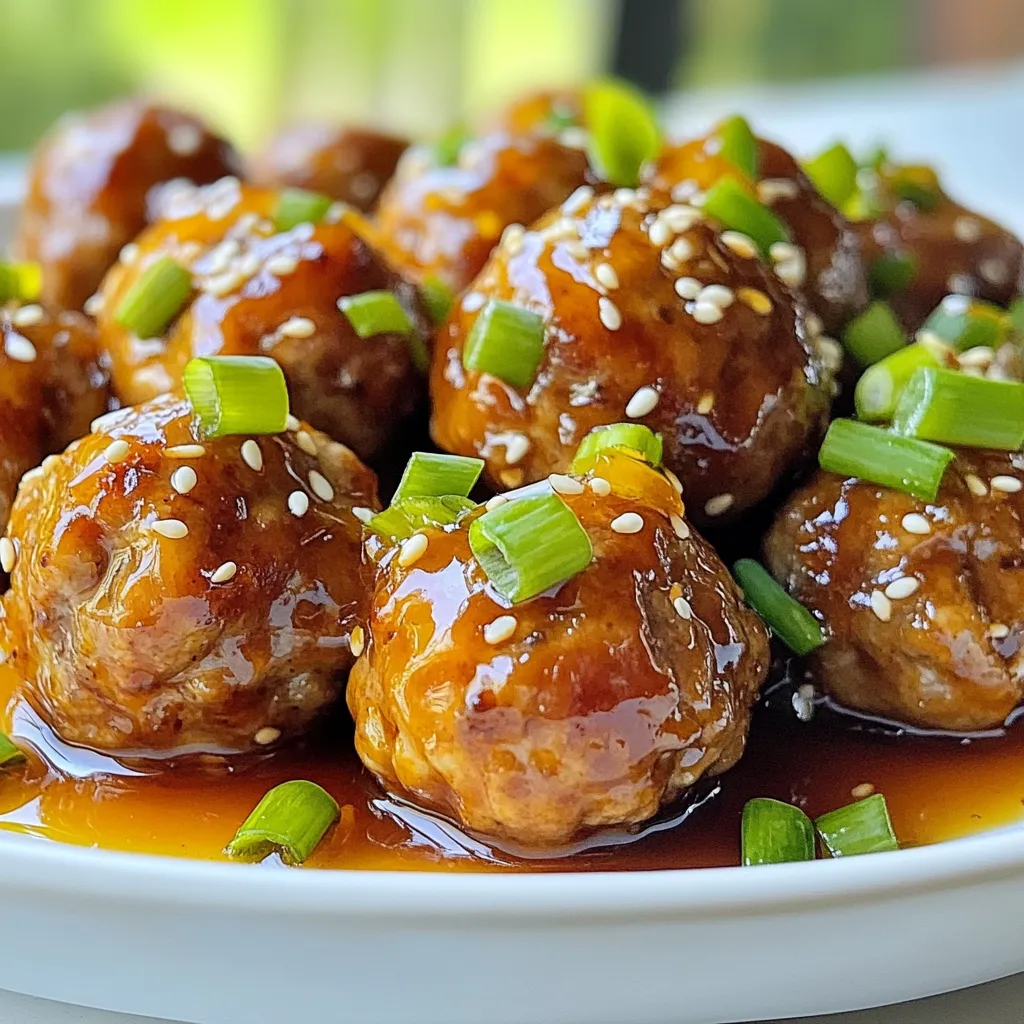
Honey Garlic Glazed Meatballs Simple and Flavorful Meal
Looking for a simple and tasty meal? Honey Garlic Glazed Meatballs are the answer! These little bites pack a flavorful punch. With just a few
- Chickpeas and Variations You need one can of chickpeas, rinsed and drained. Chickpeas give a great texture. You can also use cooked dried chickpeas if you prefer. - Optional Ingredients for Flavor To enhance the taste, include: - 2 tablespoons olive oil - 3 tablespoons hot sauce (adjust to taste) - 1 tablespoon apple cider vinegar - 1 teaspoon garlic powder - 1 teaspoon onion powder - 1 teaspoon smoked paprika - Salt and pepper to taste You can add blue cheese crumbles and fresh cilantro for extra flavor. - Tortilla Options Choose four whole wheat tortillas for a healthier wrap. You can also use spinach or gluten-free tortillas for different options. This choice adds color and nutrition to your meal. {{ingredient_image_1}} First, we need to prepare the chickpeas. Take a medium bowl and rinse the chickpeas. Drain them well. Use a fork to mash the chickpeas lightly. Leave some whole for texture. This gives a nice bite to the wrap. Next, we mix the sauce. In a small bowl, combine olive oil, hot sauce, apple cider vinegar, garlic powder, onion powder, smoked paprika, salt, and pepper. Stir well until everything blends. Pour this sauce over the mashed chickpeas. Mix gently until every chickpea is coated with the sauce. Now it's time to cook the chickpeas. Heat a non-stick skillet over medium heat. Add the chickpea mixture to the skillet. Cook for about 5 to 7 minutes. Stir occasionally to avoid sticking. We want them heated through and slightly crispy. This adds a great texture. Make sure the flavor spreads evenly. Stir well during cooking. This helps every bite be full of flavor. If you need more spice, add more hot sauce to the mix. Now, let’s assemble the wraps. Start with a whole wheat tortilla on a plate. Lay it flat. Place a layer of chopped lettuce on the tortilla. Then add cucumber slices and shredded carrots. This adds crunch and freshness. Next, scoop a portion of the buffalo chickpea mixture on top. If you like, sprinkle blue cheese crumbles over it. They add a nice flavor contrast. Roll the tortilla tightly. Fold in the sides as you go. This keeps the filling secure. Once wrapped, slice the wrap in half at an angle. You can garnish with fresh cilantro if you want. Repeat these steps with the remaining tortillas and filling. Adjusting Heat Levels You can easily adjust the heat in your Buffalo Chickpea Wraps. To make it milder, use less hot sauce. You can also add a touch of honey or brown sugar to balance the heat. If you love spice, try a hotter sauce or add red pepper flakes for more kick. Adding More Veggie Options Feel free to add more veggies to your wraps. Sliced bell peppers, diced tomatoes, or avocado work great. You could also toss in some spinach or kale for extra nutrients. Get creative with your favorite veggies! Pairing with Side Dishes These wraps taste great with simple sides. Try serving them with carrot sticks, celery, or a fresh salad. A side of coleslaw adds crunch and balances the flavors nicely. Serving Suggestions for Gatherings For parties, cut the wraps into smaller pieces. Serve them on a platter with a dipping sauce. You can use ranch or more hot sauce for dipping. This makes them easy for guests to grab and enjoy! Recommended Seasonings To boost the flavor, try adding extra seasonings. A sprinkle of cumin or chili powder can add depth. You can also mix in a bit of lemon juice for brightness. Alternatives to Blue Cheese If you want to skip blue cheese, try feta or goat cheese. You can also use a creamy avocado dressing for a rich flavor. Yogurt can offer a nice tang as well. Pro Tips Adjust the Heat: Feel free to modify the amount of hot sauce based on your heat preference. Start with less and add more to achieve your desired spice level. Mix in Some Greens: For added nutrition, consider mixing in some chopped spinach or kale with the chickpeas for an extra boost of vitamins. Make It Ahead: You can prepare the chickpea mixture a day in advance to save time. Just store it in an airtight container in the fridge until you're ready to assemble the wraps. Experiment with Toppings: Customize your wraps by adding other toppings like avocado, diced tomatoes, or your favorite type of cheese for a unique twist. {{image_2}} You can change the protein in your wraps. Try tofu for a different texture. - Tofu Buffalo Wraps: Use firm tofu instead of chickpeas. Press and cube the tofu. Cook it in the same sauce until crispy. This gives a great flavor and is fun to eat. - Lentil Versions: Lentils are another great choice. Cook them until soft, then mix with the sauce. They add a nice, earthy taste. Making changes for diets is easy and fun. You can adapt these wraps to meet your needs. - Gluten-Free Options: Use gluten-free tortillas or lettuce leaves. This way, everyone can enjoy the wraps without worry. - Vegan Substitutions: Skip the blue cheese for a vegan wrap. You can use avocado or a vegan cheese instead. This keeps the dish tasty and plant-based. Sauce can change the flavor of your wraps. Explore spicy or mild options to find what you like. - Spicy vs. Mild: Adjust the hot sauce to suit your taste. More sauce means more heat! If you want it mild, use less hot sauce and add more vinegar. - Homemade vs. Store-Bought: Making your sauce is fun! You can mix ingredients to create a unique flavor. Use your favorite hot sauce or buy one you love. Store-bought options save time, but homemade can wow your guests. After enjoying your Buffalo Chickpea Wraps, you may have some left. To store them safely, place them in an airtight container. Keep them in the fridge. They will stay fresh for about three days. Make sure to keep the filling and the tortillas separate. This keeps the wraps from getting soggy. If you want to save them for longer, freezing is a great option. Wrap each assembled wrap tightly in plastic wrap. Then, place them in a freezer-safe bag. You can freeze them for up to three months. When you are ready to eat them, just thaw them in the fridge overnight. To enjoy your wraps again, reheating is key. The best way to reheat them is in a skillet. Heat the skillet on medium heat. Place the wrap in the skillet and cover it with a lid. Cook for about 3-4 minutes on each side. This method keeps the wrap crispy and warm. You can also use a microwave, but this may make the wrap soggy. If you use a microwave, heat it for about 30 seconds. Then, check and heat more if needed. Knowing how long your wraps last is important. In the fridge, your Buffalo Chickpea Wraps can last for about three days. If you freeze them, they will last up to three months. Just remember to label your containers. This way, you know when to use them. Enjoy your tasty wraps while they are at their best! Yes, you can prep these wraps ahead of time. To save time, make the chickpea mixture a day before. Store it in the fridge. This helps the flavors blend well. When you're ready to eat, just warm it up. Then, assemble your wraps with fresh veggies. This keeps everything crunchy and tasty. If you want a fun twist, try these alternatives: - Lettuce leaves: Great for a low-carb option. - Pita bread: Adds a nice pocket for filling. - Rice paper wraps: For a light, fresh taste. - Naan bread: For a heartier wrap. These options let you enjoy the flavors in different ways. Yes, these wraps can be very healthy! Here’s why: - Chickpeas provide protein and fiber. - Whole wheat tortillas add complex carbs. - Fresh veggies like lettuce and cucumber boost vitamins. - Olive oil offers healthy fats. This meal gives you energy and keeps you full. Plus, you can adjust the hot sauce for your spice level. Enjoy these wraps as a tasty and nutritious choice! In this article, we explored how to create delicious Buffalo Chickpea Wraps. We discussed key ingredients, from chickpeas to tortilla choices. I shared detailed steps, tips for flavor, and how to customize your wraps. You can use various proteins like tofu or lentils, and even tweak it to fit dietary needs. Remember to store your leftovers properly and consider how to reheat them for the best taste. These wraps are healthy and fun to make. Enjoy trying them out in your kitchen!
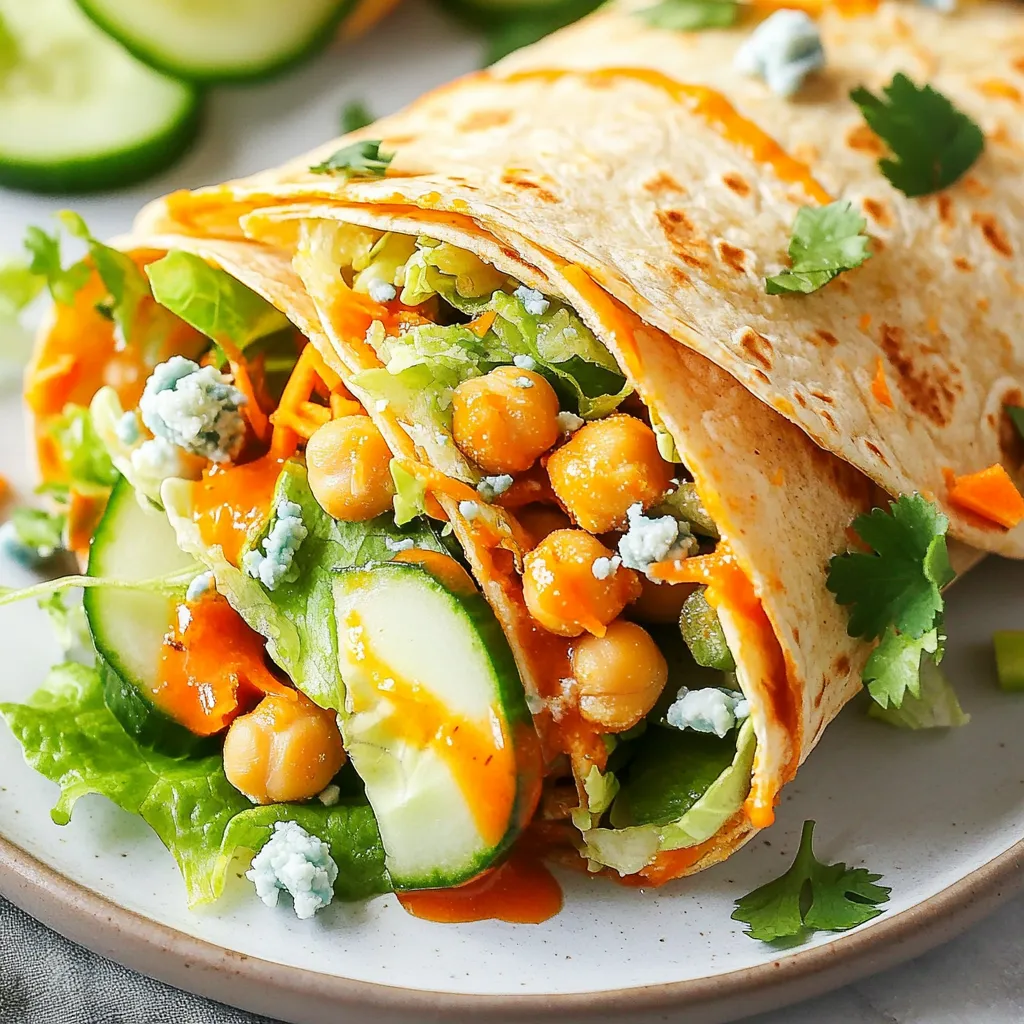
Buffalo Chickpea Wraps for a Flavorful Meal
Looking for a meal that’s packed with flavor and easy to make? Buffalo Chickpea Wraps are the answer! These wraps combine hearty chickpeas and zesty
- 4 cod fillets (about 6 oz each) - 1 cup panko breadcrumbs - 1/2 cup grated Parmesan cheese The cod fillets are the star of this dish. They are mild and flaky, perfect for the crunchy topping. Panko breadcrumbs give a light and crispy texture. Use fresh grated Parmesan for the best flavor. - 1/4 cup fresh parsley, chopped - 2 garlic cloves, minced - 1 teaspoon lemon zest Fresh parsley adds color and a bright taste. Minced garlic gives a warm, savory flavor. Lemon zest brightens the dish with its fresh aroma. - 1/2 teaspoon smoked paprika - 1/4 cup mayonnaise - 2 tablespoons Dijon mustard - 1 tablespoon olive oil - Salt and pepper to taste Smoked paprika adds a subtle smokiness. Mayonnaise and Dijon mustard create a creamy base for the topping. Olive oil brings richness and helps the crust brown. Season with salt and pepper to enhance all the flavors. Each ingredient plays a key role in making this dish flavorful and easy to prepare. This recipe is simple yet impressive, perfect for a cozy dinner. {{ingredient_image_1}} 1. Preheat your oven to 425°F (220°C). This high heat gives a great crust. 2. Line a baking sheet with parchment paper for easy cleanup. 3. In a bowl, mix these ingredients for the breadcrumb topping: - 1 cup panko breadcrumbs - 1/2 cup grated Parmesan cheese - 1/4 cup fresh parsley, chopped - 2 minced garlic cloves - 1 teaspoon lemon zest - 1/2 teaspoon smoked paprika - Salt and pepper to taste 1. Pat the cod fillets dry using a paper towel. This step helps the coating stick. 2. Season both sides with a sprinkle of salt and pepper. This enhances the flavor. 3. In a separate bowl, mix: - 1/4 cup mayonnaise - 2 tablespoons Dijon mustard Stir until they blend well. This mixture keeps the cod moist. 1. Spread a thin layer of the mayonnaise mixture on each fillet. This helps the crumbs stick. 2. Press the breadcrumb mixture onto the mayonnaise side of the fillets. Make sure they are well covered. 3. Drizzle a little olive oil on top of the crust for added richness and flavor. 4. Place the cod on the lined baking sheet. Bake for about 12-15 minutes. Check for doneness by ensuring the fish is opaque and flakes easily with a fork. To get the best crust, use panko breadcrumbs. They are light and crispy. Mix them with grated Parmesan cheese, fresh parsley, minced garlic, lemon zest, and smoked paprika. This mix gives a great flavor and crunch. Tips for breadcrumb consistency: - Use fresh panko for the best texture. - Avoid over-mixing; keep it light and fluffy. How to avoid sogginess: - Pat the cod dry before adding the mayonnaise. - Don’t skip the olive oil drizzle; it helps the crust stay crisp. You can bake or broil your cod. Baking is easier and gives even heat. Broiling cooks faster but needs close watch. Suggestions for baking vs. broiling: - Bake at 425°F for a golden crust and juicy fish. - Broil for 5-7 minutes for a faster cook, but stay nearby. Monitoring fish for perfect doneness: - Cook until the fish flakes easily with a fork. - The internal temperature should reach 145°F. Pair your Parmesan crusted cod with bright, fresh sides. This adds color and balance to the meal. Ideal side dishes: - Serve on a bed of sautéed spinach. - Add roasted vegetables for more flavor. Garnishes for enhanced presentation: - Use lemon wedges for a pop of color. - Drizzle olive oil over the plate for a nice finish. Pro Tips Fresh Ingredients: Use fresh cod fillets for the best flavor and texture. Frozen cod can also be used, but ensure it is fully thawed and pat it dry before seasoning. Customize the Crust: Feel free to add other herbs or spices to the breadcrumb mixture, such as thyme or cayenne pepper, to suit your taste preferences. Check for Doneness: To ensure your cod is perfectly cooked, use a fork to check if it flakes easily. The internal temperature should reach 145°F (63°C). Let it Rest: Allow the cod to rest for a few minutes after baking. This helps the juices redistribute, resulting in a more flavorful and moist fish. {{image_2}} Using different types of breadcrumbs can change the taste and texture of your dish. Traditional panko gives a light and crispy crust. If you want a gluten-free option, use gluten-free breadcrumbs. They work well and still provide a nice crunch. You can also try crushed cornflakes or even ground nuts for a unique twist. Each option adds its own flavor and texture to the cod. You can boost the flavor of your Parmesan crusted cod by adding herbs and spices. Fresh herbs like thyme or dill can add a bright taste. Just chop them finely and mix them into your breadcrumb mixture. Spices can also make your dish pop. A pinch of cayenne pepper adds heat and depth. Experiment with these additions to find your perfect blend of flavors. While cod is delicious, you can use other fish too. Tilapia and haddock are great substitutes. They both have mild flavors that pair well with the Parmesan crust. Just make sure to adjust the cooking time based on the thickness of the fish. This way, you can enjoy a variety of tastes while keeping the same crispy crust! Store leftover Parmesan crusted cod in an airtight container. This keeps it fresh. It lasts for about 2-3 days in the fridge. Label your container with the date. This helps you track how long it has been stored. To reheat, use the oven for best results. Preheat your oven to 350°F (175°C). Place the cod on a baking sheet. Cover it loosely with foil to keep it moist. Heat for about 10-15 minutes or until warmed through. Avoid using the microwave, as it can dry out the fish. You can freeze cooked cod for later use. Wrap each piece tightly in plastic wrap. Then place the wrapped cod in a freezer bag. Squeeze out as much air as you can. It keeps well for up to 2 months. When ready to eat, thaw it in the fridge overnight before reheating. The best side dishes for Parmesan crusted cod include: - Sautéed spinach: The greens add brightness. - Roasted vegetables: Carrots or zucchini work well. - Rice pilaf: It complements the flavors nicely. - Mashed potatoes: Creamy potatoes balance the dish. - Simple salad: A light salad adds freshness. These sides enhance the meal's taste and create a color-rich plate. Yes, you can prep Parmesan crusted cod in advance. Here’s how: 1. Prepare the cod: Follow the recipe up to the baking step. 2. Store: Place the coated fillets on a baking sheet and cover with plastic wrap. 3. Refrigerate: You can keep them for up to 24 hours. When ready to cook, just bake them straight from the fridge. This saves time on busy nights. To check if the cod is done, look for: - Internal temperature: It should reach 145°F (62.8°C). - Color change: The flesh should turn opaque and flaky. - Crust: The top should be golden and crispy. Use a fork or knife to check the fish's center. If it flakes easily, it’s ready to eat. This blog post covers how to make delicious Parmesan crusted cod. We discussed the main ingredients, flavor enhancers, and seasonings needed for this dish. You learned step-by-step instructions for preparation, baking, and tips for a perfect crust. Variations allow you to explore different breadcrumbs and fish types. Finally, we shared best practices for storage and reheating. Now, you're ready to enjoy a tasty meal that’s simple and satisfying. Try it yourself and impress your family!
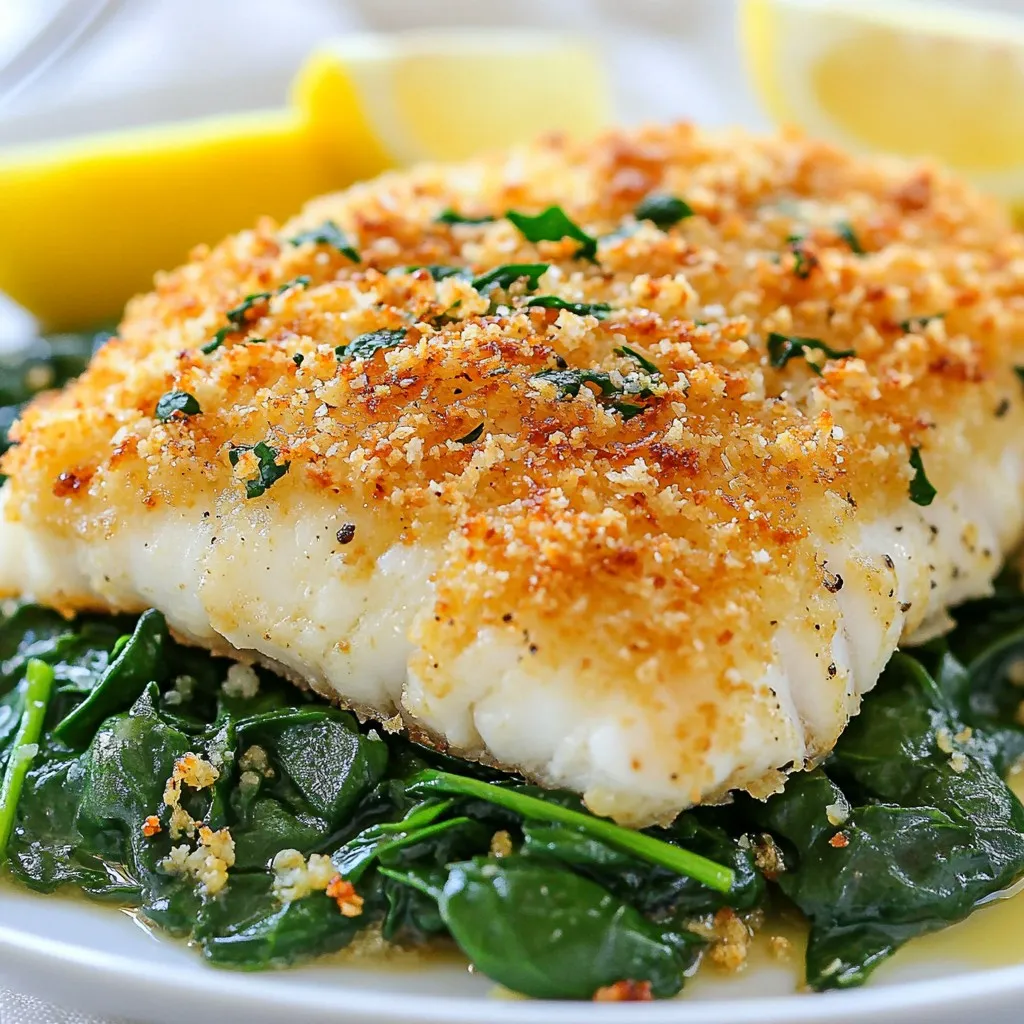
Parmesan Crusted Cod Flavorful and Easy Dinner Recipe
Looking for a quick and tasty dinner idea? This Parmesan Crusted Cod will become your new favorite. With a crunchy crust and juicy fish, it’s
To make a great Creamy Pumpkin Alfredo, gather these key items: - 12 oz fettuccine pasta: This pasta gives the dish its rich texture and holds the sauce well. You can use fresh or dried fettuccine, but I love the way dried fettuccine absorbs the sauce. - 1 cup pumpkin puree: You can use canned pumpkin or make your own. If you choose fresh, roast a pumpkin, scoop the flesh, and blend it until smooth. Canned puree is convenient and saves time. - 1 cup heavy cream: This is what makes the sauce creamy and rich. If you want a lighter version, you can use half-and-half, but it won’t be as thick. - 1/2 cup grated Parmesan cheese: Freshly grated cheese melts better. It adds a salty flavor that balances the sweetness of the pumpkin. - 2 tablespoons unsalted butter: This adds richness to the sauce and enhances the flavor. - 2 cloves garlic, minced: Fresh garlic brings a lovely aroma and depth. - 1/4 teaspoon nutmeg: Nutmeg adds warmth and a hint of spice that complements the pumpkin. - Salt and pepper to taste: These help enhance all the flavors. - Fresh parsley, chopped: This is for garnish. It adds color and freshness to the dish. To make your Alfredo even better, consider adding: - Pinch of cayenne pepper: This adds a slight kick and warmth to the dish. - Sautéed mushrooms or spinach: These veggies lend extra flavor and nutrients. - Crushed red pepper flakes: If you like it spicy, this is a perfect choice. You can adjust the recipe to fit your needs: - Pasta: Use gluten-free pasta if you have a gluten allergy. - Cream: For a dairy-free option, try coconut cream or cashew cream. - Cheese: Nutritional yeast can replace cheese for a vegan twist. This recipe is flexible, so feel free to get creative! {{ingredient_image_1}} To start, boil a large pot of salted water. The salt adds great flavor to the pasta. Cook the fettuccine until it is al dente. This means it should still have a bit of firmness when you bite it. Al dente pasta holds up better when mixed with the sauce. Tips for saving pasta water: - Before you drain the pasta, scoop out about 1 cup of the cooking water. - This starchy water is great for adjusting your sauce later. - It helps make the sauce cling to the pasta. Next, grab a large skillet and melt the butter over medium heat. Once it melts, add the minced garlic. Sauté the garlic for about 1 minute. You want it fragrant but not browned. Burnt garlic can taste bitter. Now, stir in the pumpkin puree and heavy cream. Mix them well until they blend smoothly. This forms the base of your creamy sauce. Then, add the grated Parmesan cheese, nutmeg, salt, and pepper. Stir until the cheese melts into the sauce. Incorporation methods: - If your sauce seems too thick, add some reserved pasta water. - Do this a little at a time until you reach the desired creaminess. Once your sauce is ready, it’s time to mix it with the pasta. Add the cooked fettuccine directly into the skillet. Gently toss the pasta and sauce together. Use tongs to help coat every strand evenly. This ensures each bite is rich and flavorful. Serve this dish right away. Garnish with chopped fresh parsley for a bright touch. Enjoy your creamy pumpkin Alfredo! To make your sauce super creamy, use reserved pasta water. When you cook the fettuccine, save a cup of that starchy water. If the sauce seems thick, add a little pasta water. Stir it in slowly until you reach the creaminess you like. This water helps blend the flavors and keeps the sauce smooth. You can boost the flavor with spices and herbs. A pinch of cinnamon or a dash of cayenne pepper adds warmth and depth. Fresh herbs like sage or thyme bring a fresh taste. Mix these in while you combine the pumpkin and cream. This gives your dish a unique twist that makes it stand out. Garnishing is key for a beautiful dish. After serving, sprinkle fresh parsley on top. This adds a pop of color and freshness. You can also add extra Parmesan cheese for a rich finish. Serve it in a nice bowl to show off the creamy sauce. A great presentation makes your meal even more enjoyable! Pro Tips Use Fresh Pumpkin: For a more vibrant flavor, consider using fresh pumpkin instead of canned puree. Roast or steam the pumpkin, then blend until smooth. Perfect Pasta Texture: To achieve the best texture, ensure you cook the fettuccine just until al dente. It will continue to cook slightly when mixed with the sauce. Adjust the Creaminess: If your sauce is too thick, gradually add reserved pasta water to reach your desired creaminess. This also helps the sauce adhere better to the pasta. Garnish Wisely: Fresh herbs, like parsley or sage, add a wonderful contrast to the rich sauce. Sprinkle them on just before serving for the best flavor and presentation. {{image_2}} You can make Creamy Pumpkin Alfredo even better with veggies. Try adding spinach, kale, or roasted bell peppers. These add color and nutrients. You can also include mushrooms for a nice texture. Just sauté them with the garlic. This keeps the dish tasty and healthy! To make this dish heartier, add protein. Cooked chicken breast works well. Shrimp also adds a nice touch. Just sauté them until they turn pink. If you want something richer, consider adding Italian sausage. Cook it first, then mix it into the sauce. Each option boosts flavor and fills you up! Feel free to switch up the ingredients based on the season. In fall, add sage or thyme for a warm taste. In spring, consider asparagus or peas for brightness. Using seasonal ingredients keeps the dish fresh and exciting. Each change can bring a new twist to your Alfredo! To store leftovers, let the Creamy Pumpkin Alfredo cool down. Place it in an airtight container. This keeps the dish fresh and tasty. Make sure to use a container that fits the amount you have left. If you have extra sauce, separate it from the pasta. This helps prevent the pasta from getting too soggy. You can freeze Creamy Pumpkin Alfredo for later. First, cool the dish completely. Then, use freezer-safe containers or bags. Try to remove as much air as possible. This helps prevent freezer burn. When you want to eat it, thaw it in the fridge overnight. Reheat it slowly on the stove or in the microwave. If the sauce seems thick, add a splash of water or cream. In the fridge, Creamy Pumpkin Alfredo lasts for about 3 to 5 days. If you freeze it, it can stay good for up to 2 months. Just remember, the sooner you eat it, the better it tastes! When reheating, always check for any signs of spoilage before enjoying your dish. Yes, you can! If you want gluten-free pasta, use rice or chickpea pasta. Both work well with the sauce. Other options are whole-grain or penne pasta. Each choice adds its own texture and flavor. To make this dish dairy-free, swap heavy cream for coconut milk or almond milk. For cheese, use nutritional yeast for a cheesy flavor. You can also try dairy-free cream cheese to keep it rich and creamy. These substitutes will still give you a tasty meal. This dish pairs great with fresh salad or garlic bread. For a heartier meal, add roasted vegetables like broccoli or Brussels sprouts. Grilled chicken or shrimp also makes a nice addition. These sides balance the creamy sauce and add more flavor. In this blog post, we explored making a creamy pumpkin Alfredo. We covered essential ingredients like fettuccine, pumpkin puree, and cheese. You learned cooking tips for the perfect pasta and sauce. I shared ways to enhance flavor and substitute ingredients for your needs. Remember to store leftovers properly and try variations for different diets. Enjoy your creamy pumpkin Alfredo, and let your creativity shine in the kitchen!
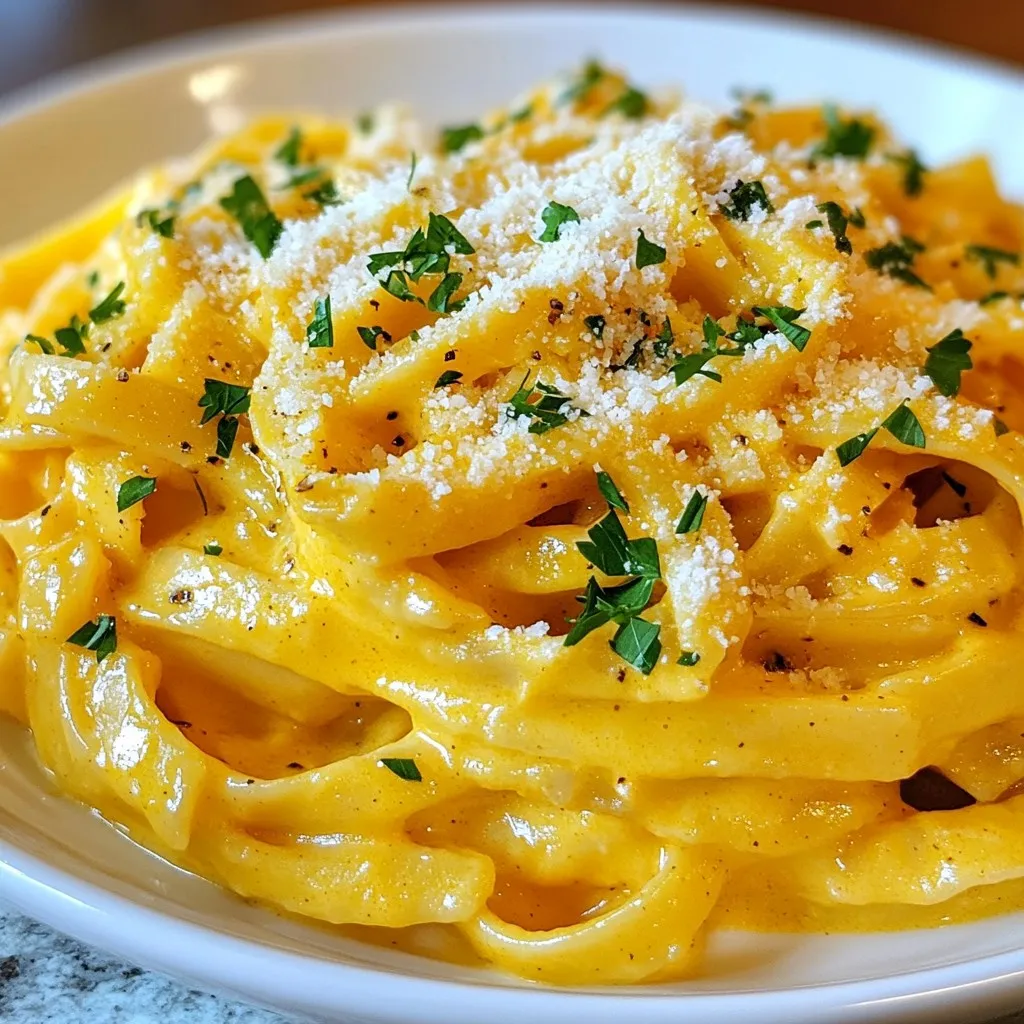
Creamy Pumpkin Alfredo Rich and Flavorful Recipe
Are you ready to make a dish that’s both cozy and delicious? My Creamy Pumpkin Alfredo recipe brings warm flavors to your table. This dish
Gather the following items for your One Pot Enchilada Rice: - 1 cup long-grain rice - 1 tablespoon olive oil - 1 small onion, diced - 2 cloves garlic, minced - 1 bell pepper (red or green), diced - 1 can (15 oz) black beans, drained and rinsed - 1 can (15 oz) corn, drained - 1 can (10 oz) enchilada sauce - 2 cups vegetable broth - 1 teaspoon ground cumin - 1 teaspoon chili powder - 1 teaspoon smoked paprika - Salt and pepper to taste - 1 cup shredded cheese (cheddar or Mexican blend) - Fresh cilantro, for garnish Each ingredient adds depth and flavor. The long-grain rice serves as the base, soaking up all the tasty juices. Olive oil helps sauté the veggies, while onion and bell pepper give a sweet crunch. Black beans and corn add protein and sweetness, making every bite satisfying. The enchilada sauce and vegetable broth create a rich, savory flavor. The spices—cumin, chili powder, and smoked paprika—bring warmth and a hint of smoke that perfectly complements the dish. Finally, cheese melts into a creamy layer, and cilantro adds a fresh touch. This mix makes a meal that is both hearty and delicious. {{ingredient_image_1}} - Sautéing the onion and bell pepper Start by heating the olive oil in a large pot over medium heat. Add the diced onion and bell pepper. Cook for 4 to 5 minutes until they soften. The smell will fill your kitchen. - Adding garlic and rice Next, stir in the minced garlic. Cook it for about 1 minute. Then, add the long-grain rice to the pot. Mix it well to coat the rice with the oil and veggies. - Toasting the rice Toast the rice in the pot for 2 to 3 minutes. Stir it often. This step adds a nice depth of flavor to the dish. - Combining all ingredients Pour in the enchilada sauce and vegetable broth. Add the drained black beans and corn along with the spices: ground cumin, chili powder, smoked paprika, salt, and pepper. Stir everything together until mixed well. - Boiling and simmering the mixture Bring the mixture to a boil. Once boiling, lower the heat and cover the pot. Let it simmer for about 20 minutes. The rice should become tender and absorb most of the liquid. - Melting the cheese Remove the pot from heat. Stir in half of the shredded cheese until it melts. Sprinkle the rest of the cheese on top. Cover the pot again for a few minutes to let the cheese melt completely. This adds a creamy finish to your dish. To make your One Pot Enchilada Rice burst with flavor, use the right spices. I suggest adding: - 1 teaspoon ground cumin - 1 teaspoon chili powder - 1 teaspoon smoked paprika These spices bring a warm taste and depth to your dish. If you want a unique twist, try using homemade enchilada sauce. It can elevate the flavor and make your meal even more special. Just mix tomatoes, chili powder, and garlic for a quick version. When cooking in one pot, I have some best practices to share. First, always heat your oil and sauté your veggies first. This step builds great flavor. Next, avoid overcooking the rice. Keep an eye on the simmering time. After about 20 minutes, check the rice for tenderness. If you see extra liquid, let it sit covered for a few minutes. The rice will soak up that moisture and become fluffy. Pro Tips Rinse Your Beans: Always rinse canned beans to remove excess sodium and preservatives for a fresher taste. Cheese Variations: Experiment with different cheeses like Monterey Jack or Pepper Jack for added flavor and heat. Make It Spicy: Add sliced jalapeños or a pinch of cayenne pepper for an extra kick if you enjoy spicy food. Leftovers Storage: Store leftover rice in an airtight container in the fridge for up to 3 days; reheat gently to maintain texture. {{image_2}} You can change the beans or grains in this dish. Try pinto beans or kidney beans for a different taste. If you want more texture, use quinoa instead of rice. It cooks well and adds protein. Using fresh vegetables can also boost flavor. Swap the bell pepper for zucchini or mushrooms. They will add a nice twist. You can even toss in some spinach for extra nutrients. To make this meal gluten-free, choose a gluten-free enchilada sauce. Most brands offer this option. You can also use gluten-free grains like rice or quinoa. If you're looking for vegan options, skip the cheese or use a plant-based cheese. You can also add more veggies to enhance the meal. Cauliflower or sweet potatoes work great in this dish. To keep your enchilada rice fresh, use airtight containers. Glass or plastic containers work well. Divide the rice into smaller portions. This makes it easy to heat just what you need. Store the rice in the fridge. It stays good for up to three days. When reheating, avoid drying out the rice. Use a microwave or stove. If you choose the microwave, add a splash of water. Cover the dish with a damp paper towel. Heat in short bursts, stirring in between. If you use the stove, add a little broth. Heat gently over low heat while stirring. This keeps the rice moist and tasty. Can I use brown rice instead of long-grain rice? Yes, you can use brown rice. Just remember, brown rice takes longer to cook than long-grain rice. Adjust the cooking time to about 40-45 minutes. You may need to add a bit more broth to help it cook fully. How can I make my enchilada rice spicier? To spice it up, add chopped jalapeños or a pinch of cayenne pepper. You can also mix in a bit of hot sauce while cooking. Taste as you go to find your perfect heat level. What side dishes pair well with One Pot Enchilada Rice? Some great sides include a fresh salad, guacamole, or tortilla chips with salsa. You can also serve it with a dollop of sour cream or a side of refried beans to make the meal even heartier. This blog post covered how to make One Pot Enchilada Rice. You learned about the key ingredients, preparation steps, and cooking process. I shared tips to boost flavor and techniques for perfect cooking. We also explored ingredient variations and storage tips. In conclusion, this dish is easy to adapt and perfect for everyone. Enjoy experimenting in your kitchen!
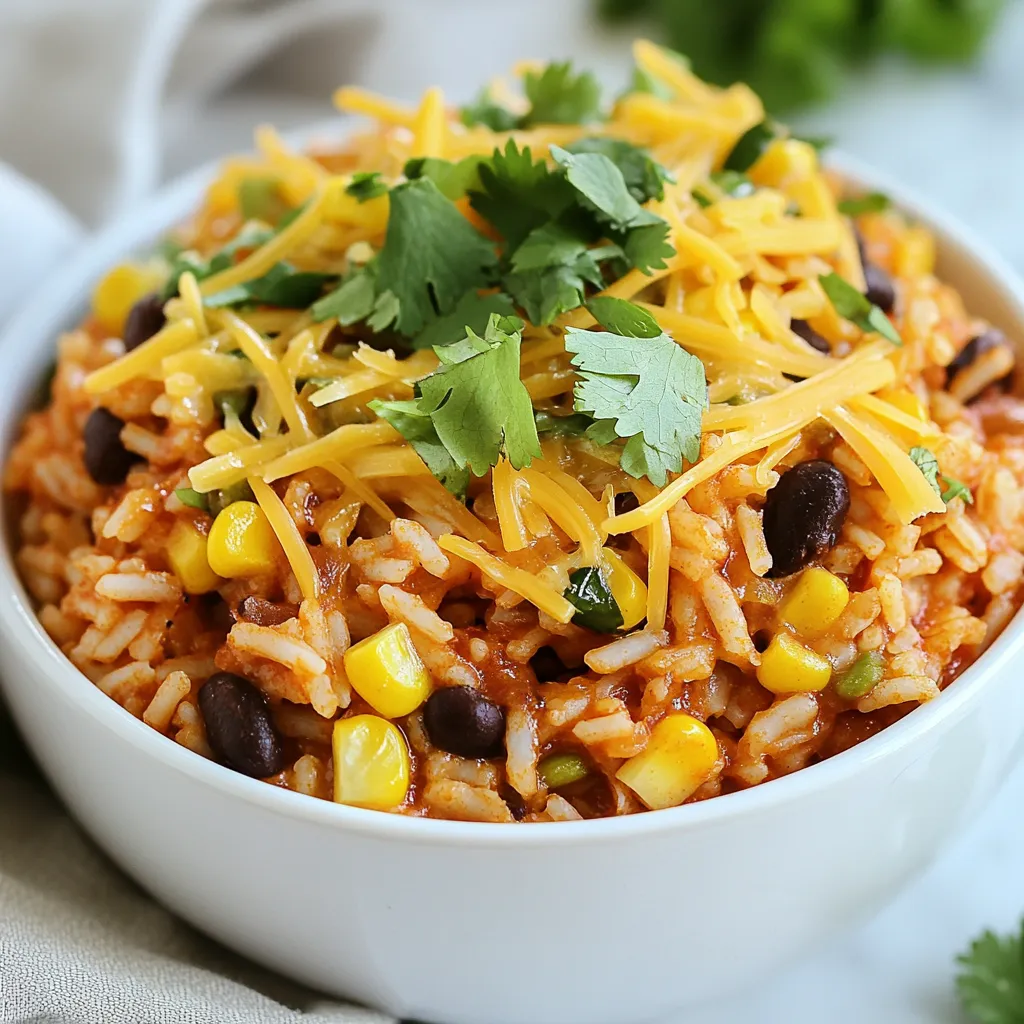
One Pot Enchilada Rice Flavorful and Easy Meal Solution
Craving a tasty meal without the mess? One Pot Enchilada Rice is your answer! This dish combines savory flavors and simple steps for an easy,
To make the Southwest Chicken Quinoa Bake, gather these ingredients: - 1 cup quinoa, rinsed and drained - 2 cups chicken broth - 1 lb chicken breast, cooked and shredded - 1 can (15 oz) black beans, rinsed and drained - 1 cup corn (fresh or frozen) - 1 red bell pepper, diced - 1/2 cup red onion, finely chopped - 1 tsp cumin - 1 tsp chili powder - 1/2 tsp smoked paprika - Salt and pepper to taste - 1 1/2 cups shredded cheese (cheddar or Monterey Jack) - 1/4 cup fresh cilantro, chopped (for garnish) - 2 tablespoons olive oil - 1 lime, juiced Each ingredient plays a role in this dish. Quinoa gives a nutty flavor and is high in protein. Chicken breast adds lean protein. Black beans provide fiber and a hearty texture. Corn adds sweetness, while red bell pepper and onion bring color and crunch. Spices like cumin and chili powder give warmth, and smoked paprika adds a unique twist. Cheese melts into a creamy topping, making every bite delightful. You can swap ingredients based on your taste or what you have at home. - Use vegetable broth instead of chicken broth for a vegetarian option. - Swap quinoa with brown rice for a different grain. - If you don't like black beans, try kidney beans or pinto beans. - You can use frozen corn if fresh corn is not available. - For cheese, mozzarella or pepper jack works great too. - If you want a fresh twist, add chopped green onions instead of red onion. These substitutions allow you to customize the dish to your liking. Enjoy exploring different flavors! {{ingredient_image_1}} Start by rinsing one cup of quinoa under cold water. This step removes the bitter coating. In a medium saucepan, combine the rinsed quinoa and two cups of chicken broth. Bring this mix to a boil over medium-high heat. Once it boils, lower the heat and cover it. Let it simmer for 15 to 20 minutes until the quinoa absorbs all the liquid. After cooking, fluff it with a fork and set it aside. Next, heat two tablespoons of olive oil in a large skillet over medium heat. Add half a cup of finely chopped red onion and one diced red bell pepper. Sauté these for about five minutes. You want them soft but not mushy. This adds flavor and texture to your dish. In a large mixing bowl, combine the cooked quinoa, one pound of shredded chicken, a 15-ounce can of rinsed black beans, and one cup of corn. Add the sautéed vegetables, the juice of one lime, one teaspoon of cumin, one teaspoon of chili powder, and half a teaspoon of smoked paprika. Season this mix with salt and pepper to taste. Stir well until everything is nicely blended. Grease a 9x13 inch baking dish and pour in the mixture. Spread it evenly across the dish. Top with one and a half cups of shredded cheese. Bake in the preheated oven at 375°F for about 20 to 25 minutes. The cheese should be melted and bubbly. Once it’s done, let it cool for a few minutes, then garnish with fresh cilantro before serving. Enjoy your delicious Southwest Chicken Quinoa Bake! To make the best quinoa, start with rinsing it well. This removes the bitter coating. Use two cups of chicken broth for one cup of quinoa. This adds great flavor. Cook it on medium heat until it boils. Then, lower the heat and cover it. Let it simmer for 15-20 minutes. You will know it is done when it is fluffy and all the water is gone. After cooking, let it sit covered for five more minutes. This helps it become even fluffier. Fluff it with a fork before mixing it into your dish. You can change up the flavors in this bake. Try adding diced jalapeños for heat. If you like a smoky flavor, use chipotle powder instead of chili powder. For a fresh twist, add lime zest. You can also mix in different veggies like zucchini or spinach. For a creamier dish, stir in some cream cheese or sour cream before baking. This will make it rich and tasty. If you want a crunch, top with crushed tortilla chips before baking. Serve the Southwest Chicken Quinoa Bake hot from the oven. It pairs well with a fresh salad. You can also add a dollop of sour cream or guacamole on top. For extra flavor, squeeze lime juice over each serving. This dish is great for meal prep. You can store leftovers in the fridge. Reheat in the oven or microwave. Enjoy it as a quick lunch or dinner throughout the week. Pro Tips Tip for Perfect Quinoa: Make sure to rinse the quinoa thoroughly before cooking to remove its natural bitterness. Chicken Cooking Method: Use leftover rotisserie chicken for a quick and flavorful option, saving you time in the kitchen. Vegetable Variations: Feel free to add other vegetables such as zucchini or spinach for extra nutrients and flavor. Cheese Choices: Experiment with different types of cheese like pepper jack for a spicy kick or feta for a tangy twist. {{image_2}} You can make a tasty vegetarian version of this dish. Start by skipping the chicken. Use more beans or add extra veggies. Try chickpeas for protein. They mix well with quinoa. You can add zucchini, spinach, or mushrooms too. Use vegetable broth instead of chicken broth for flavor. Add some diced tomatoes for a juicy touch. This way, everyone can enjoy the dish! If you like heat, add some spice! Try diced jalapeños or a dash of hot sauce. You can also mix in red pepper flakes. This will give your bake a nice kick. For extra flavor, add chipotle peppers in adobo sauce. These peppers bring a smoky taste that is amazing. Don't forget to balance the heat with lime juice. It will brighten up the dish. This recipe is naturally gluten-free when you use quinoa. Make sure your broth and other ingredients are also gluten-free. Check labels on canned goods like beans and corn. Some brands add gluten as a thickener. You can serve this dish with a side salad or gluten-free corn chips. This way, you can enjoy a full meal without worries! Store your Southwest Chicken Quinoa Bake in an airtight container. Let it cool down first. It stays fresh for about 3 to 5 days in the fridge. When you want to eat it, just take it out and check for any smells or odd colors. If it looks good, you can enjoy it again. To freeze this dish, first let it cool completely. Then, cut it into portions for easy serving. Wrap each piece in plastic wrap and place them in a freezer-safe bag. It will last up to 2 months in the freezer. Remember to label the bags with the date. This way, you'll know when you made it. When it’s time to eat, you can reheat it easily. For the oven, preheat to 350°F (175°C). Place it in a baking dish and cover with foil. Heat it for about 20 minutes or until warm. If you prefer the microwave, place a portion on a microwave-safe plate. Heat for 2 to 3 minutes, stirring halfway. Make sure it's hot all the way through before you dig in! Yes, you can use brown rice. However, cooking times will change. Brown rice takes about 45-50 minutes to cook. Make sure to adjust the liquid too, using about 2.5 cups of chicken broth. This will keep it moist and flavorful. Quinoa cooks faster and has a nutty taste. Brown rice will add a chewy texture. The total time is about 50 minutes. This includes 15 minutes for prep and 20-25 minutes for baking. Cooking the quinoa takes around 15-20 minutes. Make sure to keep an eye on the cheese. You want it melted and bubbly, not burnt. This timing makes it easy to serve fresh and hot. Here are a few great side dishes: - Green salad: A simple salad adds freshness. - Guacamole: Creamy avocado balances the spice. - Spanish rice: A tasty side that pairs well. - Cornbread: Sweet cornbread complements the flavors. These sides enhance the meal and make it even more enjoyable. This post covered all the essential details for cooking with quinoa. We discussed key ingredients, cooking steps, and helpful tips. You learned about flavor variations and storage methods. Quinoa is versatile, healthy, and easy to prepare. Whether you follow my tips or try your own ideas, you can make delicious meals. Now, it's your turn to experiment with quinoa and enjoy its benefits in your kitchen. Happy cooking!
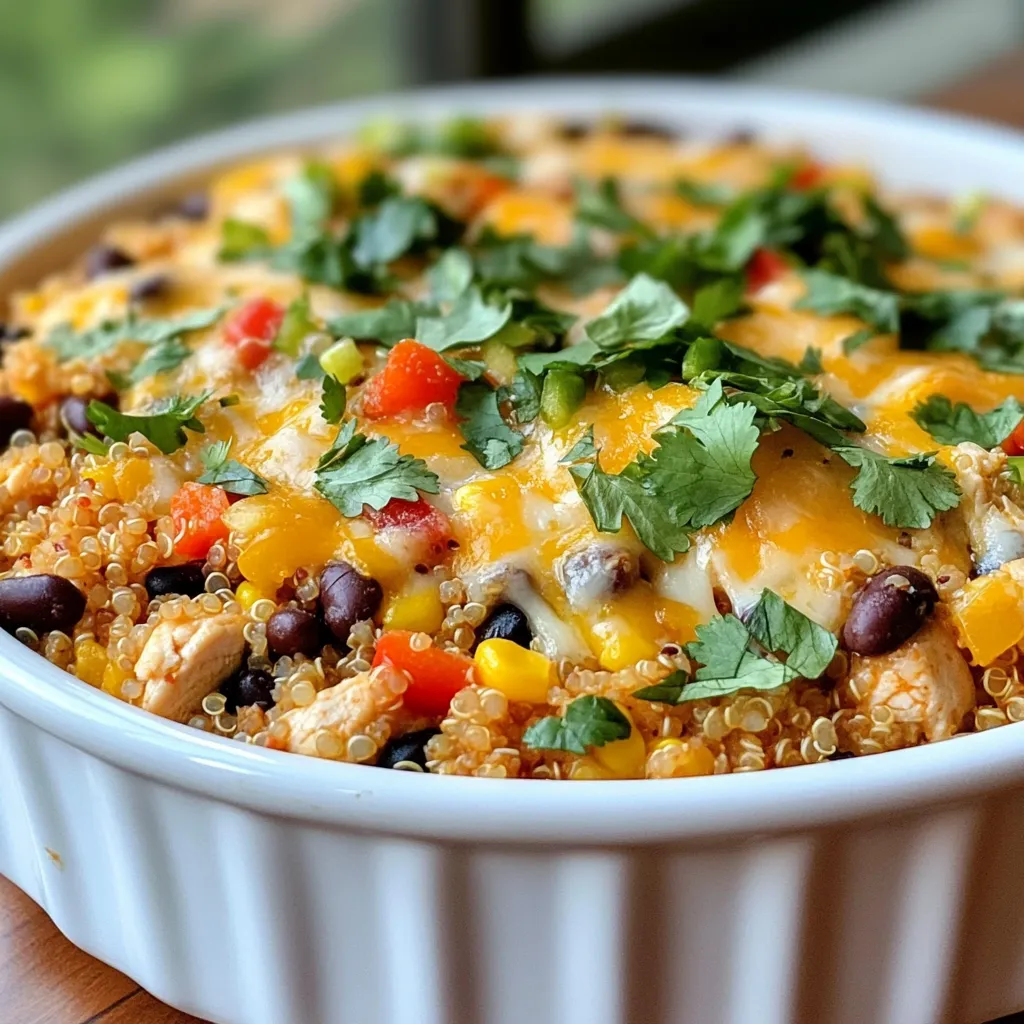
Satisfying Southwest Chicken Quinoa Bake Recipe
Looking for a hearty dish that’s both tasty and healthy? The Satisfying Southwest Chicken Quinoa Bake is your answer! You’ll love how simple it is
To make creamy spinach parmesan orzo, you will need: - 1 cup orzo pasta - 2 cups fresh spinach, chopped - 1 small onion, finely diced - 2 cloves garlic, minced - 2 cups vegetable broth - 1 cup heavy cream - 1 cup grated Parmesan cheese - 2 tablespoons olive oil - Salt and pepper to taste - ½ teaspoon red pepper flakes (optional) - Fresh basil leaves for garnish I always prefer fresh spinach in this dish. Fresh spinach has a vibrant color and a better texture. It wilts perfectly when cooked. If you can't find fresh spinach, frozen spinach works too. Just make sure to thaw and drain it well. This helps avoid excess water in your dish. Both options add great flavor, but fresh gives a nicer bite. You can swap some ingredients to fit your taste. Use whole wheat or gluten-free orzo if you like. Instead of heavy cream, try using Greek yogurt for a lighter option. You can also replace Parmesan cheese with nutritional yeast for a vegan twist. For added protein, toss in cooked chicken or shrimp. These swaps keep the dish tasty while fitting different diets. {{ingredient_image_1}} First, you need to heat the olive oil in a medium saucepan over medium heat. Add in the finely diced onion. Sauté the onion until it turns soft and clear, which takes about 3 to 4 minutes. Next, add the minced garlic and red pepper flakes if you want some spice. Cook this mixture for 1 to 2 minutes. The garlic smell will fill your kitchen and make you hungry! Now it’s time for the orzo. Stir the orzo into the saucepan, making sure it gets coated in the oil. Toast the orzo for about 1 to 2 minutes. This step adds a nice flavor. Then, pour in the vegetable broth and bring it to a boil. Once it boils, lower the heat and cover the pot. Let the orzo simmer for about 10 to 12 minutes. Check the orzo after 10 minutes. It should be soft and most of the broth should be gone. After the orzo is cooked, stir in the chopped spinach. Cook for an additional 2 to 3 minutes. You want the spinach to wilt but still stay bright green. Lower the heat again, and now add the heavy cream and grated Parmesan cheese. Stir this until the cheese melts and the sauce becomes creamy. Season with salt and pepper to taste. Let it rest for a minute or two. This will help it thicken up. Now, you’re ready to serve! To make the sauce creamy, use heavy cream. It adds richness and depth. Stir in the Parmesan cheese slowly. This helps it melt evenly. Taste the sauce and adjust the salt and pepper. You can add a pinch of nutmeg for warmth. This small touch makes a big difference. Cook the orzo until it is just tender. Follow the cooking time on the package. Stir it often while it cooks to prevent sticking. If you overcook it, the orzo can become mushy. Remember, it will continue to cook slightly after you remove it from heat. To boost the flavor, try adding herbs. Fresh basil or thyme works well in this dish. You can also mix in sun-dried tomatoes or cooked mushrooms. For some heat, add more red pepper flakes. Each of these upgrades adds unique tastes to your creamy orzo. Pro Tips Fresh Spinach: For the best flavor and texture, use fresh spinach instead of frozen. It wilts beautifully and adds a vibrant color to your dish. Cheese Variations: Try mixing different types of cheese, such as mozzarella or goat cheese, for a unique twist on the classic Parmesan flavor. Herb Infusion: Add herbs like thyme or oregano while cooking for an aromatic depth. Fresh herbs can be added just before serving for a burst of freshness. Leftover Makeover: This dish can be easily transformed into a baked casserole. Top with breadcrumbs and bake until golden for an exciting new meal. {{image_2}} You can make Creamy Spinach Parmesan Orzo even more filling by adding protein. Chicken is a great choice. Cook diced chicken in the pan before adding the onion. Shrimp also works well. Sauté shrimp until pink, then set aside. Add them back in with the spinach. This adds flavor and makes the dish heartier. To make this dish vegan, swap the heavy cream for coconut milk or a nut-based cream. Replace Parmesan cheese with a plant-based option or nutritional yeast for a cheesy flavor. Use vegetable broth and add extra veggies like mushrooms or bell peppers for more texture. This keeps the dish creamy and satisfying without dairy. While Parmesan is classic, you can try other cheeses. Feta adds a tangy kick. Goat cheese offers a creamy texture. For a sharper taste, use aged cheddar. Experiment with blending different cheeses for unique flavors. Just remember to melt them into the sauce to keep it creamy and smooth. To keep your creamy spinach Parmesan orzo fresh, store it in an airtight container. Let it cool before sealing. This prevents moisture buildup. The orzo can stay in the fridge for up to three days. Always label the container with the date. This helps you track freshness. When you're ready to enjoy leftovers, reheat the orzo in a saucepan. Add a splash of vegetable broth or cream. This helps restore its creamy texture. Heat it over medium-low until warm. Stir it often to avoid burning. You can also use the microwave. Heat in short bursts, stirring in between. Freezing creamy orzo is easy but may change the texture. To freeze it, let the dish cool completely. Place it in freezer-safe bags or containers. Remove as much air as possible to avoid freezer burn. It can last for up to three months. To thaw, place it in the fridge overnight before reheating. Yes, you can use other types of pasta. Try small shapes like penne or fusilli. Keep in mind that cooking times may change. Check the package for exact times. You want the pasta to be tender but not mushy. To make it less creamy, reduce the heavy cream. You can use half a cup instead of a full cup. Another option is to add more broth. This will balance the creaminess while still keeping the dish flavorful. You can also use low-fat milk for a lighter touch. Yes, you can prepare this dish ahead of time. Cook the orzo and mix in the spinach. Store it in the fridge without the cream. When ready to eat, heat it up and stir in the cream and cheese. This way, your creamy spinach parmesan orzo stays fresh and delicious! This blog post guided you through making a creamy orzo dish. We covered ingredients, prep steps, and tips. You learned how fresh and frozen spinach compare, and about protein options, like chicken or shrimp. We also shared storage tips and answered common questions. Remember, you can adjust flavors to suit your taste. Experiment with different ingredients to create your best dish. Enjoy cooking, and don't hesitate to share your results!
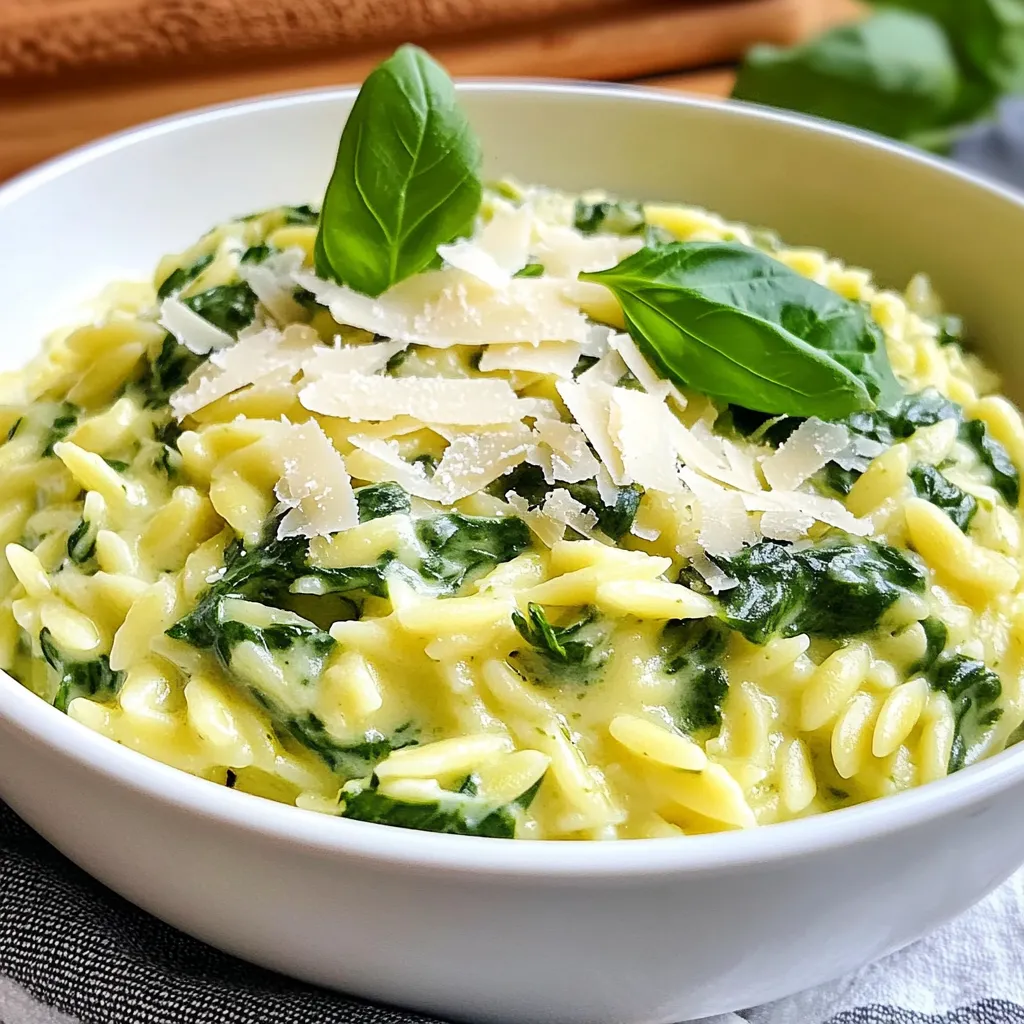
Creamy Spinach Parmesan Orzo Delicious Dinner Dish
Are you ready to elevate your dinner game with a scrumptious twist? This Creamy Spinach Parmesan Orzo is both rich and delightful, making it a