Dinner

To make teriyaki glazed salmon, gather these key ingredients: - 2 salmon fillets (about 6 ounces each) - 1/4 cup soy sauce (low-sodium) - 2 tablespoons honey - 1 tablespoon rice vinegar - 1 teaspoon sesame oil - 1 tablespoon fresh ginger, grated - 2 cloves garlic, minced - 1 teaspoon cornstarch mixed with 1 tablespoon water (for thickening) - 1 tablespoon sesame seeds (for garnish) - 2 green onions, finely chopped (for garnish) - Cooked jasmine rice (for serving) - Steamed broccoli (optional, for serving) These ingredients create a sweet and savory glaze that pairs perfectly with salmon. While the recipe shines with jasmine rice and broccoli, feel free to mix it up! You can serve the salmon with: - Quinoa for a nutty flavor - Stir-fried vegetables for added crunch - Sautéed spinach for a healthy boost - A side salad to freshen the plate These options make the dish more colorful and fun. Using fresh ingredients makes a big difference. Look for: - Wild-caught salmon for better taste and texture - Fresh ginger instead of powdered for a bright flavor - Low-sodium soy sauce to control saltiness - Organic honey for a pure sweetness Choosing high-quality ingredients elevates your dish and makes it even more enjoyable. {{ingredient_image_1}} To make the teriyaki sauce, grab a small saucepan. Add 1/4 cup of low-sodium soy sauce. Next, mix in 2 tablespoons of honey, 1 tablespoon of rice vinegar, and 1 teaspoon of sesame oil. Then, add 1 tablespoon of grated fresh ginger and 2 minced garlic cloves. Stir all the ingredients well. Heat the mixture over medium heat until it simmers gently. Once it simmers, mix 1 teaspoon of cornstarch with 1 tablespoon of water. Stir this mixture into the sauce to thicken it. Cook for 1-2 more minutes until the sauce coats the back of a spoon. Remove it from heat and set it aside. Now, let’s cook the salmon. Preheat your grill or non-stick skillet over medium-high heat. Lightly oil the surface to keep the salmon from sticking. Season the salmon fillets with a pinch of salt and pepper. Place the fillets skin-side down. Let them cook for about 4-5 minutes. Carefully flip the salmon and brush half of the teriyaki sauce on top. Cook for another 4-5 minutes. The salmon is done when it flakes easily with a fork. In the last minute, brush the remaining glaze over the salmon for extra flavor. After cooking, let the salmon rest for a minute on a plate. Serving teriyaki glazed salmon is easy and fun! Place the salmon on a colorful plate. Serve it over a mound of jasmine rice. If you like, add steamed broccoli on the side for color and nutrition. Drizzle any extra teriyaki sauce over the salmon. For a beautiful touch, sprinkle sesame seeds and chopped green onions over the top. This simple presentation makes your dish look gourmet and inviting! For a perfect teriyaki glaze, you need balance. The mix of soy sauce, honey, and rice vinegar creates a sweet and savory taste. Make sure to simmer the sauce until it thickens. This helps it stick to the salmon better. Don't rush this step. Patience pays off! Brush the glaze on the salmon twice while cooking. This adds layers of flavor. You can grill or pan-sear salmon for the best results. Grilling gives a smoky flavor, while pan-searing offers a nice crust. Preheat your grill or skillet well. This helps the salmon cook evenly. Always start with the skin-side down. This keeps the fish moist. Flip it carefully to avoid breaking the fillet. Avoid cooking salmon at too high a heat. This can lead to burnt edges and raw centers. Also, don’t forget to season the salmon before cooking. A little salt and pepper make a big difference. Lastly, don’t overcook the salmon. It should flake easily with a fork when done. If it feels tough, it’s likely overcooked. Pro Tips Fresh Ingredients: Always use fresh salmon and high-quality ingredients for the best flavor. Freshness enhances the overall taste of your teriyaki glaze. Marinate for Flavor: For an extra flavor boost, consider marinating the salmon in the teriyaki sauce for 30 minutes before cooking. This allows the flavors to penetrate the fish. Don’t Overcook: Salmon is best when it’s just cooked through and still moist. Keep an eye on the cooking time to avoid dry fish. Versatile Glaze: This teriyaki glaze is not just for salmon! Try it on chicken or grilled vegetables for a delicious alternative. {{image_2}} You can use chicken or tofu for a tasty twist on teriyaki. Chicken thighs work well because they stay juicy. Just follow the same cooking steps. For tofu, press it first to remove extra water. Cut it into cubes and sauté until golden. Then glaze it with the teriyaki sauce. If you want a meat-free meal, try vegetables instead. Grilled eggplant or zucchini absorbs the teriyaki flavor nicely. Slice them thick, brush with the sauce, and grill until soft. You can also use mushrooms for a hearty option. Portobello mushrooms are perfect because they have a meaty texture. Want to boost the flavor? Add pineapple juice to the teriyaki glaze for sweetness. You can also mix in some chili paste for heat. Fresh herbs like cilantro or basil add a nice touch too. Try sprinkling sesame seeds or chopped nuts on top for crunch. These small changes can make a big difference in taste. After enjoying your teriyaki glazed salmon, let it cool. Place the salmon in an airtight container. Make sure to store it in the fridge. It will stay fresh for up to two days. If you have leftover rice, store it in a separate container. Keeping it separate helps maintain its texture. To reheat your salmon, use the microwave or a skillet. For the microwave, cover the salmon with a damp paper towel. Heat it on medium power for about one minute. Check it to avoid overcooking. If using a skillet, add a tiny bit of water and cover it. Warm it on low heat for a few minutes. This keeps the salmon moist. You can freeze teriyaki glazed salmon for later meals. Wrap each fillet tightly in plastic wrap, then in aluminum foil. This prevents freezer burn. It can last for up to three months in the freezer. When ready to eat, thaw it in the fridge overnight. Reheat as described earlier for the best taste. Teriyaki sauce is a mix of simple ingredients. It has soy sauce, honey, and rice vinegar. You add sesame oil, ginger, and garlic for more flavor. You can also thicken it with cornstarch and water. This sauce gives the salmon its sweet and savory taste. Yes, you can bake Teriyaki glazed salmon in the oven. Preheat your oven to 400°F (200°C). Place the salmon fillets on a lined baking tray. Brush them with half of the teriyaki glaze. Bake for about 12-15 minutes. Make sure to check if they flake easily with a fork. Salmon is perfectly cooked when it flakes easily. Use a fork to gently test it. The inside should be a light pink color, not raw or overly dry. A good rule is to cook it for 4-6 minutes per half-inch of thickness. Teriyaki glazed salmon pairs well with jasmine rice. You can add steamed broccoli for crunch and color. Other great sides are stir-fried vegetables or a fresh salad. These sides balance the rich flavors of the salmon and sauce. In this post, we explored how to make teriyaki glazed salmon. We covered the main ingredients and tips for quality. I shared step-by-step instructions for cooking the salmon and making the sauce. You learned about variations, storage tips, and common mistakes. Teriyaki glazed salmon is easy and tasty. Feel free to play with flavors or proteins. Enjoy your cooking and make it your own.
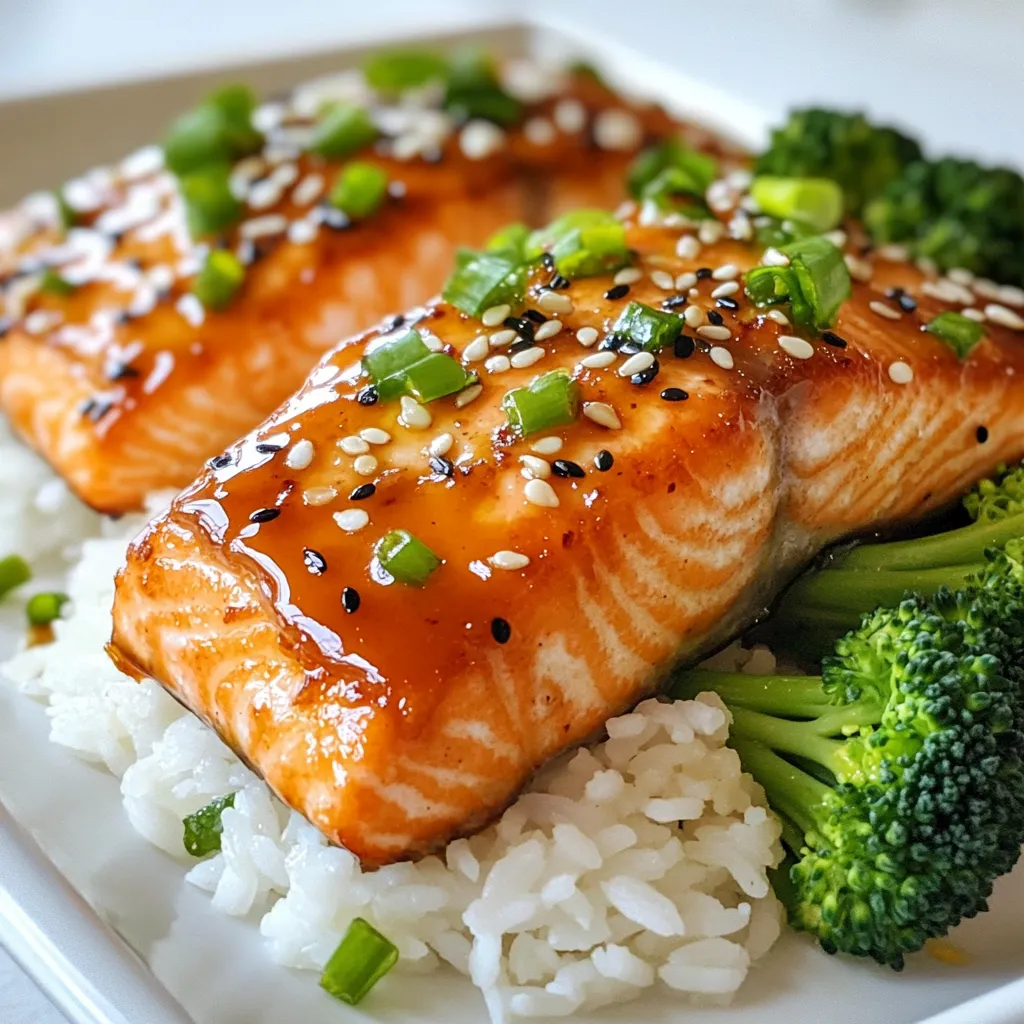
Teriyaki Glazed Salmon Flavorful Dinner Delight
Looking for a dinner that bursts with flavor and impresses everyone? Teriyaki Glazed Salmon is your answer! This dish combines tender salmon with a sweet
To make a delicious sweet potato kale curry, gather these simple ingredients: - 2 medium sweet potatoes, peeled and diced - 1 tablespoon coconut oil - 1 onion, finely chopped - 3 cloves garlic, minced - 1 tablespoon fresh ginger, grated - 1 tablespoon curry powder - 1 teaspoon cumin - 1 teaspoon turmeric - 1 can (400ml) coconut milk - 2 cups vegetable broth - 4 cups kale, stems removed and leaves roughly chopped - Salt and pepper to taste - Juice of 1 lime - Fresh cilantro for garnish These ingredients create a warm and comforting dish. Sweet potatoes give it a natural sweetness, while kale adds a nutritious boost. The spices bring a rich flavor that makes the curry special. Coconut milk adds creaminess, tying everything together. This curry is not just easy to make; it also offers a great way to enjoy healthy ingredients in one bowl. {{ingredient_image_1}} 1. Sautéing onion and spices Start by heating the coconut oil in a large pot over medium heat. Add the finely chopped onion. Cook for about five minutes until the onion turns soft and clear. This step builds a great base for your curry. Next, stir in the minced garlic and grated ginger. Cook for two more minutes. The smell will be amazing! Now, add the curry powder, cumin, and turmeric. Mix well and toast the spices for one to two minutes. This enhances their flavor. 2. Incorporating sweet potatoes Now it's time to add the diced sweet potatoes. Make sure they mix well with the onion and spices. This will coat them with flavor. 3. Cooking with coconut milk and broth Pour in the coconut milk and vegetable broth. Stir everything together. Bring the mixture to a gentle boil. This step helps the sweet potatoes cook evenly. 1. Reducing heat and simmering time Once boiling, reduce the heat to low. Cover the pot and let it simmer for about 15 minutes. This allows the sweet potatoes to become tender. 2. Adding kale After 15 minutes, stir in the chopped kale. This adds color and nutrients. Cook for another five minutes until the kale wilts and softens. 3. Seasoning and serving suggestions Finally, season the curry with salt, pepper, and lime juice to taste. This brightens the dish! Serve the curry hot, and don’t forget to garnish with fresh cilantro. Enjoy this flavorful and healthy dish! To cook sweet potatoes for the best texture, use fresh ones. Chop them into uniform pieces. This helps them cook evenly. Boil them for about ten minutes first. This speeds up the cooking process in the curry. Adjusting spice levels is key. If you like it hot, add more curry powder or a pinch of cayenne pepper. For milder flavors, reduce the curry powder. You can also add a dollop of yogurt for creaminess. Substituting ingredients can make this dish unique. Instead of kale, use spinach or Swiss chard. You can swap coconut milk for almond milk if you want a lighter taste. Pair your curry with rice or warm naan bread. The rice soaks up the sauce. Naan adds a nice texture to each bite. For presentation, garnish with fresh cilantro. This adds color and flavor. You can also squeeze lime juice on top. It brightens the dish and adds freshness. Pro Tips Use Fresh Ingredients: Fresh garlic, ginger, and spices will elevate the flavor of your curry significantly compared to dried or pre-packaged options. Adjust the Spice Level: If you prefer a spicier curry, consider adding a chopped chili pepper or a pinch of cayenne pepper when cooking the onions. Customize Your Greens: Feel free to mix in other leafy greens like spinach or Swiss chard for added nutrition and variety in texture. Let It Rest: Allow the curry to sit for a few minutes after cooking; this helps the flavors meld together for a more delicious dish. {{image_2}} You can easily change the greens in this recipe. Instead of kale, try spinach or Swiss chard. Both options bring a nice flavor and color. They cook fast, so stir them in at the end. Want to add protein? Chickpeas are a great choice. They add fiber and a nice texture. You can also use tofu. Just press it to remove water, then cube it. Add it when you cook the sweet potatoes. To boost flavor, consider adding nuts or seeds. Toasted cashews or sunflower seeds add crunch. They also enhance the dish's nutrition. You can try other spices too. A pinch of cinnamon or chili powder can add warmth. Feel free to explore! If you want a different cooking method, try a slow cooker. Just mix all the ingredients and cook on low for about 6 hours. A pressure cooker is also great. It cuts the cooking time to about 10 minutes. These variations make the sweet potato kale curry fun and unique! To keep your sweet potato kale curry fresh, use airtight containers. Glass or plastic containers work well. Make sure they seal tightly. This keeps moisture in and air out. Your curry will last up to four days in the fridge. If you want to store it longer, consider freezing it. In the freezer, it can last for about three months. When reheating your curry, you have two good options: the stovetop or the microwave. For the stovetop method, pour the curry into a pot. Heat it over low to medium heat. Stir it often to avoid burning. For the microwave, place the curry in a microwave-safe dish. Cover it and heat for one minute, then stir. Repeat until hot. To keep the texture and flavor, add a splash of water or coconut milk while reheating. This will help maintain its creamy goodness. Enjoy your warm and tasty curry again! Can I make this curry vegan? Yes, this curry is vegan by default. It uses coconut milk and vegetable broth. Both are plant-based. You can use any vegetable broth you like. Just check the labels to be sure. How do I make it spicier? To add heat, stir in some red pepper flakes or diced jalapeños. You can also use a spicier curry powder. Adjust the amount to fit your taste. Start with a little and add more if needed. What can I serve with sweet potato kale curry? This curry pairs well with rice or quinoa. You can also serve it with naan bread. For a fresh touch, add a side salad. Each option brings out the flavors of the curry. Enjoy experimenting with your favorites! This recipe for sweet potato kale curry is rich in flavor and simple to make. You learned how to prepare, cook, and serve it. I shared tips for perfect texture and spice levels. I also suggested fun ingredient swaps and storage ideas for leftovers. Enjoy this dish as is, or tweak it to your taste. Happy cooking!
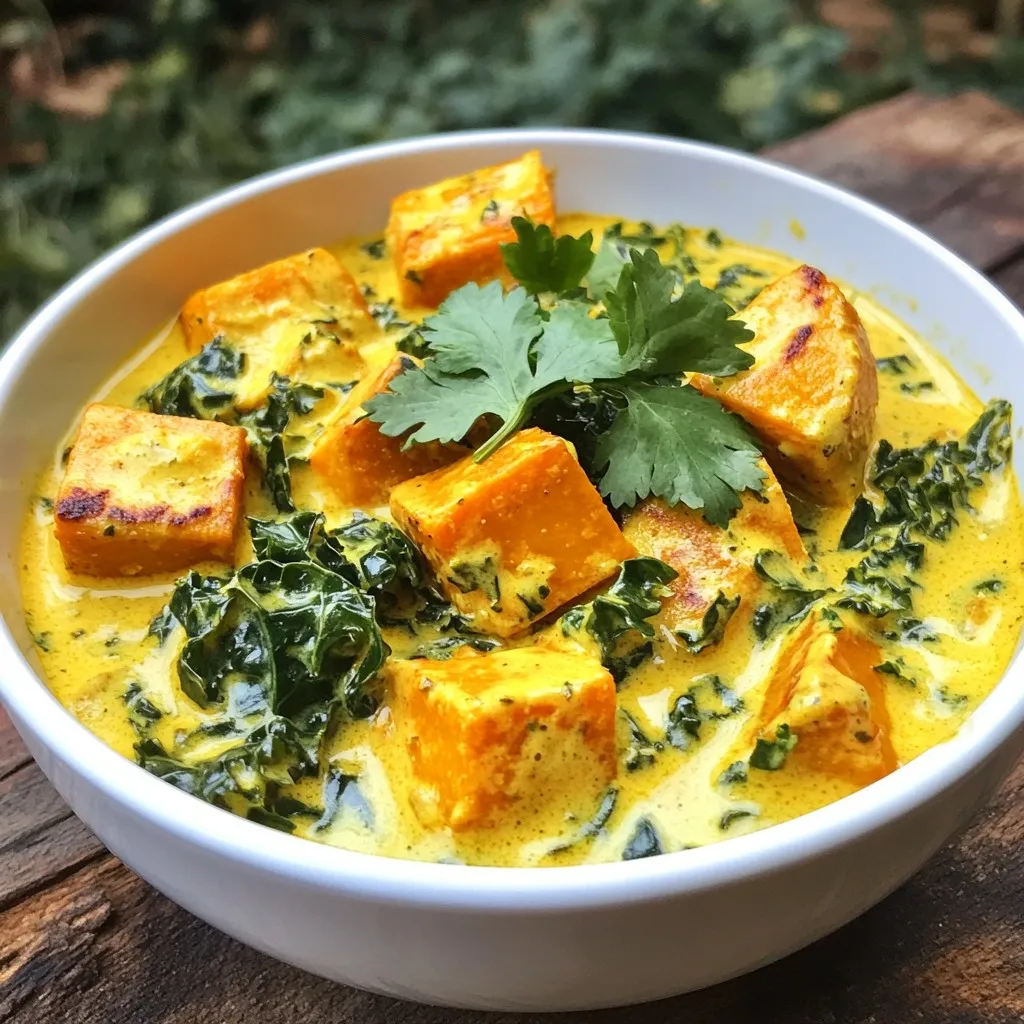
Savory Sweet Potato Kale Curry Easy and Flavorful Dish
If you’re craving a warm, comforting meal, this Savory Sweet Potato Kale Curry is perfect for you. Made with sweet potatoes, coconut milk, and fresh
To make vegan coconut curry ramen, you will need: - 200g ramen noodles - 1 tablespoon coconut oil - 1 small onion, diced - 3 cloves garlic, minced - 1 tablespoon ginger, grated - 1 tablespoon red curry paste - 400ml coconut milk - 2 cups vegetable broth - 1 cup broccoli florets - 1 bell pepper, sliced - 1 carrot, julienned - 1 tablespoon soy sauce - 1 tablespoon lime juice - Fresh cilantro, for garnish - Sliced green onions, for garnish - Sriracha, for serving (optional) You can add some fun to your ramen with these garnishes: - Fresh cilantro adds a burst of flavor. - Sliced green onions bring a nice crunch. - A drizzle of Sriracha gives it a spicy kick. If you have allergies or special diets, consider these swaps: - Use gluten-free ramen noodles if you need a gluten-free option. - Swap coconut oil for olive oil if you prefer. - Choose tamari instead of soy sauce for a gluten-free alternative. {{ingredient_image_1}} First, cook the ramen noodles. Follow the package instructions carefully. This step usually takes about 3 to 4 minutes. Once they are done, drain the noodles. Set them aside in a bowl. You want them ready for the curry. Next, let’s make the coconut curry base. In a large pot, heat 1 tablespoon of coconut oil over medium heat. Add 1 small diced onion. Sauté it until it turns translucent, about 3 to 4 minutes. Then, add 3 minced garlic cloves and 1 tablespoon of grated ginger. Cook for another minute until you smell the nice aroma. Stir in 1 tablespoon of red curry paste. Cook this for about 2 minutes. This helps deepen the flavor. Then, pour in 400ml of coconut milk and 2 cups of vegetable broth. Mix it well. Bring the mixture to a gentle simmer. Now, it's time to add the vegetables. Add 1 cup of broccoli florets, 1 sliced bell pepper, and 1 julienned carrot to the pot. Cook everything for about 5 to 7 minutes. You want the veggies tender but still bright. They add color and crunch to your dish. Finally, stir in 1 tablespoon of soy sauce and 1 tablespoon of lime juice. This adds a nice balance to the curry. Your coconut curry base is now ready! To boost the flavor of your coconut curry, use fresh ingredients. Fresh garlic and ginger add a strong taste. Choose a good red curry paste; it makes a big difference. You can also add a splash of soy sauce for depth. A squeeze of lime juice brightens the dish. If you like heat, add chili flakes or fresh chili. When cooking ramen noodles, follow the package instructions closely. This helps you achieve the perfect texture. Use a large pot with plenty of water to prevent sticking. Once cooked, drain and rinse the noodles under cold water. This stops the cooking process and helps them stay firm. Always add the noodles to the broth just before serving. This keeps them from becoming soggy. Serve your vegan coconut curry ramen in deep bowls. This helps hold the broth and toppings well. Garnish with fresh cilantro and sliced green onions for color and flavor. You can add lime wedges on the side for an extra zest. For spice lovers, include Sriracha on the table. It allows guests to customize their heat level. Pro Tips Use Fresh Ingredients: Fresh vegetables not only enhance the flavor but also add vibrant colors to your dish. Adjust Spice Level: Feel free to modify the amount of red curry paste based on your spice tolerance. Start with less and add more if desired. Customize Your Vegetables: This recipe is versatile; you can substitute or add any vegetables you have on hand like snap peas or mushrooms. Perfectly Cooked Noodles: Rinse your cooked ramen noodles with cold water to stop the cooking process and prevent them from becoming mushy in the broth. {{image_2}} You can change the veggies based on what is fresh. Try using spinach, kale, or zucchini. These greens add nutrition and a pop of color. In the fall, add squash or sweet potatoes for a sweet touch. Seasonal choices keep the dish interesting and fun. To make your ramen more filling, add protein. Tofu is a great choice. You can cube it and fry it until golden. Tempeh or chickpeas work well too. If you want a more chewy texture, try adding edamame. These additions make your meal richer and more satisfying. Do you like it spicy? You can increase the red curry paste. Start with a little and taste as you go. If you prefer milder flavors, use less curry paste. For a different kick, try adding some fresh chili or crushed red pepper. Adjusting the spice lets you make this dish your own. To store your vegan coconut curry ramen, let it cool first. Once cooled, transfer it to an airtight container. Make sure to divide the noodles and broth. This keeps the noodles from getting mushy. Store the container in the fridge. It will stay fresh for up to three days. When you’re ready to enjoy your ramen again, reheat it on the stove. Use a medium heat. Add a splash of water or broth to keep it from drying out. Stir often until it is hot. You can also use a microwave. Heat in short bursts of 30 seconds. Stir between each burst to heat evenly. If you want to save it for later, freezing works too. Freeze the broth and vegetables together but keep the noodles separate. Store them in freezer-safe bags or containers. The ramen will last up to three months in the freezer. To thaw, place it in the fridge overnight. Reheat as mentioned above for the best taste. Yes, you can use different types of noodles. Rice noodles or soba noodles work well. Just cook them according to package directions. Each noodle adds its own twist to the dish. Try them out and see what you like best! This dish lasts about 3 to 4 days in the fridge. Store it in an airtight container. The flavors will deepen over time, making it even tastier. Just remember to reheat it until hot before eating. Yes, this recipe can be gluten-free! Use gluten-free ramen or rice noodles. Check the soy sauce too; choose a gluten-free version. This way, you can enjoy the dish without worries. In this blog post, we explored a delicious vegan coconut curry ramen recipe. We covered the needed ingredients and optional garnishes. I shared tips for cooking the noodles and making the curry. You learned how to boost flavors and adapt ingredients. Remember, cooking is about creativity. Feel free to swap vegetables or adjust spices. With these guidelines, you can make this dish your own. Enjoy cooking and savoring your delicious ramen!
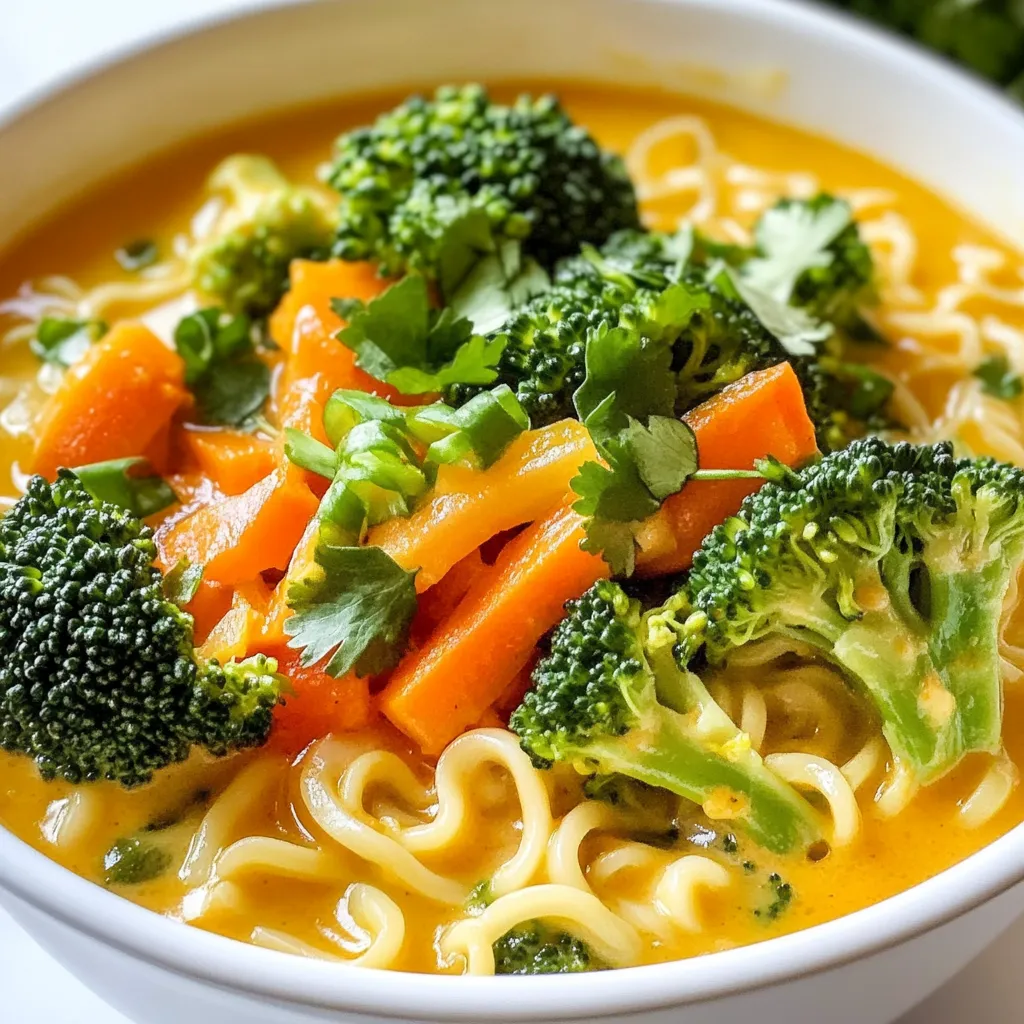
Vegan Coconut Curry Ramen Flavorful and Healthy Dish
Are you ready to dive into a bowl of Vegan Coconut Curry Ramen that is both flavorful and healthy? This dish is simple to make
- 2 boneless, skinless chicken breasts - 2 tablespoons Cajun seasoning - 1 tablespoon olive oil - 4 large tortillas - 2 cups romaine lettuce, chopped - ½ cup cherry tomatoes, halved - ½ cup Parmesan cheese, grated - ½ cup Caesar dressing (store-bought or homemade) - Salt and pepper to taste The heart of this Blackened Chicken Caesar Wrap lies in its fresh and bold ingredients. The chicken adds protein, while the romaine brings crunch. Cherry tomatoes give a pop of color and sweetness. The Parmesan cheese melts into the wrap, adding a rich, creamy flavor. Lastly, the Cajun seasoning gives the chicken its signature kick. - Fresh basil leaves Adding fresh basil leaves not only looks great but also adds a nice herbal note. It balances the spicy flavors from the Cajun seasoning. You can sprinkle them on top for a touch of color and taste. - Chicken can be swapped for shrimp or tofu for different flavors. - Use spinach or mixed greens instead of romaine for variety. - Try feta cheese instead of Parmesan for a tangy twist. - If you can't find Cajun seasoning, a mix of paprika, garlic powder, and cayenne can work well. These substitutions allow for creativity. You can adjust the wrap to your taste or dietary needs. Don't hesitate to mix things up! {{ingredient_image_1}} Start by rubbing the chicken breasts with olive oil. Use about 1 tablespoon for both breasts. Next, sprinkle the Cajun seasoning evenly over the chicken. Make sure every part is well coated. This adds great flavor. You can also add salt and pepper to taste if you like. Heat your skillet on medium-high heat. Once it is hot, place the seasoned chicken breasts in the pan. Cook each side for 6 to 7 minutes. You want the internal temperature to reach 165°F. This ensures the chicken is safe to eat. After cooking, take the chicken out and let it rest for a few minutes. This helps keep it juicy. Take a tortilla and lay it flat on a clean surface. Add a layer of chopped romaine lettuce in the center. Next, place the sliced blackened chicken on top. Add halved cherry tomatoes and sprinkle grated Parmesan cheese over everything. Finally, drizzle Caesar dressing on top. Now, fold the sides of the tortilla inwards. Roll it tightly from the bottom up. Your wrap is now ready! Slice it in half for a great presentation. Optionally, you can add fresh basil leaves on top for a pop of color and flavor. When making a Blackened Chicken Caesar Wrap, seasoning is key. Use Cajun seasoning generously. This adds a bold flavor to the chicken. Make sure to rub the seasoning all over the chicken. You want every bite to burst with taste. If you like more heat, add a pinch of cayenne. For a milder flavor, use less seasoning. Cooking the chicken well makes a big difference. Heat your skillet over medium-high heat before adding the chicken. This helps create that nice blackened crust. Cook each side for about 6-7 minutes. Check the internal temperature; it should reach 165°F. Let the chicken rest after cooking. This keeps it juicy and tender. You can prepare this wrap in advance. Cook the chicken and slice it up. Store it in the fridge in an airtight container. You can also chop the lettuce and tomatoes ahead of time. When you're ready to eat, just assemble the wrap. This makes for a quick and easy lunch or dinner option. Pro Tips Seasoning Matters: Don’t skimp on the Cajun seasoning; it’s what gives the chicken its bold flavor. Make sure to cover all sides of the chicken breasts evenly. Rest the Chicken: Allowing the chicken to rest after cooking helps retain its juices, making it more tender and juicy when sliced. Fresh Ingredients: Use fresh romaine lettuce and cherry tomatoes for the best flavor and texture. They add freshness that balances the richness of the chicken and dressing. Wrap It Right: To prevent your wrap from falling apart, make sure to fold the sides inward snugly before rolling from the bottom up. {{image_2}} You can switch the chicken for shrimp or tofu. Shrimp cooks fast and adds a nice taste. Just season it like you would the chicken. Cook shrimp for about 3-4 minutes on each side. For tofu, use firm tofu and press it to remove water. Slice it and season well. Cook until it’s golden brown. Both options keep the wrap yummy and fun. While Caesar dressing is classic, many choices exist. Try ranch for a creamy twist. You can also use a zesty vinaigrette for a lighter option. If you want a kick, add buffalo sauce or a spicy yogurt dressing. Each dressing adds its own flavor, making the wrap unique. Boost the wrap's nutrition by adding more veggies. Spinach adds iron and flavor. Bell peppers add crunch and bright colors. You can also throw in cucumbers for a refreshing bite. Carrots add sweetness and crunch too. Mixing in different veggies makes the wrap healthier and more appealing. To keep your Blackened Chicken Caesar Wrap fresh, wrap it tightly in plastic wrap. You can also use aluminum foil. Place it in an airtight container. Store it in the fridge. This keeps the flavors and textures intact. Make sure it is completely cooled before storing. This prevents moisture buildup. When you're ready to eat, you can reheat the wrap. Unwrap it and place it in a skillet over low heat. Heat it for about 5 minutes, turning often. This ensures even warming without making it soggy. You can also microwave it. Place it on a microwave-safe plate, cover it with a damp paper towel, and heat for 30 seconds. Check to see if it's warm enough, then enjoy. The Blackened Chicken Caesar Wrap lasts for up to three days in the fridge. After that, the quality may drop. If you want to keep it longer, you can freeze it. Wrap it tightly in plastic wrap, then place it in a freezer bag. It can last for up to three months in the freezer. Just remember to thaw it in the fridge overnight before reheating. The Blackened Chicken Caesar Wrap comes from classic Cajun cooking. Cajun chefs often blacken fish or chicken. They use high heat and spices to create a crust. This wrap combines that bold flavor with a Caesar salad. It’s a fun twist on two favorites! Yes, you can make this wrap gluten-free. Just switch the regular tortillas for gluten-free ones. Many brands offer great options. Always check the label to ensure they are free from gluten. This way, everyone can enjoy this tasty meal! Making homemade Caesar dressing is easy. You will need: - 1 cup mayonnaise - 2 tablespoons lemon juice - 2 cloves garlic, minced - 2 tablespoons Parmesan cheese - Salt and pepper to taste Mix all ingredients in a bowl. Adjust to your taste. This dressing will give your wrap a fresh flavor! To change the spice level, adjust the Cajun seasoning. Use less for a milder flavor. Add some hot sauce for extra heat. You could also try other spices like paprika or cayenne. Taste as you go to find your perfect balance! This blog post covered everything you need for a Blackened Chicken Caesar Wrap. We discussed the key ingredients, step-by-step cooking methods, and valuable tips for great flavor. You learned how to make variations with different proteins and veggies, plus storage tips to keep your wraps fresh. With this guide, you can easily prepare a delicious meal that suits your taste. Enjoy making your wraps, and feel free to explore your own unique twists!
Blackened Chicken Caesar Wrap Flavorful Meal Idea
Are you ready to spice up your lunch? The Blackened Chicken Caesar Wrap offers a tasty twist on a classic dish. This meal is not
To make tasty Firecracker Shrimp Tacos, you need: - 1 pound of shrimp, peeled and deveined - 1 tablespoon olive oil - 8 small corn tortillas - 1 cup shredded cabbage (purple or green) - 1/2 cup diced mango - 1/4 cup fresh cilantro, chopped - 1 avocado, sliced - 1 lime, cut into wedges - 1/4 cup sour cream or Greek yogurt (optional) These ingredients come together to create a fresh and fun meal. The right spices make these tacos pop with flavor. You will use: - 2 teaspoons chili powder - 1 teaspoon smoked paprika - 1 teaspoon garlic powder - 1/2 teaspoon cayenne pepper (adjust to taste) - Salt and pepper, to taste The chili powder and smoked paprika give a warm kick. Garlic powder adds depth, while cayenne brings the heat. Want to add even more fun? Here are some optional toppings: - Extra cilantro for freshness - Slices of jalapeño for heat - Shredded cheese for creaminess - Fresh lime juice for a zesty touch Feel free to mix and match these toppings to create your perfect taco. {{ingredient_image_1}} Start by mixing the shrimp with olive oil and spices. In a bowl, add: - 1 pound of shrimp, peeled and deveined - 1 tablespoon olive oil - 2 teaspoons chili powder - 1 teaspoon smoked paprika - 1 teaspoon garlic powder - 1/2 teaspoon cayenne pepper - Salt and pepper to taste Toss the shrimp well to coat them evenly. Let them sit for 15-20 minutes. This step is key for flavor. The spices soak in and make the shrimp tasty. Heat a large skillet over medium-high heat. Add the marinated shrimp in a single layer. Cook for 2-3 minutes. Flip the shrimp and cook for another 2-3 minutes. They should turn pink and opaque when done. Remove them from heat and set aside. Use another skillet to warm corn tortillas. Heat each tortilla for about 30 seconds on each side. This makes them soft and pliable. You can also wrap them in foil and warm them in the oven. Warm tortillas make a big difference in your tacos. Now it's time to build your tacos. For each tortilla, place a few shrimp in the center. Top with: - Shredded cabbage - Diced mango - Sliced avocado - Fresh cilantro If you like, add a dollop of sour cream or Greek yogurt. The toppings add crunch and freshness. Serve your tacos right away. Place lime wedges on the side. Squeeze lime over the tacos for extra zest. Enjoy your flavorful meal! To cook shrimp just right, start with fresh shrimp. Look for shrimp that are firm and smell like the ocean. The key is not to overcook them. Cook shrimp for about 2-3 minutes on each side. They should turn pink and opaque. If they curl up tightly, they are overcooked. For extra flavor, let them marinate for 15-20 minutes. When it comes to tortillas, corn tortillas work best for Firecracker Shrimp Tacos. They add a nice texture and flavor. Make sure to warm them up first. This makes them soft and easy to fold. You can heat them in a skillet or wrap them in foil and place them in the oven. Flour tortillas are also an option if you prefer a softer bite. To boost the flavor of your tacos, try adding a creamy element. Sour cream or Greek yogurt adds richness. You can also drizzle a spicy sauce over the shrimp. A squeeze of lime juice brightens the dish. Fresh toppings like diced mango and cilantro add color and taste. Don’t forget to experiment with these extras to find your favorite combination! Pro Tips Perfectly Cooked Shrimp: Keep an eye on the shrimp while cooking; they only need 2-3 minutes per side to become pink and opaque. Overcooking can make them rubbery. Spice Level Adjustment: Tailor the heat of your tacos by adjusting the cayenne pepper. Start with a smaller amount and add more if you prefer a spicier kick. Freshness Matters: Use fresh ingredients for the best flavor. Opt for ripe avocados and fresh cilantro to enhance the taste of your tacos. Warm Tortillas: Warming the tortillas makes them more pliable and enhances the overall taco experience. Consider using a dry skillet for an extra touch of flavor. {{image_2}} You can easily swap shrimp for other tasty options. Try using grilled zucchini or mushrooms. Both add a nice texture. You can also use chickpeas for protein. They soak up flavors well. If you want a nutty twist, consider using tofu. Just marinate it with the same spices. Get creative with toppings to match your taste. Instead of cabbage, you can use lettuce or slaw. For a fruity kick, try adding pineapple or papaya. You can also use diced tomatoes for freshness. If you love crunch, sprinkle some crushed tortilla chips on top. Each topping adds a new layer of flavor. Adjust the heat to suit your taste. For a spicier taco, add more cayenne pepper or use hot sauce. You can also mix in jalapeños for an extra kick. If you prefer milder flavors, reduce the cayenne or skip it. You can also add more mango or avocado to balance the spice. To store leftover tacos, place them in an airtight container. Keep the shrimp, tortillas, and toppings separate. This keeps everything fresh and tasty. Store in the fridge for up to three days. If you mix them, the tortillas get soggy, and the shrimp loses its crunch. When you want to eat your tacos again, reheat the shrimp in a skillet. Use medium heat for about 2-3 minutes until warmed through. For tortillas, heat them in a pan for about 30 seconds on each side. This keeps them soft and warm. You can also use the microwave for a quick fix, but it may make them chewy. You can freeze shrimp tacos, but it's best to freeze the shrimp only. Place the cooked shrimp in a freezer-safe bag. They will keep well for up to three months. To thaw, move them to the fridge overnight. Reheat as mentioned above. Avoid freezing the tortillas and toppings, as they do not freeze well. You can use chicken, tofu, or fish as a substitute. Chicken works well when diced and cooked. Tofu is great for a vegetarian option and soaks up flavors. Fish fillets, like tilapia or cod, can also replace shrimp. Just adjust the cooking time based on the ingredient you choose. Yes, you can prepare some parts ahead. Marinate the shrimp and store it in the fridge for up to 24 hours. You can also prep the toppings, like diced mango and shredded cabbage, a day in advance. Just warm the shrimp and tortillas right before serving for the best taste. Some great sides include black beans, corn salad, or a fresh green salad. You can also serve chips with salsa or guacamole for a fun touch. These sides add color and flavor, making your meal extra special. To cool down the spice, reduce the cayenne pepper in the recipe. You can also serve the tacos with sour cream or Greek yogurt. This creamy addition helps balance the heat. Adding more toppings like avocado or mango also tones down the spice level. In this blog post, we covered how to make delicious Firecracker Shrimp Tacos. We discussed key ingredients, step-by-step cooking, and tips for great results. I shared ideas for vegetarian versions and ways to store leftovers. Remember, you can customize this dish with toppings to suit your taste. Enjoy the process and make it your own! With these steps, you can impress anyone with your tasty tacos. Now it's time to gather your ingredients and start cooking!
Firecracker Shrimp Tacos Flavorful and Easy Recipe
Are you ready to spice up your taco night? Firecracker Shrimp Tacos are packed with flavor and super easy to make. With a few simple
To make the spicy peanut noodle bowls, gather these items: - 8 oz rice noodles - 1 cup cooked chicken, shredded (or tofu for a vegetarian option) - 1 red bell pepper, sliced - 1 cup snap peas, trimmed - 1 carrot, julienned - 4 green onions, sliced - 1/4 cup fresh cilantro, chopped - 1/4 cup creamy peanut butter - 3 tablespoons soy sauce - 2 tablespoons sriracha (adjust to taste) - 1 tablespoon lime juice - 1 tablespoon sesame oil - Salt and black pepper to taste - Crushed peanuts, for garnish - Lime wedges, for serving You can swap items based on your taste or needs. Here are some ideas: - Instead of chicken, use tofu, tempeh, or chickpeas for protein. - For a nut-free option, try sun butter or tahini in place of peanut butter. - Use zucchini noodles if you want a low-carb dish. - If you don’t have snap peas, use green beans or bell pepper strips. - Swap lime juice with rice vinegar for a different tang. Fresh ingredients often taste better. However, store-bought items can save time. Here’s what to consider: - Fresh chicken or tofu adds flavor and texture. - Fresh veggies like bell peppers and snap peas bring crunch. - You can buy pre-sliced vegetables to cut prep time. - Store-bought peanut sauce works if you’re in a hurry. - For herbs, fresh cilantro gives a vibrant taste, but dried works in a pinch. This mix of ingredients makes your spicy peanut noodle bowl both tasty and fun to prepare. Enjoy crafting this delightful meal! {{ingredient_image_1}} To start, boil water in a big pot. Add 8 oz of rice noodles. Cook them according to the package instructions. This usually takes just a few minutes. When they are ready, drain them well. Rinse under cold water to stop the cooking. Set the noodles aside while you prepare the sauce and veggies. Next, grab a mixing bowl. In it, combine 1/4 cup of creamy peanut butter, 3 tablespoons of soy sauce, and 2 tablespoons of sriracha. Adjust the sriracha to your taste. Add 1 tablespoon of lime juice and 1 tablespoon of sesame oil. Whisk everything until it’s smooth. If the sauce feels too thick, add a bit of warm water. This will help reach the right texture. Now, take a large skillet and place it over medium heat. Pour in a splash of sesame oil. Once hot, add the sliced red bell pepper, trimmed snap peas, and julienned carrot. Sauté for about 4-5 minutes. You want them to be tender but still crisp. Season with salt and black pepper while cooking. Lower the heat and add the cooked noodles to the skillet. If you’re using chicken, add 1 cup of shredded cooked chicken. For a vegetarian option, use tofu. Pour in the peanut sauce and toss everything gently. Make sure it’s all combined and heated through. Finally, serve the noodles in bowls. Top with sliced green onions, chopped cilantro, and crushed peanuts. Don’t forget to add lime wedges on the side for extra flavor! To make a great peanut sauce, start with creamy peanut butter. Mix it well with soy sauce, sriracha, lime juice, and sesame oil. The key is to whisk until it’s smooth. If the sauce feels too thick, add a bit of warm water. This will help it coat the noodles better. Taste it after mixing. If you want more heat, add more sriracha. When cooking rice noodles, bring water to a rolling boil. Follow the package instructions closely. Usually, it takes about 5-7 minutes. Once they are soft, drain and rinse them with cold water. This stops the cooking process and keeps them from getting mushy. Make sure to separate the noodles with a fork after rinsing. To adjust the spice level, change the amount of sriracha. For a milder dish, use less sriracha or omit it. You can also add a bit of sugar to balance the heat. If you love spice, try adding chili flakes or a dash of hot sauce. Always taste as you go to find the perfect level for you. Pro Tips Perfectly Cooked Noodles: Make sure to rinse the noodles under cold water after cooking to stop them from becoming mushy. Customize Your Heat: Adjust the amount of sriracha based on your spice preference, or substitute with a milder sauce if desired. Fresh Vegetables: Use seasonal vegetables for the best flavor and nutrition; bell peppers and snap peas add a great crunch. Garnish for Appeal: Don't skip the crushed peanuts and lime wedges; they add both texture and a zesty finish to the dish. {{image_2}} You can easily make this dish vegetarian or vegan. Instead of chicken, use tofu. Firm tofu works best. Just press and cube it before cooking. You can also add more veggies like mushrooms or zucchini for extra flavor. For a vegan sauce, use maple syrup instead of honey, and check your soy sauce for gluten-free options. Want to boost nutrition? Add some cooked edamame or chickpeas. Both add protein and fiber. You can also toss in spinach or kale. These greens cook quickly and mix well. For crunch, add some raw veggies or seeds like sunflower or pumpkin seeds. They give a nice texture. Looking for different flavors? Try Asian-inspired options. Add ginger and garlic for a warm touch. For a Thai-style bowl, mix in coconut milk for creaminess. You can also add fresh basil or mint for a bright flavor. Experiment with lime or lemon zest for a fresh twist. Use chili flakes or fresh chilis if you want more heat. You can keep leftover spicy peanut noodle bowls in the fridge. Store them in an airtight container. They will stay fresh for up to three days. Before eating, check for any off smells or colors. To freeze, pack the noodles and sauce separately. Use freezer-safe bags or containers. They can last up to three months in the freezer. When ready to eat, thaw them overnight in the fridge before reheating. To reheat, place the noodles in a skillet over low heat. Add a splash of water or extra sauce to prevent sticking. Stir until heated through, about 5 minutes. You can also microwave for 1-2 minutes, stirring halfway. Make sure it’s hot all the way through before serving. Yes, you can use other noodles. Rice noodles are great, but try egg noodles or soba. They each have unique flavors and textures. Just cook them according to the package. Make sure they are the same amount as the rice noodles. To make this dish gluten-free, use gluten-free soy sauce. You can find it easily in stores. Also, check the rice noodles. Most are gluten-free, but always read the label. This way, you can enjoy the flavor without worry. If you need a substitute, try almond butter or sunflower seed butter. Both provide a nice taste and creaminess. You can also use tahini, but it gives a different flavor. Adjust the amount to your liking. Leftovers can last about three to four days in the fridge. Store them in an airtight container. When you reheat, add a splash of water or broth to help with moisture. Enjoy your meal again! This guide shows you everything you need to make a tasty dish. We covered ingredients, cooking steps, and lots of tips. You can use fresh ingredients or store-bought options. Don’t forget to try different flavors and add-ons to make it your own. With simple storage tips, you can keep leftovers for later. Enjoy making this dish, and feel free to modify it to suit your taste! It’s fun to experiment and share with friends.
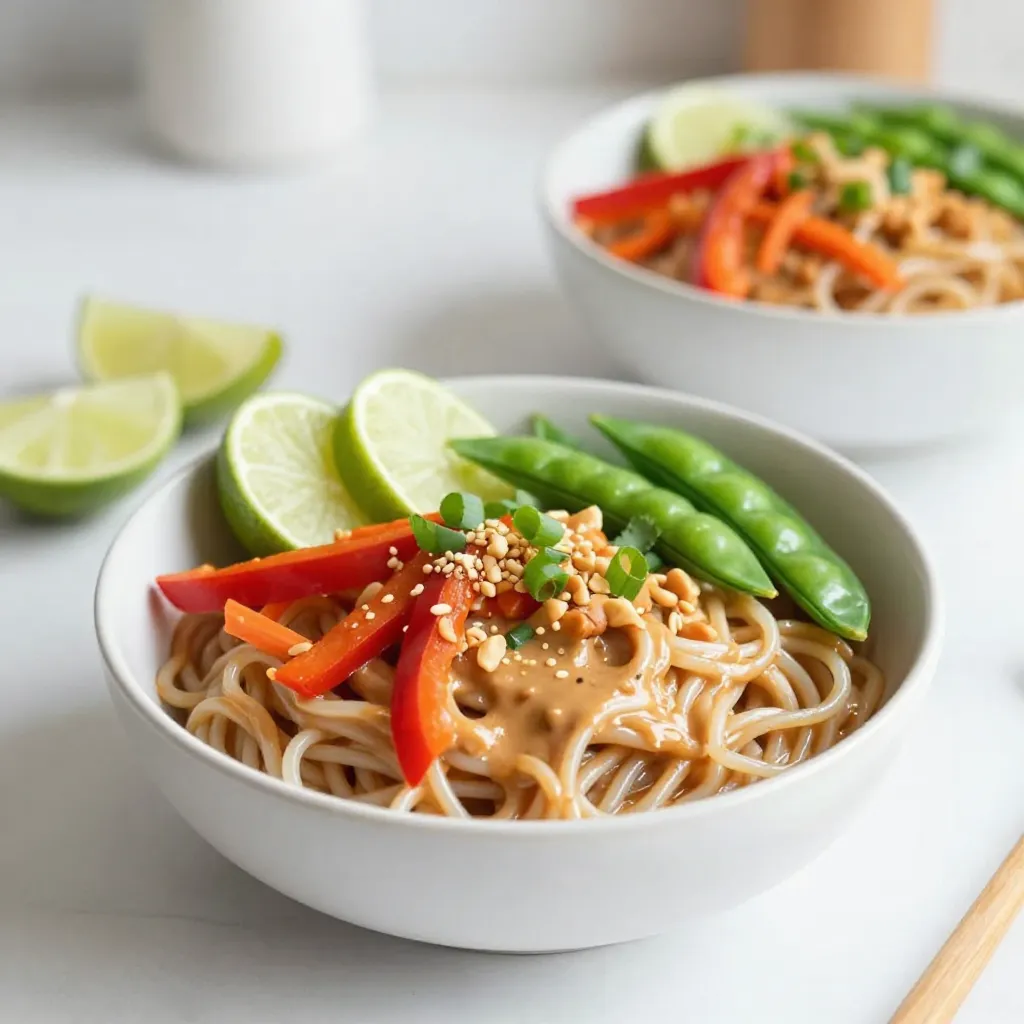
Spicy Peanut Noodle Bowls Quick and Easy Meal
Looking for a quick and easy meal that packs a punch? You’ve found it! Spicy Peanut Noodle Bowls offer bold flavors and a satisfying crunch.
To make creamy pumpkin sage pasta, gather these items: - 12 oz fettuccine or pasta of choice - 1 cup pure pumpkin puree (canned or fresh) - 1 cup heavy cream - 1/2 cup grated Parmesan cheese - 1 tablespoon olive oil - 3 cloves garlic, minced - 1/2 teaspoon ground nutmeg - 1/4 teaspoon crushed red pepper flakes (optional for heat) - 1/4 cup fresh sage leaves, chopped (plus extra for garnish) - Salt and pepper to taste - Toasted pumpkin seeds for garnish (optional) I often choose specific brands for best results. For pasta, Barilla or De Cecco are great picks. For pumpkin puree, Libby's is a solid choice. When it comes to heavy cream, I use Horizon Organic or Land O'Lakes. For cheese, look for freshly grated Parmigiano-Reggiano. Quality ingredients make a big difference in taste. If you need substitutions, here are some options: - For a dairy-free version, use coconut cream instead of heavy cream. - Swap Parmesan with nutritional yeast for a vegan twist. - If gluten-free, use brown rice or chickpea pasta. - For a lighter dish, try using half-and-half instead of heavy cream. - Feel free to adjust the spices to match your taste, or skip the red pepper if you want less heat. This dish is versatile, so don’t hesitate to make it your own! {{ingredient_image_1}} To start, bring a large pot of salted water to a boil. Add 12 oz of fettuccine or your favorite pasta. Cook it until it's al dente, which usually takes about 8-10 minutes. Once done, reserve 1 cup of the pasta water. Drain the pasta and set it aside. Next, heat 1 tablespoon of olive oil in a large skillet over medium heat. Add 3 cloves of minced garlic and sauté for 1 minute. You want it fragrant, not browned. Then, stir in 1 cup of pure pumpkin puree and 1 cup of heavy cream. Add 1/2 teaspoon of ground nutmeg and, if you like heat, 1/4 teaspoon of crushed red pepper flakes. Let this simmer for 4-5 minutes. This will help the sauce thicken a bit. Now, gradually mix in 1/2 cup of grated Parmesan cheese. Stir until it melts into the sauce. If your sauce seems too thick, use the reserved pasta water to thin it out. Add it a little at a time until you get the right consistency. Finally, mix in 1/4 cup of chopped fresh sage. Season with salt and pepper to taste. Toss the cooked pasta gently in the sauce, ensuring every noodle is coated. Make sure your water is boiling before adding the pasta. This helps it cook evenly. Don’t skip adding salt to your water; it enhances the pasta's flavor. Stir the pasta during cooking to prevent it from sticking together. Always check the pasta a minute before the package says it’s done. You want it al dente, meaning firm to the bite. Your sauce should be creamy and smooth, not too thick or runny. If it’s thick, slowly add the reserved pasta water to loosen it. Stir well after each addition. The cheese will also help thicken the sauce. If you want it creamier, add a bit more heavy cream. Just remember to taste as you go to keep the flavors balanced. When making creamy pumpkin sage pasta, avoid overcooking the pasta. Cook it al dente. This keeps the noodles firm and prevents mushiness. Also, don’t skip reserving pasta water; it helps adjust sauce thickness. Adding too much salt early can ruin the dish. Taste your sauce before adding more salt. To make a smooth sauce, warm the cream gently. Don’t boil it, or it can curdle. Stir in the pumpkin puree slowly. This helps it blend well. When adding cheese, do it gradually. This way, it melts perfectly into the sauce. Use a whisk to keep everything creamy and smooth. Fresh herbs bring life to your dish. Consider adding thyme or rosemary for a warm touch. A pinch of cinnamon can add depth to the flavor. If you like heat, increase the red pepper flakes. For brightness, squeeze fresh lemon juice before serving. Each of these tweaks makes your pasta even more delicious. Pro Tips Use Fresh Sage: Fresh sage leaves add a vibrant flavor that dried sage cannot replicate. Make sure to chop them just before adding for maximum freshness. Adjust Consistency: If your sauce is too thick, gradually add reserved pasta water until you reach your desired creamy consistency. This will help the sauce cling better to the pasta. Enhance Flavor: For an extra depth of flavor, consider adding a splash of white wine to the sauce after sautéing the garlic. Let it simmer until reduced before adding the pumpkin and cream. Garnish Wisely: Toasted pumpkin seeds add a delightful crunch and nutty flavor to the dish. Toss them on just before serving for a delightful texture contrast. {{image_2}} You can make this dish vegetarian easily. Just skip the Parmesan cheese or use a vegetarian brand. For a vegan version, swap the heavy cream for coconut cream or a nut milk. Use nutritional yeast instead of cheese for that cheesy flavor. This way, you keep the creaminess without the dairy. If you need gluten-free pasta, look for options made from rice, quinoa, or chickpeas. Many brands now offer gluten-free fettuccine. Cook it according to the package instructions. The creamy pumpkin sauce pairs well with any gluten-free pasta, giving you a rich taste without the gluten. Fall is the perfect time to add seasonal ingredients. Try adding sautéed mushrooms for an earthy touch. Spinach adds color and nutrients. You can also toss in caramelized onions for sweetness. Roasted butternut squash is another great choice. These add-ins not only enhance the flavor but also make your dish more colorful and fun. To keep your creamy pumpkin sage pasta fresh, store it in an airtight container. Make sure the pasta has cooled down before sealing it. This will help prevent moisture build-up, which can make the pasta soggy. You can store it in the fridge for up to three days. When reheating, use a skillet over low heat for the best results. Add a splash of water or more heavy cream to the pasta. This will help it regain its creamy texture. Stir gently until the pasta warms up. Avoid using the microwave if you want to keep it creamy. If you want to freeze your creamy pumpkin sage pasta, divide it into portions. Place each portion in a freezer-safe bag or container. Make sure to remove as much air as possible. It can last up to three months in the freezer. To reheat, let it thaw in the fridge overnight and follow the reheating tips to keep it creamy. Yes, you can use any pasta you like. Fettuccine works well, but penne or spaghetti are also great choices. Just make sure to cook it until it is al dente. This means the pasta should still have a slight bite to it. The sauce will coat any pasta type nicely. You can use half-and-half for a lighter option. If you want a dairy-free version, try coconut milk or cashew cream. These choices will give you a creamy texture without using heavy cream. Each option will add a unique flavor, so choose one that fits your taste. You can prepare the sauce in advance. Just store it in the fridge until you're ready to serve. Cook the pasta fresh for the best texture. When you're ready, heat the sauce and mix in the pasta. This keeps everything creamy and delicious. Yes, this recipe is perfect for meal prep. You can store the sauce and pasta separately. This way, they stay fresh longer. When you’re ready to eat, mix them together and heat. It's a quick, tasty meal for your busy days. We explored how to make creamy pumpkin sage pasta from start to finish. You learned about key ingredients and alternatives for different diets. The step-by-step process ensures your pasta cooks just right. We shared tips to avoid common mistakes and ideas for tasty variations. Don’t forget about storing and reheating for later enjoyment. With these insights, you can create a delicious dish for any occasion. Enjoy your cooking and make this recipe your own!
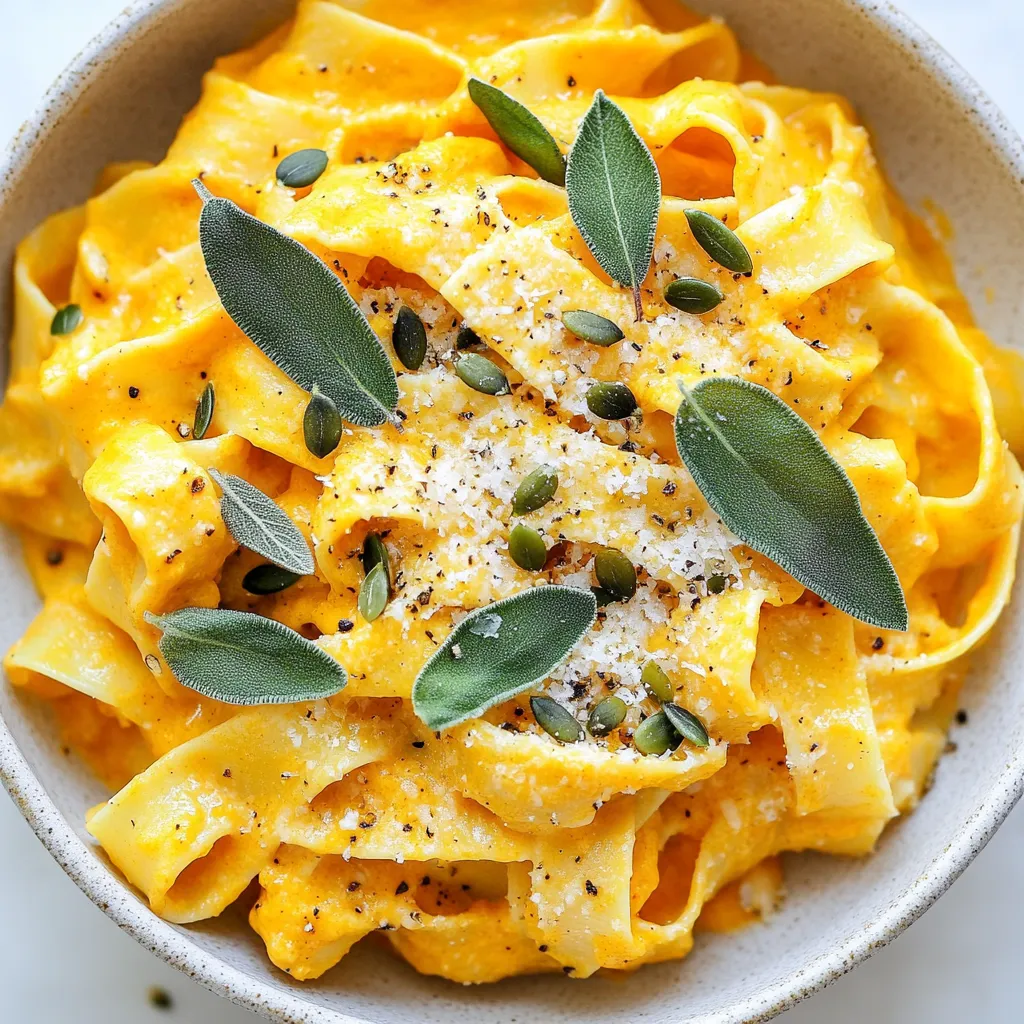
Creamy Pumpkin Sage Pasta Flavorful Fall Delight
Are you ready to dive into a bowl of warm comfort? Creamy Pumpkin Sage Pasta is a delightful fall dish that you can whip up
- 1 tablespoon olive oil - 1 pound boneless, skinless chicken breasts, diced - 1 medium onion, diced - 3 cloves garlic, minced - 3 carrots, sliced - 2 celery stalks, sliced - 6 cups chicken broth - 1 teaspoon dried thyme - 1 teaspoon dried oregano - 1 bay leaf - 1 pound potato gnocchi - 1 cup heavy cream - 1 cup kale or spinach, chopped - Salt and pepper to taste - Fresh parsley, chopped for garnish Using boneless, skinless chicken breasts makes this soup lean and tasty. Chicken is high in protein, helping to keep you full. The onion and garlic add a strong flavor and health benefits. Garlic may help your heart health, while onions support your immune system. Carrots and celery give crunch and color, plus they are good sources of vitamins. Kale or spinach adds nutrients and a pop of green, making the soup more vibrant. If you want a lighter soup, you can use half-and-half instead of heavy cream. For a vegetarian version, try using vegetable broth and swap the chicken for chickpeas or tofu. You can also add some mushrooms for extra flavor. If you do not have potato gnocchi, regular pasta works well too. Just cook it according to the package directions. {{ingredient_image_1}} To start, gather all your ingredients. You need olive oil, chicken, onion, garlic, carrots, celery, chicken broth, thyme, oregano, a bay leaf, gnocchi, heavy cream, kale or spinach, salt, pepper, and parsley. First, dice the chicken into small pieces. Then, chop the onion, garlic, carrots, and celery. This makes cooking easier. In a large pot, heat one tablespoon of olive oil over medium heat. Add the diced chicken and sauté it. Cook until it turns brown, about 5-7 minutes. Once done, remove the chicken and set it aside. Next, in the same pot, add the onion, garlic, carrots, and celery. Sauté these for about 5 minutes until they soften. This adds great flavor to your soup. Now, pour in 6 cups of chicken broth. Add one teaspoon each of dried thyme and oregano, plus one bay leaf. Bring this mixture to a boil. Once boiling, add one pound of potato gnocchi. Cook it according to the package instructions, usually about 3-5 minutes. After the gnocchi is ready, lower the heat. Stir in one cup of heavy cream, the cooked chicken, and one cup of chopped kale or spinach. Let this simmer for about 5 minutes. This step is key to meld the flavors together. Before serving, season with salt and pepper to taste. Remember to remove the bay leaf; it’s not meant to be eaten. Ladle the soup into bowls and garnish with fresh parsley. Your creamy herb chicken gnocchi soup is now ready to enjoy! To boost the flavor of your creamy herb chicken gnocchi soup, consider adding more herbs. Fresh herbs like thyme and parsley elevate the taste. If you want more zing, add a squeeze of lemon juice. A pinch of red pepper flakes can also add a hint of heat. Experiment with flavors to find the perfect balance for your taste buds. Avoid overcooking the gnocchi. Gnocchi cooks quickly, usually in just 3-5 minutes. If you cook them too long, they can turn mushy. Also, watch the cream. Add it at the end to keep the soup rich and smooth. Skipping the bay leaf can lessen the depth of flavor, so don’t leave it out! This soup is great on its own, but pairing it with bread makes it even better. A crusty baguette or warm rolls soak up the creamy broth nicely. You can also serve it with a simple salad for a balanced meal. Try to sprinkle some extra parsley on top for a fresh touch before serving. Pro Tips Use Fresh Herbs: Fresh herbs can elevate the flavor of your soup. Add chopped parsley or dill just before serving for a burst of freshness. Perfect Gnocchi Texture: Avoid overcooking the gnocchi; they should float to the top when done. This usually takes about 3-5 minutes. Chicken Options: For a richer flavor, consider using bone-in chicken thighs instead of breasts. Just ensure to remove the skin and bones before serving. Thickening the Soup: If you prefer a thicker soup, you can blend a portion of the soup and then stir it back in to create a creamier texture. {{image_2}} You can easily swap the chicken in this recipe. Turkey makes a great choice if you want a leaner option. Shrimp can also work well, adding a nice seafood twist. Just cook shrimp until pink, then add it to the soup near the end. This keeps the shrimp tender and juicy. Don't hesitate to add more veggies for extra flavor and nutrition. Peas can add sweetness and color. Asparagus offers a nice crunch; just chop it into small pieces. You could also toss in zucchini or bell peppers. These veggies will cook quickly and infuse the soup with vibrant taste. If you want a lighter soup, swap heavy cream for half-and-half or whole milk. For a dairy-free option, use coconut milk or almond milk. Both options provide a creamy texture without the dairy. Adjust the amount to your taste, adding more for a richer flavor or less for a lighter soup. This soup is best when fresh, but you can store it in the fridge. It lasts about three days. Make sure to place it in an airtight container. This keeps it safe and tasty for later. You can freeze this soup too. Just let it cool first. Pour it into freezer-safe bags or containers. Leave some space for the soup to expand. It can stay in the freezer for up to three months. When ready to eat, just thaw it overnight in the fridge. To reheat, place the soup in a pot over low heat. Stir often to keep it smooth. If it seems too thick, add a splash of broth or cream. This helps maintain the creamy texture. You can also microwave it, but stir every minute for even warming. Enjoy your warm bowl of comfort! To thicken the soup, you can use a few methods. One way is to add more heavy cream. This makes the soup rich and creamy. You can also mash some of the gnocchi in the soup. This gives it body without changing the flavor. Another option is to mix a bit of cornstarch with cold water. Add this mixture to the soup while it simmers. It will help thicken the broth quickly. Yes, you can use frozen gnocchi. It is very convenient and saves time. Just add the frozen gnocchi directly to the boiling soup. Cook it according to the package instructions. Usually, it takes about 3-5 minutes. Frozen gnocchi holds its shape well and still tastes great in the soup. Making this soup in a slow cooker is easy. Start by cooking the chicken in a pan. Sauté it until it is browned. Then, add it to the slow cooker along with the veggies and spices. Pour in the chicken broth and set the slow cooker on low for about 4 hours. Add the gnocchi and cream during the last 30 minutes of cooking. This keeps the gnocchi soft and the soup creamy. Enjoy your slow-cooked meal! In this blog post, we explored the key ingredients for making a delicious soup. We covered the complete ingredient list, showcased highlights like the health benefits of kale, and shared useful substitutions. You learned step-by-step instructions for preparation and cooking, along with helpful tips to enhance flavor and avoid common mistakes. To wrap it up, remember that small changes in ingredients or cooking methods can transform a dish. Enjoy experimenting and have fun while cooking!
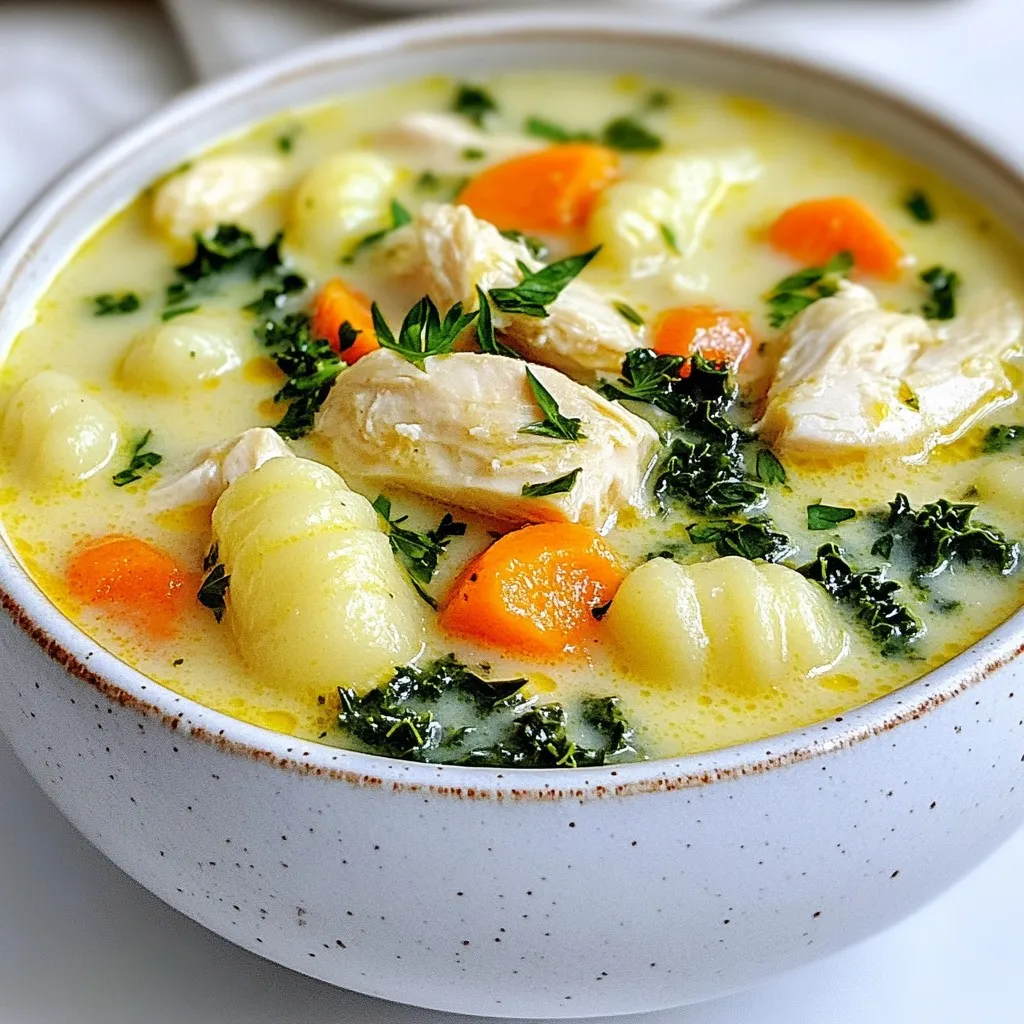
Creamy Herb Chicken Gnocchi Soup Comforting Delight
Are you ready to warm your soul with a bowl of creamy herb chicken gnocchi soup? This comforting delight is perfect for chilly nights or
To make Creamy Mushroom Spinach Orzo, you need these main ingredients: - 1 cup orzo pasta - 2 tablespoons olive oil - 1 medium onion, finely chopped - 3 garlic cloves, minced - 8 ounces mushrooms, sliced (button or cremini) - 4 cups fresh spinach - 1 cup vegetable broth - 1 cup heavy cream - 1 teaspoon dried thyme - 1 teaspoon dried oregano - Salt and pepper to taste - ¼ cup grated Parmesan cheese (optional) - Fresh parsley for garnish You can swap some ingredients if you want. Here are a few options: - Use whole wheat orzo for a healthier twist. - Replace heavy cream with coconut milk for a lighter version. - Try adding kale instead of spinach for a different flavor. For seasonings and garnishes, keep it simple. You can use: - Extra herbs like basil or rosemary for more flavor. - A sprinkle of red pepper flakes for heat. - Lemon zest to add brightness to the dish. These ingredients come together to create a creamy, savory meal that's easy to make and full of flavor. {{ingredient_image_1}} To cook orzo pasta, first bring salted water to a boil in a large pot. Once boiling, add 1 cup of orzo. Cook it until al dente, following the package instructions. This usually takes about 8 to 10 minutes. Drain the orzo in a colander and set it aside. For the perfect texture, make sure not to overcook the orzo. It should remain slightly firm when bitten. In the same pot, heat 2 tablespoons of olive oil over medium heat. Add 1 medium chopped onion and sauté it for about 3 to 4 minutes. You want it soft and translucent. Next, stir in 3 minced garlic cloves and 8 ounces of sliced mushrooms. Cook them until the mushrooms are browned and have released their moisture. This should take about 5 to 7 minutes. After that, add 4 cups of fresh spinach. Cook this for about 2 minutes until it wilts down. This not only adds flavor but also a nice green color to the dish. Now it's time to bring everything together. Pour in 1 cup of vegetable broth and let it simmer. Reduce the heat and add 1 cup of heavy cream, along with 1 teaspoon each of dried thyme and oregano. Season with salt and pepper to taste. Stir well and let the sauce simmer for about 5 minutes until it thickens slightly. Finally, toss in the cooked orzo. Mix everything well until the orzo is fully coated in the creamy mixture. If you like, add ¼ cup of grated Parmesan cheese. Stir until it melts into the dish. Taste it and adjust the seasoning if needed. Serve it warm, garnished with fresh parsley for a nice touch. To boost the taste of your creamy mushroom spinach orzo, try adding a splash of lemon juice. This brightens the dish and adds a fresh note. You can also sprinkle in a pinch of red pepper flakes for a little heat. For extra creaminess, use full-fat cream. If you want a lighter option, try half-and-half. Add the cream slowly while stirring for even mixing. Cook the orzo until it is al dente, which takes about 8-10 minutes. Check it often to avoid overcooking. When cooking mushrooms, let them brown well. This gives the dish a rich flavor. If you notice the mushrooms starting to stick, add a bit of broth to loosen them up. Serve your orzo with a side salad or garlic bread. A light vinaigrette pairs well with the creamy dish. For presentation, top the orzo with fresh parsley and a sprinkle of Parmesan cheese. This makes it look vibrant and adds a nice touch. Use a large serving bowl to showcase the colorful ingredients. Pro Tips Use Fresh Ingredients: Always opt for fresh mushrooms and spinach for the best flavor and texture in your dish. Don't Overcook the Orzo: Make sure to cook the orzo until al dente to prevent it from becoming mushy in the creamy sauce. Customize the Creaminess: Adjust the amount of heavy cream based on your preference for a richer or lighter sauce. Experiment with Herbs: Feel free to add other herbs like basil or parsley for an extra burst of flavor. {{image_2}} For those who want a vegan or dairy-free version, swap the heavy cream with coconut milk or cashew cream. You can also skip the Parmesan cheese, or use a vegan cheese alternative. This keeps the dish creamy and tasty without animal products. If you need a gluten-free option, use gluten-free orzo. Many brands offer great substitutes that taste similar. Always check labels to ensure they fit your diet. Feel free to get creative with the vegetables. You can add bell peppers, zucchini, or even kale for extra flavor. Fresh herbs like basil or dill can brighten the dish too. For protein, consider adding cooked chicken, shrimp, or chickpeas. This turns your orzo into a heartier meal. Adjust the spices to match your mood. If you love heat, add some red pepper flakes. For a more earthy taste, try adding smoked paprika or nutmeg. You can also mix in different cheeses. Goat cheese or feta can add a tangy twist. Cream cheese can make it even richer. Just remember to melt it well into the dish for a smooth texture. To store your Creamy Mushroom Spinach Orzo, let it cool first. Place it in an airtight container. This keeps it fresh. Make sure to seal the container tightly. It can last in the fridge for up to three days. When reheating, use the stove or microwave. For the stove, place it in a pan over low heat. Add a splash of vegetable broth or water to keep it moist. Stir often to prevent sticking. In the microwave, heat in short bursts. Stir every 30 seconds to ensure even warmth. To freeze your orzo dish, let it cool completely. Use a freezer-safe container, leaving space for expansion. It can last up to three months in the freezer. When ready to eat, thaw it in the fridge overnight. Reheat using the stovetop method, adding a little broth for smoothness. How can I make Creamy Mushroom Spinach Orzo gluten-free? To make this dish gluten-free, use gluten-free orzo. Many brands offer this option. Check the package for cooking instructions. The rest of the ingredients, like vegetables and broth, are often gluten-free too. Can I prepare this dish in advance? Yes, you can make this dish ahead of time. Cook the orzo and sauce separately. Store them in the fridge for up to two days. When ready to eat, warm the sauce and mix in the orzo. What can I substitute for heavy cream? You can use coconut cream or cashew cream for a lighter option. Both will add creaminess without dairy. Another option is using Greek yogurt mixed with a little milk for a tangy twist. How to adjust the recipe for more servings? To make more servings, simply double or triple the ingredients. Keep the same cooking times for each step. Just ensure your pot is large enough to hold everything. This dish holds well, so it's perfect for gatherings. You learned how to make Creamy Mushroom Spinach Orzo step by step. We covered the key ingredients, cooking methods, and tips to enhance flavor. Don't forget the variations that fit your diet. Store leftovers properly and reheat them to keep the taste. Enjoy this dish with a twist based on your cravings. Cooking should be fun, and this recipe makes it easy! You'll impress your family and friends with your delicious and creamy creation.
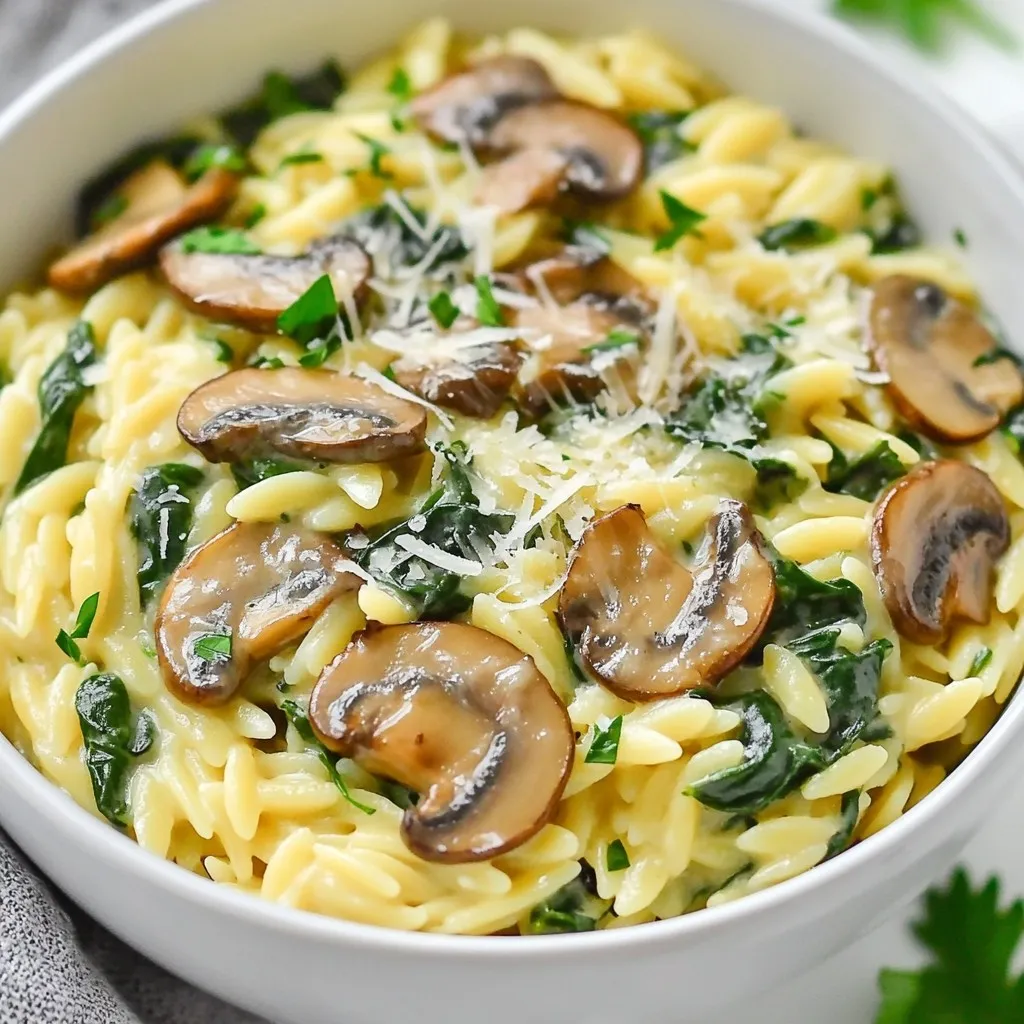
Creamy Mushroom Spinach Orzo Flavorful Dinner Dish
If you’re craving comfort food with a twist, Creamy Mushroom Spinach Orzo is the answer. This dish combines tender orzo with savory mushrooms and fresh
- 16 oz package potato gnocchi - 1 cup sun dried tomatoes in oil - 2 cloves garlic - 1 cup heavy cream - 1 cup freshly grated Parmesan cheese - Salt and pepper - 1 cup fresh spinach - 1 teaspoon dried basil - Crushed red pepper flakes (optional) - Fresh basil leaves for garnish When making creamy sun dried tomato gnocchi, you need to gather a few key items. First, the potato gnocchi is the star of the dish. It gives a soft, pillowy texture that pairs well with the sauce. You will need a 16 oz package. Next, sun dried tomatoes add a rich, tangy flavor. Make sure to get a cup of these in oil. Garlic is essential for a great taste. You will use 2 cloves, minced finely. Heavy cream brings the dish together. You will need a whole cup. Finally, Parmesan cheese offers a cheesy kick. Freshly grated is best, so grab a cup of that too. To season and garnish, you should have salt and pepper for taste. Fresh spinach adds color and nutrients, so get a cup of it. Dried basil gives a lovely aroma, while crushed red pepper flakes can add heat if you like. Lastly, fresh basil leaves make a nice touch on top. With these ingredients, you will create a rich and flavorful dish that impresses everyone at the table. {{ingredient_image_1}} To cook the gnocchi, start by boiling a large pot of salted water. Once the water is boiling, add the gnocchi. Watch closely as they cook. They will float to the top in about 2-3 minutes. This means they are done! Carefully drain them and set them aside. In a large skillet, heat one tablespoon of olive oil over medium heat. Add two cloves of minced garlic and sauté for about a minute until it smells great. Next, stir in one cup of chopped sun-dried tomatoes. Cook this mix for another 2-3 minutes to let the flavors blend well. Now, reduce the heat to low. Pour in one cup of heavy cream and stir it all together. Let it simmer for 2-3 minutes. After that, add one cup of freshly grated Parmesan cheese. Stir constantly until the cheese melts and the sauce is creamy. Now, it’s time to mix everything. Gently fold in the cooked gnocchi and one cup of roughly chopped spinach. Add one teaspoon of dried basil, along with salt and pepper to taste. Stir until the spinach wilts and everything is coated in that creamy sauce. Taste it and adjust the flavors as needed. If you like a kick, add some crushed red pepper flakes. Now, you're ready to serve! To ensure the sauce has a smooth, creamy texture, stir it gently. A good sauce should coat the gnocchi without being too runny. If it feels too thick, add a splash of pasta water to adjust the consistency. You can also try different cooking methods. Instead of boiling, you can pan-fry gnocchi for a crispy edge. This adds a fun texture and flavor to your dish. If you want a lighter dish, use half-and-half instead of heavy cream. It still gives a nice creaminess but cuts some calories. For herbs, try using fresh parsley or thyme. They can change the dish's flavor profile while keeping it tasty. You can also swap spinach for kale or arugula. These greens add a different taste and texture, making your gnocchi unique each time. Pair your gnocchi with a light salad. A simple arugula salad with lemon dressing works well. It adds a fresh crunch that balances the creaminess. Wine lovers will enjoy a glass of Chardonnay. Its creamy notes match perfectly with the sun-dried tomatoes and cheese. A light red, like Pinot Noir, can also complement the flavors if you prefer. Pro Tips Use Quality Ingredients: The flavor of your dish relies heavily on the quality of your sun dried tomatoes and cheese. Choose high-quality brands for the best results. Don't Overcook the Gnocchi: Gnocchi should only be cooked until they float to the top of the boiling water. Overcooking can make them mushy. Add Protein: For a heartier meal, consider adding grilled chicken or shrimp to the gnocchi before serving. Customize the Spice: Adjust the amount of crushed red pepper flakes to your preference. You can also use fresh chili or hot sauce for a different flavor profile. {{image_2}} For a vegan twist, swap the heavy cream with coconut cream or cashew cream. You can make cashew cream by blending soaked cashews with water until smooth. For cheese, use nutritional yeast or a vegan cheese alternative. Sun-dried tomatoes are often vegan, but check the label to be sure. Some brands might add dairy products. By using these swaps, you can enjoy a creamy dish that fits your diet. You can boost this dish with proteins like chicken, shrimp, or tofu. If using chicken, cook it in the skillet first until golden. Then, remove it and add it back later with the gnocchi. For shrimp, sauté them until pink before adding the sauce. Tofu can be cubed and sautéed until crispy. This way, you keep the creamy sauce's flavor while adding protein. Want a spicier dish? Add crushed red pepper flakes during the sauce-making step. You can also include a pinch of cayenne pepper or some chili powder. Fresh herbs like oregano or thyme can add a nice kick too. Adjust these spices to your taste for the perfect heat level. To keep your creamy sun dried tomato gnocchi fresh, use a tight container. Glass or plastic containers work well. Make sure to cool the dish before sealing. Store it in the fridge right away. This dish lasts about 3 days in the fridge. After that, the flavors may fade. When you want to enjoy your leftovers, reheat them gently. The best way is to use a skillet. Add a splash of heavy cream or water to keep the sauce creamy. Heat it over low heat. Stir often to prevent sticking. You can also use a microwave, but check it every 30 seconds. This way, it warms evenly and stays fresh. You cook potato gnocchi for about 2-3 minutes. Boil it in salted water. When the gnocchi floats, it is done. This quick process keeps the gnocchi soft and light. Just keep an eye on it. Overcooking can make it mushy. Yes, you can make parts of this dish ahead of time. You can cook the gnocchi and store it. Keep it in a container with some oil to prevent sticking. For the sauce, prepare it and store it separately. Just heat it up when you're ready to eat. Combine everything before serving for the best taste. This dish pairs well with various sides. You can serve a fresh green salad. A simple arugula salad with lemon dressing works great. Garlic bread is also a fantastic option. If you like, add grilled chicken or shrimp for extra protein. These sides enhance the meal and make it even more satisfying. This blog post guides you through making creamy sun-dried tomato gnocchi. You learned about the key ingredients and seasonings, plus easy steps to cook the dish to perfection. I shared tips to enhance flavor and variations for different diets. Remember, storing leftovers correctly keeps your dish fresh longer. Enjoying gnocchi can be a simple, delicious adventure. You can impress your family and friends with this recipe. Get cooking, and savor every bite!
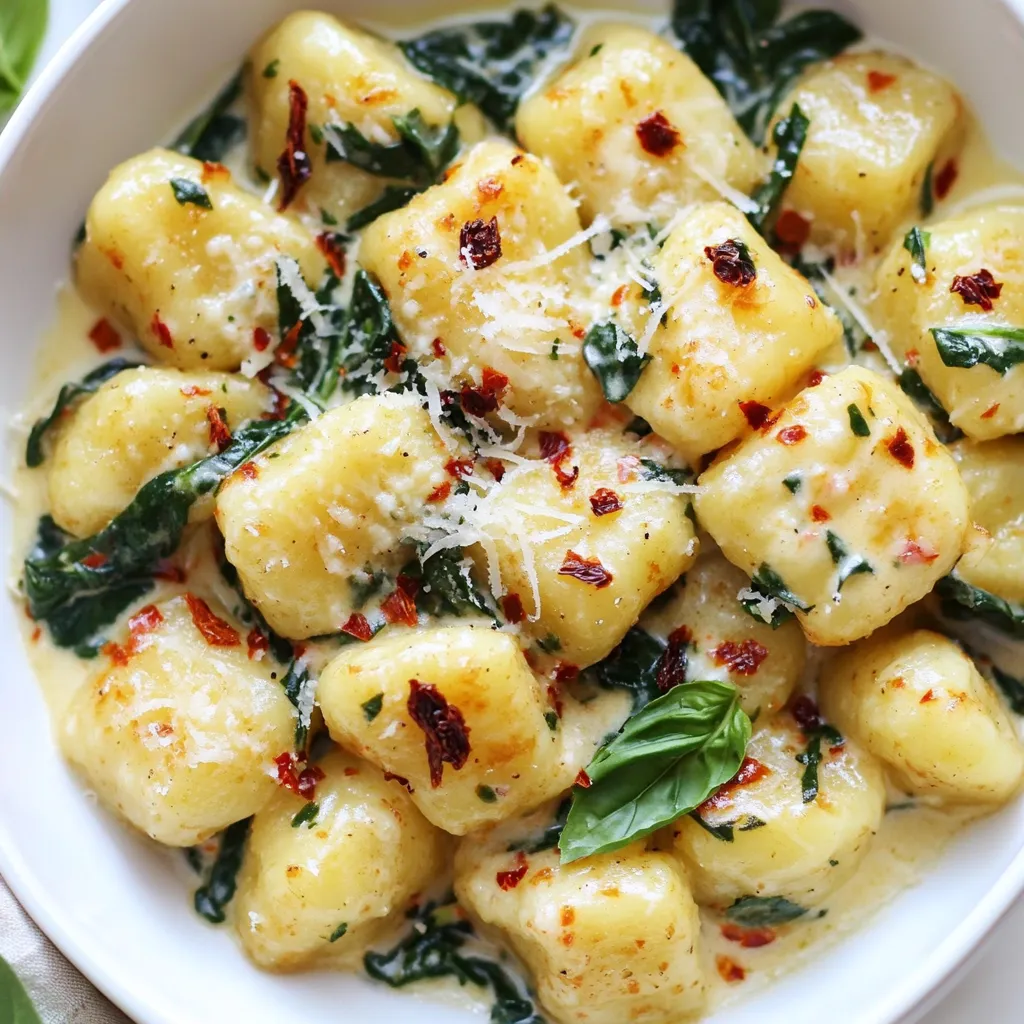
Creamy Sun Dried Tomato Gnocchi Rich and Flavorful Dish
Get ready to indulge in a delicious dish! My Creamy Sun Dried Tomato Gnocchi is rich, flavorful, and easy to make. With simple ingredients, you