Dinner

- 2 packs of instant ramen noodles (discard the seasoning packets) - 4 tablespoons unsalted butter - 6 cloves garlic, minced - 1 tablespoon red pepper flakes (adjust to taste) - 4 cups chicken or vegetable broth - 2 tablespoons soy sauce - 2 green onions, thinly sliced - 1 cup baby spinach or bok choy - Sesame seeds for garnish - Soft-boiled eggs (optional) I love using instant ramen noodles for this recipe. They cook quickly and soak up flavors well. Discard the seasoning packets since we will create our own rich taste. Unsalted butter gives the broth a creamy texture. The fresh garlic adds a strong, savory base. Red pepper flakes bring heat, but you can adjust this to your taste. The broth is crucial. Chicken or vegetable broth provides depth. Soy sauce adds a salty umami kick. Green onions and spinach or bok choy add freshness and color, making the dish pop. Finishing with sesame seeds adds a nice crunch. If you want, add soft-boiled eggs on top for extra protein and richness. You can swap in other vegetables like mushrooms or bell peppers if you prefer. If you need gluten-free noodles, look for rice noodles or gluten-free ramen. For a lighter dish, consider low-sodium broth options. To kick up the flavor, you can add a splash of lime juice or a dash of sesame oil. Fresh herbs like cilantro or basil add brightness too. Consider adding more spices like ginger or a spoonful of miso for extra depth. {{ingredient_image_1}} To start, fill a pot with water and bring it to a boil. Once boiling, add the instant ramen noodles. Cook them for about 3 to 4 minutes. You want them tender but not mushy. Keep an eye on the timer to avoid overcooking. After cooking, drain the noodles and set them aside. For best results, use a large pot. This allows the noodles to move freely. Stir them gently while cooking to prevent sticking. Next, grab a large skillet and place it over medium heat. Add 4 tablespoons of unsalted butter. Let it melt slowly. Once melted, add 6 cloves of minced garlic and 1 tablespoon of red pepper flakes. Sauté this mixture for 1 to 2 minutes. The goal is to make the garlic fragrant, not burnt. Stir it constantly to avoid any burning. This garlic butter sauce is the heart of the dish. It gives the ramen rich flavor and a lovely aroma. Now, pour in 4 cups of chicken or vegetable broth along with 2 tablespoons of soy sauce. Bring this mixture to a gentle simmer. Let it simmer for about 5 minutes to blend the flavors well. After the broth simmers, it’s time to add the cooked noodles. Gently stir to coat the noodles with the garlic butter broth. This step is crucial for flavor. Next, toss in 1 cup of baby spinach or bok choy. Cook for about 1 to 2 minutes until wilted. This adds color and nutrition to your ramen. For a great presentation, ladle the spicy garlic butter ramen into bowls. Top each bowl with sliced green onions and sesame seeds. If you like, add soft-boiled eggs for a nice touch. To serve, use a wide soup spoon or a deep bowl. This makes it easy to enjoy every bite. For an extra pop of flavor, drizzle some melted garlic butter on top before serving. To adjust spice levels, start small. Add red pepper flakes slowly. Taste as you go. You can make it mild or fiery. For a richer broth, add more soy sauce or a splash of mirin. This will deepen the taste. A dash of sesame oil can also boost flavor. When boiling noodles, use a big pot. This helps them cook evenly. Stir them gently to avoid sticking. For sautéing garlic, keep the heat medium. This helps prevent burning. If you're short on time, use leftover broth. It speeds up the cooking process. Get creative with garnishes. Try a sprinkle of sesame seeds or a drizzle of extra garlic butter. Use bright green onions for color. To plate like a pro, use a deep bowl. Layer the noodles first, then pour broth over. Add greens last for a fresh look. Pro Tips Adjust Spice Level: If you prefer a milder dish, reduce the amount of red pepper flakes or omit them entirely. You can always add more spice later if desired. Butter Quality Matters: Use high-quality unsalted butter for a richer flavor. If you want to experiment, try adding a flavored butter, like garlic herb butter, for an extra kick. Fresh Herbs Enhance Flavor: Consider adding fresh herbs like cilantro or basil just before serving. They add a delightful freshness that complements the rich garlic butter. Customize Your Toppings: Get creative with toppings—try adding sliced mushrooms, shredded carrots, or even a sprinkle of chili oil for additional flavor and texture. {{image_2}} You can boost your ramen with added protein. Chicken, shrimp, and tofu work well. - For chicken, use cooked, shredded pieces. - Shrimp cooks quickly and adds a nice taste. - Tofu is great for a vegetarian option. Just cube it and add to the broth. For vegan choices, use firm tofu or tempeh. Both absorb flavors well and keep the meal filling. Spicy garlic butter ramen can adapt to your taste. - If you want it milder, reduce the red pepper flakes. - Try adding ginger for a fresh kick or lime for brightness. You can also explore regional twists. For a Korean flair, add gochujang. For a Japanese touch, use miso paste. You can change the broth to fit your taste. - Use vegetable broth for a lighter option. - For more richness, try adding coconut milk. You can also switch up the seasonings. Add a splash of fish sauce for depth. If you want a creamy broth, blend in some sesame paste or miso. Both give a nice texture and flavor. After you make spicy garlic butter ramen, keep it in the fridge. Place the ramen in an airtight container. It stays fresh for about 3 days. Before eating, check for any odd smells or changes in color. If it seems off, toss it out. You can freeze ramen leftovers for later. First, let it cool completely. Then, put it in a freezer-safe container. It can last up to 2 months in the freezer. When you're ready to eat, thaw it in the fridge overnight. For reheating, use a pot on the stove or the microwave. Add a splash of broth or water to keep it moist. Meal prep makes cooking easy. You can make a big batch of spicy garlic butter ramen. Divide it into individual portions. Use small containers for quick meals. When hunger strikes, just grab a container and heat it. This way, you save time and enjoy tasty ramen anytime. Yes, you can! To make it vegan, use plant-based butter. For the broth, pick vegetable broth. This keeps the dish rich and tasty without animal products. To tone down the heat, reduce the red pepper flakes. You can also add more butter to balance the spice. A touch of sugar can help too. The total time is about 20 minutes. Prep takes about 10 minutes. Cooking the noodles and sauce takes another 10 minutes. It’s quick and easy! Fresh noodles work great! Just cook them per the package instructions. They may take a bit longer than instant noodles but will add a nice texture. In this post, I shared how to make a tasty garlic butter ramen dish. You learned about the main ingredients, flavor enhancements, and easy steps to cook. I also covered tips, variations, and how to store leftovers. Ramen is fun to customize, so feel free to mix and match ingredients. With a little creativity, you can make this dish your own. Enjoy your cooking adventure!
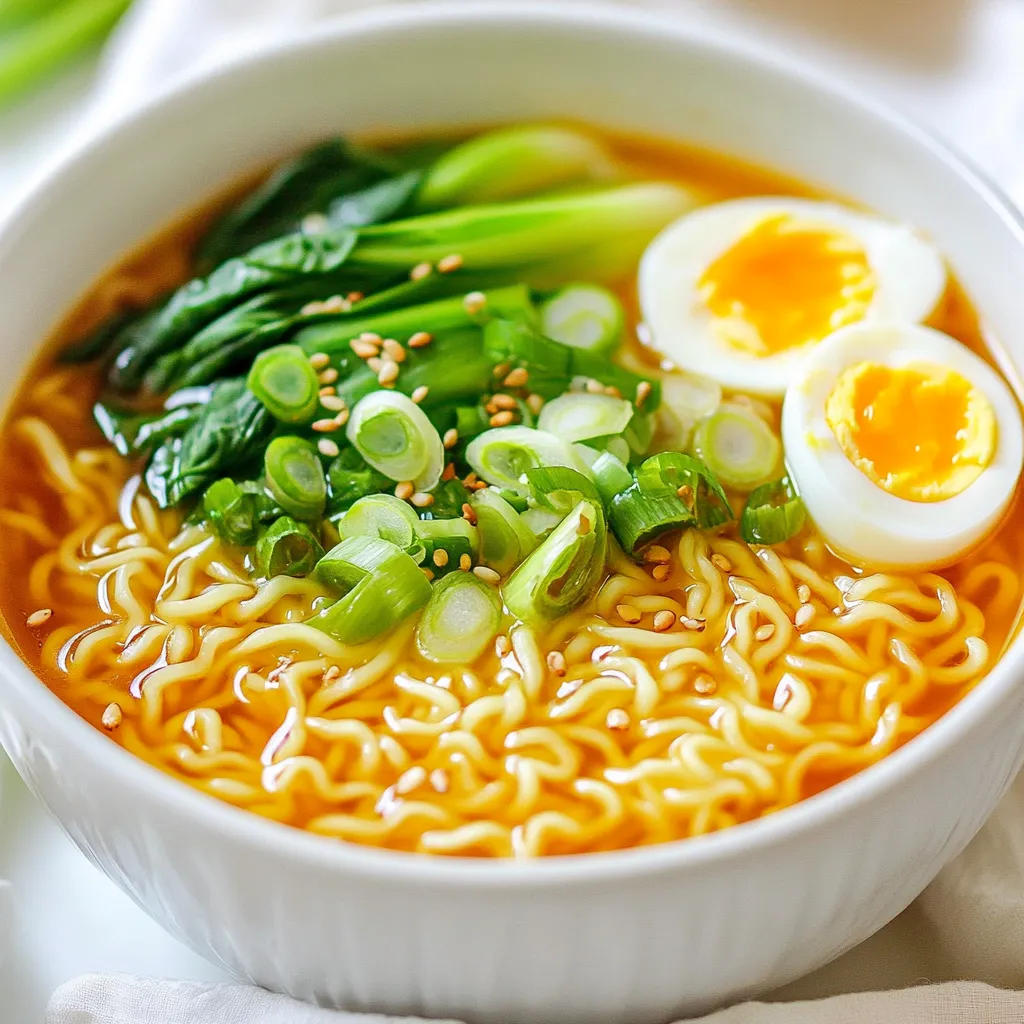
Spicy Garlic Butter Ramen Delicious and Easy Recipe
craving a quick and tasty meal? Try my Spicy Garlic Butter Ramen! This easy recipe brings together the rich flavors of garlic and butter while
To make Creamy Tuscan Shrimp, you will need: - 1 lb shrimp, peeled and deveined - 2 tablespoons olive oil - 3 cloves garlic, minced - 1 cup cherry tomatoes, halved - 1 cup fresh spinach - 1 cup heavy cream - 1/2 cup grated Parmesan cheese - 1 teaspoon Italian seasoning - Salt and pepper to taste - Fresh basil, for garnish Each ingredient plays a key role. The shrimp gives a nice protein base. Olive oil adds richness. Garlic brings a strong flavor. Cherry tomatoes add sweetness and color. Spinach gives a fresh touch. Heavy cream makes it rich and creamy. Parmesan adds a salty depth. Italian seasoning ties all the flavors together. Salt and pepper enhance everything, while basil gives a fresh finish. You can use both fresh and frozen shrimp in this dish. Fresh shrimp tastes great, but frozen shrimp is easy to find and often cheaper. If you use frozen shrimp, thaw it before cooking. You can do this by leaving it in the fridge overnight or placing it in cold water for about 15 minutes. Both types work well, so choose what you prefer. If you don’t have an ingredient, here are some easy swaps: - Instead of shrimp, you can use chicken or tofu for a different protein. - Use sun-dried tomatoes if you want a stronger tomato flavor. - Heavy cream can be replaced with half-and-half or a dairy-free cream for a lighter option. - For a different cheese, try feta or goat cheese instead of Parmesan. These substitutions will still give you a tasty dish, so feel free to get creative! {{ingredient_image_1}} 1. Heat the oil: Start by heating 2 tablespoons of olive oil in a large skillet over medium heat. 2. Sauté garlic: Add 3 minced garlic cloves. Sauté them for about 30 seconds until you smell that great garlic scent. 3. Cook shrimp: Add 1 lb of peeled and deveined shrimp to the skillet. Season them with salt, pepper, and 1 teaspoon of Italian seasoning. Cook for 2-3 minutes until the shrimp turn pink and opaque. Remove them and set aside. 4. Add tomatoes: In the same skillet, toss in 1 cup of halved cherry tomatoes. Cook for about 2 minutes until they start to soften. 5. Stir in spinach: Next, add 1 cup of fresh spinach. Stir it in and let it wilt for about 1 minute. 6. Make it creamy: Pour in 1 cup of heavy cream. Bring it to a gentle simmer. Reduce the heat and mix in 1/2 cup of grated Parmesan cheese. Stir until it melts and gets creamy. 7. Combine shrimp: Add the shrimp back into the skillet. Stir everything together and let the shrimp warm up for about 1 minute. Taste and adjust the seasoning if needed. 8. Garnish: Finally, remove from heat and sprinkle fresh basil on top before serving. To get the best shrimp, remember these tips: - Don't overcook: Shrimp cook fast. Just a few minutes will do. - Look for color: Perfect shrimp should be pink and opaque. When you cook, visuals help! Consider taking photos or videos at each step. This way, you can keep track of your progress. Plus, it’s fun to share your cooking journey with friends or on social media! To get that perfect creamy texture in your Tuscan shrimp, use heavy cream. It makes a rich sauce. Start with medium heat when you add the cream. If it’s too hot, the cream can curdle. Stir it slowly while it simmers. This will help it blend well with the cheese. Grated Parmesan adds more creaminess. Mix it in until melted, and you'll have a smooth sauce that clings to the shrimp. Seasoning makes a huge difference in this dish. Use fresh garlic for the best taste. It adds a bright, strong flavor. Italian seasoning brings warmth and depth. Don’t forget salt and pepper. They balance the flavors. Taste as you cook. If it needs more, add it! Fresh basil at the end adds freshness. It also makes the dish look beautiful. One common mistake is overcooking the shrimp. They cook fast, just 2-3 minutes. If you cook them too long, they become tough. Another mistake is adding the cheese too early. If you add it to the hot pan, it might clump. Wait until the cream simmers. Lastly, don’t skip the seasoning. It is key for flavor. Pro Tips Fresh Ingredients Matter: Always use fresh spinach and ripe cherry tomatoes for the best flavor and texture in your creamy sauce. Perfectly Cooked Shrimp: Be careful not to overcook the shrimp; they should be just pink and opaque when fully cooked, which takes only a few minutes. Customize the Creaminess: Adjust the amount of heavy cream and Parmesan to your preference for a richer or lighter sauce. Garnish for Flavor: Fresh basil not only adds color but enhances the flavor; consider adding a sprinkle of red pepper flakes for a spicy kick! {{image_2}} You can swap shrimp for other proteins. Chicken works great in this dish. Simply cook it until golden brown. Use the same spices for flavor. Cook it in the same skillet for extra taste. You can also use scallops. They cook quickly and absorb the sauce well. Just watch them closely so they don’t overcook. You can make this dish vegetarian by leaving out the shrimp. Instead, use mushrooms or zucchini. They add a nice texture. Sauté them until tender. You can keep the garlic, spinach, and tomatoes for flavor. The creamy sauce will still taste rich and delicious without meat. It’s a great way to enjoy this dish without seafood. Add more flavor by including sun-dried tomatoes or artichokes. They bring extra depth to the sauce. If you like it spicy, add red pepper flakes. You can also try different herbs like oregano or thyme. For a tangy twist, squeeze some lemon juice before serving. You can mix and match these ideas. Customize the dish to fit your taste! To store leftovers of Creamy Tuscan Shrimp, let it cool first. Place it in an airtight container. This keeps the dish fresh. You can store it in the fridge for up to three days. Make sure you seal it well to avoid any smells. When reheating, use a skillet for best results. Heat it over low to medium heat. Add a splash of cream or broth to keep it moist. Stir gently as it warms. This helps keep the shrimp tender. You can also microwave it in short bursts. Cover it to avoid drying out. You can freeze Creamy Tuscan Shrimp for later. Place it in a freezer-safe container. It can last up to three months in the freezer. When ready to eat, thaw it overnight in the fridge. Reheat it gently on the stove or microwave. Avoid refreezing after thawing for the best taste. The best type of shrimp for this dish is medium to large shrimp. They hold their shape well and have a great texture. Look for shrimp that are peeled and deveined to save time. Fresh shrimp offers the best taste, but frozen shrimp works too. If you use frozen, thaw them first for even cooking. Yes, you can make Creamy Tuscan Shrimp ahead of time. Cook the dish, then cool it down. Store it in an airtight container in the fridge. It stays fresh for about two days. When you reheat, do it gently on low heat to keep it creamy. Avoid boiling it again, as this can change the texture. Creamy Tuscan Shrimp pairs well with many sides. Here are some great options: - Cooked pasta, like fettuccine or linguine - Rice, such as jasmine or basmati - Fresh bread, perfect for soaking up the sauce - Steamed veggies like broccoli or asparagus - A light salad with greens and vinaigrette These sides complement the rich flavors of the shrimp and make the meal more filling. In this blog post, we covered the key ingredients for Creamy Tuscan Shrimp, including fresh versus frozen options and suggested substitutions. I walked you through step-by-step cooking instructions and shared tips for perfecting flavor and texture. We explored variations to suit different diets and discussed how to store and reheat your dish. As you make this recipe, remember that practice makes perfect. Enjoy trying new flavors and combinations, and take your time in the kitchen! Your delicious creation awaits.
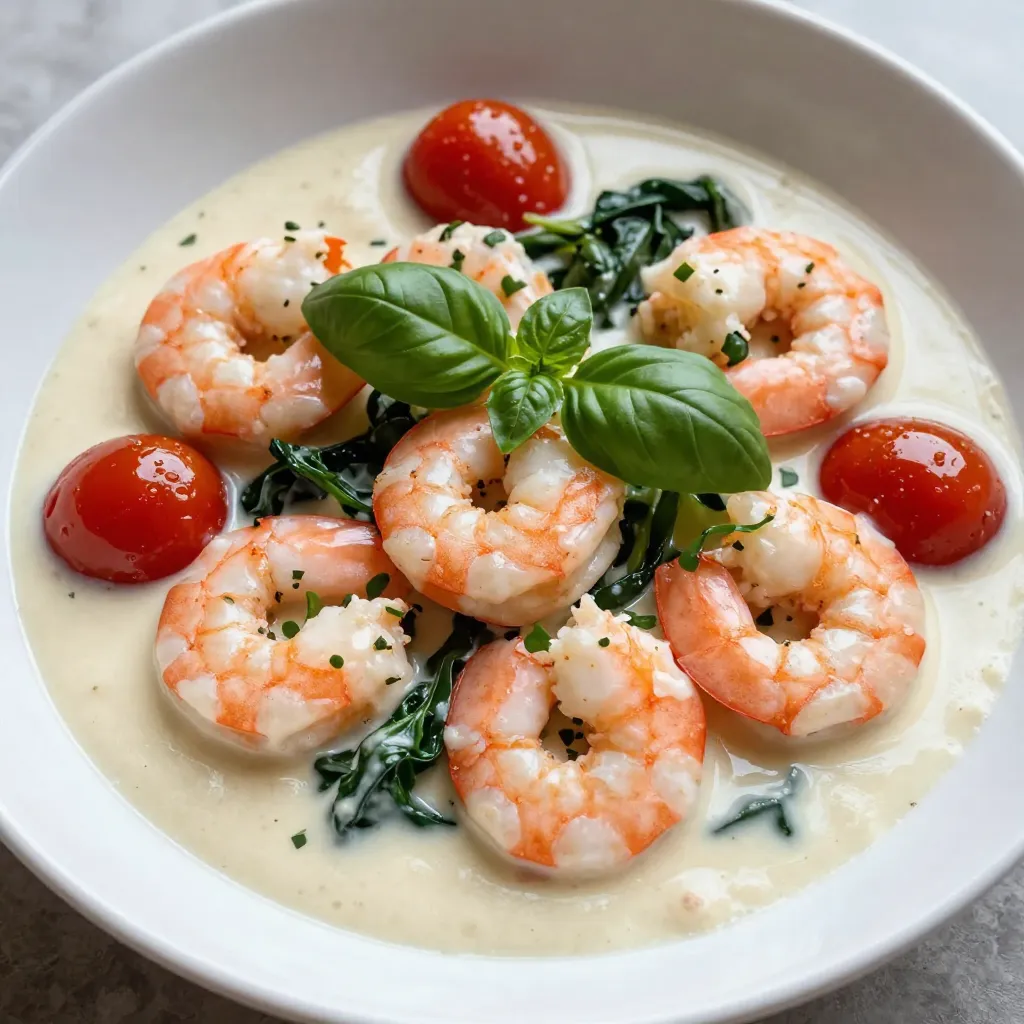
Creamy Tuscan Shrimp Hearty and Flavorful Dish
Creamy Tuscan Shrimp is a dish that bursts with flavor and warmth. I’ll walk you through every step, from choosing fresh shrimp to perfecting that
To make Coconut Lime Rice, gather these key ingredients: - 1 cup jasmine rice - 1 can (13.5 oz) coconut milk - 1 cup water - Zest of 1 lime - Juice of 1 lime - 1 tablespoon brown sugar - 1/2 teaspoon salt Each ingredient adds to the dish’s bright and creamy flavor. Jasmine rice gives a lovely aroma and texture. Coconut milk brings richness, while lime zest and juice add freshness. The brown sugar balances the tartness of the lime. Finally, salt enhances all the flavors. To make your Coconut Lime Rice even better, try these garnishes and serving ideas: - Fresh cilantro, chopped - Lime wedges Cilantro adds a pop of color and flavor. Lime wedges let diners squeeze fresh juice on top. For a fun twist, serve the rice in coconut shells. This adds a tropical vibe to your meal. If you have dietary needs, here are some easy swaps: - Use brown rice instead of jasmine rice for more fiber. - Swap coconut milk for almond milk or soy milk for a lighter option. - Omit brown sugar for a sugar-free version or use honey as a substitute. These changes keep the spirit of the dish while meeting your needs. Enjoy the flavors and textures that Coconut Lime Rice brings to your table. {{ingredient_image_1}} Start by rinsing the jasmine rice. Place it in a fine mesh strainer. Rinse the rice under cold water. Keep rinsing until the water runs clear. This step is key to a nice texture. It removes extra starch and helps the rice stay fluffy. Next, grab a medium saucepan. Add the rinsed rice, coconut milk, and water. Then, add lime zest, brown sugar, and salt. Stir the mixture well to mix everything. Bring this mix to a boil over medium-high heat. Once it boils, reduce the heat to low. Cover the saucepan with a lid. Let it simmer for about 15 to 18 minutes. Check the rice to make sure it is tender and has absorbed most of the liquid. After cooking, remove the saucepan from the heat. Let it sit covered for 5 more minutes. This step helps the rice finish cooking in steam. Now, fluff the rice gently with a fork. Stir in the lime juice carefully. You want to mix it in without smashing the rice grains. Taste the rice and adjust the seasoning if needed. Add more salt or lime juice to suit your taste. To serve, scoop the rice onto plates. Garnish with fresh cilantro and lime wedges. This adds a burst of color and flavor. Enjoy your coconut lime rice! To get fluffy coconut lime rice, rinse the jasmine rice well. Rinsing removes extra starch. This step makes sure the rice does not clump together. Use a medium saucepan for even cooking. Keep the heat low after boiling. Let it simmer gently. This helps the rice cook evenly. After cooking, let it sit covered. This step allows the rice to steam. Fluff it with a fork for the best texture. For a burst of flavor, add more lime zest. The zest gives a strong lime taste. You can also mix in a bit of coconut flake. This adds texture and more coconut flavor. If you like heat, try adding a pinch of chili flakes. This will give your rice a nice kick. Fresh herbs are great too! Add cilantro or mint right before serving to brighten the dish. If your rice is too wet, let it sit uncovered for a few minutes. This will help it dry out. You can also add a bit more lime juice for a fresh taste. If the rice is too dry, add a splash of coconut milk or water. Stir gently to combine. Always taste your rice before serving. This way, you can adjust the flavors to your liking. Pro Tips Rinse the Rice: Always rinse jasmine rice under cold water until the water runs clear. This removes excess starch and helps achieve a perfect texture. Adjust Coconut Milk: If you prefer a creamier rice, use more coconut milk and reduce the water slightly. This enhances the coconut flavor. Flavor Boost: For extra flavor, consider adding a pinch of ginger or a few kaffir lime leaves during cooking. Serving Style: Serve the rice in a coconut shell or colorful bowls to create a vibrant presentation that matches its tropical taste. {{image_2}} You can easily add vegetables to this dish. Try mixing in peas, bell peppers, or carrots. These add color and nutrition. To do this, chop the veggies and add them to the rice during cooking. They will steam nicely and soak up the coconut flavor. This twist makes your meal more colorful and tasty. Want to make it a main dish? Add protein! Grilled chicken, shrimp, or tofu work well. If using chicken or shrimp, cook them separately and add them at the end. For tofu, sauté until golden and mix in with the rice. This adds substance and keeps the meal balanced. You can change the taste by adding spices or herbs. Try a dash of cumin or coriander for warmth. Fresh herbs like basil or mint can bring a bright note. Mix in these flavors when you combine the rice and coconut milk. This small change creates a new and exciting dish each time. To store leftover coconut lime rice, first let it cool. Place the rice in an airtight container. This keeps it fresh and prevents odors. You can store it in the fridge for up to four days. Make sure to label it with the date. This way, you know when to use it. When reheating coconut lime rice, add a splash of water. This helps to keep it moist. Use a microwave or a stovetop. If using a microwave, cover the container with a lid or a damp paper towel. Heat in short bursts, stirring in between. On the stovetop, warm it over low heat. Stir gently until heated through. You can freeze coconut lime rice for later use. Spoon the cooled rice into freezer-safe bags. Press out air to avoid freezer burn. Label each bag with the date and contents. Frozen rice can last up to three months. To defrost, place the bag in the fridge overnight or use a microwave. Yes, you can use brown rice. It has a nutty taste and a chewier texture. However, it will take longer to cook. You should also adjust the water. Use 2 cups of water for 1 cup of brown rice. Cook it for about 40-45 minutes until tender. The flavor will change, but it will still be tasty. If you need a substitute for coconut milk, try using almond milk or soy milk. You can also mix regular milk with a bit of coconut extract. This gives you a coconut flavor without the milk. Keep in mind that the taste will differ. Adjust your sweeteners since some milk types are sweeter. Coconut Lime Rice stays fresh for about 3 to 5 days in the fridge. Be sure to store it in an airtight container to keep it from drying out. When you want to eat it again, just reheat it in the microwave or on the stove. Add a splash of water or extra lime juice for moisture. Coconut lime rice is easy and fun to make. We've covered the main ingredients, cooking steps, and tips to get it right. You can customize it with add-ins and serve it your way. Don't forget to store leftovers properly to enjoy later. Remember, cooking is about trying new things, so feel free to experiment. With practice, you'll master this dish and impress your family and friends. Enjoy your delicious coconut lime rice journey!
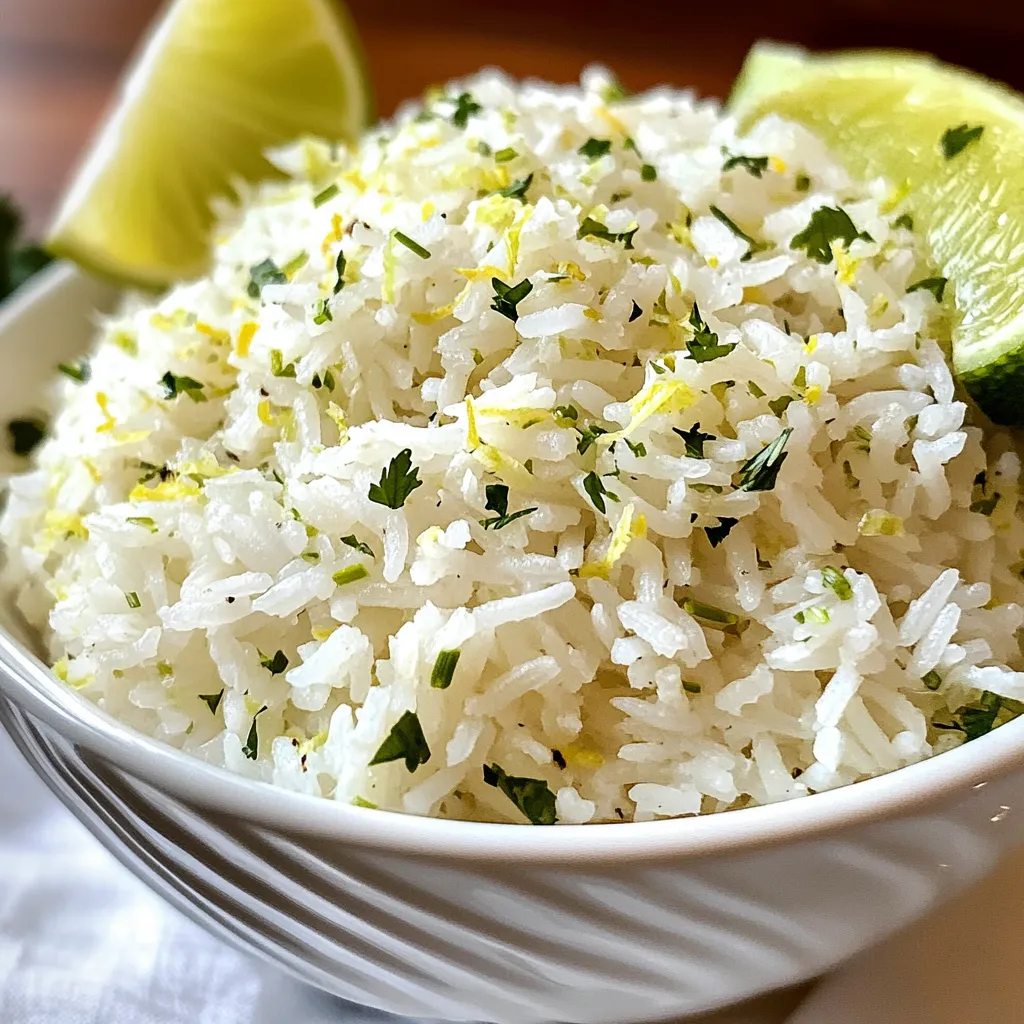
Coconut Lime Rice Flavorful and Easy Side Dish
Looking for a side dish that’s packed with flavor? Look no further than Coconut Lime Rice! This bright and zesty dish pairs perfectly with various
To make lemon garlic butter chicken, gather these items: - 4 boneless, skinless chicken breasts - 1/2 cup unsalted butter (1 stick) - 6 cloves garlic, minced - Zest of 1 lemon - 1/4 cup fresh lemon juice - 1 teaspoon dried oregano - 1 teaspoon dried thyme - Salt and pepper, to taste - Fresh parsley, chopped (for garnish) - Lemon slices (for garnish) You can enhance the dish with: - A pinch of red pepper flakes for heat - Fresh basil or rosemary for extra aroma - A splash of white wine for depth If you have dietary needs, try these: - Use chicken thighs for more flavor and moisture. - Swap butter for olive oil to make it dairy-free. - Replace lemon juice with lime juice for a twist. {{ingredient_image_1}} 1. Prepare the Chicken: Start by seasoning your chicken breasts. Use salt, pepper, and a little oregano and thyme. This adds great flavor. Set the chicken aside for a moment. 2. Melt the Butter: Grab a large skillet and place it over medium heat. Add the butter and let it melt slowly. This will create a rich base for your dish. 3. Sauté Garlic: Once the butter melts, add minced garlic. Sauté it for about 1-2 minutes. You want it fragrant, but be careful not to burn it. 4. Add Lemon: Stir in the lemon zest and lemon juice next. Let this simmer for one more minute. This helps mix all the flavors. 5. Cook Chicken: Now, add your seasoned chicken to the skillet. Cook each side for about 6-7 minutes. The chicken should turn golden brown. Baste it with the butter-garlic mix while it cooks. 6. Check Doneness: To be sure the chicken is done, use a meat thermometer. It should read 165°F (75°C). This ensures it's safe to eat. 7. Final Touches: After cooking, take the chicken out and let it rest for a few minutes. Drizzle some of that lemon garlic butter sauce on top for extra flavor. 8. Garnish and Serve: Plate your chicken and add some chopped parsley and lemon slices for a fresh look. The prep time for this dish is quick, only about 10 minutes. Cooking takes around 20 minutes. This makes the total time about 30 minutes. Use medium heat for cooking. This helps the chicken cook evenly and stay moist. Seasoning is key to great flavor. Salt and pepper are must-haves. Dried herbs like oregano and thyme add depth. Don't rush this step. Proper seasoning makes the chicken taste amazing and brings out the lemon and garlic. To get the best chicken, follow these tips. Start with fresh chicken. Always season your chicken well with salt, pepper, oregano, and thyme. This adds flavor right from the start. Use a meat thermometer to check doneness. The chicken should reach 165°F (75°C). This keeps it juicy and safe to eat. Basting the chicken with the butter-garlic sauce while it cooks is key. It keeps the meat moist and adds flavor. Let the chicken rest for a few minutes after cooking. This helps the juices settle in. Many cooks make simple mistakes. One common error is not seasoning enough. Always taste your food as you cook. If the chicken is not cooked through, it can be dry. Avoid turning the chicken too much. Let it cook without fussing. Also, don’t burn the garlic. It can taste bitter. If you do burn it, start over. Lastly, don’t skip the resting time. It’s important for great texture. Lemon garlic butter chicken is versatile. It pairs well with many sides. Try it with steamed vegetables or a fresh salad. Mashed potatoes or rice are also great choices. For a fun twist, serve with garlic bread. You can complement the dish with a glass of white wine. A crisp Sauvignon Blanc works nicely. For a fresh touch, add lemon wedges on the side. This adds a burst of flavor when you squeeze them on the chicken. Enjoy your meal with family or friends! Pro Tips Marinate for Extra Flavor: For even more flavor, consider marinating the chicken in the lemon garlic butter mixture for at least 30 minutes or up to overnight before cooking. Use Fresh Ingredients: Whenever possible, use fresh garlic and freshly squeezed lemon juice to enhance the dish's flavor profile. Don’t Overcook the Chicken: Ensure the chicken is cooked just until it reaches the safe internal temperature to keep it juicy and tender. A meat thermometer is your best friend here! Serve with Sides: This dish pairs wonderfully with roasted vegetables or a light salad for a complete meal. Consider adding a starch like rice or quinoa to soak up the delicious sauce. {{image_2}} You can boost the flavor of Lemon Garlic Butter Chicken by adding fresh herbs. Try using fresh basil or rosemary. Chop them finely and add them to the butter and garlic mix. This will give your dish a fresh taste. You can also sprinkle herbs on top before serving for extra color and flavor. If you follow a low-carb diet, you can still enjoy this dish. Use cauliflower rice instead of regular rice. It pairs well with the rich lemon garlic butter. You can also skip the butter and use olive oil for a healthier option. This keeps the flavor while lowering carbs. If you like a kick, add some spice! You can mix in red pepper flakes when you sauté the garlic. Start with a half teaspoon and adjust to your taste. For a bolder flavor, you can add diced jalapeños to the skillet. This will make your Lemon Garlic Butter Chicken exciting and zesty. To keep your lemon garlic butter chicken fresh, store leftovers in an airtight container. Make sure the chicken cools down first. Place it in the fridge within two hours of cooking. This helps keep it safe to eat later. It will stay good for up to three days. If you want to enjoy it longer, consider freezing. When you're ready to eat your leftovers, reheating properly is key. Start by removing the chicken from the fridge. Place it in a skillet over low heat. Add a splash of water or some of the butter sauce. Cover it with a lid to keep moisture in. Heat for about 5-7 minutes, flipping once. You want it warm but not overcooked. You can also use a microwave. Heat on medium power for 1-2 minutes. Check to make sure it's hot all the way through. Freezing is a great option if you want to save some chicken for later. Wrap each piece in plastic wrap, then place it in a freezer bag. Remove as much air as possible before sealing. This keeps the chicken from getting freezer burn. You can freeze it for up to three months. When you're ready to eat, transfer the chicken to the fridge to thaw overnight. Never thaw it at room temp, as that can cause bacteria to grow. Once thawed, you can reheat it as described above for the best taste and texture. You can serve Lemon Garlic Butter Chicken with a variety of sides. Here are some great options: - Rice: White or brown rice soaks up the sauce well. - Vegetables: Steamed broccoli or green beans add color and nutrition. - Mashed Potatoes: Creamy potatoes balance the flavors nicely. - Salad: A fresh salad adds crunch and brightness to the meal. These sides make your dinner feel more complete and delicious. Yes, you can use chicken thighs! They are juicy and full of flavor. Thighs also stay moist during cooking. Just adjust the cooking time. Check that they reach 165°F (75°C) for safety. To make this recipe dairy-free, replace the unsalted butter with a dairy-free option. You can use olive oil or coconut oil instead. Both will give a nice taste. Adjust the amount based on your preference, but start with the same measurement. The dish will still be tasty! This blog post covered all you need for Lemon Garlic Butter Chicken. We discussed key ingredients, methods for cooking, and tips for great flavor. I shared variations to match your taste and dietary needs. Plus, I gave storage tips to keep your leftovers fresh. Enjoy making this dish! Remember, with practice, you’ll create a meal everyone will love.
Lemon Garlic Butter Chicken Delightful and Easy Recipe
If you’re craving a dish that’s simple, tasty, and bursting with flavor, you’re in for a treat! My Lemon Garlic Butter Chicken is an easy
- Baby carrots - Honey - Garlic - Olive oil - Fresh thyme - Salt and pepper - Optional garnishes To make honey garlic roasted carrots, you need simple, fresh ingredients. First, grab 1 pound of baby carrots. They are sweet and tender, perfect for roasting. Next, you will need 3 tablespoons of honey. This adds a lovely sweetness that balances the garlic. You also need 3 cloves of garlic, minced. Garlic gives a strong flavor and works well with honey. For richness, use 2 tablespoons of olive oil. This helps the carrots roast nicely. For an herby touch, get 1 teaspoon of fresh thyme or 1/2 teaspoon of dried thyme. Thyme adds warmth and depth. Finally, season with salt and pepper to taste. If you like, sprinkle on 1 tablespoon of sesame seeds for a crunchy finish. These ingredients come together to create a sweet and savory dish that you will love. Enjoy making this easy recipe! {{ingredient_image_1}} First, set your oven to 425°F (220°C). This is the best temperature to roast the carrots. Let the oven preheat for about 10 minutes. This helps the carrots cook evenly and get nice and tender. In a large bowl, add 3 tablespoons of honey, 3 cloves of minced garlic, and 2 tablespoons of olive oil. Then, toss in 1 teaspoon of fresh thyme, plus salt and pepper to taste. Whisk all these ingredients well until they mix smoothly. The mix should be thick but pourable. If it's too thick, you can add a touch more olive oil. Take 1 pound of peeled baby carrots and add them to your honey garlic mix. Toss them gently but thoroughly. Make sure each carrot gets a nice coat of the mixture. This step is key for great flavor in every bite. Spread the coated carrots in a single layer on a baking sheet lined with parchment paper. This prevents sticking and helps with cleanup. Roast the carrots in the oven for 20 to 25 minutes. About halfway through, take them out and toss them around. This ensures they brown evenly. Once the carrots are tender and slightly caramelized, take them out of the oven. If you like, sprinkle 1 tablespoon of sesame seeds on top for a nice crunch. Serve the carrots warm. They make a great side dish! When picking carrots, baby carrots are sweet and tender. They cook quicker than regular carrots. Look for bright colors and smooth skins. Fresh carrots should feel firm, not soft. If they have green tops, that means they are fresh. Avoid carrots that look dull or have dark spots. You can change the sweetness by adding more or less honey. If you want a bit of spice, try red pepper flakes. Fresh herbs like parsley or dill can add a nice twist. Experiment with flavors to make the dish your own. Remember, just a small change can make a big difference. Place your baking sheet in the middle of the oven. This ensures even heat for roasting. Check the carrots after 20 minutes. They should be tender and caramelized. If they need more time, roast them a little longer. Toss them halfway through for even cooking. Pro Tips Use Fresh Carrots: Fresh baby carrots will yield the best flavor and texture. Look for vibrant colors and firm skin when selecting your carrots. Adjust the Sweetness: Feel free to adjust the amount of honey based on your preference. If you like it sweeter, add a little more honey before roasting. Check for Doneness: Roast the carrots until they are tender but still have a slight bite. You can test this by piercing them with a fork. Experiment with Herbs: While thyme works wonderfully, feel free to experiment with other herbs like rosemary or parsley for a different flavor profile. {{image_2}} You can switch up the flavor by adding thyme. Fresh thyme brings a bright taste. Dried thyme works well, too, and is easy to use. Just remember, dried herbs are stronger. Use half the amount if you choose dried thyme. This little change can elevate your dish. Want some heat? Add red pepper flakes for a spicy twist. Start with a pinch and taste as you go. You can also try using chili powder or cayenne pepper. These options can add depth and warmth. Adjust according to your spice preference for the best result. If you want a vegan version, swap honey for maple syrup. Maple syrup gives a sweet flavor that works great. Agave nectar is another good choice. Both options keep the dish sweet while making it plant-based. Enjoy the same tasty carrots without any animal products. After you enjoy your honey garlic roasted carrots, store leftovers in the fridge. Use an airtight container to keep them fresh. Glass or plastic containers work well. They can stay good for about 3 to 5 days. Always check for any signs of spoilage before eating. When you reheat your carrots, aim to keep them tender and not soggy. The best method is to use your oven. Preheat it to 350°F (175°C) and place the carrots on a baking sheet. Heat them for about 10 to 15 minutes. This keeps the texture nice. You can also use a microwave, but be careful. Heat them in short bursts to avoid excess moisture. To freeze your honey garlic roasted carrots, first let them cool completely. Then, spread them out on a baking sheet to freeze individually for a few hours. Once frozen, transfer them to a freezer bag. Remove as much air as possible. They can last up to 3 months in the freezer. When ready to eat, thaw them overnight in the fridge before reheating to keep the flavor intact. The cooking time for honey garlic roasted carrots is 20 to 25 minutes. You roast them at 425°F (220°C). Toss the carrots halfway through to ensure even cooking. This helps them get soft and slightly caramelized. Yes, you can use regular carrots instead of baby carrots. Just cut them into similar-sized pieces. This ensures they cook evenly. Baby carrots are tender and sweet, but regular carrots work well, too. You can prepare honey garlic roasted carrots ahead of time. Mix the honey, garlic, and oil, then coat the carrots. Store them in the fridge for up to 24 hours. Just roast them when you are ready to serve. Honey garlic roasted carrots pair well with many dishes. They complement roasted chicken and grilled fish perfectly. You can also serve them with rice or quinoa for a wholesome meal. Yes, honey garlic roasted carrots are healthy. Carrots are rich in vitamins and fiber. The honey adds a touch of sweetness, while garlic provides health benefits, like boosting your immune system. This dish is both tasty and nutritious. In this blog post, I guided you through making honey garlic roasted carrots. We covered all the key ingredients, the step-by-step instructions, and smart tips for perfect results. Remember, you can adjust flavors and even try different variations, like a spicy kick or vegan options. Follow these methods to enjoy delicious carrots that impress. Now, you can confidently roast carrots that are both tasty and healthy! Happy cooking!
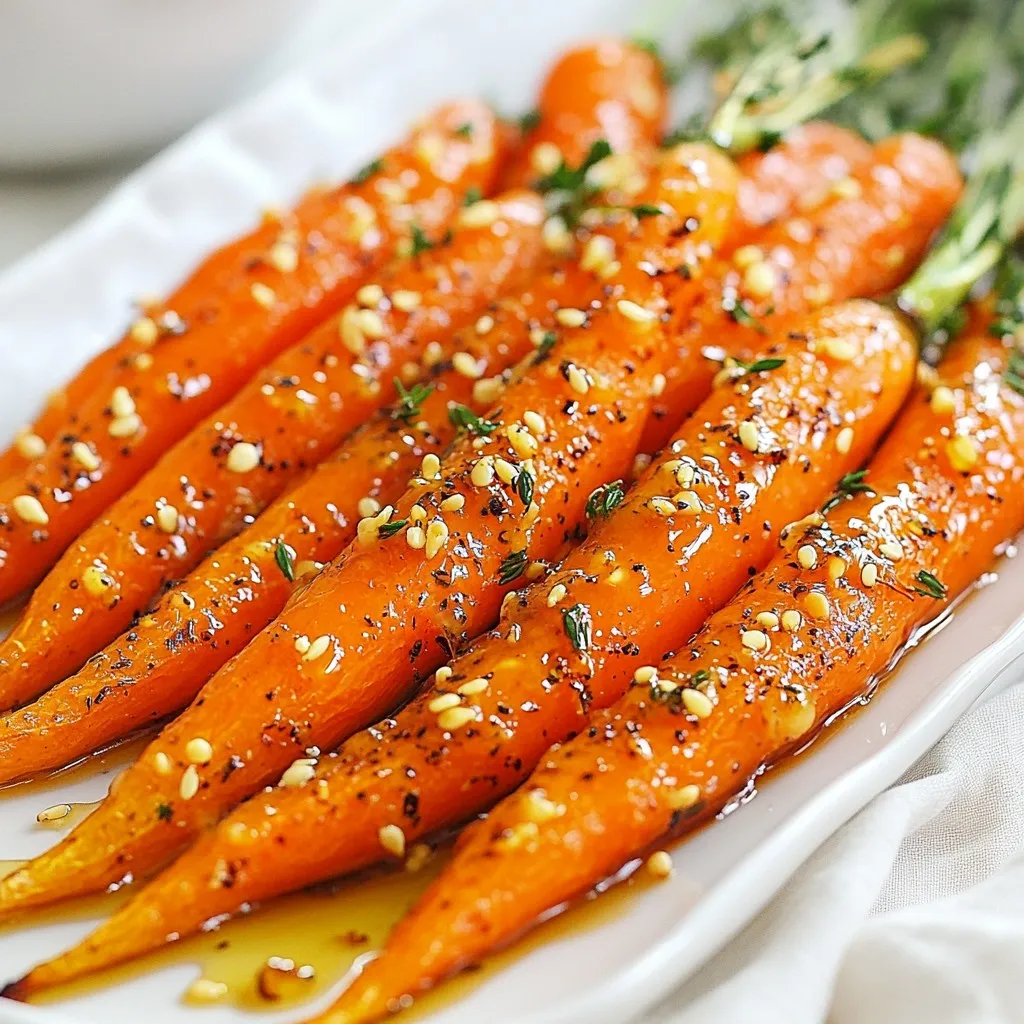
Honey Garlic Roasted Carrots Savory and Simple Recipe
Looking for a simple yet tasty side dish? My Honey Garlic Roasted Carrots recipe brings sweet and savory flavors to your table in no time.
To make Greek Lemon Chicken Soup Avgolemono, you will need: - 1 whole chicken (about 3-4 lbs), cleaned - 8 cups chicken broth - 1 medium onion, chopped - 2 carrots, diced - 2 celery stalks, diced - 1 cup orzo pasta - 3 large eggs - 1/2 cup fresh lemon juice (about 3 large lemons) - Zest of 1 lemon - Salt and pepper to taste - Fresh dill or parsley, for garnish You can swap some ingredients based on what you have. - Use rotisserie chicken if you are short on time. - Swap orzo for rice or quinoa for a gluten-free option. - If you don’t have fresh lemons, use bottled lemon juice, but the taste may vary. - For a vegetarian version, replace chicken with mushrooms and use vegetable broth. Using fresh ingredients is key for great taste. Fresh chicken adds rich flavor and texture. Fresh lemons give that bright zing. Fresh herbs like dill or parsley enhance aroma and color. When you choose fresh, you elevate your dish. This makes your Avgolemono not just a meal but an experience. {{ingredient_image_1}} Start by placing your whole chicken in a large pot. Pour in eight cups of chicken broth. Turn the heat to medium-high and bring it to a boil. Once it starts boiling, lower the heat to medium-low. Skim off any foam that appears on the surface. This helps keep the broth clear. Next, add a chopped onion, two diced carrots, and two diced celery stalks to the pot. Cover the pot and let it simmer for about one hour. The chicken should be cooked and tender at this point. After the chicken has cooked, take it out of the pot. Let it cool on a plate. Strain the broth to remove the vegetables. This gives you a clear and flavorful broth. Return the broth to the pot. Now, it's time to add one cup of orzo pasta. Bring the broth back to a gentle simmer. Cook the orzo according to the package instructions until it's al dente. This usually takes about eight to ten minutes. While the broth simmers, prepare the Avgolemono mixture. In a bowl, whisk together three large eggs, half a cup of fresh lemon juice, and the zest of one lemon. Mix until everything is well combined. Once the chicken is cool enough to handle, shred the meat into bite-sized pieces. Discard the bones and skin. Now it’s time to combine everything. Slowly temper the egg mixture by adding a ladle of hot broth to it while whisking. This step is crucial to prevent curdling. Repeat this a few times. Once the egg mixture is tempered, stir it back into the pot of soup. Keep stirring constantly. Finally, add the shredded chicken back into the soup. Season with salt and pepper to taste. Serve the soup hot, garnished with fresh dill or parsley for a bright finish. Enjoy your delicious Greek Lemon Chicken Soup! To get the right thickness in your Avgolemono soup, follow these steps: - Use orzo pasta. It cooks well and adds body. - Slowly mix the egg and lemon blend into the hot broth. This keeps it smooth. - Stir constantly to avoid lumps. Slowly is key here. - If you want it thicker, add a bit less broth when cooking the orzo. For a richer flavor in your soup, try these tips: - Use fresh herbs like dill or parsley. They brighten the dish. - Sauté the onion, carrots, and celery before adding broth. This enhances the taste. - Add a pinch of salt early on, then adjust later. This builds layers of flavor. - Opt for homemade chicken broth if you can. It adds depth and richness. Avoid these common pitfalls for the best Avgolemono: - Don’t rush the egg mixture. Temper it slowly to prevent curdling. - Avoid boiling after adding the egg mixture. This can cause lumps. - Don’t skip straining the broth. It helps keep the soup clear and light. - Remember to taste as you cook. Adjust seasoning to suit your taste. Pro Tips Use Fresh Ingredients: For the best flavor, use fresh lemons and high-quality chicken broth. Fresh ingredients can significantly enhance the soup's taste. Egg Tempering Technique: When adding the egg mixture to the soup, ensure you temper the eggs properly to prevent curdling. Slowly adding hot broth while whisking continuously is key. Customize Your Veggies: Feel free to add or substitute vegetables like spinach or peas for added nutrition and color. This soup is versatile! Garnish for Flavor: Fresh herbs like dill or parsley not only add a pop of color but also bring a fresh flavor that complements the lemon in the soup. {{image_2}} To make a vegetarian version of Greek Lemon Chicken Soup, swap the chicken for hearty vegetables. Use mushrooms or chickpeas for protein. Replace the chicken broth with vegetable broth for a rich base. Add more veggies like zucchini, spinach, or bell peppers. This keeps the soup flavorful and satisfying without meat. Orzo adds a nice texture, but you can try different grains. Quinoa is a great choice; it cooks fast and is full of protein. Rice works well too; jasmine or basmati can add a unique taste. For gluten-free options, use gluten-free pasta or even cauliflower rice for a low-carb twist. Different regions in Greece use unique ingredients in Avgolemono. Some add wild greens like dandelion or sorrel for a fresh kick. Others may use different herbs, like mint or oregano, to change the flavor profile. Depending on local customs, the soup may even include different types of meat, like lamb or goat, adding to its rich heritage. To keep your Greek Lemon Chicken Soup fresh, let it cool first. Once cooled, pour the soup into airtight containers. This helps lock in flavor and moisture. Store it in the fridge for up to three days. If you want to keep it longer, freezing is a great option. When you're ready to enjoy your leftovers, reheat on the stove. Pour the soup into a pot and warm over low heat. Stir it often to prevent sticking. You can also use a microwave. Just place the soup in a microwave-safe bowl. Heat in short bursts, stirring in between. This keeps the soup creamy and smooth. To freeze your soup, use freezer-safe bags or containers. Leave some space at the top for expansion. The soup can stay in the freezer for up to three months. When it's time to eat, thaw it overnight in the fridge. Reheat gently on the stove after thawing. This way, you’ll have a delicious meal ready in no time! Avgolemono is a Greek sauce and soup made with eggs and lemon. You mix the two to get a creamy texture. It gives the soup a bright, fresh taste. The dish usually features chicken, broth, and orzo pasta. This soup warms your soul, making it perfect for any season. Yes, you can make this soup ahead of time. Just keep the soup base and the egg mixture separate. If you mix them too early, the eggs can curdle. Store the soup in the fridge for up to three days. Reheat gently and then add the egg mixture before serving. To make the soup less tangy, reduce the lemon juice. Start with a smaller amount, about 1/4 cup. Taste it and add more if needed. You can also use less lemon zest. This way, you still keep some flavor without the strong tang. You can use many herbs for garnish. Fresh parsley adds a mild flavor. Chives or basil also work well. Mint gives a fresh twist. Dill is traditional, but feel free to explore your favorites. Adding herbs makes the soup look pretty and taste great! This blog post covered how to make a delicious Avgolemono soup. We discussed fresh ingredients, step-by-step cooking, and tips for the best taste. Remember to adapt the recipe with variations like a vegetarian version or alternative grains. Always store leftovers properly and know how to reheat them well. Cooking should be fun and flexible. Enjoy experimenting and making this soup your own. I hope you feel ready to create a tasty bowl of Avgolemono. Happy cooking!
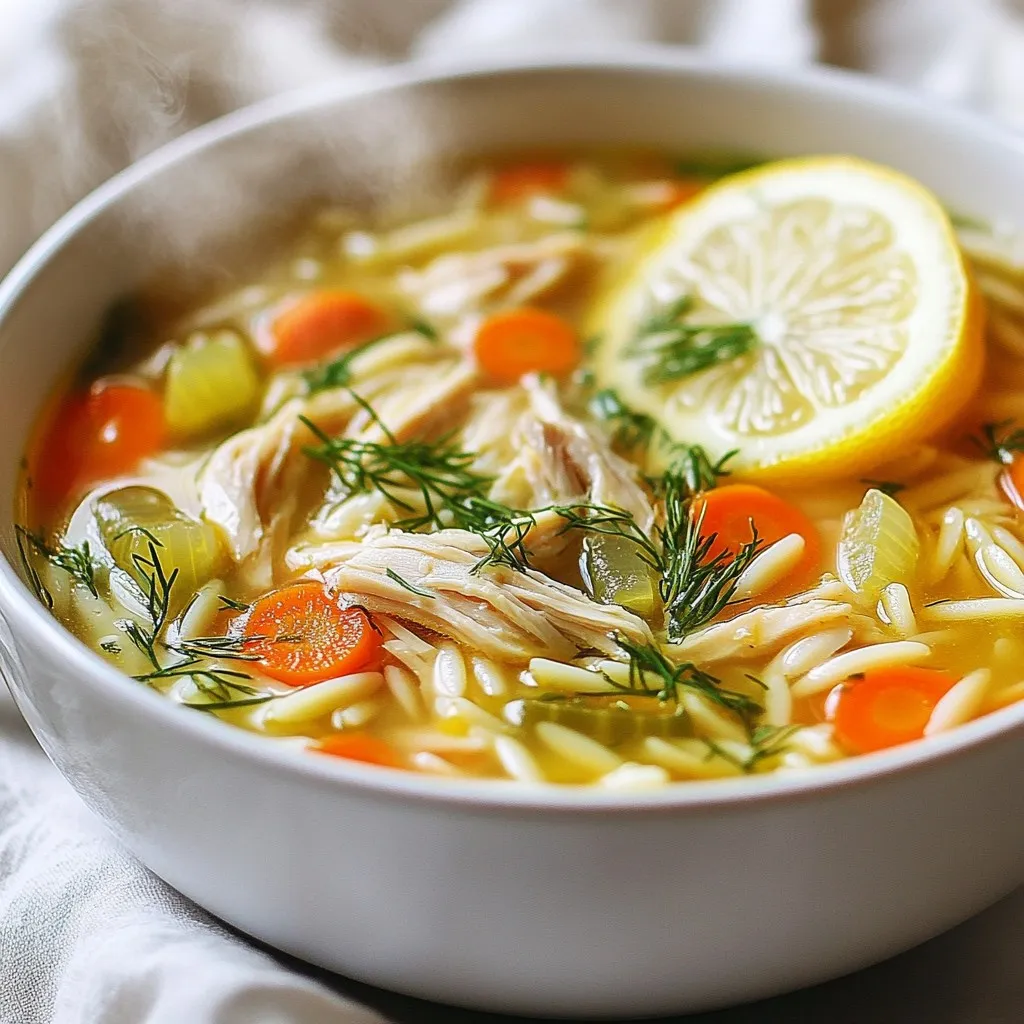
Greek Lemon Chicken Soup Avgolemono Delightful Meal
Welcome to the comforting world of Avgolemono, a Greek lemon chicken soup! This dish is a delightful blend of flavors that warms both the body
- 8 oz (226g) pasta (penne or rotini works well) - 4 oz (113g) cream cheese, softened - 1 cup (240ml) heavy cream - 1 cup (100g) shredded sharp cheddar cheese - 1/2 cup (50g) grated Parmesan cheese - 1-2 jalapeños, seeded and finely chopped (adjust for spice preference) - 3 slices of crispy cooked chicken (optional), chopped - 2 cloves garlic, minced - 1 tablespoon olive oil - 1/2 teaspoon smoked paprika - Salt and pepper to taste - Fresh cilantro or parsley for garnish I use simple measurements for easy cooking. Here they are: - Ounces (oz) for weight - Cups for volume - Tablespoons (tbsp) for smaller amounts - Teaspoons (tsp) for tiny amounts When choosing your pasta, pick penne or rotini. They hold sauce well. Softened cream cheese blends smoothly into the dish. Heavy cream adds richness. Sharp cheddar cheese gives great flavor. Jalapeños bring heat. Adjust them based on your spice level. You can add crispy chicken for protein and flavor. Garlic makes everything better. Smoked paprika adds a nice touch. Use fresh herbs for garnish to brighten up the dish. {{ingredient_image_1}} First, grab a large pot. Fill it with water and add a good pinch of salt. Bring the water to a boil. Once it’s bubbling, add 8 oz of pasta, like penne or rotini. Cook the pasta until it is al dente, which means it should still have a little bite. This usually takes about 8 to 10 minutes. Drain the pasta and set it aside. In a big saucepan, pour in 1 tablespoon of olive oil. Heat it on medium heat. Next, add 2 minced cloves of garlic and 1 to 2 finely chopped jalapeños. Sauté these for about 2 minutes. You want to cook them until they smell amazing. This step brings out the flavors before we add the creamy sauce. Now, lower the heat to medium-low. Add 4 oz of softened cream cheese to the pan. Then pour in 1 cup of heavy cream. Stir these together until the cheese melts and becomes smooth. This is the base of your creamy sauce. Next, sprinkle in 1/2 cup of grated Parmesan cheese and 1/2 teaspoon of smoked paprika. Mix well. Season with salt and pepper to taste. It’s time to bring it all together! Add the drained pasta into the creamy sauce. If you want, you can also add 3 slices of chopped crispy cooked chicken at this step. Stir everything well so that the pasta gets coated evenly in the sauce. This is where all that flavor combines. Once the pasta is coated, add the remaining 1 cup of shredded sharp cheddar cheese. Mix it in until it melts into the dish. Now, it's ready to serve! Divide the creamy jalapeño popper pasta into bowls. For a fresh touch, garnish with fresh cilantro or parsley. Enjoy your delicious meal! To get the creamiest sauce, use softened cream cheese. This helps it melt well. Start on low heat when you add the cream cheese and heavy cream. Stir until smooth. Adding half of the cheddar cheese first helps create that rich texture. Don’t rush this step; let it blend perfectly. Want more heat? Add more jalapeños. You can use 1 or 2 based on your taste. If you want less spice, remove the seeds and ribs from the jalapeños. This cuts down the heat without losing the flavor. Always taste as you go to find your perfect balance. Cook the pasta until it's al dente. This means it should still have a little bite. Use a large pot of salted boiling water for the best results. Check the package for cooking times, but start testing a minute early. Drain the pasta but don’t rinse it. This keeps the starch, which helps the sauce stick. Pro Tips Adjust the Spice Level: If you prefer a milder dish, make sure to remove all the seeds and membranes from the jalapeños. You can also reduce the number of jalapeños used. Use Fresh Ingredients: For the best flavor, use fresh garlic and high-quality cheeses. Fresh ingredients can significantly enhance the taste of your creamy sauce. Extra Creaminess: For an even creamier pasta, consider adding a splash of sour cream or Greek yogurt just before serving. This addition will give it a nice tang and richness. Customize Your Protein: Feel free to add or substitute the chicken with cooked shrimp, sausage, or even roasted vegetables to make this dish your own! {{image_2}} You can easily make this dish vegetarian. Simply skip the chicken. Add extra veggies like bell peppers or spinach instead. These add color and taste. You can also use a plant-based cream cheese for a creamy texture. This keeps the dish rich, while also being meat-free. If you want more protein, try adding shrimp or sausage. Cook them in the pan with jalapeños and garlic. This adds flavor and makes the dish heartier. You can also try beans for a different twist. Chickpeas or black beans work well and bring a nice texture. For cheese lovers, you can mix it up with different kinds of cheese. Try using mozzarella for a gooey texture. Or go for pepper jack if you want extra spice. Vegan cheese options are also available. Look for brands that melt well if you prefer a dairy-free version. You can store leftover creamy jalapeño popper pasta in an airtight container. Make sure to let the pasta cool before sealing it. It stays good for about 3 to 4 days in the fridge. If you want to keep it longer, consider freezing instead. To reheat, place the pasta in a pot over low heat. Add a splash of cream or water to keep it from drying out. Stir often until it heats through. You can also use the microwave. Just cover the bowl and heat in short bursts, stirring in between. Freezing this dish is a great option for meal prep. To freeze, let the pasta cool completely. Then, transfer it to a freezer-safe container. It can last up to 2 months in the freezer. When you're ready to eat, thaw it overnight in the fridge before reheating. Yes, you can use any pasta. Penne and rotini are great choices. They hold the sauce well. You can also try spaghetti or fettuccine. Just cook it according to package directions. To add spice, use more jalapeños. Chop them finely and mix in. You can also add red pepper flakes or hot sauce. A pinch of cayenne pepper works nicely too. These small changes will give your dish more heat. This dish pairs well with a simple salad. A fresh green salad brings balance. You can also serve it with garlic bread for a tasty side. For a heartier meal, add grilled chicken or shrimp on top. This post covered all you need to know for making Creamy Jalapeño Popper Pasta. We explored ingredients, step-by-step cooking, and helpful tips. You learned how to adjust spice levels and try variations like vegetarian options. Lastly, we discussed how to store and reheat leftovers. Cooking can be fun and easy. With these guidelines, you can create a tasty dish that suits your taste. Enjoy your cooking adventure!
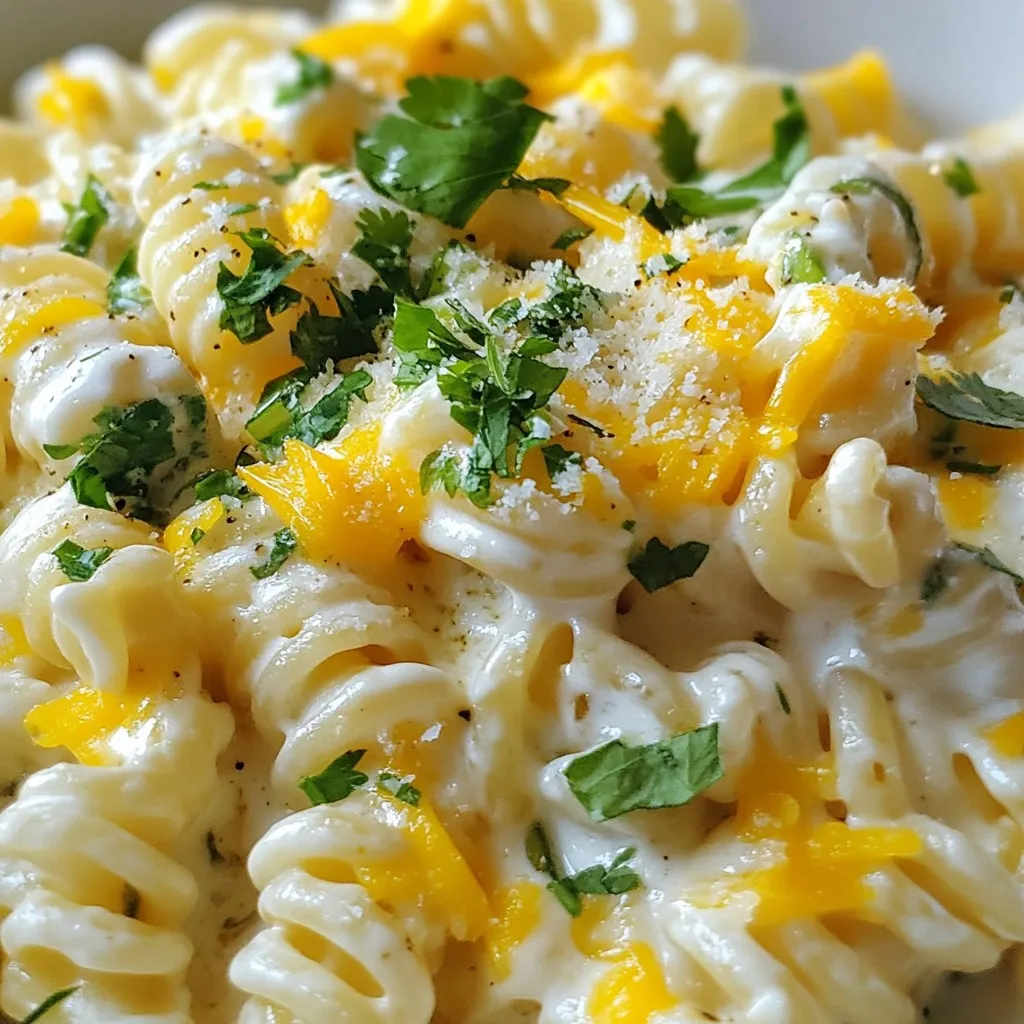
Creamy Jalapeño Popper Pasta Irresistible Comfort Meal
Craving a meal that warms your soul? Look no further than Creamy Jalapeño Popper Pasta! This dish blends rich creaminess with the perfect kick of
- 2 pounds red potatoes, halved - 4 tablespoons olive oil - 4 cloves garlic, minced Red potatoes are key to this dish. They hold their shape and have a nice, creamy texture. Olive oil adds richness and helps the potatoes crisp up. Garlic gives a bold flavor that makes every bite special. - 1 tablespoon fresh rosemary, chopped - 1 tablespoon fresh thyme, chopped - Fresh parsley, chopped (for garnish) Fresh herbs bring life to these roasted potatoes. Rosemary adds a piney flavor. Thyme lends a warm, earthy taste. Garnish with parsley for a pop of color and freshness. - 1 teaspoon paprika - Salt and pepper to taste Paprika adds a subtle smokiness and a beautiful color. Salt and pepper enhance the flavors of all the ingredients. Use them generously to make every bite delicious. {{ingredient_image_1}} First, you need to preheat your oven to 425°F (220°C). This high heat helps the potatoes become crispy. While the oven warms up, prepare a large baking sheet. Line it with parchment paper. This makes cleanup much easier later. Next, grab a large mixing bowl. Combine the halved red potatoes with four tablespoons of olive oil. Make sure each piece gets some oil. Then, add four minced garlic cloves, one tablespoon of chopped rosemary, and one tablespoon of chopped thyme. Sprinkle in one teaspoon of paprika, and add salt and pepper to taste. Toss everything together until the potatoes are fully coated in the mixture. Now it’s time to spread the potatoes on the prepared baking sheet. Arrange them in a single layer. This helps them roast evenly. Place the baking sheet in the oven. Roast for 25 to 30 minutes. Be sure to turn the potatoes halfway through. This helps them brown nicely on all sides. When they are golden brown and crispy, remove them from the oven. Let them cool for a few minutes before serving. To get crispy potatoes, don’t overcrowd the baking sheet. If you pack them tight, they steam instead of roast. This makes them soft, not crispy. Spread the potatoes out in one layer. Next, choose the right oven temperature. Preheat your oven to 425°F (220°C). This high heat helps the edges turn golden and crispy. It also cooks the insides perfectly. Marinating the potatoes adds great flavor. Toss them in olive oil, garlic, and herbs for at least 30 minutes. This helps all those good tastes soak in. You can also try different seasonings. Consider adding lemon zest for brightness or chili flakes for heat. A sprinkle of cheese before serving adds a rich touch too. Cook the potatoes for 25-30 minutes. This gives them time to brown nicely. Halfway through cooking, turn them over. This helps them cook evenly and get crispy on all sides. To check if they are done, pierce a potato with a fork. It should slide in easily. If it feels hard, give them a few more minutes. Enjoy your crispy, flavorful potatoes! Pro Tips Cut Evenly: Ensure that all potatoes are cut to similar sizes for even cooking. Use Fresh Herbs: Fresh herbs provide a more vibrant flavor compared to dried ones. Use them when possible. Don’t Overcrowd: Spread the potatoes out on the baking sheet. Overcrowding can lead to steaming instead of roasting. Check for Doneness: Use a fork to check if the potatoes are tender inside and crispy outside before removing them from the oven. {{image_2}} You can switch up the herbs for new flavors. Try using sage or oregano instead of rosemary and thyme. Sage gives a warm, earthy taste. Oregano adds a hint of spice that pairs well with potatoes. You can also experiment with dried herbs. Dried herbs are strong, so use less. For a simple swap, use half the amount of dried herbs compared to fresh ones. Adding cheese can take your roasted potatoes to a whole new level. Grate some Parmesan or sprinkle feta cheese on top before roasting. The cheese will melt and create a creamy texture. You can also mix in vegetables like bell peppers or onions. Adding these veggies will add color and crunch. Just chop them up and toss them in with the potatoes. If you need vegan options, just skip the cheese. The potatoes will still taste great with the herbs and garlic. For gluten-free needs, this recipe is already safe. All the ingredients are gluten-free. Just make sure your seasonings do not have added gluten. This way, everyone can enjoy these tasty Garlic Herb Roasted Red Potatoes! Store any leftover Garlic Herb Roasted Red Potatoes in the fridge. Place them in an airtight container. This keeps them fresh for up to four days. If you do not have an airtight container, use plastic wrap over a bowl. You can reheat potatoes in the oven or microwave. The oven gives the best results. Preheat your oven to 350°F (175°C). Spread the potatoes on a baking sheet. Heat them for about 10-15 minutes. This helps keep them crispy. The microwave is quicker but makes them softer. If you use the microwave, cover the potatoes with a damp paper towel. Heat in short bursts to keep them from drying out. You can freeze Garlic Herb Roasted Red Potatoes. First, let them cool completely. Then, place them in a freezer-safe bag. Remove as much air as possible before sealing. They can last up to three months in the freezer. To thaw, move them to the fridge overnight. Reheat in the oven for the best taste and texture. Yes, you can use different potatoes. Yukon Gold or fingerling potatoes work well. They both have a nice texture and flavor. If you want a slightly sweeter taste, try sweet potatoes. They will change the dish, but they can still be tasty. Just cut them into similar sizes as red potatoes for even cooking. Garlic Herb Roasted Red Potatoes last about 3 to 5 days in the fridge. Store them in an airtight container to keep them fresh. If you leave them out, they can spoil quickly. Always check for any signs of spoilage before eating leftovers. If they smell off or look bad, throw them away. These potatoes pair well with many dishes. Try serving them with grilled chicken or steak for a hearty meal. They also go great with roasted veggies or a fresh salad. For a fun twist, add them to a breakfast bowl with eggs. The flavors mix well and make for a tasty bite! You learned how to make Garlic Herb Roasted Red Potatoes. We covered the main ingredients, like red potatoes and garlic. We also explored tips for crispy results and how to save leftovers. Remember to try different herbs and toppings for fun twists. Cooking is about experimenting, so make these potatoes your own. Enjoy the process, and share your tasty results!
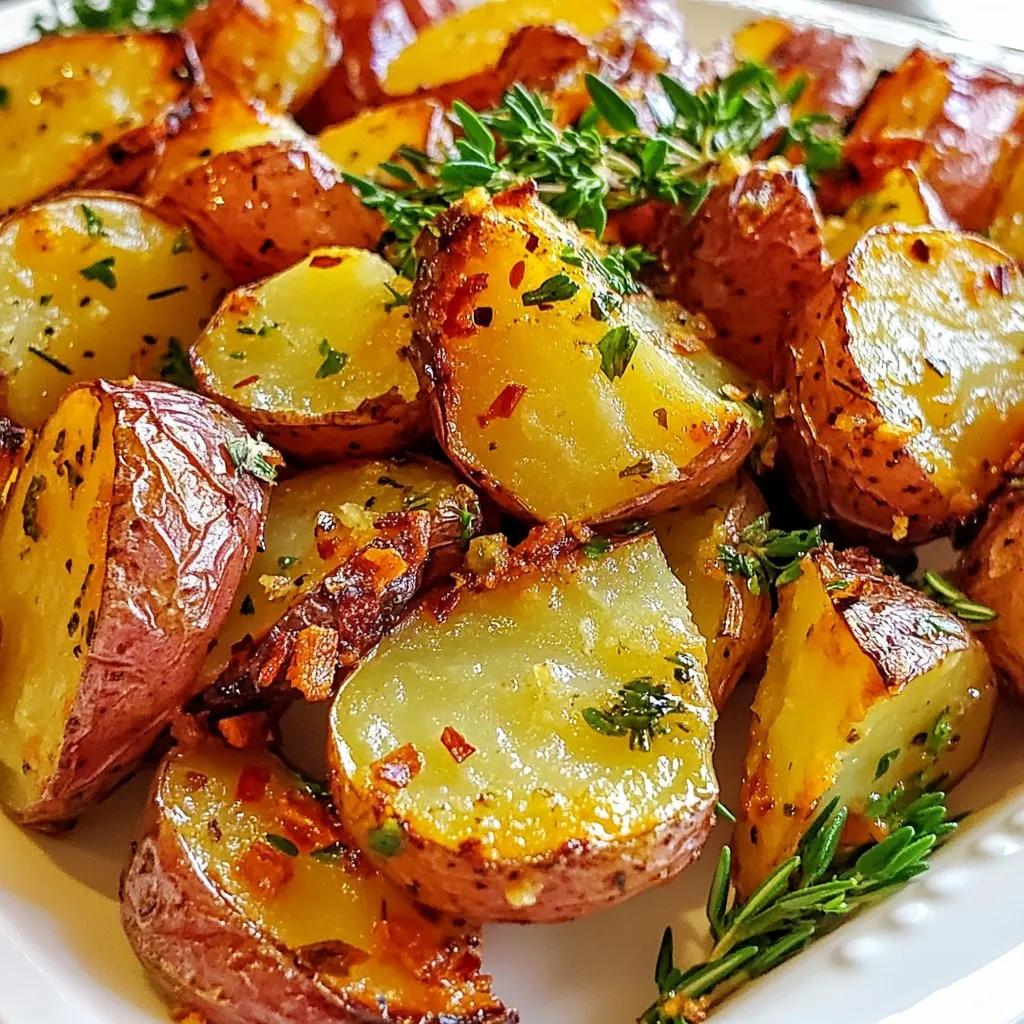
Garlic Herb Roasted Red Potatoes Flavorful Easy Recipe
Discover a simple yet delicious way to elevate your meals with Garlic Herb Roasted Red Potatoes. In this easy recipe, I’ll guide you through using
- 4 cups fresh broccoli florets - 1 medium onion, diced - 2 cloves garlic, minced - 3 cups vegetable broth - 1 cup heavy cream - 2 cups sharp cheddar cheese, shredded - 1 tablespoon olive oil - 1 teaspoon mustard powder - 1/2 teaspoon black pepper - Salt to taste To make this creamy broccoli cheddar soup, gather these ingredients first. The fresh broccoli gives a vibrant color and taste. The onion and garlic add sweetness and depth. Vegetable broth acts as the soup's base, while heavy cream and cheddar cheese create that rich, creamy finish. - Croutons - Extra cheese - Fresh herbs (like parsley or chives) Garnishes can elevate your soup. Croutons add crunch. Extra cheese makes it even cheesier. Fresh herbs give a pop of color and fresh flavor. - Use almond or oat milk instead of heavy cream for a lighter option. - Swap sharp cheddar with vegan cheese for a dairy-free version. - If you need gluten-free, croutons can be left out or made with gluten-free bread. These substitutions keep the spirit of the dish while catering to dietary needs. You can enjoy this soup in many ways. Always adjust the flavors to suit your taste! {{ingredient_image_1}} To start, gather your ingredients. You will need: - 4 cups fresh broccoli florets - 1 medium onion, diced - 2 cloves garlic, minced - 3 cups vegetable broth - 1 cup heavy cream - 2 cups sharp cheddar cheese, shredded - 1 tablespoon olive oil - 1 teaspoon mustard powder - 1/2 teaspoon black pepper - Salt to taste - Croutons for garnish (optional) Chop the onion and mince the garlic. The broccoli should be in small florets, so it cooks well. In a large pot, heat the olive oil over medium heat. Add the diced onion. Sauté for about 5 minutes until it turns soft. Then, add the minced garlic. Sauté for another minute until you smell the garlic. Next, stir in the broccoli florets and vegetable broth. Bring this mixture to a boil. Once it boils, reduce the heat. Let it simmer for 10 to 15 minutes. The goal is to make the broccoli tender. Now it’s time to blend. Use an immersion blender to mix the soup until it’s smooth. If you don’t have one, pour the soup in batches into a regular blender. Be careful; the soup is hot! After blending, return the soup to the pot on low heat. Stir in the heavy cream, cheddar cheese, mustard powder, black pepper, and salt. Mix until the cheese melts. Taste the soup and adjust the seasoning if needed. Serve it hot. If you like, add croutons on top for a nice crunch. To make this soup taste amazing, use fresh broccoli. Fresh veggies give the best flavor. Add a pinch of nutmeg for warmth. It pairs well with the cheese. A squeeze of lemon juice brightens the dish too. You can also try different cheeses. Gruyère or Monterey Jack can add a nice twist. If you love spice, toss in some red pepper flakes. One big mistake is overcooking the broccoli. Cook it just until tender, so it stays bright green. Blending too much can make your soup too thin. Blend only until smooth. If you add the cheese too fast, it might clump. Add it slowly, mixing well to melt it evenly. Don't skip tasting before serving. Adjust salt and pepper for the best flavor. Using an immersion blender makes blending easy. It saves you from transferring hot soup. A sharp knife helps chop the onion and garlic finely. A heavy-bottomed pot is great for even cooking. This prevents burning the bottom. Finally, a good measuring cup is key for accuracy. It helps keep your ingredients balanced for perfect results. Pro Tips Fresh Broccoli is Key: Use fresh broccoli florets for the best flavor and texture. Frozen broccoli can become mushy when cooked. Blending Techniques: If using a traditional blender, allow the soup to cool slightly before blending to avoid hot splashes. Blend in smaller batches for safety. Cheese Variations: Experiment with different types of cheese like Gruyère or Monterey Jack for a unique flavor twist. Seasoning Adjustments: Taste the soup before serving and adjust the seasoning as necessary. A squeeze of lemon juice can brighten the flavors! {{image_2}} You can easily make a vegan version of this soup. Just swap the heavy cream with coconut cream or cashew cream. For cheese, use vegan cheese or skip it altogether. The soup still tastes great without cheese. The vegetable broth adds rich flavor, which makes it satisfying and creamy. This recipe is already gluten-free! The ingredients do not contain any gluten. Just make sure the vegetable broth you choose is gluten-free. This way, you can enjoy the soup without any worries. You can add more fun flavors to the soup! Here are some ideas: - Spices: Try adding a pinch of cayenne pepper for heat. - Herbs: Stir in fresh thyme or basil for a fresh taste. - Veggies: Add carrots or potatoes for extra texture and flavor. - Protein: Toss in cooked chickpeas or beans for a hearty meal. These options make your creamy broccoli cheddar soup more exciting and tasty. Enjoy experimenting! To store your creamy broccoli cheddar soup, let it cool first. Once cool, pour it into an airtight container. This helps keep the soup fresh. You can store it in the fridge for up to three days. Just make sure to label the container with the date. If you want to keep it longer, freezing is a great option. Freezing this soup is simple. Use a freezer-safe container or bags. Leave some space at the top for expansion. It’s best to freeze the soup without croutons. They can get soggy when thawed. Your soup will stay good in the freezer for up to three months. When ready to eat, just thaw it in the fridge overnight. To reheat, pour the soup into a pot. Warm it over medium heat, stirring often. This keeps it from sticking to the bottom. If the soup is too thick, add a little vegetable broth or cream. Heat until it’s hot, but don’t boil. You can also use the microwave for quick reheating. Just cover it and heat in short bursts, stirring in between. Enjoy your warm soup again! Yes, you can use frozen broccoli. Frozen broccoli is convenient and saves time. Just add it directly to the pot with the broth. The cooking time may be slightly shorter since it's already blanched. To thicken the soup, you have a few options. First, blend more broccoli until smooth. You can also add a bit of cornstarch mixed with cold water. Stir this mix into the soup and cook until it thickens. Lastly, adding more cheese will also help to make the soup creamier. Yes, you can make this soup ahead of time. Just prepare the soup, let it cool, and store it in the fridge. It will stay fresh for about three days. When you're ready to eat, warm it on the stove until hot. You may need to add a splash of cream or broth to restore its creamy texture. In this post, I shared key details about making a delicious soup. You learned about the right ingredients, cooking steps, and helpful tips. I covered substitutions for special diets, variations, and how to store leftovers. Each section aimed to make your soup-making process easier and more fun. Remember, cooking is all about experimenting, so don’t be afraid to try new flavors! Dive into this soup adventure and enjoy every bite.
Creamy Broccoli Cheddar Soup Rich and Nourishing Dish
Warm your heart and soothe your soul with my creamy broccoli cheddar soup! This rich and nourishing dish brings comfort and flavor to your table.
For this tasty dish, you'll need: - 1 lb ground turkey - 1 cup uncooked elbow macaroni - 1 can (10.5 oz) cream of chicken soup - 1 cup ranch dressing - 1 cup shredded cheddar cheese - 1 cup frozen mixed vegetables (peas, carrots, corn) - 1/2 cup milk - 1 teaspoon garlic powder - 1 teaspoon onion powder - Salt and pepper to taste - 1/2 cup breadcrumbs (optional, for topping) - 2 tablespoons olive oil This list gives you a great start. Each ingredient brings flavor and comfort to the dish. You can make your casserole even better with some fun toppings: - Extra shredded cheddar cheese for a cheesy top - Breadcrumbs for a crunchy layer - Chopped fresh parsley for a pop of color These toppings add texture and look nice on the table. Don’t have all the ingredients? No worries! Here are some easy swaps: - Ground turkey can be replaced with ground chicken or beef. - Elbow macaroni can switch to any pasta type you love, like penne or rotini. - Cream of chicken soup can be swapped for cream of mushroom soup for a different flavor. - Ranch dressing can be exchanged for a homemade ranch mix or any creamy dressing. These substitutions keep the recipe flexible and fun, so you can make it your own. {{ingredient_image_1}} Start by preheating your oven to 350°F (175°C). This step is key for even cooking. Next, bring a large pot of salted water to a boil. Add 1 cup of uncooked elbow macaroni and cook it until it's al dente. This usually takes about 8 minutes. Once done, drain the macaroni and set it aside. In a large skillet, heat 2 tablespoons of olive oil over medium heat. Add 1 pound of ground turkey. Cook it for about 5-7 minutes, breaking it into small crumbles. Make sure the turkey is browned. Season it with 1 teaspoon each of garlic powder and onion powder. Add salt and pepper to your taste. After the turkey is cooked, stir in 1 can (10.5 oz) of cream of chicken soup, 1 cup of ranch dressing, and 1/2 cup of milk. Mix it well. Toss in 1 cup of frozen mixed vegetables and cook for another 5 minutes. Now, add the cooked macaroni and half of the shredded cheddar cheese into the skillet. Mix everything until combined. Transfer the mixture to a greased 9x13 inch baking dish. Top it with the remaining cheese and, if you like, sprinkle 1/2 cup of breadcrumbs on top for a crunchy finish. Bake in the preheated oven for 25-30 minutes. Look for bubbly, golden cheese as a sign it’s ready. Enjoy serving it hot! To make a great creamy casserole, use a good mix of flavors. I like to blend different textures. This adds interest to each bite. Always cook your pasta al dente. This keeps it firm while baking. Remember to season your turkey well. Garlic powder and onion powder bring out great tastes. Don’t skip the cheese; it adds creaminess and flavor. One mistake is overcooking the pasta. It will turn mushy in the oven. Another error is using too much broth or milk. This can make your casserole watery. Be careful with the salt. The ranch dressing and cheese already add saltiness. Lastly, don’t forget to preheat your oven. A hot oven helps everything cook evenly. To boost flavor, try adding fresh herbs like parsley or thyme. They brighten the dish. You can also mix in some crushed red pepper for heat. If you want a smoky taste, add some paprika or smoked cheese. A sprinkle of lemon juice can also freshen up the flavors. Make it your own by adjusting the spices and toppings! Pro Tips Use Lean Turkey: Opt for lean ground turkey to keep the dish lighter and healthier while still delivering on flavor. Add Fresh Herbs: Enhance the flavor by adding fresh herbs like parsley or chives to the mixture before baking. Customize Vegetables: Feel free to swap in your favorite vegetables, such as broccoli or bell peppers, to suit your taste. Make Ahead: Prepare the casserole in advance and store it in the refrigerator. Bake it just before serving for an easy meal. {{image_2}} You can easily make a vegetarian version of this casserole. Instead of ground turkey, use 1 pound of plant-based meat or cooked lentils. This keeps the texture similar. For the cream of chicken soup, choose a vegetable-based soup. This swap maintains creaminess without meat. The ranch dressing can also be found in a vegetarian version. This way, you keep all the delicious flavors without using meat. If you prefer a different protein, try shredded chicken or cooked sausage. Both options work well with the ranch flavor. You can also use canned tuna or chickpeas for a new twist. Each option brings its own taste and texture. Just make sure to season your choice to match the rich flavors in the recipe. Feel free to get creative with the ingredients. Swap out elbow macaroni for whole wheat pasta or gluten-free pasta. This change adds nutritional value and can cater to dietary needs. For veggies, consider using broccoli, bell peppers, or spinach. These options not only add color but also boost nutrition. Instead of cheddar cheese, you might use mozzarella or pepper jack for a kick. These swaps help you customize the dish to your taste. To store your leftover creamy ranch turkey casserole, let it cool first. Then, place it in an airtight container. This helps keep it fresh. You can store it in the fridge for up to three days. If you want to enjoy it later, freezing is a great option. To freeze the casserole, wrap it tightly in plastic wrap. Then, cover it with aluminum foil. This prevents freezer burn. It can last in the freezer for up to three months. When you're ready to eat it, thaw it in the fridge overnight. When reheating, use the oven for the best results. Preheat the oven to 350°F (175°C). Place the casserole in a baking dish and cover it with foil. Bake for about 20-25 minutes until it is hot throughout. You can also microwave it, but stir it halfway for even heating. Yes, you can prepare this casserole ahead of time. Just follow the recipe steps but stop before baking. Cover and chill it in the fridge. When you're ready to cook, bake it straight from the fridge. Add a few extra minutes to the baking time to ensure it's hot all the way through. This casserole pairs well with many sides. Here are some ideas: - Fresh green salad - Steamed broccoli - Garlic bread - Roasted vegetables These sides add color and texture to your meal. This casserole lasts about 3 to 4 days in the fridge. Store it in an airtight container. Make sure it cools down before sealing. This keeps it fresh and tasty for your next meal. Yes, you can use different cheeses! Mozzarella, pepper jack, or even a blend works well. Each cheese gives a new flavor and texture. Choose what you like best, and enjoy experimenting! We explored how to make a creamy ranch turkey casserole that delights. I shared key ingredients, cooking steps, and smart tips. You can even try fun variations and learn storage tips for leftovers. Remember, with simple swaps and choices, you can make this dish your own. Enjoy creating a meal your family will love!
Creamy Ranch Turkey Casserole Simple and Savory Dish
Looking for a tasty, easy meal? My Creamy Ranch Turkey Casserole is both simple and delicious. This dish brings comfort to your table with minimal