Dinner
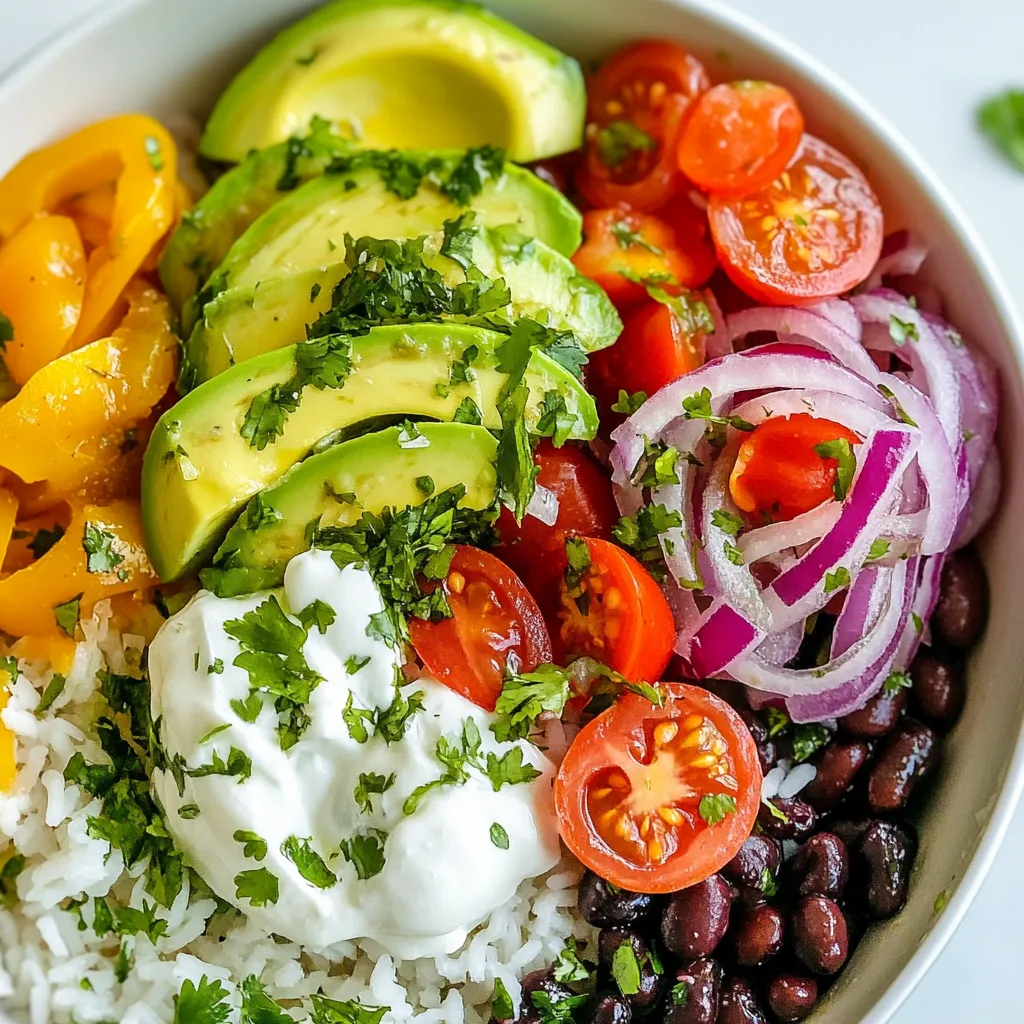
Cilantro Lime Rice Bowls Flavorful and Fresh Meal Idea
Looking for a fresh and tasty meal? These Cilantro Lime Rice Bowls are your answer! Packed with flavor and bright ingredients, they make for a
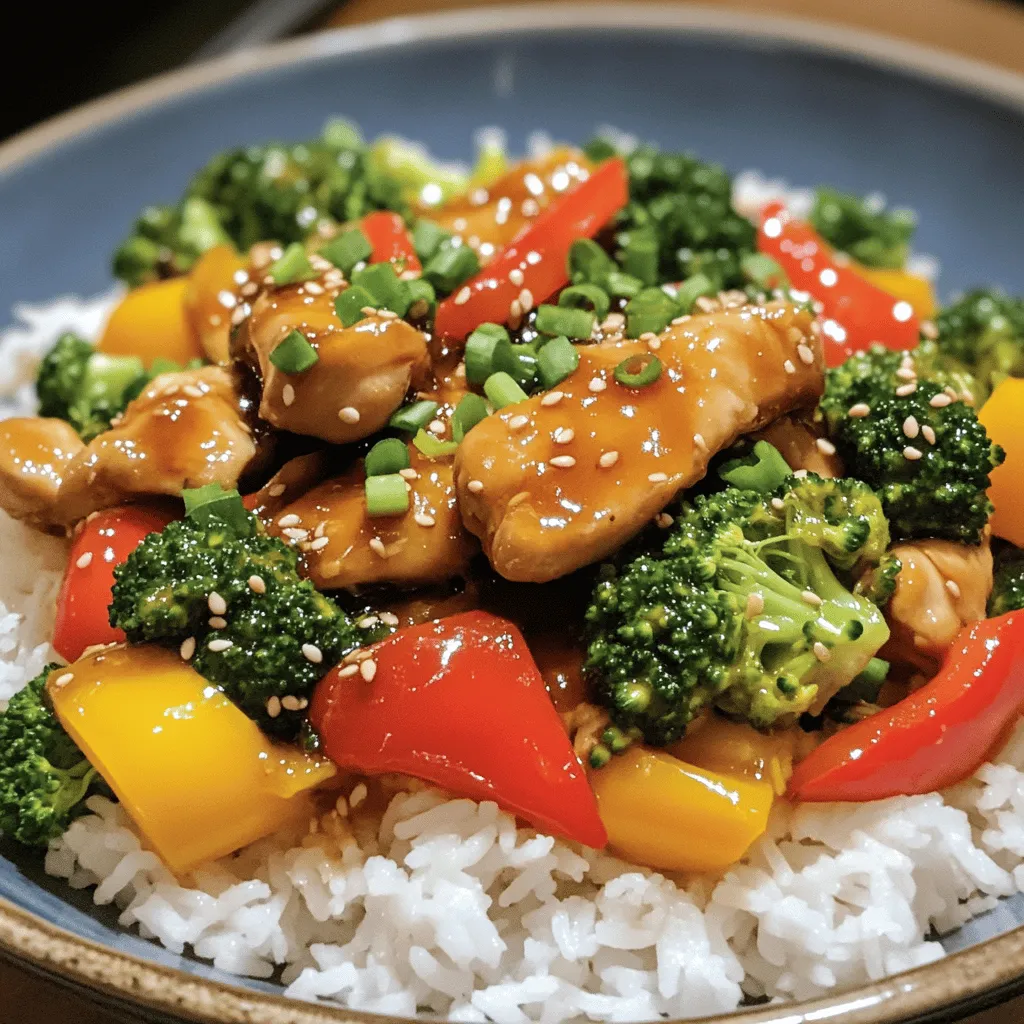
Teriyaki Chicken Stir-Fry Flavorful and Quick Meal
Are you looking for a quick, tasty meal that satisfies your cravings? My Teriyaki Chicken Stir-Fry is just what you need! This dish blends tender
![This Spicy Honey Garlic Shrimp recipe is quick and full of flavor. It takes about 30 minutes to prepare and cook. You can serve it for dinner or impress guests at a small gathering. - 1 pound large shrimp, peeled and deveined - 3 tablespoons honey - 2 tablespoons low-sodium soy sauce - 4 cloves garlic, finely minced - 1 teaspoon fresh ginger, freshly grated - 1 teaspoon red pepper flakes (adjust for your desired heat level) - 2 tablespoons olive oil - 1 tablespoon freshly squeezed lime juice - Salt and freshly ground pepper to taste - Chopped scallions and toasted sesame seeds for garnish When making this dish, choose fresh shrimp for the best taste. Look for shrimp that smell like the ocean, not fishy. Use raw honey for deeper flavor and health benefits. Low-sodium soy sauce helps keep the dish balanced. Fresh garlic and ginger add the best aroma and taste. Finally, use good-quality olive oil to ensure a rich flavor in the sauce. These choices elevate your meal and make every bite a delight! To make the marinade, grab a medium mixing bowl. Add 3 tablespoons of honey, 2 tablespoons of low-sodium soy sauce, 4 cloves of finely minced garlic, and 1 teaspoon of freshly grated ginger. Then, sprinkle in 1 teaspoon of red pepper flakes. This is where you control the heat. If you like it spicy, keep it as is! Next, pour in 2 tablespoons of olive oil and 1 tablespoon of freshly squeezed lime juice. Whisk everything together until it blends well. You want a smooth mix that will coat the shrimp perfectly. Now it's time for the shrimp! Take 1 pound of large shrimp, peeled and deveined. Gently add them to the bowl with the marinade. Toss the shrimp carefully so every piece gets covered. This step is key for a burst of flavor. Let them sit at room temperature for 20-30 minutes. This wait is worth it; it allows the flavors to soak in deeply. Heat a large non-stick skillet on medium-high heat. When the skillet is hot, add the marinated shrimp, but save the marinade for later. Cook the shrimp for about 2-3 minutes on each side. You'll know they are done when they turn a vibrant pink and look opaque. Be careful not to overcook them. That can make shrimp tough. Once cooked, pour in the reserved marinade. Bring it to a gentle simmer and let it thicken for 2-3 minutes. Stir occasionally to coat the shrimp. Finally, taste and add salt and freshly ground pepper as needed. For a lovely finish, garnish with chopped scallions and toasted sesame seeds. Serve these shrimp over rice or quinoa to soak up all that delicious sauce. Follow the [Full Recipe] for more details and enjoy! To get the best flavor from your shrimp, marinate them well. I suggest letting them soak in the marinade for 20 to 30 minutes. This time allows the shrimp to absorb the honey, garlic, and ginger. If you have time, try marinating for an hour in the fridge. This extra time enhances the taste even more. Cooking shrimp is quick, so pay close attention. Cook them for about 2 to 3 minutes on each side. Watch for the color change. When they turn pink and opaque, they are done. Overcooking makes shrimp tough, so don’t walk away! For a beautiful dish, serve your shrimp in a shallow bowl. Drizzle the honey garlic sauce over the top. Add chopped scallions and toasted sesame seeds for color and crunch. Pair with steamed rice or fluffy quinoa. This helps soak up the tasty sauce. It makes your meal look great and taste even better! {{image_4}} If you love heat, you can amp up the spice! Consider using fresh jalapeños or serrano peppers. You can also swap red pepper flakes for cayenne pepper. This adds a different kind of heat. You might try sriracha or chili garlic sauce for a bold twist. These options enhance the flavor while keeping it exciting. Adding veggies makes this dish even better. Bell peppers, snap peas, or broccoli are great choices. Simply sauté them in the same skillet after the shrimp. You can also serve the shrimp over a bed of stir-fried vegetables. For a hearty side, serve with fluffy rice or quinoa. This balances the meal and adds nutrients. Not all ingredients need to be set in stone. If you don't have honey, maple syrup works well. For soy sauce, you can use coconut aminos for a gluten-free option. If fresh ginger is not available, ground ginger can be a quick fix. Each change still brings great taste to the dish. Feel free to experiment for your perfect recipe! To keep your Spicy Honey Garlic Shrimp fresh, store leftovers in an airtight container. Place the shrimp in the fridge within two hours of cooking. They will stay good for up to three days. Make sure to keep the sauce with the shrimp for best flavor. When you're ready to enjoy your leftovers, reheat them gently. You can use a skillet over medium heat. Add a splash of water or broth to keep them moist. Heat them for about 4-5 minutes, stirring often. You want them warm, not overcooked. If you have more shrimp than you can eat, freezing is a great option. First, let the shrimp cool completely. Place them in a freezer-safe bag or container. Remove as much air as possible before sealing. These shrimp can be frozen for up to three months. When ready to eat, thaw them in the fridge overnight before reheating. For the full recipe, check the earlier sections! Yes, you can use frozen shrimp. Just be sure to thaw them first. Place the frozen shrimp in a bowl of cold water for about 15-20 minutes. This helps them thaw quickly and keeps them from cooking unevenly. Once thawed, pat them dry with a paper towel before marinating. This step helps the marinade stick better. To adjust the spice level, you can change the amount of red pepper flakes. If you want it milder, use less or skip them entirely. If you love heat, add more flakes or even a pinch of cayenne pepper. You could also add fresh chili peppers for a different kick. Always taste as you go to find your perfect balance. Spicy Honey Garlic Shrimp pairs well with several side dishes. Here are some great options: - Steamed rice - Quinoa - Stir-fried vegetables - A fresh salad - Noodles Each of these choices complements the sweet and spicy flavors of the shrimp. Serving the shrimp over rice or quinoa helps soak up the tasty sauce. Check the [Full Recipe] for more serving ideas! This blog post covered each step for making spicy honey garlic shrimp. We began with the right ingredients and why quality matters. Then, I shared clear steps for marinating and cooking. I shared tips for great flavor and perfect cooking times. You learned about fun variations and how to store leftovers. Remember, cooking shrimp is simple and fun. With practice, you'll enjoy many tasty meals. Try different sides and spices to make it your own! Now go enjoy your cooking adventure!](https://tossedflavors.com/wp-content/uploads/2025/05/0f6964dd-9784-45b5-828c-3efc6d53db6f.webp)
Spicy Honey Garlic Shrimp Quick and Flavorful Delight
Get ready to delight your taste buds with my Spicy Honey Garlic Shrimp! This dish is quick, easy, and packed with flavor. You only need
![- 2 lbs beef chuck, cut into 1-inch pieces - 1 large onion, diced - 3 cloves garlic, minced - 4 medium carrots, peeled and sliced - 4 medium potatoes, peeled and diced - 2 cups beef broth (low sodium preferred) - 1 tablespoon tomato paste - 1 teaspoon dried thyme - 1 teaspoon dried rosemary - Salt and pepper to taste - 1 cup frozen peas - 2 bay leaves Gathering the right ingredients is key for a great Instant Pot beef stew. Start with fresh beef chuck. This cut gives the stew a rich flavor. Dicing the onion and mincing the garlic adds depth. Carrots and potatoes add heartiness and texture. The beef broth ties everything together, while tomato paste adds a touch of sweetness. Thyme and rosemary bring out the warmth of the dish. Don't forget the bay leaves; they enhance the stew's aroma. The frozen peas finish it off with a pop of color and sweetness. For the full recipe, check out the detailed steps to bring this comforting dish to life. - Sauté the Beef: First, set your Instant Pot to the Sauté mode. Pour in 1 tablespoon of olive oil and let it heat up until it shimmers. This step helps to lock in flavor. - Brown the Beef in Batches: Next, add the beef chuck pieces in small batches. This helps brown the meat evenly. Sear each batch for about 5-7 minutes until they are nicely browned. Once browned, remove the beef and set it aside on a plate. - Sauté the Aromatics: In the same pot, add the diced onion. Sauté for 3-4 minutes until the onion turns translucent. Then, add the minced garlic and sauté for an additional minute. Stir frequently to avoid burning the garlic. - Incorporate Tomato Paste: Now, stir in the tomato paste. Mix it well with the onion and garlic. Let it meld for about a minute. Then, return the browned beef to the pot. - Add Vegetables and Broth: Layer in the sliced carrots and diced potatoes next. Pour in 2 cups of beef broth, followed by the dried thyme, dried rosemary, and a generous pinch of salt and pepper. Stir everything to combine well. - Add Bay Leaves: Gently lay the bay leaves on top of the stew ingredients. Do not stir them in. They will release their flavor during cooking. - Pressure Cook: Close the Instant Pot lid securely. Set it to Manual or Pressure Cook mode for 35 minutes. Make sure the steam valve is set to Sealing. - Release Pressure: Once the cooking cycle is done, allow the pressure to release naturally for 10 minutes. After that, carefully switch the steam valve to Venting to release any remaining pressure. - Finish Stew with Peas: Open the lid carefully. Remove and discard the bay leaves. Stir in 1 cup of frozen peas. The residual heat will warm them through in about a minute. - Final Taste Adjustments: Taste the stew and adjust the seasoning with more salt or pepper if needed. Serve warm for a comforting meal. For the full recipe, check out [Full Recipe]. - Proper Searing Techniques: Searing the beef is key for flavor. Use high heat and do not crowd the pot. Brown the beef in small batches. This step adds depth to your stew. - How to Layer Ingredients for Best Flavor: Add the ingredients in layers. Start with the beef, then add aromatics, and finish with veggies and broth. This builds a rich flavor profile. - Adjusting Consistency of the Stew: If your stew is too thick, add more broth. If it’s too thin, use the sauté function. Cook it briefly with the lid off to thicken it up. - Presentation Tips for Serving: Serve the beef stew in rustic bowls. Garnish with fresh parsley or thyme. This adds a pop of color and freshness to the dish. - Side Dishes to Complement Stew: Crusty bread is a great choice. It’s perfect for dipping and adds texture. A simple green salad also pairs well with the rich stew. - Storage Tips for Leftovers: Let the stew cool before storing. Use airtight containers to keep it fresh. It will last in the fridge for up to three days. You can freeze it too for longer storage. This stew is not just a meal; it’s a warm hug in a bowl. For the full recipe, check out the [Full Recipe]. {{image_4}} Alternative Meat Options You can switch out beef for other meats. Try using lamb or pork for a new taste. Chicken also works well if you want a lighter option. Make sure to adjust cooking times for these meats. Vegetable Variations Feel free to change the veggies based on what you have. Sweet potatoes can replace regular potatoes. You can add parsnips, turnips, or even mushrooms for different textures. Use what you love for the best flavor. Vegan or Vegetarian Adaptations To make this stew vegan, replace the beef with hearty beans or lentils. Use vegetable broth instead of beef broth. Add more veggies like bell peppers, zucchini, or green beans. You can also use tofu or seitan for protein. Adding Spices for Extra Flavor Spices can take your stew to the next level. Try adding paprika for warmth or cumin for an earthy taste. A pinch of cayenne can give it a nice kick. Adjust to your liking for the perfect balance. Using Red Wine for Depth A splash of red wine can deepen the flavors. Add it after browning the meat. Let it cook a bit to cook off the alcohol, then add your broth. This addition gives the stew a rich taste. Fresh Herb Additions Fresh herbs can brighten the stew's flavor. Try adding parsley or thyme just before serving. You can also use fresh rosemary for a strong aroma. These herbs add freshness and make the dish feel special. To see how all these ideas come together, check the Full Recipe. To keep your beef stew fresh, store it in the fridge. Place the stew in an airtight container. This helps keep out air and moisture. Let the stew cool down before sealing it. This step prevents condensation inside the container. - Recommended Storage Containers - Glass containers with lids - BPA-free plastic containers - Mason jars for smaller portions These options work well and are easy to stack. Your stew should stay good in the fridge for about three to four days. Freezing beef stew is a great way to save leftovers. First, let the stew cool completely. This helps prevent ice crystals from forming. Then, pour the stew into freezer-safe bags or containers. Remove as much air as possible before sealing. - Best Practices for Freezing Stew - Use freezer-safe containers - Label with the date - Divide into single servings for quick meals When you're ready to eat, thaw the stew in the fridge overnight. - Thawing and Reheating Tips - Reheat on the stovetop or in the microwave. - Stir occasionally to heat evenly. - Add a splash of broth or water if it seems too thick. By following these steps, you can enjoy your hearty Instant Pot beef stew anytime! For the Full Recipe, check earlier sections. How long does Instant Pot Beef Stew last in the fridge? Instant Pot Beef Stew lasts about 3 to 4 days in the fridge. Store it in an airtight container. This keeps it fresh and tasty for when you want a quick meal. Can I make Instant Pot Beef Stew without browning the meat? Yes, you can skip browning the meat. However, browning adds depth to the flavor. If you're in a rush, don’t worry; the stew will still taste good. What can I serve with Instant Pot Beef Stew? You can serve this stew with crusty bread, rice, or mashed potatoes. A simple green salad also pairs well. These sides complement the rich flavors of the stew. How do I adjust cooking time for larger batches? For larger batches, keep the cooking time the same. The Instant Pot will take longer to reach pressure, but once it does, the cooking time stays the same. Is it safe to freeze beef stew with potatoes? Yes, you can freeze beef stew with potatoes. The potatoes may change texture, but they will still taste great. Just cool the stew completely before freezing it. Can I cook this stew on the stovetop instead? Yes, you can cook this stew on the stovetop. Just simmer it in a pot for about 2 to 3 hours. Stir occasionally until the beef is tender and flavors meld together. For the full recipe, check [Full Recipe]. This blog post covered how to make a delicious Instant Pot beef stew. We looked at key ingredients like beef, onions, and carrots, plus how to prepare and cook them step by step. I shared tips for the best flavor, serving ideas, and storage options. In summary, mastering this stew adds comfort to any meal. With a few variations and techniques, you can make it your own. Enjoy your cooking and let this stew bring warmth to your kitchen!](https://tossedflavors.com/wp-content/uploads/2025/05/99c4b6e4-567d-46ab-9e53-5f33d48339e0.webp)
Instant Pot Beef Stew Hearty Comforting Recipe
Are you craving a warm and hearty meal? Look no further! My Instant Pot Beef Stew recipe is simple, flavorful, and perfect for any day
![- 4 boneless, skinless chicken breasts - 2 tablespoons olive oil - 1 teaspoon sea salt - 1/2 teaspoon freshly ground black pepper - 4 cloves garlic, minced - 1 cup heavy cream - 1/2 cup low-sodium chicken broth - 1 cup fresh spinach, chopped - 1/2 cup sun-dried tomatoes, rehydrated and chopped - 1/2 cup freshly grated Parmesan cheese - 1 teaspoon dried Italian herb blend - Fresh basil leaves for garnish For Creamy Garlic Tuscan Chicken, you need fresh ingredients. The chicken breasts form the heart of this dish. They must be boneless and skinless for easy cooking and eating. Season them with sea salt and black pepper. This brings out their natural flavors. The sauce is where the magic happens. You will use garlic, heavy cream, and chicken broth. These ingredients create a rich and creamy texture. The spinach and sun-dried tomatoes add color and health. They also bring unique flavors that make this dish pop. Lastly, the Parmesan cheese gives it a savory finish. Don’t forget fresh basil leaves for garnish. They add a nice touch to your plate. You can find the Full Recipe to guide you through the cooking process. This recipe ensures a tasty dinner that everyone will love. Start by patting the chicken dry with paper towels. This helps the seasoning stick well. Next, season both sides of the chicken breasts with sea salt and freshly ground black pepper. Make sure the seasoning is even for great flavor. Heat olive oil in a large skillet over medium-high heat until it shimmers. Carefully add the seasoned chicken breasts to the skillet. Cook for 5-7 minutes on each side until golden brown. The chicken should reach an internal temperature of 165°F (75°C). Once done, remove the chicken from the skillet and place it on a plate. Cover it with foil to keep warm. Lower the heat to medium. In the same skillet, add minced garlic and sauté for about 1 minute. Stir constantly to avoid burning the garlic. Once fragrant, add chopped sun-dried tomatoes and spinach. Stir well to combine. Cook for another 2-3 minutes, allowing the spinach to wilt completely. Pour in low-sodium chicken broth. Use a wooden spoon to scrape up any brown bits stuck to the skillet. This adds a rich flavor to the sauce. Then, add heavy cream and bring the mixture to a gentle simmer. Gradually stir in freshly grated Parmesan cheese and dried Italian herb blend. Let the sauce simmer for a few minutes until it thickens slightly and becomes creamy. Return the seared chicken breasts to the skillet. Spoon the creamy sauce over each piece, ensuring they are well-coated. Allow everything to simmer together for about 5 minutes. This step lets the chicken soak in the delicious flavors of the sauce. To serve, place each chicken breast on individual plates. Drizzle a generous amount of the creamy sauce over the top. Garnish with fresh basil leaves for a touch of color and added flavor. Enjoy this delightful meal! For the full recipe, check out the [Full Recipe]. To ensure even cooking, start by patting the chicken dry. Dry chicken cooks better. Season both sides with salt and pepper. This gives it a flavor boost. Cook the chicken until golden brown, about 5-7 minutes per side. Check the internal temperature. It should reach 165°F (75°C). If you like, taste a piece to adjust seasoning. Thickening the sauce can be easy. If it’s too thin, simmer it longer. This helps the sauce reduce and thicken naturally. To make it creamy, add heavy cream slowly. Stir well to blend it in. Be careful not to overpower the sauce's flavor. The goal is a creamy texture that still shines. Want to add more depth? Try adding fresh herbs like thyme or rosemary. These herbs can complement the dish well. You can also use a mix of cheeses. Swap Parmesan for mozzarella or goat cheese. Each will give a unique twist to the flavor. Experiment with what you have on hand! For the full recipe, check out [Full Recipe]. {{image_4}} You can swap chicken for shrimp or turkey. Shrimp cooks fast and adds a nice taste. Just sauté it until it turns pink. Turkey is a lean option that works well too. It may require longer cooking time, so keep an eye on it. For a vegetarian option, try chickpeas or mushrooms. These add great texture and flavor to the dish. To make a gluten-free version, use gluten-free chicken broth and check your cream brand. Many creams are gluten-free, but it’s good to check labels. Pair your dish with gluten-free pasta or rice for a full meal. Steamed veggies or a fresh salad can also be great side dishes. For side dishes, serve this creamy garlic Tuscan chicken with mashed potatoes or roasted veggies. They balance the flavors well. You can also serve it over pasta for a delicious twist. When plating, drizzle the sauce generously over the chicken. Add a few sun-dried tomatoes and fresh basil on top for a beautiful presentation. This will impress your guests and make your meal look even more inviting. After enjoying Creamy Garlic Tuscan Chicken, let leftovers cool. Place the chicken in an airtight container. Store it in the fridge for up to three days. To reheat, use a skillet over low heat. Add a splash of chicken broth to keep it moist. Stir gently until heated through. For long-term storage, you can freeze the chicken. Wrap it tightly in plastic wrap, then place it in a freezer bag. This keeps it fresh for up to three months. When you’re ready to eat, take it out and thaw it in the fridge overnight. Reheat in a skillet, adding a bit of cream to restore its creaminess. Enjoy your meal, and make the most of your leftovers! You can use alternatives like half-and-half or whole milk. For a dairy-free option, try coconut cream or cashew cream. Each will change the taste a bit but still work well. Just remember, these substitutes may not be as rich. Yes, you can prepare this dish ahead of time. Cook the chicken and sauce, then cool them. Store in the fridge for up to 3 days. Reheat gently in a pan when ready to serve. Use a meat thermometer to check the internal temperature. It should reach 165°F (75°C). If you don’t have a thermometer, cut into the chicken. The inside should no longer be pink and the juices should run clear. This dish is not spicy at all. The flavors come from garlic, herbs, and sun-dried tomatoes. If you prefer heat, add crushed red pepper flakes while cooking. While fresh spinach gives a nice texture, you can use dried spinach. Rehydrate the dried spinach in warm water for about 10 minutes before adding it to the dish. This way, you keep some flavor and nutrients. This dish pairs well with pasta, rice, or a simple salad. Garlic bread also makes a great side. You can even serve it over zucchini noodles for a low-carb option. For the full recipe, check out the details above! This blog post detailed how to make a delicious Creamy Garlic Tuscan Chicken. We covered the key ingredients like chicken, cream, garlic, and fresh spinach. Next, you learned each step, from cooking the chicken to making the sauce. I shared tips for perfecting the dish and variations for different diets. In conclusion, enjoy this dish's rich flavors and make it your own. Keep experimenting with herbs and spices to suit your taste. Happy cooking!](https://tossedflavors.com/wp-content/uploads/2025/05/5db90058-f489-43a6-b0eb-6a1e17b6539b.webp)
Creamy Garlic Tuscan Chicken Tasty Dinner Delight
Craving a tasty dinner that’s both easy to make and full of flavor? Look no further than my Creamy Garlic Tuscan Chicken! Imagine seared chicken

Mango Jalapeño Margarita Mocktail Refreshing Treat
Looking for a refreshing drink without the alcohol? Try my Mango Jalapeño Margarita Mocktail! It’s a perfect balance of sweet mango and spicy jalapeño. This

Philly Cheesesteak Cheesy Bread Tasty and Easy Recipe
Are you ready to take your taste buds on a savory adventure? If you love cheesesteaks, you’ll adore this Philly Cheesesteak Cheesy Bread recipe. It’s
![The ingredients for Cheesy Asparagus Casserole are simple and fresh. Here’s what you need: - 1 lb fresh asparagus - 1 cup cooked quinoa - 1 cup shredded cheddar cheese - 1 cup cream of mushroom soup - 1/2 cup sour cream - 1/2 cup grated Parmesan cheese - 1/2 cup breadcrumbs - 2 tablespoons olive oil - 1 teaspoon garlic powder - 1 teaspoon onion powder - Salt and pepper to taste - Fresh parsley for garnish Each ingredient plays a key role in making this dish rich and tasty. Fresh asparagus adds a crisp bite, while quinoa gives it a hearty base. Cream of mushroom soup and sour cream create a creamy texture that binds everything together. The cheeses melt beautifully, giving that gooey, cheesy goodness you crave. Breadcrumbs on top add a crunch, making each bite a delight. Olive oil helps in roasting and enhances the flavors of the dish. Garlic and onion powder boost the savory taste. Salt and pepper balance everything out, while parsley adds a pop of color. For the full recipe and cooking steps, check the [Full Recipe]. Enjoy this comforting dish with family or friends! First, you need to preheat your oven to 350°F (175°C). This step is key. A hot oven helps cook the casserole evenly and gives it a nice brown top. While the oven heats, you can get your dish ready. Next, grab a large mixing bowl. Combine the cooked quinoa, cream of mushroom soup, sour cream, garlic powder, and onion powder. Don’t forget to add salt and pepper! Mix it well until it looks smooth and creamy. This mixture is the heart of the dish. Now, it’s time to fold in the asparagus. Gently stir until all the pieces are coated in the creamy mix. Pour this mixture into your greased casserole dish. Spread it out evenly. This helps every bite be full of flavor. Sprinkle the shredded cheddar cheese over the top. This makes it rich and gooey. In another bowl, mix the breadcrumbs with the grated Parmesan cheese. Add a little olive oil and stir. This will create a crunchy topping. Spread it evenly over the cheese layer. Bake everything in the oven for 30-35 minutes. Look for a golden brown top and bubbling edges. After baking, let the casserole cool for a few minutes. This makes it easier to serve. Finish with a sprinkle of fresh parsley to add color. You can serve it right from the dish for a cozy feel or move it to a platter. Enjoy with a light salad to balance the richness! For the full recipe, check the earlier section. When choosing asparagus, look for firm and bright green stalks. They should snap easily when bent. Avoid any stalks that look limp or have dark spots. Fresh asparagus tastes best and gives you a nice crunch in your casserole. If you can, buy asparagus that is in season for the best flavor. To make your own soup, start with fresh mushrooms. Sauté them in butter until they are soft. Add flour to thicken, then slowly stir in broth and milk. Let it simmer until it’s creamy. This simple soup adds great flavor to your casserole. Plus, it lets you skip the cans! For a creamier texture, use full-fat sour cream and cream of mushroom soup. Mixing in a bit of cream cheese can also elevate the richness. Always stir until the mixture is smooth before adding the asparagus. This way, every piece gets coated well, creating a harmonious dish. Store any leftover casserole in an airtight container. It stays fresh in the fridge for up to four days. To reheat, use an oven at 350°F for about 15 minutes. This keeps the cheese melty and the topping crispy. If you want to freeze it, wrap it well and use it within three months. {{image_4}} You can add cooked chicken or turkey to your casserole. This will make it heartier. Simply shred the meat into small pieces, and mix it in with the other ingredients. This change adds flavor and protein. It turns the dish into a full meal. If you want a vegetarian twist, try chickpeas or lentils. These options are great for adding protein and fiber. Use one can of drained chickpeas or one cup of cooked lentils. Mix them in with the asparagus for a tasty, plant-based meal. Cheese lovers can have fun with this recipe. You can try different cheese types. Swap cheddar for mozzarella, gouda, or even feta. Each cheese gives a unique flavor. Mixing two or three types can boost the dish's creaminess and taste. For a gluten-free version, use crushed cornflakes or almond flour. These ingredients give a nice crunch. Just replace the breadcrumbs in the recipe with your choice. You can still enjoy a crispy topping without gluten. For the complete dish, check out the Full Recipe. To keep your cheesy asparagus casserole fresh, let it cool first. Once cooled, store it in an airtight container. Place it in the fridge. It will last for about 3 to 4 days. This way, you can enjoy it again! If you want to save it for later, freezing is a great option. First, let the casserole cool completely. Then, wrap it tightly in plastic wrap and aluminum foil. This helps prevent freezer burn. You can freeze it for up to 3 months. When you're ready to eat it, thaw it in the fridge overnight. To reheat, preheat your oven to 350°F (175°C). Remove the casserole from the fridge and cover it with foil. Bake it for about 20-25 minutes. This warms it through without drying it out. For a crispy top, remove the foil for the last 5 minutes. Enjoy your cheesy goodness! For the complete recipe, check out the Full Recipe section. Yes, you can prepare this casserole a day ahead. Just follow the recipe until you add the cheese topping. Cover and store it in the fridge. When you are ready to bake, add the cheese and bake as directed. This makes it easy for busy days. You can use Greek yogurt as a great substitute. It gives a nice creamy texture and adds protein. You can also try cream cheese or even plain yogurt if you prefer a lighter option. To make it healthier, reduce the cheese by half. You can also use low-fat sour cream and cream of mushroom soup. Adding more veggies, like spinach or bell peppers, boosts the nutrition too. Yes, frozen asparagus works well in this casserole. Just thaw and drain it first. This saves you time and can still give a great taste. The casserole is done when the top is golden brown and bubbly. You can also poke a knife into the center. If it comes out hot, it's ready to eat. For the full recipe, check out the details above. This blog post covered a tasty cheesy asparagus casserole. We explored the ingredients and step-by-step instructions for making it. You learned tips for choosing fresh asparagus, creating a creamy sauce, and storing leftovers. We also discussed variations like adding protein or trying different cheeses. In my final thoughts, this dish is flexible and easy to prepare. Feel free to customize it to fit your taste. Enjoy making this casserole for your next meal!](https://tossedflavors.com/wp-content/uploads/2025/05/5729ddf8-3cbd-43d6-a5d1-dd701129da62.webp)
Cheesy Asparagus Casserole Savory and Comforting Dish
If you’re looking for a dish that warms your heart and fills your belly, try my Cheesy Asparagus Casserole. It’s a delightful mix of fresh
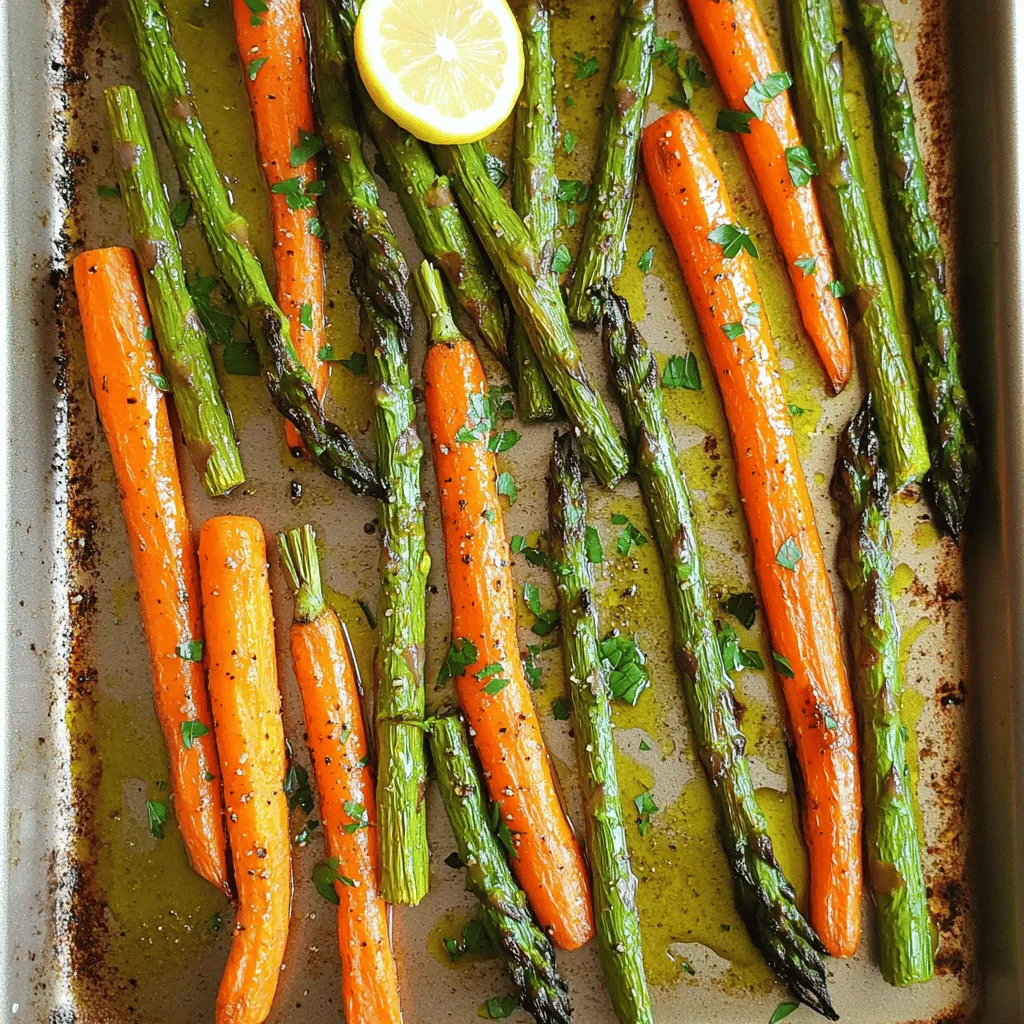
Roasted Asparagus & Carrots Flavorful and Simple Dish
Looking for a quick and tasty way to enjoy fresh vegetables? Roasted asparagus and carrots are here to save your dinner! This simple dish is

Savory Chicken Parmesan Pillows Easy and Flavorful Dish
If you crave a dish that’s easy and full of flavor, you’ve got to try Chicken Parmesan Pillows! These delightful pockets of goodness combine tender