Dinner
. {{image_4}} You can change the Street Corn Chicken Rice Bowl to a vegetarian dish easily. Start by swapping the chicken with grilled vegetables. Zucchini, bell peppers, and mushrooms work well. These veggies add great flavor and texture. Another option is to use plant-based protein sources. Try tofu or tempeh for a hearty bite. You can marinate them with spices to boost the taste. This way, you still get a filling meal without meat. To take your bowl to the next level, consider adding other toppings. Jalapeños give a nice heat if you like spice. Black beans add protein and fiber, making the dish even more filling. Different cheeses can also change the flavor. Try cotija for a crumbly taste or pepper jack for a kick. These small changes can make your bowl unique and fun. You can serve the meal in different ways. One idea is to turn it into a burrito bowl. Just add all the ingredients in a larger bowl and mix them together. Mix in other grains like quinoa for added nutrition. Quinoa is light and fluffy, making a great base. This small change can change the whole dish while keeping it healthy. For the full recipe, check out the details above. To keep your Street Corn Chicken Rice Bowl fresh, store it in an airtight container. Refrigerate the bowl as soon as you finish eating. Try to eat leftovers within three days for the best taste. If you wait longer, the flavors may fade. When reheating, add a splash of water or broth to keep the rice moist. You can use a microwave or stovetop. For the microwave, heat in short bursts. Stir it frequently to avoid hot spots. If you use the stovetop, cover the pan with a lid to trap steam. This way, you won’t overcook the chicken or corn. For freezing, it’s best to separate the components. You can freeze rice, chicken, and corn in different bags. This helps keep each part fresh. They can last up to three months in the freezer. When you’re ready to eat, thaw overnight in the fridge before reheating. To make this bowl from scratch, follow these steps: 1. Cook the Rice: Start with 1 cup of jasmine rice. Cook it according to package instructions. 2. Grill the Chicken: Grill 2 chicken breasts until fully cooked. Slice them thinly. 3. Sauté the Corn: Heat 1 tablespoon of olive oil in a skillet. Add 1 cup of sweet corn. Cook until golden brown. 4. Season the Corn: Mix in chili powder, smoked paprika, garlic powder, salt, and pepper. Cook for 2 more minutes. 5. Layer the Bowl: In a bowl, place the jasmine rice as the base. Top with sliced chicken and sautéed corn. 6. Add Toppings: Include sliced avocado and crumbled feta cheese on top. 7. Finish with Freshness: Squeeze lime juice over the bowl and sprinkle with chopped cilantro. 8. Serve: Enjoy your Street Corn Chicken Rice Bowl right away! This process gives you a hearty meal with bright flavors. Yes, you can prepare this meal ahead of time. - Meal Prep: Cook the chicken and corn in advance. Store them in airtight containers in the fridge. - Storage: Keep the rice separately to prevent it from getting mushy. Store the toppings like avocado and feta cheese in a different container. - Timing: Consume within 3 days for the best taste. Reheat the chicken and corn before serving. This way, you can enjoy a quick, delicious meal during busy days. If you need a rice alternative, consider these options: - Brown Rice: Offers more fiber and a nutty flavor. - Quinoa: A protein-rich choice that cooks quickly. - Cauliflower Rice: A low-carb option that adds a fresh twist. Each of these substitutes works well with the other flavors in the dish. They keep the meal satisfying while adding unique textures. This blog post outlines how to create a delicious Street Corn Chicken Rice Bowl. You start with jasmine rice, grilled chicken, and sweet corn. Season it well, and add optional toppings like sour cream or feta for extra flavor. Remember, you can adjust the dish to match your taste and even go vegetarian. Use these tips for cooking and storing to enjoy your meal later. Simple steps lead to big flavor! Enjoy your cooking journey and make the dish your own!](https://tossedflavors.com/wp-content/uploads/2025/05/3892f726-c1df-4ac4-862b-82a0e5f6d654.webp)
Street Corn Chicken Rice Bowl Flavorful and Filling Meal
Are you ready for a meal that’s as vibrant as it is filling? The Street Corn Chicken Rice Bowl brings together juicy grilled chicken, sweet

Easy Cheesy Chicken Garlic Wraps Flavorful and Quick
Looking for a quick and tasty meal? These Easy Cheesy Chicken Garlic Wraps are your answer! With juicy chicken, gooey cheese, and a hint of

Teriyaki Meatball Rice Bowls Flavorful and Easy Meal
If you’re looking for a tasty and easy meal, you’ve found it! My Teriyaki Meatball Rice Bowls bring bold flavors right to your table. In
![To make your Five Cheese Ziti Al Forno, gather these ingredients: - 1 pound ziti pasta - 2 cups marinara sauce - 1 cup ricotta cheese - 1 cup shredded mozzarella cheese - 1 cup shredded gouda cheese - 1/2 cup grated parmesan cheese - 1/2 cup crumbled goat cheese - 2 tablespoons olive oil - 2 cloves garlic, minced - 1 teaspoon dried oregano - Salt and freshly cracked black pepper, to taste - Fresh basil leaves for garnish Using the right ingredients makes a big difference. Here are some helpful tips: - Pasta: You can use penne or rigatoni instead of ziti. Both work well. - Cheese: Feel free to mix your favorite cheeses. Fontina or cheddar can replace gouda. - Sauce: If you want a kick, use spicy marinara. It adds great flavor. - Herbs: Fresh herbs like thyme or parsley can give a fresh taste, too. Quality ingredients lead to a tasty dish. Here’s why they matter: - Freshness: Fresh cheeses melt better and taste great. Look for good quality at your store. - Flavor: High-quality marinara has deep flavors. It makes your ziti rich and savory. - Source: Try to choose local or organic ingredients. They often taste better and are better for you. By using fresh and high-quality ingredients, your Five Cheese Ziti Al Forno will shine. You can find the full recipe for this delicious dish and enjoy cooking it at home! To make Five Cheese Ziti Al Forno, you need to prep your ingredients first. Gather all the items on the list. This includes ziti pasta, marinara sauce, and five types of cheese. Chop your garlic and measure out the herbs and spices. Prepping helps keep the cooking process smooth and fun. 1. Preheat the Oven: Set your oven to 375°F (190°C). This step is key to get that perfect bake. 2. Cook the Pasta: Boil salted water in a large pot. Add the ziti pasta and cook until al dente, about 6-8 minutes. Drain the pasta and let it sit. 3. Sauté the Garlic: In a skillet, heat olive oil on medium. Add minced garlic and sauté for 1 minute. You want the garlic fragrant, not brown. 4. Prepare the Marinara Sauce: Add marinara sauce and oregano to the skillet. Stir well, and let it simmer for 5 minutes. This melds the flavors. 5. Combine the Ingredients: In a big bowl, mix the cooked ziti, ricotta cheese, half of the mozzarella, gouda, parmesan, and half of the goat cheese. Season with salt and pepper. 6. Mix in the Marinara: Pour the marinara sauce over the ziti mix. Stir gently until everything is well coated. 7. Transfer to a Baking Dish: Grease a 9x13-inch dish. Spread the ziti mixture evenly in the dish. Top with the rest of the mozzarella and goat cheese. 8. Bake Covered: Cover with aluminum foil. Bake for 25 minutes to keep it moist. 9. Bake Uncovered: Remove the foil after 25 minutes. Bake for another 15 minutes. Look for a golden, bubbly top. 10. Let it Rest: Take it out of the oven. Let it rest for 5-10 minutes. This helps it set. 11. Garnish: Add fresh basil leaves on top before serving. This adds flavor and color. Make sure your oven is preheated to 375°F (190°C) for the best results. Bake covered for 25 minutes, then uncovered for 15 minutes. These timing steps are important for a perfect Five Cheese Ziti Al Forno. Following this will yield a delicious and cheesy meal. To make your Five Cheese Ziti Al Forno shine, follow these tips: - Cook Pasta Al Dente: This means it should be firm. Undercook it by one minute to keep it from getting mushy. - Use Fresh Cheese: Fresh cheese gives the best flavor. Look for quality brands at your store. - Layer the Cheese: Mix some cheese into the pasta and sprinkle more on top. This will create a cheesy crust. - Let It Rest: After baking, let the dish sit for 5-10 minutes. This helps it set and makes serving easier. Here are some common pitfalls to watch for: - Overcooking the Pasta: If the pasta is too soft, it will fall apart in the bake. Keep it firm. - Skipping the Rest: Serving too soon can lead to a messy dish. Always let it rest. - Not Seasoning: Don’t forget to add salt and pepper. This enhances the flavors greatly. - Using Low-Quality Marinara: A good sauce makes all the difference. Choose one with fresh ingredients. For the best dining experience, consider these serving ideas: - Garnish with Fresh Basil: This adds color and a fresh taste. It makes your dish look fancy. - Serve with Salad: A simple green salad pairs well and balances the richness of the ziti. - Add Crusty Bread: Bread helps to soak up extra sauce. It’s a great side for any pasta dish. - Offer Extra Cheese: Have more grated parmesan or mozzarella on the side for cheese lovers. For a full recipe, check the details above. Enjoy your cooking! {{image_4}} You can easily adapt Five Cheese Ziti Al Forno to fit a vegetarian diet. Simply skip any meat and load up on veggies. Think bell peppers, spinach, or mushrooms for great flavor. For a gluten-free version, swap regular ziti for gluten-free pasta. Always check labels to ensure no hidden gluten. This way, everyone can enjoy this dish! While the classic five cheeses create a rich taste, you can switch them up. Try using aged cheddar or creamy feta for a twist. You can also add blue cheese for a bold flavor. Mixing cheeses makes the dish unique and fun. Experimenting allows you to find your favorite combo! Get creative with add-ins to make your ziti special. Chopped sun-dried tomatoes add a sweet kick. Sautéed onions bring depth and sweetness. For a spicy kick, toss in red pepper flakes or diced jalapeños. You can even layer in cooked sausage or ground turkey for extra protein. Each of these ideas makes your dish stand out! To store your Five Cheese Ziti Al Forno, let it cool first. Once cool, place it in an airtight container. This keeps it fresh for later meals. If you use a shallow container, it will cool faster. You can store it in the fridge for up to three days. When you're ready to reheat, preheat your oven to 350°F (175°C). Cover the ziti with foil to keep it moist. Heat for about 20 minutes or until warmed through. You can also use the microwave. Place a portion in a bowl, cover it, and heat for about two minutes. Stir halfway to ensure even warming. Freezing is a great option for this dish. First, let it cool completely. Then, cut the ziti into portions. Wrap each portion tightly in plastic wrap, then place them in a freezer-safe bag. This way, it stays fresh for up to three months. When you're ready to eat, thaw it in the fridge overnight before reheating. Enjoy your ziti like it’s fresh from the oven! For the full recipe, check [Full Recipe]. Yes, you can make Five Cheese Ziti Al Forno ahead of time. Just prepare the dish up to the baking step. Cover it tightly and store it in the fridge for up to two days. When you're ready to bake, take it out and let it sit at room temperature for 30 minutes. This helps it cook evenly. Then, bake it as directed in the Full Recipe. To keep the ziti from drying out, make sure you cover the baking dish with foil. This traps steam and moisture. After baking for 25 minutes, remove the foil. This helps the cheese get bubbly and golden. If you notice it still looks dry, you can add a splash of marinara sauce before baking uncovered. Five Cheese Ziti Al Forno pairs well with many dishes. A simple side salad adds freshness. Garlic bread offers a nice crunch. You can also serve it with roasted vegetables for color and flavor. If you want something light, a caprese salad works great too. Each of these sides complements the rich, cheesy flavors of the ziti. Five Cheese Ziti Al Forno is a rich and hearty dish. We discussed the key ingredients and how quality matters. You learned step-by-step cooking instructions to create this meal. Tips and tricks helped you avoid common mistakes and served it perfectly. We also explored fun variations, storage methods, and answered FAQs. Now, you can confidently make this dish and impress anyone at your table. Enjoy your cooking adventure and the smiles that come with sharing this delicious ziti!](https://tossedflavors.com/wp-content/uploads/2025/05/ce9571e1-183b-4058-9c69-7b8e2a236a57.webp)
Five Cheese Ziti Al Forno Irresistible Dinner Recipe
Are you ready to impress your family with a dish that’s creamy, cheesy, and oh-so-delicious? This Five Cheese Ziti Al Forno recipe is a must-try!
![To make a great Pomodoro sauce, gather these fresh ingredients: - 2 pounds ripe tomatoes (preferably Roma or San Marzano), roughly chopped - 1 medium onion, finely diced - 4 cloves garlic, minced - 1/4 cup extra virgin olive oil - 1 teaspoon sugar (optional, to balance acidity) - Salt and freshly ground black pepper, to taste - 1/4 cup fresh basil leaves, chopped (plus extra for garnish) - 1 teaspoon dried oregano - 1/4 teaspoon red pepper flakes (optional for a touch of heat) You can add a few optional ingredients to change up the flavor: - Carrots for sweetness - Bell peppers for extra color - A splash of red wine for depth - Parmesan cheese for creaminess If you can't find fresh tomatoes, use canned ones instead. Look for whole peeled tomatoes for the best taste. You can swap extra virgin olive oil with any light oil like canola. If you want a different herb, use thyme or parsley in place of basil. This makes your sauce unique while keeping it delicious. Start by heating the extra virgin olive oil in a large pot over medium heat. Once the oil is hot, add the finely diced onion. Sauté the onion for about 5 minutes. You want it to turn soft and clear. Next, add the minced garlic. Stir it for 1 to 2 minutes. Be careful not to let it burn. Now it’s time to add the roughly chopped tomatoes to the pot. Stir the mixture well and bring it to a gentle boil. Once boiling, lower the heat to a simmer. Add the sugar if you like. It helps to balance the sauce's acidity. Season with salt, freshly ground black pepper, dried oregano, and red pepper flakes if you want some heat. Let the sauce simmer uncovered for 30 to 35 minutes. Stir occasionally. It should thicken and taste great. While simmering, keep an eye on the sauce. Stir it now and then to prevent sticking. If you want a smoother sauce, let it cool a bit, then use an immersion blender. This step is optional. When done, fold in the chopped fresh basil leaves. Taste your sauce and adjust the seasoning if needed. For the full experience, check out the Full Recipe for more details on cooking this classic sauce. To boost the flavor of your Pomodoro sauce, consider adding a few extra touches. You can use fresh herbs like thyme or parsley for an aromatic kick. A splash of red wine can add depth. You can also add grated Parmesan cheese for a rich, savory finish. If you want heat, toss in more red pepper flakes. Each ingredient adds a unique twist to the sauce. Many home cooks make a few simple errors when making Pomodoro sauce. One mistake is not using ripe tomatoes. Fresh, juicy tomatoes make all the difference. Another common error is overcooking garlic. Garlic should be soft but not brown. Finally, avoid rushing the simmering process. Give your sauce time to thicken for the best flavor. Homemade Pomodoro sauce pairs perfectly with many dishes. Serve it over cooked al dente pasta for a classic meal. Use it as a dipping sauce with warm, crusty bread. You can also top grilled chicken or fish with the sauce for added flavor. Garnish with fresh basil and a drizzle of olive oil for a beautiful presentation. For more ideas, check the Full Recipe. {{image_4}} To make a spicy version, add red pepper flakes. You can start with 1/4 teaspoon. If you want more heat, add more. This small change gives the sauce a nice kick. You can also try adding fresh chopped chili peppers. This adds flavor and heat. For a creamy twist, stir in heavy cream or half-and-half. Start with 1/2 cup after the sauce simmers. This makes the sauce rich and smooth. You can also use dairy-free cream for a vegan option. This keeps the flavor while adding a creamy texture. The basic Pomodoro sauce is already vegetarian. To make it vegan, skip any dairy, like cheese. You can add nutritional yeast for a cheesy flavor. Fresh herbs like basil or parsley brighten the sauce. You can also add veggies like spinach or bell peppers for more nutrition. For all these variations, the full recipe remains the same. Adjusting ingredients can create a sauce just for you. Enjoy making it your own! To keep your Pomodoro sauce fresh, store it in an airtight container. Glass jars work well for this. Let the sauce cool completely before sealing. This helps prevent condensation that can make the sauce watery. If you plan to use it soon, place it in the fridge. You can freeze Pomodoro sauce for later use. Pour it into freezer bags or containers, leaving some space for expansion. When you want to use it, thaw it in the fridge overnight. To reheat, pour the sauce into a pot. Heat on low until warm, stirring often. You can also use the microwave, but be sure to check for hot spots. Homemade Pomodoro sauce lasts about 4 to 5 days in the fridge. If you freeze it, it can last up to 3 months. Always check for off smells or changes in color before using. Enjoy your sauce from the [Full Recipe] any time you want! Pomodoro sauce uses fresh, simple ingredients. You need ripe tomatoes, onions, and garlic. Here’s what else you’ll need: - 2 pounds ripe tomatoes (preferably Roma or San Marzano), roughly chopped - 1 medium onion, finely diced - 4 cloves garlic, minced - 1/4 cup extra virgin olive oil - 1 teaspoon sugar (optional) - Salt and freshly ground black pepper, to taste - 1/4 cup fresh basil leaves, chopped - 1 teaspoon dried oregano - 1/4 teaspoon red pepper flakes (optional) These ingredients create a rich and vibrant sauce full of flavor. You can store Pomodoro sauce in the fridge for up to one week. Make sure to keep it in an airtight container. This will help maintain its fresh flavor and aroma. Yes, you can use canned tomatoes for Pomodoro sauce. Choose high-quality canned whole or crushed tomatoes. This option can save time and still give great flavor. Just remember to adjust the cooking time since canned tomatoes are softer. Pomodoro sauce goes well with many pasta types. I recommend using spaghetti or penne. The sauce clings well to these shapes, making each bite tasty. You can also try it with fettuccine or rigatoni for a fun twist. To thicken Pomodoro sauce, let it simmer longer. This will help reduce excess liquid. You can also crush some of the tomatoes while cooking. If you want a quicker method, add a bit of tomato paste. This boosts flavor and thickens the sauce nicely. For a smooth texture, blend the sauce after it cools slightly. For the full recipe, check out the detailed instructions above. You learned how to make Pomodoro sauce, from ingredients to storage tips. I showed you ways to boost flavor and avoid common mistakes. You can also try variations like spicy or creamy versions. Remember, homemade sauce tastes best fresh, and proper storage matters too. Enjoy your cooking adventure and impress others with your delicious Pomodoro sauce!](https://tossedflavors.com/wp-content/uploads/2025/05/01f202b3-e79f-49e2-b1c8-2a89e95dc323.webp)
Pomodoro Sauce Flavorful and Simple Recipe Guide
Pomodoro sauce is a classic Italian dish that bursts with flavor. In this guide, I will share a simple and tasty recipe for you to
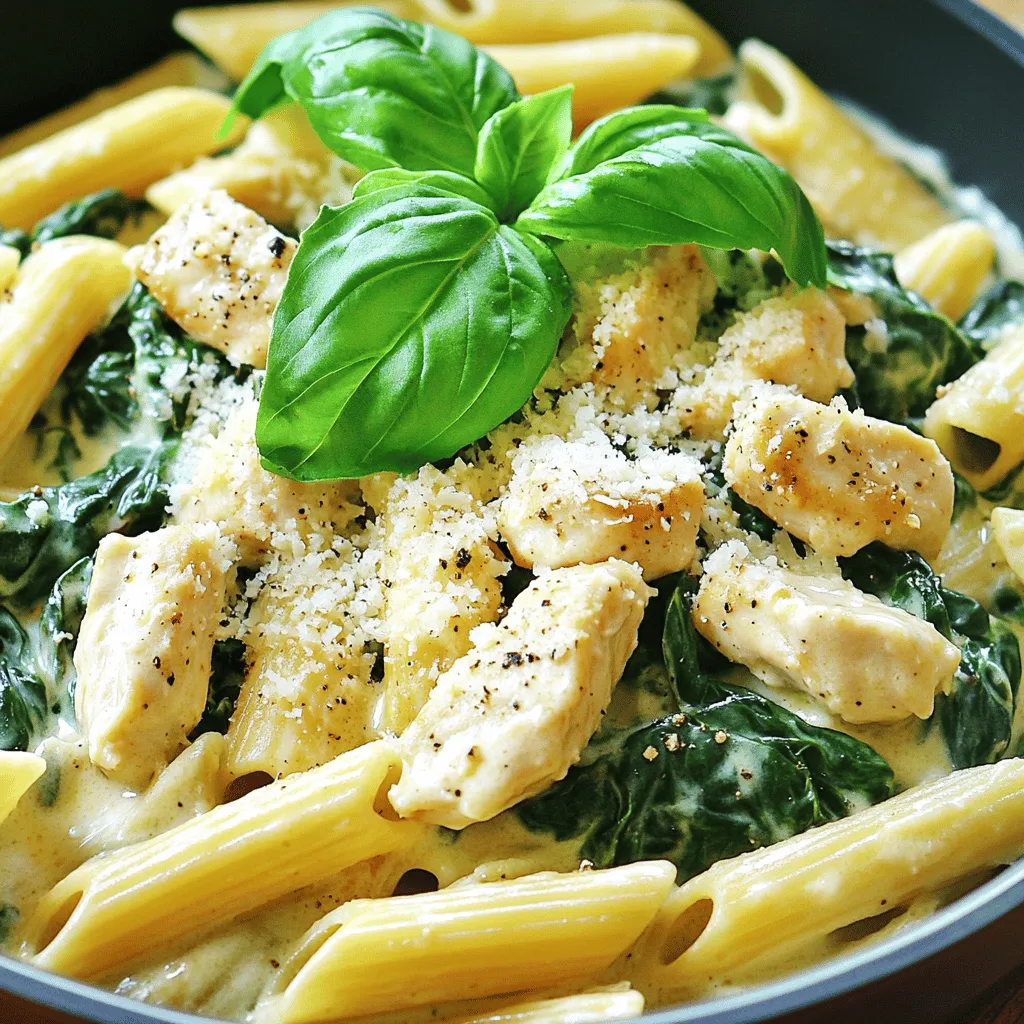
Easy Spinach Chicken Pasta Simple and Tasty Recipe
Craving a meal that’s both easy and delicious? My Easy Spinach Chicken Pasta recipe is just what you need! With simple ingredients like penne, fresh
![- 1 pound fresh asparagus, trimmed and cut into 2-inch pieces - 1 cup cooked quinoa or brown rice - 1 cup sharp cheddar cheese, shredded (divided) - ½ cup cream cheese, softened to room temperature - 1 cup vegetable broth - 1 cup milk (whole or 2%) - 1 teaspoon garlic powder - 1 teaspoon onion powder - 1 tablespoon olive oil - Salt and pepper, to taste - ½ cup breadcrumbs (optional for a crispy topping) - Fresh parsley, finely chopped, for garnish You can swap out the cheese if you need to. Try mozzarella or gouda for a different taste. If you want to avoid quinoa or rice, use cauliflower rice or barley. For a dairy-free version, opt for a plant-based cream cheese and almond milk. These swaps will still keep your casserole creamy and delicious. 1. Preheat the oven: Start by setting your oven to 375°F (190°C). This ensures the oven is ready for your casserole. 2. Mixing the creamy base: In a large bowl, combine softened cream cheese with milk and vegetable broth. Whisk until smooth. Add garlic powder and onion powder. Season with salt and pepper. Stir well to mix everything. 1. Incorporating asparagus and grains: Now, add cooked quinoa or brown rice to the creamy mix. Then, fold in the asparagus pieces gently. Make sure they are well-coated for more flavor. 2. Layering with cheese: Pour the mixture into a greased 9x13 inch baking dish. Spread it out evenly. Sprinkle half of the shredded cheddar cheese on top. This will melt beautifully during baking. 1. Timing and temperature guidelines: Place the dish in your preheated oven. Bake for 25-30 minutes, or until you see the top bubbling. It should be a lovely golden brown. 2. Tips for achieving the perfect crust: If you want a crispy topping, consider adding breadcrumbs before baking. Drizzle a bit of olive oil over them. This helps create a crunchy texture. Now, just wait for the delicious aroma to fill your kitchen! For the full recipe, check out the detailed instructions provided. To ensure even cooking, spread the mixture evenly in the baking dish. Use a 9x13 inch dish for best results. This size helps the heat circulate well. Avoiding sogginess is key. Make sure your asparagus is not overcooked before mixing. If using frozen asparagus, thaw it first and pat it dry. This keeps the casserole firm and tasty. Adding fresh herbs or spices can boost flavor. Try thyme, basil, or even a pinch of red pepper flakes for a kick. Mixing in some garlic adds a nice touch too. Incorporating proteins makes this dish heartier. Cooked chicken or turkey works well. You can also use beans for a vegetarian option. Both add flavor and make the casserole filling. For serving, you can dish it right from the baking dish. This gives a homey feel. If you want a fancier touch, serve individual portions on plates. Garnishing is fun! Fresh parsley adds color and brightness. You can sprinkle some extra cheese on top before serving for a cheesy finish. A side salad pairs great to balance the richness of the casserole. For more tips, check the Full Recipe. {{image_4}} For a low-carb version, swap quinoa with cauliflower rice. This keeps it light but still filling. You can also add more veggies like spinach or bell peppers. They boost nutrition and add color. Mix different cheeses for more depth. Try mozzarella or gouda for a creamy twist. You can also add crispy pancetta or chopped nuts for crunch. These add-ins give your casserole a fun twist. Use seasonal veggies to keep it fresh. In spring, add peas or fresh herbs. In the fall, consider roasted squash or even some caramelized onions. Adjust flavors for holidays, like adding nutmeg or sage for a festive touch. These variations let you customize your Cheesy Asparagus Casserole to fit any taste or occasion. For the complete recipe, check the [Full Recipe]. To keep your cheesy asparagus casserole fresh, store it in an airtight container. Place it in the fridge as soon as it cools down. This helps keep the flavors intact. Leftovers can last about three to four days in the fridge. If you want to save it for longer, consider freezing it. For freezing, wrap the casserole tightly in plastic wrap and then in foil. This helps prevent freezer burn. It can last up to three months in the freezer. When reheating, I recommend using the oven. Preheat the oven to 350°F (175°C). Place the casserole in a baking dish and cover it with foil. This keeps it moist while it heats. Bake for about 20-30 minutes. Check if it's hot all the way through before serving. You can also use the microwave for quicker reheating. Heat it in short intervals, about 1-2 minutes at a time, stirring in between. This method helps keep the texture nice. In the fridge, your casserole stays good for about three to four days. If you see any mold or an off smell, it's best to toss it. Signs of spoilage also include a slimy texture or discoloration. If you freeze it, remember to label the container with the date. This way, you’ll know when to use it. For the best taste, consume frozen leftovers within three months. Can I use frozen asparagus? Yes, you can use frozen asparagus. Just thaw it and drain any excess water. Frozen asparagus cooks quickly, so adjust your baking time slightly. This helps keep the texture nice and firm. How can I make this recipe ahead of time? You can prepare the casserole a day before. Mix all your ingredients and place them in the baking dish. Cover it tightly and store it in the fridge. When you’re ready to bake, just pop it in the oven. You may need to add a few minutes to the baking time if it’s cold. Overview of calorie count and macros Each serving of Cheesy Asparagus Casserole has about 300 calories. It contains 15 grams of protein, 20 grams of carbs, and 18 grams of fat. This dish is a good balance of nutrients, making it great for meals. Healthy modifications To make it healthier, use low-fat cheese or substitute quinoa for brown rice. You can also add more veggies like spinach or bell peppers. This boosts nutrients without losing flavor. How to ensure the cheese melts perfectly? To get smooth, melted cheese, use room temperature cheese. Mix it in with the warm creamy base. This helps it melt evenly throughout the casserole and gives you that gooey texture we all love. Can I substitute quinoa with rice? Yes, you can swap quinoa with brown rice or even white rice. Just make sure to cook it before adding it to the casserole. This ensures it blends well with the cheese and asparagus. This blog post explored crafting a cheesy asparagus casserole from scratch. You learned about key ingredients, swaps, and easy instructions. We covered tips for perfect cooking, ways to add flavor, and how to store leftovers. Whether for a family meal or a gathering, this dish shines. You can adjust it to your taste and health needs. Enjoy making this fun recipe, and don’t hesitate to experiment with seasonal veggies. Happy cooking!](https://tossedflavors.com/wp-content/uploads/2025/05/219b23ea-7656-4f25-a273-5d97d2d98fa8.webp)
Cheesy Asparagus Casserole Delightful and Easy Recipe
Are you ready to whip up a delicious dish that’s both easy and tasty? This Cheesy Asparagus Casserole combines fresh asparagus with creamy cheese and

White Bean Chicken Chili Flavorful Comfort Dish
If you’re seeking a cozy meal that warms your soul, look no further. White Bean Chicken Chili is packed with flavor and comfort. With tender

Ginger Garlic Beef Stir Fry Flavorful Quick Dinner
Are you ready to whip up a quick and tasty dinner? This Ginger Garlic Beef Stir Fry is your answer! Packed with fresh veggies and

Southern Crab Pie Flavorful and Easy Recipe
If you love seafood, you’ll adore this Southern Crab Pie recipe! Made with fresh crab meat, creamy goodness, and a blend of spices, it’s a