Dinner
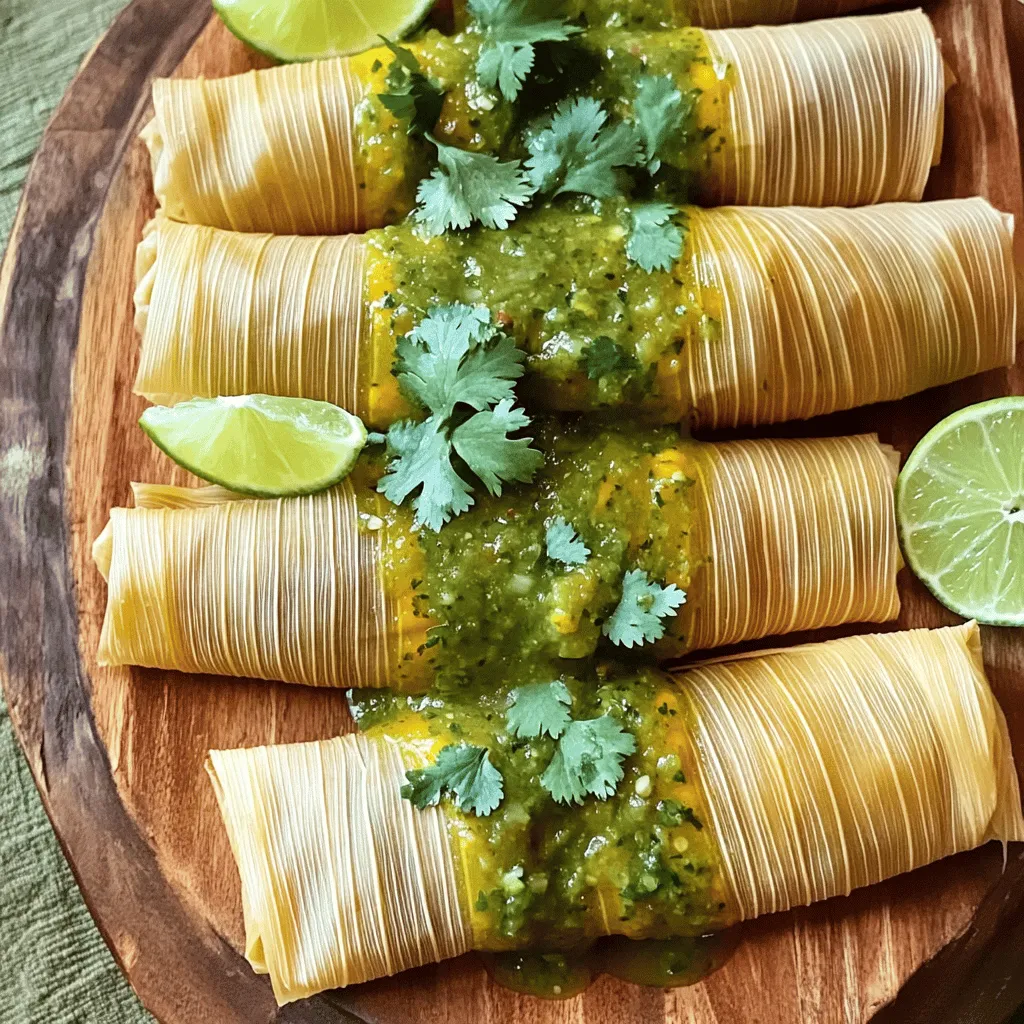
Homemade Mexican Tamales Simple Steps to Enjoy
Are you ready to dive into the world of homemade Mexican tamales? Making these tasty treats can be fun and rewarding. In this guide, I’ll
![To make blackened fish taco bowls, gather these fresh ingredients: - 2 fillets of firm white fish (cod or tilapia are great) - 2 tablespoons olive oil - 2 teaspoons smoked paprika - 1 teaspoon cayenne pepper (adjust for spice) - 1 teaspoon garlic powder - 1 teaspoon onion powder - 1 teaspoon dried oregano - 1 teaspoon sea salt - 1/2 teaspoon freshly ground black pepper - 1 cup cooked brown rice or quinoa - 1 cup shredded cabbage (red or green) - 1 ripe avocado, sliced - 1 cup cherry tomatoes, halved - 1/4 cup fresh cilantro, chopped - 1 lime, cut into wedges - 1/4 cup sour cream or Greek yogurt (optional) - Hot sauce (optional) For this dish, I suggest using firm white fish. Cod and tilapia work well. They hold their shape and soak up flavors nicely. Other options include mahi-mahi or snapper. Each fish adds a unique taste and texture, so pick your favorite! You can customize your taco bowls with fun toppings. Some tasty ideas include: - Extra avocado slices for creaminess - More fresh cilantro for a burst of flavor - Crunchy radishes for added texture - Spicy jalapeños for heat - A drizzle of lime juice for freshness - Your favorite hot sauce for a kick Feel free to mix and match toppings! This makes your bowls unique and delicious. For the full recipe, check above. To start, gather your spices. You need smoked paprika, cayenne pepper, garlic powder, onion powder, dried oregano, sea salt, and black pepper. This blend gives the fish its bold flavor. In a small bowl, mix these spices well. The aroma will excite your senses, getting you ready for the next steps. Next, prepare the fish. Use firm white fish like cod or tilapia. Pat the fillets dry with a paper towel. This helps the fish sear nicely. Drizzle olive oil on both sides of the fish. Then, coat each fillet with your spice blend. Make sure every bit is covered for the best flavor. In a large non-stick skillet, heat over medium-high heat. When the skillet is hot, add the fish. Sear the fish for about 4-5 minutes on each side. It should develop a crispy crust. When done, remove the fish from the heat and let it rest. Flake the cooked fish into chunky pieces with a fork. This will add to the rustic feel of your dish. Now, it's time to assemble your taco bowls. Start with a base of cooked brown rice or quinoa in each bowl. This adds a hearty touch. Next, place the flaky blackened fish on top. Add a layer of shredded cabbage for crunch. Then, arrange avocado slices and halved cherry tomatoes for color and flavor. Lastly, sprinkle fresh cilantro over everything. Squeeze lime juice on top to bring out all the flavors. If you like creamy textures, add a dollop of sour cream or Greek yogurt. If you want some heat, drizzle hot sauce over the dish. Enjoy your flavorful blackened fish taco bowls! For the full recipe, check out the details above. To achieve the best blackened fish, use fresh fillets. I prefer firm white fish like cod or tilapia for texture. Pat the fish dry before seasoning. This helps the spices stick well. Create a balanced spice blend using smoked paprika and cayenne pepper. Adjust the cayenne for your spice level. Heat your skillet until it is hot before adding the fish. This step gives a nice crust and enhances flavor. Cook each side for four to five minutes. You want a beautiful blackened color. You can customize your taco bowls easily. Choose a base like brown rice or quinoa. For veggies, use shredded cabbage, peppers, or corn. Add toppings like sliced avocado and halved cherry tomatoes. You can also swap sour cream for Greek yogurt or use guacamole. For an extra kick, drizzle your favorite hot sauce on top. This lets you create a bowl that suits your taste. Mix and match ingredients to find your perfect combo. Presentation matters in food. Start by layering your ingredients neatly in the bowl. Use defined sections for rice, fish, and toppings. This creates a colorful display. Garnish with fresh cilantro and lime wedges on the side. A squeeze of lime adds brightness to the dish. Serve your bowls right away for the best taste. A beautiful presentation makes your meal more inviting and enjoyable. For the full recipe, check out the [Full Recipe] section. {{image_4}} You can swap fish for other proteins like chicken, shrimp, or tofu. Each option brings a unique taste. Chicken works well with the same spice mix. Just make sure to cook it until it's juicy. Shrimp cooks fast, so watch it closely. Tofu absorbs flavors beautifully, making it a great choice for a vegan option. For a vegetarian take, replace the fish with grilled vegetables or beans. Grilled bell peppers, zucchini, and corn add color and texture. Black beans or chickpeas also provide protein. You can use the same spices to keep the flavor bold. Try adding some roasted sweet potatoes for a sweet twist. Changing the spice blend can transform your taco bowls. For a milder taste, use cumin and coriander. If you like heat, add more cayenne or try chili powder. Fresh herbs like cilantro or dill can brighten flavors too. Experiment with different spice mixes until you find your perfect match. To store leftover taco bowls, first cool them down. Place the fish, rice, and toppings in an airtight container. Make sure to keep the toppings separate to avoid sogginess. You can store them in the fridge for up to three days. If you want to keep the flavors fresh, eat them sooner rather than later. Reheating is key to keeping your taco bowls tasty. Use a skillet over medium heat for best results. Add a splash of water to keep everything moist. Stir the contents gently, and heat for about five minutes. You can also microwave the fish and rice for about one to two minutes, but cover it with a damp paper towel. This helps retain moisture and flavor. Freezing is a smart option for meal prep. You can freeze the fish and rice separately. Wrap each in plastic wrap, then place them in freezer bags. They can last up to three months. For best results, thaw in the fridge overnight before reheating. Keep the toppings fresh in the fridge until you're ready to eat. The best fish for blackened tacos are firm white fish fillets. Cod and tilapia work great. These fish have a mild flavor that pairs well with spices. They also hold up during cooking, making them perfect for blackening. Other options include snapper or mahi-mahi. Each choice adds a unique twist to the dish. The spice level in blackened fish taco bowls can vary. It depends on how much cayenne pepper you add. The recipe suggests one teaspoon, but you can adjust it to your taste. If you prefer mild flavors, use less cayenne. If you love heat, feel free to add more. The smoky paprika also adds depth without too much spice. Yes, you can make blackened fish taco bowls ahead of time. Cook the fish and store it in the fridge for up to two days. You can prepare the rice or quinoa and toppings in advance too. Just keep everything separate until serving. This keeps the dish fresh and tasty. When ready to eat, simply reheat the fish and layer it in your bowl. For the full recipe, check out the detailed instructions above. Blackened fish taco bowls are a delicious way to enjoy fresh flavors. We explored key ingredients, recommended fish options, and tasty toppings. I shared step-by-step instructions to help you cook the fish just right. You learned best practices for blackening and helpful tips for serving. We also covered variations with proteins and vegetarian choices. Storing leftovers and reheating to keep them tasty is easy. Now, you can enjoy making these bowls your way. Dive in and impress your friends and family with this fun and flavorful dish!](https://tossedflavors.com/wp-content/uploads/2025/05/45cb0b8b-8318-4f84-b11d-bf2e4e559328.webp)
Blackened Fish Taco Bowls Packed with Flavorful Taste
Welcome to the world of Blackened Fish Taco Bowls! If you love bold flavors and fresh ingredients, you’re in for a treat. These bowls blend
![- 1 lb shrimp, peeled and deveined - 2 cups cooked jasmine rice - 1 ripe avocado, diced - Olive oil, smoked paprika, cayenne pepper, garlic powder - Salt and freshly cracked black pepper - Cherry tomatoes, red onion, fresh cilantro - Lime juice, optional Sriracha sauce This Spicy Shrimp and Avocado Rice Bowl shines with fresh ingredients and bold flavors. The shrimp brings a juicy bite that pairs well with creamy avocado. To make the shrimp pop, we use a mix of olive oil, smoked paprika, cayenne pepper, and garlic powder. This combo creates a warm, smoky flavor with a nice kick. I suggest using fresh shrimp for the best taste. If you can’t find fresh, frozen shrimp works too. Just be sure to thaw them well. The jasmine rice serves as a soft base. It absorbs the lime juice perfectly, giving it a zesty touch. Using a fork to fluff the rice helps keep it light and airy. For the fresh toppings, cherry tomatoes add sweetness, while red onion brings a nice crunch. Fresh cilantro adds a burst of flavor. Drizzling lime juice brightens everything up. If you crave more heat, Sriracha sauce brings an extra kick. You can check out the Full Recipe for more details on how to put it all together. This bowl is not only colorful but also packed with nutrients. Enjoy creating a meal that is both tasty and fun! First, marinate the shrimp. In a bowl, mix shrimp with olive oil, smoked paprika, cayenne pepper, garlic powder, salt, and black pepper. Stir well. Let it marinate for 15 minutes. This helps the shrimp soak up all the flavors. Next, cook the shrimp. Heat a skillet over medium-high heat. Once hot, add the shrimp in a single layer. Cook them for 2-3 minutes without stirring. This creates a nice sear. Flip the shrimp and cook for another 2-3 minutes. They should turn pink and opaque. Remove cooked shrimp from the skillet and set aside. Now, prepare the rice base. In a big bowl, fluff the cooked jasmine rice with a fork. This step separates the grains. Drizzle lime juice over the rice and add a pinch of salt. Mix well to combine all the flavors. Lime juice adds a fresh zing that brightens the dish. It’s time to assemble your bowl. Start with a generous layer of seasoned jasmine rice. This acts as a tasty base. Next, arrange the cooked shrimp on one side of the rice. Add diced avocado, halved cherry tomatoes, and chopped red onion on top. This makes the bowl colorful and fun to eat. For the finishing touch, sprinkle fresh cilantro over everything. If you enjoy heat, drizzle sriracha sauce on top. This adds an extra kick. Remember, how you layer the ingredients matters. A well-arranged bowl looks appealing and makes each bite better. Follow the [Full Recipe] for all details on preparing this delightful dish! To avoid overcooking shrimp, keep a close eye on them. Cook shrimp just until they turn pink and opaque. For small shrimp, aim for 2-3 minutes per side. Medium shrimp need about 3-4 minutes, while large shrimp may require 4-5 minutes. Always cook shrimp in a single layer so they sear well. Marinating shrimp is key for great taste. Mix shrimp with olive oil, smoked paprika, and garlic powder. Let them sit for at least 15 minutes. You can add lime juice for extra zest. Other good seasonings include cumin or chili powder if you want to change things up. Pair your spicy shrimp bowl with a fresh salad or cold drink. A light white wine or sparkling water works well. For garnishes, consider adding lime wedges or extra cilantro. A sprinkle of sesame seeds can also add crunch and beauty to your dish. Enjoy your beautiful bowl filled with fresh flavors! {{image_4}} You can easily swap shrimp for other proteins. Chicken works well and cooks similarly. If you prefer a plant-based option, try tofu or your favorite veggies. Quinoa is a great grain alternative. It adds a nutty flavor and is packed with protein. Brown rice is another option for a heartier texture. To change the heat level, use different spices. For mild, skip the cayenne pepper. Try adding chili powder for a different flavor. You can also mix in fresh herbs like basil or parsley for a fresh twist. Top your bowl with a sprinkle of feta cheese or crunchy nuts for extra texture. Seasonal veggies can brighten your dish. In summer, add fresh corn or bell peppers. During fall, toss in roasted butternut squash or sweet potatoes. For holiday flair, use festive toppings like pomegranate seeds. They add color and a sweet crunch. Each variation can bring new life to your Spicy Shrimp and Avocado Rice Bowl. You can find the Full Recipe for more details! To keep your spicy shrimp and avocado rice bowl fresh, follow these tips: - Place leftovers in an airtight container. - Store in the fridge right away to prevent spoilage. - The dish can last for up to three days in the fridge. If you want to save it for later, consider freezing: - Freeze shrimp and rice separately to keep textures intact. - Allow shrimp to cool before placing in freezer bags. - For rice, use a sealed container to prevent freezer burn. - To reheat shrimp, thaw in the fridge overnight. Heat for 2-3 minutes in a skillet until warm. - For rice, add a splash of water and microwave for 1-2 minutes. Watch for signs of spoilage: - If shrimp smells sour or has a slimy texture, toss it. - For rice, if it has an off smell or unusual color, avoid eating it. To maintain quality while reheating: - Heat shrimp and rice just until warm, not too long. - Stir occasionally to ensure even heating. This way, you’ll enjoy the flavors just as you did when fresh! For this dish, I recommend using fresh shrimp if you can find it. Fresh shrimp tastes better and has a firmer texture. If fresh shrimp is not available, frozen shrimp works well too. Just make sure to thaw it properly. When choosing shrimp, look for large or jumbo sizes. They cook evenly and give a great bite. Yes, you can prep some parts ahead. Marinate the shrimp up to two hours before cooking. For best flavor, do not marinate too long. You can cook the shrimp and store it in the fridge for a day. The rice can also be made in advance. Just keep it covered to stay fresh. Assemble the bowl right before serving for the best taste. To lower the heat, reduce the cayenne pepper. You can also skip the sriracha sauce. If you love spice, add more cayenne or try a spicy seasoning blend. For a different flavor, use chili powder or smoked paprika instead of cayenne. Always taste as you go to find your perfect heat level. This blog post covered how to make a delicious shrimp rice bowl. We explored the main ingredients, like shrimp and jasmine rice, and highlighted the importance of seasoning. You learned how to prepare, cook, and assemble the dish visually. We shared tips for flavor and suggested variations to suit your taste. In summary, this dish is easy to customize and enjoyable for any occasion. Use these steps to create a tasty meal that impresses and satisfies. Happy cooking!](https://tossedflavors.com/wp-content/uploads/2025/05/83b8ef5f-96f3-4746-b8ed-d0d209871c22.webp)
Spicy Shrimp and Avocado Rice Bowl Delight
Craving a fresh, flavorful dish that packs a punch? The Spicy Shrimp and Avocado Rice Bowl is your answer! This vibrant bowl combines juicy shrimp
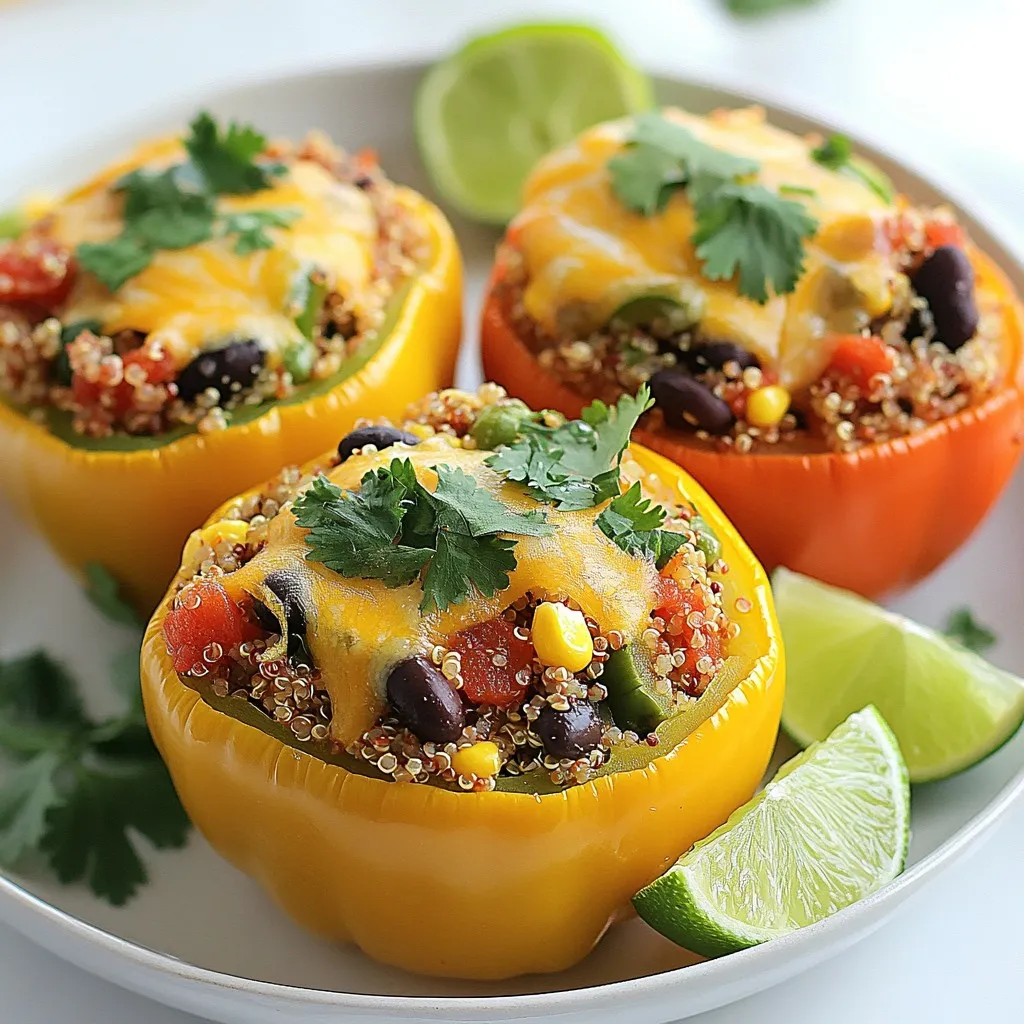
Quinoa Stuffed Peppers Flavorful and Nutritious Meal
Are you ready to spice up your dinner routine? Quinoa stuffed peppers are a colorful, tasty, and nutritious meal option that everyone will love. With
![To make these tasty tacos, gather these main ingredients: - 1 lb boneless, skinless chicken thighs - 4 tablespoons unsalted butter - 4 cloves garlic, minced - 1/4 cup honey - 1/4 cup BBQ sauce (your favorite brand) These chicken thighs are juicy and soak up flavors well. The butter adds richness, while garlic gives a lovely aroma. Honey and BBQ sauce mix for a sweet and tangy taste. You need these seasonings and sauces to enhance the flavor: - 1 teaspoon smoked paprika - 1 teaspoon chili powder - 1 teaspoon salt - 1/2 teaspoon black pepper These spices bring warmth and depth. They balance the sweetness of the honey, making each bite delicious. You can choose from these tortillas for your tacos: - 8 small corn tortillas - 8 small flour tortillas Corn tortillas give a nice texture, while flour tortillas are soft and pliable. Pick what you like best! You can find both in stores, so choose your favorite for wrapping the tasty filling. For the full recipe, check out the [Full Recipe]. Start by melting the unsalted butter in a large skillet over medium heat. Once it melts, add the minced garlic. Sauté it for about 1-2 minutes until it smells great. Be careful not to let it brown. Next, pour in the honey and BBQ sauce. Stir it all together well. Let the mixture simmer gently for a few minutes. This helps the flavors blend nicely. While the sauce simmers, it's time to season the chicken thighs. Sprinkle smoked paprika, chili powder, salt, and black pepper evenly over the chicken. This gives it a nice kick. Now, place the seasoned chicken into the skillet. Make sure each piece gets coated in that tasty sauce. Cook the chicken for about 7-8 minutes on each side. It should reach an internal temperature of 165°F (74°C). Look for the chicken to be no longer pink in the middle. Once it’s done, take it out of the skillet and let it rest for a few minutes. This keeps the juices inside. After resting, slice the chicken into bite-sized pieces. Now, warm the tortillas in a separate skillet or microwave until they are soft. This makes them easy to fold. To assemble the tacos, put a few pieces of the garlic butter honey BBQ chicken on each tortilla. Make sure you have enough filling. Next, top the chicken with shredded cabbage, diced tomatoes, and chopped cilantro. This adds freshness and crunch. Serve the tacos with lime wedges on the side. Squeeze some lime juice over the tacos for a zesty kick. Enjoy your Garlic Butter Honey BBQ Chicken Tacos! For the full recipe, click here. Marinades boost flavor. I love using a honey and BBQ mix. Combine 1/4 cup honey and 1/4 cup BBQ sauce in a bowl. Add salt, pepper, and spices. Let the chicken soak for at least 30 minutes. This makes your chicken juicy and full of taste. Feel free to add lime juice or hot sauce for a kick. To get tender chicken, use boneless, skinless thighs. They stay moist while cooking. Sear the chicken on medium heat for even cooking. Check the internal temperature; it should be 165°F (74°C). Let it rest for a few minutes after cooking. This helps keep the juices inside. Slice it just before you put it in the tacos. Presentation matters! Use a bright platter for a fun look. Arrange the tacos neatly. Add lime wedges around the tacos for color. Sprinkle extra chopped cilantro on top. This not only adds color but also freshness. A good look makes the meal more inviting. Enjoy your beautiful and tasty Garlic Butter Honey BBQ Chicken Tacos! {{image_4}} You can switch chicken for other meats. Try shredded pork or beef. Both have great flavor. You can even use cooked shrimp for a seafood twist. Just adjust the cooking time. Make sure your protein is cooked fully. For a vegetarian twist, use grilled veggies. Bell peppers, zucchini, and mushrooms work well. You can also try black beans or lentils. Both add protein and texture. Toss them in the garlic butter sauce for flavor. Get creative with your taco toppings. Add avocado slices for creaminess. Use jalapeños for heat. Feta cheese or sour cream adds a tangy touch. You can also mix in different herbs like mint or basil. This adds freshness and new flavors to each bite. For more ideas, check out the Full Recipe! To keep your leftover tacos fresh, store them separately. Place the chicken in one container and the toppings in another. This helps keep the tortillas from getting soggy. Use airtight containers to lock in freshness. Store them in the fridge for up to three days. If you want to enjoy them later, you can freeze the chicken as well. When you're ready to eat, reheat the chicken on the stove. Use medium heat and stir occasionally. This keeps the chicken juicy. For tortillas, warm them in a dry skillet for about 30 seconds on each side. You can also use the microwave for a quicker option. Just wrap them in a damp paper towel to keep them soft. Freezing is a great way to save time. To freeze, place the cooked chicken in a freezer-safe bag. Remove as much air as possible before sealing. You can freeze it for up to three months. When you want to use it, thaw the chicken in the fridge overnight. This way, it stays tasty and ready for your tacos. If you're making a big batch, consider freezing individual servings for quick meals later. Remember, you can always grab the Full Recipe when you need it! For these tacos, choose a BBQ sauce you enjoy. I like sweet sauces with a hint of tang. Look for sauces that blend well with honey. This balance adds depth and flavor to the chicken. You can also try a spicy BBQ sauce for a kick! Yes, you can use chicken breasts. They cook faster but may dry out. To avoid this, cook them on lower heat. Check the temperature to ensure they reach 165°F. Thighs stay juicier and add more flavor, but breasts work in a pinch. To spice things up, add chili powder or cayenne pepper. You can also use a hot BBQ sauce. For an extra kick, mix in some diced jalapeños. Toppings like hot sauce or sliced serrano peppers work well, too! Great sides include Mexican rice, black beans, or corn salad. Fresh guacamole and tortilla chips make a tasty combo. For something light, serve with a simple green salad. These sides balance the rich tacos perfectly. Yes, you can prepare the garlic butter ahead of time. Store it in an airtight container in the fridge. Just reheat it gently before mixing with the chicken. This saves time and makes cooking even easier. For the full recipe, check the link! In this post, we explored the key ingredients for Garlic Butter Honey BBQ Chicken Tacos. We walked through step-by-step instructions for preparation and cooking. I shared tips for enhancing flavor and presentation, plus variations to keep things fresh. Remember to store leftovers properly and follow reheating tips for the best taste. These tacos can bring excitement to any meal. Enjoy experimenting with new flavors and sharing them with others! Get ready to impress your friends and family with this tasty dish.](https://tossedflavors.com/wp-content/uploads/2025/05/5759d692-38b3-4adc-847d-4242cb1d05ad.webp)
Garlic Butter Honey BBQ Chicken Tacos Easy Recipe
Looking to spice up your taco night? Let me introduce you to the delicious Garlic Butter Honey BBQ Chicken Tacos. This easy recipe combines sweet
Taco Rice Bowl with Doritos Easy and Flavorful Meal
Craving a fun and tasty meal? Let’s dive into making a Taco Rice Bowl with Doritos! This easy recipe mixes bold flavors with crunchy chips,
![- Chicken and Pasta - 2 boneless, skinless chicken breasts, cut into bite-sized chunks - 12 oz rigatoni pasta - Seasonings and Sauces - 6 tablespoons unsalted butter, divided - 6 cloves garlic, minced - 1 teaspoon red chili flakes (optional, for heat) - 1 cup chicken broth (low sodium preferred) - 1 lemon, juiced and zested (keep zest separate) - 1 cup heavy cream - 1 cup freshly grated Parmesan cheese - Salt and freshly ground black pepper, to taste - Garnishes - Fresh parsley, chopped, for garnish Each ingredient plays a key role in creating the rich flavor of this garlic butter chicken with rigatoni. The chicken provides a hearty base, while the rigatoni adds a delightful texture. The garlic and butter work together for a savory aroma that fills your kitchen. Don't skip the lemon juice; it brightens the dish and balances the creaminess. Using fresh parsley as a garnish gives a pop of color and a fresh taste. You can adjust the heat with red chili flakes. If you prefer, feel free to experiment with other flavors or add-ins. This dish is all about making it your own while keeping that delicious garlic butter goodness at the forefront. For the full cooking experience, check out the Full Recipe to guide you through each step. Boiling the Pasta Start by bringing a large pot of salted water to a rolling boil. Add the rigatoni pasta and cook it according to the package instructions. You want it to be al dente, which means it should be firm but not hard. Draining and Setting Aside Once the pasta is cooked, drain it well using a colander. Make sure to shake off any excess water. Set the rigatoni aside in a large bowl, ready for mixing later. Seasoning the Chicken While the pasta cooks, grab your chicken. Cut the boneless, skinless chicken breasts into bite-sized chunks. Season these pieces generously with salt and freshly ground black pepper on all sides. Sautéing Instructions In a large skillet, melt 3 tablespoons of butter over medium heat. When the butter is bubbling, carefully add the seasoned chicken. Cook the chicken for about 5-7 minutes, stirring occasionally. You want it golden brown and fully cooked. Once done, transfer the chicken to a plate and set aside. Melting Butter and Sautéing Garlic In the same skillet, lower the heat to low. Add the remaining 3 tablespoons of butter. Once it melts, stir in the minced garlic and red chili flakes, if you want some heat. Cook for 1-2 minutes until fragrant, but watch closely to avoid burning the garlic. Incorporating Broth and Cream Next, carefully pour in the chicken broth and freshly squeezed lemon juice. Increase the heat to bring it to a gentle simmer. Once it simmers, add the heavy cream and lemon zest. Stir well and let the sauce simmer for 3-4 minutes until it thickens slightly. Mixing Chicken and Pasta Reduce the heat to medium-low. Add the cooked chicken and rigatoni back into the skillet. Toss everything together, ensuring the pasta and chicken are well coated in the creamy sauce. Adding Parmesan Cheese Gradually stir in the grated Parmesan cheese. This will melt into the dish, adding a rich flavor. Taste and adjust the seasoning with more salt and pepper if needed. For the complete recipe, check out the [Full Recipe]. Perfect Doneness for Chicken To ensure your chicken is juicy and safe to eat, cook it until it reaches 165°F. Use a meat thermometer for accuracy. The inside should no longer be pink. This gives you tender chicken that pairs well with the sauce. Ideal Pasta Texture When cooking rigatoni, aim for al dente. This means the pasta should be firm to the bite. Follow the package instructions, but start checking a minute early. Under-cooked pasta holds sauce better, giving you a delightful bite. Achieving the Right Consistency Your garlic butter sauce should be creamy and slightly thick. After adding the heavy cream, let it simmer. Stir often to avoid burning. If it's too thick, add a splash of chicken broth. Adjust until you reach that luscious feel. Flavor Enhancements For more flavor, add fresh herbs like thyme or basil when cooking the sauce. A dash of white wine can also brighten the taste. Don’t forget to adjust salt and pepper to make all the flavors pop. Presentation Ideas Serve the garlic butter chicken and rigatoni in deep bowls. Drizzle extra sauce on top for a glossy finish. Add more freshly grated Parmesan and a sprinkle of parsley for a colorful look. This makes the dish inviting! Pairing Recommendations This dish pairs well with a light salad or garlic bread. A crisp white wine, like Pinot Grigio, enhances the meal. For dessert, consider something light, like sorbet, to cleanse your palate after the rich flavors. For the complete cooking process, refer to the Full Recipe. {{image_4}} Different Proteins You can change the chicken to suit your taste. Try shrimp for a seafood twist. Salmon also works well; it adds richness. If you prefer plant-based meals, use tofu or tempeh. Both soak up flavors nicely. Each protein brings its own unique taste to this dish. Vegetable Additions Adding veggies can enhance the meal. Spinach adds color and nutrients. Broccoli gives a nice crunch. You can also use bell peppers for sweetness. Just sauté them in the garlic butter sauce. This way, you get a more balanced dish. Mild vs Spicy Options For a mild dish, skip the red chili flakes. The garlic butter sauce is still full of flavor. If you want heat, add more chili flakes or a dash of hot sauce. You can also mix in fresh jalapeños for a kick. Adjusting spice can fit everyone’s taste. Alternative Pasta Choices If you need a gluten-free option, use rice pasta or quinoa pasta. These options cook well and taste great. You can also try spiralized zucchini for a low-carb twist. This keeps the dish fresh and light. Just remember to adjust cooking times for different pasta. After you make garlic butter chicken with rigatoni, let it cool for about 30 minutes. This cooling helps keep the food safe. Store the chicken and pasta in an airtight container. It keeps well in the fridge for up to three days. If you want to keep it fresh longer, make sure to separate the chicken from the rigatoni. This prevents the pasta from getting too soggy. To warm up leftovers, the best method is to use the stove. Place the chicken and rigatoni in a skillet over medium heat. Add a splash of chicken broth or water to help with moisture. Stir often until everything is heated through. You can also use a microwave if you’re in a hurry. Just cover the dish with a lid and heat it for one to two minutes. Stir halfway to ensure even heating. If you want to freeze garlic butter chicken with rigatoni, do it carefully. Store the chicken and pasta in separate containers. Use freezer-safe bags or containers to avoid freezer burn. It can last in the freezer for up to three months. When you’re ready to eat, move it to the fridge to thaw overnight. Reheat it in a skillet to restore its creaminess. This way, you still enjoy that rich flavor! Can I use other types of pasta? Yes, you can use different pasta shapes. Penne or farfalle work well. Just adjust cooking times based on the pasta you choose. How can I make this dish lighter? To lighten it up, you can use less butter. You could also swap heavy cream for a lighter option like half-and-half. What can I substitute for heavy cream? You can use coconut milk or cashew cream for a dairy-free version. Greek yogurt can also add creaminess with fewer calories. How long to cook chicken thoroughly? Cook chicken pieces for 5-7 minutes until they are golden brown. Ensure they reach an internal temp of 165°F for safety. What is the ideal cook time for rigatoni? Rigatoni usually takes about 10-12 minutes to cook until al dente. Check the package for specific times. Can I replace Parmesan cheese? Yes, try Pecorino Romano for a sharper taste. Nutritional yeast is great for a vegan option. What to use instead of lemon juice? You can use lime juice or white vinegar as a tangy substitute. Both will add similar acidity to the dish. This blog post covered how to make garlic butter chicken with rigatoni. We went through the ingredients, step-by-step cooking instructions, and helpful tips for success. I shared variations to keep it exciting and storage info for leftovers. Dive into this dish with confidence! Remember, small tweaks can make a big difference. Enjoy your cooking journey and make this meal your own!](https://tossedflavors.com/wp-content/uploads/2025/05/0602eed4-19e6-4505-a246-5a36060504c3.webp)
Garlic Butter Chicken with Rigatoni Flavorful Delight
If you’re looking for a delicious meal that’s quick and easy, you’ve found it! Garlic Butter Chicken with Rigatoni is a flavorful delight that will
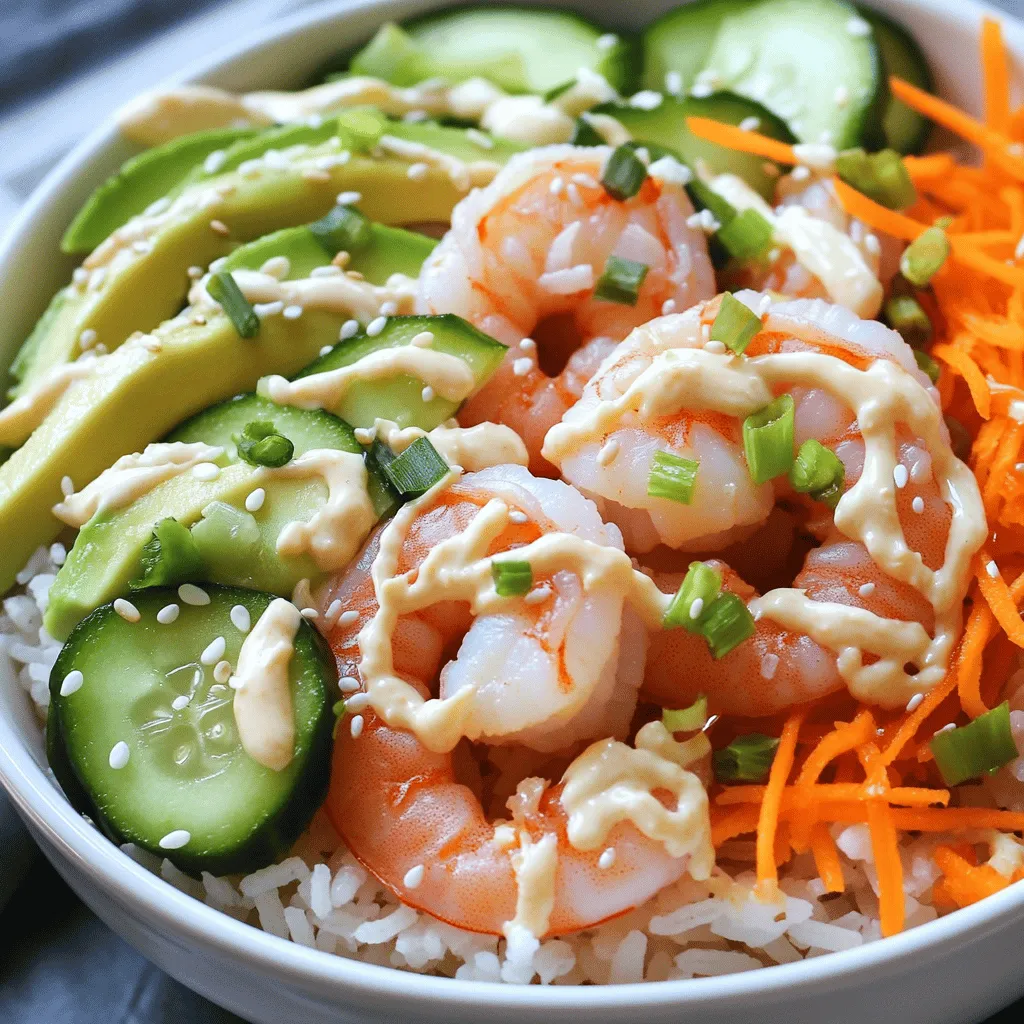
Savory Shrimp Rice Bowls with Spicy Mayo Delight
Are you looking for a quick, delicious meal that will satisfy your cravings? Look no further than these Savory Shrimp Rice Bowls with Spicy Mayo!
![For this dish, you need 1 pound of fresh salmon fillet. Make sure to remove the skin. Fresh salmon gives the best taste and texture. You can use wild-caught salmon for added flavor. This is the star of your meatballs. Next, gather your dry ingredients: - 1/2 cup whole wheat breadcrumbs - 1/4 cup grated Parmesan cheese - 1 large egg - 2 cloves garlic, minced - 1 tablespoon fresh dill, finely chopped - 1 teaspoon lemon zest - Salt and black pepper to taste These ingredients help bind the salmon and add texture. The breadcrumbs keep the meatballs from being too dense. Parmesan cheese adds a nice salty flavor. Garlic and dill bring freshness, while lemon zest brightens everything up. For the creamy avocado sauce, you will need: - 1 medium ripe avocado - 1/2 cup plain Greek yogurt - 1 tablespoon freshly squeezed lime juice - 1 tablespoon fresh cilantro, chopped These wet ingredients give the sauce its creaminess and flavor. The avocado is rich and smooth, while Greek yogurt adds tang. Lime juice gives it a zesty kick, and cilantro adds freshness. You can find the full recipe for these delicious salmon meatballs with creamy avocado sauce at the beginning of this article. Start by preheating your oven to 375°F (190°C). This step is key for a perfect bake. Next, line a baking sheet with parchment paper. This keeps the meatballs from sticking. In a food processor, add the salmon fillet. Pulse it until it’s finely chopped, but don’t turn it into a puree. You want a chunky texture. In a large mixing bowl, combine the chopped salmon with whole wheat breadcrumbs, grated Parmesan cheese, and the egg. Add minced garlic, fresh dill, lemon zest, and a pinch of salt and black pepper. Mix all these ingredients well. Use your hands to form the mixture into meatballs, about 1.5 inches wide. Place them on the prepared baking sheet, making sure they have space around them. Bake the meatballs for 15 to 20 minutes. Keep an eye on them, and look for a golden brown color. To check if they’re done, use a meat thermometer. The internal temperature should reach 145°F (63°C). This ensures they are safe to eat and still juicy. While the meatballs bake, you can start preparing the creamy avocado sauce. In a blender, add the ripe avocado, Greek yogurt, freshly squeezed lime juice, and chopped cilantro. Toss in a pinch of salt for flavor. Blend until the mix is ultra-smooth and creamy. You may need to stop and scrape down the sides to blend everything evenly. When the meatballs are done baking, remove them from the oven. Let them cool on the baking sheet for a few minutes. This helps them firm up. Serve the salmon meatballs with the creamy avocado sauce drizzled on top or in a small bowl for dipping. For the complete recipe, check out the Full Recipe section. To make sure your salmon meatballs stay moist, use fresh salmon. Fresh salmon has fat that keeps the meatballs juicy. Avoid overmixing when combining the ingredients. Overmixing can lead to tough meatballs. Instead, mix gently until just combined. Also, let the meatballs rest for a few minutes after baking. This helps them firm up without drying out. You can add spice by using more herbs or seasonings. Try adding a pinch of smoked paprika or red pepper flakes for warmth. Fresh herbs like parsley or chives can also brighten the dish. When mixing, taste your mixture before forming meatballs. This way, you can adjust the salt or seasoning to your liking. For an extra layer of flavor, consider adding a squeeze of lemon juice into the mixture. How you serve your salmon meatballs can make a big difference. Use a large, colorful platter to catch the eye. Arrange the meatballs in a circle for a fun look. Drizzle the creamy avocado sauce over the meatballs right before serving. You can also place the sauce in a small bowl for dipping. Garnish your dish with fresh herbs and citrus wedges. This adds color and makes it look gourmet. For a full recipe, check out the complete guide. {{image_4}} You can switch up the salmon for other fish like trout or tuna. These fish work well with the same recipe and offer different flavors. If you want a plant-based option, use chickpeas instead of salmon. Just mash them and mix them with the same dry ingredients. You can also add spices or herbs to change the taste. Try smoked paprika for a smoky kick or cumin for a warm, earthy flavor. Serve these meatballs in many ways! You can place them on a bed of greens for a light meal. They also taste great in a soft taco with fresh salsa. For a fun twist, serve them with toothpicks as appetizers at a party. Drizzle extra creamy avocado sauce on top for added flavor. You can even pair them with rice or quinoa for a filling dish. To make this dish gluten-free, swap the whole wheat breadcrumbs for gluten-free breadcrumbs. You can also use almond flour or crushed gluten-free crackers. These options help keep the meatballs together while being safe for those with gluten sensitivities. Be sure to check the labels to avoid hidden gluten sources. Enjoy these meatballs worry-free while still enjoying great taste! For the complete recipe, check out the Full Recipe section. After you enjoy your salmon meatballs, store leftovers in an airtight container. Place them in the fridge right away. They will stay fresh for up to three days. Make sure they cool down before sealing. This helps keep them tasty. If you want to save some for later, freezing is a great option. First, cool the meatballs completely. Then, place them in a freezer-safe bag or container. You can freeze them for up to three months. Just remember to label the bag with the date. This way, you know when you made them. To reheat your salmon meatballs, use your oven for best results. Preheat it to 350°F (175°C). Place the meatballs on a baking sheet and heat for about 10-15 minutes. If you prefer a microwave, cover the meatballs with a damp paper towel. Heat them in short bursts until warm. Enjoy with the creamy avocado sauce from the Full Recipe. Yes, you can use canned salmon. It is a great option. Just make sure to drain it well. The flavor will still be good, but the texture may differ slightly. Canned salmon is often softer. If you use it, you may need to adjust the amount of breadcrumbs. This helps the meatballs hold their shape. You can check the meatballs in a few ways. The best method is to use a meat thermometer. The internal temperature should be 145°F (63°C). If you don’t have a thermometer, look for a nice golden brown color. The meatballs should feel firm to the touch. If they are not soft or mushy, they are likely done. Salmon meatballs pair well with many sides. Here are some tasty ideas: - Quinoa or rice for a hearty base - A fresh green salad for crunch - Roasted vegetables for extra flavor - Whole wheat pasta with a light sauce - Crusty bread to soak up the creamy avocado sauce Feel free to mix and match based on your taste. Enjoy your meal! For the full recipe, check [Full Recipe]. We discussed how to make tasty salmon meatballs in this post. First, you learned about fresh ingredients and the right seasonings. Then, I shared step-by-step instructions to prepare and bake the meatballs. You also got tips for making them moist and flavorful. Remember, there are fun variations and storage tips too. Enjoy experimenting with these ideas and make your meals special. Try new combinations and find what you love best. Cooking can be fun and rewarding when you use fresh ingredients!](https://tossedflavors.com/wp-content/uploads/2025/05/3a0eb78a-cd3d-4972-b4a0-2a94029b01eb.webp)
Salmon Meatballs with Creamy Avocado Sauce Delight
Get ready to elevate your dinner game with my Salmon Meatballs with Creamy Avocado Sauce! This dish combines fresh salmon and a rich, tangy sauce
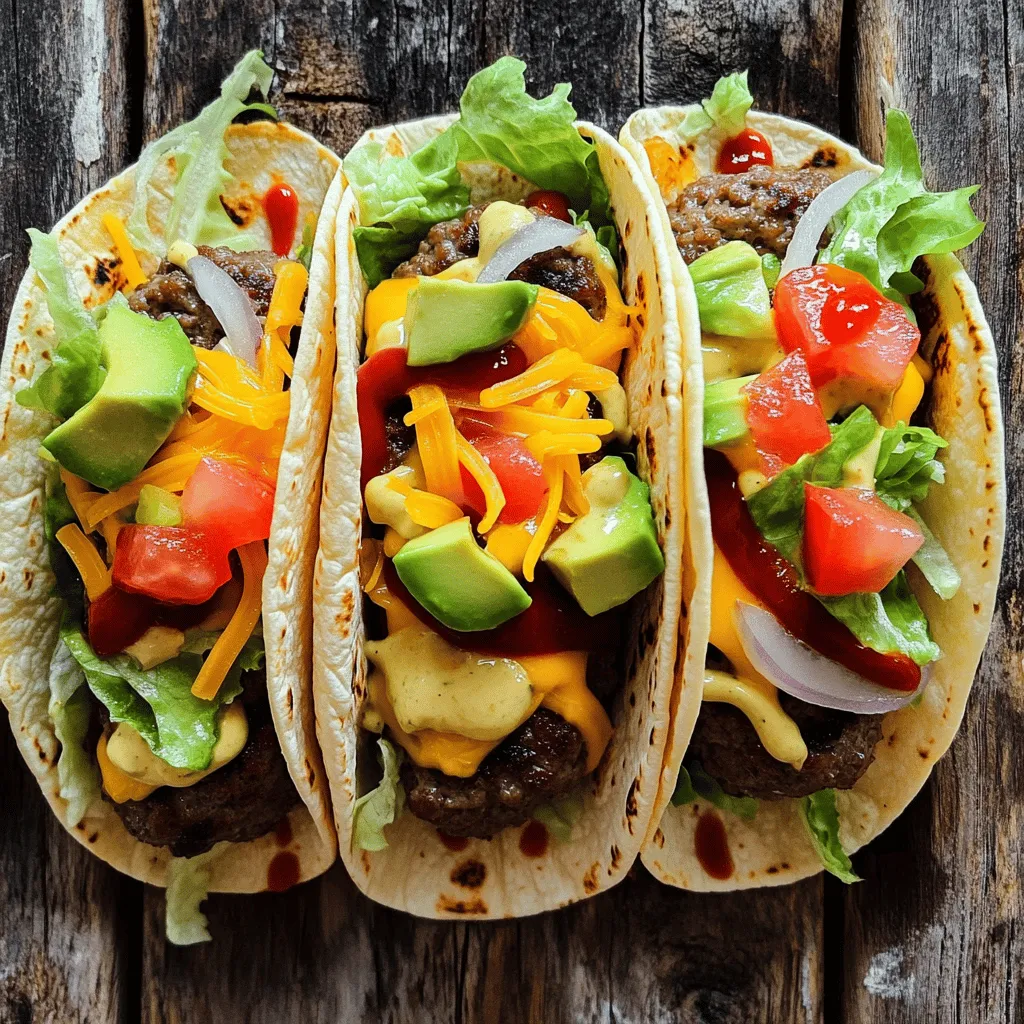
Smash Burger Tacos Flavorful and Fun Meal Idea
Looking for a meal that’s both fun and tasty? Smash Burger Tacos combine the best of both worlds. Imagine juicy beef patties tucked inside warm