Dinner

Easy Chipotle Ranch Grilled Chicken Burrito Delight
Are you ready to sink your teeth into a delicious Easy Chipotle Ranch Grilled Chicken Burrito? This recipe makes a tasty meal that’s simple to
![To make these Roasted Garlic Butter Parmesan Potatoes, you will need: - 2 pounds baby potatoes, halved - 6 cloves garlic, finely minced - 1/2 cup unsalted butter, fully melted - 1 cup freshly grated Parmesan cheese - 2 tablespoons fresh parsley, finely chopped - 1 teaspoon garlic powder - 1 teaspoon onion powder - Salt and freshly cracked black pepper, to taste These ingredients come together to create a rich, buttery flavor. The baby potatoes give a nice texture, while the garlic adds depth. You can enhance the flavors even more by using: - A pinch of smoked paprika for a hint of smokiness - Fresh herbs like rosemary or thyme for added aroma - A squeeze of lemon juice to brighten the dish - Extra cheese varieties like Gruyère or cheddar for a twist Feel free to mix and match your favorites! These options can elevate the dish and fit your taste. Each serving of Roasted Garlic Butter Parmesan Potatoes has: - Calories: Approximately 350 - Protein: 7 grams - Carbohydrates: 40 grams - Fat: 20 grams - Fiber: 3 grams This dish balances rich flavors with satisfying ingredients. It’s a great side for many meals! For the complete recipe, check out the Full Recipe link. Start by preheating your oven to 400°F (200°C). This heat will help the potatoes become nice and crispy. Line a large baking sheet with parchment paper. This way, your potatoes won't stick, and cleanup will be easy. In a big bowl, add your halved baby potatoes. Then, toss in the minced garlic, melted butter, garlic powder, onion powder, and a good pinch of salt and pepper. Mix everything gently. You want the potatoes to be well-coated in that tasty buttery goodness. Spread the coated potatoes on the lined baking sheet. Make sure the cut sides face down. This helps them brown nicely. Roast them in the oven for about 25-30 minutes. They should turn golden brown and be tender enough to poke with a fork. After roasting, take the baking sheet out of the oven. Sprinkle the grated Parmesan cheese over the hot potatoes. Place them back in the oven for another 5 minutes. You want the cheese to melt and get bubbly, turning a lovely golden color. Once done, drizzle any leftover garlic butter from the bowl over the potatoes. Finish with a sprinkle of fresh parsley for color. Serve these Roasted Garlic Butter Parmesan Potatoes hot. Enjoy every bite of this tasty dish! For the complete recipe, check out the [Full Recipe]. To get crispy and tasty roasted potatoes, start with small baby potatoes. Cut them in half to help them cook faster. Always coat them well in butter and seasonings. This way, they soak up all the flavors. Use parchment paper on your baking sheet. It helps with easy cleanup and prevents sticking. Make sure the potatoes are in a single layer. This lets them roast evenly. Don’t crowd the pan. If they are too close, they will steam instead of roast. You can swap baby potatoes for regular ones. Just cut them into smaller pieces. If you don’t have garlic cloves, use garlic powder instead. For a lighter option, use olive oil in place of butter. You can also try other cheeses, like cheddar or mozzarella, if you don’t have Parmesan. Fresh herbs like thyme or rosemary can add great flavor too. Don’t be afraid to mix and match! These roasted garlic butter Parmesan potatoes are great with meat or fish. Serve them with grilled chicken or steak for a complete meal. They also pair well with a fresh salad. Add a lemon vinaigrette to brighten the dish. For a cozy night in, enjoy them with a glass of wine. These potatoes make a perfect side for any gathering. Everyone will love their cheesy goodness. Check out the Full Recipe for more details! {{image_4}} You can add fresh herbs for extra flavor. Try using rosemary or thyme. Chop the herbs and mix them in the bowl with the potatoes. This adds a fresh taste that pairs well with garlic and cheese. You can also use dried herbs if fresh ones are not available. Just use about half the amount since dried herbs are stronger. If you like heat, add some spices. Mix in a teaspoon of red pepper flakes. You can also use cayenne pepper for more kick. This will give your potatoes a nice spicy twist. The heat balances well with the rich garlic butter and cheese. Just be careful not to add too much, or it might overpower the dish. You can easily make this dish vegan. Substitute the butter with olive oil or vegan butter. For the cheese, use a vegan Parmesan cheese or nutritional yeast. Both options will still give you a cheesy flavor. This way, everyone can enjoy these tasty roasted potatoes without missing out on flavor. You can find the full recipe for more details. To keep your leftover Roasted Garlic Butter Parmesan Potatoes fresh, let them cool down. Place them in an airtight container. Store them in the fridge for up to three days. This way, you can enjoy them later without losing flavor. When you're ready to eat your leftover potatoes, preheat your oven to 350°F (175°C). Spread the potatoes on a baking sheet. Heat them for about 10-15 minutes. This helps them regain their crispy edges. You can also reheat them in the microwave for a faster option. Just cover them to avoid drying out. If you want to store your potatoes for longer, freezing is a great option. First, let them cool completely. Then, place them in a freezer-safe bag. Remove as much air as possible before sealing. They can last up to three months in the freezer. When ready to eat, thaw in the fridge overnight, then reheat as mentioned. Enjoy your delicious garlic butter goodness anytime! Yes, you can use other potatoes. Try red, Yukon gold, or fingerling potatoes. They all roast well. Just make sure to cut them into similar sizes. This helps them cook evenly. To make these potatoes in an air fryer, follow these steps: - Preheat the air fryer to 400°F (200°C). - Toss the halved potatoes with the garlic, butter, and seasonings. - Place them in the air fryer basket in a single layer. - Cook them for 15-20 minutes, shaking the basket halfway. - After cooking, add the Parmesan and cook for 3-5 more minutes until melted. If you need a substitute for Parmesan, try Pecorino Romano or nutritional yeast. Both offer a similar flavor. Other options include Grana Padano or even a vegan cheese. Just keep in mind that the taste may change a bit. Yes, this dish is great for meal prep! You can make it ahead and store it in the fridge. Just reheat it in the oven or microwave. The flavors hold up well, making it a tasty option for lunch or dinner. For the full recipe, check out the earlier section. This blog post covered everything you need for perfect roasted potatoes. We explored the main ingredients, optional seasonings, and cooking steps. I shared tips for achieving that ideal crunch and variations to keep things interesting. You also learned how to store leftovers and adapt the recipe to suit your taste. In conclusion, mastering roasted potatoes can elevate any meal. Enjoy the process and have fun experimenting with flavors. You’ll surprise yourself with delicious results every time.](https://tossedflavors.com/wp-content/uploads/2025/05/8a6f8517-7b22-430c-b185-8a154dda22e3.webp)
Roasted Garlic Butter Parmesan Potatoes Delightful Recipe
Get ready to delight your taste buds with Roasted Garlic Butter Parmesan Potatoes! This mouthwatering dish is easy to make and perfect for any meal.

The Best Mascarpone Stuffed Dates Delightful Treat
If you’re craving a sweet yet sophisticated treat, you’ll love these mascarpone stuffed dates! They are creamy, sweet, and packed with flavor. With just a
![- 4 boneless, skinless chicken breasts - 1 cup finely grated Parmesan cheese - 1 cup panko breadcrumbs - 2 teaspoons garlic powder - 1 teaspoon onion powder - 1 teaspoon mixed dried Italian herbs (oregano, basil, thyme) - 2 large eggs - Olive oil or avocado oil spray for cooking - Salt and freshly cracked black pepper, to taste When you gather your ingredients, ensure they are fresh. Fresh chicken makes a big difference. I always look for firm, pink chicken breasts. The Parmesan cheese should be finely grated for a better crust. Panko breadcrumbs give that perfect crunch. For seasoning, garlic powder adds a nice kick. Onion powder brings out the flavor of the chicken. Dried Italian herbs give a warm, aromatic touch. You need eggs to help the breadcrumbs stick. Oil spray ensures that the chicken doesn’t stick to the air fryer. Finally, salt and pepper add the essential seasoning to make everything pop. For the full recipe, refer to the cooking instructions. This dish is not only easy but also delicious. It's perfect for family meals or special occasions. To start, preheat your air fryer. Set it to 400°F (200°C) and let it run for about 5 minutes. This step is key. Preheating ensures your chicken cooks evenly. If you skip this, the outside may cook too fast, leaving the inside raw. Next, we need to prepare the egg wash. In a shallow bowl, crack two large eggs. Whisk them with a pinch of salt and some freshly cracked black pepper. Mix until well combined. Now, let's make the breadcrumb coating. In a separate plate, combine 1 cup of finely grated Parmesan cheese, 1 cup of panko breadcrumbs, 2 teaspoons of garlic powder, 1 teaspoon of onion powder, and 1 teaspoon of mixed dried Italian herbs. Stir this mixture well; it should look colorful and appetizing. Now, take your chicken breasts and dry them with paper towels. This step helps the breading stick. Season both sides with salt and pepper for extra flavor. For the breading, dip each seasoned chicken breast into the egg wash. Make sure it's fully coated, then let any excess drip off. Next, transfer it to the breadcrumb mixture. Press down gently so the crumbs stick well. Make sure to coat both sides. Repeat this for all chicken pieces until they are ready. Before placing the chicken in the fryer, spray the basket with oil to avoid sticking. Arrange the breaded chicken in a single layer. It's important they do not touch; this helps them cook evenly. If your fryer is small, cook in batches. Cook the chicken for 12 to 15 minutes. Flip the chicken halfway through to ensure both sides get crispy. You're aiming for a golden brown crust and an internal temperature of 165°F (75°C). Use a meat thermometer for accuracy. Once done, carefully remove the chicken and let it rest for a few minutes. This time helps the juices settle, making each bite juicy and tender. For the full recipe, check the link above! To get that perfect crunch, panko breadcrumbs are key. Panko is light and airy, which gives your chicken a nice, crispy bite. Regular breadcrumbs don't give the same texture. Also, don’t forget to use oil spray. A light spray helps the breadcrumbs brown well without soaking them. Aim for an even layer of oil to achieve that golden finish. Many people overcrowd the air fryer. This can lead to uneven cooking. Make sure the chicken pieces have space around them. If you have a lot, cook in batches. Also, be careful not to overcook or undercook the chicken. The ideal internal temperature is 165°F (75°C). Use a meat thermometer to check this. Pair your chicken with fresh sides. A mixed salad or roasted veggies works great. For presentation, arrange the chicken on a large platter. Garnish with chopped parsley for color. You can also add lemon wedges for a zesty touch. This makes the meal look appealing and adds a fresh taste. For more ideas, check the Full Recipe. {{image_4}} You can add more flavor to your Air Fryer Parmesan Crusted Chicken. Here are some easy ways: - Herbs: Try adding dried rosemary, thyme, or parsley. These herbs give a fresh taste. - Spices: Add paprika or cayenne pepper for some heat. A pinch can make a big difference. - Cheese Alternatives: Swap Parmesan for aged cheddar or Romano. Each brings a new flavor twist to the dish. Need to fit special diets? There are great options for this recipe: - Gluten-Free Panko: Use gluten-free breadcrumbs to keep it safe for gluten-free diets. Many brands offer tasty options. - Low-Carb Options: Replace breadcrumbs with crushed pork rinds or almond flour. This keeps the dish low in carbs and still crispy. If you don’t have an air fryer, no worries! You can still enjoy this dish by baking or doing it on the stovetop: - Baking Instructions: Preheat your oven to 425°F (220°C). Place the breaded chicken on a greased baking sheet. Bake for 20-25 minutes, flipping halfway, until golden and cooked through. - Stovetop Method: Heat a large skillet over medium heat. Add oil, then cook the breaded chicken for about 6-7 minutes on each side. Look for a golden crust and ensure it reaches 165°F (75°C) inside. These variations help you personalize your meal while keeping it delicious! For the full recipe, check out the details above. After enjoying your Air Fryer Parmesan Crusted Chicken, store any leftovers properly. Use airtight containers or resealable bags. This keeps the chicken fresh and prevents it from drying out. Place the chicken in the fridge. It will stay good for about 3 to 4 days. When reheating, you want the chicken to stay crispy. The best way is to use the air fryer again. Preheat your air fryer to 350°F (175°C). Place the chicken in for about 5 to 7 minutes. Check it often to ensure it heats evenly. You can also use an oven. Set it to 350°F (175°C) and reheat for about 10 to 15 minutes. This method works well too! Freezing your chicken extends its shelf life. First, let the chicken cool completely. Wrap each piece tightly in plastic wrap. Then, place them in a freezer-safe bag or container. This helps prevent freezer burn. You can freeze the chicken for up to 2 to 3 months. To thaw, place the chicken in the fridge overnight. If you need it faster, use the microwave's defrost setting. After thawing, reheat it in the air fryer or oven to keep it crispy. For more details, refer to the [Full Recipe]. Cooking time for Air Fryer Parmesan Crusted Chicken varies. It depends on how thick your chicken breasts are. Generally, it takes about 12 to 15 minutes. Thicker pieces may need a few extra minutes. Always check for doneness. Yes, you can use other cheeses. Romano or cheddar can work well. For a twist, try pepper jack for some heat! The best way is to use a meat thermometer. Insert it into the thickest part. The chicken should reach 165°F (75°C). This ensures it is safe to eat. You can prep the chicken ahead. Bread the chicken and store it in the fridge. Cook it later when you’re ready. If you freeze it, make sure to thaw it before cooking. This blog post covered how to make Air Fryer Parmesan Crusted Chicken. We discussed key ingredients, like chicken, Parmesan, and panko. You learned to prep your air fryer and create a simple breading station. I shared tips for crispiness, avoiding mistakes, and suggested side dishes. You can even explore variations like gluten-free options. In conclusion, this dish is easy and delicious. You can impress anyone with it. Enjoy cooking and experimenting with your meals!](https://tossedflavors.com/wp-content/uploads/2025/05/3274c517-3a1a-4f55-b7ec-7930ec37bcf4.webp)
Air Fryer Parmesan Crusted Chicken Delicious Delight
If you crave a crispy, cheesy chicken dinner that’s super easy to make, you’re in the right place! My Air Fryer Parmesan Crusted Chicken is
![- 4 medium russet potatoes - 2 tablespoons olive oil - 1 teaspoon garlic powder - 1 teaspoon onion powder - 1 teaspoon paprika - 1 teaspoon sea salt - 1/2 teaspoon black pepper - Optional toppings: sour cream, chives, shredded cheese, bacon bits (non-pork) For my air fryer baked potatoes, I love using medium russet potatoes. They are perfect for this recipe because they are fluffy inside and have a crispy skin when cooked right. I also use olive oil to help the seasonings stick and to add a slight richness. When it comes to seasoning, I keep it simple yet flavorful. I use garlic powder, onion powder, and paprika for a nice kick. Sea salt and black pepper add the finishing touch. You can also top your potatoes with whatever you like! Sour cream, chives, shredded cheese, or even non-pork bacon bits work great. Make sure to check out the Full Recipe for all the details on how to prepare these delicious baked potatoes! First, wash your russet potatoes well under running water. Use a vegetable scrubber to remove dirt. After washing, dry the potatoes completely with a paper towel. Drying helps them crisp up in the air fryer. Next, take a fork and prick each potato several times on all sides. This action lets steam escape, so the potatoes do not burst while cooking. In a large mixing bowl, mix together olive oil, garlic powder, onion powder, paprika, sea salt, and black pepper. Stir well to create a tasty spice mix. Now, add the cleaned potatoes into the bowl. Toss them gently until each potato is covered with the seasoning. This ensures every bite is full of flavor. Preheat your air fryer to 400°F (200°C) for about 5 minutes. This step is key for getting crispy potatoes. Carefully place the potatoes in the air fryer basket in a single layer. Make sure they are not too close together. If needed, cook them in batches to allow air to move freely. Cook the potatoes for 35 to 40 minutes. Halfway through, turn the potatoes to get an even crisp. They are done when the insides feel fork-tender and the skin is crispy. After cooking, use tongs to place the potatoes on a plate. Let them cool for a few minutes. Finally, slice each potato lengthwise and fluff the insides with a fork. Now, add your favorite toppings for a delicious treat. For the full recipe, check out the complete instructions above. To get that perfect crunch on your air fryer baked potatoes, preheating is key. Set your air fryer to 400°F (200°C) and let it warm up for about 5 minutes. This helps the potatoes start cooking right away, leading to crisp skin. When cooking, size matters. If you have many potatoes, cook them in batches. This allows air to flow around each potato, ensuring they cook evenly and become crispy. Overcrowding can lead to soggy skins, which we want to avoid! For seasoning, try mixing things up. You can use different spices like Italian herbs or a spicy Cajun blend. This adds a twist to your baked potatoes. Don’t forget to choose the right potatoes. Russet potatoes work best; they are fluffy inside and have thick skins. Presentation matters! Serve your baked potatoes on individual plates. This makes them look fancy and inviting. Garnish with fresh toppings like chives or a dollop of sour cream. You can even sprinkle shredded cheese or add non-pork bacon bits on top. These little touches make your dish pop and taste even better! For the full recipe, check out the details above. {{image_4}} You can change the flavor of your air fryer baked potatoes with different seasonings. Here are a few fun blends: - Italian herb mix: Mix dried basil, oregano, and rosemary for a fresh taste. - Spicy Cajun blend: Combine paprika, cayenne pepper, and garlic for a kick. - Vegan cheese toppings: Try nutritional yeast or cashew cheese for a creamy layer. These blends can make your baked potatoes unique and exciting. Feel free to experiment! You might wonder how air frying compares to other cooking methods. Air frying is faster and gives a crispier skin. Here’s a quick comparison: - Air frying: Cooks quickly and evenly, keeping the insides fluffy. - Oven baking: Takes longer but can cook more potatoes at once. If you need a quicker option, you can use the microwave. Just microwave the potatoes for 5-7 minutes before air frying. This method cuts your cooking time by almost half! Toppings can transform your baked potatoes into gourmet meals. Here are some tasty ideas: - Vegetarian options: Load up with sautéed mushrooms, spinach, or roasted peppers. - Non-pork options: Use turkey bacon or plant-based bacon for a satisfying crunch. - Creative combinations: Try chili with cheese, or a medley of roasted veggies for a colorful dish. These ideas can make your baked potatoes stand out. Don’t be afraid to mix and match toppings! For the full recipe, check out the [Full Recipe]. To keep your baked potatoes fresh, follow these tips: - Cool them first: Let the baked potatoes cool to room temperature before storing. - Wrap tightly: Use plastic wrap or foil to wrap each potato. This keeps moisture in and prevents them from drying out. - Store in the fridge: Place the wrapped potatoes in an airtight container or bag. They can last about 3 to 5 days in the fridge. If you want to save them for later: - Freezing baked potatoes: Wrap them as mentioned and place in a freezer bag. They can last up to 6 months in the freezer. Just remember to label the bag with the date. For the best flavor and texture, try these reheating methods: - Air fryer method: Preheat your air fryer to 350°F (175°C). Place the potatoes in the basket for 10-15 minutes. This will make them crispy again. - Microwave method: If you're in a hurry, microwave the potatoes for 2-3 minutes. Check them and heat more if needed. The skin won’t be crispy, but the inside will be hot. - Oven method: Preheat your oven to 350°F (175°C). Wrap the potatoes in foil and heat for about 20-25 minutes. This keeps the skin nice and moist. By following these storage and reheating tips, you can enjoy your crispy air fryer baked potatoes anytime! For the full recipe, check out the detailed steps above. You cook baked potatoes for 35-40 minutes at 400°F (200°C). The time may change based on potato size. - Small potatoes: Cook for 30-35 minutes. - Medium potatoes: Cook for 35-40 minutes. - Large potatoes: Cook for 40-45 minutes. Flip the potatoes halfway through for even cooking. Yes, you can use aluminum foil in an air fryer. Make sure to follow these tips for safety: - Place the foil in a way that allows air to flow. - Do not cover the entire basket with foil. - Avoid letting foil touch the heating element. Using foil can help with clean-up and keep flavors in. The best potatoes for baking are russet, red, and Yukon gold. - Russet potatoes: They have a fluffy inside and a crisp skin. They are perfect for classic baked potatoes. - Red potatoes: These are waxy and hold their shape well. They are great for a creamy texture. - Yukon gold potatoes: They are smooth and buttery. They offer a mix of fluffy and creamy. Each type adds its own flavor and texture to your dish. For my recipe, I love using russet potatoes for their perfect balance of crispiness and fluffiness. For the full recipe, check out the details above. In this article, we explored how to make perfect air fryer baked potatoes. We covered essential ingredients, seasoning, cooking steps, tips for crispiness, and creative variations. Remember, preheating your air fryer is key to getting that perfect texture. Experiment with different spices and toppings to make each potato unique. With these simple steps, you can enjoy a delicious and versatile dish that satisfies any craving. Happy cooking!](https://tossedflavors.com/wp-content/uploads/2025/05/8ce6dbc1-6d3d-4132-a0cf-b3097429dc70.webp)
Air Fryer Baked Potatoes Crispy and Flavorful Delight
Are you ready to enjoy perfectly crispy and flavorful baked potatoes? Cooking them in an air fryer is the game changer you need! In this
![- 1 lb sirloin steak, cut into bite-sized pieces - 2 tablespoons Cajun seasoning - 4 tablespoons unsalted butter - 4 cloves garlic, minced The main ingredients make this dish pop. Sirloin steak offers rich flavor and tenderness. Cajun seasoning gives it that bold kick. Unsalted butter adds creaminess, while garlic enhances the aroma. The blend of these ingredients creates a mouthwatering experience. - 1 tablespoon fresh parsley, chopped (for garnish) - Salt and pepper to taste - Juice of half a lemon The additional ingredients bring freshness and brightness. Fresh parsley adds a vibrant touch. Salt and pepper balance the flavors, while lemon juice brightens the dish. This combination makes the steak bites even more delicious. For the full recipe, check out the details above. To start, you need to marinate the steak with Cajun seasoning. Take your sirloin steak and cut it into bite-sized pieces. In a large bowl, sprinkle 2 tablespoons of Cajun seasoning over the meat. Add a pinch of salt and some black pepper. Mix it well to coat every piece. The marinating time is key for flavor. I recommend letting the steak sit for at least 15-20 minutes at room temperature. This helps the spices soak in and makes the steak taste amazing. Next, heat the pan. Grab a large, heavy skillet and set it over medium-high heat. Once it’s hot, add 2 tablespoons of unsalted butter. You want the butter to melt and start to shimmer. This means it is ready for searing. Now, carefully add the seasoned steak pieces in a single layer. Make sure not to overcrowd the pan. Sear the steak for about 3-4 minutes on each side. You should see a nice brown crust forming. For medium-rare steak, cook it for a total of around 8 minutes. If you have a lot of steak, cook in batches to keep it even. Now it’s time to add garlic and butter. Once the steak is seared, lower the heat to medium. Push the steak to one side of the skillet. On the other side, add the remaining 2 tablespoons of butter and 4 cloves of minced garlic. Sauté the garlic for 1-2 minutes. It should smell great and turn lightly golden. Stir it often to keep it from burning. After that, mix the steak pieces back into the skillet. Squeeze half a lemon over the mixture for a bright, tangy flavor. Stir well to coat every bite in that garlic butter sauce. For serving, transfer the steak bites to a dish. Garnish with fresh parsley for color. Enjoy your Cajun garlic butter steak bites! For the complete recipe, check out the Full Recipe section. To cook steak bites just right, aim for a medium-high heat. This gives a nice sear. Use a meat thermometer to check the temperature. For medium-rare, look for 130°F. Avoid overcrowding the pan. If you add too much steak, it steams instead of sears. Cook in batches if needed. This way, you get the best flavor and texture in each bite. Customize the Cajun seasoning to suit your taste. If you love heat, add more spice. For a milder taste, reduce the seasoning. You can also mix in herbs like thyme or oregano for a fresh twist. Try using different ingredients for added flavor. A splash of Worcestershire sauce adds depth. You can also use smoked paprika for a hint of smokiness. These small changes create big flavor in your steak bites. For the full recipe, click here: [Full Recipe]. {{image_4}} You can change the cut of steak for this dish. While sirloin is great, try ribeye or flank steak. These cuts add different textures and flavors. Ribeye has more fat, giving it a rich taste. Flank steak is leaner but still juicy. Both work well with Cajun seasoning. You can also switch up the spices. If you want a different kick, try smoked paprika or chili powder. Both can bring a unique flavor profile. You could even make your own seasoning mix. Just combine garlic powder, onion powder, and cayenne pepper for a nice twist. Pair these steak bites with tasty sides. A fresh green salad adds a nice crunch. Roasted vegetables bring color and flavor to your plate. You can also serve them with rice or mashed potatoes. These sides soak up the garlic butter sauce well. Dips and sauces can elevate your meal. A creamy ranch or a tangy blue cheese sauce works great. For a spicy kick, try a sriracha mayo. These sauces add extra layers of flavor. You can choose based on your taste and mood. Enjoy exploring these options! For the full recipe, check out the Cajun Garlic Butter Steak Bites section above. To keep your Cajun garlic butter steak bites fresh, follow these tips: - Refrigeration: Place the steak bites in an airtight container. They stay good for up to three days. - Freezing: If you want to save them longer, freeze the steak bites. Use freezer-safe bags or containers. They can last up to three months. When reheating, you want to keep the flavor and texture just right. Here are some methods: - Skillet Method: Heat a skillet over medium heat. Add the steak bites and a splash of water or broth. Stir until warmed through. - Microwave Method: If you're in a hurry, use the microwave. Place the steak bites in a microwave-safe dish. Cover with a damp paper towel and heat for 30 seconds. Check and heat more if needed. To avoid dry steak, don’t overheat. Keep an eye on it while reheating. Enjoy every juicy bite! For more ideas, check out the Full Recipe. How do I make cajun seasoning from scratch? To make cajun seasoning, you need a few spices. Mix together: - 1 tablespoon paprika - 1 teaspoon onion powder - 1 teaspoon garlic powder - 1 teaspoon cayenne pepper - 1 teaspoon dried thyme - 1 teaspoon dried oregano - Salt and black pepper to taste. This mix gives you a spicy kick that adds flavor to your steak bites. Can I use chicken or shrimp instead of steak? Yes, chicken or shrimp works great too! Just adjust cooking times. Shrimp cooks fast, about 2-3 minutes. Chicken needs more time. Aim for 6-8 minutes until fully cooked. You’ll still enjoy the same tasty garlic butter sauce with these options. What is the best way to ensure steak is tender? To keep steak tender, choose the right cut. Sirloin is great! Marinate for at least 15-20 minutes. This helps break down tough fibers. Always let the steak rest after cooking. It keeps juices in, making each bite juicy and soft. How long can I marinate the steak for optimal flavor? You can marinate the steak for up to 24 hours. However, I suggest 15-20 minutes for a quick meal. Longer marinating can make the steak too salty. Just find that sweet spot to enjoy bold flavors without losing tenderness. In this blog, we explored the key ingredients for a tasty dish. We focused on sirloin steak, Cajun seasoning, and cooking techniques. I shared tips to perfect your steak bites and suggested ways to customize flavors. Variations, storage tips, and answers to common questions rounded out the post. Cooking steak can be simple and rewarding. With these methods, you can impress at any meal. Enjoy experimenting and making this dish your own!](https://tossedflavors.com/wp-content/uploads/2025/05/209683ec-179b-49ee-9363-8cfd50164d65.webp)
Cajun Garlic Butter Steak Bites Flavorful and Juicy
Get ready to savor the bold flavors of Cajun Garlic Butter Steak Bites! This dish is packed with juicy sirloin, zesty Cajun seasoning, and rich
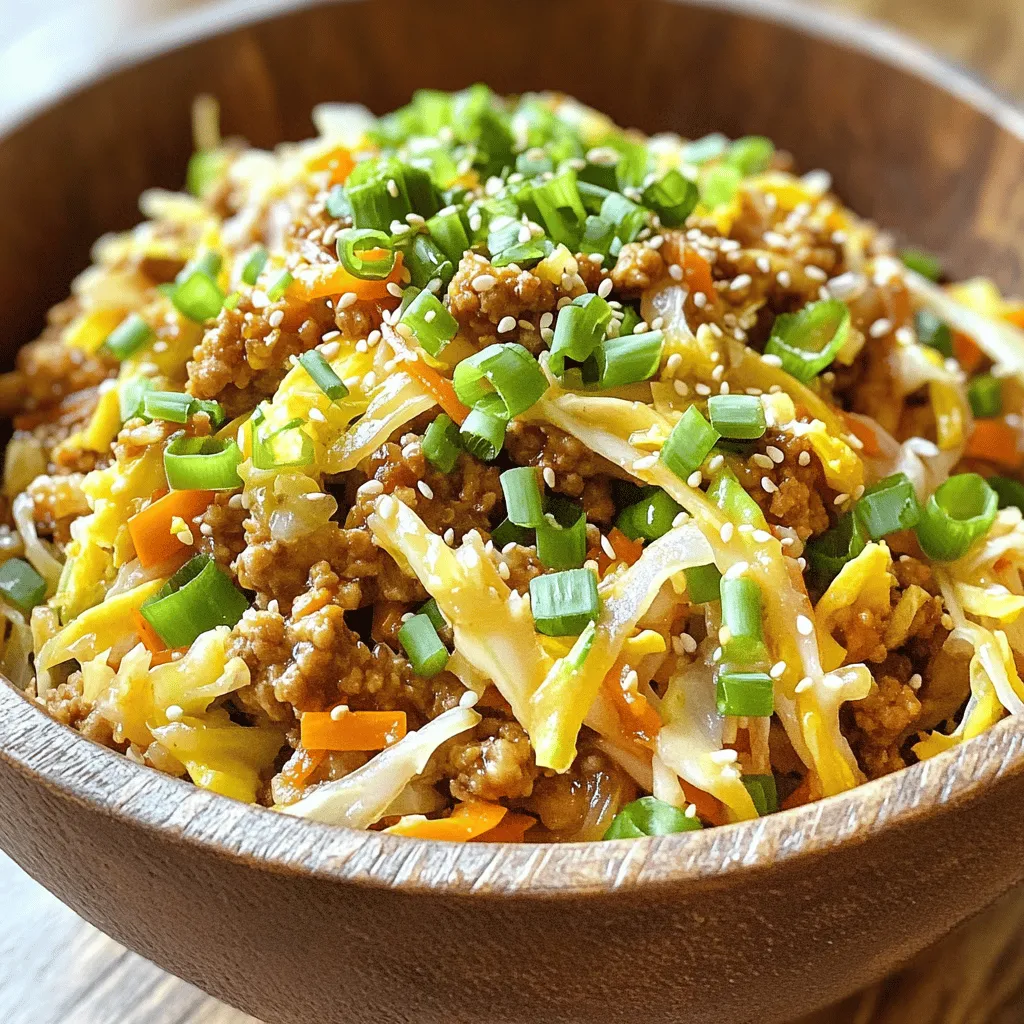
Easy Egg Roll in a Bowl with Flavorful Ingredients
Craving a quick, tasty meal? Let me show you how to make an Easy Egg Roll in a Bowl using simple, flavorful ingredients. This dish

Juicy Air Fryer Chicken Breasts Perfectly Cooked Dish
Looking for the ultimate recipe for Juicy Air Fryer Chicken Breasts? You’ve come to the right place! In this post, I’ll share step-by-step instructions and
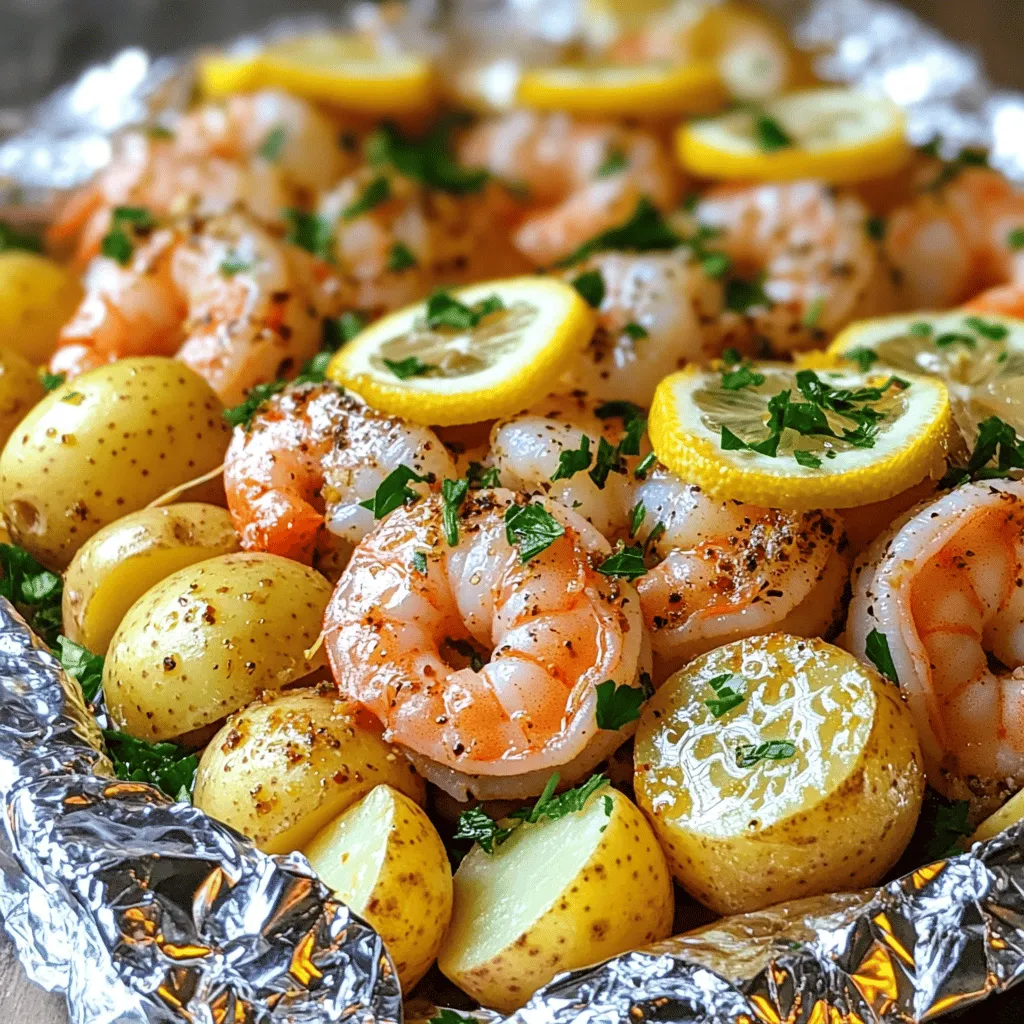
Savory Shrimp Boil Foil Packs Easy and Flavorful Dish
Looking for a simple yet tasty meal? Try these savory shrimp boil foil packs! Packed with fresh shrimp, corn, and baby potatoes, this dish is
![- 2 boneless, skinless chicken breasts - 1 cup breadcrumbs (panko preferred) - 1/2 cup freshly grated Parmesan cheese - 1 teaspoon garlic powder - 1 teaspoon Italian seasoning - 1/2 teaspoon salt - 1/2 teaspoon freshly ground black pepper - 3 cloves garlic, finely minced - 1/2 cup heavy cream - Fresh parsley, for garnish For this crispy Parmesan chicken, I use simple yet tasty ingredients. The star of the dish is, of course, the chicken. I like to use boneless and skinless chicken breasts. They cook evenly and get so tender. For the coating, I prefer panko breadcrumbs. They add a light crunch that makes each bite delightful. Mixing them with freshly grated Parmesan cheese gives the chicken a rich flavor. Next, I add some seasoning to make the chicken pop. Garlic powder and Italian seasoning bring warmth and depth. The salt and pepper round out the taste perfectly. Now, let’s talk about the garlic sauce. Fresh garlic is a must for a strong flavor. I finely mince it to release its oils. Heavy cream makes the sauce rich and creamy. Finally, I top it with fresh parsley for a pop of color and flavor. You can find the full recipe to make this dish at home. Get ready to impress your family and friends with this delicious meal! - Preheat your oven to 400°F (200°C). Line a baking sheet with parchment paper. - Set up your dredging station. Place all-purpose flour in one bowl. In another bowl, crack two eggs and beat them well. - In a shallow dish, mix the breadcrumbs, grated Parmesan cheese, garlic powder, Italian seasoning, salt, and pepper. Stir until well combined. - Take each chicken breast. Coat it in flour first, shaking off the extra. Then, dip it in the beaten eggs. Finally, press it into the breadcrumb mix to coat evenly. - Heat two tablespoons of olive oil in an oven-safe skillet over medium heat. - Once the oil is hot, add the breaded chicken. Cook it for about 3-4 minutes on each side until golden brown. - Transfer the skillet to the preheated oven. Bake the chicken for 15-20 minutes until it reaches 165°F (75°C) inside. This ensures it is fully cooked. These steps will help you create Crispy Parmesan Chicken with Garlic Sauce that is both easy and delicious. For the complete recipe, check the [Full Recipe]. Enjoy every bite! To get the best crunch, use panko breadcrumbs. They create a light, airy texture. When you coat the chicken, make sure to cover every inch. Press the breadcrumbs firmly to help them stick. This ensures a uniform crunch that is simply delightful. Timing is key for the garlic sauce. Start making it when the chicken is baking. This way, it stays fresh and hot. To adjust the flavor, taste and season as needed. A pinch of salt or pepper can really enhance the sauce. Drizzle the garlic sauce over the chicken just before serving. This adds a nice touch and keeps the chicken looking fresh. Add some fresh parsley as a garnish. It brightens the dish and makes it visually appealing. Serve on warm plates to keep everything at the perfect temperature. Enjoy your meal! {{image_4}} You can make this dish even better with some fun tweaks. Try different cheeses like mozzarella or gouda for a new taste. Each cheese adds its own twist. You can also mix in herbs or spices. Basil, thyme, or even a pinch of cayenne pepper can change the flavor profile. Experimenting will keep your meals exciting! Looking for a lighter option? Baking instead of frying works great. It cuts down on oil and keeps the chicken crispy. You can also use whole wheat breadcrumbs. They add more fiber and nutrients, making your meal healthier without losing taste. These small swaps can make a big difference in your cooking. What’s the best way to enjoy your Crispy Parmesan Chicken? Pair it with sides like roasted vegetables or a fresh salad. The crunch of the chicken goes well with the freshness of the veggies. A lemon wedge on the side adds a zesty kick. Squeeze it over the chicken for a burst of flavor. It elevates the dish and makes it feel special. To keep your Crispy Parmesan Chicken fresh, store leftovers in an airtight container. This helps lock in flavor and moisture. In the fridge, the chicken stays good for about three to four days. Make sure it cools down before packing it away. This ensures it stays crispy. Freezing is a great way to save leftover chicken for later. First, let the chicken cool completely. Then, wrap it tightly in plastic wrap. Place it in a freezer-safe bag or container. This helps prevent freezer burn. You can freeze the chicken for up to three months. When you’re ready to enjoy it, thaw it in the fridge overnight for the best taste. To reheat your chicken without losing its lovely crunch, use the oven. Preheat it to 350°F (175°C). Place the chicken on a baking sheet and heat for about 10-15 minutes. This method helps keep the crust crispy. Avoid reheating in the microwave, as it can make the coating soggy. If you must use the microwave, try a short burst on low power. It takes about 15 minutes to prep and 25 minutes to cook. The total time is around 40 minutes. You will have a delicious meal ready to enjoy in no time. Yes, you can make the garlic sauce ahead. Simply prepare the sauce and store it in the fridge. When ready to serve, just reheat it gently on the stove. This saves time when you want to enjoy your chicken. If your chicken isn’t crispy, check your coating. Make sure you use enough breadcrumbs. Panko breadcrumbs add the best crunch. Also, ensure you heat your oil well before adding the chicken. If the oil isn’t hot enough, the chicken will not crisp up. Another tip is to avoid overcrowding the pan; this keeps the heat steady and helps each piece cook evenly. This blog covered all you need for making Crispy Parmesan Chicken. You learned about key ingredients, step-by-step instructions, and tips for success. I shared ideas for variations, storage, and answers to common questions. Cooking can be fun and simple with these methods. Enjoy trying new flavors and techniques in your kitchen. Mix and match ideas for your perfect dish. With practice, you'll impress everyone with your crispy chicken. Happy cooking!](https://tossedflavors.com/wp-content/uploads/2025/05/784d5e5e-2cbc-43e7-9f3b-2c661943fd93.webp)
Crispy Parmesan Chicken with Garlic Sauce Delight
Are you ready to impress your family with a delicious dinner? Let’s dive into making Crispy Parmesan Chicken with Garlic Sauce! This dish features golden,