Dinner

Easy Chicken Enchilada Casserole Tasty and Fast Meal
Are you looking for a quick and tasty dinner? This Easy Chicken Enchilada Casserole is your answer! With simple ingredients like cooked chicken, black beans,

White Cheddar and Spinach Chicken Burgers Recipe
Are you ready to spice up your dinner routine? This White Cheddar and Spinach Chicken Burgers recipe combines juicy chicken with creamy cheese and healthy
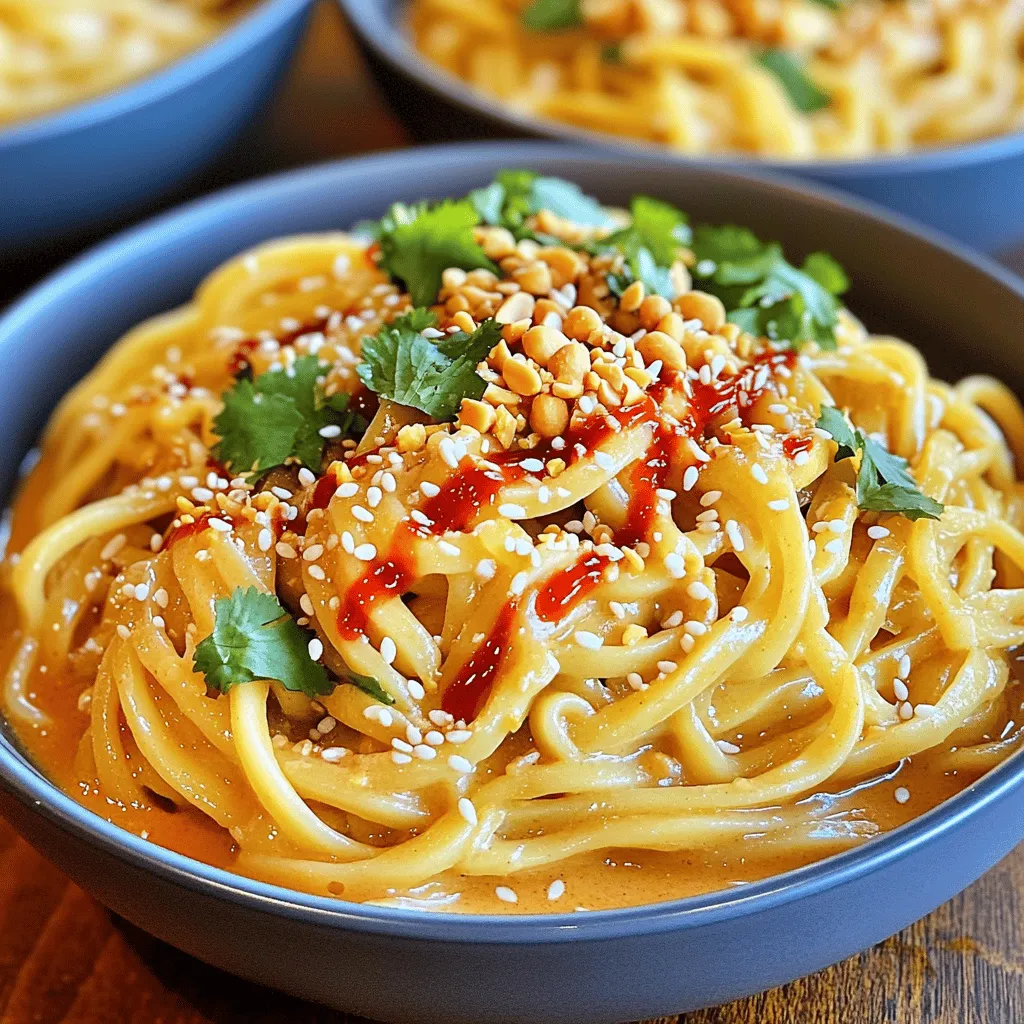
Addictive Dan Dan Noodles That You’ll Crave
Are you ready to discover a dish that will have you coming back for more? Addictive Dan Dan Noodles are bursting with flavor and spice.

Homemade Hamburger Helper Simple and Flavorful Meal
If you’re looking for a simple and tasty meal, you’ve found it! Homemade Hamburger Helper is easy to make and packed with flavor. You can
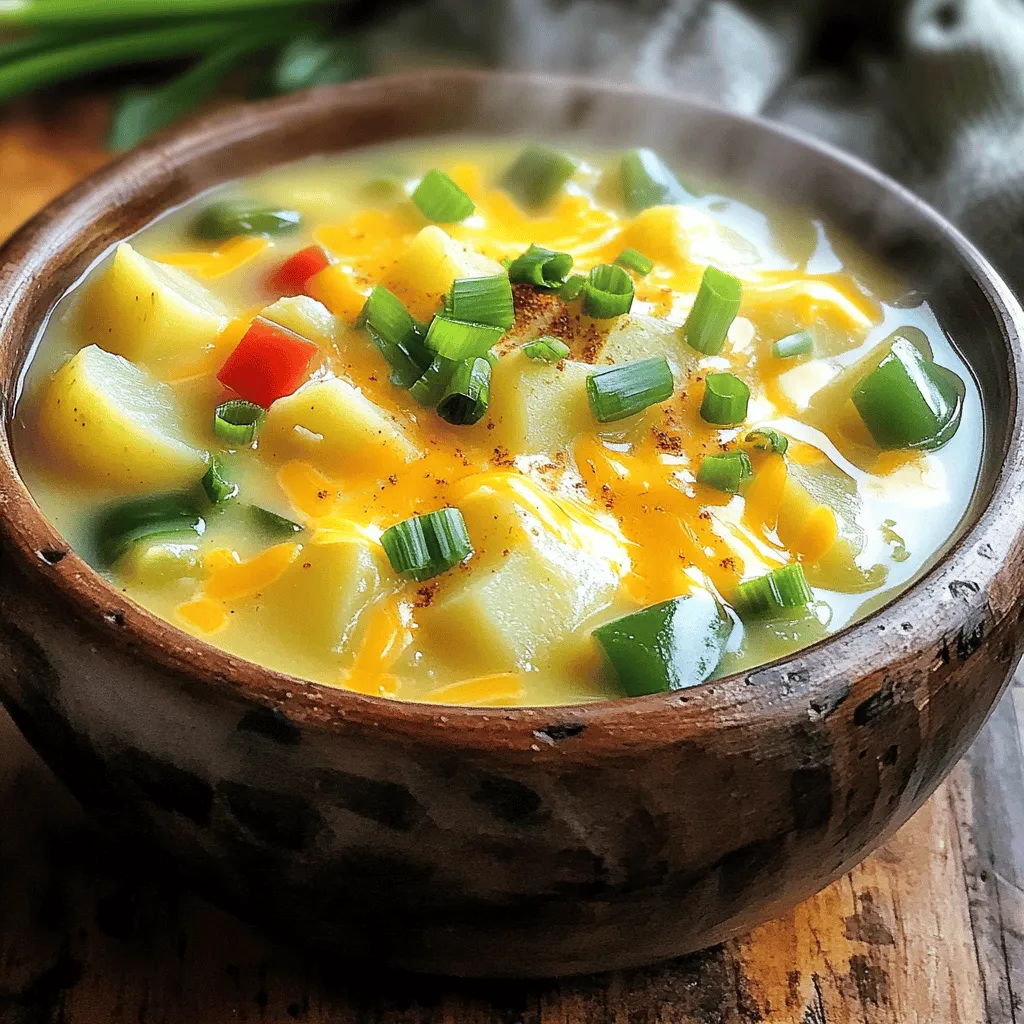
Cajun Potato Soup Rich and Comforting Recipe Guide
Warm, rich, and full of flavor, Cajun Potato Soup is comfort in a bowl. In this guide, I’ll share my favorite recipe and tips to
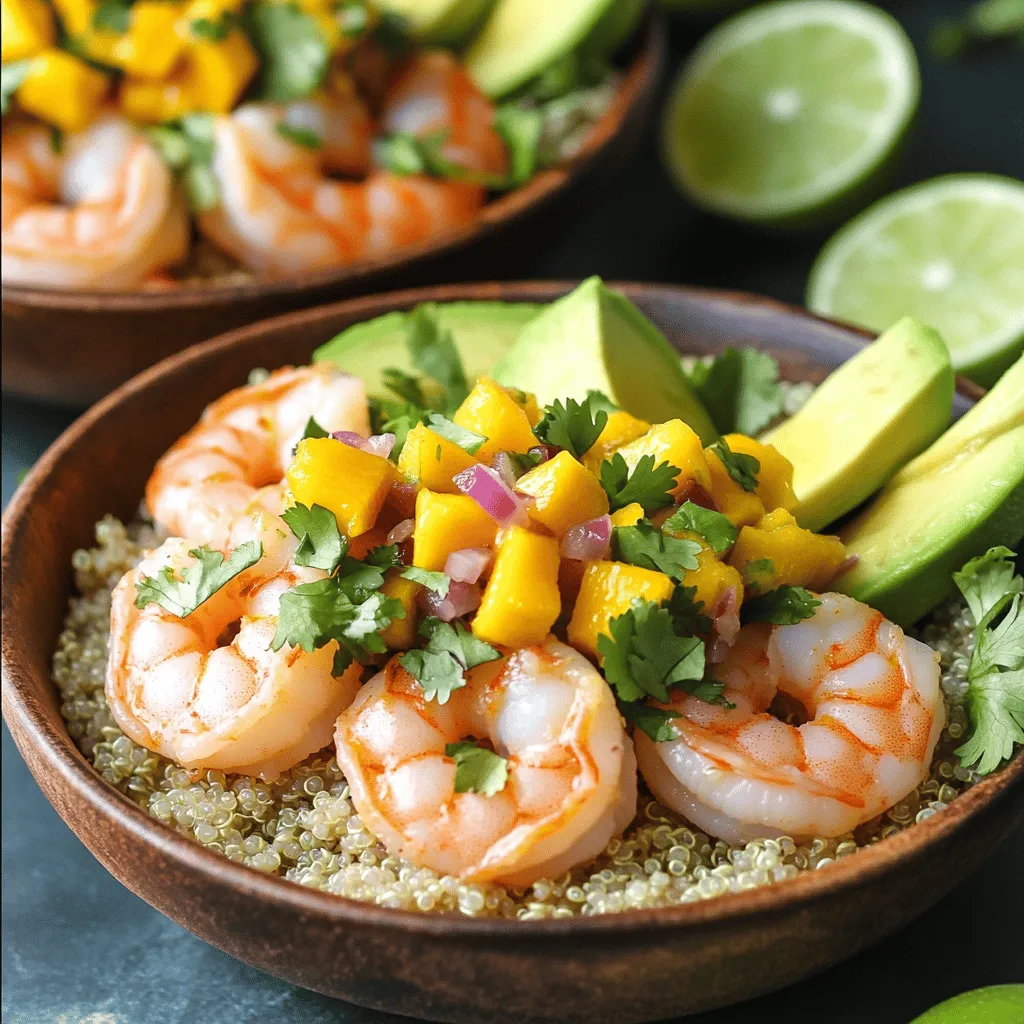
Shrimp and Avocado Bowls with Mango Salsa Delight
Craving a fresh and vibrant meal? Dive into my Shrimp and Avocado Bowls with Mango Salsa Delight! This dish combines juicy shrimp, creamy avocados, and
![- Fresh cheese tortellini - Italian sausage - Pepperoni slices - Ground beef - Mozzarella cheese - Marinara sauce - Pizza sauce - Italian herbs - Olive oil - Salt and pepper - Fresh basil (optional) To make Meat Lovers Pizza Tortellini, you need fresh cheese tortellini as your base. This pasta is soft and holds flavor well. For meat, crumbled Italian sausage and cooked ground beef give a hearty texture. Pepperoni slices add a nice spice and crunch. You also need shredded mozzarella cheese for that gooey, melty goodness. Marinara sauce and pizza sauce bring the pizza flavor to life. Italian herbs like oregano and basil add depth to the dish. Olive oil helps cook the sausage. Don't forget salt and pepper for seasoning. Fresh basil can elevate the look and taste if you like. You can find all these ingredients at your local grocery store. This list makes about four servings. You will love how these ingredients come together to create a warm, filling meal. For the full recipe, check out the detailed steps in the recipe section. Start by boiling a large pot of salted water. Once it bubbles, add the fresh cheese tortellini. Cook them based on the package directions until they are al dente. This means they should be firm but not hard. After cooking, drain the tortellini and set them aside. Next, grab a large skillet and heat it over medium heat. Add olive oil to the hot pan. Once the oil shimmers, toss in the crumbled Italian sausage. Cook it until it turns brown and is fully cooked. Then, add the cooked ground beef to the skillet. Stir everything together and let the flavors mix for 2-3 minutes. Now it’s time to add the fun part: the pepperoni! Put the halved pepperoni into the meat mixture. Let it cook for another 2 minutes. This will make the pepperoni crisp and release its tasty oils. After that, lower the heat and pour in both the marinara sauce and pizza sauce. Mix everything well, adding dried Italian herbs, salt, and pepper to taste. Carefully fold the cooked tortellini into your skillet. Gently stir until every piece is coated with the meat and sauce. You want to make sure the flavors blend nicely. Next, sprinkle the shredded mozzarella cheese evenly over the top. Cover the skillet with a lid and cook on low heat for about 5 minutes. This will help the cheese melt and become bubbly. Once the cheese is melted, remove the lid and give the mixture a gentle stir. This helps mix everything together. Serve your dish hot on plates or in bowls. For a fresh touch, you can garnish it with basil leaves if you like. For the complete recipe, check out the Full Recipe section! To keep your tortellini from becoming mushy, cook them just until al dente. This means they should still have a slight bite. Follow the package instructions carefully. Once cooked, drain them right away. Don’t let them sit in the water. For the cheese, melting it perfectly is key. After folding the tortellini into the meat mixture, sprinkle the mozzarella on top. Cover the skillet with a lid. This traps the heat and helps the cheese melt evenly. Cook on low heat for about five minutes. You want it bubbly and golden. To amp up the flavor, consider adding spices like crushed red pepper or garlic powder. You can also try different cheeses. Gouda or provolone can add a nice twist. Want extra toppings? Add sliced olives, mushrooms, or bell peppers. These will bring more taste and texture to your dish. For the perfect side dish, serve a fresh green salad. A light vinaigrette pairs well with the rich flavors of the tortellini. Garlic bread is another great option. It helps soak up all the delicious sauce. When it comes to beverages, a light beer or a glass of red wine works well. Look for something fruity and not too heavy. Sparkling water with a slice of lemon is a refreshing non-alcoholic choice. For the complete recipe, check out the [Full Recipe]. {{image_4}} You can switch up the meats in this dish. Try chicken or ham for a twist. These options add new flavors and textures. If you want a vegetarian choice, use meat substitutes like tempeh or seitan. These alternatives work well and still taste great. They soak up the sauce, making every bite delicious. The sauce is key to a tasty dish. You can use different pizza or pasta sauces to change the flavor. For a creamier texture, add a rich Alfredo sauce or a bright pesto. Mixing marinara with cream gives a nice balance. You can also try spicy sauce for a kick. Experimenting with sauces lets you find the perfect taste. Adding veggies can make your dish even better. Bell peppers, onions, or mushrooms add color and nutrition. You can also sprinkle extra cheese on top. Try goat cheese or Parmesan for a new flavor. Mixing different cheeses brings richness and depth. Get creative with toppings to make your Meat Lovers Pizza Tortellini unique. For the full recipe, check out the details above. To store your Meat Lovers Pizza Tortellini leftovers, let them cool first. Place the tortellini in an airtight container. This keeps them fresh and safe. Use glass or plastic containers with tight lids for the best results. Avoid using metal containers as they may rust. If you want to save the dish for later, freezing is a great option. Make sure the tortellini is fully cooled before freezing. Use freezer-safe bags or containers. Squeeze out as much air as possible to prevent freezer burn. When you are ready to eat, thaw the tortellini in the fridge overnight. Reheat gently on the stove or in the microwave until hot. In the fridge, the Meat Lovers Pizza Tortellini lasts about three to four days. If you freeze it, it can last up to three months. Always check for signs of spoilage. Look for any off smells, mold, or changes in texture. If you notice any of these, it’s best to throw it away. Meat Lovers Pizza Tortellini is a fun twist on classic pizza flavors. It combines cheese tortellini with savory meats like Italian sausage, pepperoni, and ground beef. The dish gets its rich taste from marinara and pizza sauce, topped with gooey mozzarella cheese. This dish is hearty and fills you up, perfect for pizza lovers. Yes, you can use frozen tortellini! Just add it directly to boiling water. Cook it for 1-2 minutes longer than fresh tortellini. Make sure to check the package for exact cooking times. This method keeps your meal quick and easy. To make this dish vegetarian, swap the meats for plant-based options. Use meatless sausage or mushrooms for texture. You can also add more veggies like bell peppers or spinach. This keeps the flavor while making it meat-free. Yes, you can prepare it in advance! Cook the tortellini and meat mixture. Then, store them separately in the fridge. When you're ready to eat, combine them and reheat. This saves time on busy nights. Great side dishes include a fresh salad or garlic bread. You can also serve it with steamed vegetables for balance. These options add color and nutrition to your meal. Many pizza places and Italian restaurants offer variations of Meat Lovers Pizza Tortellini. Check local chains like Olive Garden or Pizza Hut. They may have similar pasta dishes on their menus. Now you know how to make Meat Lovers Pizza Tortellini. We covered ingredients, cooking steps, and helpful tips. Remember to use fresh ingredients for the best flavor. Feel free to try variations with different meats and sauces. Don't forget to store leftovers properly. With these tips, you can impress friends and family. Enjoy your cooking and have fun experimenting with flavors!](https://tossedflavors.com/wp-content/uploads/2025/06/5e32b6f7-bee6-4919-b5a1-10227b40c276.webp)
Meat Lovers Pizza Tortellini Savory and Filling Dish
Are you ready to dive into a dish that’s both savory and satisfying? Meat Lovers Pizza Tortellini combines all your favorite pizza flavors with tender,
![To make a tasty Mediterranean ground beef stir fry, gather these simple ingredients: - 1 lb ground beef - 1 medium onion, finely diced - 2 cloves garlic, minced - 1 bell pepper, thinly sliced - 1 medium zucchini, sliced into half-moons - 1 cup cherry tomatoes, halved - 1 teaspoon dried oregano - 1 teaspoon ground cumin - 1/2 teaspoon smoked paprika - 2 tablespoons olive oil - Salt and freshly cracked pepper to taste - Fresh parsley, chopped (for garnish) - Crumbled feta cheese (optional) - Pita bread or fluffy couscous (for serving) These ingredients blend well to create a dish that sings with flavor. The ground beef serves as a hearty base, while the vegetables add color and crunch. Fresh herbs and spices elevate the taste, making each bite a delight. The feta cheese offers a tangy twist, perfect for those who love a creamy finish. You can find the full recipe at the end of this article for easy reference! - Heat 2 tablespoons of olive oil over medium-high heat. - Sauté 1 finely diced onion until it turns translucent. - Add 2 minced garlic cloves and cook until fragrant. - Add 1 pound of ground beef and break it into smaller pieces. - Cook until browned and drain any excess fat. - Introduce 1 sliced bell pepper and 1 sliced zucchini to the skillet. - Add 1 cup of halved cherry tomatoes and season with 1 teaspoon dried oregano, 1 teaspoon ground cumin, and 1/2 teaspoon smoked paprika. - Stir well and cook until vegetables are softened and bright. For a detailed list of ingredients and the full recipe, check the [Full Recipe]. Adjusting the seasoning is key. Start with salt and pepper. Taste as you cook. This way, you find the balance you like. If you want more depth, add a pinch of cumin or smoked paprika. Cooking the vegetables to the right texture matters too. You want them soft but still bright. Sauté bell peppers and zucchini just until they soften. This keeps them from becoming mushy and bland. When serving, choose between warm pita bread or fluffy couscous. Pita is great for scooping. Couscous offers a nice, fluffy base for the stir fry. Both are tasty and fill you up. For an extra flavor boost, add tzatziki sauce. This creamy dip pairs well with the spices in the stir fry. It adds a fresh note that brightens the whole dish. To sauté well, keep your pan hot. Heat the olive oil until it shimmers. This helps the onions cook quickly and evenly. Stir often to prevent burning. For a perfect stir fry texture, cook the ground beef in small pieces. This allows it to brown nicely. Use a spatula to break it apart as it cooks. Avoid overcrowding the pan, or the beef will steam instead of sear. For the full recipe, check the section above. {{image_4}} You can switch up the protein in your Mediterranean ground beef stir fry. Try using turkey or chicken for a lighter meal. These meats still bring great flavor and pair well with the spices. If you want a vegetarian option, chickpeas or lentils work nicely. Both options add protein and fiber, making the dish filling and healthy. Feel free to swap in seasonal vegetables based on what you have. For instance, you can use asparagus in spring or butternut squash in fall. These choices keep your stir fry fresh and exciting. You can also add leafy greens like spinach or kale. Just toss them in at the end of cooking. They wilt quickly and add a nice color. Don’t hesitate to play with spices and herbs to make this dish your own. A sprinkle of cumin or a dash of sumac adds depth. If you like tang, a splash of lemon juice or red wine vinegar brightens the flavors. These small changes can transform your stir fry into a new experience. For the full recipe, check out the details above. To keep your Mediterranean ground beef stir fry fresh, store it in an airtight container. This helps maintain flavor and texture. Place the container in the fridge promptly after serving. You can store leftovers for up to three days. If you want to keep them longer, consider freezing. When it’s time to enjoy your leftovers, use the stovetop for the best results. Heat a skillet over medium heat and add a splash of water or broth to keep it moist. Stir until heated through, about 5-7 minutes. If you freeze the stir fry, thaw it overnight in the fridge before reheating. This way, it retains its yummy taste. To speed up your meal prep, chop your veggies and store them in the fridge. You can also cook the ground beef ahead of time. This means you can whip up dinner in under 15 minutes on busy weeknights. For quick meals, serve the stir fry with pita bread or couscous, as both are ready in minutes. Enjoy your flavorful delight! You can serve it with: - Warm pita bread - Fluffy couscous - A side of creamy tzatziki - A fresh salad with cucumbers and tomatoes These sides add a nice balance to the meal. They soak up juices and enhance flavors. Yes! To make a meatless stir fry, you can use: - Cooked chickpeas - Lentils - Tofu, cubed and sautéed - Extra vegetables like spinach or mushrooms These options keep the dish hearty and flavorful. You can still use the same spices for a tasty outcome. This dish is quick! It takes about: - 10 minutes to prep - 20 minutes to cook So, you can have dinner ready in just 30 minutes. Perfect for busy weeknights! Absolutely! You can adjust spices such as: - Adding more cumin for warmth - Using chili flakes for heat - Trying fresh herbs like basil or thyme Feel free to experiment until you find your perfect blend. This blog post explored a flavorful Mediterranean ground beef stir fry. We discussed ingredients, preparation, and easy cooking techniques. You learned how to adjust flavors, store leftovers, and customize this dish. Remember, you can use different proteins and veggies for variety. Cooking should be fun and fit your taste. Enjoy creating your own unique version and share it with others. Dive in and let your kitchen adventures begin!](https://tossedflavors.com/wp-content/uploads/2025/06/cc1fe251-ce7f-43fa-81f7-39589a8945d6.webp)
Mediterranean Ground Beef Stir Fry Flavorful Delight
Get ready to elevate your dinner game with a Mediterranean Ground Beef Stir Fry! This dish isn’t just quick to make; it’s packed with fresh
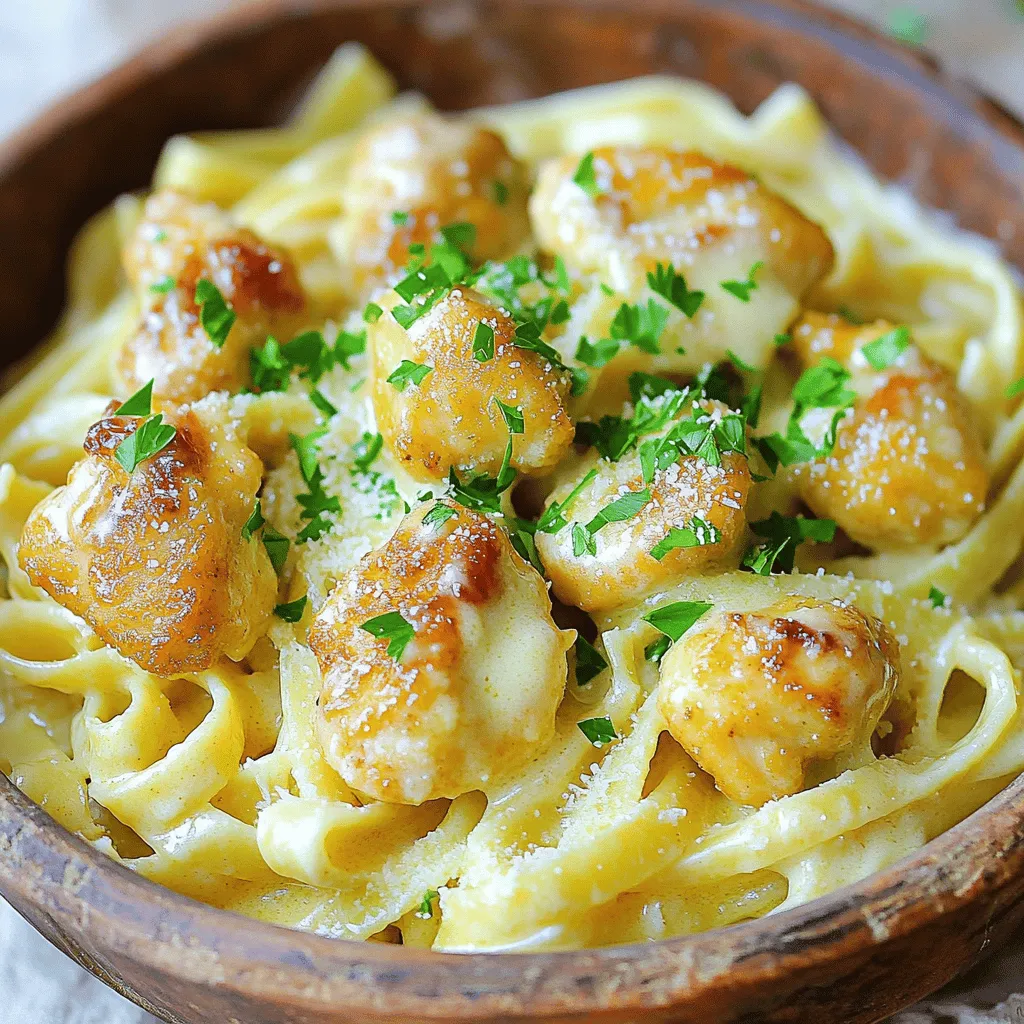
Garlic Butter Chicken Bites with Creamy Parmesan Pasta
Craving a cozy meal that’s loaded with flavor? Let me introduce you to Garlic Butter Chicken Bites with Creamy Parmesan Pasta! This dish combines juicy

Healthy Enchilada Skillet Easy and Flavorful Recipe
Are you ready to whip up a delicious meal that’s both healthy and simple? My Healthy Enchilada Skillet is just the recipe you need! Bursting