Dinner
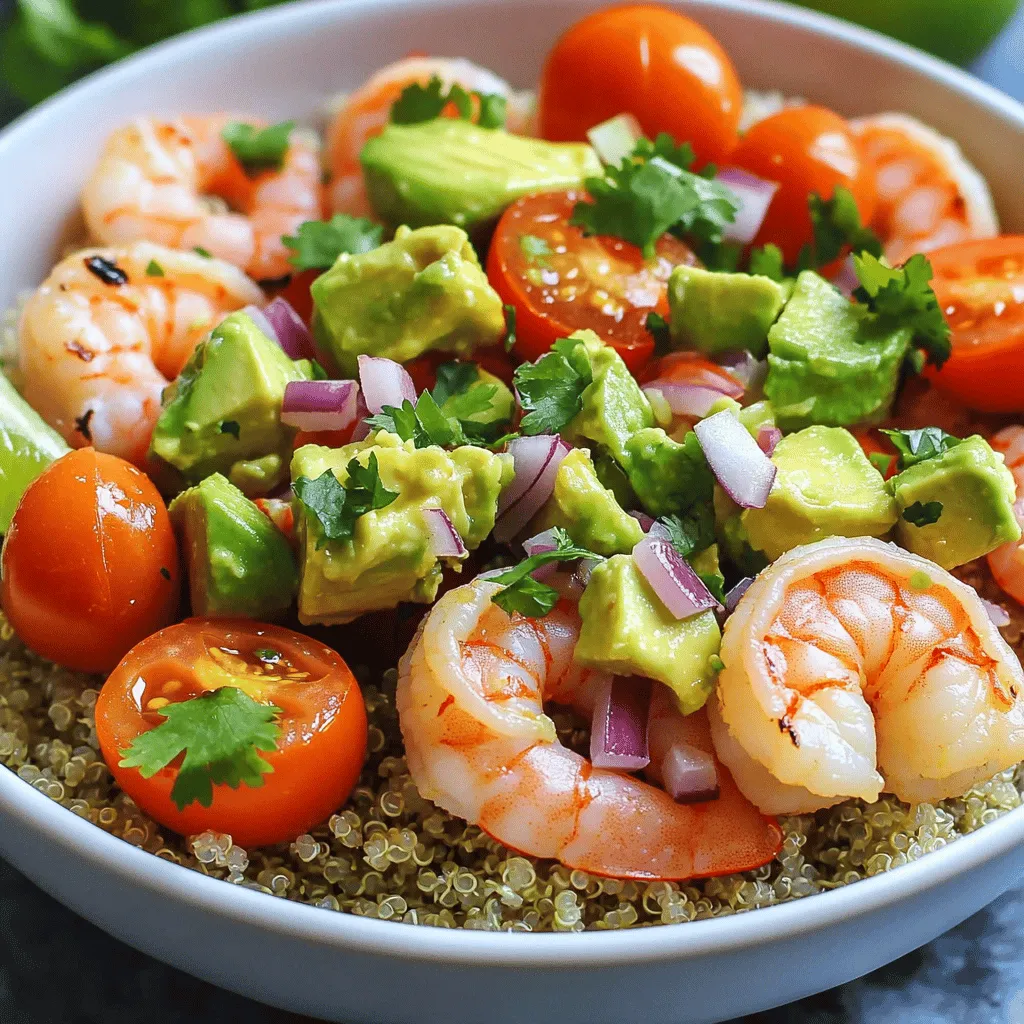
Grilled Shrimp Bowl with Avocado Salsa Delight
Welcome to my Grilled Shrimp Bowl with Avocado Salsa Delight! If you crave a tasty and healthy meal, this dish is for you. Juicy shrimp
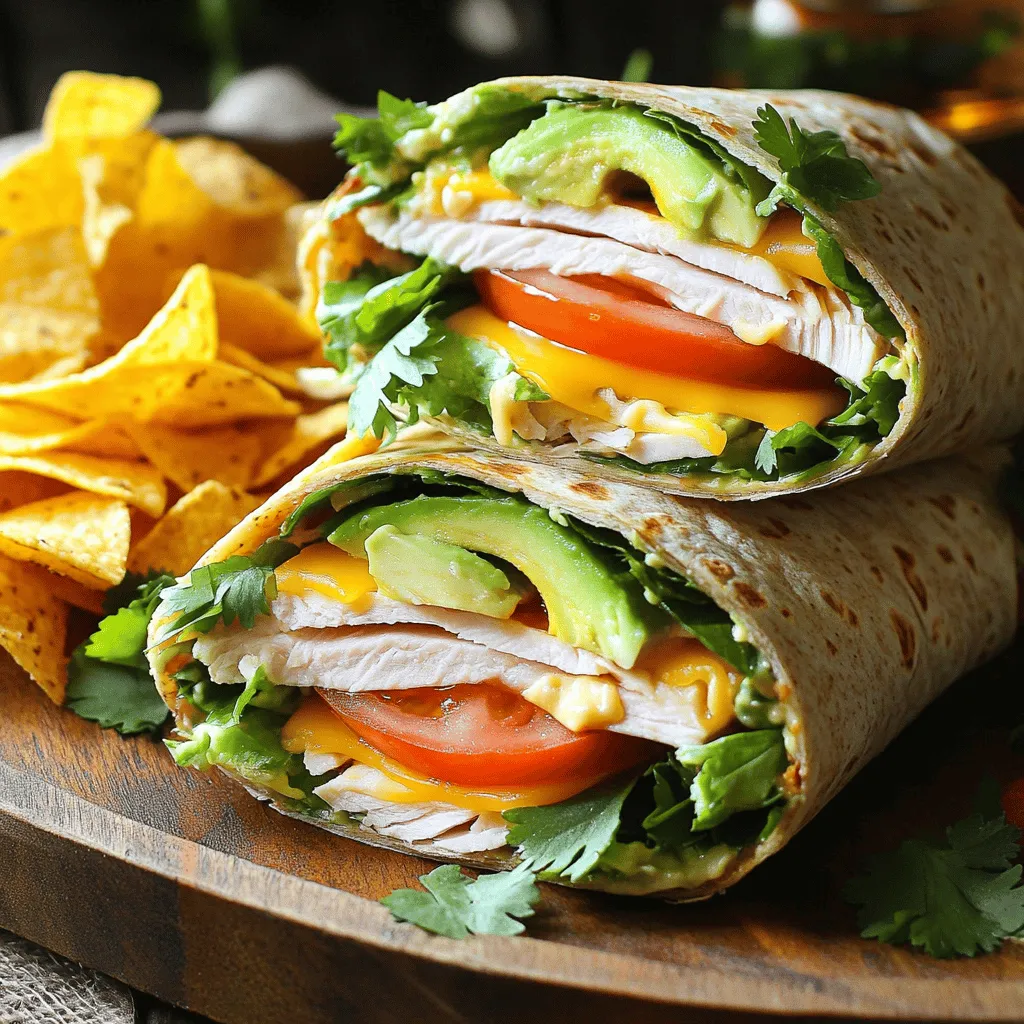
California Turkey Club Wraps Tasty and Easy Recipe
Are you ready to whip up a quick meal that’s both tasty and satisfying? Today, I’ll share my easy recipe for California Turkey Club Wraps.
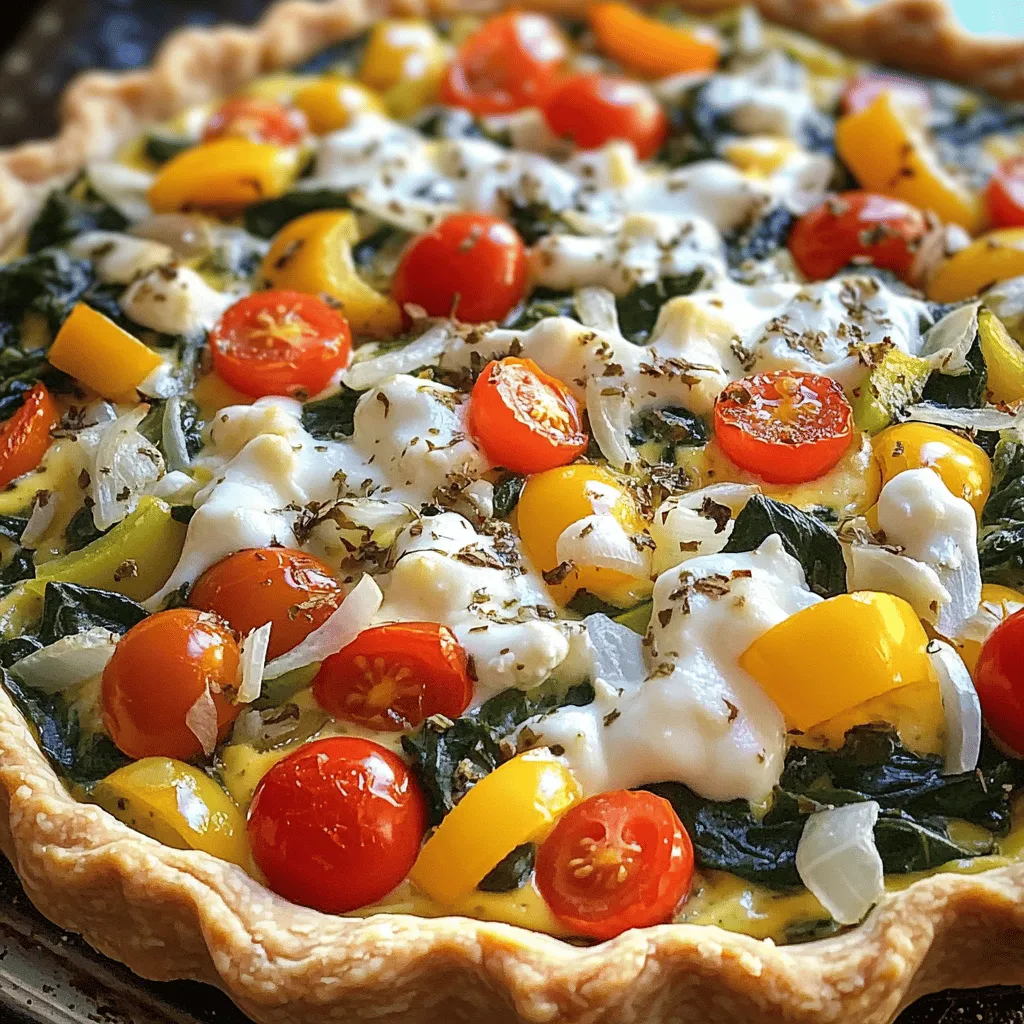
Crustless Cottage Cheese Quiche Simple and Tasty Dish
Crustless Cottage Cheese Quiche is a simple and tasty dish that you’ll love. Packed with protein and fresh veggies, it’s perfect for breakfast, lunch, or
![- 4 salmon fillets (approximately 6 ounces each) - 1/4 cup Dijon mustard - 1/4 cup honey - 2 tablespoons extra-virgin olive oil - 2 cloves garlic, finely minced - 1 tablespoon freshly squeezed lemon juice - Salt and freshly ground black pepper, to taste - 1 tablespoon fresh dill or parsley (for garnish) - Lemon wedges (for serving) Gathering these ingredients is quick and easy. Salmon is the star of this dish. Each fillet should weigh around 6 ounces. This ensures they cook evenly. Dijon mustard and honey form a great glaze. The mustard adds a nice tang, while honey brings sweetness. These flavors blend well and make the salmon shine. Don't forget the olive oil! It adds richness and helps the glaze stick. Fresh garlic gives a nice kick. The lemon juice brightens the dish and adds freshness. Use salt and black pepper to season the salmon well. They enhance the flavors of the fish and the glaze. For garnish, fresh dill or parsley makes the dish look pretty. Lemon wedges on the side add extra zest. You can use these to squeeze on top before eating. This mix of flavors makes every bite a delight. For the full recipe, check out the detailed instructions. This will guide you step-by-step to make a fantastic meal. - Preheat your oven to 375°F (190°C). - Prepare a baking dish with parchment paper. This helps with easy cleanup. - Combine Dijon mustard, honey, olive oil, garlic, and lemon juice in a bowl. - Whisk until smooth and well blended. This mix brings sweet and tangy flavors. - Pat the salmon fillets dry with paper towels. - Season both sides with salt and pepper. This step boosts the taste. - Arrange the fillets in the baking dish, skin-side down. - Generously apply the honey mustard mixture over each fillet. - Make sure each piece is well coated. This adds great flavor. - Bake in the preheated oven for 15-20 minutes. - Check for doneness: the salmon should be opaque and flake easily. - Allow the salmon to rest before serving. - Garnish with fresh dill or parsley for color. Serve with lemon wedges for a zesty touch. For the full recipe, check out the [Full Recipe]. For a tasty salmon, start with the right seasoning. Use salt and black pepper generously. This simple step enhances the salmon's natural flavor. You can also add garlic powder or paprika for more taste. Cooking times vary with salmon thickness. Bake thinner fillets for about 15 minutes. For thicker pieces, aim for 20 minutes or a bit more. Always check with a fork; it should flake easily when done. Marinades boost flavor and tenderness. A mix of soy sauce, garlic, and ginger works well. You can prepare this ahead of time. Marinate the salmon for at least 30 minutes. For stronger flavor, let it sit for up to 2 hours. If you want a lighter dish, consider using maple syrup instead of honey. You can use whole grain mustard instead of Dijon for a different taste. Pair your salmon with low-calorie sides like steamed broccoli or a fresh salad. Think about serving it with quinoa or brown rice for added nutrients. For the full recipe, check the link above! {{image_4}} You can enhance your salmon by adding fresh herbs. Thyme and rosemary work great. Just chop a tablespoon of either and mix it into the honey mustard glaze. This will give your dish a fresh twist. You can also swap the honey or mustard for different flavors. Try using maple syrup or spicy mustard for a unique taste. If you like heat, add spices to your glaze. Cayenne or chili flakes can give your dish a kick. Start with a pinch and taste as you go. You can also serve your salmon with spicy sides, like a jalapeño corn salad or spicy roasted potatoes. This can make your meal exciting and bold. For those with dietary restrictions, swaps are easy! Use tamari instead of soy sauce for a gluten-free option. You can also make your glaze dairy-free by skipping any butter. If you prefer baking without oil, try using vegetable broth instead. Cooking methods like grilling or broiling can also work well. This keeps your meal healthy and safe for all diets. For more details, check the Full Recipe. After enjoying your Baked Honey Mustard Salmon, store any leftovers properly. First, let the salmon cool down to room temperature. Then, place it in an airtight container. This helps keep it fresh. Store it in the refrigerator for up to three days. If you want to keep it longer, you can freeze it. Wrap each portion tightly in plastic wrap or foil. Then, put it in a freezer-safe bag. This method prevents freezer burn and keeps the flavor intact. When you are ready to enjoy the leftovers, reheating is key. One great method is to use the oven. Preheat your oven to 300°F (150°C). Place the salmon on a baking sheet lined with parchment paper. Cover it loosely with foil to keep moisture in. Heat for about 10-15 minutes. This way, it stays flaky and juicy. Another option is using the microwave. Place the salmon on a microwave-safe plate. Cover it with a damp paper towel to avoid drying out. Heat in 30-second intervals until warm. Be careful not to overcook it, as that can make it tough. Baked Honey Mustard Salmon lasts a few days in the fridge. It is best within three days after cooking. Look for signs of spoilage. If the salmon has a sour smell or changes color, do not eat it. Texture is also important; it should feel firm and not slimy. If you notice these signs, it’s time to discard the salmon. Keeping an eye on freshness ensures a safe and delicious meal every time. For a tasty meal, I love serving Baked Honey Mustard Salmon with simple sides. Here are some great options: - Steamed broccoli - Roasted asparagus - Quinoa salad - Garlic mashed potatoes - Mixed green salad These sides balance the sweet glaze of the salmon. Each adds texture and flavor, making your meal more enjoyable. Yes, you can use fresh salmon! Fresh salmon has a better texture and flavor. It cooks evenly and stays moist. Look for bright, shiny fillets with no strong fish smell. Both fresh and frozen salmon work well, but fresh gives you a richer taste. To check if your salmon is done, look for these signs: - The salmon should be opaque. - It should flake easily with a fork. - The internal temperature should reach 145°F (63°C). If you see these signs, your salmon is ready! Let it rest for a few minutes before serving. Yes, you can prepare the salmon ahead of time. Marinate the salmon in the honey mustard glaze for up to 2 hours. After marinating, cover it and store it in the fridge. When you're ready, bake it according to the recipe. To reheat, place it in the oven at 350°F (175°C) until warmed. You can easily switch up the glaze for more flavor. Here are some ideas: - Add a splash of soy sauce for umami. - Mix in some sriracha for heat. - Use maple syrup instead of honey for a new twist. - Try adding fresh herbs like thyme or rosemary. These variations can create unique flavors for your salmon. Experiment and find your favorite! For the full recipe, check the link above. In this post, we explored a simple yet delicious baked honey mustard salmon recipe. You learned about the key ingredients like salmon, Dijon mustard, and honey. We walked through each step, from preheating the oven to serving the dish perfectly. Remember, you can enhance this recipe by adding spices or fresh herbs. Feel free to adjust ingredients to fit your taste. Whether you’re enjoying a family dinner or meal prepping, this dish offers flavor and ease. Give it a try, and savor the delicious results!](https://tossedflavors.com/wp-content/uploads/2025/06/42587a19-3f74-405a-97e8-f334a3af9066.webp)
Baked Honey Mustard Salmon Flavorful and Easy Recipe
Are you ready to impress your taste buds with a simple yet delicious dinner? Baked Honey Mustard Salmon is a dish that brings zesty flavor
![- 1 pre-made pizza crust (choose between thin or thick based on your preference) - 1 cup cooked chicken breast (shredded into bite-sized pieces) - 1 cup plain Greek yogurt - 1 medium cucumber (grated and excess moisture thoroughly squeezed out) - 2 cloves garlic (finely minced) - 1 tablespoon fresh lemon juice - 1 tablespoon extra virgin olive oil - 1 teaspoon dried dill or 1 tablespoon fresh dill (finely chopped) - 1/2 teaspoon sea salt - 1/4 teaspoon freshly ground black pepper To make this pizza, the crust is your base. You can select a thin crust for a crispy bite or a thicker one for a soft chew. I like to use cooked chicken breast that is already shredded. This saves time and adds flavor. For the tzatziki sauce, the Greek yogurt gives it a creamy texture. You’ll also want to add the grated cucumber, garlic, lemon juice, olive oil, dill, salt, and pepper. This blend creates a refreshing sauce. - 1 cup shredded mozzarella cheese - 1/4 cup cherry tomatoes (halved for a fresh burst) - Fresh parsley (chopped, for garnish - optional) To add more flavor, use mozzarella cheese. It melts perfectly and adds creaminess. Cherry tomatoes give a burst of freshness and color. If you like, sprinkle some fresh parsley on top to enhance the look and taste. This pizza is not just easy; it’s delicious and colorful! For the full recipe, check out [Full Recipe]. 1. Start by mixing one cup of Greek yogurt in a bowl. This gives your sauce a creamy base. 2. Next, add one grated cucumber. Make sure to squeeze out the extra water. This keeps the sauce thick. 3. Now, add two minced garlic cloves, one tablespoon of lemon juice, and one tablespoon of olive oil. 4. Sprinkle in one teaspoon of dried dill or one tablespoon of fresh dill. Season with half a teaspoon of sea salt and a quarter teaspoon of black pepper. 5. Mix all these ingredients well and set the sauce aside. Letting it sit helps the flavors blend. 1. Grab your pre-made pizza crust. Spread half of the tzatziki sauce on it. Leave a small edge for a crispy crust. 2. Evenly distribute one cup of shredded chicken on top of the sauce. Make sure every slice gets some chicken. 3. Now, sprinkle one cup of shredded mozzarella cheese over the chicken. This will melt beautifully. 4. Add a quarter cup of halved cherry tomatoes on top. They will bring a fresh burst to each bite. 1. Preheat your oven to 450°F (230°C) if your crust is raw. If it is cooked, lower the time. 2. Bake the pizza for about 10 to 12 minutes. You want the cheese bubbly and the crust golden brown. 3. After baking, take the pizza out and let it cool for a couple of minutes. This helps with slicing. 4. Drizzle the rest of the tzatziki sauce on top. Garnish with fresh parsley if you like. 5. Slice the pizza into wedges and serve warm. Enjoy the mix of flavors in every bite. For the full recipe, refer to the details above. To make the best Tzatziki Chicken Pizza, follow these tips: - How to avoid a soggy crust: Use a pre-cooked crust if you want to skip sogginess. If you use raw dough, bake it for a few minutes before adding toppings. This step helps firm up the base. - Tips for achieving a golden crust: Preheat your oven well. A hotter oven gives a crispier crust. Also, brush the edges of the crust with olive oil before baking. This adds flavor and color. - Enhancing the flavor of the toppings: Use fresh herbs like dill or parsley. They add brightness. You can also try adding a sprinkle of red pepper flakes for a little heat. Here are some fun ways to cook your pizza: - Grilling variations for a smoky flavor: Try grilling your pizza. It adds a nice smoky taste. Preheat the grill and use a pizza stone or a cast-iron pan. - Baking on a pizza stone vs. a baking sheet: A pizza stone absorbs heat and gives you a crispier base. If you use a baking sheet, make sure to grease it well to prevent sticking. - Using different herbs for zest: Basil or oregano can change the flavor profile. Experiment with what you like best to find your perfect taste. For the full recipe, check out the complete list above. Enjoy making your own Tzatziki Chicken Pizza! {{image_4}} You can swap chicken for many different proteins. Try turkey for a leaner choice. If you prefer beef, ground beef works well. For a fun twist, use shrimp for a seafood flavor. Vegetarians can enjoy this pizza too. Use roasted veggies like zucchini or bell peppers. Grilled portobello mushrooms also make a delicious topping. You can even try marinated tofu for a protein boost. Don’t forget about leftovers! If you have some chicken or veggies left, use them for a quick lunch. Just mix them into a salad or make a wrap. Want a little kick? Add red pepper flakes to the tzatziki or sprinkle them on top. Smoked paprika gives a rich flavor that surprises the palate. Try mixing in fresh herbs like basil or cilantro for a fresh burst. Incorporating different cheeses can really change the taste. Feta cheese adds a salty, tangy note. Goat cheese provides a creamy texture that pairs nicely with the tzatziki. You can also use a blend of cheeses for a deeper flavor. Get creative with your toppings! Add olives or artichokes for a Mediterranean vibe. You could also toss on arugula after baking for a fresh, peppery finish. Each of these ideas gives your pizza a unique twist, making every bite exciting. To keep your Tzatziki Chicken Pizza fresh, store it in the fridge. First, let it cool down to room temperature. Then, slice the pizza into pieces. Next, wrap each piece tightly in plastic wrap. You can also use an airtight container to keep moisture in. This helps the pizza stay tasty and avoid drying out. How long does it last in the fridge? You can keep your pizza for up to three days. After that, the flavors may fade. Always check for any signs of spoilage before enjoying leftovers. When it’s time to eat your leftovers, reheating is key. The best method is to use an oven. Preheat the oven to 350°F (175°C). Place the pizza slices on a baking sheet. Heat for about 10 minutes or until the cheese melts again. To retain moisture and texture, cover the pizza with aluminum foil. This keeps it from drying out. If you prefer, you can also use a microwave. Heat each slice for 30 seconds to 1 minute. Just keep in mind the crust may not be as crispy. Enjoy every bite! Can I use a homemade pizza dough instead of store-bought? Yes, you can use homemade pizza dough. Just roll it out to your desired thickness. Make sure to pre-bake it a bit if you like a crispy crust. This gives you a fresh taste and texture that store-bought dough may not match. What are some good sides to serve with this pizza? Try a simple Greek salad or some roasted vegetables. You can also serve it with pita chips and more tzatziki for dipping. These sides balance the flavors and add freshness to your meal. Is tzatziki sauce suitable for other recipes? Absolutely! Tzatziki works well as a dip for veggies or pita bread. You can drizzle it over grilled meats or use it as a spread in wraps. Its creamy, tangy taste adds a special touch to many dishes. For the full recipe, check out Tzatziki Chicken Pizza Delight! 🥒 In this article, we explored how to make a delicious Tzatziki Chicken Pizza. We discussed key ingredients, including pizza crust, chicken, and tzatziki sauce. I shared step-by-step instructions for preparing the sauce, assembling, and baking the pizza. We also covered tips to achieve the perfect pizza and variations to suit your taste. Tzatziki Chicken Pizza is versatile and easy to customize. With the right ingredients and tips, you can create a meal everyone will love. Get creative, and enjoy your cooking journey!](https://tossedflavors.com/wp-content/uploads/2025/06/eb85b009-ec91-495d-9712-90dc76269e2d.webp)
Tzatziki Chicken Pizza Flavorful and Easy Recipe
If you’re craving a fresh twist on pizza, Tzatziki Chicken Pizza is your answer! This easy-to-make dish combines juicy chicken, creamy tzatziki sauce, and all
![- Chicken breasts: 2 boneless, skinless - Quinoa or rice: 1 cup (cooked in water or low-sodium chicken broth) - Fresh vegetables: - Cherry tomatoes: 1 cup, halved - Cucumber: 1 medium, diced - Red onion: 1 small, finely chopped - Olive oil: 1 tablespoon - Oregano: 2 teaspoons, dried - Garlic powder: 1 teaspoon - Sea salt and black pepper: to taste - Feta cheese: 1 cup, crumbled - Kalamata olives: 1 cup, pitted and halved - Fresh lemon juice: from 1 lemon - Fresh parsley: chopped, for garnish The ingredients in these Healthy Greek Chicken Bowls are simple yet packed with flavor. Chicken breasts are the main protein source. They are lean and easy to cook. Quinoa or rice serves as a great base. It adds texture and nutrition. Fresh vegetables brighten up the dish. They bring crunch and color. For spices, olive oil gives richness. Oregano and garlic powder add a nice kick. Sea salt and black pepper enhance the taste. Now for the toppings! Feta cheese adds creaminess. Kalamata olives provide a briny bite. Don’t forget the lemon juice! It brightens every bite. Lastly, parsley adds a fresh touch. With these ingredients, you can create a meal that is both healthy and delicious. For the full recipe, check out the details above. Enjoy your cooking adventure! To start, mix the marinade. In a bowl, whisk together olive oil, dried oregano, garlic powder, sea salt, and black pepper. Make sure the chicken breasts are coated well with this mixture. Cover the bowl with plastic wrap. For the best flavor, let the chicken marinate for at least 30 minutes at room temperature. If you have time, refrigerate it for up to 2 hours. This marination time helps the flavors soak in deeply. Next, let's cook the quinoa. Rinse the quinoa in cold water using a fine-mesh sieve. This step removes any bitter taste. In a medium saucepan, add the rinsed quinoa and 2 cups of water or low-sodium chicken broth. Bring it to a boil. Once it boils, reduce the heat to low, cover the pan, and let it simmer for about 15 minutes. After cooking, fluff the quinoa gently with a fork and set it aside. Now, it’s time to grill the chicken. Preheat your grill pan or outdoor grill to medium-high heat. This ensures a good sear. Grill the marinated chicken breasts for about 6-7 minutes on each side. You want them to reach an internal temperature of 165°F (75°C). After cooking, take the chicken off the grill and let it rest on a cutting board for 5 minutes. This resting time keeps the chicken juicy and makes slicing easier. Once you follow these steps, you’ll have a flavorful base for your Healthy Greek Chicken Bowls. For the complete recipe, check out the Full Recipe section. To ensure your chicken is juicy, aim for an internal temperature of 165°F (75°C). Use a meat thermometer for accuracy. After grilling, let the chicken rest for five minutes. This helps the juices stay in the meat. If you prefer other cooking methods, you can bake or pan-sear the chicken. Bake at 375°F (190°C) for 25-30 minutes. For pan-searing, cook on medium heat for about 6-7 minutes per side. Rinsing quinoa is important. It removes a bitter coating. Use a fine-mesh sieve and run cold water over it. For cooking, you can use water or low-sodium chicken broth. Both work well and add flavor. If you want different textures, try cooking the quinoa less for a firmer bite. Serve quinoa warm or let it cool for salads. Layering your bowl makes it visually appealing. Start with a base of quinoa. Next, add sliced grilled chicken on top. Then, pile on fresh veggies like tomatoes and cucumbers. Sprinkle crumbled feta cheese over everything. A squeeze of lemon juice brightens the flavors. If you want more taste, add a drizzle of olive oil or a sprinkle of fresh herbs. {{image_4}} You can easily switch out chicken for other proteins. Tofu works well for a plant-based option. Chickpeas are also a great choice for added fiber and protein. Both options keep the bowls healthy and tasty. If you want a gluten-free meal, you can swap quinoa for rice. Brown rice or cauliflower rice are good choices. These alternatives still provide a filling base. Customization is key with these bowls. You can add bell peppers for sweetness or spinach for a pop of color. Carrots and zucchini also work nicely. Consider whether you want to use roasted or fresh vegetables. Roasting adds a sweet, caramelized flavor. Fresh veggies give you a crisp, refreshing bite. Both options are delicious! For dressings, Greek yogurt is a great option. Mix it with lemon juice and herbs for a creamy topping. Tzatziki sauce is another classic choice. If you want to add depth, consider other sauces. A drizzle of balsamic glaze or tahini can enhance the flavors. These small touches make your Greek chicken bowls even more exciting. For the full recipe, check out Healthy Greek Chicken Bowls. To store leftovers, let the bowls cool down first. Place them in airtight containers. This keeps them fresh for later. You can expect the chicken and quinoa mix to last about 3 to 4 days in the fridge. Always check for any off smells before eating. When you want to reheat the chicken, use a microwave or a skillet. For the best results, add a splash of water to keep the chicken moist. Heat it on low to avoid drying it out. For quinoa, you can sprinkle a bit of water before microwaving. This helps it stay fluffy and not dry. Assembling bowls in advance is easy and fun. Prepare the chicken and quinoa ahead of time and store them separately. You can mix and match your veggies based on what you enjoy. For long-term storage, freeze the chicken and quinoa in meal-sized portions. Just remember to defrost them in the fridge overnight before reheating. Check out the Full Recipe for more tips! Yes, you can prep ingredients in advance. Marinate the chicken a day before. You can cook quinoa and chop vegetables ahead too. Store them separately in containers. This will save you time when you’re ready to eat. You can use other grains like couscous or farro. Both grains add different textures. Couscous cooks fast, while farro has a chewy bite. Each grain brings its own flavor to the bowl. Yes, serving the bowls cold can enhance their flavor. Chilled bowls taste refreshing, especially on warm days. For a nice touch, drizzle some extra lemon juice before serving. Add fresh herbs for a vibrant look. This recipe is rich in protein and fiber. Chicken provides lean protein, and quinoa adds fiber and essential nutrients. A serving has about 400 calories, making it a healthy choice. Feta cheese adds flavor, but use it wisely for lower calories. Check the [Full Recipe] for detailed nutritional information. This blog post walked you through making healthy Greek chicken bowls. We covered key ingredients like chicken, quinoa, and fresh veggies. You learned to marinate, grill the chicken, and fluff quinoa for perfect texture. I shared tips for storage and meal prep, plus ways to customize your dish. Enjoy this tasty and nutritious meal. Try different veggies and dressings to make it yours. Your taste buds will thank you!](https://tossedflavors.com/wp-content/uploads/2025/06/f44d54fa-85e1-46b5-a69b-15ba97d2f277.webp)
Healthy Greek Chicken Bowls Flavorful and Nutritious Meal
Are you ready to elevate your meal prep with a dish that’s both tasty and nutritious? Healthy Greek Chicken Bowls are a perfect balance of
Cowboy Butter Chicken Pasta Flavorful and Simple Meal
Ready for a tasty meal that’s quick and easy? Cowboy Butter Chicken Pasta delivers big on flavor with just a few simple ingredients. This dish
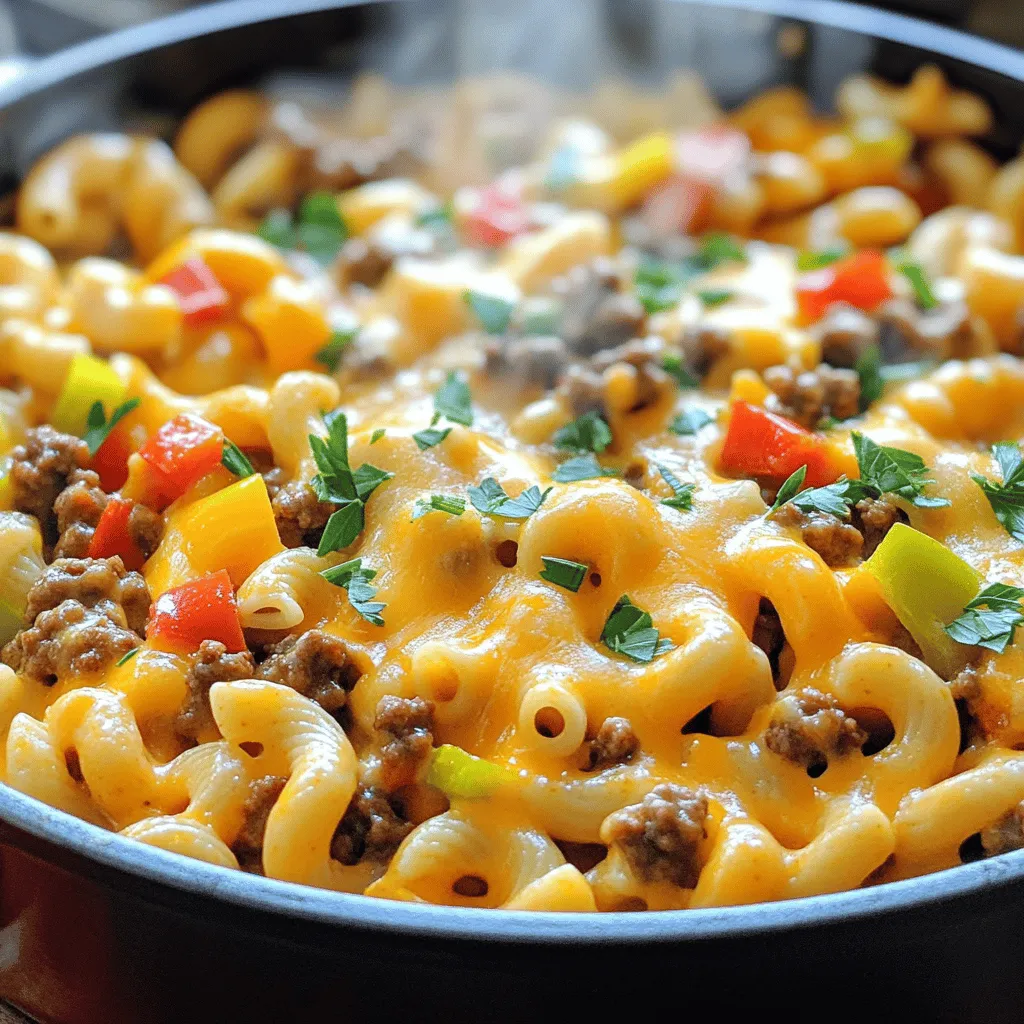
One-Pot Beef and Cheddar Pasta Easy Dinner Recipe
Looking for a quick and tasty dinner? Try my One-Pot Beef and Cheddar Pasta! This easy recipe packs flavor and comfort into one dish. With
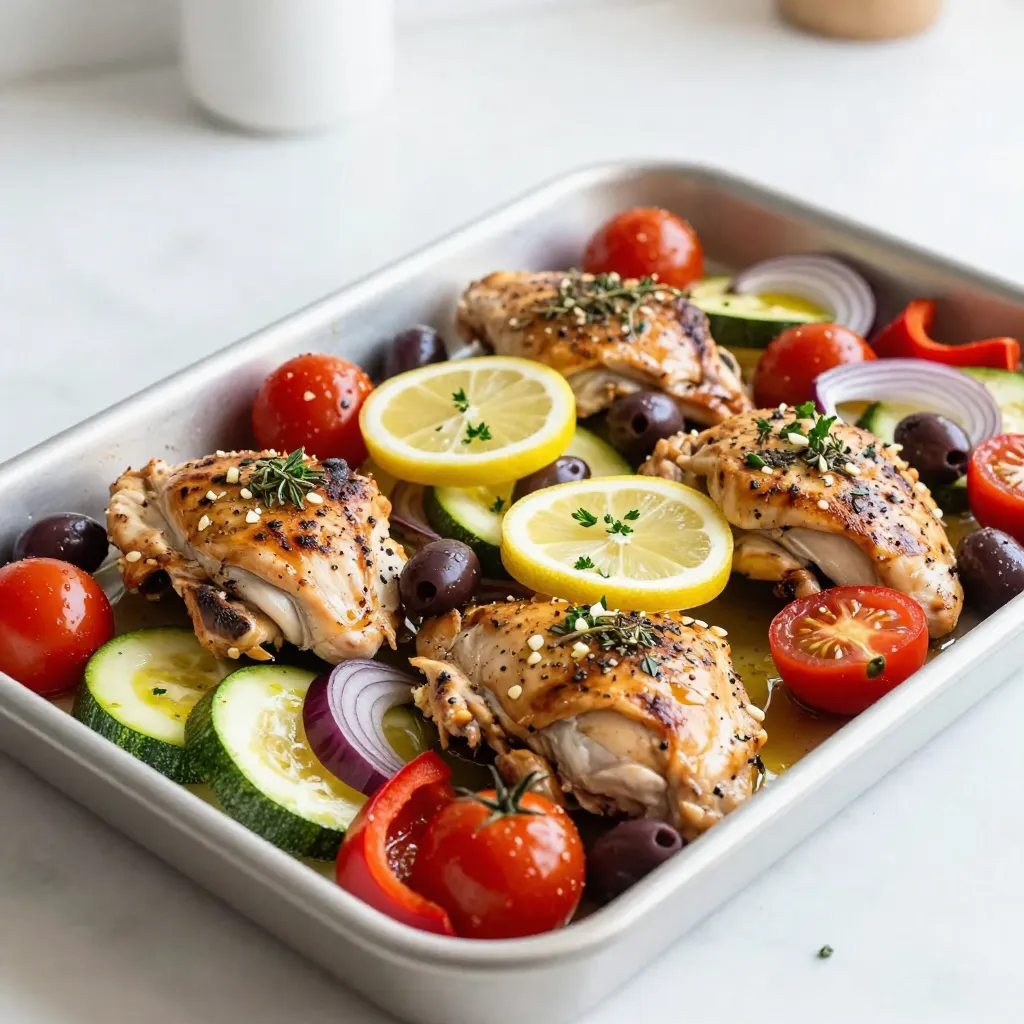
Greek Chicken Sheet Pan Dinner Flavorful and Easy Meal
Looking for a quick and tasty dinner idea? You’re in the right place! This Greek Chicken Sheet Pan Dinner is packed with bold flavors and
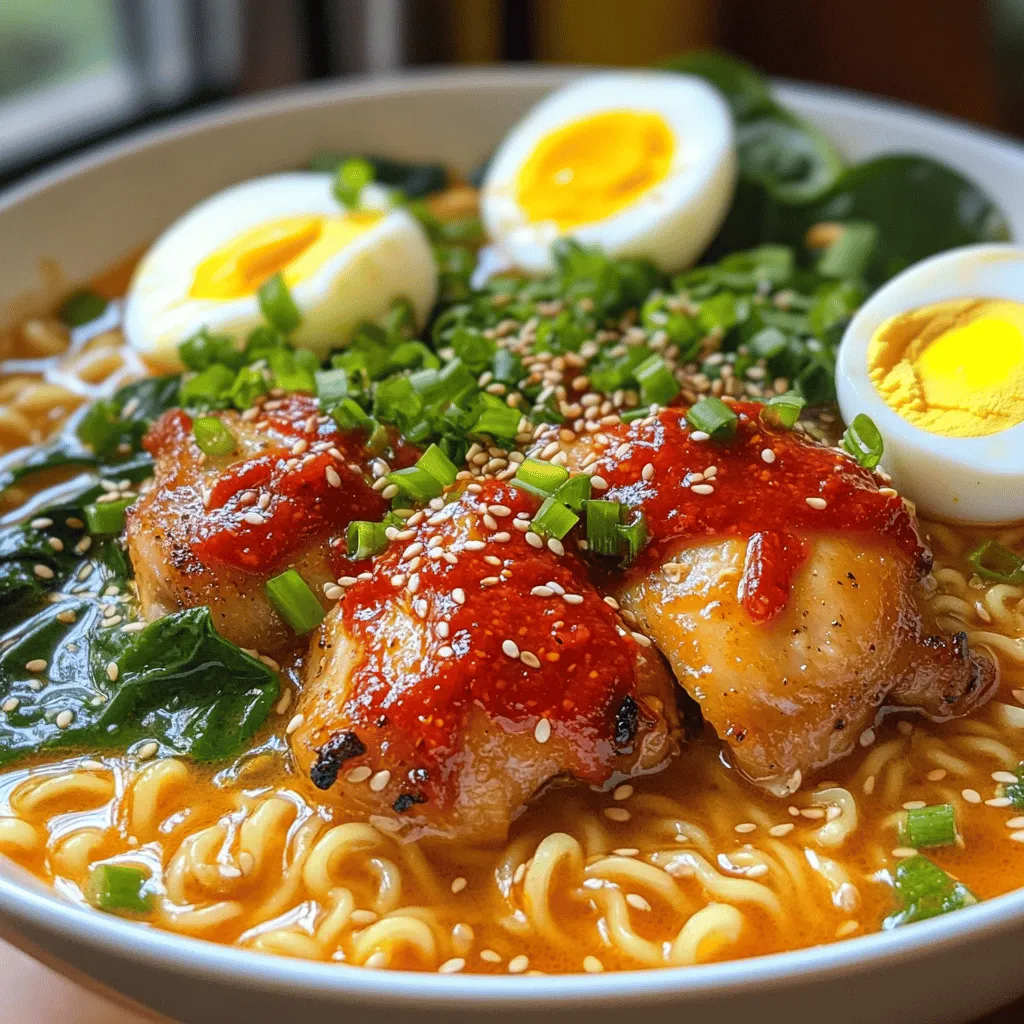
Fiery Chicken Ramen with Creamy Garlic Sauce Delight
Welcome to a flavor explosion! This Fiery Chicken Ramen with Creamy Garlic Sauce combines juicy chicken, rich broth, and a delightful kick. You’ll learn how