Dinner
![- 4 boneless, skinless chicken breasts - 1/2 cup buttermilk - 1 tablespoon Dijon mustard - 1 teaspoon garlic powder - 1 teaspoon onion powder - 1 teaspoon smoked paprika - 1 teaspoon salt - 1/2 teaspoon freshly ground black pepper - 1/4 cup all-purpose flour - 1/4 cup cornstarch - 3 tablespoons unsalted butter - Fresh parsley, finely chopped (for garnish) - Mixing bowl - Sharp knife - Measuring cups and spoons - Oven-safe skillet - Plastic wrap or lid To make your melt in your mouth chicken breast, start with fresh, high-quality ingredients. Using the right tools helps too. A sharp knife makes cutting easier. A mixing bowl mixes flavors well. Measuring cups and spoons ensure accuracy. An oven-safe skillet allows for searing and baking in one dish. Gathering your tools and ingredients first makes cooking smooth. It also saves time. You won’t have to scramble for items while cooking. This recipe takes simple items and turns them into a delightful meal. For the best flavor, use fresh herbs when possible. Fresh parsley brightens the dish and adds color. The buttermilk tenderizes the chicken, making it juicy. Combine the ingredients carefully to ensure every bite is full of flavor. Check out the [Full Recipe] for a complete guide to making this dish! - In a medium mixing bowl, combine buttermilk, Dijon mustard, garlic powder, onion powder, smoked paprika, salt, and black pepper. - Whisk until smooth. - Add the chicken breasts, making sure they are well-coated. - Cover the bowl with plastic wrap or a lid and refrigerate for at least 1 hour. For the best flavor, marinate overnight. - Preheat your oven to 375°F (190°C). - In a shallow dish, mix flour and cornstarch together. - Remove the chicken from the marinade and shake off excess liquid. - Dredge each breast in the flour-cornstarch mix, covering all sides evenly. - In an oven-safe skillet, melt the butter over medium heat. - Once bubbling, add the chicken breasts to the skillet. - Sear each breast for 4-5 minutes on each side until golden brown. - After searing, transfer the skillet to the preheated oven. - Bake the chicken for 15-20 minutes, until it reaches an internal temperature of 165°F (74°C). - After baking, let the chicken rest in the skillet for a few minutes. This helps keep it juicy and tender. For a full recipe with all details, check the [Full Recipe]. Marinating chicken makes it juicy and tasty. I recommend marinating for at least one hour. For the best results, let it sit overnight. This gives the flavors time to soak in. Searing is key for a great crust. Start with a hot skillet and add butter. Cook each side for 4-5 minutes. You want a nice golden color. Feel free to mix up the spices. Try adding oregano or thyme for a fresh twist. Lemon zest adds brightness, too. If you love heat, a pinch of cayenne can spice things up. Adjust the salt and pepper to match your taste. You can also use garlic or onion powder for extra flavor. Use a heavy skillet for even cooking. Cast iron skillets work great. They hold heat well and create a good crust. Keep your skillet seasoned to prevent sticking. Clean it with hot water and avoid soap. This keeps the flavors intact for your next meal. {{image_4}} You can make this chicken even better by adding new flavors. Try mixing citrus juice, like lemon or lime, into the marinade. This brightens the dish and adds a zesty kick. Fresh herbs, like thyme or rosemary, also work great. They give the chicken a fresh taste. You can even mix different mustards. Honey mustard adds sweetness, while whole grain mustard brings texture. These tweaks make your meal unique and exciting. Grilling is a fun way to cook this chicken. It gives a smoky taste that many love. Just marinate the chicken and place it on the grill. Cook until it reaches the right temperature for juicy meat. If you prefer quicker cooking, use the stovetop. Heat a pan on medium-high and sear the chicken as in the oven method. Both methods keep the chicken tender and tasty. Pair this chicken with delicious sides for a full meal. Roasted vegetables like carrots and Brussels sprouts work well. A fresh salad with greens and a simple vinaigrette also complements the chicken. You can add some creative garnishes, like lemon wedges or extra herbs, for a pop of color. These small touches make your plate look great and taste even better. For the full recipe, check out the complete guide for all steps. To keep your cooked chicken fresh, store it in an airtight container. This helps seal in moisture and flavor. Make sure the chicken is completely cool before you store it. Properly stored, it lasts in the fridge for up to four days. If you want to enjoy it longer, consider freezing it. You can freeze both uncooked and cooked chicken. For uncooked chicken, wrap each piece in plastic wrap, then place it in a freezer bag. Remove as much air as possible. For cooked chicken, let it cool, then slice it. Store slices in a single layer, using parchment paper between layers to prevent sticking. Thaw frozen chicken in the fridge overnight. This method keeps the chicken juicy and tasty. When reheating, keep moisture in by covering the chicken. You can use a microwave or an oven. For the microwave, heat on medium for 2-3 minutes. Check every minute until it’s warm. In the oven, preheat to 350°F (175°C). Place the chicken in a dish, cover it, and heat for 15-20 minutes. This keeps it tender and flavorful. Enjoy your melt in your mouth chicken breast! For the full recipe, check out the previous section. Marinating chicken is key for tender meat. The buttermilk in the marinade breaks down proteins. This helps the chicken stay juicy. Also, cooking techniques matter a lot. Searing the chicken in butter gives it a nice crust. Baking it afterward keeps it moist and tender. This two-step cooking method enhances the flavor and texture. Yes, you can use frozen chicken but with care. It’s best to thaw it first. This helps the marinade soak in better. If you cook from frozen, add extra time to the cooking process. Use a meat thermometer to check if it reaches 165°F. This ensures the chicken is cooked through and safe to eat. Dry chicken can happen for a few reasons. Overcooking is a common issue. Always check the cooking time and use a thermometer. If the chicken ends up dry, try adding a sauce or broth. This can help restore some moisture. You can also use the leftovers in soups or salads for extra flavor. To sum up, we covered the essential ingredients and steps for making tender chicken breasts. You learned the importance of marinating and searing, along with tips for flavoring and cooking methods. Remember, a well-cooked chicken can please anyone and adapt to many tastes. Whether you grill, bake, or try new spices, each step can make a big difference. Keep these tips handy for your next cooking adventure, and enjoy each bite!](https://tossedflavors.com/wp-content/uploads/2025/06/c93975b3-234e-445f-bb32-2281024cbcb4.webp)
Melt in Your Mouth Chicken Breast Simple and Tasty Recipe
Are you ready to impress your family with a dish that truly melts in your mouth? In this simple and tasty recipe, I’ll show you
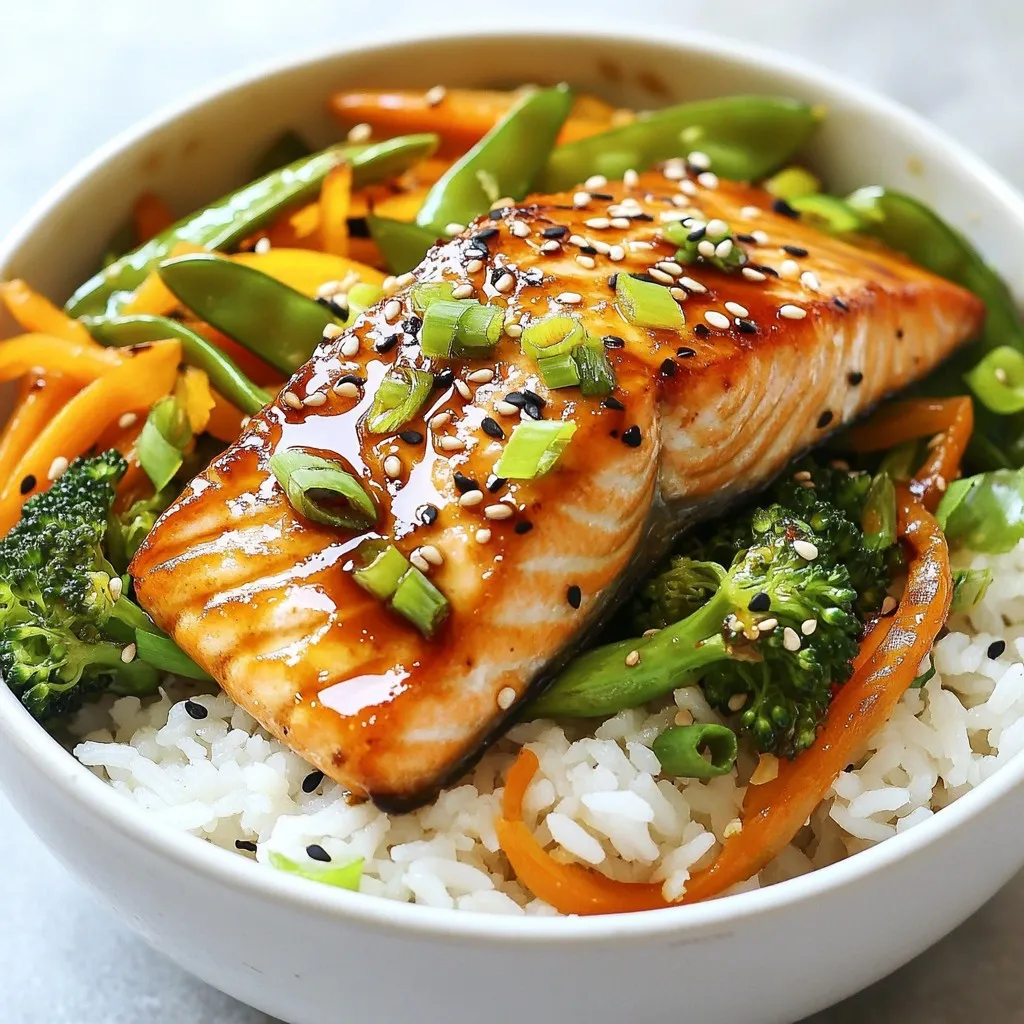
Teriyaki Salmon Rice Bowls Flavorful and Easy Recipe
Are you ready to whip up a meal that’s both tasty and simple? Teriyaki Salmon Rice Bowls are just that! This dish combines juicy salmon,
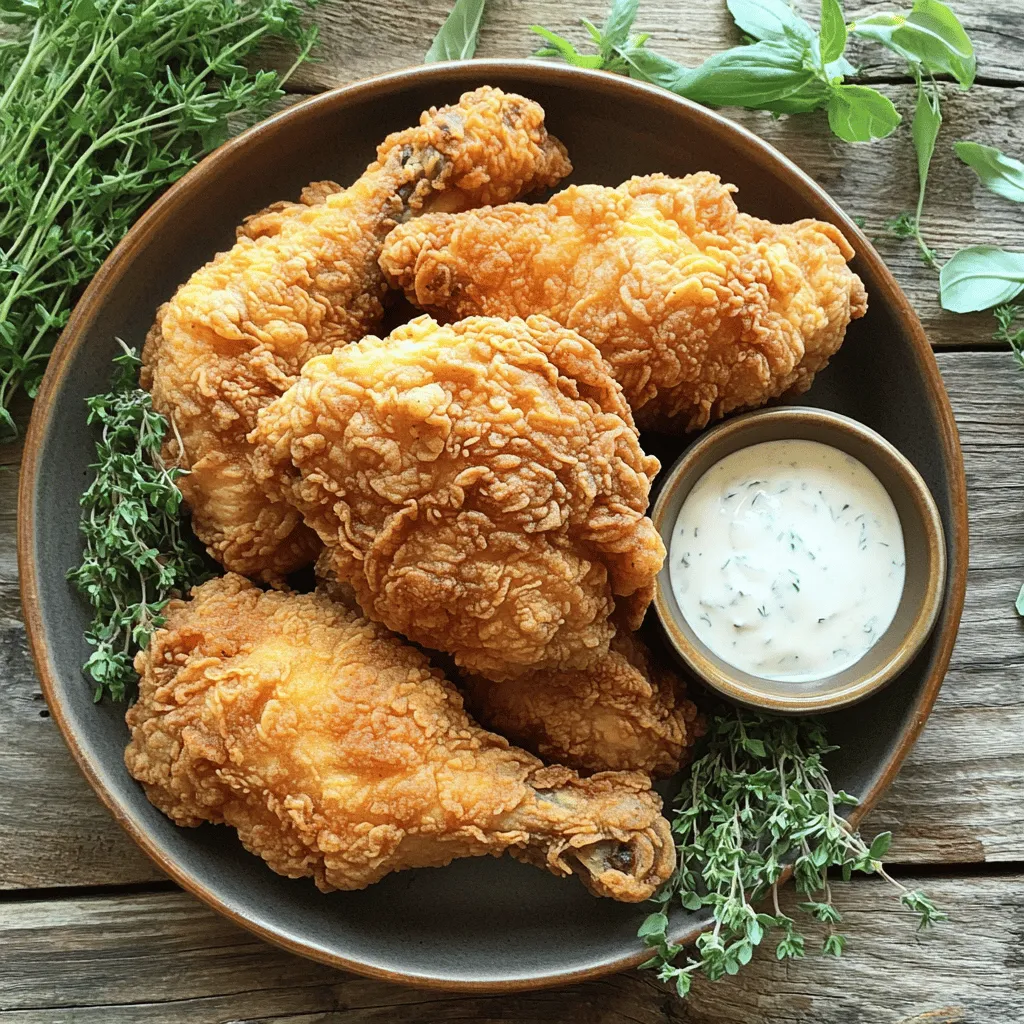
No-Fuss Fried Chicken Simple and Crispy Recipe
Are you craving crispy, mouthwatering fried chicken without the fuss? You’ve come to the right place! In this simple recipe, I’ll show you how to
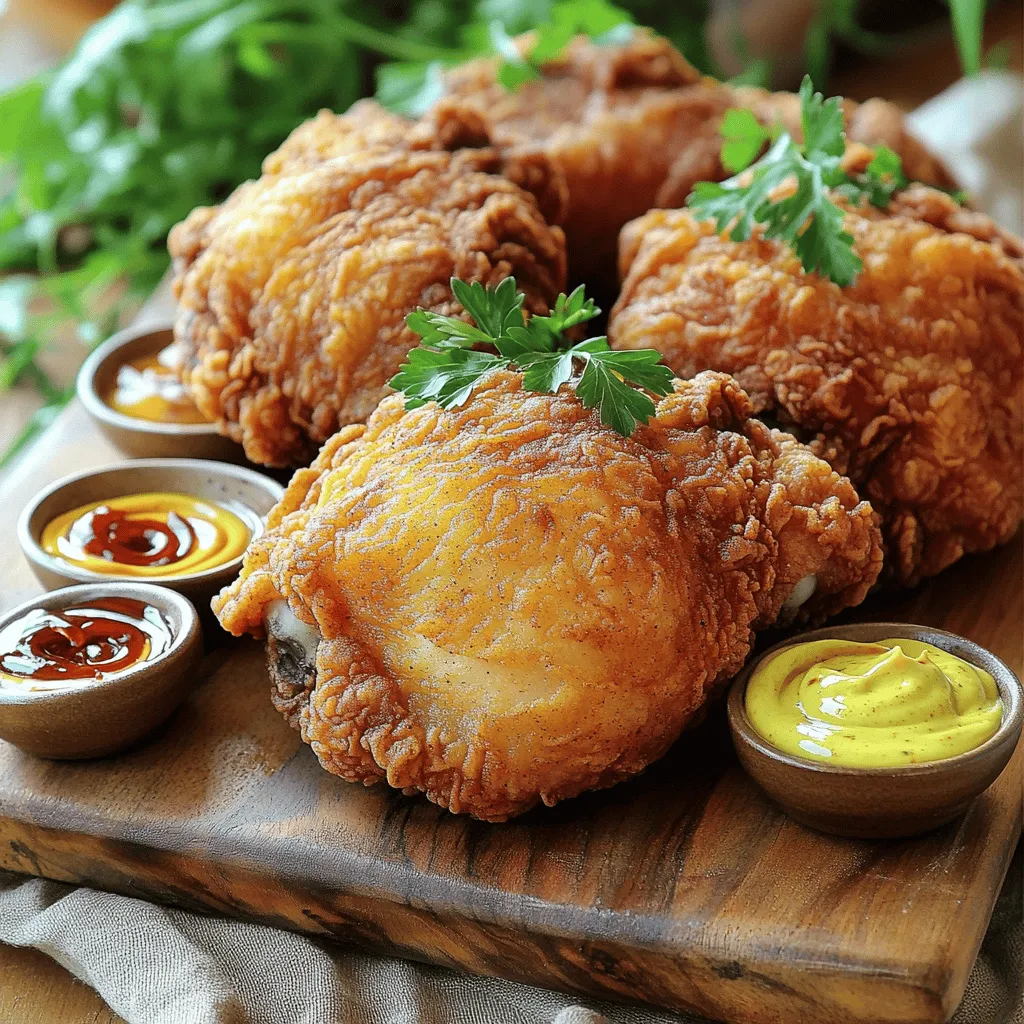
Copycat KFC Fried Chicken Crispy and Flavorful Recipe
Craving the crispy, flavorful taste of KFC fried chicken? You’re not alone! In this post, I will share an easy copycat recipe that captures all
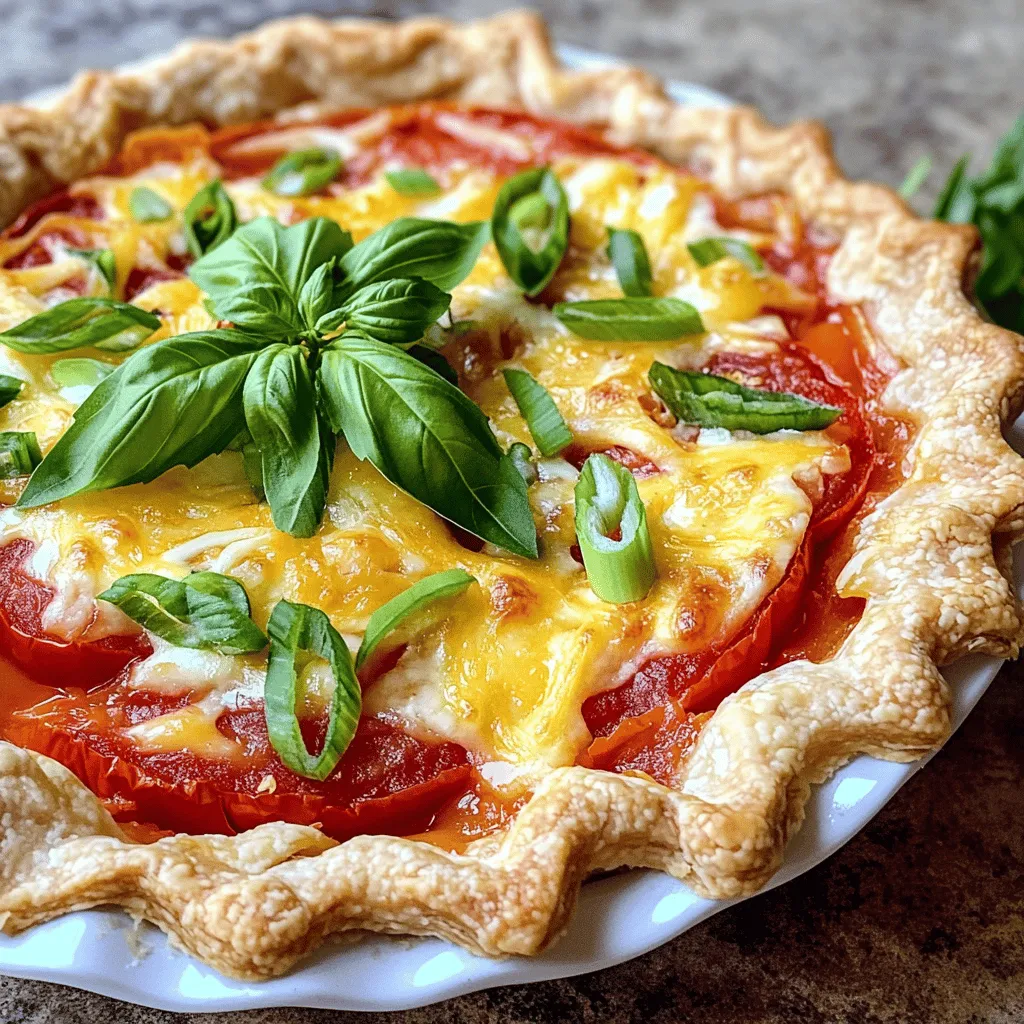
Paula Deen’s Tomato Pie Savory and Simple Delight
If you crave comfort food packed with flavor, you’ll love Paula Deen’s Tomato Pie. This dish combines ripe tomatoes, creamy cheese, and fresh herbs in
![- 4 large, ripe tomatoes, sliced into thick rounds - 1 medium onion, thinly sliced - 2 cloves garlic, finely minced - 1 cup fresh basil leaves, roughly chopped - 1 cup mozzarella cheese, freshly shredded The ripe tomatoes are the star of this dish. They bring a juicy and sweet flavor. Onions and garlic add a rich depth to the casserole. Fresh basil gives it a bright, earthy note. Finally, mozzarella cheese melts beautifully, tying everything together. - 1/2 cup breadcrumbs (preferably seasoned) - 1/4 cup extra virgin olive oil - 1 teaspoon dried oregano Breadcrumbs provide a lovely crunch on top. Olive oil adds healthy fats and richness. Dried oregano enhances the dish with its warm, fragrant notes. - Seasoned breadcrumbs - Additional herbs and spices Feel free to use seasoned breadcrumbs for added taste. You can also play with herbs and spices like thyme or red pepper flakes. These can boost flavor and make the dish your own. For the full recipe, check out the detailed instructions above. Start by slicing your tomatoes. Use four large, ripe tomatoes to get the best flavor. Cut them into thick rounds. Next, slice one medium onion thinly. Then, finely mince two cloves of garlic. This will add a nice kick to your dish. Finally, chop one cup of fresh basil leaves. You can use a knife or scissors for this. Don’t forget to shred one cup of mozzarella cheese. Fresh cheese melts better and tastes great. Now, it’s time to layer your casserole. Begin with a layer of half the sliced tomatoes. Place them evenly in a medium-sized baking dish. Next, add half of the sliced onion and half of the minced garlic. Spread them evenly over the tomatoes. Then, add half of the chopped basil. Season this layer with a pinch of sea salt, black pepper, and half a teaspoon of dried oregano. Now, sprinkle half of the shredded mozzarella cheese over this layer. Follow with half of the breadcrumbs for a nice crunch. Repeat this process. Add the remaining tomatoes, onions, garlic, basil, oregano, mozzarella, and breadcrumbs. Layering creates great flavors! Preheat your oven to 375°F (190°C). This step is key for even cooking. Once preheated, cover the dish tightly with aluminum foil. This helps keep moisture in while baking. Bake for 30 minutes. After that, carefully remove the foil. This allows the top to get crispy. Bake for another 15-20 minutes. You want the top to be golden brown and the tomatoes tender. Once done, take the casserole out of the oven. Let it cool for a few minutes. It will set nicely before you serve it. For the full recipe, refer to the provided details. Enjoy this easy baked tomato casserole! To avoid sogginess in layers, start with thick tomato slices. This helps them hold their shape. Use a good amount of breadcrumbs. They soak up excess moisture and add crunch. For seasoning, balance is key. Use sea salt and black pepper to enhance the flavors. Dried oregano brings warmth to the dish. Taste as you go to find what works best. For a great presentation, serve the casserole warm in the baking dish. It looks rustic and inviting. Garnish with fresh basil leaves for color and flavor. Pair your casserole with a side salad. A light, crisp salad complements the dish well. For drinks, try a chilled white wine. It enhances the tomato flavors perfectly. Adding protein can make your casserole heartier. Cooked ground beef, chicken, or sausage works well. Feel free to layer these with the tomatoes. Different cheese varieties can also elevate the taste. Try sharp cheddar or feta for a new twist. Mixing cheeses adds depth and richness to each bite. For the full recipe, check out the details above. {{image_4}} You can make this baked tomato casserole even better by adding more veggies. Try adding sliced zucchini or bell peppers for extra flavor and texture. These veggies will blend well with the tomatoes and add great color. If you need a gluten-free option, use quinoa or rice instead of breadcrumbs. They will give the dish a nice base while keeping it light and healthy. If you love meat, you can make this casserole heartier. Incorporate ground beef or sausage for a tasty twist. Just cook the meat ahead of time and layer it in with the tomatoes. You can also layer prosciutto in the dish. This adds richness and a savory taste that pairs well with the fresh tomatoes. Want to add some kick? Sprinkle in red pepper flakes or chili powder. This will give your casserole a nice heat without overpowering the dish. You can also create a Mediterranean twist by adding olives. The briny flavor of olives blends perfectly with the tomatoes and fresh basil, making each bite delicious. For the full recipe, check out the [Full Recipe]. To keep your baked tomato casserole fresh, store it in the fridge. Use an airtight container to lock in moisture and flavor. You can keep it for up to four days in the fridge. If you want to save it for later, freezing is a great option. Just let it cool completely, then wrap it tightly in foil or plastic wrap. It can last for up to three months in the freezer. When you want to eat it, thaw it overnight in the fridge. For the best taste, reheat your casserole in the oven. Preheat the oven to 350°F (175°C). Place the casserole in a dish and cover it with foil. Heat for about 20 to 25 minutes, or until it's warm all the way through. You can use the microwave, but the oven makes it crispier. If you use a microwave, heat it on medium power for three to five minutes. Make sure to check it often to avoid hot spots. In the fridge, your baked tomato casserole will last for about four days. If you notice any strange smells or mold, it’s time to toss it. Look for changes in color or texture. If the top looks dry or the cheese has turned a weird shade, don’t eat it. Always trust your senses; they help you spot spoilage. Enjoy your leftovers while they’re still delicious! For the full recipe, check out the complete guide. Yes, you can prepare this casserole a day in advance. Just layer all the ingredients in your dish. Cover it tightly with plastic wrap or foil. Store it in the fridge until you're ready to bake. This can save time on busy days. Just make sure to let it sit at room temperature for about 30 minutes before baking. This helps it cook evenly. If you need a cheese alternative, try these options: - Cheddar cheese for a sharper taste - Provolone for a richer flavor - Feta for a crumbly, tangy twist - Vegan cheese for a dairy-free option These options can change the flavor and texture of your dish. Choose one based on your taste and dietary needs. To make this recipe vegan, substitute the mozzarella cheese with vegan cheese. You can also use nutritional yeast for a cheesy flavor. Replace the olive oil with a plant-based oil, if needed. Use a vegetable broth instead of any animal-based ingredients. With these changes, you can enjoy a tasty, plant-based version of this dish. This baked tomato casserole is simple and full of flavor. I covered key ingredients like ripe tomatoes, fresh basil, and tasty spices. Step-by-step, you saw how to prep, layer, and bake it for a delicious dish. Remember, add your own twist with veggies or meat. Don’t forget how to store leftovers for later enjoyment. With these tips, you’re ready to create a meal that everyone will love. Enjoy customizing your casserole to fit your taste!](https://tossedflavors.com/wp-content/uploads/2025/06/e88ed1b7-4559-41e8-bd27-d4608d4a3419.webp)
Easy Baked Tomato Casserole Simple and Tasty Dish
Looking for a simple and tasty dish to impress your family? This Easy Baked Tomato Casserole is just what you need! With juicy tomatoes, fresh
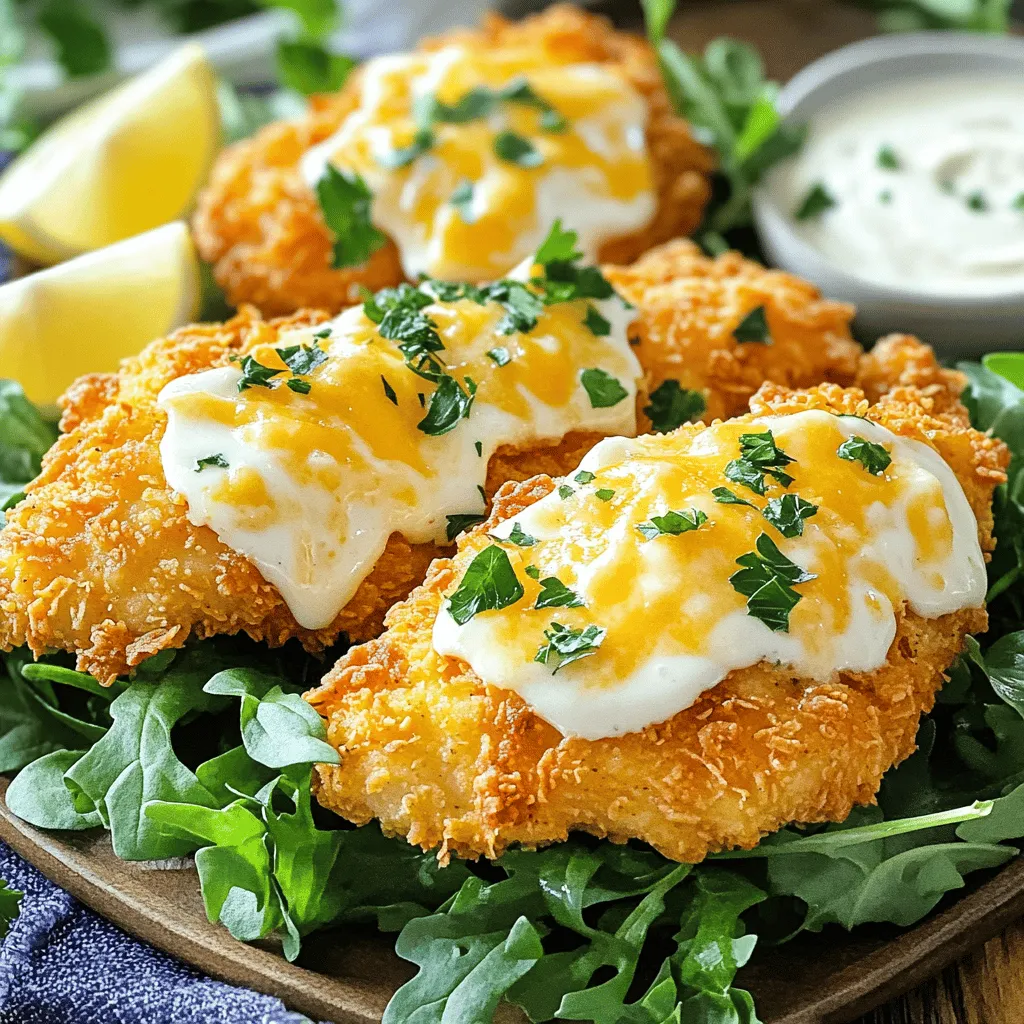
Easy Crispy Cheddar Chicken Delightful Dinner Recipe
Craving a dinner that’s both tasty and easy to make? Look no further! This Easy Crispy Cheddar Chicken recipe is your answer to quick family
![To make Baked Ranch Chicken, gather these items: - 4 boneless, skinless chicken breasts - 1 cup buttermilk - 1 packet ranch seasoning mix - 1 cup panko breadcrumbs - ½ cup grated Parmesan cheese - 1 teaspoon garlic powder - ½ teaspoon onion powder - Salt and pepper to taste - Fresh parsley, chopped (for garnish) When choosing your ingredients, I recommend using quality brands for the best flavors. For buttermilk, I like Organic Valley or Horizon. For ranch seasoning, Hidden Valley is a classic choice. Panko breadcrumbs from Kikkoman give a nice crunch. Feel free to use low-fat options for the buttermilk or cheese if you want a lighter dish. You can also try different seasonings. Adding smoked paprika or dried herbs can enhance the taste. If you prefer a bit of heat, add cayenne pepper to the breadcrumb mix. This dish serves four and provides a balanced meal. Each serving has about: - Calories: 375 - Protein: 36g - Carbohydrates: 28g - Fats: 15g - Fiber: 2g Baked Ranch Chicken is a great source of protein and can fit well into various diets. Pair it with veggies for a complete meal. For the full recipe, check the link! 1. Preheat your oven to 400°F (200°C). Lightly grease a baking dish to prevent sticking. 2. In a medium bowl, mix buttermilk and ranch seasoning. Whisk until smooth. 3. Soak the chicken breasts in the buttermilk mix. Coat them well for the best flavor. Marinate for at least 30 minutes or up to 2 hours in the fridge. 4. In a separate bowl, combine panko breadcrumbs, Parmesan cheese, garlic powder, onion powder, salt, and pepper. Stir until blended. 5. Take each chicken breast from the buttermilk. Shake off extra liquid. Then, coat each piece in the breadcrumb mix. Press gently to help crumbs stick. 6. Arrange the coated chicken in the baking dish. Leave space between each piece for even cooking. Bake the chicken in your preheated oven for 25-30 minutes. Check that the chicken is no longer pink inside. The breadcrumbs should be golden brown and crispy. Once done, take the chicken out and let it rest for about 5 minutes. This helps keep it juicy. Serve the Baked Ranch Chicken on a large platter. Add roasted veggies or a fresh garden salad for color. Drizzle more ranch dressing around the dish for a nice touch. For the full recipe, refer to the earlier sections. To make your Baked Ranch Chicken even tastier, consider these tips: - Use fresh herbs. Adding fresh parsley or dill boosts the flavor. - Add lemon zest. Grate some lemon peel into the buttermilk mixture. This adds a nice zing. - Try different ranch mixes. Experiment with spicy or garlic ranch seasoning for a twist. - Marinate longer. Let the chicken soak in the buttermilk for a few hours. This makes it juicy and flavorful. Avoid these common pitfalls for perfect Baked Ranch Chicken: - Skipping the marination step. Don’t rush this step; it’s key for flavor. - Overcrowding the baking dish. Space the chicken evenly for even cooking and crispiness. - Not checking doneness. Always confirm the chicken reaches 165°F (75°C) in the center. Use a meat thermometer for accuracy. - Not cooling before serving. Let the chicken rest for a few minutes. This helps keep it juicy. While boneless, skinless chicken breasts work well, consider these options: - Chicken thighs. They are more tender and add a rich flavor. - Bone-in pieces. If you prefer a crispy skin, bone-in chicken is a great choice. - Cutlets. Thinly sliced chicken cooks faster and absorbs flavor well. Each cut offers a unique taste and texture, allowing you to customize your dish. For the complete experience, check out the Full Recipe. {{image_4}} To make this recipe gluten-free, swap out the panko breadcrumbs. Use gluten-free breadcrumbs or crushed gluten-free crackers. You can also make your own crumbs from gluten-free bread. Just toast it and crush it into fine pieces. This keeps your meal tasty and safe for those with gluten sensitivities. If you need a dairy-free option, replace buttermilk with a dairy-free milk. Almond milk or oat milk works well. Add a splash of vinegar or lemon juice to mimic the tang of buttermilk. For the cheese, you can use a dairy-free Parmesan. These swaps keep the flavor while catering to your dietary needs. For those who love spice, add chili powder or cayenne pepper to the breadcrumb mix. Start with a teaspoon and adjust to your taste. You can also add hot sauce to the buttermilk mixture for an extra kick. This variation adds a fun twist and makes your Baked Ranch Chicken even more exciting. After cooking your Baked Ranch Chicken, let it cool down. Once cooled, place the chicken in an airtight container. This keeps it fresh and tasty in the fridge. Baked Ranch Chicken lasts for 3 to 4 days when stored properly. Make sure to keep it away from strong-smelling foods to avoid flavor changes. If you want to save some chicken for later, freezing is a great option. Wrap each piece tightly in plastic wrap. Then, place them in a freezer-safe bag or container. This helps to prevent freezer burn. Your Baked Ranch Chicken can stay good in the freezer for about 2 to 3 months. When you’re ready to eat it, thaw it overnight in the fridge for the best taste. To reheat your chicken, start by preheating your oven to 350°F (175°C). Place the chicken pieces on a baking tray. Cover them with foil to keep them moist. Heat for about 15 to 20 minutes, or until warm. You can also use a microwave, but be careful not to dry it out. Heat in short bursts, checking often. Enjoy your leftovers just as much as when they were fresh! For the full recipe, check [Full Recipe]. To perfect Baked Ranch Chicken, use fresh ingredients. The chicken should be boneless and skinless. Marinate it in buttermilk and ranch seasoning for at least 30 minutes. This helps the flavors soak in. Coat the chicken well in the breadcrumb mixture. Bake it until golden brown and fully cooked. Use a meat thermometer to check the internal temperature. It should reach 165°F (75°C). Let the chicken rest before serving. This keeps it juicy and tender. Yes, you can marinate the chicken overnight. Doing this enhances the flavor even more. Just make sure to keep it in the fridge. Use a covered container to prevent any spills. If you marinate overnight, the chicken will be very tasty. However, if you prefer a quicker option, 30 minutes still works well. Baked Ranch Chicken pairs well with many sides. Here are some great options: - Roasted vegetables, like carrots and broccoli - A fresh garden salad with mixed greens - Mashed potatoes or creamy coleslaw - Rice or quinoa for a filling side - Garlic bread for a comforting touch These sides balance the flavors and make your meal complete. You can also find more ideas in the Full Recipe to inspire your dinner! In this article, we explored the key ingredients, step-by-step instructions, and tips for Baked Ranch Chicken. We discussed variations for dietary needs and proper storage methods. By using the recommended brands and avoiding common mistakes, you can make a tasty meal. Remember to try different flavors and sides. Cooking should be fun and flexible. Enjoy this easy dish and make it your own!](https://tossedflavors.com/wp-content/uploads/2025/06/2328616f-fd02-4856-af10-f80cf7d1328e.webp)
Baked Ranch Chicken Flavorful and Easy Dinner Recipe
Looking for an easy and tasty dinner? Baked Ranch Chicken is your answer! This dish combines rich ranch flavor with juicy chicken for a meal
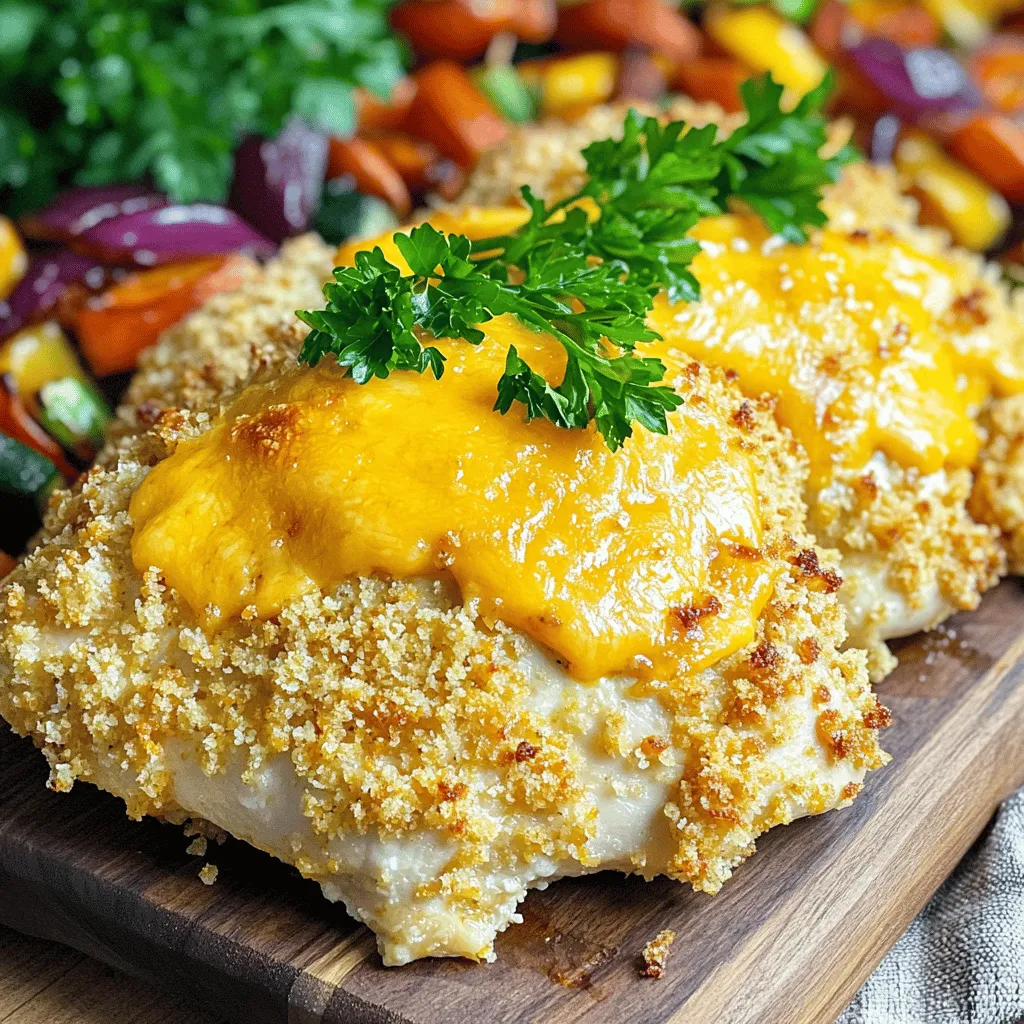
Cheddar Ranch Chicken Irresistible and Easy Recipe
Are you ready to elevate your dinner game? This Cheddar Ranch Chicken recipe is both irresistible and super easy to make. With just a few
![To make old school fried chicken, you need some key items. Here’s a list: - 4 pieces of chicken (preferably legs and thighs) - 1 cup buttermilk - 1 teaspoon hot sauce (optional for a spicy kick) - 2 cups all-purpose flour - 1 teaspoon smoked paprika (for extra flavor) - 1 teaspoon garlic powder - 1 teaspoon onion powder - 1 teaspoon dried oregano - Salt and pepper, to taste - Vegetable oil, for frying These ingredients work together to create a crispy and flavorful delight. You can add a few things to boost flavor even more. Consider using: - 1 teaspoon cayenne pepper (for heat) - 1 tablespoon fresh herbs (like thyme or rosemary) - 1 teaspoon sugar (to balance flavors) These options can take your chicken to the next level. Having the right tools makes cooking easier. Here’s what I recommend: - Large mixing bowl - Whisk for mixing ingredients - Skillet or deep frying pan - Tongs for turning chicken - Wire rack for draining chicken These tools help ensure your fried chicken comes out perfect every time. For the complete recipe, check the [Full Recipe]. To start, you need to marinate the chicken. Combine buttermilk and hot sauce in a big bowl. Stir it well until it's mixed. Add the chicken pieces, making sure they are fully covered. This part is crucial for making the chicken tender. Cover the bowl with plastic wrap. Place it in the fridge for a minimum of 2 hours. If you can, let it sit overnight. This allows the flavors to soak in deeply. Next, let's prepare the coating. In a separate bowl, mix the flour, smoked paprika, garlic powder, onion powder, oregano, salt, and pepper. Whisk it all together till it’s blended well. This will create a tasty crust that makes the chicken shine. Make sure the mixture is ready when the chicken comes out of the fridge. Now, it's time to fry. Heat about one inch of vegetable oil in a large skillet or deep pan over medium heat. You want the oil to reach 350°F (175°C). To check if it’s hot enough, drop a small pinch of flour in the oil. If it sizzles, it’s ready for the chicken. Carefully add the chicken pieces one by one, making sure not to crowd the pan. Fry the chicken for about 8 to 10 minutes on each side. Look for a deep golden brown color. The internal temperature should hit 165°F (75°C) to ensure it’s safe to eat. Once the chicken is done, use tongs to take it out of the oil. Place the chicken on a wire rack over a baking tray. This helps the extra oil drip off and keeps the chicken crispy. Let it rest for about 5 minutes before serving. This resting time is key. It allows the juices to settle back into the meat, making each bite juicy and delicious. You can find the full recipe and more tips in the recipe section above. To make great fried chicken, start with good chicken. I prefer legs and thighs for their flavor. Marinating in buttermilk is a must. It makes the meat tender and juicy. Let it soak for at least two hours. Overnight is even better. For the coating, use a mix of flour and spices. This forms a crispy crust. Don't rush the frying. Keep the oil hot but not smoking. Fry the chicken in small batches. This ensures even cooking. A common mistake is not seasoning enough. Always add salt and pepper to your flour mixture. Another issue is overcrowding the pan. This can make the chicken soggy. Also, don’t skip the resting step. Letting the chicken rest helps keep it juicy. Lastly, avoid flipping the chicken too soon. Wait until it's golden brown before turning. To jazz up your fried chicken, try adding spices to your flour. Smoked paprika adds depth, while garlic powder gives flavor. You can also try cayenne for heat. For a twist, mix in some dried herbs like thyme or rosemary. A splash of lemon juice or hot sauce in the marinade can brighten the taste. These small changes can elevate your dish. Explore different combinations to find what you love. For more tips, check out the Full Recipe for even more ideas! {{image_4}} Southern-style fried chicken is crispy and juicy. It features a seasoned flour coating and has a mild flavor. You fry it until it's golden brown. In contrast, Nashville hot chicken brings the heat! This version uses a spicy oil to coat the chicken after frying. It has a bold kick that many love. Both styles are great, but they cater to different tastes. Try them both to see which one you like more! If you want a gluten-free option, use almond flour or rice flour instead of regular flour. They still give a nice crunch. You can also use crushed cornflakes for extra crispy texture. For a healthier choice, try using whole wheat flour. It adds fiber and nutrients. Another option is to use a mixture of nuts and seeds for a unique taste. These swaps can make your fried chicken fit your diet better without losing flavor. Marinating chicken is key to flavor. You can switch up the classic buttermilk marinade. For a tangy twist, try yogurt mixed with lemon juice. This adds a nice zest. If you love Asian flavors, use soy sauce and ginger in your marinade. Another fun idea is to use pickle juice for a salty and sour kick. Let your chicken soak in these marinades for at least two hours. The longer, the better! Explore these options to find your favorite flavor. For the full recipe, check out the Crispy Classic Fried Chicken section above. To keep your fried chicken fresh, let it cool first. Then, wrap each piece in foil or parchment paper. Place the wrapped chicken in an airtight container. This helps keep the moisture in while preventing sogginess. Avoid stacking the pieces too tightly, as this can cause them to lose their crispiness. Store the container in the fridge for the best results. When it's time to enjoy your leftover fried chicken, reheating it properly is key. The best way is to use an oven. Preheat your oven to 375°F (190°C). Place the chicken on a wire rack over a baking sheet. This allows hot air to circulate around the chicken, keeping it crispy. Bake for about 15-20 minutes, or until heated through. If you're in a hurry, you can use a microwave, but it may not keep the skin crunchy. Fried chicken can last in the fridge for about 3-4 days. If you want to keep it longer, consider freezing it. Wrap the chicken tightly in plastic wrap and foil. In the freezer, it can last up to 4 months. For best flavor, try to consume it within 2-3 months. This way, you'll enjoy that crispy, flavorful delight just like when it was freshly made! The best oil for frying chicken is one with a high smoke point. Vegetable oil works great. Canola oil is also a good choice. These oils help achieve that crispy texture without burning. They are neutral, so they won’t change the chicken's flavor. Yes, you can bake old school fried chicken. Baking is a healthier option. To do this, preheat your oven to 425°F (220°C). Place the coated chicken on a baking sheet lined with parchment paper. Bake for about 30-40 minutes, or until golden brown. This method may not be as crispy as frying, but it’s still tasty. To check if the chicken is fully cooked, use a meat thermometer. Insert it into the thickest part of the chicken. You want it to reach 165°F (75°C). Another way is to check the juices. If they run clear, the chicken is ready. Proper cooking keeps it safe and juicy. Old school fried chicken pairs well with many sides. Here are a few favorites: - Coleslaw: Crunchy and refreshing. - Mashed potatoes: Creamy and comforting. - Cornbread: Sweet and soft. - Green beans: Light, fresh, and healthy. These sides complement the rich flavors of the chicken and make a complete meal. For more ideas, check the full recipe! Old school fried chicken requires care and attention, from ingredients to tips. You learned about essential ingredients and some extra options for flavor. The step-by-step instructions teach effective frying and marinating techniques. We explored variations like Southern-style and gluten-free options. Lastly, storing and reheating tips help keep your chicken fresh. In the end, the secret lies in your practice and enthusiasm. Frying chicken can be both fun and rewarding. Enjoy each bite and share with loved ones!](https://tossedflavors.com/wp-content/uploads/2025/06/9141325c-0dc0-4339-863a-5a4b430ef5a6.webp)
Old School Fried Chicken Crispy and Flavorful Delight
Welcome to the crispy world of Old School Fried Chicken! I’ll guide you through making this classic dish, packed with rich flavor and satisfying crunch.