Dinner

Crispy Lemon Garlic Chicken Tasty and Simple Delight
Are you ready for a flavor explosion? Crispy Lemon Garlic Chicken combines juicy, tender chicken thighs with zesty lemon and garlic for a meal that’s
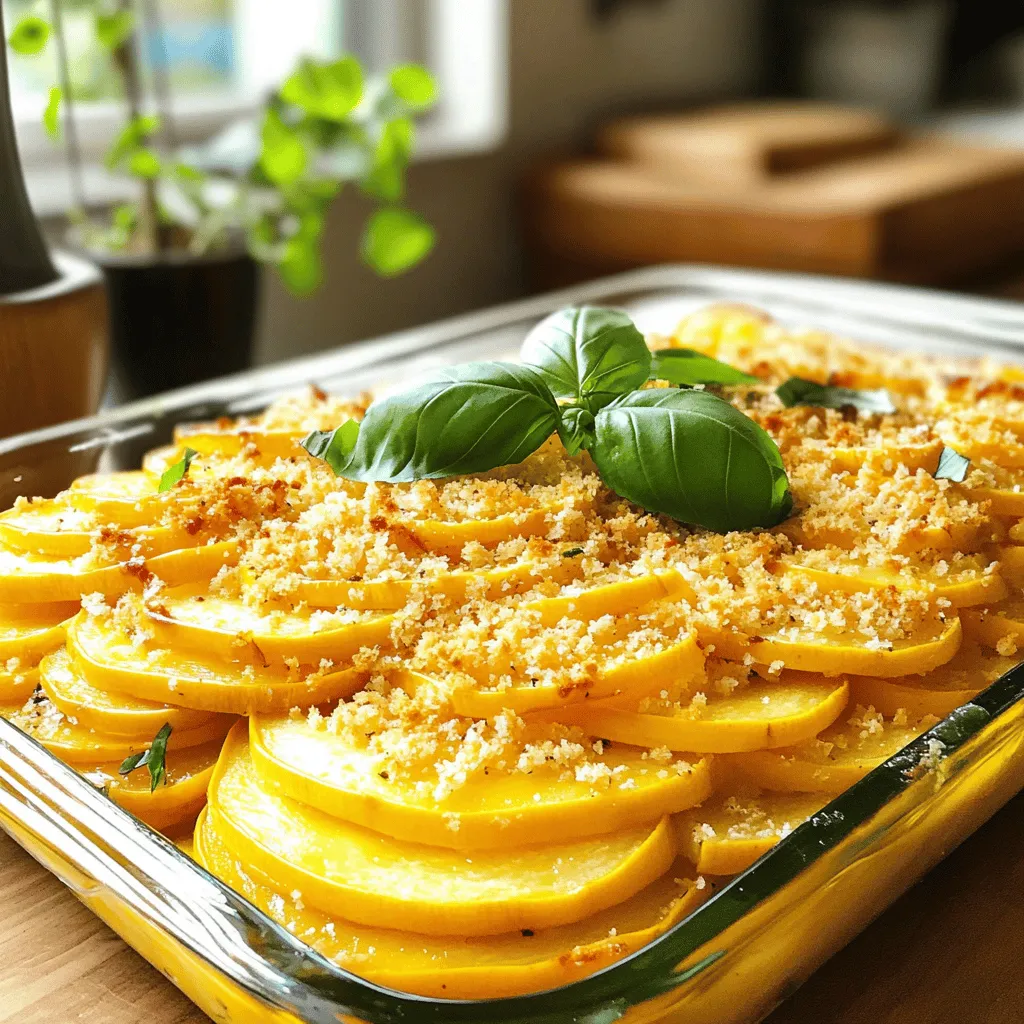
![- Zucchini and yellow squash: These are the main stars of the dish. Choose fresh, firm squash for the best flavor. Slice them thinly to ensure even cooking. - Aromatics: onion and garlic: The diced onion adds sweetness, while minced garlic brings a punch of flavor. Sautéing them releases their natural oils and aroma. - Creamy components: sour cream and cheese: Sour cream adds richness, making the casserole creamy. Cheddar cheese brings a sharp taste that pairs well with the squash. Use a mix of shredded and melted cheese for a great texture. - Corn kernels: fresh vs. frozen: Corn adds sweetness and texture. Fresh corn gives a bright crunch, while frozen corn is convenient and just as tasty. - Herbs and seasonings: thyme and paprika: Thyme adds a warm, earthy note, while paprika gives a subtle smokiness. Feel free to adjust these to fit your taste. 1. First, preheat your oven to 350°F (175°C). This step is key for a well-baked casserole. 2. Next, heat olive oil in a large skillet over medium heat. Add diced onions and minced garlic. Cook for about 3-4 minutes. You want the onions to turn clear and smell great. 1. Now, add the thinly sliced zucchinis and yellow squash to the skillet. Stir them in well. 2. Sauté for about 5-7 minutes. The squash should start to soften. Add corn kernels, then season with thyme and paprika. Mix everything well and remove from heat. 1. In a big mixing bowl, whisk together the beaten eggs, sour cream, and half of the shredded cheddar cheese. Make sure it's smooth. 2. Gently fold in the sautéed squash mixture. This step makes sure all the flavors blend together nicely. 1. Lightly grease a 9x13 inch baking dish to help prevent sticking. 2. Pour the combined squash mixture into the dish. Spread it evenly across the bottom. 3. Sprinkle the remaining shredded cheddar cheese over the top. Then, layer crushed buttery crackers on top for a crunchy finish. 4. Place the dish in the oven and bake for 30-35 minutes. Check it until the top is golden brown and bubbly. Follow the [Full Recipe] for more details and tips. To get the best texture for your Cozy Southern Squash Casserole, slice your squash evenly. Use a sharp knife for clean cuts. This helps all the pieces cook at the same time. Aim for about a quarter-inch thickness. If some pieces are too thick, they may not soften fully. Moisture balance is important too. If the squash releases too much water, it can make the dish soggy. To avoid this, cook the squash just enough before mixing it in. After sautéing, let it cool for a bit. This helps it release some moisture before mixing. Spices and herbs can make your dish special. Adding a pinch of nutmeg or cayenne pepper can change the flavor. Mix in a tablespoon of fresh herbs like basil or parsley for a fresh taste. You can even try adding a splash of hot sauce for some heat. When using herbs, fresh is always best, but dried herbs work well too. Fresh herbs add a bright flavor, while dried herbs offer a stronger taste. If you use dried herbs, remember to use less. A teaspoon of dried thyme goes a long way. When serving your casserole, consider the look. You can dish it out onto individual plates or serve it directly from the baking dish. Garnishing with fresh herbs, like thyme or parsley, adds a nice touch. Let your casserole cool for about 10 minutes before serving. This helps it set, making it easier to scoop out. A golden, bubbly top paired with a sprinkle of color looks great and tastes even better. {{image_4}} You can switch up the squash in this dish. Try butternut or acorn squash for a new taste. They bring sweetness and texture that blend well with the other flavors. For cheese, consider using feta or mozzarella. Both add a creamy texture and unique flavor to the casserole. If you need a gluten-free option, swap the buttery crackers for gluten-free ones. Look for brands that mimic the crunch and flavor. For vegetarian options, leave out any meat and focus on the veggies. You can add mushrooms or peppers for extra depth and nutrition. To bring in classic Southern flavors, add crumbled bacon or sausage. This adds a savory richness that elevates the dish. You can also incorporate different vegetables like spinach or bell peppers. This not only adds color but boosts the health factor of your casserole. To keep your Cozy Southern Squash Casserole fresh, first let it cool to room temperature. Then, store it in an airtight container. This helps keep moisture in and prevents drying out. I recommend using glass or plastic containers with tight lids. These are easy to stack in the fridge. The casserole will last about 3 to 5 days in the fridge. To reheat your casserole without losing flavor, use the oven. Preheat it to 350°F (175°C). Then, place the casserole in an oven-safe dish. Cover it with foil to keep moisture in. Heat for about 20 minutes or until it's hot all the way through. You can also use the microwave, but it may dry out the dish. If you do, heat it in short bursts and stir in between. To refresh the leftovers, add a sprinkle of cheese or a drizzle of olive oil before serving. This keeps it tasty and inviting! You can store the squash casserole in the fridge for about 3 to 5 days. For the best taste, eat it within this time. If you freeze it, it can last for about 2 to 3 months. Just make sure to seal it tightly to avoid freezer burn. Yes, you can prep the casserole a day in advance. Chop the squash, onion, and garlic, then mix them together. Store them in the fridge. Prepare the egg and sour cream mixture as well. The next day, combine everything and bake it. This method saves time and keeps flavors fresh. This casserole pairs well with many dishes. Here are some ideas: - Grilled chicken or pork - A fresh garden salad - Cornbread or biscuits - Roasted vegetables Yes, squash casserole freezes well. To freeze it, let it cool completely. Then, place it in an airtight container or wrap it tightly in foil. When you're ready to eat, defrost it in the fridge overnight before reheating. A serving of Cozy Southern Squash Casserole has about 250 calories. It contains healthy fats from cheese and olive oil. You also get a good amount of fiber from squash and corn. Each serving has about 10 grams of protein and is low in carbs. To add some heat, try these tips: - Mix in diced jalapeños or green chilies - Use pepper jack cheese instead of cheddar - Add a dash of hot sauce in the egg mixture These simple changes will give your casserole a spicy kick! This blog post covered everything you need for a tasty squash casserole. We explored essential and optional ingredients, provided step-by-step instructions, and shared tips for the best texture and flavor. You can also find ways to modify the recipe for dietary needs or add regional flavors. Whether you’re serving it fresh or storing leftovers, these tips will ensure a great meal. Enjoy creating your cozy squash casserole, and don’t hesitate to experiment! Simple adjustments can make it truly yours.](https://tossedflavors.com/wp-content/uploads/2025/07/f82cc715-7578-41e7-bc19-28b53fd9bf42.webp)
Cozy Southern Squash Casserole Comforting Family Dish
If you’re craving a warming dish that brings family together, my Cozy Southern Squash Casserole is a must-try! This simple, creamy recipe blends fresh squash,
Cheesy Yellow Squash Bake Simple and Tasty Meal
Are you ready to impress your family with a dish that’s both simple and tasty? My Cheesy Yellow Squash Bake combines fresh yellow squash with
![Here are the simple ingredients you need for Tasty Roasted Vegetable Pasta: - 300g whole wheat pasta - 2 cups cherry tomatoes, halved - 1 medium zucchini, diced - 1 red bell pepper, diced - 1 yellow bell pepper, diced - 1 medium red onion, cut into wedges - 4 cloves garlic, unpeeled - 3 tablespoons extra virgin olive oil - 1 teaspoon dried oregano - 1/2 teaspoon red pepper flakes - Sea salt and black pepper - Fresh basil leaves for garnish - Grated Parmesan cheese for serving (optional) Using whole wheat pasta adds fiber and nutrients. The cherry tomatoes burst with sweet flavor. Zucchini and bell peppers bring color and crunch. Roasting garlic makes it rich and creamy. This dish is not only tasty but also healthy. You can find the [Full Recipe] to guide you through the steps. - Preheat the oven to 425°F (220°C). - In a large bowl, mix cherry tomatoes, zucchini, bell peppers, red onion, and garlic. - Drizzle 3 tablespoons of extra virgin olive oil over the veggies. - Add 1 teaspoon of dried oregano, 1/2 teaspoon of red pepper flakes, sea salt, and black pepper. - Toss the mixture until all vegetables are well coated. - Spread the seasoned vegetables evenly on a baking sheet. - Make sure they lie flat for even roasting. - Roast for 20-25 minutes. Stir halfway to ensure they cook well. - Boil a large pot of salted water. - Add 300g of whole wheat pasta and cook until al dente, about 8-10 minutes. - Drain the pasta and set it aside. - After roasting, take the veggies from the oven. - Let them cool slightly before handling. - Squeeze the roasted garlic from its skin into a bowl. - Mash the garlic with a fork to make a creamy paste. - In a large bowl, mix the cooked pasta, roasted vegetables, and mashed garlic. - Toss until everything is well combined. - Taste and season with more salt and pepper if needed. You can find the full recipe in the previous sections. To roast vegetables perfectly, spread them out on the baking sheet. This step helps them cook evenly. Avoid crowding the pan, as this leads to steaming, not roasting. Stir the veggies halfway through to ensure they brown nicely. For seasoning, you can mix things up! Try adding lemon zest or balsamic vinegar for a bright twist. Feel free to adjust the red pepper flakes to your spice level. To get the best al dente pasta, start with plenty of salted water. Bring it to a rolling boil before adding the pasta. Cook according to the package directions, usually about 8-10 minutes. Taste the pasta a minute or two early. It should be firm yet tender. If you want to try something fun, you can toss in a bay leaf or olive oil while boiling for extra flavor. When serving, consider using shallow bowls. This style makes the dish look fancy and lets the colors pop. Arrange the roasted veggies on top for a beautiful display. Drizzle extra olive oil for shine and flavor. Fresh basil adds a nice finishing touch. For drinks, pair this dish with a light white wine or sparkling water. Enjoy your meal with a side of crusty bread to soak up any extra sauce! {{image_4}} You can switch up the vegetables based on the season. Use fresh asparagus in spring, or try eggplant in summer. Seasonal veggies taste better and add different flavors. Look for what’s fresh at your local market. You can create a new dish each time you make it. Try to mix colors and shapes to make your dish more fun. Want to make your pasta heartier? Add protein! Chicken or shrimp works well. Just cook them before mixing in. If you prefer plant-based options, use beans or lentils. They are great sources of protein and add a nice texture. Just drain and rinse them before tossing them in with your pasta. For those who need gluten-free options, try using rice or quinoa pasta. They are easy to find in most stores. If you're vegan, skip the cheese and use olive oil instead. You can also use nutritional yeast for a cheesy taste without dairy. These changes make the dish fit for everyone while keeping it tasty. For the complete experience, check out the Full Recipe! To store your roasted vegetable pasta, place it in an airtight container. This keeps it fresh and tasty. You can store it in the fridge for up to four days. If you want to keep it longer, freeze it. In the freezer, it will last for about three months. Just remember to label the container with the date. This helps you keep track of its freshness. When you're ready to enjoy leftovers, reheat using the stovetop or microwave. For the stovetop, add a splash of water or olive oil in a pan. Heat it over low heat until warm. Stir often to avoid burning. If you choose the microwave, cover the dish loosely with a lid or paper towel. Heat in short bursts, stirring in between. The quality of the dish may change a bit when reheated. Roasted vegetables can lose some crispness, but the flavors will still shine. Enjoy your tasty roasted vegetable pasta just like when it was fresh! To make Roasted Vegetable Pasta vegan, skip the cheese. You can use nutritional yeast to add a cheesy flavor. Another idea is to replace Parmesan with a vegan cheese option. For sauce, try adding a splash of lemon juice. This will brighten the dish and keep it fresh. Yes, you can use frozen vegetables. They are convenient and save time. Just make sure to thaw and drain them before roasting. This helps avoid excess water. Add them to the baking sheet and roast as you would fresh veggies. Keep an eye on cooking time, as frozen vegetables may cook faster. Leftover pasta can be used in many ways. You can make a pasta salad by mixing it with olive oil and your favorite veggies. Another option is to reheat it with some broth to create a soup. You can also use it in a frittata or bake it with cheese for a pasta bake. Yes, you can prep this dish in advance. Roast the vegetables and cook the pasta ahead of time. Store them separately in the fridge. When you are ready to eat, mix them together and heat. This makes for a quick and easy meal when you need it. Roasted Vegetable Pasta is simple and tasty. We covered the key ingredients, from whole wheat pasta to fresh veggies. I showed you how to roast, cook, and combine all these elements. Plus, I shared tips on perfecting your dish and how to store leftovers. In the end, this recipe is great for any meal. Feel free to switch up vegetables or add proteins. Enjoy making this dish your own!](https://tossedflavors.com/wp-content/uploads/2025/07/c21d3921-a58c-4c20-bfbb-eb031234434e.webp)
Tasty Roasted Vegetable Pasta Simple and Healthy Dish
Looking for a quick, healthy dinner idea? Let me introduce you to my Tasty Roasted Vegetable Pasta. This dish combines colorful veggies and whole wheat
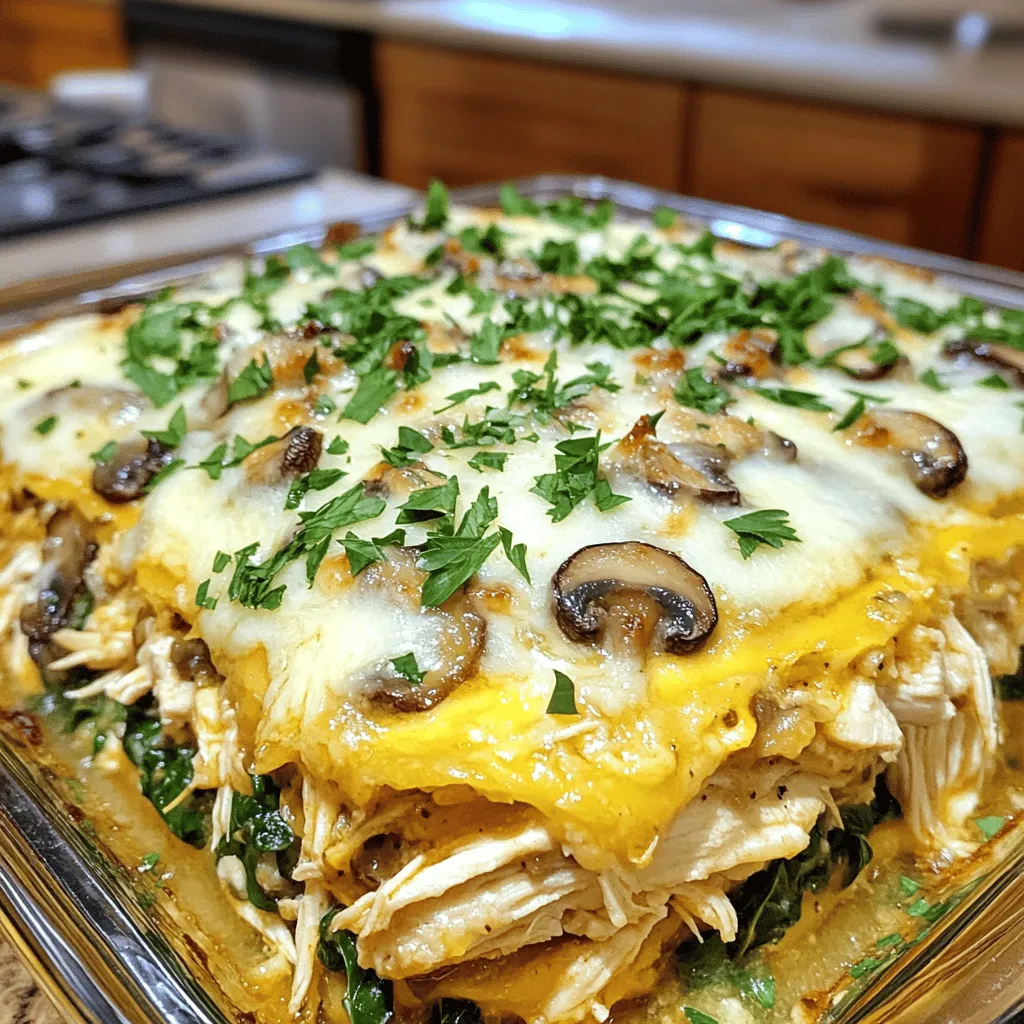
Keto Garlic Mushroom Chicken Casserole Delight
Are you ready to indulge in a low-carb feast? My Keto Garlic Mushroom Chicken Casserole Delight is a creamy, savory dish that makes your taste

Savory Stuffed Zucchini Boats Healthy and Tasty Meal
Looking for a healthy and tasty meal that’s simple to make? You’re in the right place! Savory stuffed zucchini boats are not only delicious but
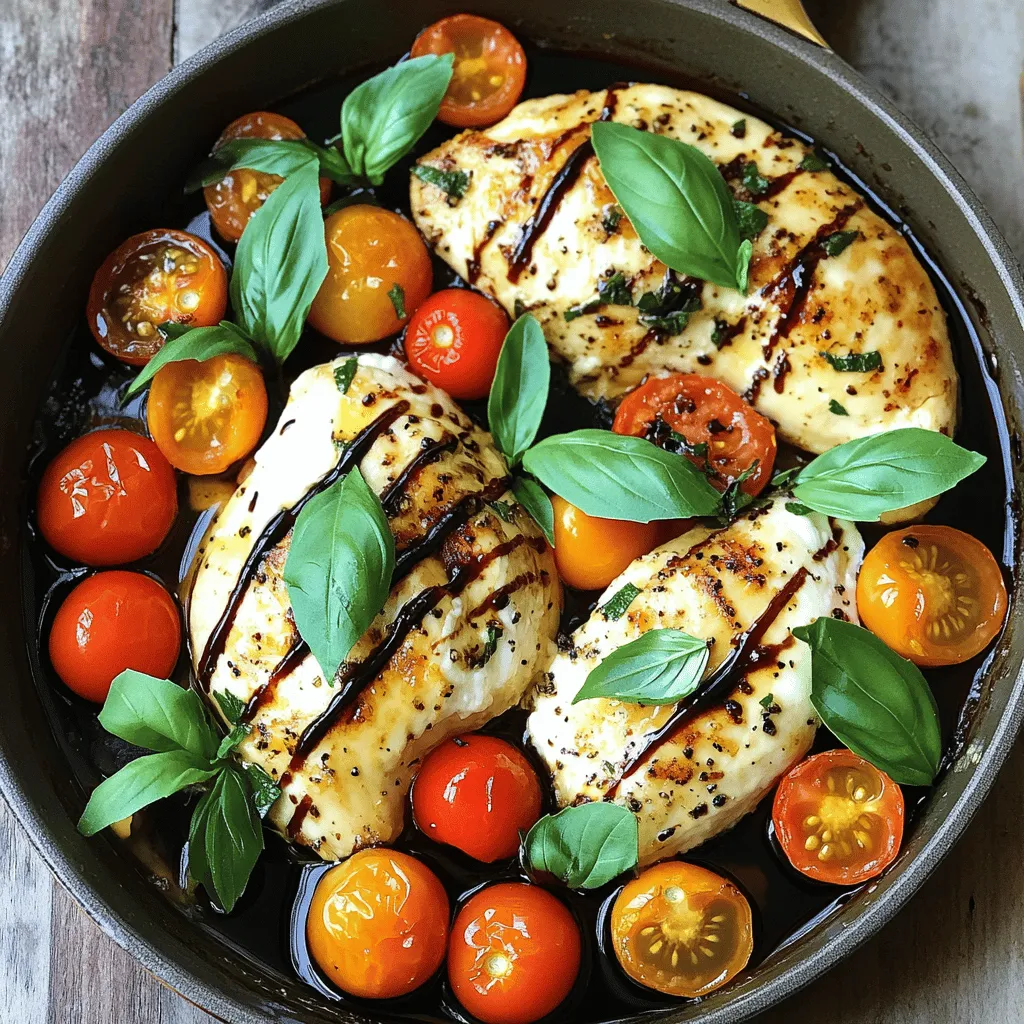
Quick Mozzarella Chicken Tasty and Simple Weeknight Dish
Looking for a quick and tasty dinner? Let me introduce you to Quick Mozzarella Chicken! This dish brings together juicy chicken breasts, fresh mozzarella, and
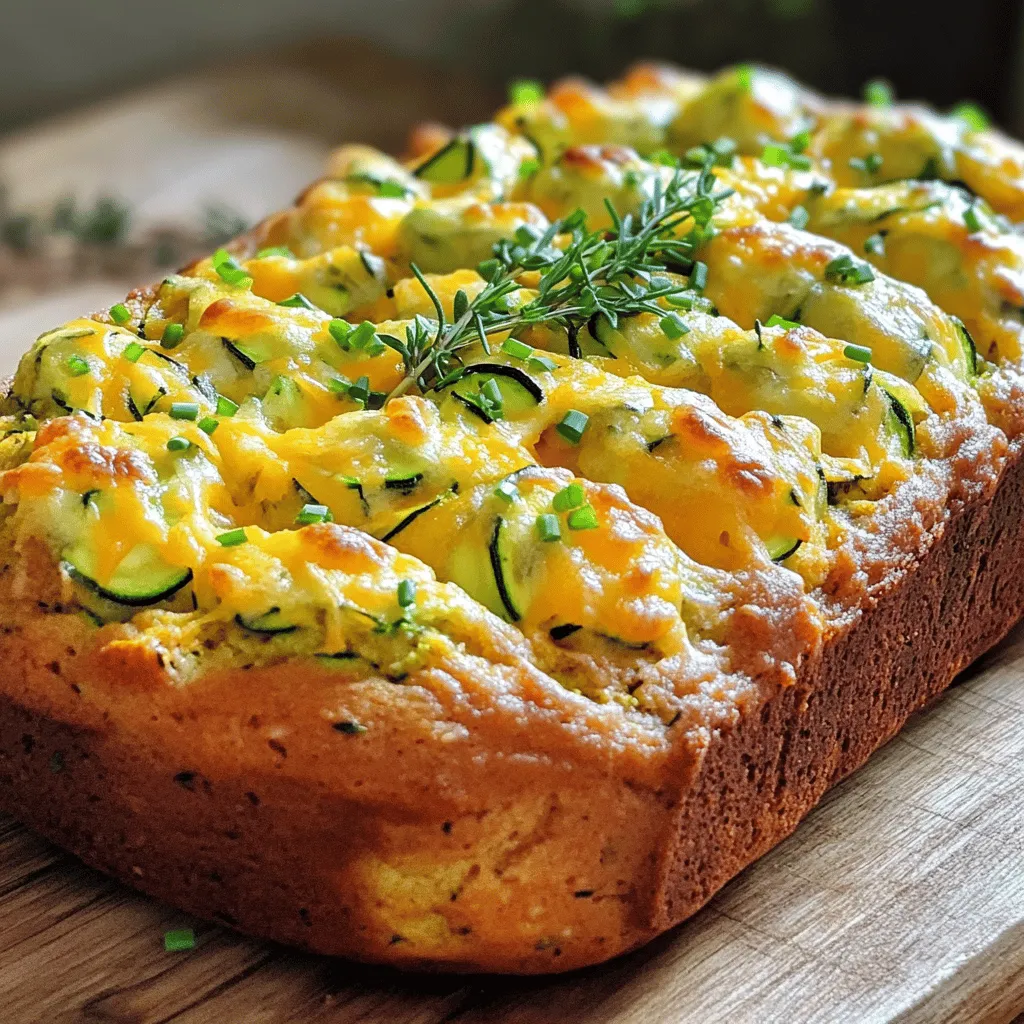
Savory Cheddar Zucchini Bread Flavorful and Easy Recipe
Are you ready to try a delicious twist on a classic favorite? My Savory Cheddar Zucchini Bread recipe is not just easy to make but

Zucchini Grilled Cheese Flavorful and Easy Delight
Are you ready for a twist on a classic? Zucchini grilled cheese is both tasty and easy to make! This recipe will transform ordinary ingredients
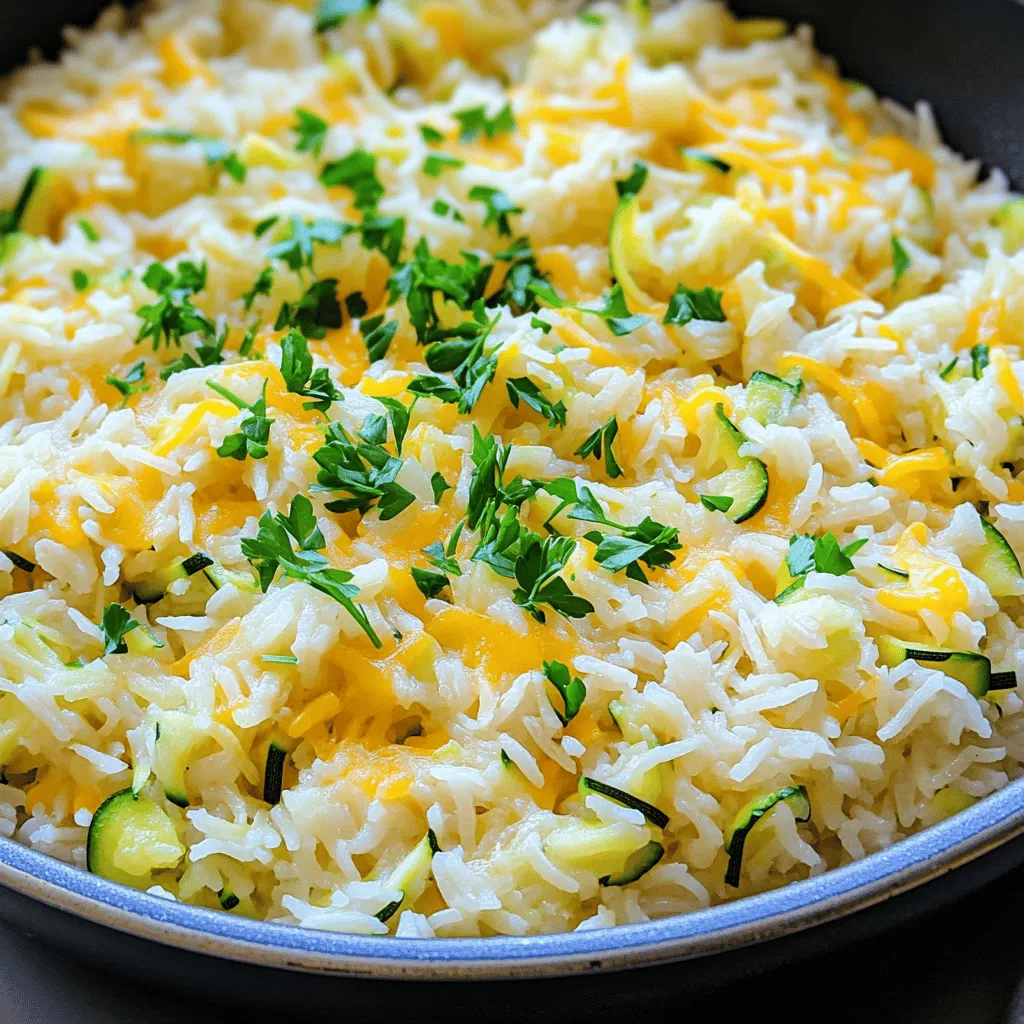
Cheesy Zucchini Rice Delight Easy and Flavorful Meal
Are you ready to whip up a meal that’s both easy and bursting with flavor? My Cheesy Zucchini Rice Delight is the perfect answer for