Dinner
![- 4 boneless, skinless chicken breasts - 1/2 cup balsamic vinegar - 3 tablespoons honey - 2 tablespoons extra virgin olive oil - 3 cloves garlic, finely minced - 1 teaspoon dried oregano - 1 teaspoon sea salt - 1/2 teaspoon freshly ground black pepper - Fresh basil leaves, for garnish - Optional: cherry tomatoes and arugula To convert measurements for larger quantities, simply multiply. For example, if you want to serve eight people, double each ingredient. If you need alternatives, here are some options: - Chicken: Use thighs for a juicier option. - Honey: Maple syrup works well for sweetness. - Vinegar: Try red wine vinegar if balsamic is not available. - Garlic: Use garlic powder in a pinch, but fresh is best. These swaps keep the dish tasty while meeting dietary needs. Always adjust based on what you have at home. Enjoy the process! You can find the full recipe to guide your cooking. To make the balsamic glaze, start by mixing balsamic vinegar and honey. In a small saucepan, combine 1/2 cup of balsamic vinegar with 3 tablespoons of honey. Heat this mixture over medium heat until it simmers. Once it simmers, lower the heat to low. Cook it gently for about 10-15 minutes. Stir it every so often. You want it to thicken into a nice glaze. When it’s thick, remove it from the heat and let it cool. Next, let’s marinate the chicken. In a bowl, whisk together 2 tablespoons of olive oil, 3 minced garlic cloves, 1 teaspoon of dried oregano, 1 teaspoon of sea salt, and 1/2 teaspoon of black pepper. This mix brings great flavor to your chicken. Place your 4 boneless, skinless chicken breasts in a large resealable bag or a shallow dish. Pour the marinade over the chicken. Make sure every piece is coated well. Seal the bag or cover the dish. Refrigerate it for at least 30 minutes. For even better flavor, let it marinate for up to 2 hours. Now it’s time to grill! Preheat your grill to medium-high heat. This step is key for perfect grilling. While the grill heats up, take the marinated chicken out of the fridge. Discard any leftover marinade. Grill each chicken breast for about 6-7 minutes per side. Cook until the internal temperature reaches 165°F (75°C). You want a nice char on the outside. In the last few minutes of grilling, brush the chicken with the balsamic glaze. This adds extra flavor and a beautiful finish. Once done, remove the chicken from the grill and let it rest for a few minutes. This helps keep it juicy when you slice it. To grill chicken perfectly, aim for medium-high heat. This temperature helps the chicken cook evenly. Use a grill thermometer to check the heat. A good range is 375°F to 450°F. To check if the chicken is done, use a meat thermometer. The safe internal temperature is 165°F. Insert the thermometer into the thickest part of the chicken. If it reads 165°F, your chicken is ready to eat! Fresh herbs can greatly improve the taste of your chicken. Try adding chopped rosemary or thyme to the marinade. Basil also pairs well with the balsamic glaze. You can also use spices to boost flavor. Consider adding smoked paprika for a smoky taste. A pinch of red pepper flakes can add some heat. Just remember not to overdo it! One mistake to avoid is over-marinating the chicken. If you marinate for too long, the chicken can become mushy. Stick to 30 minutes to 2 hours for the best results. Another key tip is to let the chicken rest after grilling. This allows the juices to settle. If you slice the chicken right away, it may dry out. Let it rest for about 5 minutes before cutting. For the complete recipe, check out the Full Recipe section. {{image_4}} You can use different chicken cuts for your grilled chicken with balsamic glaze. Chicken thighs have more fat, making them juicy and flavorful. They are a great choice if you want something rich. Chicken breasts are leaner and cook quicker. They are perfect if you prefer a lighter meal. For bone-in chicken, you need to adjust your cook time. Bone-in cuts take longer to cook, so grill them for about 10-12 minutes per side. Always check that the internal temperature reaches 165°F (75°C) to ensure safety. Adding fruits to your glaze can enhance the flavor. Peaches and apricots bring a sweet twist that pairs well with balsamic. Chop them and add them to the glaze as it simmers. This will create a delicious, fruity version. You can also experiment with different vinegars. Try apple cider vinegar or red wine vinegar for unique tastes. Each vinegar brings its own flavor, changing the dish in fun ways. Pair your grilled chicken with fresh salad or roasted vegetables. A crisp salad with mixed greens brightens the plate. Roasted veggies like zucchini or bell peppers add color and nutrition. For a creative presentation, stack the chicken slices on a plate. Drizzle with extra balsamic glaze for a beautiful look. Add a sprig of basil for color. You can even serve it with cherry tomatoes and arugula for a fresh touch. For the full recipe, check out [Full Recipe]. To keep your grilled chicken with balsamic glaze fresh, follow these simple steps: - Refrigerating leftovers effectively: Let the chicken cool down to room temperature. Then, store it in an airtight container. This helps prevent moisture loss. You can keep it in the fridge for up to four days. - Freezing grilled chicken with balsamic glaze: If you want to keep it longer, freeze the chicken. Wrap each piece in plastic wrap and place them in a freezer bag. This way, they stay fresh for up to three months. Remember to label the bags with the date for easy identification. To enjoy your grilled chicken again, you need to reheat it right: - Best methods for reheating grilled chicken: The oven is great for reheating. Preheat it to 350°F (175°C). Place the chicken on a baking sheet. Cover it with foil to keep it moist. Heat for about 15-20 minutes or until warm. You can also use a microwave for quick reheating. Just place the chicken in a microwave-safe dish and cover it. Heat it in short bursts until warm. - Maintaining flavor and juiciness while reheating: To keep the chicken juicy, add a splash of water or broth when reheating. This creates steam, which helps retain moisture. If you have leftover balsamic glaze, brush some on before serving to boost the flavor. These storage and reheating tips will help you enjoy your grilled chicken with balsamic glaze even more. For the full recipe, visit the [Full Recipe] link. To ensure chicken is safe to eat, check the internal temperature. The chicken must reach 165°F (75°C) for safe consumption. Use a meat thermometer for accuracy. Insert it into the thickest part of the chicken without touching bone. This step ensures even cooking and safety. Also, cut into the chicken to check that the juices run clear, not pink. Yes, you can prepare the balsamic glaze ahead. Just store it in an airtight container. Keep it in the fridge for up to a week. When ready to use, simply reheat the glaze on low heat. Stir it gently until it reaches the right consistency. Making the glaze ahead saves time on busy days. Grilled chicken with balsamic glaze pairs well with many sides. Here are some tasty options: - Garlic mashed potatoes: Creamy and rich in flavor. - Steamed green beans: Crisp and fresh. - Mixed green salad: Light and refreshing with a tangy dressing. - Quinoa: Nutty and full of protein, it complements the chicken well. - Roasted vegetables: Sweet and savory flavors balance the dish. Feel free to mix and match according to your taste! In this blog post, I shared a tasty grilled chicken recipe with balsamic glaze. You learned about the ingredients, preparation steps, and expert tips for grilling. I also covered meal variations and storage ideas. Remember, grilling chicken can be simple and fun. Don’t hesitate to experiment with flavors and techniques. With practice, you can make a perfect dish that impresses everyone. Enjoy your cooking journey, and let the flavor shine!](https://tossedflavors.com/wp-content/uploads/2025/07/9c263cd9-3848-4d73-a73c-08ebf213f55a.webp)
Grilled Chicken with Balsamic Glaze Easy Recipe Guide
Looking to impress your family and friends with a delicious meal? This Grilled Chicken with Balsamic Glaze Easy Recipe Guide is just what you need!
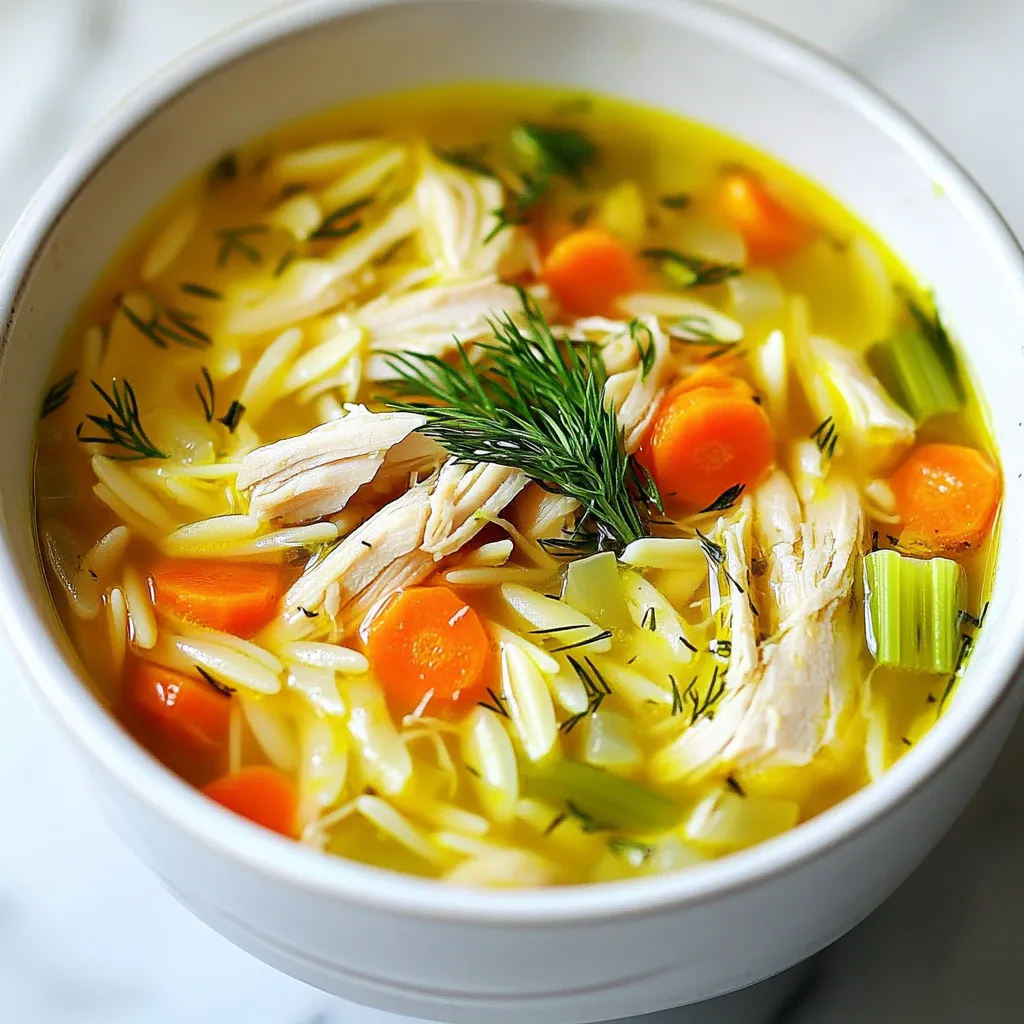
Greek Lemon Chicken Soup Comforting and Flavorful Dish
If you’re craving a warm and tasty dish, Greek Lemon Chicken Soup is a must-try. This soup bursts with flavor from fresh lemon, herbs, and
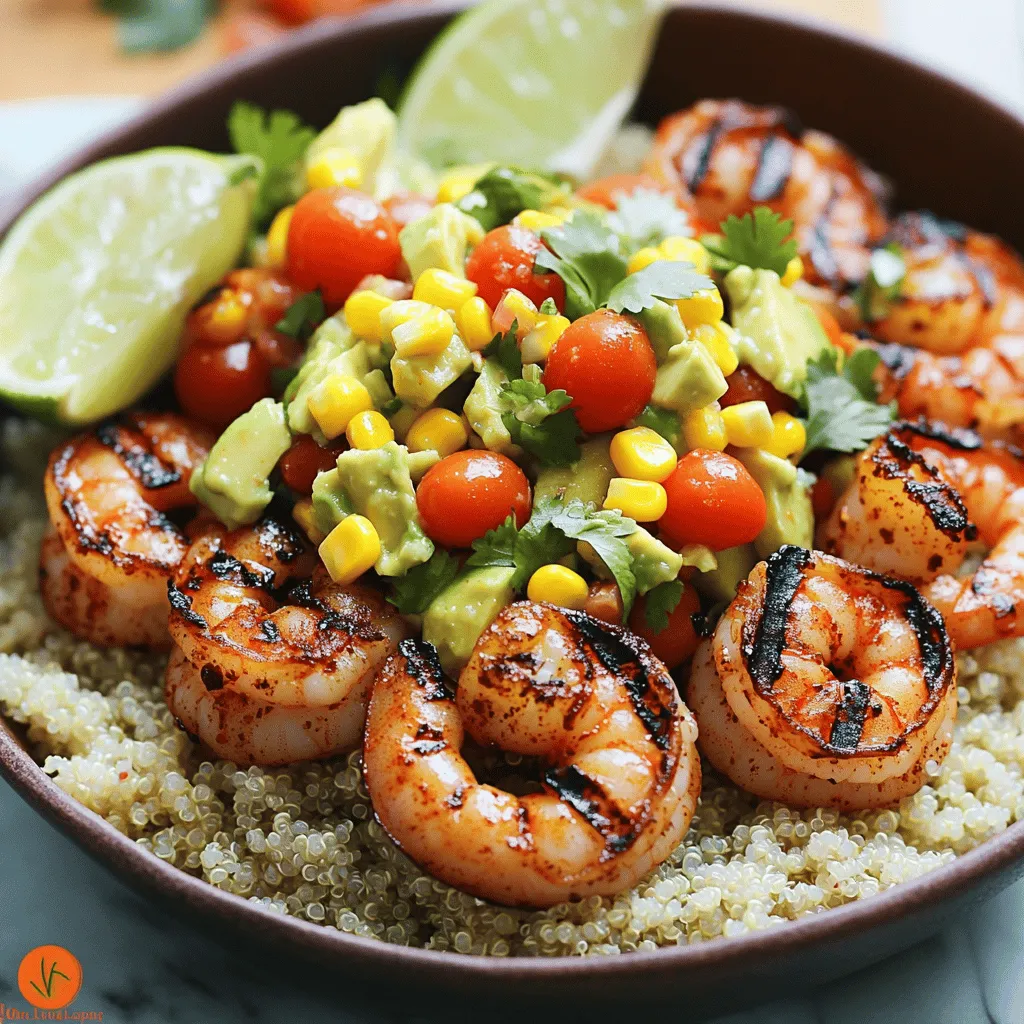
Grilled Shrimp Bowl with Avocado Corn Salsa Delight
Are you ready to elevate your dinner with a fresh, vibrant dish? My Grilled Shrimp Bowl with Avocado Corn Salsa is a delightful blend of
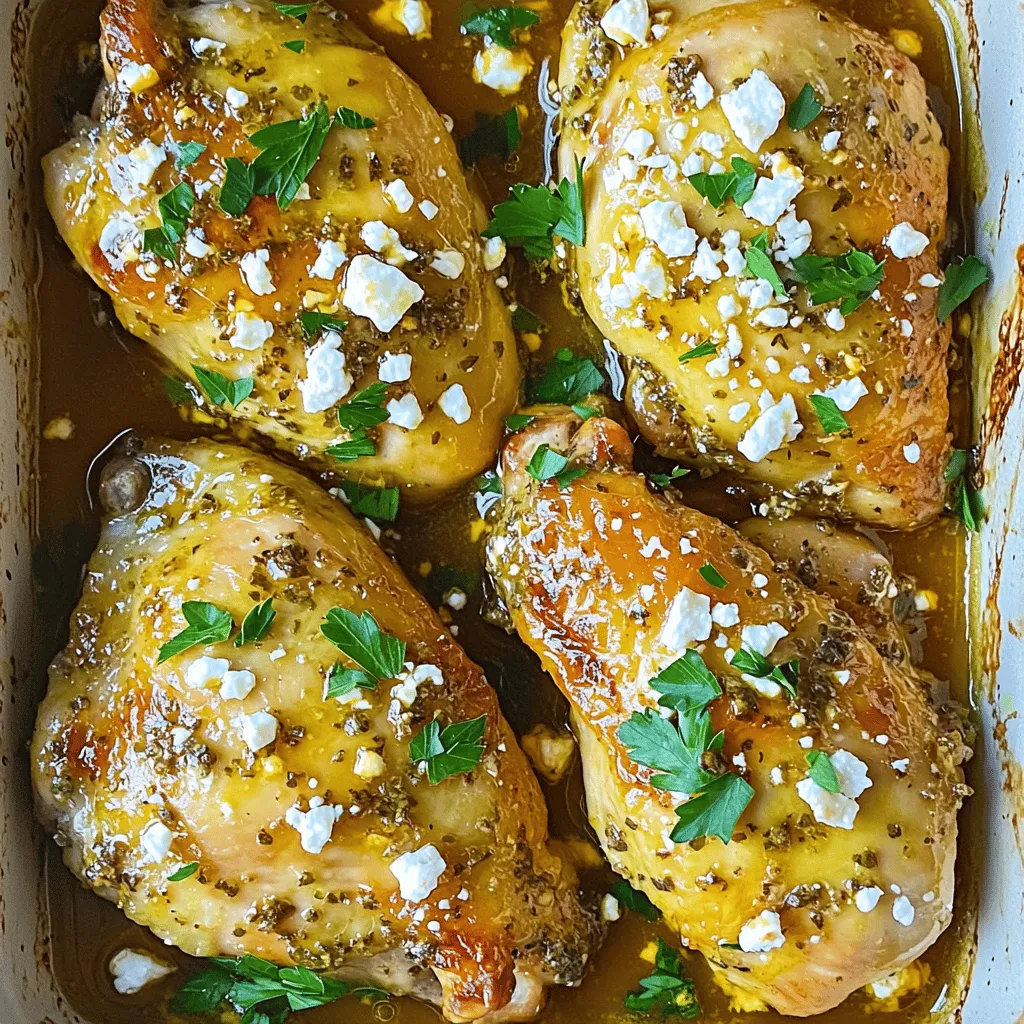
Hot Honey Feta Chicken Tasty and Simple Recipe
Looking to spice up your dinner routine? This Hot Honey Feta Chicken recipe is simple, quick, and packed with flavor. With juicy chicken breasts, tangy
![Gather these simple ingredients for your maple glazed chicken: - 4 boneless, skinless chicken breasts - 1/2 cup pure maple syrup - 2 tablespoons Dijon mustard - 2 tablespoons soy sauce (or tamari for a gluten-free option) - 2 cloves garlic, minced - 1 teaspoon fresh thyme, chopped (or 1/2 teaspoon dried thyme) - 1/2 teaspoon freshly cracked black pepper - Salt, to taste - 2 tablespoons olive oil - 1/4 cup green onions, finely chopped (for garnish) Each ingredient plays a key role. The maple syrup adds sweetness. The Dijon mustard gives a nice tang. Soy sauce brings umami flavor, while garlic adds depth. Fresh thyme lends a herby note, rounding out the dish. Make sure to use fresh ingredients for the best flavor. This recipe is a fun way to explore cooking with maple. It’s simple, yet it tastes gourmet. You will impress your family or friends with this dish. Check out the Full Recipe for step-by-step guidance. Enjoy the process, and happy cooking! Whisk together the following ingredients in a medium bowl: - 1/2 cup pure maple syrup - 2 tablespoons Dijon mustard - 2 tablespoons soy sauce - 2 cloves garlic, minced - 1 teaspoon fresh thyme, chopped - 1/2 teaspoon freshly cracked black pepper - Salt, to taste This mix creates a sweet and tangy glaze. It adds depth and flavor to the chicken. Take 4 boneless, skinless chicken breasts and coat them with half of the maple glaze. Place them in a large resealable bag or a shallow dish. Seal the bag or cover the dish and refrigerate. Let the chicken marinate for at least 30 minutes. If you have time, marinate for up to 4 hours. The longer it sits, the better the flavor. Preheat your grill or a large skillet over medium-high heat. If using a skillet, add 2 tablespoons of olive oil and let it heat. Remove the chicken from the bag or dish. Let excess glaze drip off. Discard the marinade. Place the chicken in the skillet or on the grill. Cook for about 6-7 minutes on one side. The chicken should be nicely browned. Flip the chicken over and brush the reserved glaze on the cooked side. Cook for another 6-7 minutes. Check that the internal temperature reaches 165°F (75°C). Once done, take the chicken off the heat. Let it rest for a few minutes before slicing. This helps keep the juices inside. For serving ideas, place the sliced chicken on a platter. Drizzle it with any remaining glaze and garnish with finely chopped green onions. This adds a fresh touch to your plate. For the full recipe, refer to the complete guide. To make your maple glazed chicken burst with flavor, marinate it for up to 4 hours. This step allows the chicken to soak in all the tasty ingredients. You can mix up the marinade and let the chicken sit while you prepare other parts of your meal. The longer it sits, the more intense the flavor becomes. For the best results, use a meat thermometer. It helps you know when the chicken is perfectly cooked. Aim for an internal temperature of 165°F (75°C). This will keep your chicken juicy and safe to eat. If you don’t have a thermometer, check that the juices run clear when you cut into it. Presentation matters! Serve the chicken on a wooden board lined with parchment paper. This gives a nice rustic touch. Drizzle any leftover glaze on top for extra flavor. Don’t forget to garnish with finely chopped green onions. You can also add a few sprigs of thyme for a pop of color. Pair the chicken with seasonal veggies or a fresh salad for a complete meal. Enjoy your beautiful dish! For the full recipe, check out the Maple Glazed Chicken Delight. {{image_4}} You can change the flavors of your maple glazed chicken easily. Here are some options: - Honey: Swap maple syrup for honey for a different sweetness. - Mustard: Use spicy brown mustard instead of Dijon for more heat. - Soy Sauce: Try coconut aminos for a soy-free option. - Herbs: Replace thyme with rosemary or oregano for a fresh twist. These swaps can give your dish a new flavor each time you cook it. You can cook maple glazed chicken in different ways. Try these methods: - Baking: Preheat the oven to 375°F (190°C). Place chicken in a baking dish and pour the glaze over it. Bake for about 25-30 minutes until it reaches 165°F (75°C). - Air Frying: Preheat your air fryer to 375°F (190°C). Place the chicken in the basket, brush with glaze, and cook for 12-15 minutes. This method gives a crispy outside. Each method will keep your chicken juicy and flavorful. Maple glazed chicken goes well with many sides. Here are some of my favorites: - Roasted Vegetables: Carrots, Brussels sprouts, or sweet potatoes work well. - Rice: Serve it with jasmine or brown rice to soak up the glaze. - Salad: A fresh green salad with a light vinaigrette adds crunch. - Mashed Potatoes: Creamy mashed potatoes balance the sweet glaze nicely. These sides will make your meal complete and delicious. For the full recipe, check [Full Recipe]. To keep your maple glazed chicken fresh, place leftovers in an airtight container. This helps keep the chicken juicy. Store it in the fridge for up to three days. Make sure to cool it down first before sealing. You can freeze maple glazed chicken for later meals. First, let it cool completely. Then, wrap it tightly in plastic wrap. Place it in a freezer-safe bag or container. It can last in the freezer for up to three months. When you are ready to eat, thaw it in the fridge overnight. To reheat, you can use a few methods. The oven is a great choice. Preheat it to 350°F (175°C). Place the chicken in a baking dish, cover it with foil, and heat for about 20 minutes. You can also use the microwave. Heat on medium power for 2-3 minutes, checking often. This helps keep the chicken moist. Enjoy your meal! To ensure the glaze sticks well, start by marinating the chicken. Use half of the glaze to coat the chicken fully. Let it sit in the fridge for at least 30 minutes. The longer it marinates, the better the flavor and adherence. When you cook the chicken, avoid moving it too much. This helps create a nice crust that keeps the glaze in place. Yes, you can easily make this recipe gluten-free. Instead of regular soy sauce, use tamari. This sauce tastes similar but has no gluten. It works perfectly in the glaze and keeps the dish delicious. Be sure to check other ingredients for gluten too. Maple glazed chicken pairs well with many sides. Try serving it with: - Steamed broccoli - Roasted sweet potatoes - Quinoa salad - Green beans These options balance the sweet and savory flavors of the chicken. They also add color to your plate. You can use different proteins with this glaze. Options include: - Pork chops - Salmon fillets - Tofu for a vegetarian choice These proteins soak up the maple flavor well. Each option offers a new twist on the dish. Feel free to experiment! For the full recipe, check out the earlier section. In this post, I showed you how to create a tasty maple glazed chicken. We covered the ingredients you need, step-by-step instructions, and even some helpful tips. Remember, marinating adds depth, and cooking techniques matter for flavor. Feel free to explore variations and adapt the recipe to your taste. With the right storage, you can enjoy leftovers too. This dish is easy, delicious, and sure to impress! Enjoy cooking and sharing this delightful recipe with others.](https://tossedflavors.com/wp-content/uploads/2025/07/a4545e7c-3c2c-4b6c-b6ac-83c448503ef7.webp)
Maple Glazed Chicken Savory and Simple Delight
Get ready to impress your taste buds with my Maple Glazed Chicken! This dish combines sweet maple syrup, tangy Dijon mustard, and savory garlic for
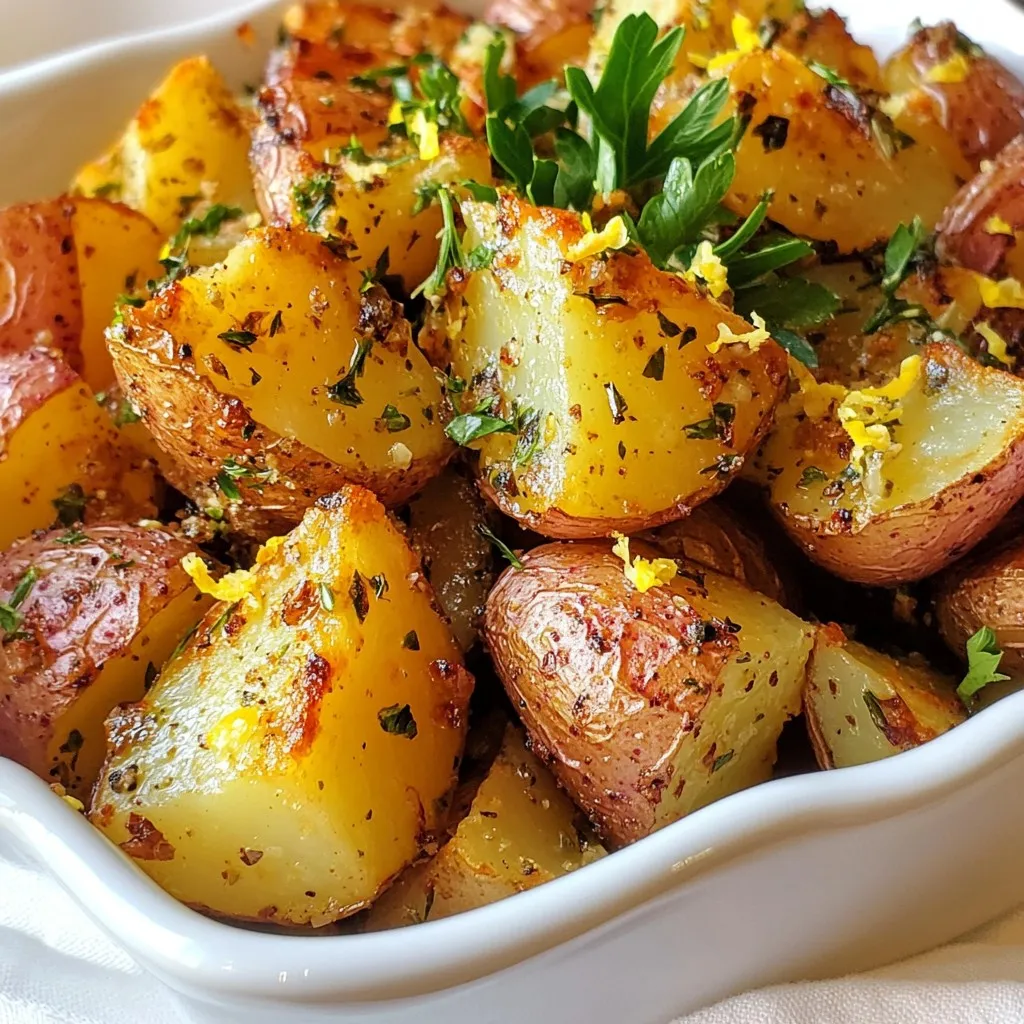
Garlic Herb Roasted Red Potatoes Tasty Side Dish Recipe
Looking for an easy side dish that packs a punch? Look no further! My Garlic Herb Roasted Red Potatoes are a perfect blend of crispy,

Creamy Crockpot Mac and Cheese Easy Comfort Dish
If you’re craving a cozy, creamy dish that practically makes itself, you’re in the right place! My Creamy Crockpot Mac and Cheese combines rich cheeses
![- 1 pound ground turkey or beef - 1 can (15 oz) black beans, drained and rinsed - 1 can (15 oz) diced tomatoes with green chilies - 1 cup corn, frozen or canned, drained if canned - 2 cups vegetable or chicken broth - 1 cup uncooked brown rice - 1 medium onion, finely diced - 2 cloves garlic, minced - 1 bell pepper, diced In this recipe, I often start with ground turkey or beef. Both add a nice flavor. Black beans and diced tomatoes bring color and nutrition. Corn gives sweetness, while broth adds depth. Brown rice binds it all together, so we get a hearty meal. - 1 packet taco seasoning (about 1 ounce) - 1 teaspoon ground cumin - Salt and pepper, to taste For seasonings, taco seasoning is key. It packs in that classic taco flavor. Ground cumin adds warmth and an earthy note. A little salt and pepper help bring all the flavors together. - Diced avocado - Fresh cilantro - Shredded cheese - Lime wedges Toppings can really make this dish special. I love adding diced avocado for creaminess. Fresh cilantro brightens it up. Shredded cheese adds richness. A squeeze of lime gives a zesty finish to each bowl. You can find the complete recipe [Full Recipe]. Start by browning the meat. In a skillet, heat it over medium heat. Add 1 pound of ground turkey or beef. Cook it for about 6-8 minutes. Stir it often until it is fully cooked. Once browned, drain any excess fat and set the meat aside. Next, layer the ingredients in your crockpot. Add the browned meat to the base. Then, add the diced onion, minced garlic, black beans, and diced tomatoes. Don't forget the corn and broth! Sprinkle in the taco seasoning, uncooked brown rice, and diced bell pepper. Finally, add ground cumin for flavor. Now, mix everything thoroughly. Stir all the ingredients together well. This ensures that each bite is packed with flavor. Cover the crockpot and set it to cook. You can choose low or high heat. Cooking on low takes 6-8 hours, while high takes 4-5 hours. Check for doneness after the cooking time. The rice should be tender, and all flavors should blend nicely. When ready, give it a good stir to mix everything again. For the full recipe, refer to the earlier section. To make your Crockpot Taco Rice Soup burst with flavor, pay close attention to seasoning. Start by tasting the soup before serving. If it seems flat, add a pinch of salt or more taco seasoning. Each brand has a unique taste. Adjust to your liking for the best results. Adding acidity can really enhance the soup. Squeeze fresh lime juice right before serving. This brightens the flavors and adds a zesty kick. Lime pairs perfectly with the spices and makes each bite pop. If you want to switch things up, try different meats. Ground chicken or pork works great in this dish. Each type of meat brings its own flavor. You can also use shredded rotisserie chicken for a quicker option. Pre-soaking the rice can save time. Soak it for about 30 minutes before cooking. This helps the rice cook faster in the crockpot. You’ll enjoy a more even texture in your soup. Pair your soup with cornbread or tortilla chips for a complete meal. The crunch adds a nice contrast to the soft soup. You can also serve it with a side salad for freshness. For presentation, ladle the soup into bowls and add toppings. A sprinkle of cilantro makes it look vibrant. Arrange lime wedges on the side so guests can add their own zesty touch. This little detail makes serving more fun and interactive. {{image_4}} For a vegetarian twist, swap the meat with beans. Use more black beans or add kidney beans for extra protein. You can also add vegetables like zucchini, bell peppers, or carrots. These will add texture and nutrition. If you love heat, add jalapeños to your soup. You can chop them finely and mix them in during cooking. Another option is to use spicy salsa instead of regular salsa. This will give your soup a nice kick. To make the soup creamy, add a splash of cream or some cream cheese. Stir it in at the end of cooking for a rich taste. You can even make it a chowder-style soup by adding more broth and cream. This gives a comforting and hearty feel to the dish. For the full recipe, visit the [Full Recipe] section. After enjoying your Crockpot Taco Rice Soup, let it cool down. I usually wait about 30 minutes before storing leftovers. Transfer the soup into airtight containers. Glass or BPA-free plastic containers work best for storing. Make sure to leave some space at the top, as the soup may expand when frozen. This soup lasts in the fridge for about 3 to 4 days. You can reheat this soup in two ways: microwave or stovetop. For the microwave, place the soup in a microwave-safe bowl. Heat it for about 2-3 minutes, stirring halfway through. For stovetop reheating, pour the soup into a pot. Heat over medium until it’s hot, stirring often. To keep the flavors fresh, add a splash of lime juice before serving. This little tip brightens the taste! If you want to save some soup for later, freezing is a great option. I recommend portioning the soup into freezer-safe bags or containers. Leave some space at the top to allow for expansion. The soup can be frozen for about 3 months. When you're ready to enjoy it again, thaw it overnight in the fridge. Reheat it on the stovetop for the best results. Enjoy your meal as if it were freshly made! For the full recipe, check out the earlier section. You can cook this soup on low for 6 to 8 hours. If you use the high setting, it takes about 4 to 5 hours. The soup is ready when the rice is soft and the flavors blend well. I prefer low cooking for better taste, but both methods work. You can use brown rice, but it needs more time to cook. Brown rice takes about 45 minutes longer than white rice. It has a chewier texture and a nutty flavor. White rice cooks faster and is softer. Choose based on your taste and time. You can make your own taco seasoning at home. Mix cumin, chili powder, garlic powder, and paprika. Use these spices in equal parts to create a flavorful blend. If you want a kick, add some cayenne pepper. This way, you control the flavors and spice level. We covered how to make a flavorful Crockpot Taco Rice Soup. First, we discussed key ingredients like meat, beans, tomatoes, and spices. Then, I shared step-by-step instructions for cooking your soup to perfection. Don’t forget to try variations and perfect your flavor with tips like adding lime juice or using different meats. Store extra servings correctly, and enjoy them later. This dish is simple and fun to personalize. Now, get cooking and savor your delicious creation!](https://tossedflavors.com/wp-content/uploads/2025/07/5e3a5791-5efb-4a6f-a2ba-27f152363e3c.webp)
Crockpot Taco Rice Soup Hearty and Flavorful Meal
Craving a warm, hearty meal that’s easy to prepare? You’ve come to the right place! This Crockpot Taco Rice Soup is packed with flavor and

Easy Slow Cooker Hawaiian Chicken Flavorful and Simple
Looking for a dinner that’s both easy and delicious? Meet my Easy Slow Cooker Hawaiian Chicken! This dish combines tender chicken, sweet pineapple, and zesty
. To get tender-crisp green beans, start by blanching them. Boil water and add the trimmed beans. After 2-3 minutes, the beans should look bright green. Transfer them to an ice bath right away. This step stops cooking. It keeps them firm and bright. Avoid overcooking by timing it well. The key is to cook them just enough. You can add extra spices to boost flavor. Try a bit of cumin for warmth or lemon zest for brightness. If you want umami-rich additions, consider mushrooms or a splash of fish sauce. Both options add depth to your dish. You can also add a pinch of sugar to balance the flavors. Garlic ginger green beans pair well with many main dishes. They go great with grilled chicken or fish. You can also serve them with rice or quinoa for a complete meal. If you meal prep, these beans store well. They stay fresh and tasty in the fridge. Enjoy them as a side for your lunch or dinner. For the full recipe, check out the section above. {{image_4}} For those needing gluten-free options, use tamari instead of soy sauce. Tamari has a similar taste but no gluten. It keeps the dish tasty while meeting dietary needs. If you're vegan, simply check that the soy sauce is vegan. This dish is already plant-based. It packs flavor without any animal products. You can swap green beans for other veggies. Try snap peas, broccoli, or asparagus. Each veggie brings its own taste and texture. Adjust cooking times as needed for different vegetables. For oils, extra virgin olive oil works great, but you can use avocado oil too. Avocado oil has a mild taste. It can change the flavor slightly, making it unique. To give this dish an Asian flair, add hoisin sauce or rice vinegar. These ingredients boost the flavor profile and add depth. You can also incorporate local herbs. Add fresh basil or mint for a twist. These herbs brighten the dish and add a fresh touch. For the full recipe, check out the complete details. To keep your Garlic Ginger Green Beans fresh, refrigerate them right away. Use an airtight container to avoid moisture loss. Make sure to cool them before sealing. This keeps them crunchy and tasty for up to three days. When it’s time to enjoy leftovers, avoid microwaving them. This can make the beans soggy. Instead, use a skillet to reheat. Warm them over medium heat for a few minutes, stirring gently. This helps maintain their texture and flavor. You can freeze Garlic Ginger Green Beans, but they are best fresh. If you want to freeze, do it right after cooking. Place them in a freezer-safe bag and push out the air. They can last for up to three months. When you’re ready to enjoy, thaw them in the fridge overnight. Sauté in a skillet to warm them up and regain that delightful crunch. You can pair Garlic Ginger Green Beans with many delicious main dishes. Here are some great options: - Grilled chicken or tofu - Stir-fried shrimp or beef - Baked salmon or white fish - Quinoa or rice bowls For sides, consider these complementary dishes: - Steamed jasmine rice - Roasted sweet potatoes - A fresh garden salad - Creamy mashed potatoes Yes, you can make Garlic Ginger Green Beans ahead of time. Here are tips for meal prep: - Blanch and sauté the green beans a day in advance. - Store them in an airtight container in the fridge. For the best taste, reheat them just before serving. Here’s how: - Use a skillet over medium heat. - Add a splash of water to prevent sticking. - Heat until warm, stirring gently. Garlic and ginger are not just tasty; they offer many health benefits. Here are their key nutritional highlights: - Garlic can help boost your immune system. - Ginger aids digestion and can reduce nausea. Both ingredients may also have anti-inflammatory effects. They can help with blood circulation and support overall wellness. Enjoying Garlic Ginger Green Beans not only delights your taste buds but also supports your health. For the full recipe, check out [Full Recipe]. Garlic Ginger Green Beans are simple to make and full of flavor. We covered the main ingredients, step-by-step cooking, and tips for the perfect texture. You can easily modify the recipe for dietary needs or enjoy different variations. Don’t forget the storage tips to keep your leftovers fresh. This dish pairs well with many meals and offers health benefits too. Enjoy making this tasty side dish that brightens any table. It's quick, easy, and delicious!](https://tossedflavors.com/wp-content/uploads/2025/07/4c2c7d0a-5ff6-4521-a217-69b1c6b4c062.webp)
Garlic Ginger Green Beans Flavorful and Easy Recipe
Looking for a quick and tasty side dish? Garlic Ginger Green Beans are your answer. This vibrant dish takes fresh green beans and elevates them