Desserts

- 1 cup rolled oats - 1 ripe banana, mashed - 1/2 cup natural peanut butter - 1/4 cup honey or maple syrup - 1/2 teaspoon vanilla extract - 1/2 teaspoon baking powder - 1/4 teaspoon salt - 1/2 teaspoon cinnamon - 1/4 cup chocolate chips (optional) For these Peanut Butter Banana Oat Cookies, you need simple, healthy ingredients. The rolled oats provide a great base. They add fiber and texture. Next, use a ripe banana. The riper the banana, the sweeter it is. Natural peanut butter brings rich flavor and healthy fats. Honey or maple syrup adds sweetness. Choose one based on your taste. Don’t forget the vanilla extract! It enhances the cookie’s flavor. Baking powder gives the cookies a light rise. A pinch of salt balances the sweetness. Cinnamon adds warmth and spice. If you want a fun twist, add chocolate chips. They melt and create gooey pockets in the cookies. Each bite becomes even more delicious. These ingredients create a cookie that is not only tasty but also filled with good nutrition. Enjoy mixing them together! {{ingredient_image_1}} 1. First, preheat your oven to 350°F (175°C). This helps the cookies bake evenly. 2. Line a baking sheet with parchment paper. This keeps the cookies from sticking. 3. In a large bowl, mash the ripe banana until smooth. 4. Add 1/2 cup of natural peanut butter to the mashed banana. Stir until they blend well. 5. Pour in 1/4 cup of honey or maple syrup. Add 1/2 teaspoon of vanilla extract. Mix these wet ingredients well. 6. In a separate bowl, whisk together the dry ingredients. Combine 1 cup of rolled oats, 1/2 teaspoon of baking powder, 1/4 teaspoon of salt, and 1/2 teaspoon of cinnamon. 1. Now, slowly add the dry mix to the wet ingredients. Stir until just combined. 2. If you want, fold in 1/4 cup of chocolate chips for extra sweetness. 3. Use a tablespoon to scoop out the dough. Place each scoop onto the baking sheet, leaving space between them. 4. Flatten each cookie slightly with the back of a spoon. This helps them bake evenly. 5. Bake for 10-12 minutes. Look for lightly golden edges. 6. After baking, let the cookies cool on the baking sheet for 5 minutes. Then, transfer them to a wire rack to cool completely. To make the best cookies, adjust baking time based on your preference. For softer cookies, bake for 10 minutes. For crunchier ones, go for 12 minutes. Using the right ingredients can help too. You can swap honey with maple syrup for a different flavor. Almond butter is a great choice if you're out of peanut butter. Ripe bananas play a big role in taste. Choose bananas with brown spots for more sweetness. Mash them well for smooth mixing. Keep your cookies fresh by storing them in an airtight container. They last for up to a week at room temperature. If you want to save some for later, freeze them. Place cookies in a freezer-safe bag. They can stay good for about three months. To enjoy frozen cookies, let them thaw at room temperature. You can also warm them in the microwave for a few seconds. Enjoy your tasty treat! Pro Tips Use Overripe Bananas: The riper the banana, the sweeter and more flavorful your cookies will be. Look for bananas with brown spots for the best taste. Experiment with Nut Butters: While peanut butter is delicious, you can substitute it with almond butter or cashew butter for a different flavor profile. Chill the Dough: For even chewier cookies, chill the dough in the refrigerator for 30 minutes before baking. Store Properly: Keep cookies in an airtight container at room temperature for up to a week, or freeze them for longer storage. {{image_2}} You can make these cookies your own with fun add-ins. Here are some ideas: - Incorporating nuts or seeds: Try adding chopped walnuts, almonds, or sunflower seeds. These will give your cookies a nice crunch and boost nutrition. - Using different sweeteners: If you want to change up the sweetness, use agave or a sugar alternative like stevia. Each sweetener gives a different flavor, so experiment to find your favorite. - Different mix-ins: Add dried fruits like raisins or cranberries for extra sweetness. You can also add spices like nutmeg or ginger to change the flavor profile. You can easily adapt this recipe to fit different diets. Here’s how: - Gluten-free options: Use gluten-free oats instead of regular rolled oats. This keeps your cookies safe for those with gluten allergies while still tasting great. - Vegan substitutions: Swap honey for maple syrup to make the cookies vegan. You can also use almond butter or sunflower seed butter instead of peanut butter for a nut-free option. These variations let you customize your Peanut Butter Banana Oat Cookies to fit your taste and dietary needs. Enjoy experimenting! How long do Peanut Butter Banana Oat Cookies last? These cookies can last about one week at room temperature. Store them in an airtight container. If you want them to last longer, you can freeze them. They will stay fresh for up to three months in the freezer. Can I use other nut butters instead of peanut butter? Yes, you can use almond butter, cashew butter, or sunflower seed butter. Each nut butter adds its own flavor. Just make sure the consistency is similar to peanut butter for the best results. Are these cookies healthy? Absolutely! These cookies use natural ingredients. They have oats, bananas, and nut butter, which provide fiber and healthy fats. They are free from refined sugars, depending on your sweetener choice. Can I make these cookies without oats? You can, but oats provide texture and fiber. If you skip them, consider using flour. Almond flour or coconut flour can work, but you may need to adjust the liquid. What should I do if my dough is too wet? If your dough feels sticky, add more oats or flour. Start with a tablespoon at a time. Mix well until you reach the right consistency for scooping. Each cookie has about 110 calories. This makes them a great snack. The key ingredients add much to your health. - Rolled oats provide fiber, which aids digestion. - Peanut butter adds protein and healthy fats. - Bananas give you potassium and natural sweetness. - Honey or maple syrup offers quick energy and taste. These cookies pack a good balance of nutrients. They provide carbohydrates, proteins, and fats in a healthy way. - Carbohydrates come from oats and bananas. They give you lasting energy. - Protein from peanut butter helps build muscle. - Healthy fats in peanut butter support cell health. The cookies also contain essential vitamins and minerals: - Vitamin B6 from bananas helps brain function. - Iron from oats supports red blood cells. - Magnesium in peanut butter helps with muscle and nerve function. These cookies are not just tasty; they are also good for you! These Peanut Butter Banana Oat Cookies are easy to make and fun to tweak. You can mix in your favorite ingredients and adjust the baking time for your perfect cookie. Remember to store them well for freshness or freeze some for later. With this recipe, you’ll enjoy a tasty treat that’s good for you too. Now, go ahead and create your own batch of delicious cookies!
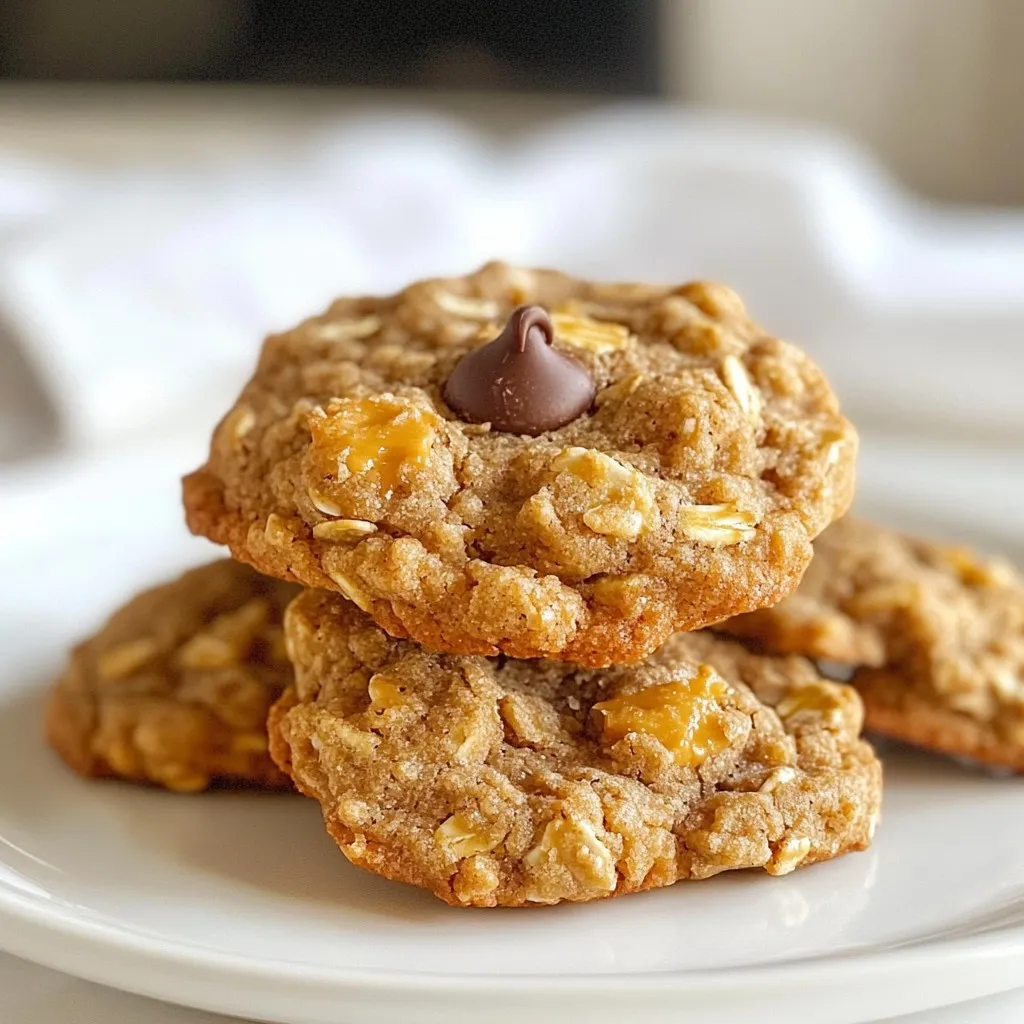
Peanut Butter Banana Oat Cookies Healthy Treat Recipe
Looking for a delicious and healthy treat? You’ve hit the jackpot with these Peanut Butter Banana Oat Cookies! Made with simple, wholesome ingredients like oats,
- 1 package of Oreo cookies (about 36 cookies), crushed - 1/2 cup unsalted butter, melted - 8 oz cream cheese, softened - 1 cup powdered sugar - 1 cup whipped topping (like Cool Whip) - 1 package (3.9 oz) instant chocolate pudding mix - 2 cups milk - 1 cup whipped topping (for topping) - Chocolate shavings or crushed Oreos for garnish You need simple, tasty ingredients for this Chocolate Oreo Lasagna. Start with a package of Oreo cookies. These will give the dessert its rich, chocolatey flavor. Crush the cookies and blend them with melted butter. This mixture forms the crust, so press it well into your pan. Next, you’ll need cream cheese. Soften it before mixing it with powdered sugar. This makes a sweet and creamy layer. Gently fold in whipped topping to make it light and fluffy. For the pudding layer, grab a package of instant chocolate pudding mix. Mix it with milk until it thickens. This layer adds a delicious chocolate taste. Don't forget more whipped topping for the final layer. It makes the dessert look pretty and adds creaminess. Finally, choose how to garnish. You can use chocolate shavings or crushed Oreos for a fun touch. Now, you are ready to create a delightful dessert! {{ingredient_image_1}} To make the crust, start by crushing the Oreo cookies. You need about 36 cookies for this. Place them in a bowl and pour in 1/2 cup of melted butter. Mix until the crumbs are evenly coated. Next, press this mixture into the bottom of a 9x13 inch baking pan. Make sure it is packed tightly. Once done, refrigerate the crust to set while you prepare the next layers. Now it’s time for the cream cheese layer. In a mixing bowl, take 8 ounces of softened cream cheese. Add 1 cup of powdered sugar and beat them together until smooth. Then, gently fold in 1 cup of whipped topping. This makes it light and fluffy. Spread this cream cheese mixture evenly over the chilled Oreo crust. Next, prepare the chocolate pudding layer. In another bowl, whisk together 1 package of instant chocolate pudding mix and 2 cups of milk. Whisk for about 2-3 minutes until it thickens nicely. Pour this chocolate pudding over the cream cheese layer. Use a spatula to spread it evenly. For the final layer, take the remaining 1 cup of whipped topping. Spread it over the chocolate pudding layer, covering the entire surface. Now, it's time to chill! Place the lasagna in the fridge for at least 4 hours, or overnight if you can wait. Before serving, add some chocolate shavings or crushed Oreos on top for a fun garnish. - Use a suitable baking pan: A 9x13 inch pan works best for this treat. It gives enough space for all the layers. - Ensure Oreo crumbs are finely crushed: Use a food processor for a fine texture. This helps the crust hold together well. - Substitute with mascarpone or ricotta cheese: These cheeses add a rich flavor twist to the layer. Both options are creamy and delicious. - Experiment with flavored whipped toppings: Try using vanilla or chocolate-flavored whipped toppings. This adds fun flavors to each bite. - Use chocolate pudding with added chocolate chips: This boosts the chocolate taste. The chips add a nice texture as well. - Add melted chocolate for richness: Melt some chocolate and mix it with the pudding. This gives a deep and satisfying chocolate flavor. Pro Tips Chill for Best Results: Allow the lasagna to chill overnight for the best flavor and texture. This helps the layers to set perfectly and makes cutting easier. Customize Your Layers: Feel free to add additional layers such as a layer of peanut butter or a layer of caramel for extra decadence. Use Fresh Ingredients: Ensure your cream cheese and whipped topping are fresh for the best taste. This can make a significant difference in the overall flavor of the dessert. Presentation Matters: When serving, consider using a warm knife to cut through the layers cleanly. This will give you beautiful squares that are perfect for presentation. {{image_2}} Pairing dessert wine with Chocolate Oreo Lasagna can enhance your experience. I suggest a sweet red wine, like a port or a late-harvest Zinfandel. These wines have a rich flavor that matches the chocolate well. You can also try a Moscato, which offers a light, fruity taste. Each sip will balance the creaminess of the lasagna. Adding fresh fruit to your lasagna can bring a new twist. Raspberries or strawberries work great. Their bright flavors cut through the rich chocolate. You can layer them in between the cream cheese and pudding layers. You can also use fruit as a topping. This adds color and freshness to each bite. Switching up the base can create fun new flavors. Instead of Oreos, try using chocolate wafer cookies or graham crackers. You can even use gluten-free cookies if you have dietary needs. Each cookie type brings its own special taste and texture. Don’t be afraid to experiment! Store any leftover Chocolate Oreo Lasagna in the fridge. Use an airtight container to keep it fresh. If you don’t have one, cover the dish with plastic wrap or foil. This helps prevent the dessert from drying out. Leftovers stay tasty for about three to five days in the fridge. You can freeze the lasagna for longer storage. Cut it into squares for easy serving later. Wrap each piece tightly in plastic wrap, then place them in a freezer-safe bag. This method keeps the layers intact. The lasagna can last for up to two months in the freezer. When you're ready to enjoy a piece, take it out of the freezer. Let it thaw in the fridge for several hours or overnight. This keeps the texture creamy and delicious. Avoid microwaving it; this can change the layers and make them soggy. Enjoy your treat! Chocolate Oreo Lasagna stays fresh for about 3 to 5 days in the fridge. After that, it might lose its texture and taste. Make sure to store it in an airtight container for best results. Yes, you can make Chocolate Oreo Lasagna a day or two ahead. This dessert tastes even better when it sits for a while. Just cover it well and refrigerate. It allows the layers to set and flavors to blend nicely. If you don't have whipped topping, you can use heavy cream whipped to soft peaks. Cream cheese mixed with a bit of milk can also work. For a non-dairy option, try coconut whipped cream or almond whipped topping. Absolutely! For a gluten-free version, use gluten-free Oreo cookies. If you need a dairy-free option, substitute cream cheese with a dairy-free alternative and use plant-based milk. Make sure your whipped topping is also dairy-free. These swaps let everyone enjoy this treat! You learned how to make a tasty Chocolate Oreo Lasagna. We covered ingredients, step-by-step instructions, and tips to make it great. Remember, you can change the flavors and make it your own. Store leftovers right to keep them fresh. This dessert is fun to share with friends and family. Enjoy your sweet creation, and don't forget to try different toppings! Delicious moments await you.
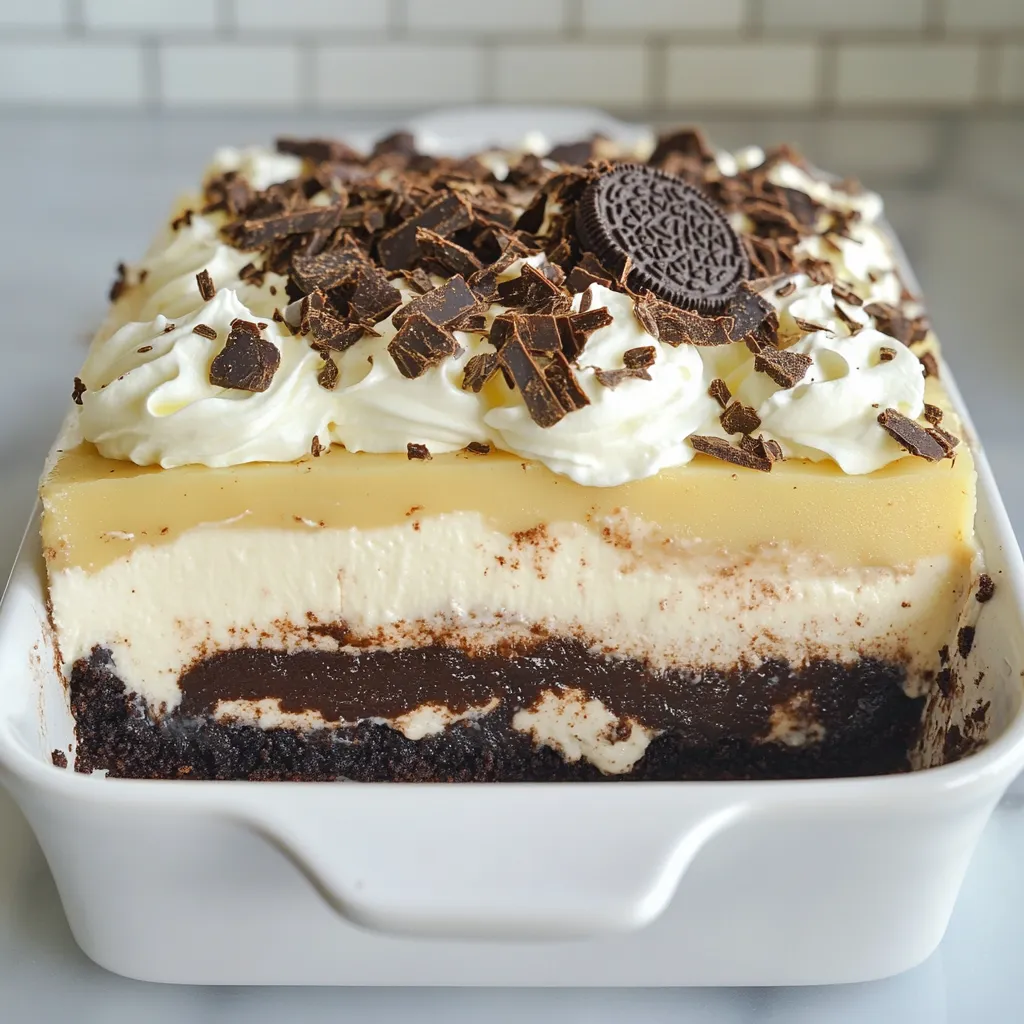
Chocolate Oreo Lasagna Delightful No-Bake Treat
Imagine a dessert that combines your favorite cookies and creamy layers—all without baking! Chocolate Oreo Lasagna is the perfect treat to impress your friends and
- 1 cup natural peanut butter (smooth or chunky) - 1 cup rolled oats - 1/2 cup brown sugar (packed) - 1/4 cup maple syrup - 1 tsp vanilla extract - 1/2 tsp baking soda - 1/4 tsp salt - 1/2 cup dark chocolate chips (dairy-free) - Optional: 1/4 cup chopped nuts (such as walnuts or pecans) Each ingredient in these cookies plays a key role. Peanut butter adds flavor and healthy fats. It gives cookies a rich, nutty taste. Rolled oats provide texture and fiber, making them chewy. Brown sugar adds sweetness and moisture, making cookies soft. Maple syrup enhances sweetness with a nice flavor twist. Vanilla extract brings depth, while baking soda helps cookies rise. Salt balances flavors and enhances the taste. Dark chocolate chips offer a sweet, creamy contrast. If you choose to add nuts, they give a satisfying crunch. You can swap peanut butter for almond or sunflower seed butter for nut allergies. Instead of brown sugar, use coconut sugar for a lower glycemic index option. Maple syrup can be replaced with agave syrup or simple syrup. For a gluten-free choice, use gluten-free oats. You can skip the chocolate chips for a plain cookie or add dried fruit for a different taste. {{ingredient_image_1}} First, set your oven to 350°F (175°C). This is the ideal temperature for baking our cookies. While the oven heats, get a baking sheet and line it with parchment paper. This will help the cookies not stick. A lined sheet makes cleanup easy, too. In a mixing bowl, add 1 cup of natural peanut butter. You can use smooth or chunky peanut butter based on your taste. Next, add 1/2 cup of packed brown sugar, 1/4 cup of maple syrup, and 1 teaspoon of vanilla extract. Mix well until the mixture is smooth. This blend gives our cookies a sweet and nutty flavor. In another bowl, whisk together 1 cup of rolled oats, 1/2 teaspoon of baking soda, and 1/4 teaspoon of salt. The oats give texture and chewiness to the cookies. Baking soda helps them rise, while salt balances the sweetness. Now, slowly add the dry mix to the wet mix. Stir until everything is well combined. If you like, fold in 1/2 cup of dark chocolate chips and 1/4 cup of chopped nuts. Using a tablespoon, scoop out the dough and form small balls. Place them on the prepared baking sheet. Flatten each ball slightly with a fork. Bake your cookies for 10-12 minutes until the edges turn golden brown. After baking, let them cool on the sheet for 5 minutes before moving them to a wire rack. Enjoy your delicious cookies! To get the right cookie texture, use the right mix of ingredients. Aim for a balance of peanut butter and oats. Too much peanut butter makes cookies soft. Too many oats make them dry. The key is one cup of each. When mixing, don’t over-mix. Stir just until everything combines. This keeps your cookies chewy and soft. Natural peanut butter is great for these cookies. It has fewer additives than regular peanut butter. This means more flavor and a more pure taste. Stir it well before using. The oil often separates, so mix it back in. If you like a crunchy texture, use chunky peanut butter. It adds fun bits in every bite. To keep your cookies fresh, store them in an airtight container. If you want them to last longer, place parchment paper between layers. This keeps them from sticking together. They can stay fresh for up to a week. If you want to save them longer, freeze them. Just wrap each cookie in plastic wrap and place them in a freezer bag. They can last for up to three months! Pro Tips Storage Tip: Store the cookies in an airtight container to keep them fresh for up to a week. Peanut Butter Choice: Use natural peanut butter for the best flavor and texture; avoid brands with added sugar or oils. Add-ins Customization: Feel free to experiment with different mix-ins like dried fruits or seeds for added texture and flavor. Chilling Dough: For thicker cookies, chill the dough for 30 minutes before baking to help them hold their shape. {{image_2}} If you want nut-free cookies, try sunflower seed butter instead of peanut butter. This swap keeps the taste great while avoiding nuts. You can also use pumpkin seed butter. Both options add a nice flavor and keep the cookies moist. To make these cookies gluten-free, use certified gluten-free oats. They taste just as good and won’t change the texture. Check the label to ensure your oats are gluten-free. You can also use almond flour or coconut flour for a different texture. Spice up your cookies with extra flavors! Add a pinch of cinnamon for warmth or a dash of nutmeg for a cozy touch. You can also mix in a bit of cocoa powder for a chocolatey twist. Consider using flavored extracts like almond or coconut for new tastes. This way, you can create cookies that are uniquely yours! Each cookie has about 120 calories. This is based on a recipe that makes 12 cookies. The cookies contain around 6 grams of fat, mostly from peanut butter. You also get about 15 grams of carbs and 3 grams of protein. The dark chocolate chips add some extra flavor and a few calories too. The main star, peanut butter, is packed with protein and healthy fats. It helps keep you full and energized. Rolled oats provide fiber, aiding digestion and heart health. Maple syrup offers a natural sweetness with some vitamins and minerals. Dark chocolate chips are rich in antioxidants, which can help with heart health. You can swap brown sugar or maple syrup with other sweeteners. For example, agave syrup has a lower glycemic index. This means it may not spike your blood sugar as much. Coconut sugar is another option; it has a slight caramel flavor and retains some nutrients. Each sweetener has different calorie counts, so check the labels. Yes, you can freeze these cookies! Just let them cool completely first. Place them in an airtight container or a freezer bag. They last up to three months in the freezer. When you’re ready to eat, just thaw them at room temperature. To make gluten-free Vegan Peanut Butter Oat Cookies, use certified gluten-free oats. Ensure all other ingredients are gluten-free too. Many brands offer gluten-free options for maple syrup and baking soda. This small change makes a big difference. If you need a substitute for peanut butter, try almond butter or sunflower seed butter. Both have a similar texture. They add a unique taste to the cookies. Just make sure the substitute is smooth and creamy for best results. Homemade Vegan Peanut Butter Oat Cookies last about one week at room temperature. Store them in an airtight container to keep them fresh. You can also store them in the fridge for up to two weeks. If you freeze them, they can last for months! You learned about making Vegan Peanut Butter Oat Cookies from scratch. We discussed the key ingredients, their roles, and how to substitute them. I shared step-by-step instructions to guide your baking. Tips for achieving the best texture and storing cookies helped ensure success. Variations allow you to customize flavors and accommodate dietary needs. Finally, I included nutritional insights to support healthier choices. These cookies are simple, tasty, and fun to make. Enjoy baking with friends and family!
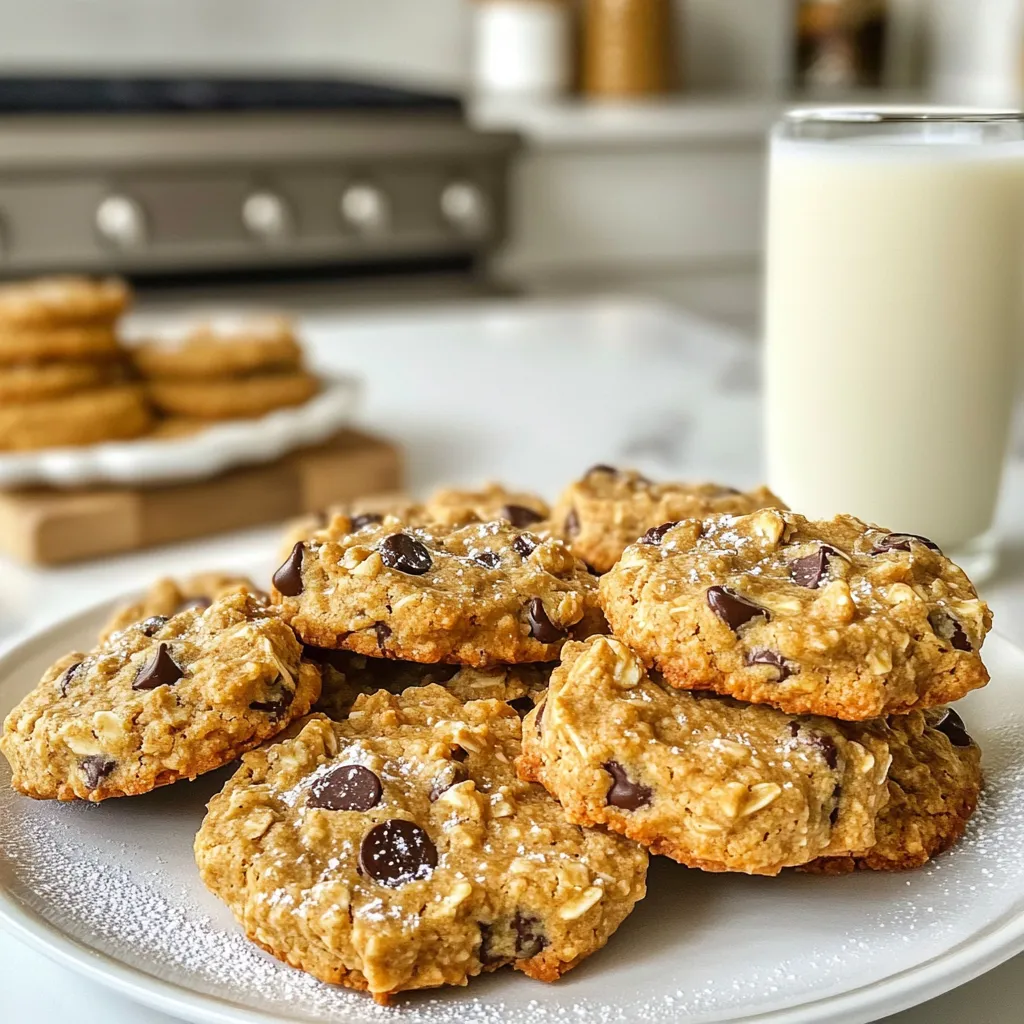
Vegan Peanut Butter Oat Cookies Simple and Tasty Treat
Are you craving a sweet and healthy treat? Look no further! My Vegan Peanut Butter Oat Cookies are simple and tasty. Made with just a
- 1 cup cooked and mashed sweet potatoes (about 1 medium sweet potato) - 1/2 cup almond butter (or peanut butter) - 1/4 cup maple syrup - 1/4 cup cocoa powder - 1/2 cup oat flour - 1/2 teaspoon baking powder - 1/2 teaspoon vanilla extract - 1/4 teaspoon salt - 1/2 cup dark chocolate chips (dairy-free if desired) - 1 cup equals 240 milliliters. - 1/2 cup equals 120 milliliters. - 1/4 cup equals 60 milliliters. - 1/2 teaspoon equals 2.5 milliliters. You can use canned sweet potatoes if you want to save time. Almond butter can switch with peanut butter or any nut butter you like. Maple syrup can be replaced with honey for a different flavor. Oat flour can be made by grinding oats in a blender. Cocoa powder can be switched with carob powder for a unique taste. Dark chocolate chips can be replaced with milk chocolate or white chocolate. {{ingredient_image_1}} First, heat your oven to 350°F (175°C). This step is key for the brownies to bake evenly. Grab an 8x8 inch baking pan. You can grease it with some oil or line it with parchment paper. Lining helps the brownies come out easier. In a mixing bowl, put 1 cup of cooked and mashed sweet potatoes. You can use about 1 medium sweet potato for this. Add in 1/2 cup of almond butter or peanut butter. Then, pour in 1/4 cup of maple syrup. Stir these together until the mix is smooth and creamy. This is the heart of your brownie mix. Next, sift in 1/4 cup of cocoa powder and 1/2 cup of oat flour. Add 1/2 teaspoon of baking powder, 1/2 teaspoon of vanilla extract, and 1/4 teaspoon of salt. Mix until it turns into a thick batter. This is where the magic happens! Now fold in 1/2 cup of dark chocolate chips. Save a few to sprinkle on top later. Pour the batter into your prepared pan. Spread it out evenly. If you saved some chocolate chips, sprinkle them on top. Bake the brownies in the preheated oven for 25 to 30 minutes. To check if they are done, insert a toothpick into the center. It should come out mostly clean, with just a few moist crumbs. After baking, let them cool in the pan for about 10 minutes. Then, move them to a wire rack to cool completely before slicing. Enjoy your sweet potato brownies! To get the best texture, use smooth, well-mashed sweet potatoes. The more you mash, the creamier the brownies. Be sure to measure one cup of sweet potatoes after mashing. If you want them extra fudgy, don't overbake them. A toothpick should come out with a few moist crumbs. You can boost the flavor of your brownies in simple ways. Try adding a pinch of cinnamon or nutmeg for warmth. You can also mix in some crushed nuts for a nice crunch. If you want a deeper chocolate flavor, add an extra tablespoon of cocoa powder. Dark chocolate chips add richness, so don't skip them! One big mistake is not measuring the ingredients correctly. Too much flour can make the brownies dry. Make sure to sift the cocoa powder to avoid lumps. Another mistake is not letting the brownies cool enough. Cutting them too early can lead to a messy result. Lastly, watch the baking time closely. It’s better to check a bit early than to overbake. Pro Tips Use Fresh Sweet Potatoes: For the best flavor and texture, use freshly cooked sweet potatoes instead of canned ones. Adjust Sweetness: Depending on your taste, you can increase or decrease the amount of maple syrup to suit your preference. Experiment with Nut Butters: Try different nut butters like cashew or sunflower seed butter for a unique twist on flavor. Storage Tips: Store leftovers in an airtight container in the fridge for up to a week or freeze for longer storage. {{image_2}} To make vegan sweet potato brownies, swap almond butter with a nut-free option. Use sunflower seed butter or tahini instead. Replace maple syrup with agave nectar for a similar sweetness. Ensure your dark chocolate chips are dairy-free. These small changes keep your brownies rich and plant-based. For gluten-free brownies, use oat flour as in the recipe. Oat flour is safe and tasty for those who avoid gluten. You can also use almond flour or a gluten-free blend if you prefer. This way, you enjoy the same texture without the gluten. You can add nuts or other mix-ins to your brownies for extra flavor. Chopped walnuts or pecans give a nice crunch. You might also try adding shredded coconut or dried fruit like cranberries. Just fold these in before you pour the batter into the pan. This step adds texture and makes each bite special. You can store leftover sweet potato brownies in an airtight container. Keep them at room temperature for about 3 days. If you want to keep them fresh longer, store them in the fridge. They can last up to a week in the fridge. Just make sure they are sealed well. This helps to keep their rich and decadent taste. To freeze your brownies, first cut them into squares. Wrap each square tightly in plastic wrap. Place the wrapped brownies in a freezer bag or container. They can stay frozen for up to 3 months. When you want one, just take it out and let it thaw in the fridge. This keeps them moist and tasty. If you want to enjoy warm brownies, reheat them easily. Place a brownie on a microwave-safe plate. Heat it in the microwave for about 10-15 seconds. This warms it up without drying it out. You can also use the oven. Preheat it to 350°F (175°C). Place the brownie on a baking sheet and heat for about 5-10 minutes. Enjoy your warm treat! Yes, you can use fresh sweet potatoes. Just cook and mash them first. I suggest boiling or baking until soft. This way, you get the best flavor and texture. These brownies last about four to five days at room temperature. Store them in an airtight container to keep them fresh. You can also refrigerate them for up to a week. Yes, sweet potato brownies can be healthy. They use natural sweeteners and healthy fats. Sweet potatoes add vitamins and fiber. Just enjoy them in moderation! Absolutely! You can use peanut butter, cashew butter, or even sunflower seed butter. Each nut butter gives a different flavor, so choose what you like best. To test doneness, insert a toothpick into the center. It should come out mostly clean; a few moist crumbs are okay. If the toothpick has wet batter, bake for a few more minutes. In this post, we explored the full process of making sweet potato brownies. We covered ingredients, step-by-step instructions, and helpful tips. We also looked at variations and how to store them. Sweet potato brownies can be a fun treat for everyone. With your new skills, you can impress friends and family. Enjoy baking this tasty dessert!
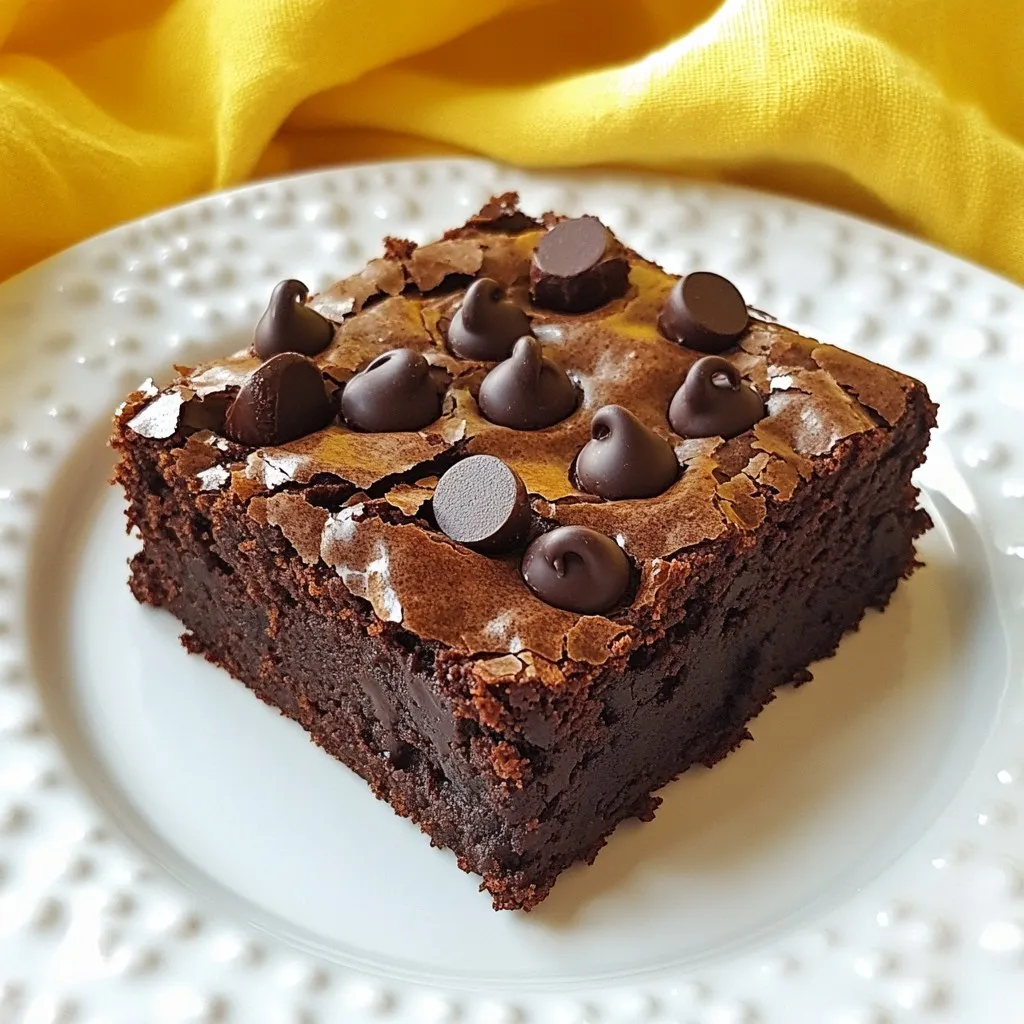
Sweet Potato Brownies Rich and Decadent Treat
Get ready to indulge in a rich and decadent treat that won’t break your diet! Sweet potato brownies are the perfect blend of taste and
To make a delicious chocolate chip pumpkin bread, gather these simple ingredients: - 1 cup canned pumpkin puree - 1/2 cup brown sugar - 1/2 cup granulated sugar - 1/3 cup vegetable oil - 2 large eggs - 1 1/2 cups all-purpose flour - 1 teaspoon baking powder - 1/2 teaspoon baking soda - 1/2 teaspoon salt - 1 teaspoon ground cinnamon - 1/2 teaspoon ground nutmeg - 1/2 teaspoon vanilla extract - 1 cup semi-sweet chocolate chips - 1/2 cup chopped walnuts (optional) Canned pumpkin puree gives a rich flavor and moist texture. The mix of brown and granulated sugar provides sweetness and depth. The vegetable oil keeps the bread tender. Eggs help bind the ingredients together. All-purpose flour is the base of the bread. Baking powder and baking soda work together for a good rise. Salt balances the sweetness and brings out flavors. Ground cinnamon and nutmeg add warmth and spice. You can add semi-sweet chocolate chips for that melty goodness. Chopped walnuts add crunch and taste, but they are optional. Feel free to mix and match according to your taste! {{ingredient_image_1}} First, preheat your oven to 350°F (175°C). This step is key for even baking. While the oven heats, grab a 9x5-inch loaf pan. Grease it well with cooking spray or butter. This helps the bread release easily after baking. In a large bowl, mix 1 cup of canned pumpkin puree with 1/2 cup of brown sugar and 1/2 cup of granulated sugar. Stir until it is smooth. Next, add 1/3 cup of vegetable oil. Mix until blended. Now, beat in 2 large eggs, one at a time. Make sure to mix well after each egg. Finally, stir in 1/2 teaspoon of vanilla extract for added flavor. In another bowl, whisk together 1 1/2 cups of all-purpose flour, 1 teaspoon of baking powder, 1/2 teaspoon of baking soda, 1/2 teaspoon of salt, 1 teaspoon of ground cinnamon, and 1/2 teaspoon of ground nutmeg. Gradually add this dry mix to the pumpkin mixture. Stir gently until just combined. Be careful not to overmix; this keeps the bread light. Now, fold in 1 cup of semi-sweet chocolate chips. If you like, add 1/2 cup of chopped walnuts for crunch. Pour the batter into your prepared loaf pan and spread it evenly. Bake for about 55-60 minutes. Check for doneness by inserting a toothpick into the center. If it comes out clean, your bread is ready. Let it cool in the pan for 10 minutes. After that, transfer it to a wire rack to cool completely. Enjoy your delicious chocolate chip pumpkin bread! To get the right texture, always measure your ingredients carefully. Use a kitchen scale if you have one. This helps you avoid dry or gooey bread. The canned pumpkin gives moisture, so don't add too much liquid. Also, make sure your baking powder and soda are fresh. Old leavening agents can lead to flat bread. Avoiding overmixing is key. When you mix the wet and dry ingredients, stir gently. Stop as soon as you see no dry flour. Overmixing makes the bread tough. You want it light and fluffy! For chocolate and nut variations, try different types of chocolate. Dark chocolate can add a rich flavor. You can also swap the walnuts for pecans or almonds. Each will bring a unique taste to your bread. Optional spices for extra flavor include ginger or allspice. A pinch of cloves can add warmth too. Feel free to experiment with these spices. They can make your bread even more special. When serving, slice the bread and dust it with powdered sugar. This simple touch makes it look fancy. You can add a dollop of whipped cream on top. A scoop of vanilla ice cream beside it offers a nice treat too. For garnishing, sprinkle with chocolate chips or nuts on top. It adds a nice visual appeal. You can also serve the slices on a colorful plate to make them pop. These small details can impress your guests! Pro Tips Use Fresh Pumpkin: If possible, use fresh pumpkin instead of canned for a richer flavor. Roast and puree your own pumpkin for the best results. Don’t Overmix: When combining the wet and dry ingredients, mix until just combined. Overmixing can result in a dense bread. Chocolate Chip Variations: Experiment with different types of chocolate chips, such as dark or milk chocolate, to customize the flavor to your liking. Storage Tips: Store the bread in an airtight container at room temperature for up to 3 days or refrigerate for up to a week. {{image_2}} You can change up the flavor of your chocolate chip pumpkin bread easily. One fun option is to add pumpkin spice. This spice mix can boost the warm, cozy taste. You can also try adding different flavors like caramel or maple. If you want a nutty crunch, toss in some chopped pecans or almonds. If you want a healthier version, you can lower the sugar. Use half the brown and granulated sugars. You can also swap out regular flour for whole wheat flour. This adds fiber and nutrients. If you need gluten-free options, try using almond flour or a gluten-free baking mix. Both work well and keep the bread moist. Using fresh pumpkin can take your bread to the next level. Roasting a pumpkin gives a richer taste. You can also add seasonal fruits like cranberries or raisins. These fruits add a nice tartness that pairs well with the sweet bread. Try mixing in a cup of these fruits for extra flavor and texture. To keep your chocolate chip pumpkin bread fresh, use an airtight container. This type of container keeps moisture in and air out. A zip-top bag also works well if you remove as much air as possible. Store it at room temperature for up to three days. If you want to store it longer, the fridge is fine but may dry it out. To freeze the bread, first, let it cool completely. Wrap it in plastic wrap tightly, then place it in a freezer bag. This double layer helps prevent freezer burn. You can freeze it for up to three months. When you're ready to enjoy it, take the bread out and place it in the fridge overnight to thaw. For best results, let it sit at room temperature for a bit before slicing. This keeps the bread moist and tasty! Can I use fresh pumpkin instead of canned? Yes, you can use fresh pumpkin. Start by roasting a small pumpkin. Cut it in half, scoop out the seeds, and roast it until soft. Then, mash it into a smooth puree. Use this in place of canned pumpkin. Fresh pumpkin adds a great flavor and texture. How can I make it vegan? To make this bread vegan, replace the eggs with unsweetened applesauce or flaxseed meal. Use 1/4 cup of applesauce for each egg. For flaxseed, mix 1 tablespoon of flaxseed with 2.5 tablespoons of water and let it sit for 5 minutes. This helps bind the ingredients without eggs. What are the best ways to serve this bread? This chocolate chip pumpkin bread tastes great on its own. You can slice it and add a dusting of powdered sugar. A dollop of whipped cream or a scoop of vanilla ice cream makes it extra special. Serve it warm for a delightful treat. You can make delicious chocolate chip pumpkin bread using simple ingredients and easy steps. We covered everything, from mixing wet and dry ingredients to baking tips for great results. Remember to try different flavors and store your bread properly for the best taste. Enjoy your baking adventure, and share your yummy creations with friends and family! This bread is perfect for any time of year, so have fun with it!
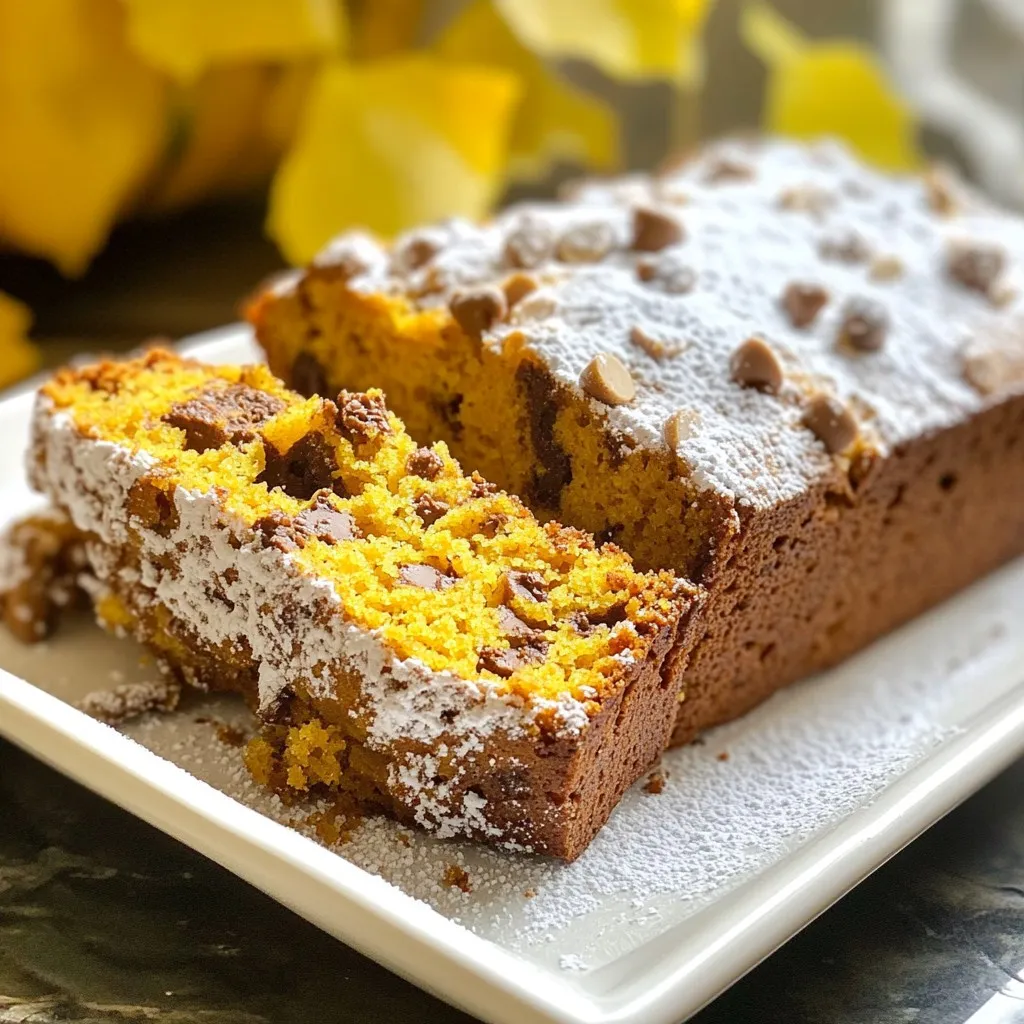
Chocolate Chip Pumpkin Bread Moist and Simple Recipe
Are you ready for a delicious fall treat? This moist Chocolate Chip Pumpkin Bread is simple to make and bursting with flavor. With just a
To make Caramel Pecan Turtle Brownies, gather these ingredients: - 1 cup unsalted butter (2 sticks), melted - 2 cups granulated sugar - 4 large eggs - 1 teaspoon vanilla extract - 1 cup all-purpose flour - 1/2 cup unsweetened cocoa powder - 1/2 teaspoon salt - 1 cup chocolate chips - 1 cup pecans, chopped - 1 cup caramel sauce (store-bought or homemade) - Sea salt for topping (optional) Each ingredient plays a role in making these brownies rich and tasty. The butter adds moisture, while the sugar brings sweetness. Eggs help bind everything together, and flour gives structure. Cocoa powder gives that deep chocolate flavor, and chocolate chips add melty goodness. Pecans provide a crunch, and caramel adds a sweet, sticky layer. You can swap ingredients if needed: - Butter: Use coconut oil or margarine for a dairy-free option. - Sugar: Try brown sugar for a deeper flavor or a sugar substitute for lower calories. - Pecans: Walnuts or almonds work well if you prefer different nuts. - Caramel Sauce: Homemade caramel can replace store-bought. These substitutions can change the taste but still keep the brownies delicious. Choosing the right ingredients makes a big difference: - Chocolate: Look for high-quality chocolate chips with at least 60% cocoa. This ensures a rich flavor. - Caramel: If you pick store-bought, check for natural ingredients without too many additives. - Pecans: Fresh pecans are key. Buy them whole and chop them yourself for better taste. Good quality ingredients will enhance every bite of your brownies. Enjoy the process of choosing the best! {{ingredient_image_1}} First, preheat your oven to 350°F (175°C). This step is key for even baking. Next, grease a 9x13-inch baking pan with butter or line it with parchment paper. This makes removing the brownies easy later. In a large bowl, combine melted butter and granulated sugar. Whisk them together until smooth. Next, add the eggs one at a time. Mix well after each egg. Then stir in the vanilla extract for flavor. In a separate bowl, sift together the all-purpose flour, cocoa powder, and salt. Slowly add this dry mix to the wet mix. Stir just until the two mixtures come together. Now, fold in the chocolate chips and chopped pecans. Remember to save a handful of pecans for the top. Pour half of the brownie batter into the prepared pan. Spread it evenly across the bottom. Next, drizzle half of the caramel sauce over the batter. Use a knife to swirl it gently for a marbled look. Add the rest of the brownie batter on top and spread it out. Drizzle the rest of the caramel sauce over this layer. Swirl it again to combine slightly. Finally, sprinkle the reserved pecans and a pinch of sea salt on top if you like. Bake in the preheated oven for 30 to 35 minutes. Check for doneness by inserting a toothpick into the center. It should come out with moist crumbs, not wet batter. Let the brownies cool in the pan for at least 30 minutes before cutting them into squares. To get perfect brownie texture, use room-temperature eggs. Cold eggs can make the batter too thick. Always melt the butter gently, so it stays smooth. Mix the sugar and butter well until creamy. This helps create a light texture. Bake at 350°F for even cooking. A toothpick should come out with moist crumbs, not wet batter. If your brownies puff up too much, you may need less flour next time. For the best marbled effect with caramel, drizzle it slowly. Use a spoon or squeeze bottle for control. Start with a zigzag pattern over the brownie batter. Then, take a knife and swirl gently. Do not mix too much; you want to see the caramel swirls. If you want extra flavor, heat the caramel slightly. This makes it easier to swirl and blend. Serve these brownies warm for a gooey treat. A scoop of vanilla ice cream adds a nice touch. Drizzle more caramel sauce on top to enhance the flavor. You can also sprinkle sea salt for a sweet-salty combo. Cut them into small squares for easy sharing. They are great for parties or as a special dessert at home. Pro Tips Use Room Temperature Eggs: Allow your eggs to come to room temperature for better incorporation into the batter, resulting in a smoother texture. Don’t Overmix: Mix the batter until just combined to keep your brownies fudgy and avoid a cake-like texture. Check for Doneness: Insert a toothpick into the center; it should come out with moist crumbs, indicating the brownies are perfectly baked. Cool Before Cutting: Allow the brownies to cool completely in the pan to ensure clean cuts and a better presentation. {{image_2}} If you want to change up the nuts, try using walnuts or almonds. Walnuts add a nice crunch and a rich taste. They work well with the chocolate and caramel. Almonds bring a light, sweet flavor that pairs nicely too. You can chop them or leave them whole for a fun look. Just remember to adjust the amount to keep the balance in your brownies. You can also add some extra flavor to your brownies. A dash of espresso powder can give a deep, rich taste. It enhances the chocolate flavor in a great way. You might also try using vanilla bean paste. It adds a lovely aroma and a hint of sweetness. Just mix it in with your wet ingredients for the best results. To make gluten-free brownies, swap the all-purpose flour for a gluten-free blend. Many blends work well, so pick one you like. For a dairy-free option, use vegan butter and dairy-free chocolate chips. This way, everyone can enjoy these delicious treats! Just keep an eye on the baking time, as it might vary a little. To keep your brownies fresh, store them in an airtight container. Make sure they cool completely first. You can place parchment paper between layers to avoid sticking. Store the brownies at room temperature for the best taste. If you want to freeze brownies, cut them into squares first. Wrap each square tightly in plastic wrap. Then, place the wrapped brownies in a freezer-safe bag. They can stay frozen for up to three months. To thaw, take them out and let them sit at room temperature for about an hour. When stored properly, brownies can last up to a week at room temperature. If refrigerated, they may last up to two weeks. However, cold storage can change their texture. Always check for any signs of spoilage before eating. To cut brownies well, let them cool down first. Use a sharp knife for clean cuts. Dip the knife in hot water, and dry it off for even better results. This helps prevent sticking. Cutting into squares or rectangles works best. Yes, you can make the brownie batter ahead of time. Store it in the fridge for up to 24 hours. Just cover it tightly with plastic wrap. When you are ready to bake, let it sit at room temperature for about 30 minutes. Then pour it into your pan and bake as normal. To check if brownies are done, insert a toothpick into the center. If it comes out with moist crumbs, they are ready. If wet batter sticks to the toothpick, bake longer. Remember, overbaking can make them dry, so check often after 25 minutes. Absolutely! Homemade caramel sauce adds a special touch. Just make sure it's thick enough to swirl into the batter. If it’s too runny, it may not create that lovely marbled effect. Use your favorite recipe or a simple one with sugar, cream, and butter. Caramel Pecan Turtle Brownies are a delightful treat. We covered each ingredient, including substitutions. You learned how to select high-quality items and followed step-by-step baking instructions. Tips helped you achieve the perfect brownie texture and create stunning caramel swirls. Variations allow for personalized flavors or dietary needs. Finally, you now know how to store and freeze your brownies for freshness. Enjoy making these delicious brownies and impress everyone with your skills!
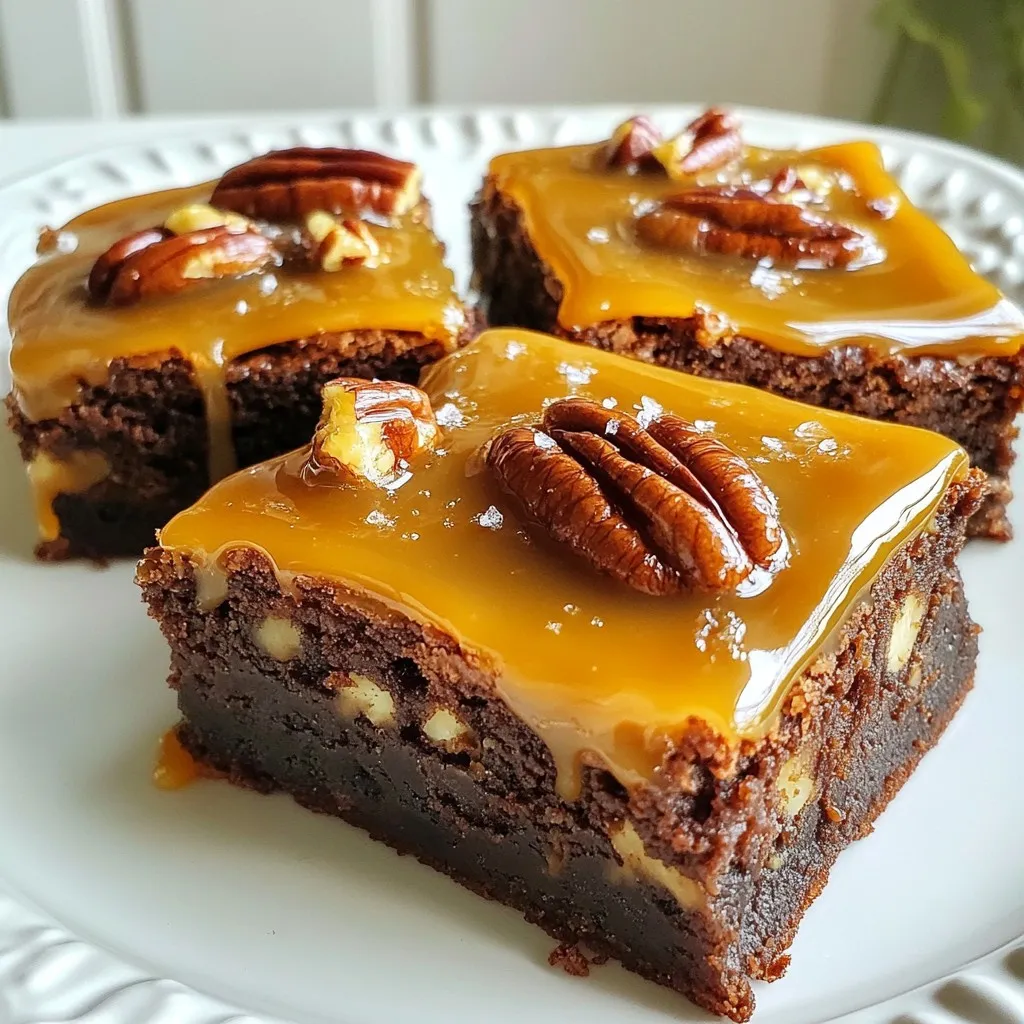
Caramel Pecan Turtle Brownies Irresistible Sweet Treat
Get ready to indulge in the ultimate sweet treat: Caramel Pecan Turtle Brownies! Imagine rich chocolate brownies loaded with creamy caramel and crunchy pecans. This
To make these tasty bars, you need the following ingredients: - 1 ½ cups graham cracker crumbs - ½ cup unsalted butter, melted - 2 tablespoons sugar - 16 oz cream cheese, softened - 1 cup sugar - 3 large eggs - 1 teaspoon vanilla extract - 1 cup sour cream - Zest of 2 lemons - ¼ cup fresh lemon juice - 1 cup raspberries (fresh or frozen) These ingredients create a creamy and tangy cheesecake with a sweet crust. You can swap some ingredients if you need to. For graham cracker crumbs, try crushed cookies or oats. Use coconut oil or margarine instead of butter for a dairy-free option. If you have no cream cheese, try Greek yogurt or a dairy-free cream cheese. You can also replace fresh raspberries with strawberries, blueberries, or blackberries for a different flavor. To make your bars look extra special, consider these garnishes: - A sprinkle of lemon zest on top - Extra fresh raspberries - Whipped cream or a dollop of yogurt - A drizzle of honey or chocolate sauce These add a nice touch and enhance the flavor. Enjoy making these raspberry lemon cheesecake bars! {{ingredient_image_1}} First, preheat your oven to 325°F (160°C). Take an 8x8-inch baking pan and line it with parchment paper. Leave some paper hanging over the sides for easy removal later. In a medium bowl, mix 1 ½ cups of graham cracker crumbs, ½ cup of melted butter, and 2 tablespoons of sugar. Stir until the mixture is well combined. Next, press this crumb mixture firmly into the bottom of your baking pan. This will be your crust. Bake it in the oven for 10 minutes, then remove it to cool slightly. Now, grab a large mixing bowl. Beat 16 ounces of softened cream cheese until it’s smooth and creamy. Gradually add in 1 cup of sugar, mixing well. Add 3 large eggs one at a time, mixing after each. Then stir in 1 teaspoon of vanilla extract, 1 cup of sour cream, the zest of 2 lemons, and ¼ cup of fresh lemon juice. Mix until everything is smooth. Very gently fold in 1 cup of raspberries. Be careful not to break them too much. Pour the cheesecake mixture over your cooled crust. Spread it evenly in the pan. Bake it in the oven for 30 to 35 minutes. You want the edges to be set but the center should still jiggle a little. After baking, take it out and let it cool at room temperature for about 1 hour. Then, refrigerate it for at least 4 hours or overnight. This helps it set better. When ready to serve, lift it out using the parchment paper and cut it into bars. Enjoy your delicious cheesecake bars! To get that creamy and smooth texture, use softened cream cheese. Cold cream cheese will not mix well. Beat it until it is fluffy. This helps it blend with the sugar easily. For a lighter feel, add sour cream. It adds moisture and tang. When baking, don’t overdo it. The center should jiggle a bit. This means it will set nicely as it cools. Cracks can happen, but you can avoid them. First, mix your ingredients gently. Overmixing can add too much air. This can cause cracks when baking. Bake at a lower temperature. High heat can make the top crack. Also, let the cheesecake cool slowly. After baking, leave it at room temp for an hour. Then chill it in the fridge. This helps it settle without cracking. Serve these bars chilled for the best taste. Top with fresh raspberries for a fun look. A sprinkle of lemon zest also makes them pop. You can pair them with a dollop of whipped cream for extra creaminess. For drinks, a nice cup of tea or lemonade works well. These bars are great for parties or a sweet treat at home! Pro Tips Chill for Perfect Texture: Allow the cheesecake bars to chill overnight in the refrigerator. This will help the flavors meld together and achieve a firmer, creamier texture. Use Room Temperature Ingredients: Ensure that your cream cheese and eggs are at room temperature before mixing. This helps create a smoother batter without lumps. Don’t Overmix: When folding in the raspberries, be gentle to avoid breaking them apart. This keeps your bars looking beautiful and adds bursts of flavor. Enhance Presentation: For an elegant touch, serve the bars with a dollop of whipped cream and a few extra raspberries on the plate. {{image_2}} You can switch out raspberries for other berries. Blueberries, strawberries, or blackberries work well. Each berry adds its own flavor and color. Just make sure the total amount stays the same. For instance, use 1 cup of blueberries instead of raspberries. This gives you a new twist on the classic recipe. If you need a gluten-free version, use gluten-free graham cracker crumbs. Many brands offer great options. You can also make your own crumbs from gluten-free cookies. This way, everyone can enjoy these tasty treats without worry. To make these bars vegan, replace cream cheese with a plant-based cream cheese. You can find many brands at stores. Use flax eggs instead of regular eggs. To make one flax egg, mix 1 tablespoon of ground flaxseed with 2.5 tablespoons of water. Let it sit for a few minutes until it thickens. This will help bind your cheesecake together without using eggs. These raspberry lemon cheesecake bars are best when fresh. They last in the fridge for about 5 days. For the best taste, store them in an airtight container. Keep them away from strong odors. This helps preserve their lovely lemon and raspberry flavors. You can freeze these cheesecake bars for up to 3 months. First, let the bars cool completely. Then, cut them into squares. Wrap each square in plastic wrap. Place the wrapped bars in a freezer bag. Be sure to remove as much air as possible. When you want to enjoy them, simply thaw them in the fridge overnight. These bars are best served chilled. If you prefer them slightly warm, you can reheat them gently. Place the bars on a baking sheet. Warm them in a 300°F (150°C) oven for about 10 minutes. Keep an eye on them to avoid overcooking. Enjoy the creamy texture and bright flavors! Yes, you can use frozen raspberries. They work well in this recipe. Just thaw them first and drain excess juice. This helps keep the cheesecake bars from getting too watery. The flavor remains fresh and bright. Frozen berries also blend nicely into the filling. You can tell the cheesecake bars are done by checking the edges. They should be set and firm. The center will have a slight jiggle. It will firm up more as it cools. Always avoid overbaking, as this can lead to cracks. To cut cheesecake bars, use a sharp knife. First, chill them well in the fridge. This makes cutting easier. Dip the knife in hot water before each cut. Wipe the knife clean between cuts for neat edges. For best results, cut them into small squares or rectangles. You learned how to make raspberry lemon cheesecake bars from start to finish. We covered must-have ingredients, proven tips, and all kinds of variations. This dessert is tasty and fun to make, no matter your skill. Remember to be patient with the cooling process to avoid cracks. Enjoy these bars fresh, and share them with friends or family. Storing them properly lets you keep the joy for later. Try these ideas, and let your creativity shine in the kitchen. You’ll impress everyone with your delicious results!
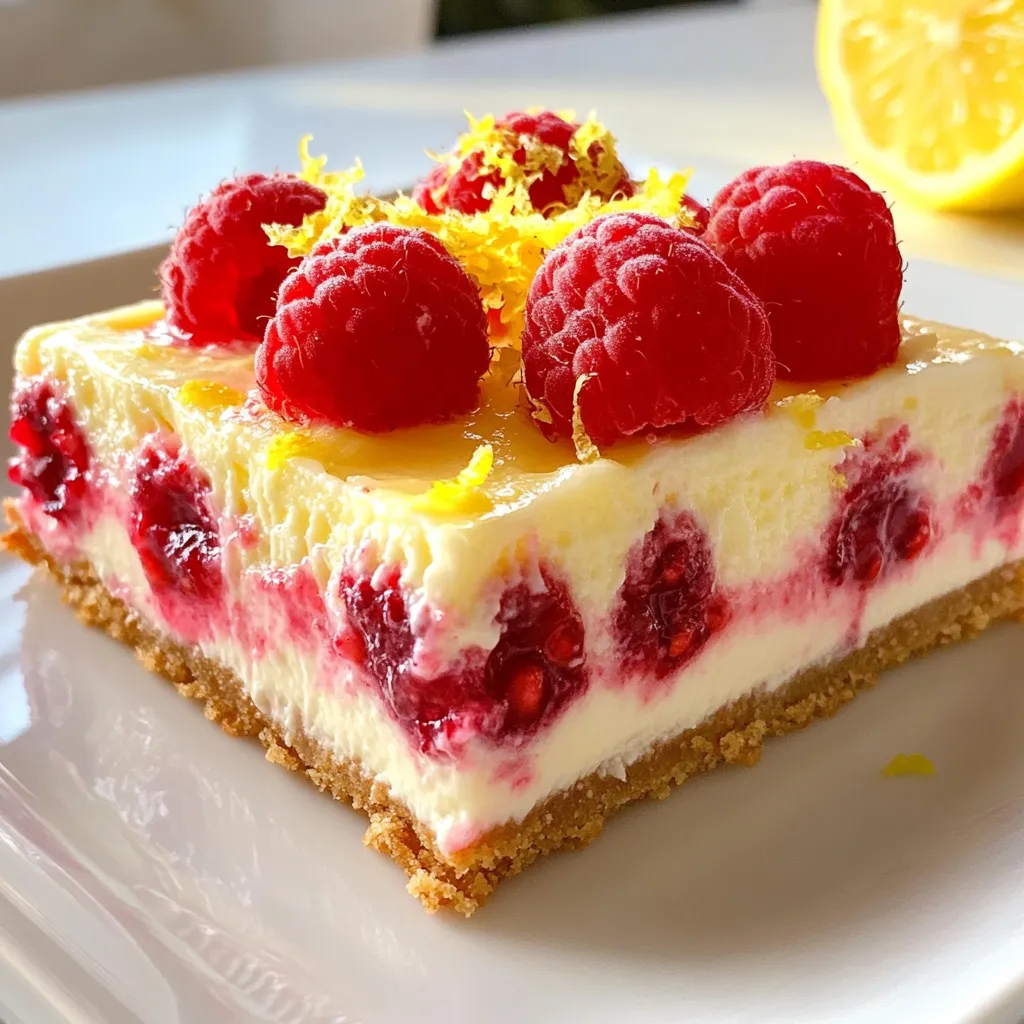
Raspberry Lemon Cheesecake Bars Easy and Delicious Treat
Looking for a sweet treat that brightens your day? These Raspberry Lemon Cheesecake Bars are simple, tasty, and sure to impress! In this guide, I’ll