Desserts
![- 1 can (20 oz) crushed pineapple, thoroughly drained - 1 cup whipped cream cheese (softened at room temperature) - 1/2 cup powdered sugar - 1/2 teaspoon pure vanilla extract - 1 cup finely crushed graham crackers - 1/4 cup unsweetened coconut flakes - 1/2 cup mini marshmallows - Fresh pineapple chunks, for garnishing - Fresh mint leaves, for optional garnish - Mixing bowls - Electric mixer - Measuring cups and spoons Gathering your ingredients is vital for a smooth cooking process. Start with the main ingredients: crushed pineapple, whipped cream cheese, and powdered sugar. These three create the rich, creamy base of your dessert. Make sure your cream cheese is soft; this helps it blend easily. You can also add coconut flakes and mini marshmallows for extra flavor and texture. For tools, have mixing bowls, an electric mixer, and measuring cups ready. The electric mixer will whip everything together quickly, saving you time. Each tool plays a key role in making this dessert delightful and easy. With the right ingredients and tools, you're set to create a treat that brightens any day! For the complete recipe, check out [Full Recipe]. To start, grab a large mixing bowl. In this bowl, combine the drained crushed pineapple, whipped cream cheese, powdered sugar, and vanilla extract. Use an electric mixer on medium speed. Mix until your ingredients blend smoothly. You want a creamy texture with no lumps. Next, take another bowl for your dry mix. Add the finely crushed graham crackers and unsweetened coconut flakes. Mix them well. Set aside 1/4 cup of this mixture to use later as a topping. This will add a nice crunch. Now it’s time to assemble your dessert. Gently fold the remaining dry mixture into your creamy pineapple mix. Be careful not to crush the mini marshmallows as you stir them in. Once combined, spoon this creamy goodness into individual dessert cups or a large serving dish. Smooth the top with a spatula. Sprinkle the reserved graham cracker and coconut mix on top for extra crunch. Cover your dessert with plastic wrap. Chill it in the refrigerator for at least 2 hours. This chilling time helps the flavors blend nicely. Just before serving, add some fresh pineapple chunks on top. You can also add fresh mint leaves for a lovely touch. Enjoy! To avoid lumps in the mixture, make sure your cream cheese is very soft. I let mine sit out for about 30 minutes before mixing. When you combine it with the crushed pineapple, whip it well. Use an electric mixer on medium speed to ensure a smooth blend. This step is key for a creamy dessert. When folding in the dry mix, do it gently. This keeps the mixture airy and light. Use a spatula and fold from the bottom up. Serving this dessert in individual cups adds a nice touch. For elegance, use decorative plates under each cup. You can also layer the dessert for added flair. Add a few edible flowers for color. They look great and make the dish even more special. Just before serving, top with fresh pineapple chunks. This brightens the dish and adds a fresh taste. If you want, add mint leaves for a pop of green. If you want to mix it up, try different fruits. Mango or strawberries can be tasty swaps. You can also add diced peaches for a summer twist. For toppings, consider crushed nuts or chocolate shavings. They add a nice crunch and flavor. You can even switch the marshmallows for yogurt-covered ones. Each variation brings its own fun taste and texture. Try these ideas to make your Pineapple Dream Dessert uniquely yours! {{image_4}} You can add a fun tropical twist to your Pineapple Dream Dessert. Try mixing in mango or coconut cream. These fruits will boost flavor and give a new look. You can also create a tropical fruit layer. Add sliced kiwis or passion fruit on top for a bright, fruity finish. If you want a lighter dessert, use low-fat cream cheese. This swap cuts calories but keeps the taste. You can also replace sugar with natural sweeteners like honey or maple syrup. These options help make your dessert a bit healthier without losing flavor. You can adapt this dessert for seasonal fruits, too. In summer, add berries like strawberries or blueberries for a fresh twist. You can also include seasonal fruits for garnish. Fresh peaches or plums would add color and taste, making your dessert even more inviting. For the full recipe, check out the recipe section above! To keep your Pineapple Dream Dessert fresh, store it in the refrigerator. Make sure to use airtight containers. This helps prevent it from drying out or absorbing other smells. If you have leftover dessert, cover it with plastic wrap. This keeps it nice and creamy for later. Can Pineapple Dream Dessert be frozen? Yes, you can freeze it! Just scoop the dessert into a freezer-safe container. Make sure to leave some space at the top, as it will expand. When you're ready to eat it, thaw it in the fridge overnight. After thawing, give it a gentle stir before serving. This helps restore its creamy texture. How long does the dessert last in the fridge? Pineapple Dream Dessert stays good for about 3 to 4 days. Always check for signs of spoilage. If you see any changes in color or smell, it's time to toss it. Freshness matters when it comes to enjoying this delightful treat. Pineapple Dream Dessert is a light and creamy treat. It features crushed pineapple mixed with whipped cream cheese. This dessert has a sweet and tropical flavor. The base is fluffy, and it has a crunchy topping made from graham crackers and coconut. Each bite feels like a trip to a sunny beach. Yes, you can prepare Pineapple Dream Dessert in advance. Make it up to a day ahead of your event. Just follow the recipe steps and chill it in the fridge. Chilling helps the flavors blend well. When you are ready to serve, add fresh pineapple chunks and mint leaves for a nice touch. Yes, you can make a vegan version. For the cream cheese, use a plant-based alternative. You can find many brands that offer vegan cream cheese. Replace powdered sugar with coconut sugar or agave syrup. For the marshmallows, look for vegan options in stores. This way, you can enjoy the same tasty dessert without any animal products. Pineapple Dream Dessert is a fun and easy treat to make. You mix crushed pineapple, cream cheese, and sugar for a sweet base. Adding coconut, fruit, or marshmallows makes it even better. Remember to chill it for great taste! You can also try adding other fruits or using healthier swaps. Store leftovers right to keep them fresh. This dessert is sure to please everyone. Enjoy every bite of your delicious creation!](https://tossedflavors.com/wp-content/uploads/2025/05/cb51ea37-063f-4af0-ae49-82b06fef5c22.webp)
Pineapple Dream Dessert Delightful and Easy Recipe
Are you ready to make a dessert that will bring smiles at any gathering? Look no further than the Pineapple Dream Dessert. This delightful treat
![To make Puff Pastry Vanilla Custard Cream Squares, we need a few key ingredients. Each one plays a big role in creating the rich flavors and textures. - Puff Pastry - Vanilla Custard Components - 2 cups whole milk - 1/2 cup granulated sugar - 3 large egg yolks - 1/4 cup cornstarch - 1 tablespoon vanilla extract - 1 tablespoon unsalted butter - Garnishing Options - Powdered sugar for dusting - Fresh berries for garnish (optional) Puff pastry serves as a light, flaky base. The vanilla custard gives it a creamy, sweet filling. You can dust the tops with powdered sugar for a pretty finish. Fresh berries add a colorful touch and a burst of flavor. Getting these ingredients right makes a huge difference. Each one creates a perfect bite of this delightful treat. For the full recipe, check out the details above. Preheat the Oven: First, set your oven to 400°F (200°C). This heat gives the pastry a nice rise. While it warms, line a baking sheet with parchment paper. This step helps keep the pastry from sticking. Prepare the Puff Pastry: Next, take your thawed puff pastry. Place it on a lightly floured surface. Roll it out gently to flatten any creases. Cut the pastry into a grid of 3x3 squares. You will have nine pieces. Transfer these squares carefully to your prepared baking sheet. Techniques for Proper Baking: To keep the squares from puffing too much, use a fork to pierce each square several times. This allows steam to escape. Bake them for about 15-20 minutes. Look for a golden brown color and a crispy texture. Cooling Process: After baking, remove the squares from the oven. Let them cool on the baking sheet. Cooling helps them stay crisp, which is key for your dessert. Heating the Milk: Pour 2 cups of whole milk into a medium saucepan. Heat it over medium heat. Watch closely and stop just before it boils. You want it steaming but not bubbling. Combining and Tempering Ingredients: In a bowl, whisk together 3 egg yolks, 1/2 cup sugar, and 1/4 cup cornstarch. Mix until smooth. Gradually add a bit of the hot milk while whisking. This process is called tempering. It helps the eggs warm up without cooking. Keep adding milk until it’s all mixed in. Assembling the Squares: After cooling the custard slightly, slice each puff pastry square in half. You now have a top and bottom. Spoon the vanilla custard onto the bottom half. Be generous with the custard. Then, gently place the top half back on. Dusting and Garnishing Tips: Finally, dust the tops of your squares with powdered sugar. This adds a sweet touch and looks pretty. For extra color, add fresh berries on top. They make your treat look even better and add a burst of flavor. For the complete recipe, remember to check the Full Recipe. To make puff pastry shine, avoid common mistakes. Here are some key points: - Don't skip chilling: Always chill the dough between rolling. This keeps the butter firm, making your pastry flaky. - Avoid overworking: Handle the pastry gently. Too much kneading can make it tough. When rolling, use the right technique. Start in the middle and roll outward. Rotate the dough to keep an even thickness. Aim for a 1/8-inch thickness, which will puff nicely. Getting the custard just right is crucial for your squares. - How to check thickness: When whisking, the custard should coat the back of a spoon. If it runs off too easily, it needs more time. - Adjusting sweetness: Taste the custard before cooling. If it’s not sweet enough, add a bit more sugar while it’s warm. Remember, it will taste less sweet once cold. Presentation matters! Here’s how to make your squares look great: - Serving suggestions: Place your squares on a fancy plate. This can elevate the dish and impress guests. - Creative garnishing ideas: Fresh berries add color and flavor. You can also use a drizzle of berry coulis for flair. A sprinkle of powdered sugar will make them look festive. These tips will help you create stunning Puff Pastry Vanilla Custard Cream Squares that taste as good as they look! For the complete recipe, check the [Full Recipe]. {{image_4}} You can switch things up with your Puff Pastry Vanilla Custard Cream Squares. Here are two tasty options: - Chocolate Custard Option For a rich chocolate flavor, use cocoa powder. Mix in 1/2 cup of unsweetened cocoa powder with the egg mixture. This change gives a deep, sweet taste to your custard. It pairs well with the flaky pastry. - Fruit-Infused Custard Alternatives To add fruit flavors, try using pureed fruits. You can use berries, mango, or even citrus. Add 1/2 cup of fruit puree to the custard after cooking. This will brighten up the squares with fresh taste and color. If you have dietary needs, you can still enjoy these squares! Here are some options: - Gluten-Free Puff Pastry Look for gluten-free puff pastry at your local store. Brands like Schar or Whole Foods offer good choices. Just follow the same steps as with regular puff pastry. Your treat will still be flaky and delicious! - Vegan Custard Recipe To make a vegan custard, swap the milk and eggs. Use almond milk or oat milk instead of whole milk. For the egg yolks, mix 1/4 cup of cornstarch with 1/2 cup of cold water. Heat this mix until thick, then add vanilla. This will create a smooth vegan custard. These variations allow everyone to enjoy the Puff Pastry Vanilla Custard Cream Squares. Whether you choose chocolate or fruit, your squares will still be a hit! For the full recipe, check out the [Full Recipe]. To keep your Puff Pastry Vanilla Custard Cream Squares fresh, store them in the fridge. Here’s how to do it: - Best Practices for Refrigeration: Allow the squares to cool completely before storing. This prevents condensation, which can make the pastry soggy. Place the squares in a single layer to avoid crushing. - Recommended Storing Containers: Use an airtight container. If stacking is necessary, place parchment paper between layers to keep them crisp. Freezing these squares can help you enjoy them later. Here’s how to freeze and reheat them: - How to Freeze the Squares: First, cool the squares completely. Then, wrap them tightly in plastic wrap, followed by aluminum foil. This double layer protects them from freezer burn. - Thawing and Reheating Tips: When you're ready to enjoy, thaw the squares in the fridge overnight. To reheat, place them in a preheated oven at 350°F (175°C) for about 10 minutes. This keeps the pastry flaky and warm. For the full recipe, refer to the earlier section on preparation and baking. What is Puff Pastry? Puff pastry is a flaky dough made of layers of butter and flour. When baked, it rises and puffs up, creating a light and airy texture. This dough is perfect for sweet and savory dishes alike. You can use it for tarts, pies, and pastries. Can I use store-bought custard? Yes, you can use store-bought custard to save time. It works well in these squares. Just make sure to choose a high-quality custard for the best flavor. Homemade custard, however, gives a richer taste and texture. How long do the squares take to bake? The squares take about 15-20 minutes to bake. You want them to be golden brown and crispy. Keep an eye on them so they don't burn. What is the total prep and cook time? The total prep and cook time is about 1 hour. You’ll spend around 30 minutes preparing the ingredients and baking the squares. The custard takes a bit longer to make and cool. What pairs well with vanilla custard cream squares? These squares pair well with fresh berries or a berry coulis. The tartness of the berries balances the sweet custard. You can also serve them with whipped cream for extra indulgence. Can I prepare these squares in advance? Yes, you can prepare the squares in advance. You can bake the puff pastry ahead of time and store it. Assemble them with custard just before serving for the best texture. We covered how to make delicious vanilla custard cream squares from start to finish. You learned the key ingredients, step-by-step preparation, and baking instructions. I shared tips for perfect puff pastry and custard consistency. You can also explore tasty variations and smart storage ideas. With a little practice, you can create these treats at home. Enjoy the process and impress yourself and others with your baking skills!](https://tossedflavors.com/wp-content/uploads/2025/05/148b5b2b-27dc-4aa4-85a6-4c37c31aa6ec.webp)
Puff Pastry Vanilla Custard Cream Squares Delightful Treat
Are you ready to impress your friends with a delightful dessert? Puff Pastry Vanilla Custard Cream Squares are the perfect treat! This easy-to-follow recipe will
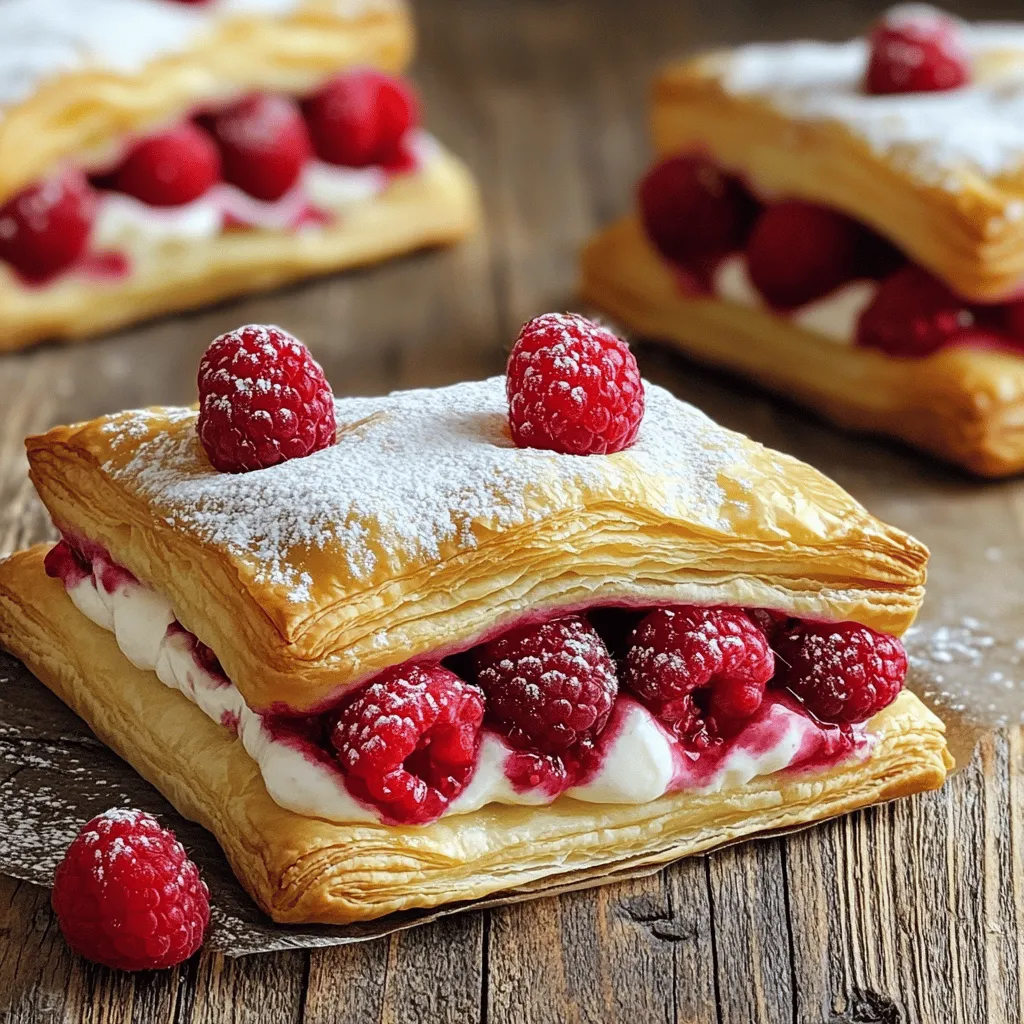
Raspberry Danish Delight Easy and Flavorful Treat
If you love delicious pastries, you’re in for a treat! In this post, I’ll show you how to make a Raspberry Danish that’s both easy
![To make the Lemon Blueberry Cream Cheese Danish, you'll need a few key ingredients. Here’s the list: - 1 sheet of puff pastry, thawed - 1 cup fresh blueberries - 4 ounces cream cheese, softened to room temperature - 1/4 cup granulated sugar - 1 teaspoon freshly grated lemon zest - 1 tablespoon fresh lemon juice - 1 egg, beaten (for egg wash) - 1 tablespoon all-purpose flour (for dusting) - Powdered sugar for dusting (optional for garnish) These ingredients come together to create a delightful treat with a zesty lemon flavor and sweet blueberries. The puff pastry provides a flaky, buttery base that perfectly complements the creamy filling. Each bite is a burst of flavor, making this danish not just a snack, but a moment to savor. Using fresh blueberries enhances the taste and offers a beautiful contrast to the cream cheese. Don’t forget to check the Full Recipe for detailed instructions! - Preheat your oven to 400°F (200°C). - Line a baking sheet with parchment paper. - On a floured surface, roll out the puff pastry. - Cut the pastry into four equal squares. - In a bowl, mix the cream cheese and sugar. - Add the lemon zest and lemon juice. - Stir until the mixture is smooth and creamy. - Spoon the cream cheese filling onto each pastry square. - Place a few blueberries on top of the filling. - Fold the corners of each square toward the center. - Pinch the corners to seal, leaving the center open. - Brush the edges with the beaten egg. - Bake the danishes for 15-18 minutes. - Look for a golden-brown color and puffed-up edges. For the full experience, check out the Full Recipe. Enjoy your creation! To achieve the best flakiness in your danish, start with cold ingredients. Keep your puff pastry chilled until you’re ready to use it. This helps create those beautiful, airy layers. Roll the pastry out gently, making sure not to overwork it. A light touch keeps the layers intact. When spreading the cream cheese filling, use a small offset spatula. This tool helps you spread the filling evenly without tearing the pastry. Aim for a thin layer in the center, leaving space at the edges. Too much filling can cause spills while baking. For garnishing your danishes, consider a dusting of powdered sugar. It adds a touch of sweetness and a lovely look. Fresh blueberries or thin lemon slices on top make a great visual appeal. You can also drizzle a bit of lemon glaze for extra flavor. Pair your danishes with refreshing drinks. A glass of iced tea or lemonade complements the lemon and blueberry flavor. Coffee or a light herbal tea also works well. These choices enhance the experience and make your treat feel special. {{image_4}} You can make this Lemon Blueberry Cream Cheese Danish even more fun. Try adding different fruits. Strawberries and raspberries work great. Their sweet and tart flavors mix well with the lemon and cream cheese. You can also use flavored cream cheese. Think about using vanilla or lemon cream cheese. These choices add a new twist to the classic recipe. If you need a gluten-free version, it’s easy to switch up the pastry. Use gluten-free puff pastry instead. Many brands now make tasty options that work well. For those who want a vegan treat, you can use dairy-free cream cheese. Look for brands that taste great and have the right texture. You can also find vegan puff pastry at some stores. These adjustments keep the flavors fresh while meeting your dietary needs. For the complete recipe, check the [Full Recipe]. Store any leftover danishes at room temperature for up to two hours. This keeps them fresh and tasty. If you have leftovers after that, place them in the fridge. Use an airtight container to prevent them from drying out. They can stay in the fridge for up to three days. For long-term storage, freezing is your best bet. Wrap each danish tightly in plastic wrap, then place them in a freezer bag. They can last for up to three months in the freezer. When you're ready to enjoy them, take them out and reheat. To keep the texture nice, bake them straight from the freezer at 350°F (175°C) for about 10-15 minutes. This method warms them through while keeping them flaky. For the best results, avoid using a microwave, as it can make them soggy. Try these simple storage tips to keep your lemon blueberry cream cheese danish fresh and delicious! You can find the full recipe earlier in the article to make it again. How to make Lemon Blueberry Cream Cheese Danish without puff pastry? You can use phyllo dough instead of puff pastry. Phyllo makes a crisp and flaky base. Just layer a few sheets and cut them into squares. Follow the same filling and assembly steps as with puff pastry. Can I use frozen blueberries instead of fresh? Yes, you can use frozen blueberries. They work well in this recipe. Just remember to thaw and drain them. This helps avoid excess moisture in your danish. What is the best way to reheat leftovers? To reheat, place the danish in the oven at 350°F (175°C) for about 10 minutes. This keeps the pastry crisp and warm. You can also use a microwave, but the pastry may get soft. Enjoy your delicious treat! For the full recipe, check out the Lemon Blueberry Cream Cheese Danish. These lemon blueberry cream cheese danishes are simple and fun to make. You learned the ingredients, from puff pastry to fresh blueberries, along with easy steps for preparing and baking. I shared tips for perfecting the pastry and ideas for serving. You can even mix flavors or make dietary adjustments. Remember, storing and reheating properly will keep your treats tasty. I hope you try this recipe and enjoy every bite. Happy baking!](https://tossedflavors.com/wp-content/uploads/2025/05/5c01d5d9-a6e1-4741-bdc4-89e8f0652a90.webp)
Lemon Blueberry Cream Cheese Danish Simple Delight
If you’re craving a sweet treat that bursts with flavor, you’ll love this Lemon Blueberry Cream Cheese Danish! With just a few simple ingredients, including
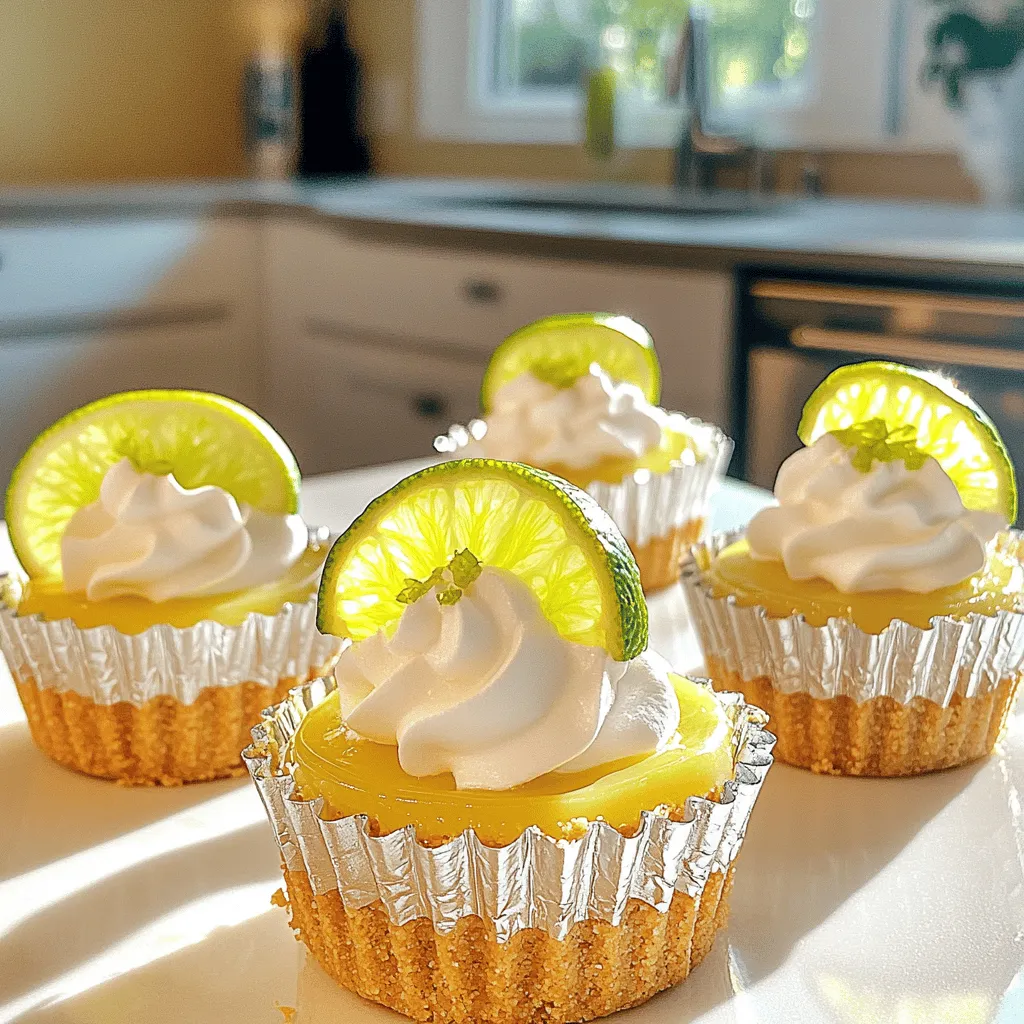
Mini Key Lime Cheesecakes Delightful and Easy Recipe
Craving a sweet treat that’s both refreshing and simple to make? Mini Key Lime Cheesecakes are the answer. With their zesty lime flavor and creamy
. First, you need to prepare your baking space. Preheat your oven to 350°F (175°C). This ensures your cookies bake evenly. Next, grab a baking sheet and line it with parchment paper. This step helps the cookies not stick. It also makes for easy clean-up. Now, let’s mix the dough. Start by gathering your dry ingredients. In a medium bowl, whisk together the flour, baking powder, baking soda, salt, cinnamon, and nutmeg. This helps blend the flavors. Set this bowl aside for now. In another larger bowl, cream the softened butter with the brown and granulated sugars. Use an electric mixer on medium speed. Beat for 2-3 minutes until the mix is light and fluffy. This is key for a soft cookie. Then, add your eggs one at a time. Mix well after each egg. Next, stir in the vanilla and milk until everything is smooth. Now, combine your dry and wet mixes. Gradually add the dry ingredients to the wet mixture. Mix on low speed until you see no flour streaks. Be careful not to overmix, or the cookies will be tough. Finally, gently fold in the maple syrup and optional pecans. Let’s shape and bake the cookies. Use a cookie scoop or tablespoon to form rounded mounds of dough. Place them on the lined baking sheet, spaced about 2 inches apart. This space allows for spreading. Now, pop the baking sheet into the oven. Bake for 10-12 minutes. You want the edges to be lightly golden while the centers stay soft. Once baked, take them out and let them cool on the sheet for 5 minutes. After that, carefully move the cookies to a wire rack to cool completely. For a nice touch, drizzle extra maple syrup over the cooled cookies. This adds a delightful flavor and makes them look even better. Enjoy your Chewy French Toast Cookies! For more details, check the full recipe. To get that perfect chewy texture, follow these tips: - Use brown sugar: It adds moisture and helps keep cookies chewy. - Do not overmix: Mix just until combined to avoid tough cookies. - Bake until soft: Take them out when the edges are golden, but the center is soft. This method ensures your cookies will have a delightful chew that mimics French toast. Here are some common mistakes to watch out for: - Skipping the chilling step: If you chill the dough, it firms up, leading to a better shape. - Not measuring flour correctly: Too much flour can dry out your cookies. Use a light hand when scooping. - Opening the oven too early: This lets out heat and can cause uneven baking. Avoiding these errors will help you achieve the best results. These cookies shine when served with a few tasty extras: - Maple syrup drizzle: A sweet touch that enhances the French toast flavor. - Fresh fruit: Slices of banana or berries add freshness and color. - Coffee or tea: A warm drink pairs perfectly with the sweet, chewy cookies. For the full recipe, you can create these delightful treats in no time! {{image_4}} You can easily make Chewy French Toast Cookies gluten-free. Use a good gluten-free flour blend. This blend should mimic all-purpose flour well. Make sure it contains xanthan gum. It helps bind the cookies and gives them a nice texture. You can add flavors to your cookies for a twist. Try using vanilla bean paste instead of vanilla extract. It gives a richer flavor. You can also mix in chocolate chips or dried fruits. Chopped apples or cranberries add a nice fruity touch. For those who love nuts, add walnuts or almonds for crunch. Change the flavors based on the seasons. In fall, add pumpkin spice to the batter. It makes the cookies perfect for autumn. In summer, use lemon zest for a fresh taste. For holidays, sprinkle in some festive spices like ginger or cloves. Each of these twists keeps your Chewy French Toast Cookies fun and exciting. To keep your Chewy French Toast Cookies fresh, store them in an airtight container. This method helps retain moisture, keeping them soft. Place parchment paper between layers to prevent sticking. Enjoy them at room temperature for the best taste. If you want to save some cookies for later, freezing is a great option. Place the cooled cookies in a single layer on a baking sheet. Freeze them for about an hour, then transfer to a freezer-safe bag. This way, they won’t stick together. They can stay fresh for up to three months. To enjoy your cookies warm, preheat your oven to 350°F (175°C). Place the cookies on a baking sheet for about 5-10 minutes. This step revives their chewy texture and enhances the warm, sweet aroma. You can also use the microwave for a quick warm-up. Just heat for 10-15 seconds. Enjoy your treats fresh with a drizzle of maple syrup! Chewy cookies have moisture and fat. Butter helps make them soft. The right mix of flour and sugar also plays a big role. When you bake, the sugar melts and creates a chewy texture. If you bake them just enough, the centers stay soft. Overbaking can make them hard, so watch the timer! Yes, you can make these cookies vegan! Replace the eggs with flaxseed meal or applesauce. Use vegan butter instead of regular butter. Almond milk or oat milk can replace regular milk. Maple syrup is already vegan, so no need to change that! These cookies stay fresh for about a week at room temperature. Store them in an airtight container. For longer freshness, keep them in the fridge. If you freeze them, they can last for three months. Just remember to thaw them at room temperature before eating. Yes, you can use other syrups! Honey, agave nectar, or even pancake syrup can work. Each will change the flavor a bit. Maple syrup gives a classic taste, but feel free to experiment. Just choose a syrup you love! The best toppings include a drizzle of maple syrup. You can also sprinkle powdered sugar on top. Chopped nuts add crunch and flavor. For a twist, try adding chocolate chips or dried fruit. Make it your own and enjoy the tasty combinations! For the complete recipe, check out the Full Recipe section. In this blog post, I covered how to make Chewy French Toast Cookies from start to finish. We explored key ingredients that shape their delightful texture and flavor. I shared tips for perfect baking and ways to customize your cookies. You also learned about storage and how to keep them fresh. These cookies bring a fun twist to your baking. Experiment with flavors and enjoy them fresh. I hope you feel inspired to try this recipe and create your own tasty treats!](https://tossedflavors.com/wp-content/uploads/2025/05/a5cafcb3-4db9-493e-a794-1ddc4e52a29c.webp)
Chewy French Toast Cookies Delightfully Easy Treat
Are you ready to make Chewy French Toast Cookies? These treats combine the warm flavors of breakfast with the sweet joy of cookies. You’ll enjoy
![To make these delicious fudgy cookies, gather these ingredients: - 1/2 cup unsalted butter, melted - 1 cup packed brown sugar - 1/4 cup granulated sugar - 2 large eggs - 1 teaspoon pure vanilla extract - 1/2 cup all-purpose flour - 1/3 cup unsweetened cocoa powder - 1/2 teaspoon baking powder - 1/4 teaspoon fine sea salt - 1 cup semi-sweet chocolate chips - 1/2 cup chopped walnuts (optional for added crunch) Measuring ingredients accurately is key to great cookies. Use dry measuring cups for flour and cocoa powder. For sticky items like butter or sugar, a liquid measuring cup works better. Always level off dry ingredients with a knife for precision. This helps ensure every bite is fudgy and chocolatey. Quality matters when picking ingredients. Use real unsalted butter for the best flavor. Choose high-quality cocoa powder for a rich taste. Semi-sweet chocolate chips add sweetness and texture, but you can swap them for dark chocolate if you prefer. If you have allergies, swap all-purpose flour with gluten-free flour. Just check the package for the right ratio. The walnuts give a nice crunch, but you can skip them if you want. Feel free to explore the [Full Recipe] for more details on making these tasty treats! Before you start, get your baking space ready. First, gather your tools. You need a mixing bowl, a spatula, a whisk, and a baking sheet. Line the baking sheet with parchment paper. This helps the cookies not stick. Preheat your oven to 350°F (175°C). This step is key to baking perfect cookies. In a large mixing bowl, pour in the melted butter. Add the brown sugar and granulated sugar. Mix these together until smooth. Next, crack in the eggs, one at a time. Stir well after each egg. This helps make your cookies rich. Finally, add the vanilla extract and mix until everything is combined. In another bowl, sift together the flour, cocoa powder, baking powder, and salt. Sifting removes lumps and blends the flavors. Gradually add this dry mix to your wet ingredients. Use a spatula to fold them together gently. Be careful not to overmix; this can make the cookies tough. Once mixed, fold in the chocolate chips and walnuts, if you’re using them. Using a tablespoon or cookie scoop, drop the dough onto your lined baking sheet. Leave about 2 inches between each cookie. This gives them room to spread. Bake in the preheated oven for 10-12 minutes. Look for slightly set edges and soft centers. This means they will stay fudgy. After baking, let them cool on the sheet for about 5 minutes. Then, transfer them to a wire rack to cool completely. For the full recipe, check out the details provided. To get that fudgy texture, you need to focus on the baking time. Bake your cookies for just 10 to 12 minutes. They should look set on the edges but soft in the middle. This slight underbaking helps keep them chewy and rich. Using a mix of brown sugar and granulated sugar also adds to that fudgy feel. Brown sugar keeps moisture, making your cookies softer. One common mistake is overmixing the dough. Mix only until the ingredients blend. Overmixing adds air, making cookies cakier. Another mistake is not measuring ingredients correctly. Use measuring cups and spoons for accuracy. Too much flour can lead to dry cookies. Also, don’t skip chilling the dough if it gets too soft. Chilling helps the cookies hold their shape while baking. Having the right tools makes baking easier. Here are a few must-haves: - Mixing bowls for wet and dry ingredients - A whisk or spatula for mixing - Measuring cups and spoons for accuracy - Cookie scoop for uniform cookie sizes - Parchment paper for easy cleanup and to prevent sticking These tools help you create perfect fudgy chocolate brownie cookies every time. For the full recipe, check out the details above. {{image_4}} I love adding walnuts to my brownie cookies. The nuts give a nice crunch and rich flavor. They also add healthy fats and protein. To make nutty brownie cookies, simply mix in 1/2 cup of chopped walnuts into the dough. This addition turns a great cookie into an even better one. You can toast the walnuts first for extra flavor. Just bake them at 350°F (175°C) for about 5-7 minutes. You can switch up the chocolate chips for fun. I often use dark chocolate chips for a richer taste. Milk chocolate chips are sweeter and great for kids. If you want something unique, try white chocolate chips. They add a creamy flavor that pairs well with the fudgy texture. Mix and match these chips to create your perfect cookie. You could even use a mix of all three for a fun surprise in every bite! Making these cookies gluten-free is easy. Just use a gluten-free flour blend instead of all-purpose flour. Make sure the blend has a good mix of starches and proteins for the best results. If you need a vegan version, swap the eggs for flax eggs. Mix 1 tablespoon of ground flaxseed with 2.5 tablespoons of water for each egg. This will help bind your cookies without eggs. Both adjustments will keep your cookies delicious and fudgy. For the full recipe, check out the details above! To keep your fudgy chocolate brownie cookies fresh, use a few simple tips. First, let them cool completely before storing. If you store warm cookies, they can become soggy. Next, place the cookies in an airtight container. This keeps them soft and prevents them from drying out. If you have many cookies, separate layers with parchment paper. This will stop them from sticking together. Freezing is a great way to save your cookies for later. To freeze, first make sure the cookies are fully cool. Then, place them in a single layer on a baking sheet. Freeze them for about an hour. Once frozen, transfer the cookies to a freezer-safe bag. Remove as much air as possible before sealing. They will stay fresh for up to three months. When you want a treat, just take out as many as you need. To enjoy your cookies warm, reheat them in the oven. Preheat the oven to 350°F (175°C). Place the cookies on a baking sheet and heat for about 5 minutes. This helps them regain their fudgy texture. You can also use the microwave. Heat them for about 10-15 seconds. This will warm them up, but be careful not to overdo it. Enjoy your fudgy chocolate brownie cookies right after reheating for the best taste! For the full recipe, check out the details above. The ideal baking time for fudgy chocolate brownie cookies is 10-12 minutes. I like to watch for signs. The edges should look set, but the center may still seem soft. This is a good sign! When you take them out, they will continue to bake a bit on the sheet. Yes, you can use margarine instead of butter. However, I recommend using unsalted margarine for the best taste. Margarine can affect the texture and flavor slightly. Butter gives a richer taste and a better chew. To tell if your cookies are done, look at the edges. They should look firm and almost set. The center may look a little underbaked. This is perfect for a fudgy texture! Let them cool for a few minutes on the baking sheet before moving them to a wire rack. This helps them firm up nicely. For the complete recipe, check the [Full Recipe]. In this blog post, we explored how to make fudgy chocolate brownie cookies. We discussed key ingredients, measurements, and even substitutions for quality. The step-by-step instructions showed how to mix, prepare, and bake perfectly chewy cookies. I shared tips for achieving that fudgy texture and common mistakes to avoid. Don’t forget the fun variations to try! Finally, I provided the best storage methods to keep your cookies fresh. Enjoy baking these cookies and impress everyone with your skills!](https://tossedflavors.com/wp-content/uploads/2025/05/c8c6e1d2-ec04-4bb6-b551-08c30524a79a.webp)
Fudgy Chocolate Brownie Cookies Rich and Delightful Treat
If you crave a dessert that combines the rich indulgence of brownies with the delightful ease of cookies, then you’re in for a treat! In
![- 1 sheet of puff pastry, fully thawed - 1 cup fresh strawberries, hulled and sliced - 1/4 cup granulated sugar (plus extra for topping) - 1 tablespoon cornstarch - 1 teaspoon fresh lemon juice To make a great Strawberry Danish, start with puff pastry. This flaky dough gives a nice crunch. Use fresh strawberries for a sweet and juicy filling. The sugar helps bring out their natural flavor. Cornstarch thickens the filling, making it less runny. A bit of lemon juice adds brightness and balances the sweetness. - 4 oz cream cheese, softened to room temperature - 2 tablespoons powdered sugar - 1 teaspoon almond extract - 1 tablespoon milk The cream cheese filling makes the Danish rich and creamy. Soften the cream cheese to help mix it well. Powdered sugar adds sweetness without graininess. Almond extract gives a lovely nutty flavor, enhancing the cream cheese. A splash of milk helps make the filling smooth and easy to spread. - 1 large egg - Extra granulated sugar An egg wash gives the Danish a golden color. Whisk the egg until well mixed. Brush it on the pastry edges before baking. This step adds shine and a beautiful look. Sprinkling extra sugar on top adds a sweet crunch that contrasts with the soft filling. For the full recipe, check the [Full Recipe]. 1. Preheat your oven to 400°F (200°C). This step warms your oven and helps the pastry rise. 2. Prepare a baking sheet. Line it with parchment paper. This keeps the Danish from sticking. 3. Roll out the puff pastry. Use a lightly floured surface to avoid sticking. 4. Cut the pastry into rectangles. Aim for four equal pieces. Lay them on the baking sheet. 5. Make the strawberry filling mixture. In a bowl, mix sliced strawberries, granulated sugar, cornstarch, lemon juice, and vanilla extract. Toss well. Let it sit for about 10 minutes. This helps the strawberries release juice. 1. Mix the cream cheese filling. In a new bowl, blend softened cream cheese with powdered sugar, almond extract, and milk. 2. Stir until smooth. Ensure there are no lumps. A creamy texture works best for spreading. 1. Score the puff pastry. Carefully cut a 1/2 inch border around each rectangle. This creates a puffy edge. 2. Add the cream cheese mixture. Spoon some into the center of each pastry rectangle. 3. Top with strawberry mixture. Distribute the strawberries evenly on top of the cream cheese. 4. Apply the egg wash. Whisk the egg and brush it around the edges. This gives a golden color. 5. Sprinkle extra sugar. Add a little sugar on top for a sweet crunch. 1. Bake the pastries. Place them in the oven for 18-20 minutes. They should puff and turn golden brown. 2. Cool slightly. Once baked, let them cool on the sheet for a bit before moving them. Enjoy your Strawberry Danish Delight! For a full recipe, check out the details above. To get the best puff pastry, thaw it properly. Leave it in the fridge overnight for great results. If you need it fast, place it on the counter for about 30 minutes. Avoid letting it get too warm. When rolling out the pastry, keep it on a floured surface. Roll it gently to avoid tearing. Aim for a rectangle about 1/8 inch thick. This thickness helps it puff nicely when baked. Choosing the right strawberries is key. Look for bright red berries that feel firm. Avoid any that are soft or have bruises. Fresh strawberries taste best and add great color. To boost the flavor, mix your sliced strawberries with a little lemon juice and sugar. Let them sit for about 10 minutes. This enhances their sweetness and creates a nice syrup. For a lovely presentation, dust the Danish with powdered sugar before serving. You can also add a mint sprig on top. This adds a pop of color and freshness. Pair your Strawberry Danish with a hot cup of coffee or tea. The warmth of the drink complements the cold cream cheese filling. Enjoy it as a breakfast treat or a sweet snack. For the complete recipe, check out the Full Recipe. {{image_4}} You can swap strawberries for other fruits. Blueberries and raspberries work great. They add a nice tartness. You can also use fruit preserves or jams. They give a sweet and rich flavor. Just spread a layer before the cream cheese. Mix and match fruits for fun, unique flavors! Toppings can change the look and taste of your Danish. Consider a simple icing made from powdered sugar and milk. Drizzle it on top for a sweet finish. You can also use a glaze with lemon or vanilla. Fresh herbs like mint or basil can add a pop of color and flavor. Just sprinkle them on before serving. If you want to make a vegan Danish, try plant-based cream cheese. Many brands offer good options. For a gluten-free version, look for gluten-free puff pastry. These swaps keep the delight while meeting your dietary needs. You can enjoy a tasty treat that fits your lifestyle! For the full recipe, check out the Strawberry Bliss Danish . After enjoying your Strawberry Danish, store any leftovers in an airtight container. This helps keep them fresh. I recommend using a glass or plastic container with a tight lid. You can also wrap each Danish in plastic wrap for extra protection. They will stay fresh for about 2-3 days at room temperature. For longer storage, consider refrigerating them. To bring back the flaky texture of your Danish, reheat them in the oven. Preheat your oven to 350°F (175°C). Place the pastries on a baking sheet and heat for about 10 minutes. This method keeps the pastry crispy. You can also use a toaster oven for similar results. Avoid using the microwave, as it can make the pastry soft and chewy. You can freeze your Danish before or after baking. If freezing before baking, assemble the Danish and place them on a baking sheet. Cover them with plastic wrap and freeze for up to 3 months. When ready to bake, bake them straight from the freezer, adding a few extra minutes to the baking time. If you freeze baked Danish, let them cool completely first. Wrap each pastry in plastic wrap, then place them in a freezer bag. To thaw, place them in the fridge overnight. Reheat in the oven as mentioned above. To make Strawberry Danish from scratch, start with puff pastry. You will need: - 1 sheet of puff pastry, fully thawed - 1 cup fresh strawberries, hulled and sliced - 1/4 cup granulated sugar (plus extra for topping) - 1 tablespoon cornstarch - 1 teaspoon fresh lemon juice - 1/2 teaspoon vanilla extract - 1 large egg (for egg wash) - 4 oz cream cheese, softened to room temperature - 2 tablespoons powdered sugar - 1 teaspoon almond extract - 1 tablespoon milk First, preheat your oven to 400°F (200°C). Roll out the pastry on a floured surface. Cut it into rectangles and place them on a baking sheet. Mix the strawberries with sugar, cornstarch, lemon juice, and vanilla in a bowl. Let it sit for ten minutes. In another bowl, mix cream cheese, powdered sugar, almond extract, and milk until smooth. Score the pastry edges, add cream cheese, and top with strawberries. Brush the edges with egg wash. Bake for 18-20 minutes until golden. Yes, you can use frozen strawberries. However, they may change the texture. Frozen berries can be mushy after thawing. They also lose some flavor compared to fresh strawberries. If using frozen, let them thaw completely and drain excess juice. This will help keep your Danish from becoming soggy. If you don’t have puff pastry, you can use phyllo dough or biscuit dough. Phyllo gives a crispy texture, but it requires more layers. Biscuit dough is thicker and may not have the same flaky quality. Each option offers a unique taste, but puff pastry is best for that light, flaky texture. Strawberry Danish lasts about 2-3 days at room temperature. Store it in an airtight container to keep it fresh. If it looks dry or has an off smell, it is best to throw it away. For longer storage, you can refrigerate it for up to a week. Yes, you can make Strawberry Danish ahead of time. Prepare the filling and pastry, then assemble them. Cover and store in the fridge for up to 24 hours before baking. When ready, bake them straight from the fridge. They will taste fresh and delicious! For the full recipe, check out the Strawberry Bliss Danish. Making Strawberry Danish is easy and fun. You learned about the key ingredients, from fresh strawberries to cream cheese filling. I provided step-by-step instructions to help you bake a perfect treat. You also discovered tips for selecting fruit and making it shine. Variations show you can switch up flavors. Plus, storage tips ensure your Danish stays fresh. With this guide, you have all you need to create a delicious Strawberry Danish at home. Enjoy sharing your tasty results with family and friends!](https://tossedflavors.com/wp-content/uploads/2025/05/8611ec45-d55d-4371-b3e4-50c0ebfe6d1c.webp)
Strawberry Danish Delight Fresh and Flaky Pastry
Welcome to your new favorite treat: Strawberry Danish! This fresh and flaky pastry brings together juicy strawberries, a creamy filling, and irresistible puff pastry. Whether
![- 1 block (8 oz) cream cheese, softened to room temperature - 1/2 cup powdered sugar (plus extra for dusting, if desired) - 1 package of spring roll wrappers or wonton wrappers - Toppings like whipped cream, chocolate sauce, and fresh berries - Ingredients for cinnamon-sugar coating Fried cheesecake bites need a few simple, tasty ingredients. The main star is cream cheese. It gives the bites that rich, creamy taste. The powdered sugar adds sweetness and helps the filling stay smooth. Use wonton or spring roll wrappers for wrapping the filling. They fry up crispy and golden. You can make the bites even better with toppings. Whipped cream is light and fluffy. Chocolate sauce adds a sweet touch. Fresh berries bring a burst of flavor. You can also mix sugar and cinnamon for a sweet coating. For the full recipe, you can check the detailed steps to bring these bites to life. Enjoy experimenting with toppings and flavors! To start, grab a mixing bowl. Place one block of softened cream cheese inside. Add half a cup of powdered sugar and one teaspoon of vanilla extract. Use a hand mixer or spatula to blend well. Aim for a smooth and creamy mix, with no lumps left. This filling will be the heart of your bites. Next, lay out your spring roll or wonton wrappers on a flat surface. If they are too big, cut them into quarters for bite-sized squares. Scoop about one teaspoon of the creamy filling and put it in the center of each wrapper. Fold the corners over the filling, creating a sealed pocket. If you need help sealing, dampen the edges with a little water. Now, it’s time to fry! In a deep pan, pour enough oil to fill about two inches deep. Heat the oil over medium heat until it reaches 350°F (175°C). You can test the oil by dropping in a small piece of dough; it should sizzle right away. Carefully add the filled wrappers to the hot oil, frying a few at a time to avoid crowding. Fry until they’re golden brown on all sides, which takes about 2-3 minutes. Use a slotted spoon to remove the bites and place them on a plate lined with paper towels to drain excess oil. To get the best fried cheesecake bites, the oil temperature is key. Heat the oil to 350°F (175°C). Use a thermometer to check. If you don’t have one, drop in a small piece of dough. If it sizzles, it’s ready. Fry the bites for 2-3 minutes. They should turn a lovely golden brown. Frying in small batches helps keep the oil hot. To prevent leaks while frying, sealing is crucial. When you fill the wrappers, use just enough filling. Too much can make them burst. Moisten the edges with a bit of water. This helps the wrapper stick together. Press the edges firmly to seal well. Check for any openings before frying. Make your fried cheesecake bites look extra special. Arrange them on a colorful plate. Drizzle chocolate sauce over them for a fun touch. Add a dollop of whipped cream on the side. Fresh berries add color and freshness. Finish with a light dusting of powdered sugar. This makes your dessert look fancy and inviting. For the full recipe, click [Full Recipe]. {{image_4}} You can make your fried cheesecake bites even more fun! Adding chocolate chips gives a sweet twist. Try mixing in fruit purees, like strawberry or raspberry, for a fruity flavor. You can also add spices like cinnamon or nutmeg to the cream cheese filling. These small changes can create big flavors. Get creative with your coatings! Instead of just graham cracker crumbs, try using crushed nuts like almonds or pecans. You can also use cereals, like cornflakes or Rice Krispies, for a crunchy texture. These options add a new layer of taste and crunch to your bites. If you prefer baking, you can skip the frying step. Preheat your oven to 350°F (175°C). Place the filled wrappers on a baking sheet lined with parchment paper. Bake them for about 15-20 minutes, or until they turn golden brown. This method gives a lighter version of these tasty bites. This way, you can enjoy them without the extra oil. For the full recipe, check out the details above. Store your fried cheesecake bites in an airtight container. Place a paper towel at the bottom to absorb moisture. This helps keep them crispy. You can keep them in the fridge for up to three days. If you want to store them longer, freezing is an option. To reheat, use the oven or an air fryer. Preheat the oven to 350°F (175°C). Place the bites on a baking sheet for 10 minutes. This method helps regain crispiness. If you use an air fryer, set it to 350°F (175°C) and heat for about 5 minutes. Avoid microwaving, as it makes them soggy. To freeze, let the bites cool completely. Place them in a single layer on a baking sheet. Freeze until solid, then transfer them to a freezer bag. Remove excess air and seal tightly. They can last up to two months. To thaw, put them in the fridge overnight before reheating. You can use low-fat cream cheese, but it changes the taste and texture. Low-fat cream cheese has less fat, which makes it less creamy. Your bites may not be as rich or smooth. If you want the best flavor, stick to full-fat cream cheese for these bites. For frying these bites, I recommend vegetable or canola oil. Both oils have a high smoke point, which means they heat well without burning. This helps create a crispy outer layer. You can also use peanut oil for a unique flavor. Just make sure to avoid olive oil, as it smokes at lower temperatures. To check if your bites are done, look for a golden brown color. This usually takes about 2-3 minutes per batch. You can also use a slotted spoon to lift one out and check the color. If it’s golden and crispy, your bites are ready! We explored how to make delicious fried cheesecake bites using simple ingredients like cream cheese and powdered sugar. You learned step-by-step instructions, tips for perfect frying, and variations for added flavor. These bites are easy to store, reheat, and freeze. You can impress friends and family with these treats. Enjoy creating and sharing your fried cheesecake bites! Get ready to make dessert time the best part of your day.](https://tossedflavors.com/wp-content/uploads/2025/05/1b5cb00d-f3ba-4b94-b551-039857aabf36.webp)
Easy Fried Cheesecake Bites Tasty Dessert Delight
Craving a sweet treat that’s both easy and delicious? You’re in for a treat with these Easy Fried Cheesecake Bites! Imagine creamy cheesecake wrapped in
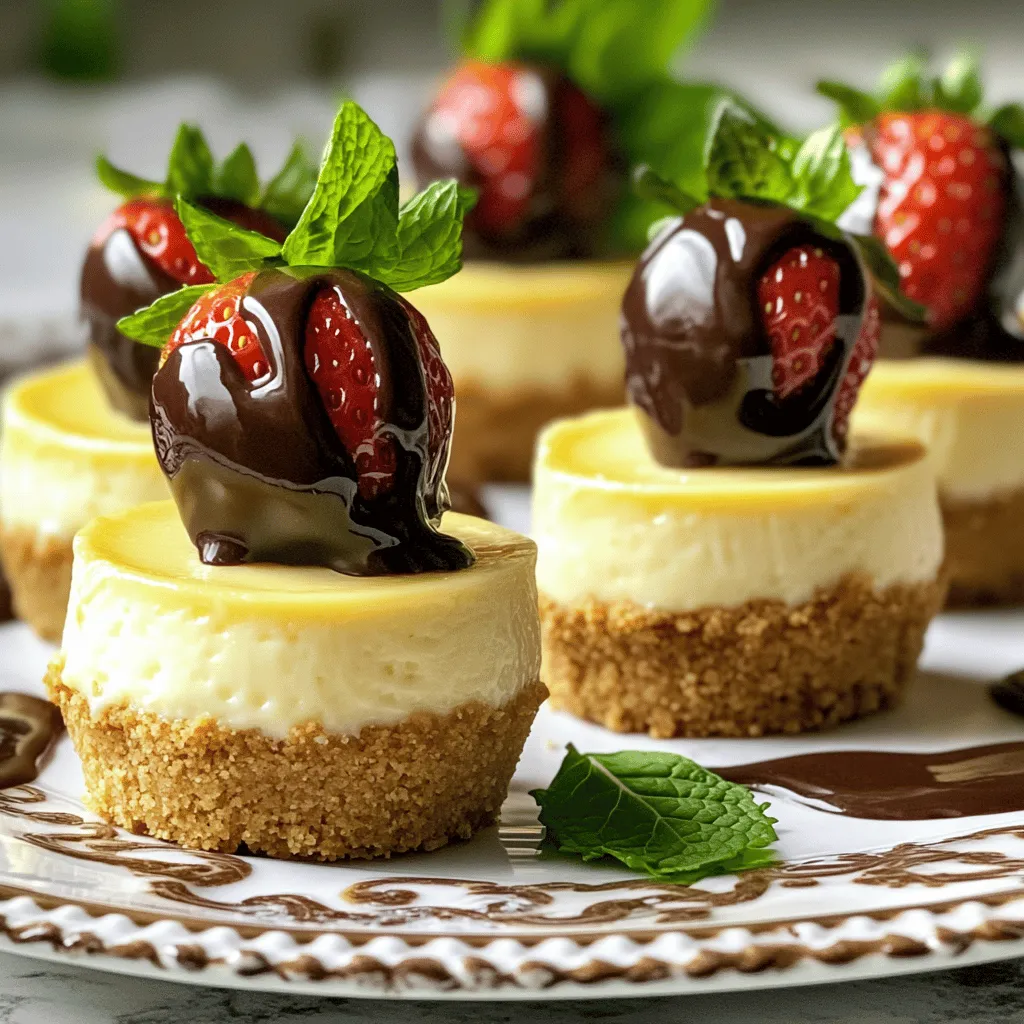
Mini Cheesecakes Topped with Chocolate Delightful Treat
Get ready to impress with these Mini Cheesecakes Topped with Chocolate Covered Strawberries! These little treats pack a big flavor punch. Perfect for parties or