Desserts
![- 1 cup all-purpose flour - 1 cup rolled oats - 1/2 teaspoon baking soda - 1/2 teaspoon ground cinnamon - 1/4 teaspoon salt - 1/2 cup unsalted butter, softened to room temperature - 1/2 cup packed brown sugar - 1/4 cup granulated sugar - 1 large egg - 2 tablespoons pure maple syrup - 1 teaspoon vanilla extract - 1/4 cup chopped pecans (optional) - 1/4 cup raisins (optional) Using fresh ingredients is key for great flavor. For the best taste, choose quality butter, pure maple syrup, and fresh eggs. If you want a gluten-free option, swap the all-purpose flour for a gluten-free blend. For a vegan twist, replace the egg with a flax egg and use vegan butter. This will change the texture slightly, but it still tastes good! Start by preheating your oven to 350°F (175°C). This helps the cookies bake evenly. Line a baking sheet with parchment paper. This keeps the cookies from sticking. In a medium bowl, mix the dry ingredients. Combine 1 cup of all-purpose flour, 1 cup of rolled oats, 1/2 teaspoon of baking soda, 1/2 teaspoon of ground cinnamon, and 1/4 teaspoon of salt. Whisk them well until they blend nicely. In a larger bowl, cream together 1/2 cup of softened unsalted butter, 1/2 cup of packed brown sugar, and 1/4 cup of granulated sugar. Use a hand mixer or whisk to beat until it’s light and fluffy. This step adds air to the mix, making the cookies soft. Next, add 1 large egg, 2 tablespoons of pure maple syrup, and 1 teaspoon of vanilla extract to the butter mixture. Mix well until everything is smooth and creamy. Now, gently add the dry mix to the wet mix. Stir just until combined. It’s okay if you see a few streaks of flour. Overmixing can lead to tough cookies. If you want, fold in 1/4 cup of chopped pecans and 1/4 cup of raisins. These add great texture and flavor. Scoop rounded balls of dough onto your baking sheet. Leave about 2 inches between each ball. This allows room for spreading. Flatten each ball slightly with a spoon or your fingers. Bake for 12-15 minutes. Watch for the edges to turn golden brown. The centers should still feel soft. This ensures they stay chewy. After baking, let the cookies cool on the baking sheet for about 5 minutes. This helps them set. Then, transfer them to a wire rack to cool completely. For serving, enjoy these cookies warm. A light dusting of powdered sugar makes them look pretty. You can drizzle some maple syrup on top for extra flavor. Pair them with coffee or cold milk for a perfect treat. For the complete recipe, check out the Full Recipe section above. To make your Chewy French Toast Cookies even better, add spices or extracts. Ground nutmeg or a hint of ginger can add warmth and depth. You can also try almond or maple extract for a unique twist. Always remember, do not overmix the dough. Mixing too much can make cookies tough. Stir just until the ingredients blend. A few flour streaks are okay; they will bake in nicely. For the best results, use quality kitchen tools. A heavy-duty mixing bowl helps you mix better. A good cookie scoop ensures even portions. Choose a sturdy cookie sheet and line it with parchment paper. This prevents sticking and helps cookies bake evenly. If you do not have parchment paper, you can grease the sheet lightly. Just make sure the cookies have room to spread while baking. {{image_4}} You can easily swap out some ingredients for your needs. If you want gluten-free cookies, use almond flour or gluten-free all-purpose flour instead of regular flour. For a nut-free version, skip the pecans or use sunflower seeds. If you have a sensitivity to oats, you can replace them with more flour or use ground flaxseed. Mix-ins can also change your cookies. Instead of raisins, try dried cranberries for a tart twist. You can add chocolate chips for a sweet kick or coconut flakes for a tropical flavor. These swaps keep the recipe fun and fresh! For a burst of flavor, add some orange or lemon zest to the dough. This brightens the taste and adds a nice aroma. You could also try different syrups. Swap maple syrup for honey or agave for a new flavor profile. Topping your cookies can be just as creative. A simple drizzle of icing made from powdered sugar and milk can add sweetness. If you want something richer, a cream cheese glaze works great too. Sprinkle some cinnamon sugar on top for an extra touch. These ideas make each batch unique and delicious! Be sure to check the [Full Recipe] for all the details to create your perfect chewy French toast cookies! To keep your Chewy French Toast Cookies fresh, store them in an airtight container. This method preserves their moisture and flavor. You can keep them at room temperature for up to five days. If you want them to last longer, refrigerate them. In the fridge, they will stay good for about two weeks. You can freeze both the dough and the baked cookies. To freeze the dough, scoop it into balls and place them on a baking sheet. Freeze until firm, then transfer to a freezer bag. The dough can last for up to three months. For baked cookies, let them cool completely. Then, layer them in an airtight container with parchment paper in between. They will stay fresh for about three months in the freezer. When you're ready to enjoy, thaw the dough overnight in the fridge. Bake them straight from the fridge for a warm treat. If you freeze baked cookies, heat them for a few minutes in the oven to restore their chewy texture. Enjoy your cookies just like they were fresh out of the oven! Chewy cookies get their texture from a few key factors. The right balance of ingredients plays a big role. Using more brown sugar than white sugar adds moisture and chewiness. Brown sugar has more moisture due to its molasses content. Also, adding an egg gives structure and a soft feel. When baking, the cookie dough should remain slightly undercooked in the center. This keeps the cookie soft and chewy. Yes, you can use different sweeteners in these cookies. Options include honey, agave syrup, or coconut sugar. Each sweetener will change the flavor a bit. For example, honey adds a floral note, while coconut sugar gives a caramel touch. Just remember that each sweetener has a different sweetness level. Adjust the amount to taste. If your cookies come out dry, don't worry. You can fix this in the dough. First, check the flour measurement; too much flour can cause dryness. You can also add a bit more butter or an extra egg. A splash of milk or cream works well too. If you realize your cookies are too dry after baking, enjoy them with a glass of milk. They will still taste great! For more details, refer to the [Full Recipe]. In summary, we covered key ingredients for delicious cookies, focusing on freshness and dietary options. I shared step-by-step instructions, from mixing the dough to baking, cooling, and serving. You learned tips to enhance flavor and texture, along with the best tools to use. We explored variations for dietary needs and creative toppings. Lastly, I provided storage tips to keep your cookies fresh. Enjoy experimenting and baking your perfect batch of cookies!](https://tossedflavors.com/wp-content/uploads/2025/05/f2e2acd3-f1a8-4cf0-a1ea-8f797742516c.webp)
Chewy French Toast Cookies Simple and Delicious Treat
If you love cookies and breakfast, you’re in for a delight with Chewy French Toast Cookies! These treats blend the warm flavors of cinnamon and
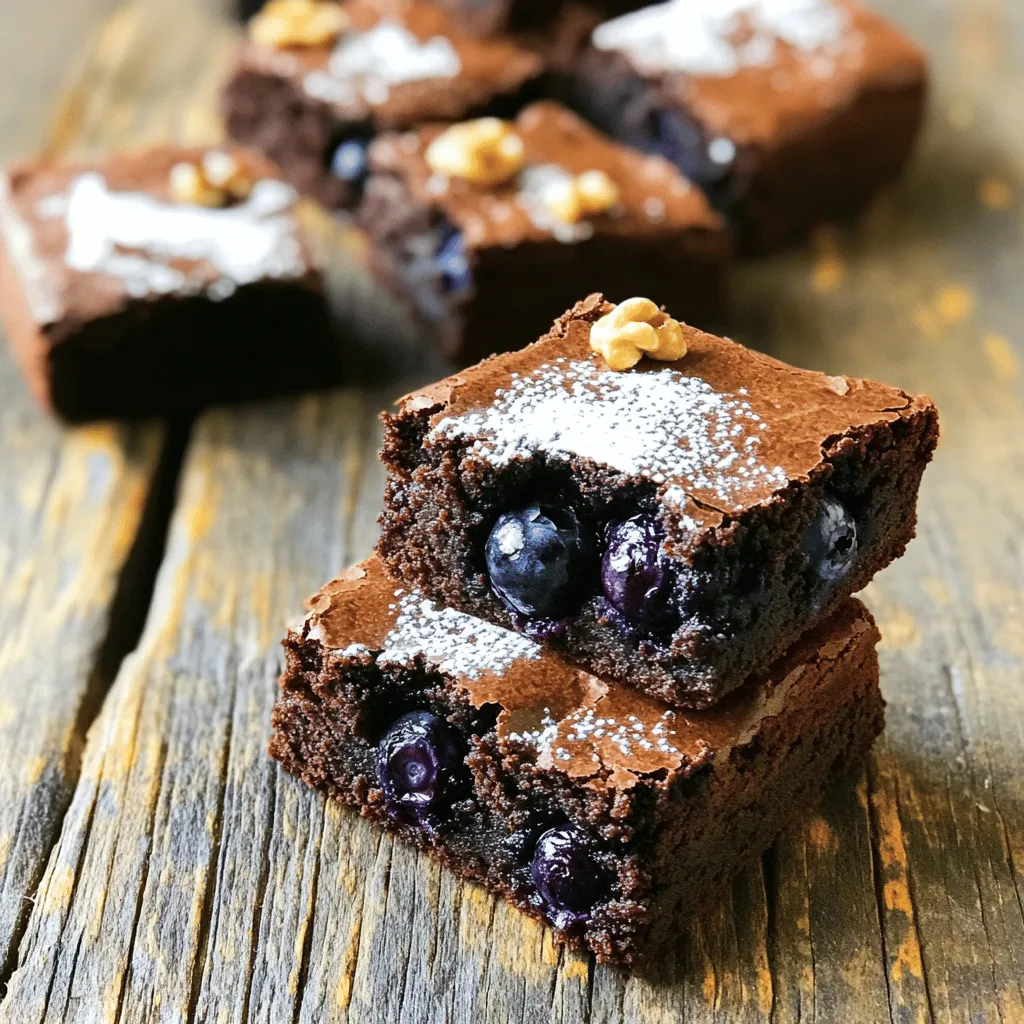
Fresh Blueberry Brownies Irresistibly Delicious Treat
Are you ready to try something deliciously new? These Fresh Blueberry Brownies are a tasty twist on the classic. Packed with juicy blueberries, they offer
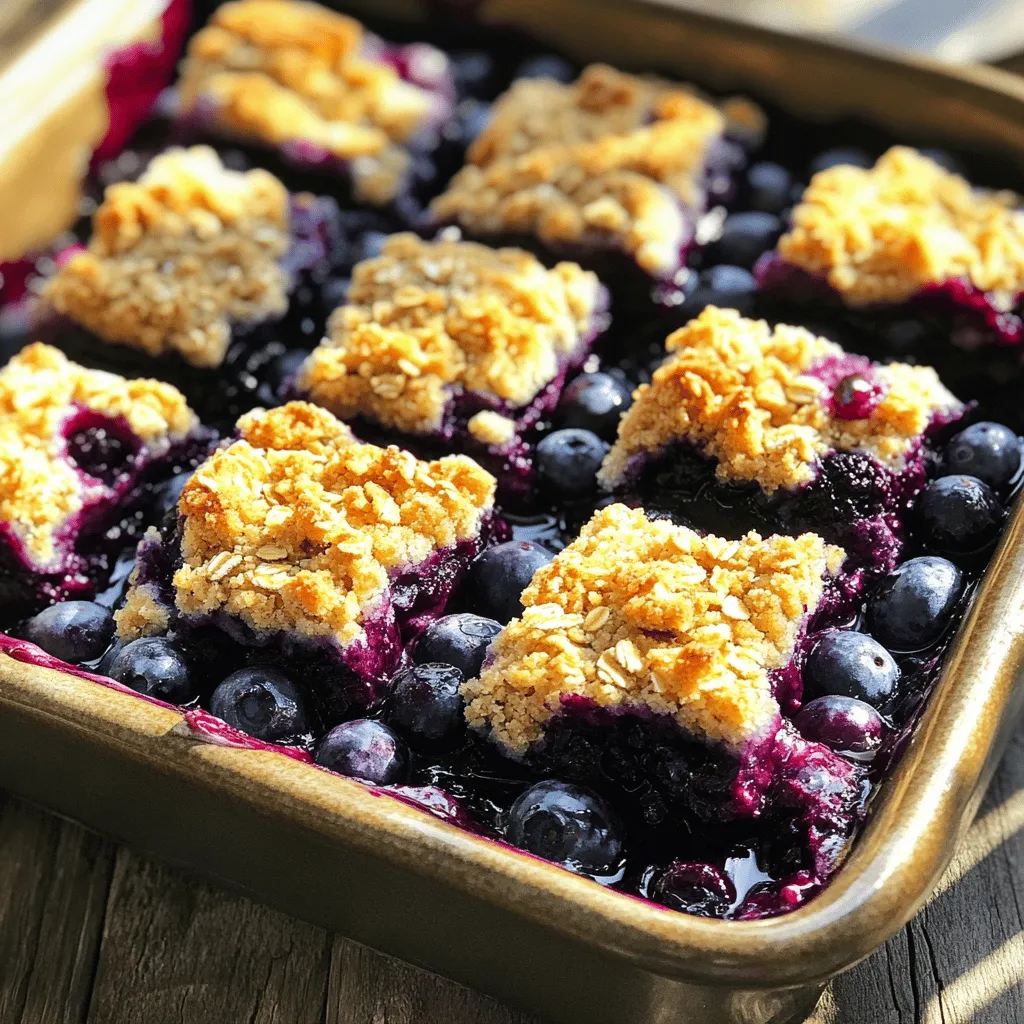
Easy Blueberry Pie Bars Simple and Tasty Dessert
Are you ready for a delicious treat that’s easy to make? These Easy Blueberry Pie Bars are the perfect simple dessert for any occasion. With
![- 1 ½ cups all-purpose flour - 2 teaspoons baking powder - ½ teaspoon salt - ½ cup unsalted butter, softened - 1 cup granulated sugar - 2 large eggs - 1 teaspoon vanilla extract - ½ cup milk - 1 ½ cups fresh blueberries (divided) - 1 cup heavy whipping cream - 2 tablespoons powdered sugar - Zest of 1 lemon - 1 teaspoon fresh lemon juice To make Nova Scotia Blueberry Cream Cake, gather these ingredients first. Each one plays a vital role in bringing this cake to life. The all-purpose flour forms the base. The baking powder helps it rise. Salt brings out the flavors. Softened butter adds richness. Granulated sugar sweetens the cake. Next, the eggs give structure and moisture. Vanilla extract adds warmth. Milk makes the batter smooth. Blueberries provide bursts of flavor. Heavy whipping cream will create the light frosting. Powdered sugar sweetens the cream, while lemon zest and juice brighten everything up. Using fresh blueberries is key. They give the cake a juicy pop. Make sure to divide the blueberries before baking. One cup goes into the batter, and the rest tops the cake. This makes each slice visually appealing and tasty. For the full recipe, follow the steps closely. Each ingredient matters. Remember, quality ingredients lead to better results. Enjoy the process and the delightful cake you'll create! 1. Preheat your oven to 350°F (175°C). This is key for even baking. 2. Grab a 9-inch round cake pan. Grease it lightly with butter and dust it with flour to stop sticking. 3. In a medium bowl, mix together the all-purpose flour, baking powder, and salt. Sifting helps with blending and aeration. 4. Set this dry mix aside for later. 1. In a large bowl, cream the softened butter and sugar. Use a hand mixer on medium speed for 3-5 minutes. Stop when it's light and fluffy. 2. Now, add two large eggs one at a time. Beat well after each egg. This makes the batter smooth. 3. Stir in 1 teaspoon of vanilla extract for that lovely flavor. 4. Gradually mix the dry ingredients into the wet mix. Do this in three parts, alternating with ½ cup of milk. Start and finish with dry ingredients. Be gentle; do not overmix! 1. Prepare 1 ½ cups of fresh blueberries. Toss 1 cup in a little flour to keep them from sinking. 2. Fold these floured blueberries into the batter. Be careful not to crush them. 3. Pour the batter into your prepared pan. Spread it evenly and sprinkle the remaining blueberries on top for extra fruitiness. 4. Bake for 30-35 minutes. A toothpick should come out clean when inserted into the center. 5. Let the cake cool in the pan for 10 minutes. Then, transfer it to a wire rack to cool fully. 6. While it cools, whip 1 cup of heavy cream in a different bowl. Mix until soft peaks form. 7. Gradually add 2 tablespoons of powdered sugar, lemon zest, and lemon juice. Whip until stiff peaks form. 8. Once the cake is cool, slice it in half horizontally. Spread half the whipped cream on the bottom layer. Place the top layer back on. 9. Cover the whole cake with the remaining whipped cream. Top it off with extra blueberries for a beautiful finish. Now, you have a lovely Nova Scotia Blueberry Cream Cake ready to enjoy! For more details, check the Full Recipe. To achieve the perfect cake texture, use room temperature ingredients. This helps them blend well. Always sift your dry ingredients. Sifting adds air and makes the cake light. Preventing blueberries from sinking is easy. Toss them in a little flour before adding them to the batter. This light coating helps them stay suspended while baking. Gently fold the floured blueberries into the batter to keep them whole. To achieve stiff peaks, start with cold heavy cream. Use a chilled bowl and beaters for the best results. Whip the cream on medium speed until it thickens. Gradually add powdered sugar for sweetness and flavor. For flavor variations, try adding lemon zest or vanilla extract to the cream. You can also mix in a bit of cocoa powder for a chocolate twist. Adjust the flavors to match your taste and the cake's fruity profile. For the full recipe, check [Full Recipe]. {{image_4}} You can make this Nova Scotia Blueberry Cream Cake even more exciting. Adding spices like cinnamon or nutmeg gives it a warm flavor. Just a pinch of cinnamon can make a big difference. You can also try nutmeg for a nutty taste. Substituting different fruits is another fun option. Consider using raspberries or strawberries instead of blueberries. They will add their own unique flair. Mix and match to find your favorite combination! If you need gluten-free options, you can use almond flour or a gluten-free blend. These flours work well in cakes. Just make sure the mix has a binding agent like xanthan gum. For those who prefer dairy-free cream, coconut cream is a great choice. It whips up nicely and has a rich taste. You can try other plant-based creams too. These options still give you a delicious, creamy topping without the dairy. Feel free to explore these variations. They let you customize the cake to fit your taste and dietary needs. For the full recipe, check out the details above! To keep your Nova Scotia blueberry cream cake fresh, store it in the fridge. Wrap the cake in plastic wrap or place it in an airtight container. This helps keep it moist and tasty. If you have leftover whipped cream, store it in a separate container. Want to save some for later? You can freeze the cake! Slice it first, then wrap each piece tightly in plastic wrap. Place the wrapped slices in a freezer bag. This way, you can enjoy it later. In the fridge, this cake lasts about 3 to 4 days. Check for signs of spoilage before enjoying. If the cake looks dry or has an off smell, it’s best to throw it away. When frozen, the cake can last up to 3 months. Just remember that freezing may change the texture a bit, but the flavor stays great! You can use frozen blueberries if fresh ones aren't available. Just thaw and drain them first. You can also try blackberries or raspberries for a different flavor. Keep in mind, these fruits may change the taste a bit. Yes, you can make this cake a day ahead. Just store it in the fridge, covered with plastic wrap. This will keep it fresh. You can add the whipped cream topping right before serving. This helps it look nice and taste great. Nova Scotia is known for its wild blueberries. The cake reflects the region's love for this fruit. The recipe combines local flavors with a creamy texture. It celebrates the harvest and brings a taste of the area to your table. To make the cake moister, try adding a bit more milk or oil. You can also use buttermilk instead of regular milk. Another option is to soak the cake layers with a simple syrup made of water and sugar. This will keep it soft and delicious. This blog post covers everything you need to make a delicious Nova Scotia Blueberry Cream Cake. We detailed the essential ingredients, step-by-step instructions, baking tips, and tasty variations. You can now create this cake with ease and even customize it to fit your needs. Remember to store leftovers properly, so they stay fresh. Enjoy the baking process and share this delightful cake with friends and family. Happy baking!](https://tossedflavors.com/wp-content/uploads/2025/05/b7486f4c-53fd-43c0-96de-1eee6cff258c.webp)
Nova Scotia Blueberry Cream Cake Delightful Recipe
Are you ready to treat your taste buds? Discover the magic of Nova Scotia Blueberry Cream Cake! This delightful recipe combines fresh blueberries with creamy
![When I bake my Blueberry Muffin Streusel Cake, I gather fresh and simple ingredients. Each one plays a key role in making this cake rich and tasty. Here’s what you need: - 2 cups all-purpose flour - 1 cup granulated sugar, divided into 1/2 cup and 1/2 cup - 1 teaspoon baking powder - 1 teaspoon baking soda - 1/2 teaspoon salt - 1/2 cup unsalted butter, softened to room temperature - 2 large eggs - 1 cup sour cream - 1 teaspoon pure vanilla extract - 2 cups fresh blueberries, rinsed and dried - 1 cup packed brown sugar - 1 teaspoon ground cinnamon - 1/2 cup rolled oats Using fresh blueberries makes the cake juicy and flavorful. The streusel topping adds a crunch that everyone loves. The balance of sweet and tangy is just perfect. You can find the full recipe to make this delicious cake. It’s a great way to enjoy baking at home! Set your oven to 350°F (175°C). It is key for baking. While it warms up, prepare your baking pan. Generously grease a 9x13 inch pan with non-stick spray or butter. This helps the cake come out easily. In a large bowl, combine 2 cups of all-purpose flour, 1/2 cup of granulated sugar, 1 teaspoon of baking powder, 1 teaspoon of baking soda, and 1/2 teaspoon of salt. Whisk this mix well. No lumps should remain. This step is vital for a fluffy cake. In a separate bowl, use an electric mixer to beat 1/2 cup of softened butter with the other 1/2 cup of granulated sugar. Mix it on medium speed. Continue until the mixture is light in color and fluffy, which takes about 2-3 minutes. This adds air to your batter. Add 2 large eggs one at a time to the butter mix. Mix well after each addition. Then stir in 1 cup of sour cream and 1 teaspoon of pure vanilla extract. Keep mixing until the batter is smooth. This will enrich the flavor. Slowly add the dry ingredients to the wet mix. Stir gently with a spatula or wooden spoon. Mix just until combined; do not overmix. This keeps the cake from becoming tough and ensures the right texture. Gently fold in 2 cups of fresh blueberries using a spatula. Be careful not to crush them. This helps to keep their shape and burst of flavor intact in the cake. In a small bowl, combine 1 cup of packed brown sugar, 1 teaspoon of ground cinnamon, and 1/2 cup of rolled oats. Mix in melted butter until crumbly. This topping adds a sweet crunch to your cake. Pour the batter into the greased pan, spreading it evenly. Evenly sprinkle the streusel topping over the cake batter. This creates that perfect crumbly finish. Bake the cake for 40-45 minutes. It is done when a toothpick inserted in the center comes out clean or with a few moist crumbs. Once baked, remove the cake from the oven. Let it cool in the pan for 10 minutes. Then, carefully transfer it to a wire rack to cool completely. For presentation, slice the cake into squares and arrange them on a pretty platter. Optionally, dust the top with powdered sugar and add fresh blueberries on the side. Enjoy your delicious Blueberry Muffin Streusel Cake! For the complete recipe, check the [Full Recipe]. - Avoiding overmixing: Mix your batter just until the dry and wet ingredients blend. Overmixing makes the cake tough. Stir gently and stop when you see no dry flour. - Choosing the right baking pan: Use a 9x13 inch pan for this recipe. A glass or metal pan works well. Grease it properly to ensure easy removal. - Suggestions for flavor add-ins: Try adding lemon zest or almond extract for a twist. These flavors brighten the cake and complement the blueberries. - Substituting ingredients: For a lighter cake, swap half the sour cream for Greek yogurt. You can also use whole wheat flour for a healthier option. - How to use a toothpick: Insert a toothpick in the center of the cake. If it comes out clean or has a few moist crumbs, your cake is done. - Signs that the cake is ready: Look for a golden top and a springy texture. The edges should pull away slightly from the pan. {{image_4}} You can switch up the flavors in your Blueberry Muffin Streusel Cake. Using other fruits adds a fun twist. Try raspberries, strawberries, or even peaches. These fruits bring their own unique taste and color. You can also add nuts for crunch. Walnuts or pecans work well. If you want a sweeter cake, toss in some chocolate chips. They melt and create gooey pockets of goodness. If you need gluten-free options, use a gluten-free flour blend. This swap keeps the cake moist and tasty. For a dairy-free version, try almond milk or coconut yogurt. Both can replace sour cream without losing flavor. Make sure to check labels for any hidden dairy in other ingredients. Seasons change, and so can your cake! Use fresh, seasonal fruits for a new taste. In summer, try juicy blackberries or cherries. In fall, consider apples or pumpkin spice for a cozy vibe. Holiday-themed variations are also fun. For Christmas, add cinnamon or nutmeg for warmth. You can even decorate with festive sprinkles or edible glitter. These ideas make your Blueberry Muffin Streusel Cake a year-round delight. For the full recipe, check out the [Full Recipe]. To keep your Blueberry Muffin Streusel Cake fresh, use an airtight container. Place the cooled cake in the container and seal it well. This helps prevent it from drying out. Store it at room temperature for up to three days. If you want to keep it longer, refrigeration is a good option. In the fridge, the cake lasts about a week. Make sure you cover it well to avoid any fridge odors. If you want to freeze your cake, slice it first. Wrap each slice tightly in plastic wrap. Then, place the wrapped slices in a freezer bag. Remove as much air as possible to prevent freezer burn. The cake can stay good in the freezer for up to three months. When you're ready to enjoy a slice, take it out of the freezer. Leave it at room temperature for about one hour to thaw. You can also thaw it in the fridge overnight for a slower, even thaw. Enjoy your delicious Blueberry Muffin Streusel Cake anytime! For the full recipe, check the recipe section above. Yes, you can use frozen blueberries. They work well in this cake. Keep in mind, frozen blueberries may release more juice. This can make the cake a bit wetter. To help with this, toss the frozen blueberries in some flour before adding them to the batter. This can help them hold their shape. The cake lasts about 3 to 4 days at room temperature. If you store it in the fridge, it can last up to a week. Make sure to cover it well to keep it fresh. You can use plastic wrap or an airtight container. Yes, you can make this cake ahead of time. I recommend storing it in the fridge. Wrap it well to keep it moist. When you are ready to serve, let it sit at room temperature. You can also warm it in the oven for a few minutes for a fresh taste. This cake pairs nicely with coffee or tea. You can also serve it with a scoop of vanilla ice cream. For a fruity twist, try it with fresh whipped cream or yogurt. Adding a side of fresh fruit can also enhance your experience. Yes, you can adjust the sugar. To lower the sugar, cut the granulated sugar by 1/4 cup. You may also add a bit of cinnamon for extra sweetness without sugar. This keeps the flavor great while reducing the sweet taste. You can try different toppings for fun. A cream cheese frosting adds a rich flavor. You can also use a simple glaze made of powdered sugar and milk. For a crunchy twist, consider adding chopped nuts or coconut flakes. This blog post covered everything from ingredients to baking tips for Blueberry Muffin Streusel Cake. You learned how to mix, bake, and even store your cake. Remember, choosing the right fruits or flavors can make a big difference. Don’t hesitate to try variations; they can add a fun twist. With these simple steps and tips, you can bake a delicious cake. Enjoy the process, and share your creations with others. Happy baking!](https://tossedflavors.com/wp-content/uploads/2025/05/b87d0a4c-d321-477b-8a7c-0658a8b5fd23.webp)
Blueberry Muffin Streusel Cake Delightful and Easy Recipe
Get ready for a treat! This Blueberry Muffin Streusel Cake is easy and delicious. Perfect for breakfast or dessert, it combines soft cake with sweet
![To make the perfect Blueberry Gooey Butter Cake, gather these simple ingredients: - 1 box of yellow cake mix - 1/2 cup unsalted butter, melted - 1 large egg - 8 oz cream cheese, softened to room temperature - 2 large eggs, at room temperature - 4 cups powdered sugar - 1 teaspoon vanilla extract - 2 cups fresh blueberries (or frozen blueberries, thawed and drained) - A pinch of salt Each ingredient has a role. The yellow cake mix provides a sweet base. The melted butter adds richness, while the eggs help bind everything. Cream cheese makes the filling creamy and smooth. Blueberries add a burst of flavor. You can use fresh or frozen, but make sure to drain frozen ones. Powdered sugar gives sweetness and helps with that gooey texture. Vanilla extract brings warmth, and the salt balances the sweetness. This combination creates a treat that is not only tasty but also comforting. Ready to bake? Check the full recipe for step-by-step instructions! Start by preheating your oven to 350°F (175°C). Grease a 9x13 inch baking pan well with butter or non-stick spray. This step helps the cake come out easily later. In a medium bowl, mix the yellow cake mix, melted butter, and 1 large egg. Stir with a spatula until smooth and fully blended. Then, press this mixture into the bottom of the greased pan. Use your fingers or the back of a measuring cup to create an even layer. In a large bowl, beat the softened cream cheese until it is creamy and smooth. Add the other 2 large eggs one at a time, mixing well after each addition. Gradually add the powdered sugar, vanilla extract, and a pinch of salt. Mix until everything is velvety and well combined. Gently fold in the fresh blueberries using a spatula. Be careful not to squish them. You want to spread them evenly throughout the cream cheese mixture. Pour the cream cheese and blueberry mix over the crust in the baking pan. Use a spatula to spread it out evenly. Make sure it covers the crust completely. Place the pan in the preheated oven and bake for 40-45 minutes. Watch it closely; the edges should turn a golden brown while the center stays soft and gooey. Insert a toothpick in the center; it may come out slightly wet but should not be too runny. After baking, remove the pan from the oven. Let the cake cool in the pan for at least 30 minutes. Once cooled, cut it into squares. For a lovely finish, dust the top with powdered sugar before serving. This adds sweetness and a nice look. Serve these squares on a decorative platter. You can add fresh blueberries and a mint sprig for color. Enjoy them with a scoop of vanilla ice cream for a special treat! For the full recipe, check the earlier section. To achieve the right gooey consistency in your Blueberry Gooey Butter Cake, focus on the baking time. Bake the cake until the edges turn golden brown, while the center remains soft. It’s okay if a toothpick comes out slightly wet; this means you nailed the gooeyness. If the cake cooks too long, it will become dry and lose its signature texture. You can boost the flavor of your cake with some simple additions. Consider adding a teaspoon of lemon zest for a bright twist. Almond extract can add a nice depth, too. For toppings, try fresh whipped cream or a scoop of vanilla ice cream. You can also sprinkle some powdered sugar on top for a beautiful finish. Maintaining moisture is key to a great Blueberry Gooey Butter Cake. Ensure you don’t over-bake it; check it a few minutes early. Lowering the oven temperature by 25°F can help if you have a hot oven. Always use room temperature ingredients, as they blend better and create a smoother batter. If you follow these tips, your cake will be moist and delicious every time. For the complete recipe, check out [Full Recipe]. {{image_4}} You can switch out blueberries for other fruits. Raspberries or blackberries work great! They add a fun twist to the cake. If you like strawberries, chop them up, and mix them in. Each fruit brings a unique flavor and color. Just remember to keep the amount the same. This keeps the cake gooey and delicious. If you need a gluten-free version, use gluten-free cake mix. This simple swap makes the dessert safe for all. Check the package for the right amount of liquid. You might need to adjust it. Follow the same steps as the original recipe. The cake will still be soft and gooey, just as it should be! Want to add more flavor? Think about mixing in some nuts or chocolate chips! Chopped pecans or walnuts add crunch. If you prefer chocolate, use semi-sweet or dark chips. This gives the cake a rich touch. Just fold in the add-ins gently to keep the gooey texture. Your friends will love the surprise in every bite! For the complete recipe, check the Full Recipe. To keep your Blueberry Gooey Butter Cake fresh, you need to cool it first. Let it sit at room temperature for about 30 minutes after baking. Once it cools, cover it with plastic wrap or foil. This helps keep it moist and prevents it from drying out. You can also place it in an airtight container. If you want to save some cake for later, freezing is a great option. First, let the cake cool completely. Next, cut it into squares. Wrap each piece tightly in plastic wrap. Then, place the wrapped pieces in a freezer bag. Seal the bag to keep out air. When you’re ready to enjoy it, take out a piece and let it thaw in the fridge overnight. When stored correctly, the cake lasts about 4 to 5 days in the fridge. If you freeze it, it can stay fresh for up to 3 months. Just remember, the sooner you eat it, the better it will taste! Yes, you can use frozen blueberries. Just thaw them first. Make sure to drain any excess water. This helps keep the cake from getting too wet. Frozen blueberries may not be as firm as fresh ones, but they still taste great. If you don’t have cream cheese, you can use mascarpone. It gives a similar creamy texture. Greek yogurt is another good choice. Just know that it may change the flavor a bit. Look for a golden edge on the cake. The center should be soft but not runny. You can gently shake the pan; if it jiggles slightly, it’s done. The cake will firm up as it cools. Yes, you can double the recipe for larger servings. Use a larger pan, like a 15x10 inch. Keep an eye on the baking time. It may take longer to bake through. Serve it warm with vanilla ice cream. Fresh whipped cream also works well. Add a sprinkle of cinnamon for extra flavor. You can also top it with more blueberries for a fresh touch. This cake started in the St. Louis area. It is a twist on the classic gooey butter cake. People love it for its rich flavor and easy prep. It has become a favorite dessert across the U.S. For the full recipe, check out the earlier section! You now have a quick and easy recipe for Blueberry Gooey Butter Cake. We covered the necessary ingredients, detailed steps, and helpful tips to perfect your bake. You can easily customize it with different fruits or make it gluten-free. Store leftovers properly to enjoy it longer. This cake is rich, gooey, and perfect for any occasion. Try it out, share it with friends, and enjoy every bite!](https://tossedflavors.com/wp-content/uploads/2025/05/eb9c1be9-3344-480a-89d0-fce632e5cf38.webp)
Blueberry Gooey Butter Cake Delicious Dessert Delight
Are you ready to indulge in a dessert that combines ease and flavor? Blueberry Gooey Butter Cake is your new go-to! With a buttery crust
![To make Violet’s Blueberry Pie Cake, you will need: - 2 cups fresh blueberries - 1 cup granulated sugar, divided - 1 tablespoon fresh lemon juice - 2 cups all-purpose flour - 1 tablespoon baking powder - ½ teaspoon fine sea salt - ½ cup unsalted butter, softened to room temperature - 3 large eggs - 1 teaspoon pure vanilla extract - 1 cup whole milk - ½ teaspoon ground cinnamon - 1 cup blueberry jam (for filling) - Powdered sugar (for dusting) If you lack an ingredient, don't worry! You can swap items with ease: - Use frozen blueberries if fresh ones are not available. - Substitute coconut sugar for granulated sugar for a richer taste. - Replace lemon juice with lime juice for a different twist. - Try almond flour instead of all-purpose flour for a gluten-free option. - Use olive oil instead of butter for a dairy-free cake. - Replace eggs with applesauce (1/4 cup per egg) for a vegan version. Choosing the best blueberries makes a big difference! Here are some tips: - Look for firm and plump berries. They should be smooth and shiny. - Check the color; they should be deep blue with a slight white bloom. - Avoid any berries that are shriveled or have green spots. - Smell them! Fresh blueberries have a sweet, fruity scent. - Buy organic if you can to avoid pesticides. These tips help you find the freshest blueberries for your cake! Try using the Full Recipe for easy cooking. Enjoy baking! First, gather your ingredients. This includes fresh blueberries, sugar, butter, and eggs. Preheat your oven to 350°F (175°C). Grease two 9-inch round cake pans with butter. Dust them with flour or use parchment paper. Next, toss the blueberries with 2 tablespoons of sugar and lemon juice. Let them sit for about 10 minutes. This step makes the blueberries taste even better. In a large bowl, mix flour, baking powder, salt, and cinnamon. In another bowl, cream softened butter with ¾ cup sugar. Use an electric mixer for about 3-5 minutes. The mix should look light and fluffy. Add eggs one at a time, mixing well after each. Then, stir in vanilla extract. Gradually add the flour mix and whole milk, alternating between the two. Start and end with flour. Stir until just combined, being careful not to overmix. Finally, fold in the marinated blueberries gently. Now, pour the batter into the prepared cake pans. Make sure to smooth the tops with a spatula. Bake the cakes for 25-30 minutes. They are done when a toothpick inserted in the center comes out clean. Once baked, take the cakes out of the oven. Let them cool in the pans for 10 minutes. Then move them to wire racks to cool completely. This step is key for a moist cake. When the cakes are cool, place one layer on a serving platter. Spread blueberry jam evenly on top. This jam adds a delicious layer of flavor. Carefully set the second layer on top. Gently press down to secure the layers together. For the final touch, dust powdered sugar over the top. You can also add fresh blueberries and mint to make it look pretty. Enjoy this delightful cake that combines the best of pie and cake! For the full recipe, check the recipe section. To achieve the best texture, use room temperature ingredients. This helps the butter mix well with sugar, creating air pockets that make your cake light. Be careful not to overmix the batter. Stir until just combined for a fluffy cake. Let your cake cool completely before frosting. This helps the icing stay firm and not melt. You can add zest from one lemon to brighten the flavor. This pairs well with the blueberries. If you want a spice kick, add a pinch of nutmeg. You could also mix in other fruits like raspberries or blackberries. For a fun twist, try adding a splash of almond extract. This gives a unique taste that blends well with the blueberries. One common mistake is using cold eggs and butter. Cold ingredients can lead to a dense cake. Avoid opening the oven door too soon while baking. This can cause your cake to sink. Lastly, don't skip the marinating step for the blueberries. This brings out their sweetness and makes the cake more delicious. For the full recipe, check out the details above. {{image_4}} You can add bright lemon zest to your cake for extra flavor. Simply mix 1 tablespoon of fresh lemon zest into the batter. This adds a lovely citrus note that pairs well with blueberries. The zest makes each bite pop with freshness. If you want a gluten-free cake, swap the all-purpose flour for a gluten-free blend. Make sure the blend you choose has a good texture for baking. You can also add a bit of xanthan gum for better structure. This way, everyone can enjoy this tasty treat without worry. You can play with the fillings and frostings to change the taste. Instead of blueberry jam, try raspberry jam or lemon curd. If you want a different frosting, cream cheese or whipped cream works great. Each option gives a new twist to the classic cake, keeping it exciting. For the complete recipe, check out the [Full Recipe]. To keep your leftover cake fresh, store it in an airtight container. Make sure to place it at room temperature if you plan to eat it within a few days. If you need to keep it longer, refrigeration is a good option. Just remember to cover it with plastic wrap or foil to avoid drying it out. Freezing is a great way to save extra slices of Violet’s Blueberry Pie Cake. First, let the cake cool completely. Then, slice it into portions. Wrap each piece tightly in plastic wrap. After that, place the wrapped slices in a freezer bag. Be sure to label the bag with the date. The cake will keep well for up to three months in the freezer. To enjoy your frozen cake, remove a slice from the freezer and let it thaw in the fridge overnight. If you want it warm, place the slice in the microwave for about 10-15 seconds. For a lovely finish, dust with powdered sugar before serving. You can also add a dollop of whipped cream or a scoop of ice cream to bring out the blueberry flavor even more. Yes, you can use frozen blueberries. Just remember to thaw them first. Drain any excess juice to avoid a soggy cake. Frozen berries work well, but they may be softer than fresh ones. You can use applesauce or mashed bananas as egg substitutes. Use 1/4 cup of either for each egg. Flaxseed meal mixed with water is another good option. Mix 1 tablespoon of flaxseed meal with 2.5 tablespoons of water per egg. To check if the cake is done, insert a toothpick into the center. If it comes out clean or with a few crumbs, the cake is ready. The edges should also pull away from the pan slightly. If it’s not done, bake for a few more minutes. This blog covered making Violet’s Blueberry Pie Cake. You learned what ingredients to use and how to select fresh blueberries. I shared steps for preparing, baking, and assembling the cake. You found tips for perfect texture and common mistakes to avoid. Don't forget the tasty variations and best storage methods. Enjoy experimenting with flavors like lemon or gluten-free options. Making this cake can be fun and rewarding! I hope you feel ready to create your own delicious dessert.](https://tossedflavors.com/wp-content/uploads/2025/05/cae62ff8-f429-4c26-8918-9813e8d0090b.webp)
Violet’s Blueberry Pie Cake Delicious Dessert Recipe
Ready to impress your friends and family with a fantastic dessert? Violet’s Blueberry Pie Cake combines the sweetness of fresh blueberries with a moist, fluffy
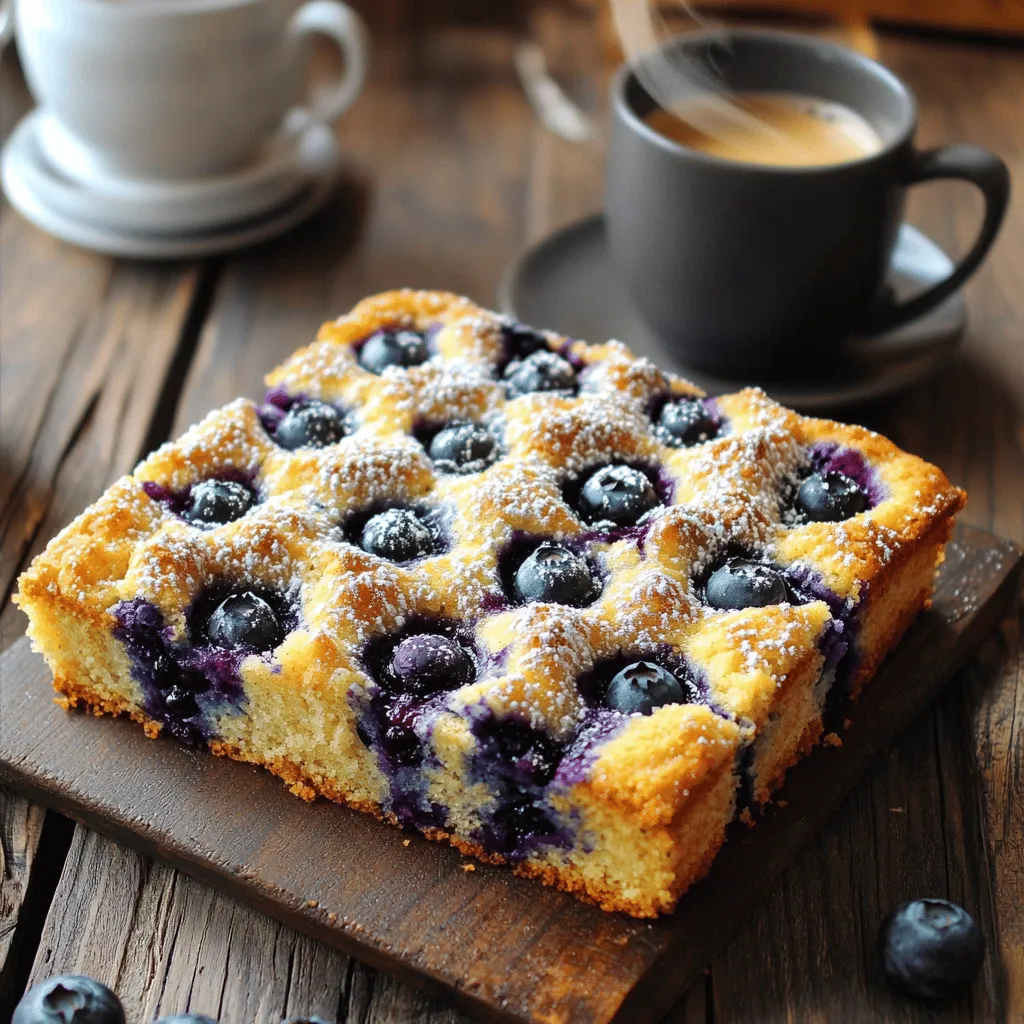
Blueberry Buckle Coffee Cake Easy and Delicious Recipe
Are you ready to bake something delicious? Let me show you how to make a Blueberry Buckle Coffee Cake that’s both easy and tasty. With
. It has all the steps and tips to make this delightful lemon loaf. You learned how to make a fantastic Starbucks Copycat Lemon Loaf. We covered key ingredients, tips for the perfect bake, and fun variations. Remember to store it well to keep the taste fresh. Use the tips to adjust for diets or try different flavors. With these steps, you'll bake a delicious loaf every time. Enjoy your baking journey, and share your tasty results with friends. Happy baking!](https://tossedflavors.com/wp-content/uploads/2025/05/75d20b96-79b1-49bd-b9c6-369d7a24f985.webp)
Starbucks Copycat Lemon Loaf Delightful Fresh Slice
If you love the bright, zesty flavor of Starbucks’ Lemon Loaf, you’re in for a treat! In this post, I’ll share how to recreate that
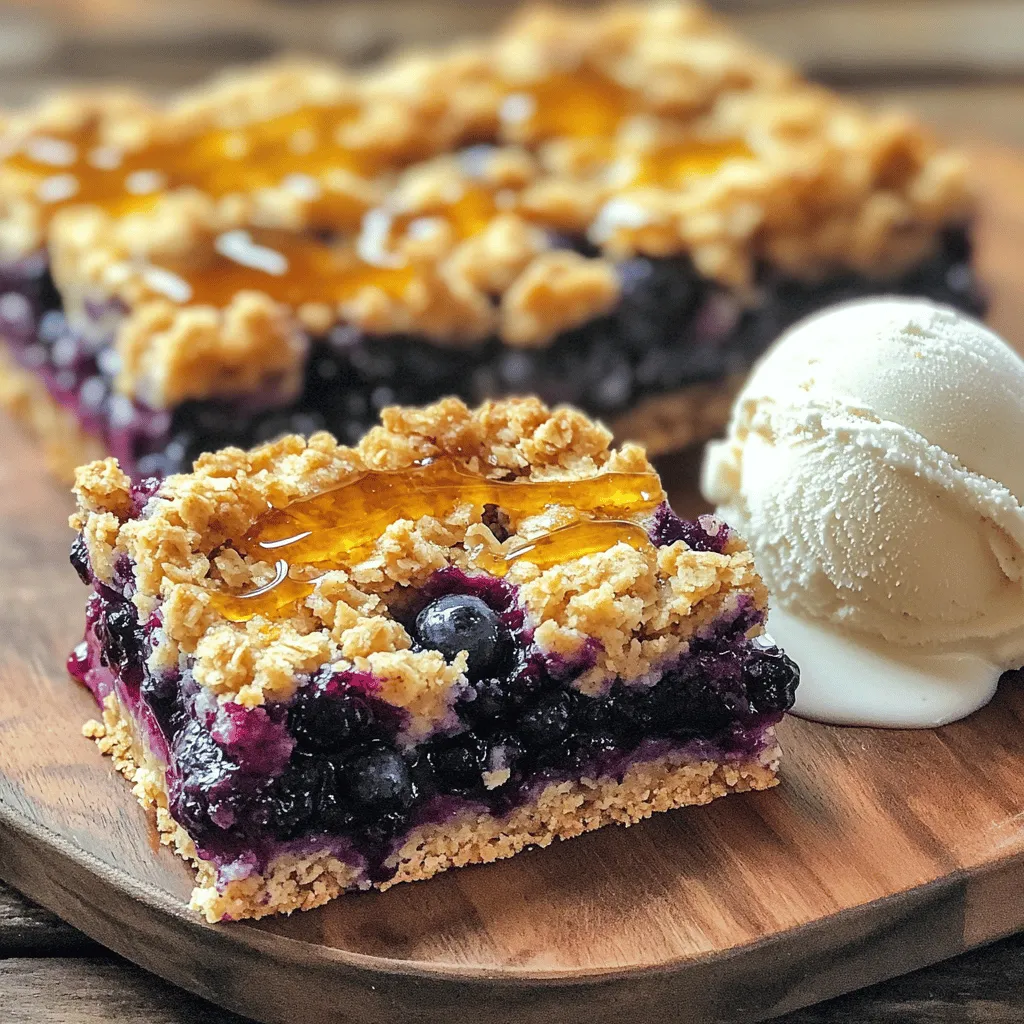
Blueberry Oatmeal Crumble Bars Simple and Delicious
If you love a sweet and healthy treat, you’re in for a delight! My Blueberry Oatmeal Crumble Bars are simple to make and oh-so-delicious. With