Desserts

Fruit Salsa with Cinnamon Sugar Tortilla Chips Delight
Get ready to elevate your snack game with my simple recipe for Fruit Salsa with Cinnamon Sugar Tortilla Chips! This sweet, tangy salsa made from
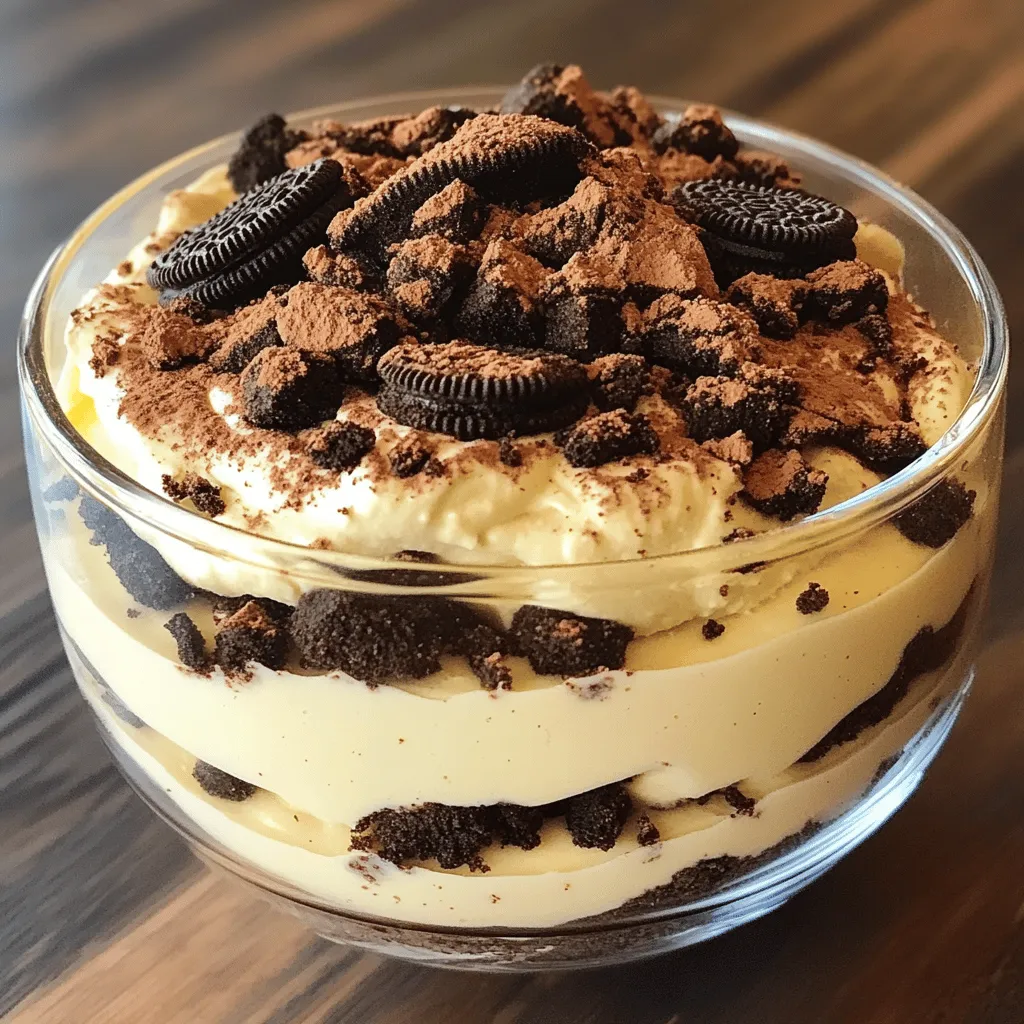
Protein Oreo Fluff Dessert Creamy and Delectable Treat
If you’ve been searching for a delicious yet healthy treat, look no further! This Protein Oreo Fluff Dessert combines creamy yogurt, protein powder, and crunchy
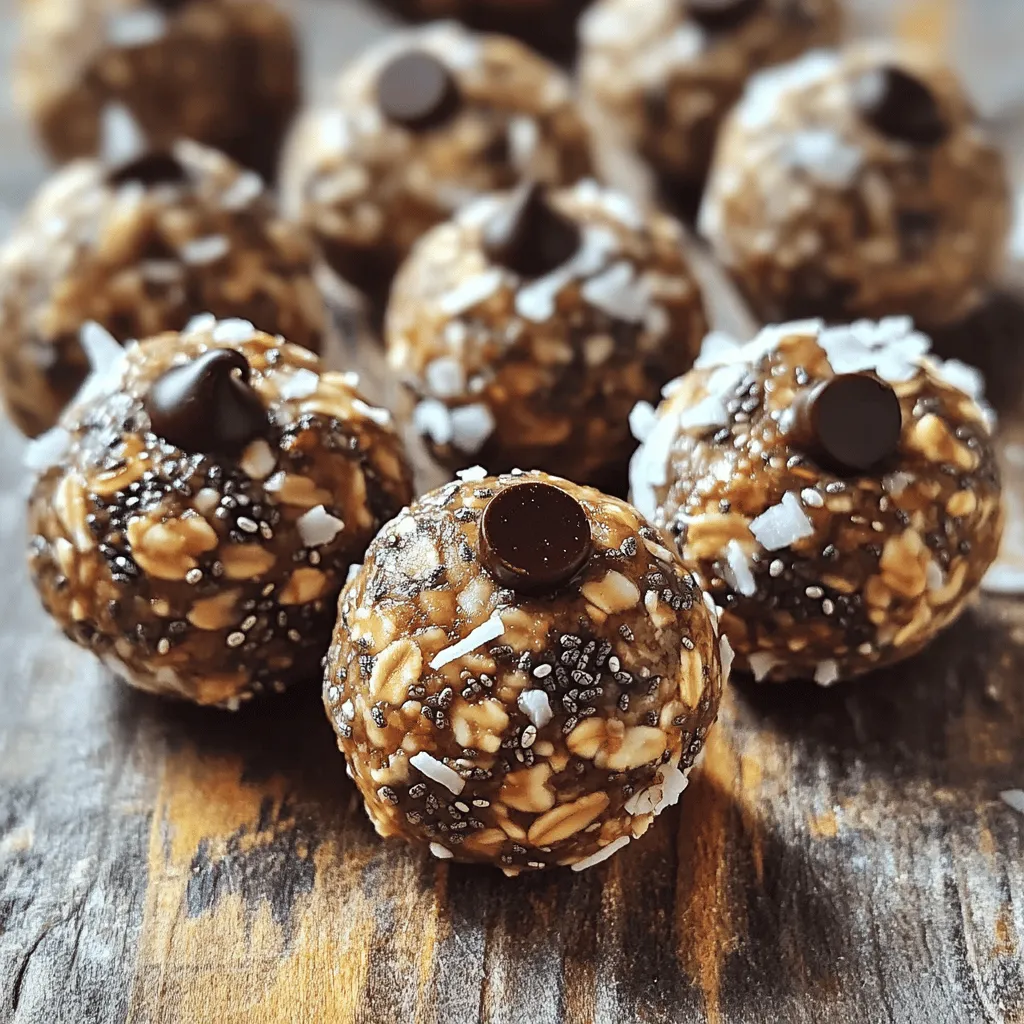
No-Bake Energy Balls Easy and Nutrient-Packed Treat
Are you looking for a quick and easy treat packed with energy? No-bake energy balls are the perfect solution! These fun snacks are not only
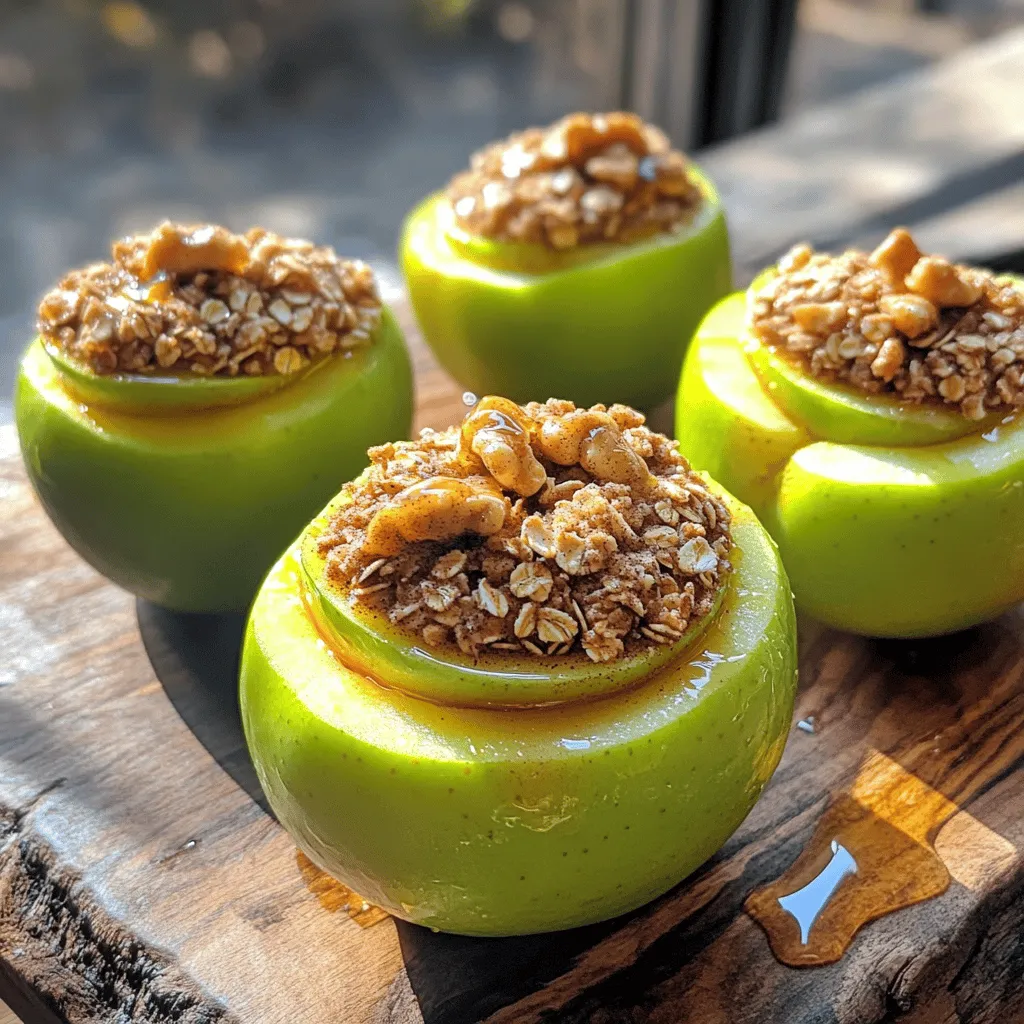
Air Fryer Apples Flavorful and Easy Dessert Recipe
Craving a sweet treat that’s both simple and delicious? Look no further! In this post, I’ll show you how to make scrumptious Air Fryer Apples,
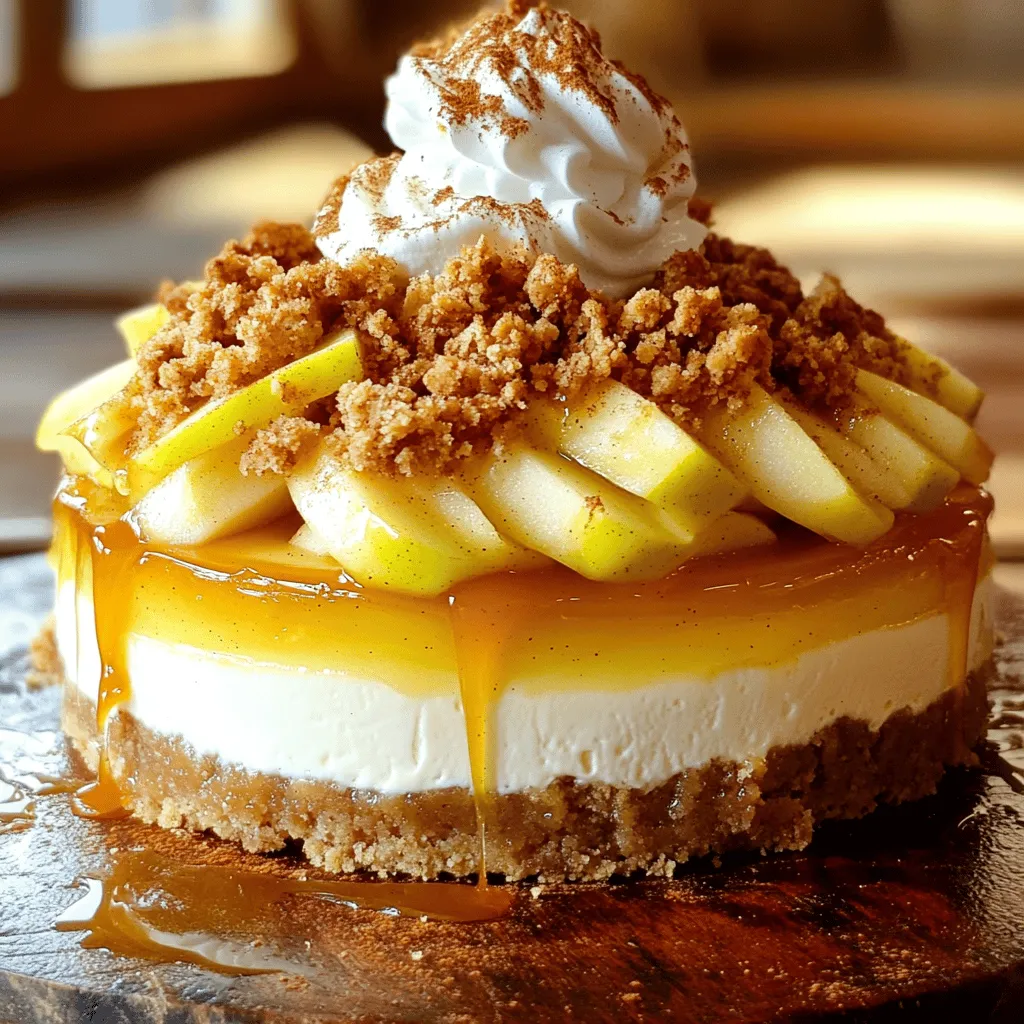
Apple Crumble Cheesecake Delightful and Easy Recipe
Are you ready to indulge in a dessert that marries creamy cheesecake with warm, spiced apples? This Apple Crumble Cheesecake is a delightful blend of
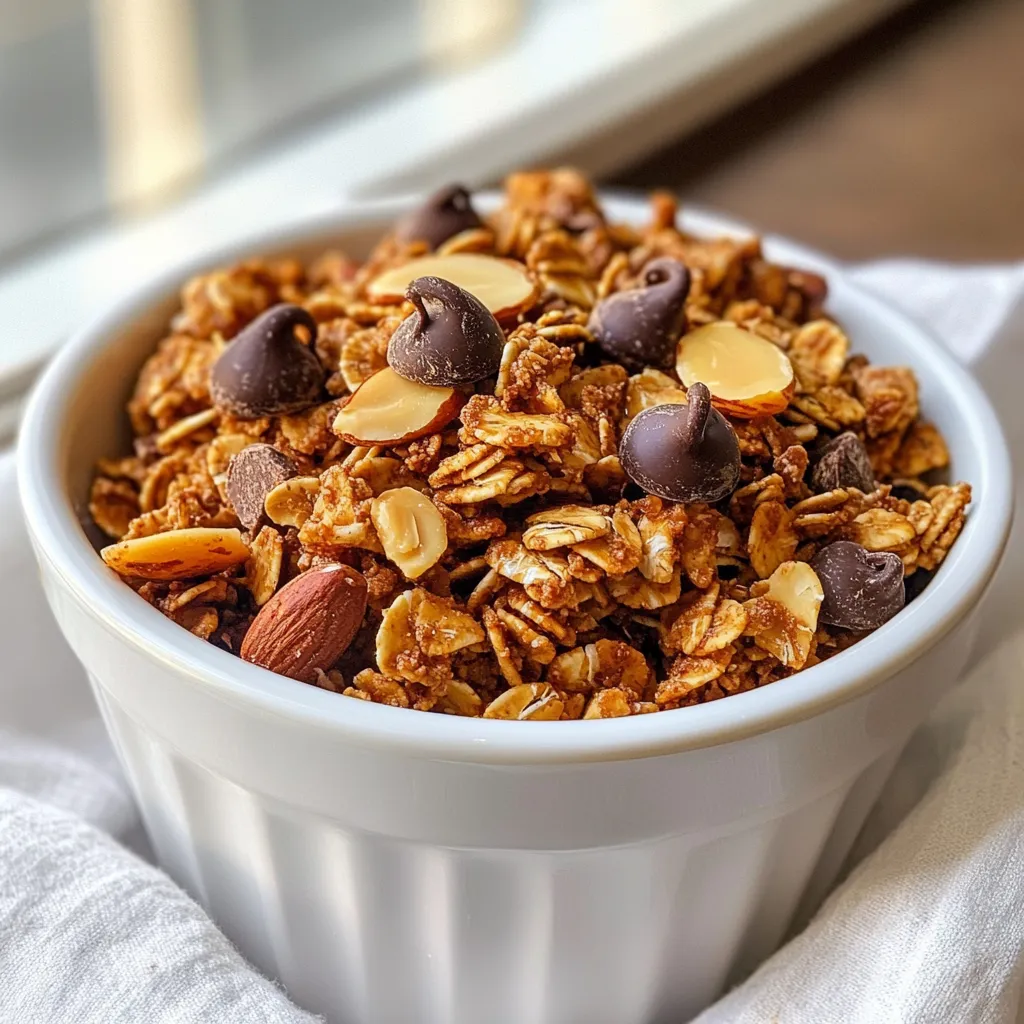
Peanut Butter Chocolate Granola Crunchy and Tasty Snack
Craving a snack that’s both crunchy and tasty? Let me introduce you to the joy of Peanut Butter Chocolate Granola! This simple recipe is packed
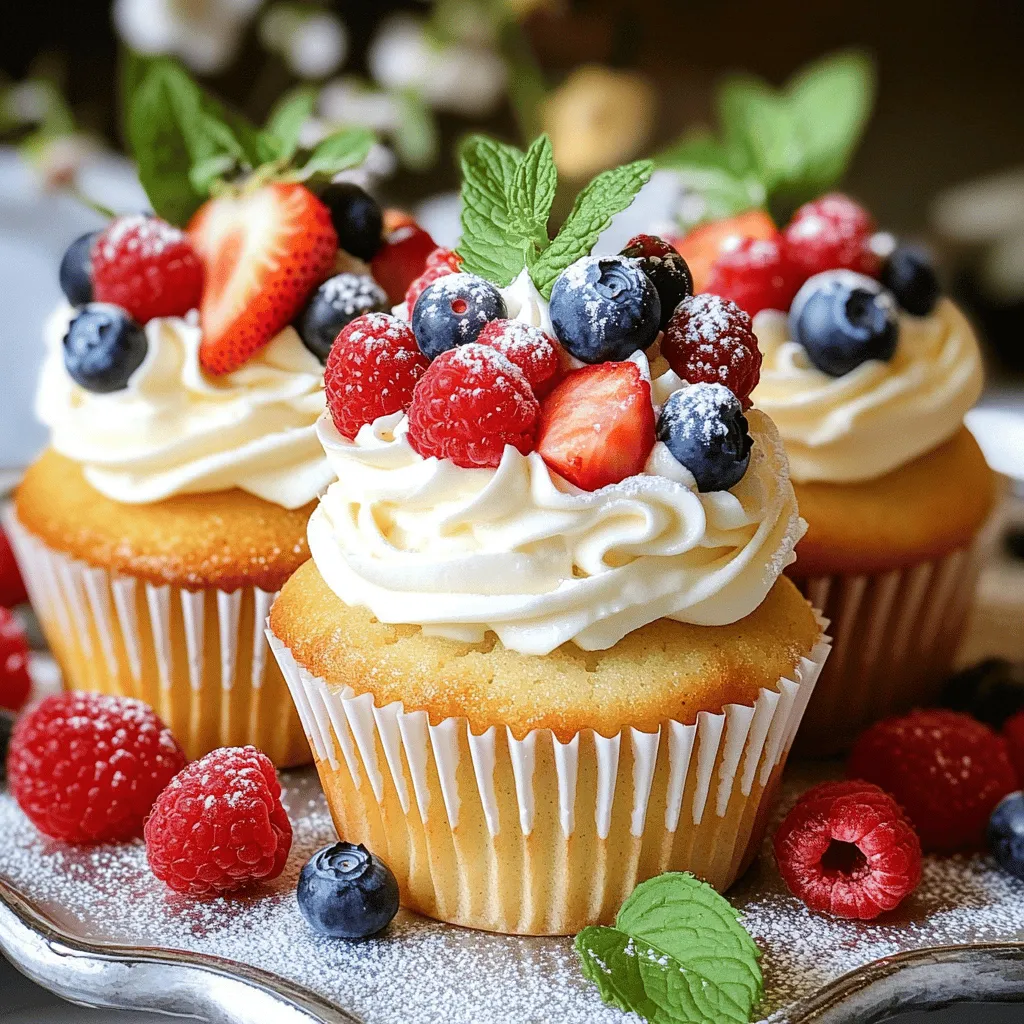
Vanilla Cupcakes with Berry Decoration Delight
If you crave a sweet treat that’s simple and beautiful, you’ve come to the right place! In this article, I’ll show you how to make
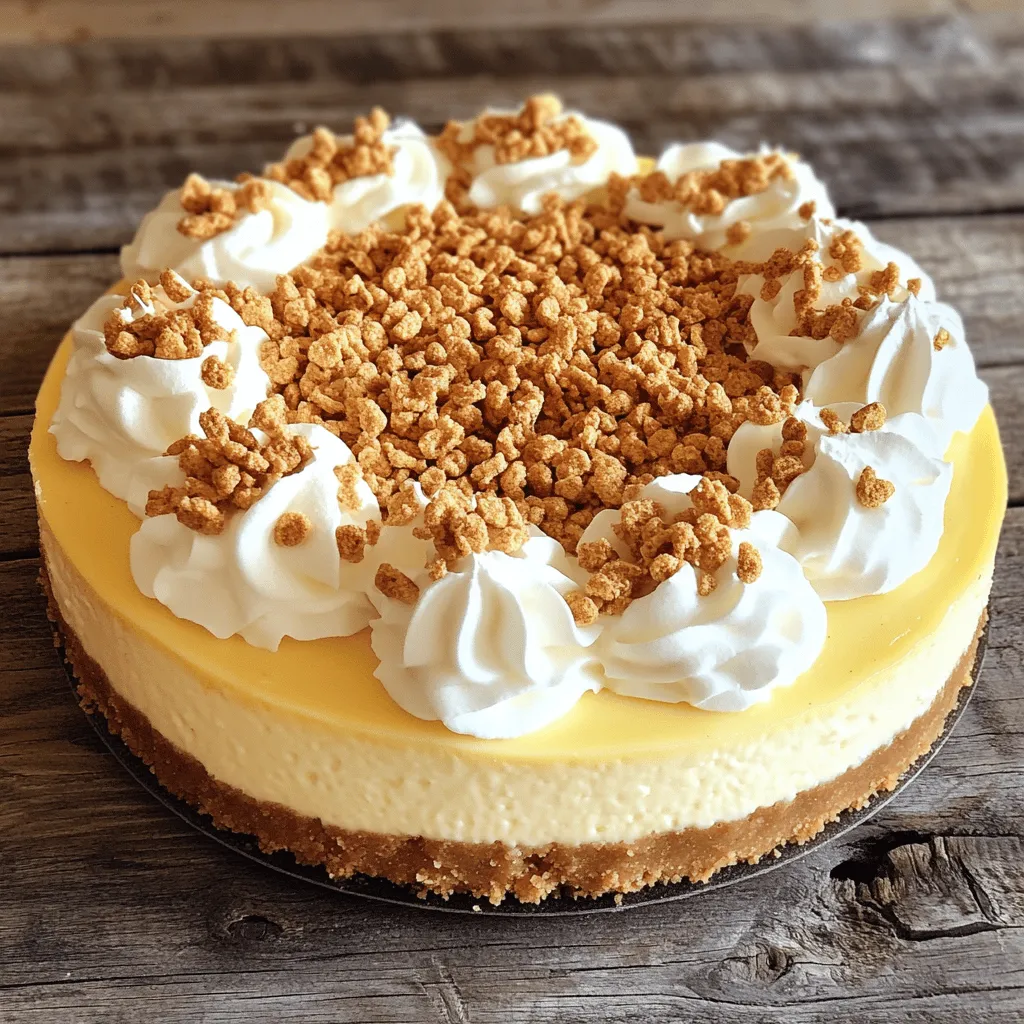
Cinnamon Toast Crunch Cheesecake Irresistible Delight
Are you ready to indulge in a dessert that combines nostalgia and decadence? This Cinnamon Toast Crunch Cheesecake is the perfect blend of creamy goodness
. In this recipe, the dry ingredients create the dough's structure, while the wet ingredients add moisture and flavor. The combination of spices brings the chai flavor to life. The warm milk activates the yeast, allowing the rolls to rise beautifully. Using the right balance of dry and wet ingredients ensures fluffy rolls. Measure accurately for the best results! Enjoy mixing these delightful ingredients together. They form the base for an unforgettable treat. To get started, combine warm milk, granulated sugar, and active dry yeast in a small bowl. Make sure the milk is warm, about 110°F (43°C). Let this mixture sit for 5-7 minutes. You want to see it get frothy and bubbly. This shows that the yeast is alive and ready to work. Next, whisk together the dry ingredients in a mixing bowl. This includes 2 ¼ cups of flour, salt, ground cinnamon, ground ginger, ground cardamom, and ground cloves. Once mixed, pour the activated yeast mixture into the bowl. Then, add melted butter and one large egg. Stir everything together with a wooden spoon until you have a shaggy dough. Now, it’s time to knead the dough. Gradually add the remaining flour as you knead on a lightly floured surface. You should knead the dough for about 5-7 minutes. It should become smooth and elastic. If the dough is too sticky, add a little more flour. After kneading, transfer the dough to a greased bowl. Cover it with a clean kitchen towel or plastic wrap. Place it in a warm area and let it rise for about 1 hour. The dough should double in size. This is an important step for fluffy chai cinnamon rolls. For the full recipe, check the reference section. To make fluffy chai cinnamon rolls, start with yeast. Proper yeast activation is key. Mix warm milk, sugar, and active dry yeast. Wait 5-7 minutes. You want a frothy mixture. This shows the yeast is alive and ready. Next, focus on the dough. Aim for a soft, elastic consistency. Knead the dough for about 5-7 minutes. If it feels sticky, add a bit more flour. The dough should spring back when you poke it. This ensures your rolls will rise well. For icing, consistency matters. Start with powdered sugar. Add 2-3 tablespoons of milk. Mix until smooth. If it’s too thick, add more milk slowly. You want it to drizzle nicely over the rolls. Adding spices can boost the flavor. Consider a pinch of ground cinnamon or nutmeg. A little extra spice can make your icing pop. Feel free to experiment with what you like. Pair your chai cinnamon rolls with a warm cup of chai tea. The flavors match perfectly. The spiciness of the chai enhances the rolls' sweetness. For special occasions, present your rolls on a nice platter. Drizzle icing generously and dust with cinnamon. Add fresh herbs or edible flowers for color. This makes your dish eye-catching and festive. For the full recipe, check out the [Full Recipe] for step-by-step instructions. Enjoy your delicious chai cinnamon rolls! {{image_4}} You can change the chai spices to fit your tastes. If you like more heat, add extra ginger or cardamom. For a sweeter roll, mix in more cinnamon. You can also add nuts like walnuts or pecans, or even dried fruits like raisins. This adds texture and flavor to your rolls. Try different combinations each time you bake! The icing can change the flavor of your rolls. A cream cheese icing gives a rich taste that pairs well with the spices. Just mix cream cheese, powdered sugar, and a bit of milk. You can also try flavored syrups, like maple or caramel. This gives your rolls a fun twist. Experiment with what you like best! If you need gluten-free rolls, you can swap out all-purpose flour. Use a gluten-free flour blend instead. Make sure the blend has a good balance of flours and starches. This helps keep the rolls fluffy. You might need to adjust the liquid a bit, so keep an eye on the dough. Enjoy making these rolls for everyone! To keep your chai cinnamon rolls fresh, wrap them in plastic wrap. You can also place them in an airtight container. This method locks in moisture and flavor. Store them in your fridge. They will stay fresh for up to three days. You can freeze unbaked rolls. After shaping them, place the rolls in a single layer on a baking sheet. Freeze them for about an hour, then transfer to a freezer-safe bag. This keeps them from sticking together. When you are ready to bake, let them thaw overnight in the fridge. Then, let them rise before baking. To reheat baked rolls, you can use the oven or the microwave. For the oven, preheat to 350°F (175°C) and warm the rolls for about 10-15 minutes. For the microwave, heat them for 15-20 seconds. This will keep them fluffy and warm. Chai cinnamon rolls last for about three days in the fridge. If you freeze them, they can last up to three months. Just make sure to wrap them well to avoid freezer burn. Enjoy the delightful taste of these rolls anytime! Yes, you can use instant yeast. It works well in most recipes. The main difference is how you use them. Active dry yeast needs to be dissolved in warm liquid first. Instant yeast can mix right into dry ingredients. If you use instant yeast, skip the proofing step. Just mix it in with the flour and other dry ingredients. You can use several options for milk. Almond milk, soy milk, or oat milk are great choices. These non-dairy options work well without changing the dough too much. The flavor may change slightly, but it will still be tasty. Just make sure to use a version that is unsweetened. Look for a golden brown color on top. The edges should be firm, but the center may still look soft. You can also use a toothpick. Insert it into the center of a roll; it should come out clean. If it has dough on it, bake longer. Trust your eyes and the toothpick test for perfect rolls. Making chai cinnamon rolls is fun and rewarding. You learned about the key ingredients, from spices to yeast. We discussed step-by-step instructions for preparing and baking them perfectly. Don't forget the helpful tips for fluffy rolls and delicious icing. In summary, enjoy the flexibility of variations, storage tips, and answers to common questions. With these insights, you can craft amazing rolls that impress anyone. So, roll up your sleeves and get baking!](https://tossedflavors.com/wp-content/uploads/2025/06/7028fbd7-d730-4544-91f0-67ed19d91ef8.webp)
Chai Cinnamon Rolls Delightful and Fluffy Recipe
Are you ready to treat yourself? This Chai Cinnamon Rolls recipe brings together warm spices and soft, fluffy dough to create a delightful experience. Each
![To make the Easy Cream Puff Cake, gather these key ingredients: - 1 cup water - 1/2 cup unsalted butter - 1 cup all-purpose flour - 1/4 teaspoon salt - 1 teaspoon vanilla extract (for the dough) - 4 large eggs - 1 cup heavy cream - 1/2 cup powdered sugar - 1 teaspoon vanilla extract (for the cream filling) These ingredients work together to create a light and airy cream puff. The water and butter form the base, while the flour and eggs give it structure. The cream and sugar make the filling sweet and fluffy. For a touch of flair, consider these optional garnishes: - Fresh berries - Chocolate shavings These add color and a burst of flavor. They make your Easy Cream Puff Cake look even more inviting. You can use any berries you like. Strawberries, blueberries, or raspberries work well. You will need a few tools to create this dessert: - Medium saucepan - Mixing bowl - Whisk or electric mixer - Pastry bag with a large round tip (or a spoon) - Baking sheet - Parchment paper - Wire rack Having the right tools makes the process smooth. Prepare everything before you start to keep things organized. This will help you enjoy making your Easy Cream Puff Cake even more. For the full recipe, check the details above. Start by preheating your oven to 400°F (200°C). This step is key for baking the cream puffs. While the oven heats, line a baking sheet with parchment paper. This makes it easy to remove the puffs later. In a medium saucepan, mix 1 cup of water and 1/2 cup of unsalted butter. Heat this over medium-high until it boils. Once boiling, remove the saucepan from heat. Quickly mix in 1 cup of all-purpose flour and 1/4 teaspoon of salt. Stir until the dough forms a ball. Let it cool for about 5 minutes. This is important so the eggs don't cook when you add them. Stir in 1 teaspoon of vanilla extract, then mix in the eggs one by one, until smooth and glossy. Using a pastry bag or spoon, drop tablespoon-sized mounds of dough onto the baking sheet. Space them about 2 inches apart. Bake for 25-30 minutes. You want them golden brown and puffed. After baking, let them cool completely on a wire rack. While the puffs cool, prepare the filling. In a mixing bowl, combine 1 cup of heavy cream, 1/2 cup of powdered sugar, and 1 teaspoon of vanilla extract. Whip this mixture until you see soft peaks. This will create a light and fluffy filling. When the cream puffs are cool, slice off the tops. Fill each puff with the whipped cream mixture. Replace the tops gently. For a nice touch, dust with powdered sugar and add fresh berries or chocolate shavings if you like. You can find the full recipe in the earlier section. When making your cream puff cake, watch out for a few key errors: - Overmixing the dough: This can lead to tough puffs. Mix just until smooth. - Underbaking: If you take them out too soon, they won’t rise well. Make sure they are golden brown. - Not spacing the dough: If you place the dough too close, they will stick together. Keep 2 inches between mounds. For light and airy cream puffs, follow these simple tips: - Use room temperature eggs: This helps them mix better into the dough. - Allow dough to cool: Let it cool for 5 minutes before adding eggs. This keeps the puffs from collapsing. - Don’t open the oven door: Opening it can cause the puffs to deflate. Wait until baking time is up. When serving your cream puff cake, consider these fun ideas: - Add fresh berries: They add color and a burst of flavor. - Drizzle chocolate sauce: A sweet touch that makes the cake even more special. - Dust with powdered sugar: This gives a nice finish and enhances the look. For the full recipe and more tips, check the [Full Recipe]. {{image_4}} You can change the filling to match your taste. Here are some ideas: - Chocolate: Use cocoa powder in the cream mix. - Coffee: Add espresso powder for a rich flavor. - Fruit: Mix in pureed fruits like strawberries or mango. - Citrus: Incorporate lemon or orange zest for a fresh kick. Each option makes the cream puffs unique and fun. Feel free to mix flavors too! If you need a gluten-free treat, you can use gluten-free flour. Choose a blend that works well for baking. Here’s how: - Substitute all-purpose flour with a gluten-free blend in equal parts. - Ensure that your other ingredients are also gluten-free, like vanilla extract. These small changes let everyone enjoy this dessert, regardless of dietary needs. Toppings can make your cream puffs even more special. Here are some great ideas: - Caramel Sauce: Drizzle over the top for a sweet finish. - Whipped Cream: Add more whipped cream for extra fluffiness. - Nuts: Sprinkle chopped nuts for a crunchy texture. - Sprinkles: Use colorful sprinkles for a festive look. Each topping can change the feel of the cake and surprise your guests. Enjoy experimenting with your favorites! To keep your cream puff cake fresh, store it in the fridge. Place it in an airtight container. It will stay good for about 2 to 3 days. The whipped cream filling may soften, but the flavors will still shine. If you stack the puffs, use parchment paper to separate them. This prevents sticking. You can freeze cream puffs if you have leftovers. Start by freezing the unfilled puffs. Place them on a baking sheet and freeze until solid. Then, transfer them to a freezer bag. They will last for up to 3 months. When ready to enjoy, just thaw them in the fridge. Then fill them with fresh whipped cream. When reheating, keep it simple. Preheat your oven to 350°F (175°C). Place the cream puffs on a baking sheet. Heat them for about 10 minutes. This method keeps them crisp. Avoid microwaving, as this can make them soggy. Serve warm for the best taste, and add fresh whipped cream just before serving for a delightful treat. For the full recipe, check out the Heavenly Cream Puff Cake! Cream puffs rise due to steam. When you heat the dough, the water turns to steam. This steam pushes against the dough, making it puff up. The eggs in the dough also help create structure. They add strength and keep the puffs airy. For best results, bake them at the right temperature. If they bake too low, they won’t rise well. Yes, you can! Feel free to get creative with fillings. You can use pastry cream, custard, or even ice cream. Try adding fruits or chocolate for extra flavor. Each filling brings a unique taste. Just ensure the filling is light to keep the puff's texture. To avoid soggy cream puffs, cool them well. Let them sit in the oven after baking. This step helps any steam escape. Make sure to fill them right before serving. If you fill them too early, they may get soggy. Storing them in a cool, dry place also helps. Serve your Easy Cream Puff Cake chilled or at room temperature. Stack the filled puffs on a nice plate. Dust them with powdered sugar for a touch of elegance. You can also add berries or chocolate shavings on top. This makes it look appealing and tasty. Enjoy with coffee or tea for a perfect treat! This article covered everything you need for Easy Cream Puff Cake. We discussed the key ingredients, tools, and step-by-step instructions to create the perfect puffs. I shared tips to avoid common mistakes and ideas for fun variations. Remember to store leftovers properly to keep them fresh. With these tips, you can impress everyone with your baking skills. Enjoy making and sharing your Easy Cream Puff Cake!](https://tossedflavors.com/wp-content/uploads/2025/06/9e48d48a-3759-4535-a45f-d0dcd856cc72.webp)
Easy Cream Puff Cake Delightful and Simple Recipe
Are you ready to impress your friends and family with a delicious dessert that’s simple to make? Look no further! My Easy Cream Puff Cake