Desserts

To make this delicious cake mix peach cobbler, you need some key items. Here’s what you need: - 1 box of yellow cake mix - 4 cups fresh or canned peaches (sliced if fresh) - 1/2 cup unsalted butter (melted) - 1 cup granulated sugar (adjust based on sweetness of peaches) - 1 teaspoon vanilla extract - 1 teaspoon ground cinnamon - 1/4 teaspoon ground nutmeg - 1/2 cup milk - Vanilla ice cream for serving (optional) These ingredients come together to create a sweet and comforting dessert. The cake mix saves time while still delivering great flavor. You can add some optional ingredients to make your cobbler even better. Consider these: - Fresh herbs like mint for a bright touch - A sprinkle of brown sugar for a caramelized crust - Chopped nuts like pecans or walnuts for crunch - A splash of lemon juice to brighten the peach flavor These extras can add fun twists to your cobbler. If you don't have an ingredient, no worries! Here are some easy swaps: - Use gluten-free cake mix if you need a gluten-free option. - Swap fresh peaches with other fruits like apples or berries. - Replace butter with coconut oil for a dairy-free version. - Use almond milk instead of regular milk for a nutty flavor. These substitutions keep your cobbler tasty and versatile. No matter what, your cake mix peach cobbler will always shine! Start by preheating your oven to 350°F (175°C). This heat is perfect for baking. Next, grab a 9x13 inch baking dish and grease it well. Use butter or non-stick spray. This helps the cobbler come out easily. Now, take your peaches. If you use fresh ones, peel and slice them first. In a large bowl, mix the peaches with 1/2 cup of sugar, the cinnamon, nutmeg, and vanilla extract. Stir gently until the peaches get coated. This will bring out their sweet flavor. Spread this peach mixture evenly in your greased dish. In a separate bowl, prepare the yellow cake mix as the box says. For extra flavor, swap half the water for milk. Mix in the melted butter until smooth. This makes a rich batter. Carefully pour it over the peaches. Make sure to cover them well but don’t mix them in. The batter will rise and create a lovely top. Now it’s time to bake! Place the baking dish in your preheated oven. Bake for 40-45 minutes. You can check if it’s done by inserting a toothpick in the center. If it comes out clean, your cobbler is ready. The top should be golden brown and smell amazing. Once baked, let the cobbler cool for a few minutes. This helps with cutting and serving. To get the best texture, make sure your butter is melted. This adds richness to the batter. Also, don’t stir the batter into the peaches. Let it sit on top. As it bakes, it will create a delightful, fluffy layer. If you want a crispy top, bake a bit longer, but watch closely. Too long can dry it out. Serving it warm with vanilla ice cream is a great touch. The cold ice cream melts into the warm cobbler, creating a delicious mix. For the full recipe, check out the detailed instructions above! When making peach cobbler, it’s easy to make a few mistakes. Here’s what to watch for: - Overmixing the batter: When you mix the cake batter, do it gently. Overmixing can make it tough. - Not greasing the dish: Always grease your baking dish well. This helps the cobbler come out easily. - Skipping the spices: Don’t forget the cinnamon and nutmeg! They add great flavor to the peaches. - Using too much sugar: Adjust the sugar based on your peaches' sweetness. Too much sugar can make it overly sweet. To make your peach cobbler even better, try these tips: - Use fresh peaches: Fresh peaches give the best taste. If you use canned, choose ones in light syrup. - Add a splash of lemon juice: A bit of lemon juice brightens the peach flavor. - Try different extracts: Swap vanilla with almond extract for a unique twist. - Top with nuts: Sprinkle chopped pecans or walnuts on the batter before baking for added crunch. Serving your peach cobbler well makes a big difference. Here’s how to do it: - Serve warm: Warm cobbler tastes best. Heat it slightly if it cools down. - Add vanilla ice cream: A scoop of vanilla ice cream on top makes it a real treat. - Drizzle syrup: Use the syrup from baked peaches as a drizzle over each slice. - Garnish with mint: Fresh mint leaves add color and a fresh taste to the dish. These tips will help you create a peach cobbler that everyone will love! For the full recipe, check out the instructions above. {{image_4}} You can get creative with this recipe! While peaches shine in this cobbler, you can use other fruits too. Try using: - Apples - Berries (blueberries, raspberries, or strawberries) - Cherries - Pears Mixing different fruits can add exciting flavors. For example, apples bring a sweet crunch, and berries add a tart bite. Just remember to adjust the sugar based on the fruit's sweetness. You don't have to stick to just yellow cake mix. You can explore various flavors to change the taste of your cobbler. Good options include: - White cake mix - Butter cake mix - Spice cake mix Each mix will give a unique twist to your cobbler. For a fun twist, try chocolate cake mix. It pairs well with fruit and creates a delightful dessert! If you need a gluten-free option, don't worry! You can still enjoy this dessert. Here are some easy swaps: - Use a gluten-free cake mix from the store. - Substitute all-purpose flour with almond flour or oat flour. These changes will help you keep the tasty texture. Just make sure to follow the instructions on the gluten-free mix you choose. To discover the full details, check out the Full Recipe. To keep your leftover peach cobbler fresh, let it cool completely. Then, cover it tightly with plastic wrap or aluminum foil. You can also place it in an airtight container. Store it in the fridge for up to three days. This way, you can enjoy the cobbler later without losing its taste. If you want to save your peach cobbler for later, freezing is a great option. First, let the cobbler cool. Cut it into squares to make it easier to thaw later. Then, wrap each piece tightly in plastic wrap. Place the wrapped pieces in a freezer-safe bag or container. You can freeze it for up to three months. When you're ready to eat it, just thaw it in the fridge overnight. To reheat your peach cobbler, start by preheating your oven to 350°F (175°C). Place the cobbler in an oven-safe dish. Cover it with foil to keep it moist. Heat for about 20 minutes, or until it's warm throughout. If you prefer, you can use the microwave. Just heat it in short bursts, checking often. Enjoy your warm peach cobbler with a scoop of vanilla ice cream for a delightful treat! Yes, you can use frozen peaches. Just make sure to thaw and drain them first. This keeps the cobbler from becoming too watery. Frozen peaches work well and save time. They taste great in this recipe! To make a healthier peach cobbler, try these simple swaps: - Use a sugar substitute or less sugar. - Choose whole wheat flour for the cake mix. - Add rolled oats for extra fiber. - Use light butter or applesauce instead of regular butter. These changes help reduce calories while keeping the dish tasty. Serve peach cobbler warm for the best taste. I love adding a scoop of vanilla ice cream on top for extra flavor. You can also drizzle some syrup from the dish over the cobbler. This adds a nice touch. Garnish with fresh peach slices for a pop of color! For more details, check the Full Recipe. We covered key ingredients for making cake mix peach cobbler, including essential and optional items. I shared steps to prepare and bake it, plus tips for a great texture. Common mistakes to avoid and expert flavor tips can enhance your dish. You can also try various fruit or cake mix options, even gluten-free versions. Lastly, I explained how to store leftovers and answered common questions. Embrace your creativity, and enjoy making this delicious dessert!
Cake Mix Peach Cobbler Delightful and Easy Recipe
Do you love a warm dessert that’s quick and easy to make? My Cake Mix Peach Cobbler recipe will delight your taste buds without any
- Fresh peaches: You need 2 cups of fresh peaches. Start by peeling them. Cut them into small chunks. This helps the peaches mix well into the batter. Choose ripe peaches for the best flavor. - Dry ingredients: Gather 1 ½ cups of all-purpose flour, 1 teaspoon of baking powder, ½ teaspoon of baking soda, ½ teaspoon of salt, 1 teaspoon of ground cinnamon, and ¼ teaspoon of ground nutmeg. These ingredients help the cake rise and add flavor. - Wet ingredients: Get ½ cup of unsalted butter, softened, and 1 cup of granulated sugar. You will also need 2 large eggs, ¾ cup of buttermilk, and 1 teaspoon of pure vanilla extract. These ingredients make the cake moist and tasty. - Variations using spices or extracts: You can try adding different spices. A pinch of ginger or allspice can give it a new twist. You might also add almond extract for a richer taste. - Swaps for gluten-free or dairy-free options: If you need gluten-free, use almond or oat flour instead of all-purpose flour. For a dairy-free version, substitute buttermilk with almond milk mixed with a splash of vinegar. - How to select the best fresh peaches: Look for peaches that are firm but slightly soft when pressed. They should have a sweet smell and be free of bruises or blemishes. Fresh peaches make your cake shine and taste amazing. For the complete list of ingredients and instructions, check out the Full Recipe. 1. First, preheat your oven to 350°F (175°C). Grease a 9-inch round cake pan with butter. Dust it lightly with flour. This helps the cake release easily later. 2. In a large bowl, use an electric mixer to cream the softened butter and sugar. Beat them together on medium speed until the mix is light and fluffy. This should take about 3-5 minutes. 3. Crack the eggs into a small bowl. Add them to the creamed butter mix, one at a time. Mix well after each addition. Finally, stir in the vanilla extract until everything is combined. 4. In a separate bowl, whisk together the dry ingredients: flour, baking powder, baking soda, salt, cinnamon, and nutmeg. This step ensures even mixing in the batter. 5. Gradually blend the dry mixture into the creamed mix, alternating with the buttermilk. Start with a third of the flour mix, then half the buttermilk. Repeat this, finishing with the flour mix. Mix until just combined. A few lumps are okay. 6. Gently fold in the diced peaches with a spatula. Be careful not to deflate the batter. The peaches should be spread evenly in the mix. 1. Pour the batter into the prepared cake pan. Use a spatula to smooth the top, making it even. 2. Place the cake in the preheated oven. Bake for 35-40 minutes. Check for doneness by inserting a toothpick into the center. If it comes out clean or with a few moist crumbs, your cake is ready. 1. Once baked, let the cake cool in the pan for about 10 minutes. Run a knife around the edges to loosen it. Then, invert it onto a wire rack to cool completely. 2. When the cake cools to room temperature, dust the top with powdered sugar if you like. This adds a nice touch! 3. Slice the cake into wedges and serve. For a special treat, add a dollop of whipped cream or a scoop of vanilla ice cream. You can also add fresh peach slices on the side. Enjoy this delightful peach cake! For more detailed instructions, refer to the Full Recipe. - Avoiding common mistakes when baking cakes: Always measure your ingredients accurately. Use a kitchen scale for the best results. Avoid opening the oven too soon. This will help your cake rise evenly. - Tips for achieving a light and fluffy texture: Make sure your butter is soft, not melted. Cream it well with sugar until it’s light and airy. This step is key for a fluffy cake. - Storage of ingredients for best results: Keep your flour and sugar in a cool, dry place. This helps maintain freshness. Store butter in the fridge until you are ready to use it. - How to enhance flavor with different spices: You can add a pinch of nutmeg for warmth or a splash of almond extract. Both will complement the peaches nicely. - Adjusting sweetness levels to taste: If you prefer a less sweet cake, reduce the sugar by a quarter cup. Taste your batter before baking to find your perfect balance. - Adding fruit or nut toppings for a twist: Try adding sliced almonds or walnuts on top before baking. You can also sprinkle some extra diced peaches for a fruity finish. Feel free to explore these tips as you bake your peach cake. Each suggestion can help you create a delightful treat! For detailed instructions, check the Full Recipe. {{image_4}} You can easily switch up the fresh peach cake to keep things fun. One great idea is to make a peach cobbler version. Just add more peaches on top before baking. This gives a lovely, juicy layer that is hard to resist. You can also mix in other fruits like berries or apples. Blueberries or raspberries bring a pop of color and flavor. Apples add a nice crunch and sweetness. Feel free to play with your favorite fruits! Another fun twist is to create a layered peach cake with frosting. Bake two or three cake layers. Once cooled, stack them with peach frosting or cream cheese icing in between. This adds a wow factor to your dessert! If you want a vegan version of fresh peach cake, swap out the eggs and butter. Use flax eggs and coconut oil instead. This keeps the cake moist and delicious. For gluten-free options, try using almond or oat flour. Both work well and keep the cake light and fluffy. Just make sure to adjust the liquid amounts as needed. If you’re looking for low-sugar alternatives, use natural sweeteners like honey or maple syrup. You can also cut the sugar in half and still enjoy a tasty cake. These swaps keep your cake delightful and a bit healthier! To keep your peach cake fresh, always let it cool fully. Place the cake on a wire rack for even cooling. Once cool, wrap the cake tightly in plastic wrap or store it in an airtight container. This keeps moisture in and prevents drying. The best temperature for storing the cake is room temperature. Avoid placing it in the fridge, as this can dry it out. You can keep the cake for up to three days before it spoils. If you have extra cake, freezing is a great option. To freeze your fresh peach cake, slice it into pieces. Wrap each slice tightly in plastic wrap, then place them in a freezer bag. This method prevents freezer burn and keeps the cake tasting fresh. When you’re ready to eat, thaw the slices in the fridge overnight. For serving, warm the slices in the microwave for a few seconds. You can also use thawed cake in other recipes, like trifle or ice cream cake. Just crumble the cake and layer it with your favorite ingredients. How do I know when my fresh peach cake is done baking? You can check if your cake is done by inserting a toothpick into the center. If it comes out clean or with a few moist crumbs, your cake is ready. I recommend checking around the 35-minute mark. Ovens can vary, so keep an eye on it. Can I use canned or frozen peaches instead of fresh? Yes, you can use canned or frozen peaches. If you use frozen peaches, be sure to thaw and drain them first. Canned peaches should be drained well too. Fresh peaches give the best flavor, but these options work in a pinch. What can I use instead of buttermilk in the recipe? You can easily make a buttermilk substitute by mixing regular milk with vinegar or lemon juice. Use 1 cup of milk and add 1 tablespoon of vinegar or lemon juice. Let it sit for 5 minutes, and you’re good to go! How to tell ripe peaches from unripe ones? Look for peaches that have a slight give when gently squeezed. They should have a sweet smell and a golden hue. Avoid peaches that are hard or have green spots, as they are likely unripe. Can this recipe be doubled for a larger gathering? Yes, you can double the recipe! Just use two cake pans and bake them at the same time. Adjust the bake time slightly if needed. Watch them closely for doneness. How should I serve peach cake for best presentation? For a lovely presentation, slice the cake into wedges. Dust the top with powdered sugar for a pretty finish. You can also serve it with whipped cream or vanilla ice cream. Add fresh peach slices next to the cake for color and flavor. In this post, we covered how to make a fresh peach cake from scratch. We looked at the essential ingredients, preparation steps, and baking instructions. You can even explore variations and dietary adaptations to fit your needs. Remember, the key to a great cake is using fresh peaches and proper baking techniques. With these tips, you'll create a delicious dessert that impresses everyone. Try it out, and enjoy the sweet taste of summer in every bite!
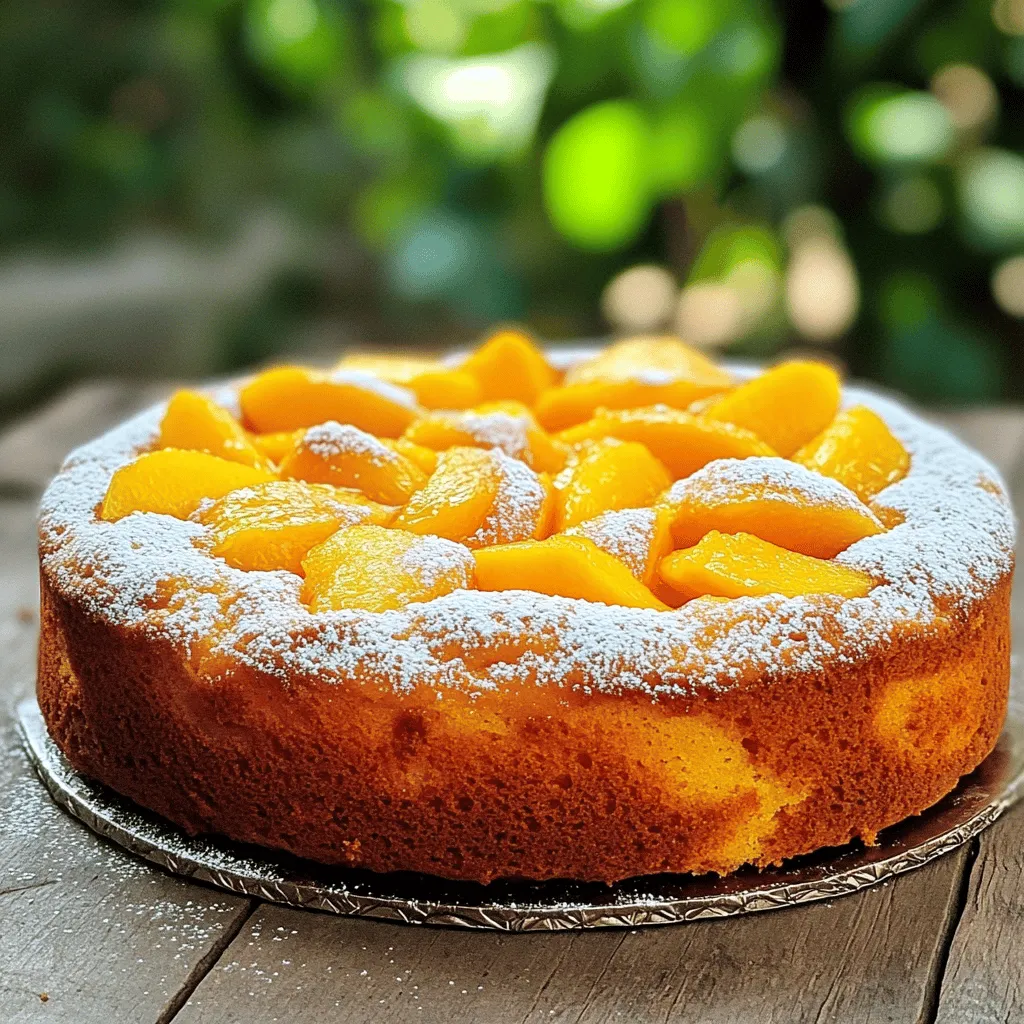
Fresh Peach Cake Delightful and Simple Recipe
Are you ready to indulge in a sweet treat that screams summer? This Fresh Peach Cake recipe is both delightful and simple, perfect for beginners
For the best flavor, choose ripe, fresh peaches. Look for peaches that are slightly soft and fragrant. You need about 2 cups, peeled and diced. If you can’t find fresh peaches, use frozen ones. Just thaw them and drain excess juice. You can swap ingredients to suit your taste. For flour, use whole wheat flour for a nutty flavor. You can also use coconut oil instead of butter for a dairy-free option. If you want less sugar, try using honey or maple syrup. Just remember to adjust the liquid in the recipe. Measuring ingredients correctly is key. Use dry measuring cups for flour and oats. For brown sugar, pack it tightly into the cup. Use a liquid measuring cup for melted butter. Precision helps create the perfect texture in your Heavenly Summer Peach Bars. Enjoy making this delightful treat! For the full recipe, refer to the earlier section. Start by washing the peaches. Then, peel and dice them into small pieces. I like to toss the diced peaches with lemon juice. This helps keep them fresh and tasty. Let the peaches sit for about ten minutes. This waiting time makes them sweeter and juicier. The juice mixes with the fruit, creating a lovely syrup. In a big bowl, combine the flour, oats, brown sugar, granulated sugar, baking powder, cinnamon, and salt. Use a whisk to blend everything well. Mixing dry ingredients first helps the flavors spread evenly. This step is key for tasty bars. Take half of your crumb mixture and press it into the bottom of a greased baking pan. This forms a solid base. Next, layer the peach mixture evenly over the crust. If you want some crunch, sprinkle granola on top of the peaches. Then, crumble the remaining mixture over the peaches. This creates a nice topping and adds flavor. Place the pan in your preheated oven at 350°F (175°C). Bake for 30 to 35 minutes until the top is golden brown. You will see the peach juices bubbling up. Once done, remove the pan from the oven and let it cool completely. Cooling helps the bars set and makes cutting easier. For the full recipe, refer to the earlier section. To avoid soggy bars, make sure to use ripe but not overripe peaches. Overripe peaches release too much juice. Tossing the diced peaches with lemon juice helps. Let them sit for about 10 minutes. This step boosts flavor while keeping moisture in check. When layering, ensure you spread the peaches evenly. This helps them cook well and prevents sogginess. Adding spices can take your bars to the next level. Ground cinnamon is a classic choice. It pairs wonderfully with peaches. You can also try nutmeg for a warm flavor. Just a pinch of cardamom can add a unique twist. Spice blends can boost the fruit's natural sweetness. Mix spices into the dry ingredients for even distribution. Crumb texture is key to great peach bars. Use cold butter for a firmer crumb. It creates a nice crunch when baked. When mixing, don’t overwork the dough. This keeps the texture light and airy. Press half of the crumb mixture into the pan firmly, but not too tightly. The top layer should be crumbled loosely. This allows the topping to crisp up nicely. For extra crunch, consider adding granola to the mix. It also adds a delightful texture contrast. {{image_4}} You can add nuts to your Heavenly Summer Peach Bars for extra crunch. Chopped nuts like walnuts, pecans, or almonds work great. Just mix about ½ cup of your chosen nuts into the crumb mixture. This small change adds a rich flavor and a fun texture. The nuts will toast as the bars bake, giving you a lovely nutty taste. While peaches shine in this recipe, you can use other fruits too. Try plums, apricots, or even berries. If using berries, be mindful of their moisture. You might need to adjust the sugar based on their sweetness. This way, you can enjoy a different fruit flavor each time. If you need gluten-free bars, swap the all-purpose flour for a gluten-free blend. Many brands offer great mixes that work well in baking. Make sure your oats are certified gluten-free too. This simple change allows everyone to enjoy these tasty treats without worry. Explore the Full Recipe for more details and tips on making these peach bars your own! After making Heavenly Summer Peach Bars, store them in an airtight container. This keeps them fresh and moist. Place a piece of parchment paper between layers if you stack them. This step helps prevent sticking. You can also wrap each bar tightly in plastic wrap for easy grabbing. These peach bars stay fresh for up to five days when stored properly. If you want them to last longer, consider freezing them. Just remember that they taste best when fresh. Enjoy them within the first few days for the best flavor and texture. To freeze the peach bars, first, let them cool completely. Then, cut them into squares. Wrap each square in plastic wrap and place them in a freezer bag. Make sure to remove all the air to prevent freezer burn. They can last for up to three months in the freezer. When you're ready to enjoy, simply thaw them in the fridge overnight or at room temperature for a few hours. For the full recipe, check back for the detailed steps. Yes, you can use canned peaches. Just make sure to drain them well. Canned peaches are often softer than fresh ones. This might change the texture of your bars. If you like a firmer bite, fresh is best. Look for a golden brown top on the bars. The peach juices should also bubble around the edges. If a toothpick comes out clean from the center, they are ready. Let them cool to set properly before cutting. These bars shine on their own, but they pair well with vanilla ice cream. You can also serve them with whipped cream or yogurt. Fresh mint leaves add a nice touch too. Consider a light drizzle of honey for extra sweetness. Yes, you can make these bars ahead of time. They stay fresh for up to three days. Store them in an airtight container at room temperature. You can also freeze them for longer storage. Just thaw them before serving. For the full recipe, check the section above. In this post, I covered how to make Heavenly Summer Peach Bars. We discussed fresh peach needs, ingredient swaps, and accurate measuring. I also shared the steps for prepping, mixing, and baking your bars. You learned tips to avoid sogginess and enhance flavor. We explored variations with nuts and gluten-free options, plus storage tips. These bars are a tasty treat for any occasion. Enjoy baking and sharing them!
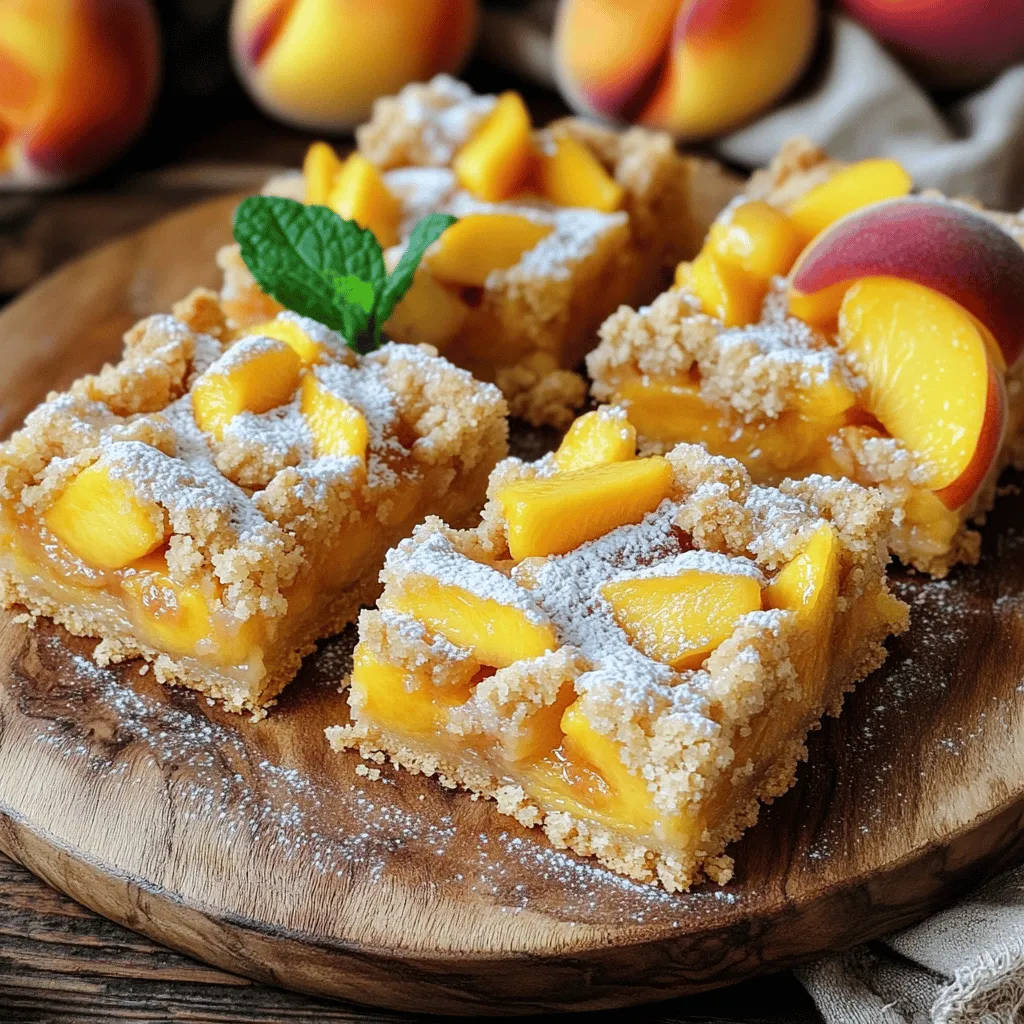
Heavenly Summer Peach Bars Delightfully Simple Treat
If you’re craving a sweet, fruity treat, these Heavenly Summer Peach Bars are for you! This delightfully simple recipe showcases fresh peaches in an easy-to-make
- 2 cans of sliced peaches in syrup (15 oz each) - 1 cup all-purpose flour - 1 cup granulated sugar (divided) - 1 cup milk - 1/2 cup unsalted butter (melted) - 2 teaspoons baking powder - 1 teaspoon pure vanilla extract - 1/2 teaspoon ground cinnamon - A pinch of salt You can use fresh peaches if you prefer. Just peel and slice them. Frozen peaches work too; thaw them first. For a gluten-free option, use almond flour or a gluten-free flour blend. This will keep your cobbler tasty and friendly for all diets. Accurate measurements are key to good results. Use dry measuring cups for flour and sugar, and liquid measuring cups for milk. When measuring flour, scoop it and level off with a knife. This gives you just the right amount without packing it down. For sugar, fill the cup and level it too. Proper measuring makes your cobbler turn out perfect every time. For the Full Recipe, check out the detailed instructions. First, preheat your oven to 350°F (175°C). This step is key. A hot oven ensures even baking and a golden top. Next, choose a 9x13-inch baking dish. This size is perfect for peach cobbler. Grease it with butter or cooking spray. This helps the cobbler come out easily after baking. In a medium bowl, mix melted unsalted butter with 1 cup of sugar. Use a whisk or spoon to blend them well. Once mixed, add all-purpose flour, baking powder, milk, vanilla extract, ground cinnamon, and a pinch of salt. Stir everything until combined. You want a thick batter, ready for the peaches. Now it's time to layer the peaches. Open the cans and pour the sliced peaches, with syrup, over the batter. Don’t stir it! The batter will rise around the peaches as it bakes. For extra sweetness, sprinkle the remaining 1/4 cup of sugar on top. Place the dish in your preheated oven. Bake for about 35-40 minutes. Check for doneness by inserting a toothpick. It should come out clean. Once ready, let it cool for 10 minutes before serving. For the full recipe, check the earlier section. To make your cobbler just right, focus on its texture. The batter should be thick but smooth. If it feels too thin, add a bit more flour. This helps create a fluffy, cake-like base. For sweetness, taste the peach syrup before adding sugar. If it's very sweet, cut back on the sugar in the batter. This balance makes each bite delightful. Spices can take your cobbler to the next level. Adding cinnamon gives warmth. You can also try nutmeg or ginger for a twist. A splash of almond extract adds a nice touch, too. If you want more fruit flavor, mix in berries or apples. Just make sure to keep the total fruit amount similar to the peaches. Nothing beats warm cobbler with ice cream. The cold cream melts into the warm fruit, creating a tasty treat. You can also serve it with whipped cream for a lighter option. For a fun twist, try serving it in individual cups. Top with fresh mint or a sprinkle of cinnamon for extra flair. Enjoy your Easy Canned Peach Cobbler with these suggestions! {{image_4}} You can mix canned peaches with other fruits. Try adding sliced pears or cherries. Both fruits pair well with peaches. You can also use fresh fruits in summer. Strawberries or blueberries offer great flavor. In fall, consider apples or plums for a warm twist. Each fruit adds its charm to the cobbler. To make this dish lighter, use less sugar. Try half the sugar or use honey. You can also add oats or nuts for texture. Rolled oats make a great topping. Chopped nuts add crunch and flavor. This way, you keep the taste while adding nutrients. Want to change it up? Turn your cobbler into a dump cake. Just pour the batter over the fruit without stirring. It bakes into a unique dessert. You can also make muffins or cupcakes with this recipe. Just pour the batter into a muffin tin. Bake them until they’re golden brown. These variations keep your treats exciting. For the full recipe, check out the Delightful Canned Peach Cobbler section. To keep your canned peach cobbler fresh, store it in the fridge. Place it in an airtight container or cover it tightly with plastic wrap. This helps prevent it from drying out. Enjoy your leftovers within three to four days for the best taste. If you want to save some for later, freezing is a great option. First, allow the cobbler to cool completely. Then, cut it into portions. Wrap each piece in plastic wrap, then place them in a freezer-safe bag. You can store it in the freezer for up to three months. When it's time to enjoy your cobbler again, you can reheat it easily. The best way is to use an oven. Preheat the oven to 350°F (175°C). Place the cobbler in an oven-safe dish and cover it with foil. Heat for about 15 to 20 minutes until it's warm. You can also use a microwave for quick reheating. Place a portion on a microwave-safe plate and cover it with a damp paper towel. Heat for about 30 seconds, then check if it’s warm. Repeat if needed. This helps keep the texture soft and the flavor intact. How long can you store your peach cobbler? In the fridge, it lasts about three to four days. In the freezer, you can keep it for up to three months. Signs of spoilage include a sour smell or mold growth. If you see either, it’s best to toss it out. Always trust your senses to ensure you enjoy this tasty dessert safely. Yes, you can use fresh peaches! Fresh peaches taste great and add a nice texture. However, they need more prep time. You must peel, slice, and pit them. Canned peaches are quick and easy. They are also sweeter since they sit in syrup. Both options work well, but choose based on what you have. Check the cobbler at 35 minutes. The top should be golden brown. Insert a toothpick in the center. If it comes out clean, the cobbler is ready. If not, bake for a few more minutes. The edges should bubble slightly. This shows the filling is hot and thickened. Yes, you can prepare the cobbler in advance. Mix the batter and layer the peaches in the dish. Cover it and keep it in the fridge for up to 24 hours. When ready, bake it straight from the fridge. This method saves time and still tastes great. Reheat any leftovers in the oven for the best results. You learned how to make a delicious cobbler using canned peaches, following simple steps. You now know about ingredient substitutions, measuring tips, and how to store leftovers. You can create variations of the cobbler, from fruit combinations to healthier options. Think about serving it with ice cream or trying the unique styles we discussed. Now it's time to enjoy your tasty creation, share it with others, and experiment with your own ideas. Baking is fun, and this cobbler is a great start!
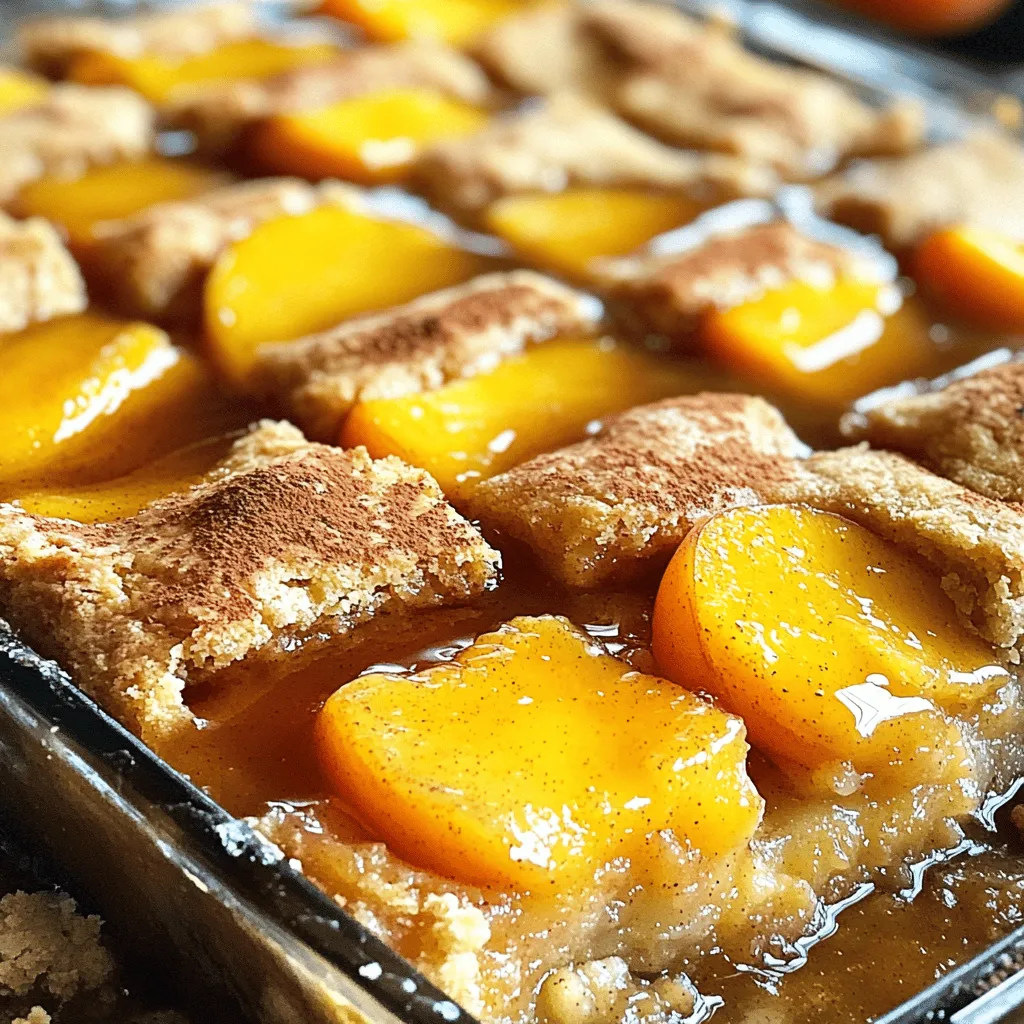
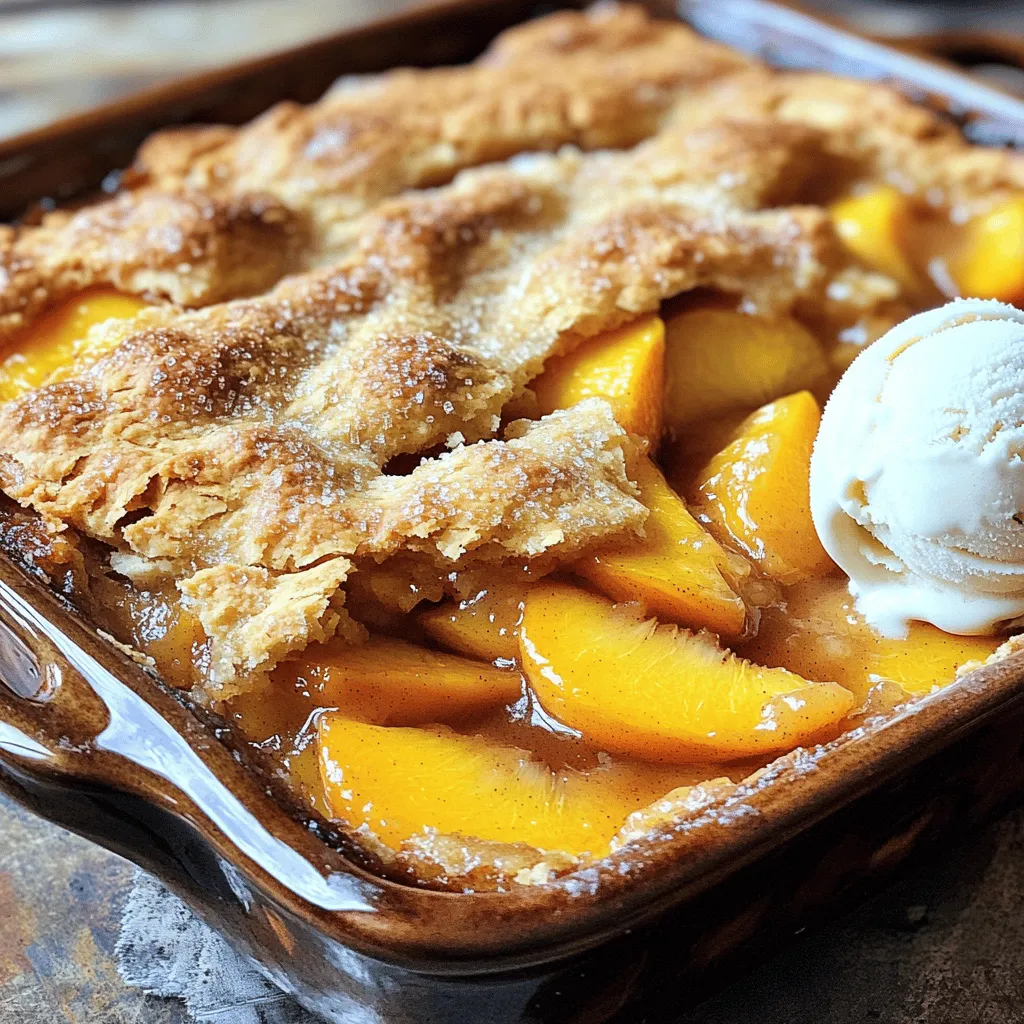
Easy Canned Peach Cobbler Simple and Flavorful Delight
Are you craving a sweet, summery dessert but short on time? Look no further! My Easy Canned Peach Cobbler is your answer. This simple yet
- 2 cups fresh raspberries - 2 cups fresh peaches, peeled and sliced - 1 tablespoon fresh lemon juice - Optional toppings: whipped cream or ice cream - 1 cup granulated sugar (divided) - 1 teaspoon pure vanilla extract - 1 teaspoon ground cinnamon - 1 teaspoon baking powder - 1 cup all-purpose flour - ½ teaspoon fine sea salt - 1 cup whole milk - ½ cup unsalted butter, melted When I make Raspberry Peach Cobbler, I love to use fresh ingredients. Fresh raspberries and peaches bring a burst of flavor, and the lemon juice adds a nice zing. The sweet and tart blend is simply heavenly. For the dry ingredients, I divide the sugar into two parts. One half sweetens the fruit, and the other half goes into the batter. Vanilla extract and ground cinnamon give a warm and inviting aroma. The baking powder helps the batter rise, while flour and salt provide structure. Don't forget the whole milk and melted butter! They add richness and moisture to the batter. You can find the full recipe for this delightful cobbler to guide you through each step. Enjoy the process and the delicious results! - Preheat the oven to 375°F (190°C). - Prepare the baking dish with cooking spray or butter. First, grab a large bowl and toss the fresh raspberries and peaches. Add half a cup of the granulated sugar, fresh lemon juice, and ground cinnamon. Use a spatula or your hands to mix gently. You want the fruit to be well coated but not smashed. Once mixed, spread this colorful fruit mix evenly in your prepared baking dish. In another bowl, mix the dry ingredients. Combine the all-purpose flour, baking powder, the remaining half cup of sugar, and fine sea salt. Stir until it looks uniform. In a different bowl, pour in the whole milk and melted butter. Gently stir this into the dry mix until just combined. It’s okay if there are lumps; they add character to your cobbler! Carefully pour the batter over the fruit in the baking dish. Use a spatula to spread it evenly, covering most of the fruit. Some fruit can peek through; it will caramelize nicely. Bake in the preheated oven for 35-40 minutes. Keep an eye on it! The top should turn golden brown. You can test with a toothpick; it should come out clean. Enjoy the process of making this delightful dessert! If you want the full details, check out the Full Recipe for more guidance. To make the best raspberry peach cobbler, start with ripe fruit. Ripe peaches and raspberries burst with flavor. They bring out the natural sweetness in your dish. You’ll notice a big difference in taste. Mixing the batter is also key. Don’t overmix it! Stir just until the ingredients come together. A few lumps are okay. This keeps the cobbler light and fluffy. Serve your cobbler warm for the best experience. Warm cobbler melts in your mouth. It tastes like a hug on a plate. Top it off with ice cream or whipped cream. These creamy additions add a nice contrast to the warm fruit. For this recipe, use a 9x13-inch baking dish. This size allows for even baking. You will also need basic kitchen tools like mixing bowls, a spatula, and a whisk. These tools make preparation simple and fun. For the full recipe, check out the [Full Recipe]. {{image_4}} You can easily switch up the fruits in this cobbler. If you want a twist, swap the raspberries for blueberries or strawberries. Both choices add a burst of flavor and color. You can also try using other stone fruits like plums or cherries. They provide a lovely sweetness and a juicy texture. If you need a gluten-free version, it’s simple. Use a gluten-free flour blend instead of all-purpose flour. Make sure to check the blend for proper binding. You may need to adjust the wet ingredients slightly. Add a bit more milk if the batter seems too thick. This will help keep your cobbler moist. For added texture, consider adding nuts or oats to the batter. Chopped walnuts or pecans can give a nice crunch. Oats add a hearty feel to the topping. You can also play with spices for new flavors. A pinch of nutmeg or cardamom can change the whole taste. Just a little will enhance the fruit and make your cobbler special. For the complete recipe, check out the Full Recipe for Raspberry Peach Cobbler Delight. To store uneaten cobbler, let it cool first. Place it in an airtight container. Make sure the lid seals tightly. This keeps the cobbler fresh and tasty. You can store it in the fridge for about three days. To reheat cobbler without losing texture, use the oven. Preheat it to 350°F (175°C). Place the cobbler in a baking dish. Cover it with foil to keep it moist. Heat for about 15-20 minutes. Check to see if it's warm all the way through. You can freeze the cobbler for longer storage. First, let it cool completely. Wrap it tightly in plastic wrap and then foil. This helps protect against freezer burn. To thaw, place the cobbler in the fridge overnight. For the best taste, reheat it after thawing. Enjoy it warm for that fresh-baked feel! Raspberry peach cobbler stays fresh for about 3 to 5 days. To keep it tasty, store it in the fridge. Use an airtight container to prevent drying out. If you won’t eat it within that time, consider freezing it. Yes, you can make raspberry peach cobbler ahead of time. Prepare it a day before and store it in the fridge. Bake it just before serving. This way, you can enjoy warm cobbler without much fuss. Yes, raspberry peach cobbler can be gluten-free. Use a gluten-free flour blend instead of all-purpose flour. Make sure other ingredients are also gluten-free. This way, everyone can enjoy this delicious dessert. You can use honey, maple syrup, or agave nectar as a sugar substitute. These options will change the flavor slightly. They add a nice sweetness without refined sugar. Adjust the amount to your taste when using these substitutes. For the full recipe, check the link provided. This blog showed you how to make a delicious Raspberry Peach Cobbler. You learned about the fresh and dry ingredients you need, plus some tips for success. The step-by-step instructions guide you from prep to baking. Remember, ripe fruit and minimal mixing make for the best texture. Feel free to play with different fruits or make it gluten-free. No matter how you serve it, enjoy your tasty treat! Now, go ahead and bake your own cobbler to share with friends and family.
Raspberry Peach Cobbler Simple and Tasty Dessert Recipe
Craving a dessert that bursts with fruity flavor? Try my Raspberry Peach Cobbler! This simple and tasty recipe is perfect for any occasion. With fresh
- Fresh peaches (4 cups, peeled and sliced) - Sugar (1 cup, divided) - Lemon juice (1 tablespoon) - Ground cinnamon (1 teaspoon) - Pure vanilla extract (1 teaspoon) - All-purpose flour (1 cup) - Baking powder (1 tablespoon) - Fine salt (½ teaspoon) - Whole milk (1 cup) - Unsalted butter (½ cup, melted) - Brown sugar (1 teaspoon for topping) - Optional: Vanilla ice cream for serving Fresh peaches are the star of this dish. Look for ripe, juicy peaches that smell sweet. You will need four cups of peaches, peeled and sliced. This gives the cobbler its lovely fruit base. You will also use one cup of sugar. Half will sweeten the peaches, and half will mix into the batter. The lemon juice brings brightness to the fruit. Just one tablespoon is enough. Ground cinnamon adds warmth to the cobbler. You only need one teaspoon. Pure vanilla extract boosts flavor, too. Use one teaspoon for a rich taste. For the dry ingredients, you need one cup of all-purpose flour, one tablespoon of baking powder, and half a teaspoon of fine salt. These help create a soft batter. The wet ingredients include one cup of whole milk and half a cup of melted unsalted butter. This makes the batter creamy. Lastly, add one teaspoon of brown sugar on top before baking. It gives a sweet, crispy finish. You can serve the cobbler warm with vanilla ice cream for a perfect summer dessert. For the full recipe, check the Golden Southern Peach Cobbler 🥧 section. - Preheat the oven to 350°F (175°C). - Grease a 9x13 inch baking dish with butter or non-stick spray. - Combine 4 cups of sliced peaches, ½ cup sugar, lemon juice, cinnamon, and vanilla in a bowl. - Let the mixture sit for 10 minutes. This helps the flavors blend together. - In a separate bowl, mix 1 cup flour, 1 tablespoon baking powder, ½ cup sugar, and ½ teaspoon salt. - Gradually add 1 cup milk and stir to form a smooth batter. Then, fold in ½ cup melted butter. - Spread the batter evenly in the greased baking dish. - Spoon the marinated peaches over the batter, including the juices. - Sprinkle 1 teaspoon brown sugar on top for extra sweetness. - Bake for 40-45 minutes. The cobbler should turn golden brown and a toothpick should come out clean. Enjoy the warm, sweet aroma filling your kitchen as it bakes! You can find the Full Recipe if you want all the details. To make a great peach cobbler, you need the best peaches. Look for ripe, slightly soft peaches. They should smell sweet and juicy. Avoid peaches that are overly bruised or firm. Firm peaches may not taste good when baked. A soft peach means it is ripe and ready to use. The texture of your cobbler matters. Adjust the sugar based on how sweet your peaches are. If your peaches are very sweet, you may need less sugar. This helps keep the dish balanced. Also, keep the batter and peaches separate. Don’t stir them together. This way, you get layers that are soft and tasty. Serving your cobbler is just as important as making it. Top it with a scoop of vanilla ice cream for extra indulgence. The cold ice cream melts into the warm cobbler. It's a great mix of flavors. Serve it warm for the best taste and texture. Warm peach cobbler is a delightful treat that everyone loves. For the full recipe, check out Golden Southern Peach Cobbler. {{image_4}} You can mix things up by adding berries. Blueberries or raspberries work great. They add a nice burst of color and flavor. Just toss in one cup of your chosen berries with the peaches. This combo makes a fresh and fruity dessert. The berries will bring a slight tartness that blends well with the sweet peaches. If you need a gluten-free dessert, you can easily change the flour. Instead of all-purpose flour, use almond or coconut flour. These flours give a nutty taste and are perfect for this dish. Just swap them in a 1:1 ratio. The cobbler will still be soft and delicious, perfect for everyone to enjoy. Want to try something new? Add spices like nutmeg or ginger for a warm twist. Just a pinch will do. These spices will give your peach cobbler a cozy flavor. You can mix in half a teaspoon of either spice into the peach mixture. It adds a unique touch that surprises and delights. Try these variations to make your fresh southern peach cobbler even more special! For the full recipe, check out the details above. After enjoying your peach cobbler, cover it with plastic wrap or foil. Store it in the fridge for up to three days. For the best taste, reheat it in the oven. This keeps the topping crisp and the filling warm. You can freeze peach cobbler for later. Use an airtight container to prevent freezer burn. It stays fresh for up to three months. When you’re ready to eat, just reheat it straight from the freezer. Add a few extra minutes to the cooking time to warm it through. To keep the topping nice and crunchy, store the cobbler uncovered. This way, it won’t get soggy. Enjoy your cobbler at its best by following these simple steps. For more details, check the Full Recipe. Yes, but adjust sugar as canned peaches are often sweeter. Canned peaches come in syrup, making them sticky. Use less sugar in your recipe. This change helps keep your cobbler from being too sweet. Look for a golden top and a clean toothpick test. When you insert a toothpick into the center, it should come out clean. The top should be brown and firm, not soft. Warm with vanilla ice cream or whipped cream for best experience. The cold ice cream melts into the warm cobbler. This mix of warm and cold is truly delightful. It lasts up to 3 days when properly stored. Store it in an airtight container to keep it fresh. Reheat it in the oven for the best taste. You will enjoy every bite, just like the first time! This article detailed how to make a delicious peach cobbler. We covered the main, dry, and wet ingredients needed. I shared step-by-step instructions for preparation and baking. Tips on selecting peaches and variations added depth. Storing and reheating methods ensure your cobbler stays fresh. Peach cobbler is simple and satisfying. Enjoy it warm with ice cream for a treat. This dessert brings comfort and joy, making every bite worthwhile. Try making it your own!
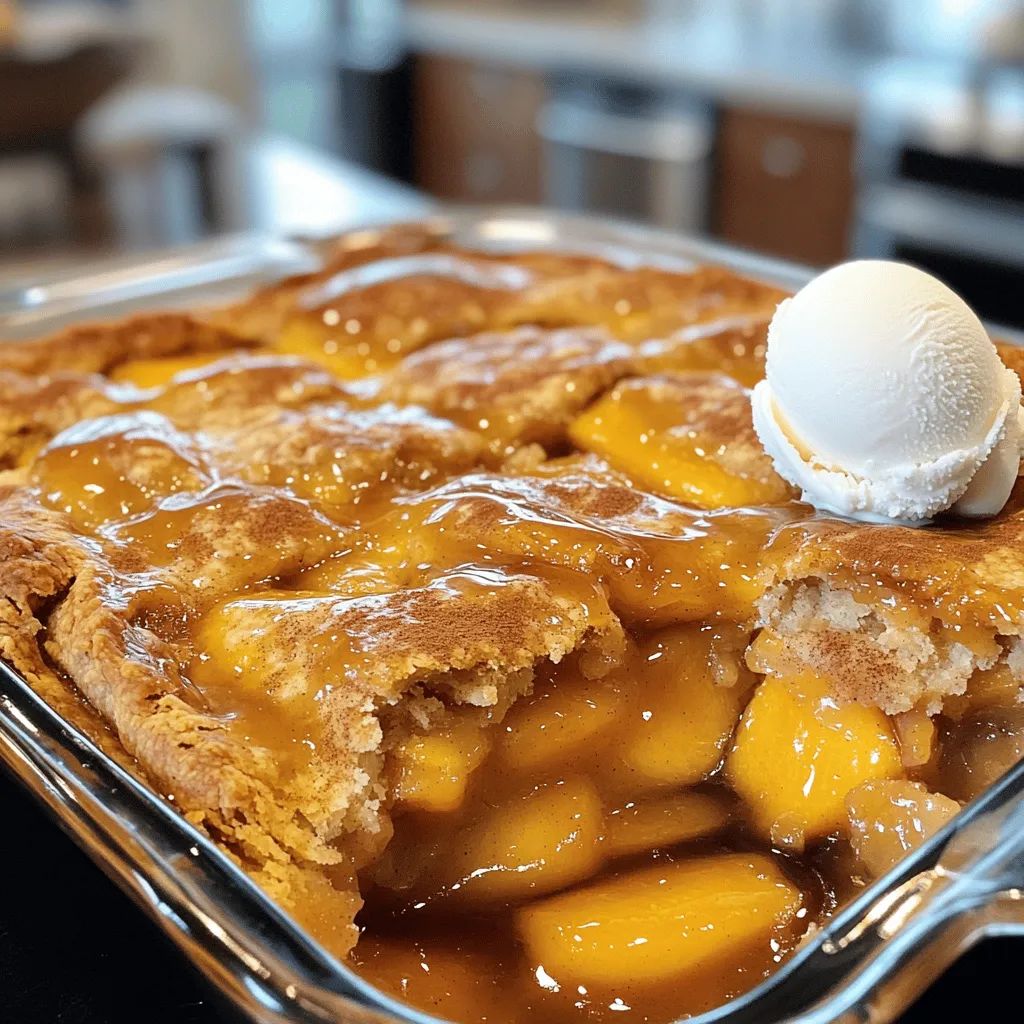
Fresh Southern Peach Cobbler Delightful Summer Treat
Are you ready to savor the taste of summer? This Fresh Southern Peach Cobbler is the perfect way to enjoy ripe, juicy peaches. With just
- Fresh peaches - Rolled oats - All-purpose flour Fresh peaches are the star of this dish. Choose ripe, juicy peaches for the best flavor. They add sweetness and moisture to the crisp. Next, rolled oats give texture. They create that crunchy topping you love. All-purpose flour helps bind the oats and adds a nice crumb. - Brown sugar - Ground cinnamon - Ground nutmeg Brown sugar adds depth and a rich sweetness. It caramelizes nicely when baked. Ground cinnamon and nutmeg offer warm flavors. Together, these spices enhance the peach taste. They make each bite delightful. - Unsalted butter - Chopped nuts - Vanilla extract Unsalted butter brings richness to the topping. It helps create that sought-after crumbly texture. Chopped nuts add crunch. You can use walnuts or pecans for a nice twist. Vanilla extract brightens the flavors. It makes the crisp smell amazing. For the full recipe, check out the link. Now you're ready to gather these ingredients and start cooking! To start, you need fresh peaches. Take four ripe peaches and peel them. Next, slice the peaches into thin wedges. Place the sliced peaches in a large bowl. Add 1/4 cup of brown sugar and a teaspoon of vanilla extract. Gently toss the peaches to coat them. This makes the peaches sweet and tasty. Then, spread the peach mixture evenly in a greased 9x13 inch baking dish. In another bowl, mix together the dry ingredients. Combine 1 cup of rolled oats, 1 cup of all-purpose flour, and 1/2 cup of brown sugar. Add a teaspoon of ground cinnamon, 1/2 teaspoon of ground nutmeg, and 1/4 teaspoon of salt. Stir this mixture well. Now, pour in 1/2 cup of melted unsalted butter. Mix it all until you get a crumbly texture, like wet sand. This will be your crisp topping. Now, it's time to layer the dish. Sprinkle the oat mixture evenly over the peaches. Make sure to cover all the fruit. This helps them cook evenly. Preheat your oven to 350°F (175°C). Place the baking dish in the oven. Bake for 30-35 minutes. You want the top to turn golden brown and the peaches to bubble. When it’s done, let it cool for a few minutes. Enjoy your Peach Crisp Treat warm, maybe with some ice cream on top. For the complete recipe, check the Full Recipe section. To get the right crumbly topping, mix the dry ingredients well. Use cold butter to keep the topping light. You want it to look like wet sand, not dough. This method keeps the crisp crunchy. For the peaches, slice them thick. Thick slices stay tender and juicy. If they are too thin, they can turn mushy. Mix the peaches gently with sugar and vanilla. This step helps enhance their natural flavor without losing their shape. You can add spices like ginger or cardamom for extra kick. A dash of nutmeg complements the sweetness of peaches. Try mixing in some fresh berries, too. They add a pop of color and flavor. Different nuts can change the taste. Walnuts add a rich flavor, while pecans give a buttery crunch. Feel free to experiment with your favorites. Each nut brings its own unique crunch. For serving, you can keep it simple. Serve the Peach Crisp Treat right from the baking dish. This gives a rustic feel and invites sharing. For a fancier look, scoop portions into bowls. Drizzle honey on top for sweetness. Finish with a mint sprig for color. This little touch makes it special. You can find the Full Recipe to create your own Peach Crisp Treat. Enjoy the warmth and joy it brings! {{image_4}} You can switch up the fruit in your Peach Crisp Treat. Apples and berries work great! For apples, use tart varieties like Granny Smith. They bring a nice balance to the sweet topping. You can also mix berries like blueberries or raspberries for a burst of color and flavor. Feel free to add a blend of fruits. This adds depth and fun to your dish. If you need gluten-free options, swap out the all-purpose flour for almond or oat flour. You can still enjoy a tasty dessert without gluten. For a vegan twist, use coconut oil instead of butter. Replace brown sugar with coconut sugar or maple syrup. These changes make the recipe suitable for various diets while keeping it delicious. Seasonal spices can elevate your Peach Crisp Treat. In fall, add nutmeg and cloves for warmth. During winter, use a hint of peppermint extract for a festive touch. You can also get creative with toppings. Try crushed gingerbread cookies for a holiday flair or sprinkle cinnamon on top for extra spice. Each season offers new ways to enjoy this dessert. Store your Peach Crisp Treat in the fridge. Use an airtight container to keep it fresh. This helps maintain its taste and texture for a few days. It’s best to cover the dish with plastic wrap if you don’t have a container. This keeps out air and moisture. To freeze Peach Crisp Treat, let it cool completely. Cut it into squares, then wrap each piece tightly in plastic wrap. Place wrapped pieces in a freezer bag. This way, they won’t stick together. For best results, eat within three months. To reheat, place a piece in the oven at 350°F (175°C) for about 15-20 minutes. This warms it up nicely. How long does peach crisp last? In the fridge, it lasts about three to four days. If frozen, expect it to last up to three months. Check for signs of spoilage. If you see mold or an off smell, it’s time to toss it. Enjoy your Peach Crisp Treat while it’s fresh! For the full recipe, explore the earlier section. Yes, you can use frozen peaches. First, thaw them completely. Place them in a bowl and let them sit at room temperature or microwave them for a short time. Once thawed, drain any excess liquid. This helps prevent a watery crisp. You want the peaches to hold their shape. Use the thawed peaches in the same way as fresh ones in the recipe. There are many fun options! Here are a few ideas: - Serve with whipped cream for a light touch. - Try yogurt for a creamy contrast. - Top with a sprinkle of granola for extra crunch. - Pair with a slice of cheddar cheese for a savory twist. These choices add variety and enhance the flavors of the peach crisp. To keep the topping crispy, follow these tips: - Bake the peach crisp until the top is golden brown. - Avoid over-mixing the topping; it should be crumbly. - Use old-fashioned rolled oats, as they hold up better. - Let it cool slightly before serving. This helps the juices set. These steps will ensure your crisp topping stays delicious and crunchy. To make a delicious Peach Crisp, we covered the key ingredients and steps. Fresh peaches, oats, and spices come together for the perfect treat. I shared how to prep, bake, and ensure the best texture. You can even try variations or dietary swaps for a unique twist. With proper storage, this dessert lasts and stays tasty. Enjoy creating your Peach Crisp, and impress others with your skills. Food is meant to be shared, so savor those moments with loved ones. Happy baking!
Peach Crisp Treat Simple and Delicious Delight
Are you ready for a sweet escape? This Peach Crisp Treat combines fresh peaches with a crunchy topping to create a simple and delicious dessert.
To make this pie, you need fresh peaches. Here’s the list of main ingredients: - 6 ripe peaches, peeled and sliced into thin wedges - 1 cup granulated sugar - 1 tablespoon fresh lemon juice - 1 teaspoon pure vanilla extract - 1 teaspoon ground cinnamon - 2 tablespoons cornstarch - 1 prepared pie crust (store-bought or homemade) These ingredients create a sweet and juicy filling that pairs perfectly with the crunchy topping. You will also need some common pantry items. Here’s what you need for the crumble: - 1 cup all-purpose flour - 1 cup rolled oats - 1/2 cup packed light brown sugar - 1/2 cup unsalted butter, melted and slightly cooled - Pinch of salt These staples help create that delicious crumble that adds texture to the pie. You can customize your peach crumble pie with some fun add-ins. Here are a few ideas: - Add nuts like walnuts or pecans for extra crunch. - Use honey or maple syrup instead of granulated sugar for a unique flavor. - Try adding a splash of almond extract for a twist on the classic taste. Feel free to mix and match to make this pie your own. For the complete recipe, check out the [Full Recipe]. Start by washing six ripe peaches. Use a peeler to remove the skin. Slice the peaches into thin wedges. Place them in a large bowl. Add one cup of granulated sugar. Squeeze in one tablespoon of fresh lemon juice. Pour in one teaspoon of pure vanilla extract. Sprinkle in one teaspoon of ground cinnamon. Finally, add two tablespoons of cornstarch. Stir gently to coat all the peach slices. Let this mixture sit for ten minutes. This time allows the flavors to blend well. Next, roll out your prepared pie crust. You can use store-bought or homemade crust. Dust a clean surface with flour to prevent sticking. Carefully place the crust into a 9-inch pie dish. Gently press it down into the dish. Trim any extra dough from the edges with a knife. This makes for a neat finish. In a separate bowl, mix together one cup of all-purpose flour. Add one cup of rolled oats and half a cup of packed light brown sugar. Pour in half a cup of melted and slightly cooled unsalted butter. Add a pinch of salt for taste. Use your fingers or a fork to blend these ingredients. Mix until it looks crumbly, like wet sand. Now, pour the peach mixture into your pie crust. Spread it out evenly for a balanced flavor. Sprinkle the crumble topping generously over the peaches. Make sure to cover all the filling. Place the pie in your preheated oven set to 350°F (175°C). Bake for 35 to 40 minutes. Look for a golden brown crumble and bubbling peach juices around the edges. Once done, take it out and let it cool for 15 minutes before slicing. This cooling time helps the filling set nicely. Enjoy your delicious peach crumble pie! For the complete recipe, refer to the Full Recipe section. When picking peaches, look for ones that feel slightly soft. A ripe peach should have a sweet aroma. The color should be a mix of yellow and red. Avoid peaches with bruises or dark spots. If they are hard, let them ripen at room temperature for a few days. You want the best fruit for a great pie! A flaky crust makes all the difference. If using store-bought crust, let it sit at room temp for 10 minutes. This helps it relax, making it easier to roll. For a homemade crust, chill your butter and water before mixing. This keeps the crust flaky. When making the crumble topping, mix until it looks like wet sand. This texture is key for crispiness. Spread it evenly on the peach filling. This ensures every bite has that crunchy topping. To boost flavor, add a pinch of nutmeg with the cinnamon. It adds warmth and depth. You can also mix in a handful of blueberries or raspberries for a color pop. For extra crunch, try adding chopped nuts like almonds or pecans to the crumble. If you want a burst of freshness, serve your pie with a scoop of vanilla ice cream. The cold creaminess pairs perfectly with warm pie. For a fun touch, sprinkle some fresh mint on top before serving. Try these tips to elevate your peach crumble pie experience. Enjoy the process, and happy baking! Check the full recipe for all the details. {{image_4}} You can boost flavors with spices. Try adding nutmeg or ginger to your peach mix. A pinch of allspice also works wonders. These spices enhance the natural sweetness of the peaches. You can also mix in some cardamom for a unique twist. Spice blends create warmth and depth in each bite. For a healthier pie, consider alternatives. You can use whole wheat flour instead of all-purpose flour. This adds fiber and nutrients to your crust. Swap white sugar for honey or maple syrup. Both options add sweetness and flavor while being more natural. If you want to cut calories, replace butter with coconut oil. This change keeps the topping crisp and tasty. Peach crumble pie is great with other fruits too. Mix in berries for a burst of color and taste. Blueberries and raspberries pair well with peaches. You can also use apples or pears for a fall vibe. Just adjust sugar based on the fruit's sweetness. Enjoy the fun of mixing flavors! Once you finish your peach crumble pie, you will want to keep it fresh. Store any leftover pie in the fridge. Use an airtight container or cover it with plastic wrap. This keeps the pie moist and prevents it from absorbing other smells. Enjoy your pie within 3 to 4 days for the best taste. If you want to save some pie for later, freezing is a great option. First, let the pie cool completely after baking. Wrap it tightly in plastic wrap and then in aluminum foil. This extra layer helps prevent freezer burn. You can freeze peach crumble pie for up to 3 months. When you're ready to eat it, just thaw it overnight in the fridge. When you want to enjoy your pie again, reheating it properly is key. Preheat your oven to 350°F (175°C). Place the pie on a baking sheet. Heat it for about 15-20 minutes. This warms the filling and crisp the crumble topping. If you prefer, you can also use the microwave. Just heat a slice for about 30 seconds, but it won't be as crisp. Enjoy every bite! Yes, you can use frozen peaches. Thaw them first and drain excess liquid. This helps prevent a soggy pie. Keep in mind that frozen peaches may need a bit more sugar for sweetness. Your pie is done when the top is golden brown and the fruit bubbles. You can check by looking for a bubbly fruit filling around the edges. This usually takes 35-40 minutes at 350°F (175°C). Peach crumble pie tastes great with vanilla ice cream. Whipped cream also works well. You can even serve it with a drizzle of caramel sauce for extra sweetness. To make the crumble topping gluten-free, swap all-purpose flour for almond flour or gluten-free flour. Use gluten-free oats to ensure the entire topping is safe for gluten-sensitive folks. This keeps the delicious crunch while meeting dietary needs. For the full recipe, check out the detailed instructions above. This peach crumble pie recipe is simple and delicious. It uses fresh, ripe peaches, which give it a sweet and juicy flavor. The pie has a buttery crust that holds all the goodness inside. You will love the crunchy crumble topping made from oats and brown sugar. Each bite is a mix of softness and crunch. To make this pie, you need to prepare the filling first. Combine peaches, sugar, and spices. Let it sit to enhance the taste. Then, spread the mixture into a pie crust. For the topping, mix flour, oats, and butter until crumbly. Bake the pie until golden brown. The warm, bubbling filling will tempt everyone. Each slice of this pie offers a delightful treat. Here’s a quick look at the nutritional facts: - Calories: 280 - Fat: 12g - Carbohydrates: 42g - Protein: 3g - Fiber: 2g - Sugar: 18g These values can change based on portion size and ingredients used. It's good to enjoy in moderation. Peach crumble pie shines on its own, but you can make it even better. Here are some tasty ideas: - Ice Cream: Serve warm slices with a scoop of vanilla ice cream. The cold creaminess balances the warm pie. - Whipped Cream: A dollop of fresh whipped cream adds lightness and sweetness. - Mint Leaves: Garnish with mint leaves for color and a fresh taste. - Coffee or Tea: Pair the pie with a warm drink for a comforting dessert experience. You can find the full recipe and detailed steps in the earlier sections. Enjoy every slice! You learned how to make a delicious peach crumble pie, from picking the right peaches to baking it perfectly. With simple steps, you can create a tasty dessert. Remember to experiment with flavors and substitutes for your own twist. Store leftovers well and enjoy them later. I hope you feel confident to try this recipe. Happy baking!
Peach Crumble Pie Simple and Delicious Delight
If you love peaches, you’ll adore this Peach Crumble Pie! It’s simple, tasty, and perfect for any occasion. I’ll guide you through each step, from
- 4 ripe peaches, peeled and sliced into thin wedges - 1 cup granulated sugar, divided - 1/2 cup all-purpose flour - 1 teaspoon baking powder - 1/4 teaspoon salt - 1 cup whole milk - 1/2 cup unsalted butter, melted and slightly cooled - 1 teaspoon vanilla extract - 1 teaspoon ground cinnamon - Whipped cream or vanilla ice cream, for serving Fresh peaches are the star of this dish. They should be ripe and juicy. I recommend peeling and slicing them thin. This helps their flavor spread throughout the pudding. You will need some key pantry items for this recipe. Sugar adds sweetness, while flour helps bind everything together. Baking powder makes the pudding rise and become fluffy. Additionally, don’t forget the wet ingredients. Whole milk gives the pudding creaminess. Melted butter adds richness, and vanilla extract brings a lovely aroma. Finally, ground cinnamon elevates the flavor, making every bite warm and inviting. For serving, whipped cream or vanilla ice cream makes the perfect topping. It adds creaminess and contrasts nicely with the warm pudding. Check out the Full Recipe for more details! To peel peaches, first, make a small "X" on the bottom. Place them in boiling water for 30 seconds. Quickly transfer them to ice water. The skins will slip right off. Next, slice the peaches into thin wedges. Macerating the peaches makes them sweeter. In a bowl, mix the sliced peaches with half a cup of sugar. Stir gently and let them sit for about ten minutes. This draws out their juices and boosts their flavor. In a clean bowl, combine the flour, remaining sugar, baking powder, and salt. Stir them well. This mix gives the pudding a great texture. Now, pour in the milk, melted butter, and vanilla extract. Mix until just combined. It's okay if the batter is a bit lumpy. This helps create a nice texture in the final dish. Gently fold in the macerated peaches with their juices. Be careful not to overmix. You want to distribute the peaches evenly without breaking them up. Transfer the peach batter to your greased baking dish. Spread it evenly with a spatula. This ensures it bakes uniformly. Sprinkle ground cinnamon over the top. This adds extra flavor while it bakes. Place the dish in your preheated oven. Bake for 35 to 40 minutes. You'll know it's ready when it turns golden brown. A toothpick should come out clean from the center. Remove the pudding from the oven and let it cool for ten minutes. This makes it easier to slice and enhances the flavors. For the full recipe, check out the instructions above. To make your Southern peach pudding shine, avoid these common mistakes: - Using unripe peaches: They lack flavor and sweetness. Choose ripe, juicy peaches for the best taste. - Overmixing the batter: This makes the pudding tough. Mix just until combined for a light texture. - Skipping the maceration step: Letting the peaches sit with sugar boosts their flavor. Don’t rush this step. For the right texture, follow these tips: - Batter lumps are okay: They help create a delightful texture. Don’t worry about a perfectly smooth mix. - Check your oven temperature: An oven thermometer can help. An accurate temperature ensures even baking. When it’s time to serve, add these toppings for extra flavor: - Whipped cream: This classic choice adds lightness and sweetness. - Vanilla ice cream: The creaminess pairs perfectly with warm pudding. - Fresh peach slices: They add color and enhance the peach flavor. For plating and presentation, try these ideas: - Serve in individual bowls: This makes each portion feel special. - Drizzle peach juices on top: It adds a beautiful sheen and extra sweetness. - Sprinkle with cinnamon: A light dusting before serving adds warmth and aroma. For the complete recipe, check out the Full Recipe. Enjoy your cooking! {{image_4}} You can switch up the main fruit in Southern Peach Pudding. Try using ripe nectarines or plums if you can't find peaches. For sweeteners, consider brown sugar or honey. These options add a deep flavor and a unique touch. If you need a dairy-free version, substitute whole milk with almond or coconut milk. You can also use a dairy-free butter for the melted butter. For gluten-free options, swap all-purpose flour for almond flour or gluten-free flour blends. To make your pudding special, consider adding spices. Nutmeg, ginger, or cardamom can enhance the flavor. A splash of almond or lemon extract adds a nice twist, too. Seasonal variations can brighten your dish. In fall, add diced apples and a pinch of nutmeg. In winter, try cranberries or pears for a festive flair. Each change gives your dessert a fresh taste while keeping the comforting essence of Southern Peach Pudding. For more details, you can find the Full Recipe online. To keep your Southern Peach Pudding fresh, follow these steps. First, let the pudding cool completely at room temperature. After that, cover it tightly with plastic wrap or aluminum foil. This will prevent it from drying out. Store it in the fridge for up to three days. When you’re ready to enjoy it again, reheat your pudding in the oven. Preheat the oven to 350°F (175°C). Place the pudding in an oven-safe dish and cover it with foil. Heat for about 15-20 minutes or until warm. This method helps maintain its texture and flavor. If you want to save some pudding for later, freezing is a great option. Cut the pudding into individual portions. Wrap each piece tightly in plastic wrap, then place it in a freezer-safe bag. Make sure to remove as much air as possible to prevent freezer burn. You can freeze the pudding for up to two months. When you’re ready to eat it, take a portion out of the freezer. Let it thaw in the fridge overnight. If you need it faster, you can microwave it on low power until soft. Enjoy your delicious Southern Peach Pudding whenever you want! You can thicken your Southern Peach Pudding by using a few simple methods: - Add More Flour: Increase the flour to create a denser pudding. - Use Cornstarch: Mix a tablespoon of cornstarch with cold water to make a slurry. Add this to the batter. - Reduce Liquid: Use less milk to make the pudding thicker. If you want a creamier texture, try adding an extra egg. This can help bind everything together while adding richness. Yes, you can use canned peaches, but there are pros and cons: - Pros: Canned peaches save time. They are easy to find and often already sweetened. - Cons: Canned peaches may lack the fresh flavor of ripe ones. They can also be mushy, which changes the pudding's texture. If you use canned peaches, drain them well. This prevents extra liquid from making your pudding too runny. Southern Peach Pudding can last about 3 to 5 days in the fridge. Be sure to store it in an airtight container. To keep it fresh, let it cool completely before covering. If you notice any signs of spoilage, it’s best to toss it out. Enjoy it warm or cold, but avoid keeping it too long to enjoy the best flavor! In this blog post, we covered how to make Southern Peach Pudding from scratch. We looked at the necessary ingredients, how to prepare peaches, and the steps for mixing and baking. I shared valuable tips to help you avoid mistakes and suggested tasty toppings. Remember, you can also try variations to suit your taste. With the right techniques, your dessert will impress everyone. Enjoy making this treat and share it with loved ones. Your Southern Peach Pudding will surely be a hit!
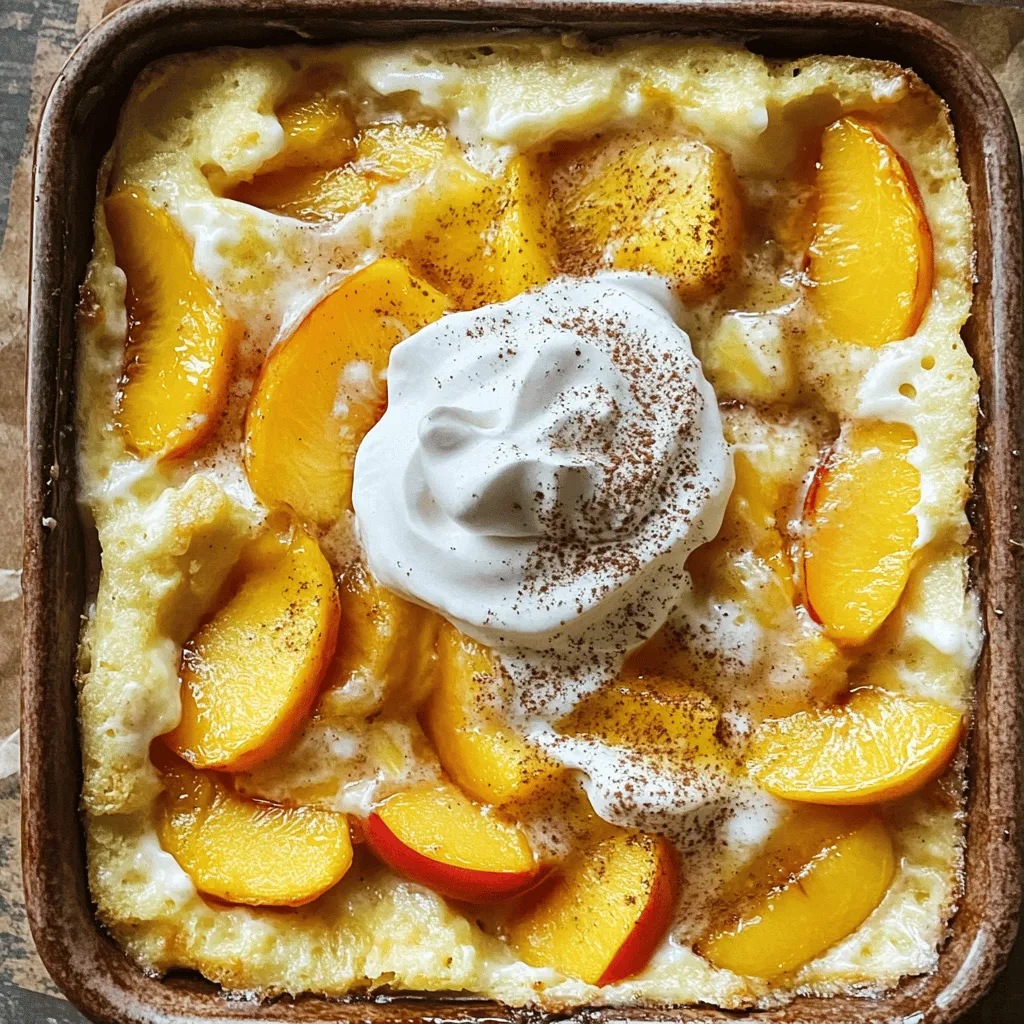
Savory Southern Peach Pudding Simple and Tasty Recipe
If you love sweet, juicy peaches, you’ll adore this Southern Peach Pudding! This simple recipe showcases fresh peaches and combines them with easy-to-find pantry staples.
- 2 cups fresh strawberries, hulled and halved - 1 prepared pie crust (store-bought or homemade) - 1 cup granulated sugar (¾ cup + ¼ cup) - 2 tablespoons cornstarch - 1 tablespoon freshly squeezed lemon juice - 1 teaspoon pure vanilla extract - 1 tablespoon unsalted butter, diced - Whipped cream (optional) - Additional strawberry slices for garnish When making the ultimate strawberry pie, fresh strawberries are key. They bring bright flavor and sweetness. Choose ripe, juicy berries for the best taste. The pie crust can be store-bought or homemade, depending on your time. Granulated sugar sweetens the pie and helps it set. The cornstarch thickens the filling, giving it a nice texture. Lemon juice adds a zesty kick, enhancing the strawberry flavor. Vanilla extract brings warmth and depth. Diced butter adds richness and helps the filling caramelize as it bakes. For serving, whipped cream elevates the pie, making it even more special. You can also add extra strawberry slices on top for a nice touch. For the full recipe, it shows how to blend these ingredients into a delicious dessert. Start by tossing the halved strawberries with ¾ cup of sugar, cornstarch, lemon juice, and vanilla extract. Mix them gently to coat each strawberry slice. This step is key. Let the mixture sit for 10-15 minutes. During this time, the strawberries will release their juices, making the filling sweeter and more flavorful. Next, pour the strawberry mixture into your prepared pie crust. Spread it evenly so every bite is packed with flavor. Dot the top with small pieces of butter. This adds a rich taste to the filling. Then, sprinkle the remaining ¼ cup of sugar over the strawberries. This will help create a lovely caramelized top while baking. First, preheat your oven to 425°F (220°C). Place the pie in the oven and bake for 15 minutes. After that, reduce the heat to 350°F (175°C) and bake for another 30 minutes. Keep an eye on it! The filling should bubble, and the crust should turn a nice golden brown. Once done, remove the pie and cool it on a wire rack for at least 2 hours. This cooling time helps the filling set, making it easier to slice. For a great pie crust, you can go homemade or store-bought. Homemade crust gives a fresh taste. It also lets you control the ingredients. Store-bought is quick and easy, saving you time. If you choose store-bought, look for one with few ingredients. This ensures quality. To prevent a soggy bottom, keep these tips in mind: - Pre-bake the crust for about 10 minutes. This helps it firm up. - Use a fork to poke holes in the crust before baking. This allows steam to escape. - Brush a thin layer of melted butter or egg wash on the crust. This creates a barrier against moisture. To boost the flavor, consider adding a pinch of cinnamon or nutmeg. These spices add warmth and depth. A splash of almond extract can also enhance the pie's taste. Choosing ripe strawberries is key. Look for berries that are bright red, firm, and fragrant. Avoid any with white or green spots. These are not fully ripe. For the best flavor, buy strawberries in season. They taste sweeter and juicier. Serve your pie at room temperature for the best taste. Cold pie can dull the flavors. If you enjoy it warm, let it cool for about 30 minutes after baking. For an eye-catching presentation, try these garnishes: - A dollop of whipped cream adds creaminess. - Fresh mint leaves bring a pop of color and flavor. - Extra strawberry slices on top offer a lovely touch. These tips will help make your Ultimate Strawberry Pie even more delightful! {{image_4}} You can mix strawberries with other berries like blueberries or raspberries. This adds more flavor and color. Try different fruit combinations to find your favorite. Using frozen strawberries is another great option. They are easy to find and can taste just as good. Just make sure to thaw and drain them before using. This step helps prevent a soggy pie. If you need a gluten-free option, choose a gluten-free pie crust. Many stores sell these now. You can also make a crust using almond or coconut flour. Reducing sugar is easy too. You can cut the sugar in half or use alternatives like honey or maple syrup. These swaps keep the pie sweet while being a bit healthier. Turn the pie into mini tarts for fun servings. Use small tart shells and fill them with the strawberry mixture. This makes great bite-sized treats for parties. Pairing the pie with ice cream or yogurt is a classic choice. The coolness of ice cream and creaminess of yogurt complement the pie perfectly. It’s a delightful way to enjoy your Ultimate Strawberry Pie. To keep your leftover pie fresh, store it in the refrigerator. Place the pie in an airtight container or cover it tightly with plastic wrap. This helps avoid drying out. If you use a pie dish, just cover it well. Aim to eat the leftovers within three to four days for the best taste. Want to save your pie for later? You can freeze it! Wrap the pie tightly in plastic wrap, then in aluminum foil. This keeps it safe from freezer burn. For best results, freeze the pie whole. If you only have leftover filling, pour that into a freezer-safe container. When you're ready to enjoy, thaw the pie or filling in the fridge overnight. This keeps the texture nice and smooth. To reheat your pie without losing quality, use the oven. Preheat it to 350°F (175°C). Place the pie on a baking sheet and cover it with foil. Heat for about 15-20 minutes. This warms the filling gently and keeps the crust crisp. If you want, you can also microwave individual slices for quick bites. Just cover the slice with a damp paper towel to keep it moist. Enjoy your pie warm! Yes, you can use frozen strawberries. They work well in this pie. Just thaw them first and drain excess juice. This step helps keep your pie from getting soggy. Frozen berries might be a bit softer, but they still taste great. Make sure to adjust the sugar if your frozen berries are sweetened. Using frozen strawberries is a great option when fresh ones are out of season. You can store the Ultimate Strawberry Pie in the fridge for up to three days. Cover it with plastic wrap or foil to keep it fresh. After that, the crust may get soft. If you want to keep it longer, freeze it. This pie can last up to three months in the freezer. Just remember to wrap it tightly. Thaw it overnight in the fridge before serving. Yes, you can make the pie crust from scratch. A simple recipe uses flour, butter, and water. Combine 1 ½ cups flour, ½ cup butter (cold and diced), and a few tablespoons of ice water. Mix until it forms a dough. Roll it out and fit it into your pie dish. A homemade crust has a fresh taste and better texture than store-bought. Plus, you can adjust the flavor to your liking. You can use honey or maple syrup instead of granulated sugar. Both add sweetness and flavor. Use less honey or syrup since they are sweeter. If you prefer a sugar substitute, consider using Stevia or erythritol. These options are lower in calories. Just keep in mind that they may change the taste slightly. Always taste the filling as you mix, to find your perfect balance. For the Full Recipe, check out the detailed steps to make this delicious pie. We covered the essential ingredients and steps to make a delightful strawberry pie. You learned how to prepare the strawberries, assemble the pie, and bake it to perfection. Don’t forget to enhance flavors and consider variations for unique twists. Proper storage and reheating will keep leftovers tasty. Now, you can impress everyone with your pie-making skills. Enjoy each bite and share it with those you love. Happy baking!
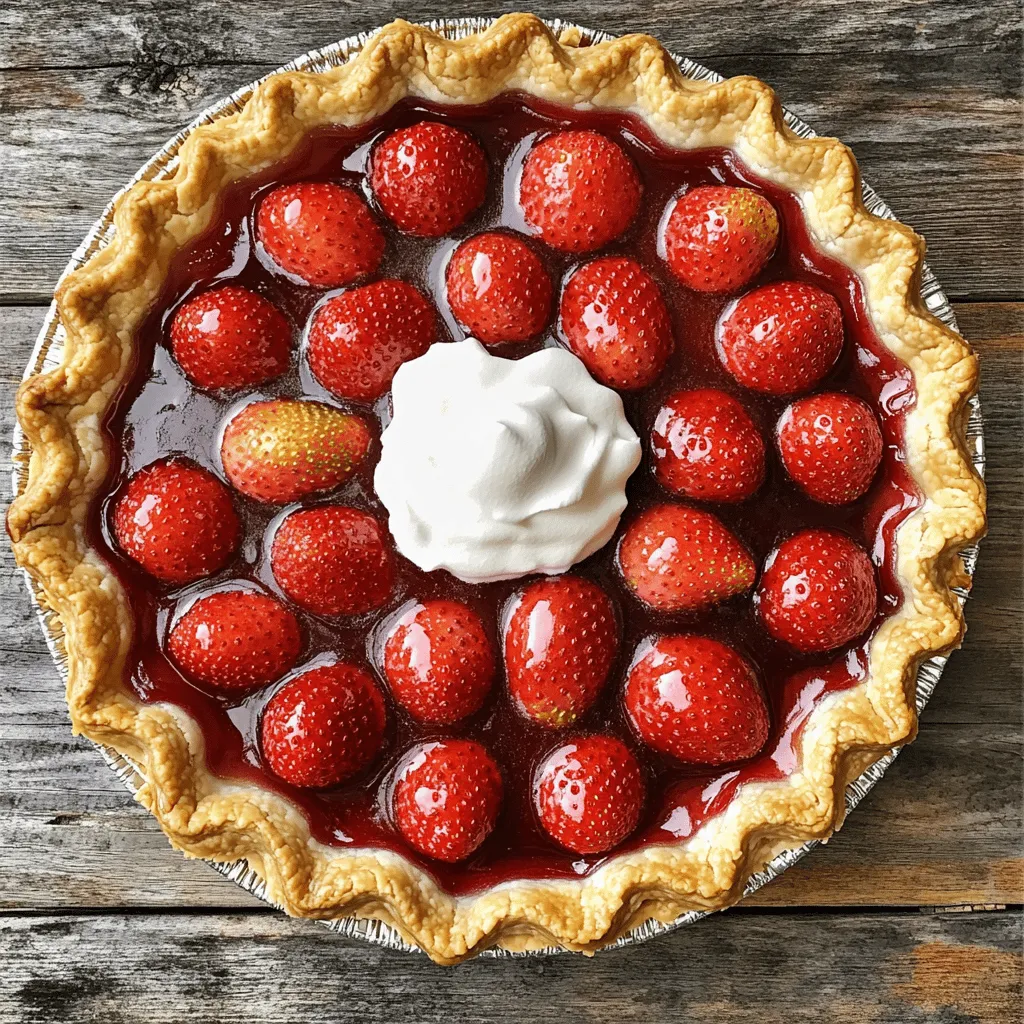
Ultimate Strawberry Pie Irresistible Summer Treat
Summer is the perfect time for a delightful dessert, and there’s nothing better than the Ultimate Strawberry Pie. This pie bursts with fresh strawberries and