Desserts
![Creating a Super Moist Chocolate Cake starts with the right ingredients. Each one plays a key role in making the cake rich and tender. Here’s what you need: - 1 ¾ cups all-purpose flour - 3/4 cup unsweetened cocoa powder - 2 cups granulated sugar - 1 ½ teaspoons baking powder - 1 ½ teaspoons baking soda - 1 teaspoon salt - 2 large eggs - 1 cup whole milk - 1/2 cup vegetable oil - 2 teaspoons vanilla extract - 1 cup boiling water - 1 cup sour cream - Optional: chocolate chips or chopped dark chocolate Using quality ingredients is essential for the best taste. The flour provides structure, while cocoa adds a deep chocolate flavor. Sugar sweetens the cake and helps it stay moist. Baking powder and baking soda make the cake rise. Salt enhances the flavors of all the ingredients. Eggs bring richness and help bind everything together. Whole milk adds creaminess, and vegetable oil keeps the cake soft. Vanilla extract gives a warm note to the cake. The boiling water ensures the batter mixes smoothly and helps the cake stay moist. Finally, sour cream adds richness and tang. For a fun twist, you can add chocolate chips or dark chocolate. They melt into the cake as it bakes, giving extra bursts of chocolate flavor. By gathering these ingredients, you're on your way to making a cake that is not just tasty but also moist and delicious. For the full recipe, check out the complete steps to bring this cake to life! 1. Preheat your oven to 350°F (175°C). Grease and flour two 9-inch round cake pans. You can also line the bottoms with parchment paper. This makes it easy to remove the cakes later. 2. In a large bowl, sift together 1 ¾ cups all-purpose flour, 3/4 cup unsweetened cocoa powder, 2 cups granulated sugar, 1 ½ teaspoons baking powder, 1 ½ teaspoons baking soda, and 1 teaspoon salt. Whisk these dry ingredients well. This helps to mix and aerate them. 3. In another bowl, whisk 2 large eggs, 1 cup whole milk, 1/2 cup vegetable oil, and 2 teaspoons vanilla extract. Make sure this mixture is smooth and well blended. 4. Gradually add the wet mixture to the dry ingredients. Use an electric mixer on medium speed. Mix for about 2 minutes until the batter is velvety and lump-free. 5. Carefully add 1 cup of boiling water to the batter. Mix just until combined. It may look thin, but this gives the cake its moist texture! 6. Next, fold in 1 cup of sour cream. This adds even more moisture. If you want, you can add in chocolate chips or chopped dark chocolate for extra richness. 1. Pour the batter evenly into the two prepared pans. Use a spatula to smooth the tops. 2. Bake the cakes for 30 to 35 minutes. They are done when a toothpick inserted into the center comes out clean or with a few moist crumbs. 3. After baking, let the cakes cool in the pans for about 10 minutes. Then, carefully remove them and transfer to a wire rack. Let them cool completely before frosting. For the full recipe, check out the details above. Remember, these steps will help you bake a super moist chocolate cake that everyone will love! To make the best Super Moist Chocolate Cake, start with fresh ingredients. Fresh eggs and milk make a big difference in the cake's texture. Using high-quality cocoa powder also boosts the flavor. Next, boiling water is key. When you add it to the batter, it helps the cocoa dissolve. This step creates a smooth, rich texture. It also activates the baking soda, giving your cake a nice rise. Sour cream is a secret weapon for moisture. It keeps the cake soft and tender. If you want an even richer cake, add chocolate chips or chopped dark chocolate. They melt into the cake, making each bite a delight. For a chocolate cake, I love using cream cheese or buttercream frosting. Both pair well with chocolate. You can even mix them for a unique flavor. To get a smooth frosting finish, make sure your cake is cool. Use a spatula to spread the frosting evenly. If you want a glossy look, warm your frosting slightly before applying. For decoration, think outside the box. Try adding chocolate shavings or fresh berries. These not only look great but also add extra flavor. Enjoy being creative with your cake! For all the details, check out the [Full Recipe]. {{image_4}} You can enhance your Super Moist Chocolate Cake with simple tweaks. Adding espresso powder boosts the chocolate flavor. Just a teaspoon or two can make a big difference. You might also try incorporating spices like cinnamon or chili. A dash of cinnamon adds warmth, while chili gives a fun kick. These flavors create an exciting twist that surprises your taste buds. If you need a gluten-free option, try almond flour. It gives the cake a nutty flavor and keeps it moist. Just replace the all-purpose flour with the same amount of almond flour. For a vegan version, use plant-based substitutes. Swap eggs for flaxseed meal mixed with water. Use almond milk instead of whole milk and opt for vegetable oil. These changes keep the cake rich and moist without animal products. For the full recipe, check out the detailed instructions above. Enjoy experimenting with these variations! To keep your Super Moist Chocolate Cake fresh, store it at room temperature. Use a cake dome or wrap it in plastic wrap. This keeps moisture in and prevents it from drying out. If you have leftovers, you can store them in the fridge. Just place the cake in an airtight container. This way, it stays moist and tasty for a few days. You can also freeze your cake for future enjoyment. To do this, wrap slices in plastic wrap. Then, place them in a freezer bag or airtight container. This protects the cake from freezer burn. When you’re ready to enjoy it, thaw the cake slowly. Move it to the fridge overnight. This keeps the cake moist and delicious when you serve it again. Remember, proper storage is key to maintaining that rich, moist texture. Enjoy every bite of your Super Moist Chocolate Cake again and again! For the full recipe, check out the details above. How long does it take to bake? It takes about 30 to 35 minutes to bake this cake. Check it with a toothpick. If it comes out clean or has a few moist crumbs, it's done! Can I substitute ingredients in the recipe? Yes, you can make some swaps. Use almond milk instead of whole milk. You can also try coconut oil in place of vegetable oil. Just remember, these changes may alter the taste slightly. What is the best way to ensure the cake is moist? Using fresh ingredients is key. The boiling water in the batter helps a lot, too. Don’t skip the sour cream; it keeps the cake soft and tender. What to do if the cake is too dry? If your cake is dry, add a simple syrup. Mix equal parts sugar and water, heat until dissolved, and brush it over the cake layers. This adds moisture back in. Why did my cake sink in the middle? A sinking cake could be due to underbaking or too much batter in the pan. Make sure to follow the baking time and check with a toothpick. How to fix an overbaked chocolate cake? If your cake is overbaked, try serving it with ice cream or whipped cream. This adds moisture back into each slice and makes it more enjoyable. Best tools for baking a chocolate cake? Use good quality cake pans, a mixer, and a spatula. These tools help ensure even mixing and baking. How to create an even cake layer? Distribute the batter evenly in the pans. Use a scale to measure if needed. This helps the layers bake evenly. Importance of patience while baking Baking takes time, so don’t rush it. Give the cake enough time to cool before frosting. This keeps the frosting from melting and sliding off. You now have all the tools to bake a super moist chocolate cake. We covered essential ingredients, clear preparation steps, and helpful tips for success. Remember to use fresh ingredients and boiling water for moisture. Consider flavor and dietary variations to suit your taste. Store your cake properly to enjoy it later. With these tips, you can create a delicious cake that impresses everyone. Happy baking!](https://tossedflavors.com/wp-content/uploads/2025/07/d7223597-a4ab-478e-aafe-545624278589.webp)
Super Moist Chocolate Cake Irresistibly Delicious Treat
Are you ready to indulge in a slice of heaven? This Super Moist Chocolate Cake is more than just a dessert; it’s an experience! With
. Start by gathering all your ingredients. You need fresh zucchini, sugar, butter, and eggs. Grate the zucchini first. This helps it mix well into the batter. Measure your ingredients carefully. Use a scale if you have one. It makes baking more reliable. In a big bowl, add the softened butter and sugar. Use an electric mixer to blend them. Mix on medium speed until it looks fluffy. This takes about 3 to 4 minutes. Next, add the eggs one by one. Mix well after each egg. Then, pour in the lemon juice and zest. Keep mixing until everything is smooth. In another bowl, whisk together the flour, baking powder, baking soda, salt, cinnamon, and nutmeg. Make sure there are no lumps. This is key for even baking. Once mixed, set it aside while you finish the wet mix. Now, it’s time to combine the mixtures. Slowly add the dry mix into the wet mix. Stir gently until just combined. It's okay if some lumps remain. Next, fold in the grated zucchini and any nuts you want. This adds a nice crunch. Make sure the zucchini is evenly mixed in. Pour the batter into a greased loaf pan. Smooth the top with a spatula. Sprinkle sugar on top for a sweet crust. Place your loaf pan in the preheated oven. Bake for 50 to 60 minutes. Check if it's done by inserting a toothpick. It should come out clean or with a few crumbs. Once it’s baked, take it out of the oven. Let it cool in the pan for about 10 minutes. Then, move it to a wire rack. Let it cool completely before slicing. When ready to serve, arrange the slices nicely. A sprinkle of lemon zest adds a lovely touch. Enjoy this delightful lemon zucchini bread! For the full recipe, check out the earlier section. To get the best texture in your lemon zucchini bread, focus on your mixing. Start with softened butter and sugar. Mix until fluffy. This step adds air and makes your bread light. When you add the flour, stir gently. Overmixing can lead to a dense loaf. Overmixing can ruin your bread. Once you add the flour, mix just until combined. It’s okay to leave some lumps. They will bake out. This helps keep the bread soft and moist. Be gentle when folding in the zucchini too. Grate your zucchini with a box grater. Use the medium holes for the best size. After grating, squeeze out excess water. Too much moisture can make your bread soggy. You can use a clean cloth or paper towel for this. When it’s time to serve, slice the bread while still warm. You can serve it plain or with a spread. Cream cheese or butter works great. For a fancy touch, sprinkle some lemon zest on top. It adds a nice pop of color and flavor. You can boost the flavor with fun add-ins. Try adding chocolate chips for sweetness. Nuts give a good crunch. Dried fruit like cranberries or apricots also works well. Each addition makes the bread unique. Feel free to experiment! For the full recipe, check out the details above. {{image_4}} You can make a gluten-free version of this bread. Replace all-purpose flour with a gluten-free blend. Look for a mix that includes xanthan gum. This will help your bread rise. Follow the same steps in the recipe. Your bread will still be moist and tasty. To make this recipe vegan, swap out the eggs. Use flaxseed meal instead. Mix 1 tablespoon of flaxseed meal with 3 tablespoons of water for each egg. Let it sit for a few minutes. This will create a gel-like consistency. You can also replace the butter with coconut oil or vegan butter. Your bread will still be fluffy and delicious. You can change the flavor of your zucchini bread easily. Try adding fresh herbs like basil or thyme. Just a teaspoon of either will give your bread a unique taste. You can also add spices, like ginger or cardamom, for warmth. A pinch of these can enhance the lemon flavor. Feel free to experiment. Each twist will make your bread special. For the full recipe, check out the details above. To keep your lemon zucchini bread fresh, wrap it tightly in plastic wrap. Place it in an airtight container or a zip-top bag. This method prevents the bread from drying out. Keep it at room temperature for up to three days. If you want it to last longer, refrigerate it. Just remember, refrigeration can change the texture. You can freeze lemon zucchini bread for up to three months. First, let it cool completely. Then, wrap it tightly in plastic wrap. For extra protection, add a layer of aluminum foil. Label the package with the date. When you are ready to eat it, thaw it overnight in the fridge. To reheat your bread, use an oven or a microwave. For the oven, preheat it to 350°F (175°C). Then, wrap the bread in foil to keep it moist. Heat for about 10-15 minutes. If you use a microwave, slice the bread and heat it for 10-15 seconds. Enjoy it warm for the best taste! Lemon Zucchini Bread can last for about 3 to 5 days at room temperature. Store it in an airtight container to keep it fresh. If you want it to last longer, you can refrigerate it for up to a week. Yes, you can use frozen zucchini! Just thaw it and drain any excess water before adding it to the batter. This helps keep the bread from getting too wet. This recipe is the best because it blends fresh lemon with moist zucchini. The flavor is bright and refreshing. It also has a perfect balance of sweetness and spice. Plus, it is easy to make and uses simple ingredients. Absolutely! You can divide the batter into mini loaf pans. Bake them for about 25 to 30 minutes. Just check with a toothpick to make sure they are done. Yes, you can reduce the sugar if you want. Cut back by about 1/4 cup for a less sweet bread. You can also add more lemon juice for extra flavor if you reduce the sugar. For the full recipe, check here. You learned about the best way to make lemon zucchini bread. We covered key ingredients, baking steps, and useful tips. Variations like gluten-free and vegan options add appeal. You can store it well or freeze for later. Remember, small changes can enhance flavor. With this guide, you can enjoy a tasty loaf anytime. Now, it’s your turn to bake and share this delight with others!](https://tossedflavors.com/wp-content/uploads/2025/07/9f023ff1-ce57-41ff-a71d-fa13961d43e8.webp)
Lemon Zucchini Bread Delightful and Easy Recipe
Are you ready to bake something delicious? My Lemon Zucchini Bread is easy and tasty! In this blog post, you’ll find simple steps, tips, and
![- Zucchini: Select a medium zucchini that feels firm. Grate it finely and squeeze out excess moisture. This step ensures your cupcakes won’t be soggy. Moisture affects the texture, so don’t skip it. - Dry ingredients: You need all-purpose flour, unsweetened cocoa powder, baking soda, and baking powder. Each ingredient plays a role. The flour gives structure, while cocoa adds rich flavor. Baking soda and baking powder help the cupcakes rise. - Sugars: Use a mix of granulated sugar and brown sugar. This balance gives the cupcakes sweetness and moisture. The brown sugar adds depth and a slight caramel flavor, enhancing the overall taste. - Variations in oil types: You can use vegetable oil for a neutral flavor. If you want a twist, try melted coconut oil. It gives a subtle coconut taste that blends well with chocolate. - Chocolate chips: Choose between dark or semi-sweet chocolate chips. Dark chips offer a deep flavor, while semi-sweet adds a nice sweetness. Both options work great, depending on your taste. For the full recipe, check the [Full Recipe] section above. Preheating your oven is key. Set it to 350°F (175°C). This helps cupcakes rise well. Line your muffin tin with cupcake liners. This makes it easy to remove them later. Start by sifting your flour, cocoa powder, baking soda, baking powder, and salt. This removes lumps. It also helps mix the dry ingredients well. Next, whisk them together in a bowl. Make sure they are fully combined for the best texture. In a large bowl, combine granulated sugar, brown sugar, and vegetable oil. Whisk until it looks smooth. This step makes sure the sugars dissolve well. Now, add your room temperature eggs one at a time. Mix well after each egg. This keeps the batter light and fluffy. Finally, stir in pure vanilla extract for flavor. Now, it’s time to mix wet and dry. Gradually add the dry mix to the wet mixture. Use a spatula or wooden spoon to mix gently. Be careful not to overmix. It’s okay if some lumps remain; they will disappear while baking. Take your finely grated zucchini and chocolate chips. Fold them into the batter gently. Use a spatula and mix just until they are evenly spread. Avoid stirring too hard, as this can make the cupcakes tough. Spoon your batter into the lined muffin tin. Fill each liner about two-thirds full. Place the tin in your preheated oven. Bake for 18-20 minutes. To check if they are done, insert a toothpick into the center. If it comes out clean or with a few moist crumbs, they are ready. Once baked, let them cool in the tin for about 5 minutes. Then, move them to a wire rack to cool completely. For the full recipe, refer to the earlier section. When baking chocolate zucchini cupcakes, avoid overmixing the batter. Overmixing leads to tough cupcakes. Mix just until the wet and dry ingredients come together. Some lumps are okay! Another mistake is undercooking your cupcakes. Always check for doneness by inserting a toothpick in the center. If it comes out clean or with a few crumbs, they are ready to enjoy. To enhance the taste of your cupcakes, adjust the sugar levels. Too much sugar can make them overly sweet. Try reducing the granulated sugar slightly if you prefer a less sweet treat. Adding spices like cinnamon or nutmeg can also elevate the flavor. These spices blend well with chocolate and zucchini, creating a warm, inviting taste. Presentation matters! After the cupcakes cool, top them with fluffy whipped cream or a light dusting of powdered sugar. This adds a lovely touch. For extra flair, sprinkle chocolate shavings on top or add a slice of fresh zucchini. These garnishes not only look great but also enhance the taste, making your cupcakes even more delightful. For the full recipe, check the link above. {{image_4}} You can make your chocolate zucchini cupcakes healthier by switching to whole wheat flour. Whole wheat flour adds fiber and nutrients. You can also use alternative sweeteners like honey or maple syrup. These options can lower refined sugar intake. When using liquid sweeteners, reduce the liquid in your recipe slightly. This makes the cupcakes moist and tasty. Adding flavor makes cupcakes special. You can mix in chopped nuts for crunch. Walnuts or pecans work great. Spices like cinnamon or nutmeg can add warmth. You could also try adding a teaspoon of espresso powder. This enhances the chocolate flavor without changing the taste much. Get creative and add your favorite flavors to your batter! The frosting can change your cupcake's taste. Cream cheese frosting gives a tangy kick. It pairs well with the sweetness of the cupcakes. Whipped cream, on the other hand, keeps it light and fluffy. If you want something richer, try chocolate ganache. Each option offers a unique way to enjoy these treats. Choose your favorite to make your cupcakes shine! For the complete recipe, check out the [Full Recipe]. You can store your chocolate zucchini cupcakes at room temperature or in the fridge. If you plan to eat them within three days, keep them in an airtight container at room temperature. If you want to keep them longer, store them in the fridge. Just be aware that cold can make the cupcakes a bit dense. To freeze your chocolate zucchini cupcakes, first, let them cool completely. Wrap each cupcake in plastic wrap tightly. Then, place them in a freezer bag or container. When you are ready to eat them, take them out and let them thaw at room temperature. You can also reheat them in the oven at 350°F (175°C) for about 10 minutes if you want them warm. Chocolate zucchini cupcakes stay fresh for about three days at room temperature. In the fridge, they can last up to a week. If frozen, they can last for about three months. Just remember, the sooner you eat them, the better they taste! For the full recipe, check out the Chocolate Zucchini Cupcakes section. Yes, you can use frozen zucchini. Thaw it first before adding it to your batter. To thaw, place the zucchini in a bowl and let it sit in the fridge overnight. You can also microwave it for a few minutes. Make sure to drain excess water after thawing. This keeps your batter from getting too wet. To check if your cupcakes are done, use a toothpick. Insert it into the center of a cupcake. If the toothpick comes out clean or with a few crumbs, they are ready. This method helps avoid overbaking, which can make your cupcakes dry. Yes, you can make these cupcakes vegan. Replace the eggs with flax eggs or applesauce. Use plant-based milk and a vegan butter substitute instead of dairy. This way, you can enjoy the same rich flavor without animal products. If your batter seems too dry, add a little milk or water. Start with one tablespoon and mix well. If needed, add more gradually. This will help achieve a smooth batter and keep your cupcakes moist. Yes, it is important to squeeze out excess moisture from the zucchini. This helps your cupcakes rise and keeps them fluffy. If you skip this step, your cupcakes may turn out dense and soggy. Absolutely, you can double the recipe. Just keep the same ratios for each ingredient. Use a larger mixing bowl and muffin tin. This way, you can bake more cupcakes at once and share them with friends! You learned about making chocolate zucchini cupcakes in an easy way. We covered essential and optional ingredients, and I shared step-by-step instructions to help you bake like a pro. You also picked up key tips to avoid common mistakes and variations for customization. Remember, these cupcakes are not just tasty; they stay fresh when stored right. With these insights, you can enjoy baking and sharing your treats confidently. Happy baking!](https://tossedflavors.com/wp-content/uploads/2025/07/82e9f4d6-4676-4096-816a-b0d07cccdfac.webp)
Chocolate Zucchini Cupcakes Delightful and Easy Recipe
Are you ready to indulge in a sweet treat that’s both tasty and healthy? These Chocolate Zucchini Cupcakes are the perfect dessert! This easy recipe
Blueberry Bread Delight Simple and Tasty Recipe
Are you ready to bake a treat that fills your kitchen with sweet, berry goodness? In this post, I’ll share my simple and tasty blueberry
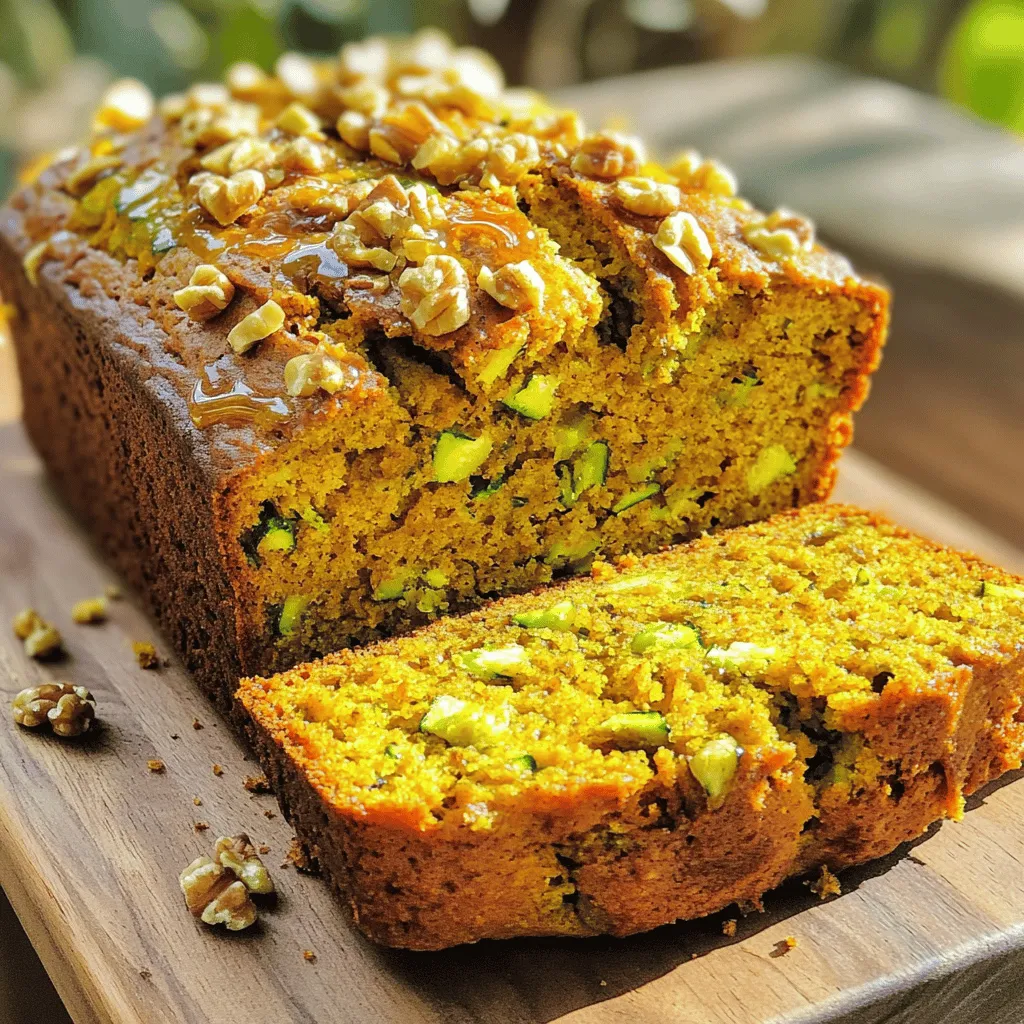
Pumpkin Zucchini Bread Flavorful and Simple Recipe
Are you ready to bake something delicious? Pumpkin Zucchini Bread is a perfect mix of fall flavors. This simple recipe combines pumpkin and zucchini for
![Zucchini: Zucchini is the star of this recipe. It adds moisture and nutrition. It’s rich in vitamins A and C, plus fiber. When picking zucchini, choose ones that are firm and shiny. Smaller zucchinis are often sweeter and less seedy. Grate the zucchini finely to blend well into the batter. Cocoa Powder: Cocoa powder gives these muffins their rich chocolate flavor. I recommend using unsweetened cocoa powder. It allows you to control the sweetness better. If you use sweetened cocoa, the muffins may taste overly sweet. Look for high-quality cocoa for the best taste. Sweeteners: You can choose between honey and maple syrup for sweetness. Honey adds a floral note, while maple syrup gives a deeper, earthy flavor. Both sweeteners keep the muffins moist. Adjust the amount based on your taste. Just remember, a little goes a long way! For the Full Recipe, check back to see how these ingredients come together to create a delightful treat. 1. Mixing wet and dry ingredients separately First, gather two bowls. In one bowl, mix the wet ingredients. Combine the grated zucchini, melted coconut oil, honey or maple syrup, applesauce, eggs, and vanilla extract. Use a whisk or spatula to blend well. In the second bowl, sift the dry ingredients. Whisk together the whole wheat flour, cocoa powder, baking soda, baking powder, and sea salt. This helps avoid lumps and ensures an even texture. 2. Tips for proper folding techniques to avoid overmixing When you combine the wet and dry ingredients, pour the wet mixture into the dry bowl. Use a spatula to gently fold them together. Be careful not to stir too hard. It’s okay if the batter looks a bit lumpy. Overmixing can lead to tough muffins, so be gentle in your approach. 3. How to check for doneness After baking, you’ll want to check if your muffins are done. Insert a toothpick into the center of a muffin. If it comes out clean or with a few moist crumbs, they are ready. If not, give them a few more minutes in the oven. Remember, the baking time is about 18-20 minutes, but ovens can vary. For the full recipe, refer to the section above. Enjoy baking these healthy chocolate zucchini muffins! Adjusting sweetness levels to taste You can change the sweetness of your muffins based on your taste. If you love sweeter treats, add more honey or maple syrup. Start with an extra tablespoon, and taste the batter. Remember, the sweetness can change after baking. How to store for maximum freshness To keep your muffins fresh, use an airtight container. Store them at room temperature for 2-3 days. For longer storage, place them in the fridge for up to a week. This helps keep them moist and tasty! Baking time adjustments for high-altitude cooking If you live at a high altitude, your muffins may bake differently. At higher altitudes, reduce the baking time by a few minutes. Start checking for doneness around 15 minutes. This way, you can avoid dry muffins and keep them soft! For more tips, check out the Full Recipe to ensure you nail these muffins every time! {{image_4}} You can make these muffins fit your diet. Here are some great swaps: - Gluten-free alternatives for whole wheat flour: Use almond flour or gluten-free flour blends. They work well and keep the muffins moist. - Vegan modifications to accommodate dietary preferences: Instead of eggs, try flax eggs. Mix 1 tablespoon of ground flaxseed with 2.5 tablespoons of water for each egg. This will bind your muffins beautifully. - Adding spices (cinnamon, nutmeg) for enhanced flavor: A pinch of cinnamon or nutmeg adds warmth and depth. Start with 1/2 teaspoon of your favorite spice. Mix it into the dry ingredients for a tasty twist. These variations keep the recipe fun and flexible. You can enjoy healthy chocolate zucchini muffins no matter your diet! For the complete recipe, check the [Full Recipe]. To keep your Healthy Chocolate Zucchini Muffins fresh, you have a few choices. - Short-term storage methods: You can store the muffins at room temperature for up to two days. Place them in an airtight container to keep them moist. If you want to keep them longer, store them in the refrigerator. This will keep them fresh for up to a week. - Freezing muffins: If you want to save some for later, freezing is a great option. Here’s how: 1. Allow the muffins to cool completely after baking. 2. Wrap each muffin tightly in plastic wrap. 3. Place the wrapped muffins in a freezer-safe bag or container. 4. Label the bag with the date. They will stay fresh for up to three months. - Reheating tips: To enjoy your muffins again, thaw them at room temperature or in the fridge overnight. You can reheat them in the microwave for about 20 seconds. For a crispier texture, pop them in the oven at 350°F (175°C) for 5 to 10 minutes. This will restore their fresh-baked goodness. For the full recipe, check out the section above. Yes, you can make these muffins without eggs. Use 1/4 cup of unsweetened applesauce for each egg. This swap keeps muffins moist and adds natural sweetness. You can also try using flaxseed meal. Mix one tablespoon of flaxseed with three tablespoons of water. Let it sit for five minutes to thicken before adding it to your batter. To keep your muffins moist, use fresh zucchini. Grate it finely and squeeze out excess water. This step helps keep the batter balanced. Also, don’t overmix when combining wet and dry ingredients. Overmixing can lead to dry muffins. Finally, keep an eye on baking time to avoid drying them out in the oven. You can add many fun ingredients to boost flavor. Try mixing in cinnamon or nutmeg for warmth. Chopped nuts like walnuts or pecans add crunch. You can also use different types of chocolate chips, like white chocolate or peanut butter chips. Dried fruit, like raisins or cranberries, can add sweetness and texture. Check the full recipe for more ideas! You learned about key ingredients for tasty muffins, like zucchini and cocoa powder. We explored easy steps for mixing and checking for doneness. Tips for adjusting sweetness help you get your perfect muffin. With ideas for variations and storage, your muffins will always be fresh. Remember, baking is fun and creative. Feel free to experiment and make it your own!](https://tossedflavors.com/wp-content/uploads/2025/07/47bc6762-1c6d-43e7-bf54-e9ab07a39f33.webp)
Healthy Chocolate Zucchini Muffins Delicious and Easy
Looking for a tasty treat that’s both healthy and easy to make? These Healthy Chocolate Zucchini Muffins hit the spot! Packed with nutrient-rich zucchini and
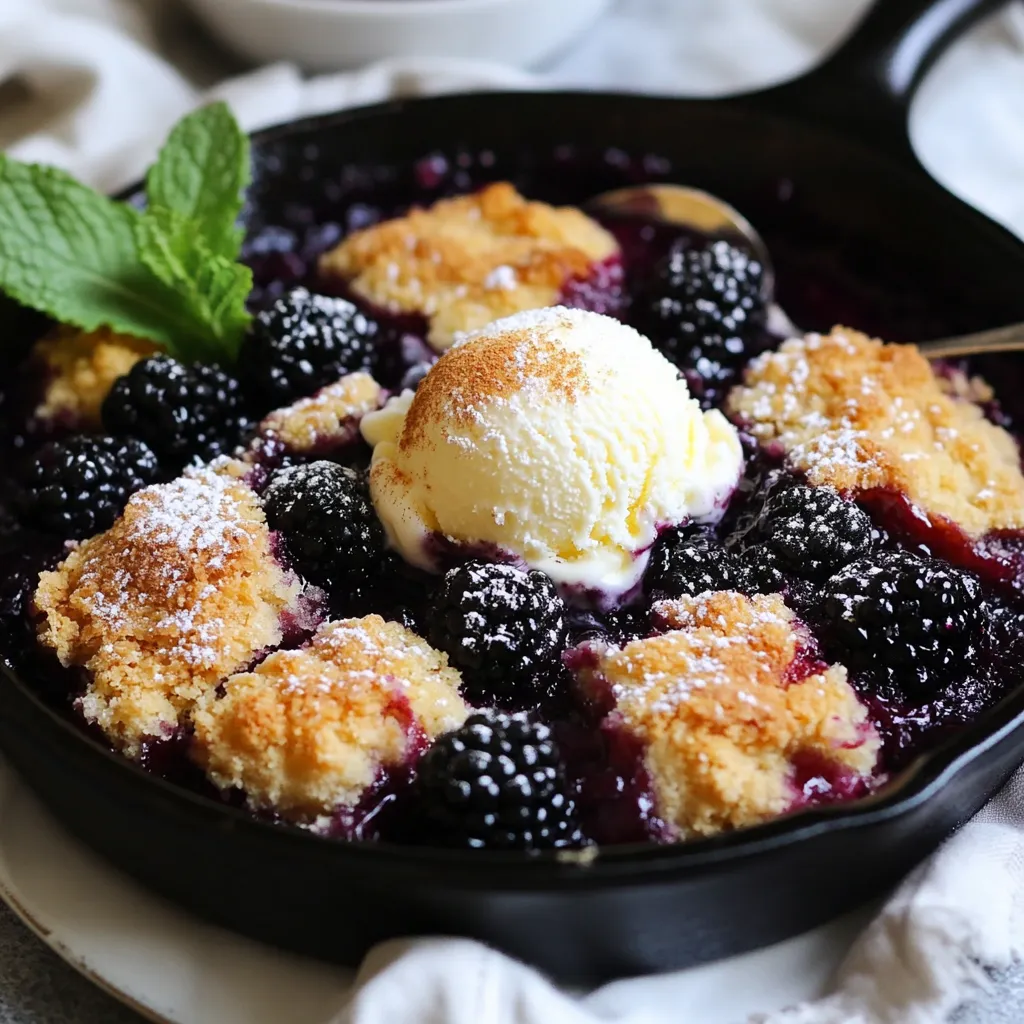
Blackberry Cobbler Skillet Irresistible and Simple Recipe
Craving a dessert that’s easy and delicious? Look no further! This Blackberry Cobbler Skillet is a treat you can whip up in no time. Fresh
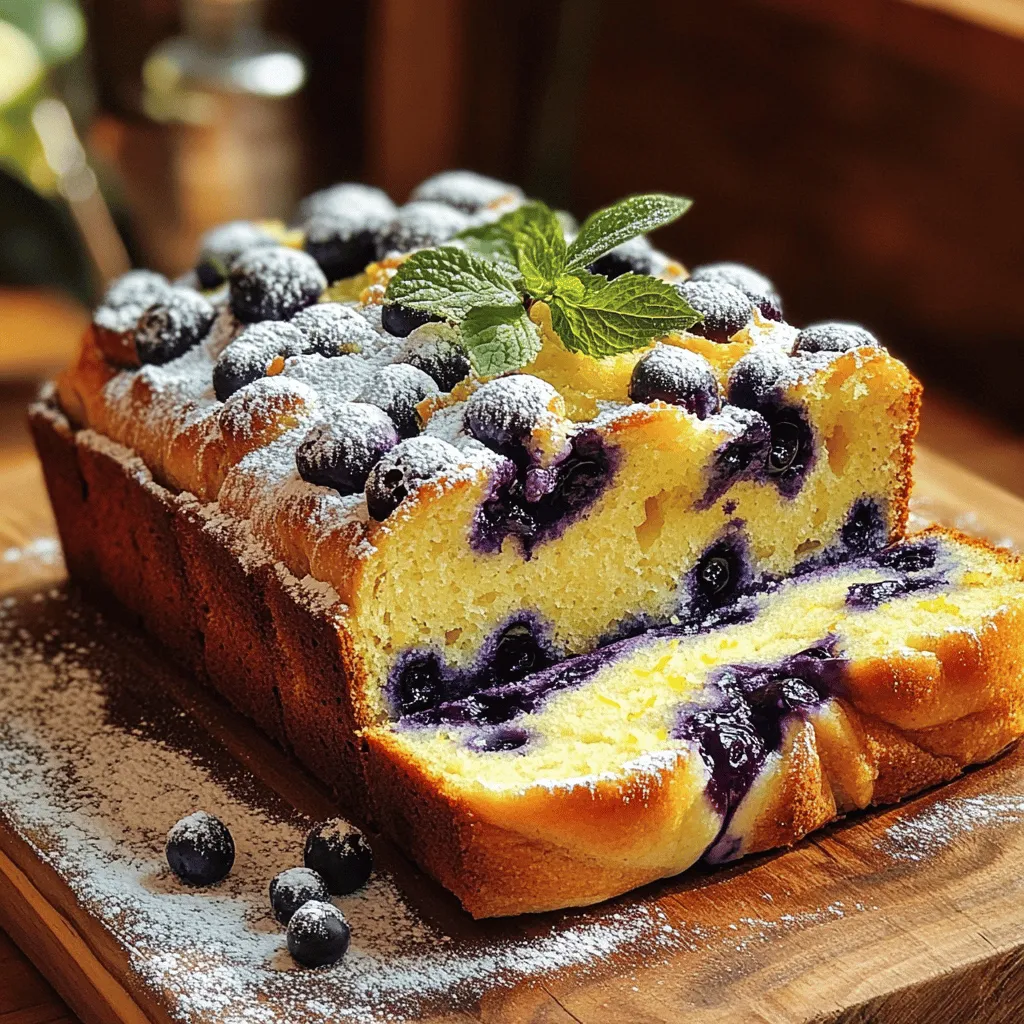
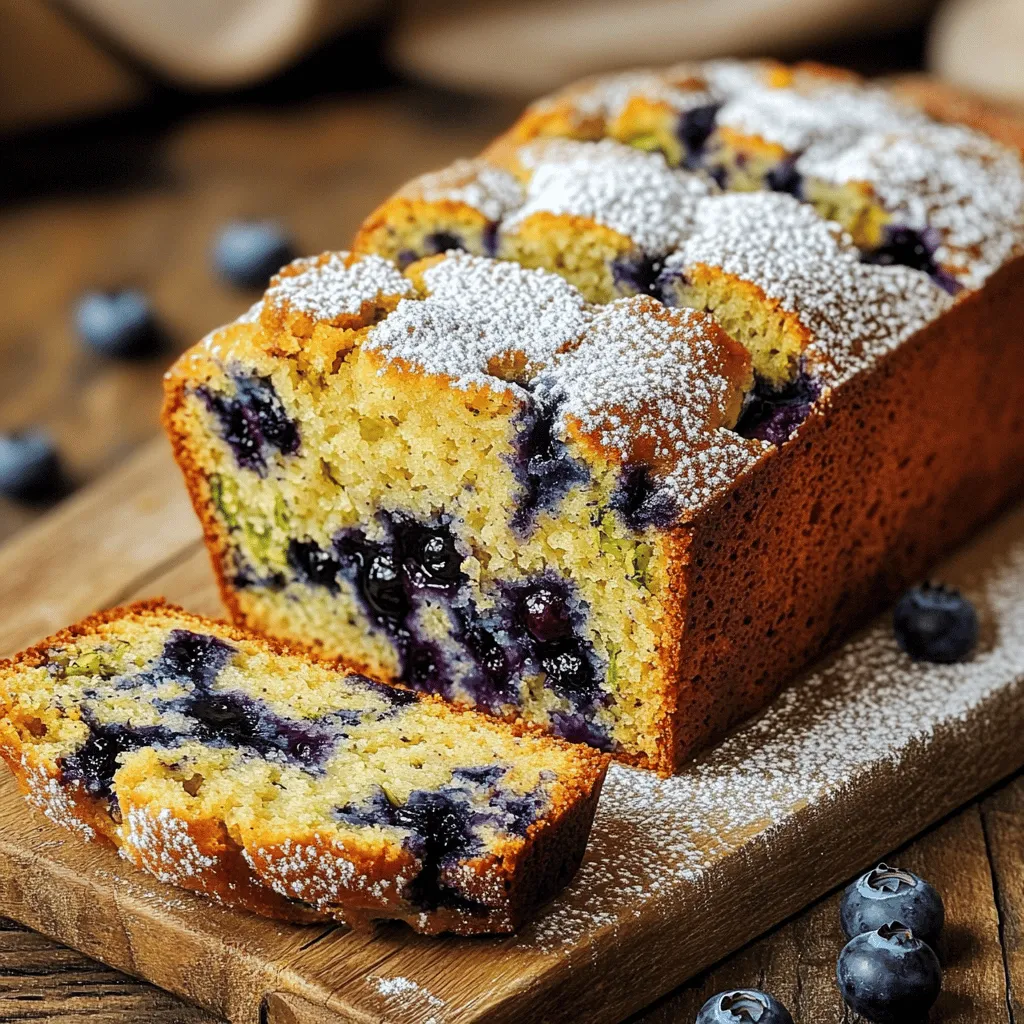
Lemon Blueberry Zucchini Bread Fresh and Flavorful Bake
Do you crave a baked delight that bursts with flavor? Lemon Blueberry Zucchini Bread offers a tasty twist on your classic loaf. I’ll guide you
![To make this delicious blueberry zucchini bread, gather these simple ingredients: - 1 medium zucchini (yields about 1 cup shredded) - 1 cup fresh blueberries (frozen is acceptable if fresh is unavailable) - 1 cup all-purpose flour - 1/2 cup whole wheat flour - 1 teaspoon baking soda - 1/2 teaspoon baking powder - 1 teaspoon ground cinnamon - 1/4 teaspoon salt - 1/2 cup granulated sugar - 1/4 cup packed brown sugar - 1/2 cup unsweetened applesauce - 1/4 cup vegetable oil - 2 large eggs - 1 teaspoon vanilla extract - Optional: 1/2 cup chopped walnuts or pecans Fresh vs. Frozen Blueberries Using fresh blueberries gives the best flavor and texture. If you cannot find fresh ones, frozen blueberries work well too. Just be sure to add them straight from the freezer to the batter. This prevents them from turning mushy. Zucchini Preparation Tips Zucchini adds moisture and nutrition. Grate the zucchini using a box grater. After grating, place it in a fine mesh colander. Let it drain for a bit to remove excess water. This step helps prevent your bread from becoming too soggy. Optional Ingredients and Enhancements For added texture and flavor, try mixing in 1/2 cup of chopped walnuts or pecans. You can also sprinkle some oats on top before baking for a crunchy finish. If you like spice, feel free to add a pinch of nutmeg or cardamom to the dry mix. For the full recipe, check the detailed steps in the [Full Recipe]. First, set your oven to 350°F (175°C). This will ensure even baking. Next, take a 9x5 inch loaf pan and grease it well. Use butter or cooking spray to coat the bottom and sides. This helps the bread slide out easily after baking. In a large bowl, combine the following dry ingredients: - 1 cup all-purpose flour - 1/2 cup whole wheat flour - 1 teaspoon baking soda - 1/2 teaspoon baking powder - 1 teaspoon ground cinnamon - 1/4 teaspoon salt Sift these together. Sifting breaks up lumps and ensures even mixing. Make sure the mixture is uniform in color. In another bowl, whisk together: - 1/2 cup granulated sugar - 1/4 cup packed brown sugar - 1/2 cup unsweetened applesauce - 1/4 cup vegetable oil - 2 large eggs - 1 teaspoon vanilla extract Mix until smooth. Then, pour this wet mixture into your dry ingredients. Gently fold them together. Do not overmix; this keeps the bread tender. Before you finish, squeeze excess moisture from the shredded zucchini. Then, add it along with 1 cup of fresh blueberries. If you want, toss in 1/2 cup of chopped walnuts or pecans. Fold these in gently. Finally, pour your batter into the greased loaf pan. Smooth the top with a spatula. Now, you’re ready to bake! For the full recipe, check out the details above. When I pick zucchini, I look for ones that are firm and smooth. They should be medium-sized, about 6 to 8 inches long. Smaller zucchinis taste sweeter and have fewer seeds. Avoid those with soft spots or blemishes. The skin should be shiny and bright green. If you find yellow zucchini, it’s also good, but I prefer green for this recipe. One common mistake is not draining the zucchini. Shredded zucchini contains a lot of water. If you don’t drain it, your bread might be soggy. After grating, let it sit in a colander for a few minutes. Another mistake is overmixing the batter. Mix just until the ingredients combine. This keeps the bread light and fluffy. Lastly, make sure to check the doneness with a toothpick. If it comes out wet, give it more time in the oven. Adding spices can really boost the flavor of your blueberry zucchini bread. I love using ground cinnamon because it pairs well with both blueberries and zucchini. You might also try adding nutmeg for warmth or ginger for a little kick. A hint of vanilla extract enhances the sweetness too. Feel free to experiment with your favorite spices to make the bread uniquely yours. For the complete recipe, check out the Full Recipe provided above. {{image_4}} You can add chocolate chips to your blueberry zucchini bread for a sweet twist. Use about 1 cup of semi-sweet or dark chocolate chips. Fold them in with the blueberries and zucchini. This option adds a rich flavor and a fun texture. Kids love this variation, and it works great for dessert! If you want a vegan version, swap the eggs for flax eggs. Mix 1 tablespoon of ground flaxseed with 3 tablespoons of water. Let it sit for a few minutes to thicken. Replace the applesauce with mashed bananas for extra moisture and sweetness. Use plant-based oil in place of regular oil. This way, you can enjoy a tasty treat that fits your diet! To make gluten-free blueberry zucchini bread, use a gluten-free flour blend. Look for a mix that includes xanthan gum for better texture. You can also use almond flour or coconut flour. Remember to adjust the liquids since these flours absorb moisture differently. This way, everyone can enjoy this delicious recipe! For the full recipe, check out the details provided earlier. To keep your blueberry zucchini bread fresh, wrap it tightly in plastic wrap or foil. This seals in moisture and prevents it from drying out. Store the wrapped bread at room temperature for up to three days. If you want to keep it longer, the fridge works too, but it may change the texture. For longer storage, you can freeze the bread. First, let it cool completely. Then, wrap it tightly in plastic wrap, followed by aluminum foil. This double layer helps avoid freezer burn. You can freeze it for up to three months. When ready to enjoy, just thaw it overnight in the fridge. To reheat your bread, preheat your oven to 350°F (175°C). Remove the plastic wrap and place the bread in the oven for about 10-15 minutes. This warms it through and revives its soft texture. If you're in a hurry, you can slice it and microwave it for about 20-30 seconds. Enjoy it warm for the best taste! Yes, you can use other berries. Raspberries, strawberries, or blackberries work great. Each berry adds its own taste. Just keep the same amount as you would for blueberries. Remember, some berries are juicier. This can change the bread's texture. To ripen zucchini, place it at room temperature. Zucchini will soften over a few days. You can also store it in a paper bag. This helps trap gases that speed up ripening. If you have firm zucchini, it’s ready for baking. This bread uses whole wheat flour and applesauce. Whole wheat flour adds fiber and nutrients. Applesauce cuts down on sugar and fat. Zucchini adds moisture and vitamins. These ingredients make the bread tasty and healthy. You can enjoy it guilt-free! For the full recipe, check out the detailed instructions above. To make Blueberry Zucchini Bread, gather fresh or frozen blueberries and prepare your zucchini well. Follow the steps for mixing dry and wet ingredients for a great batter. Use tips for choosing zucchini and avoiding common mistakes to enhance your bread. Consider fun variations like chocolate chip or vegan options. Store your bread properly and use our reheating tips to enjoy it fresh. Baking is fun, healthy, and rewarding! Now, get started and delight in your tasty creation!](https://tossedflavors.com/wp-content/uploads/2025/07/953bfbc7-d55f-48db-8fec-066243969656.webp)
Delicious Blueberry Zucchini Bread Easy and Tasty Recipe
Looking for a tasty twist on classic bread? This Delicious Blueberry Zucchini Bread recipe is packed with flavor and nutrition. You get juicy blueberries, fresh
Blueberry Zucchini Bread Flavorful and Easy Recipe
If you’re looking for a tasty treat that’s both easy to make and healthy, you’re in the right place! This Blueberry Zucchini Bread recipe blends