Desserts
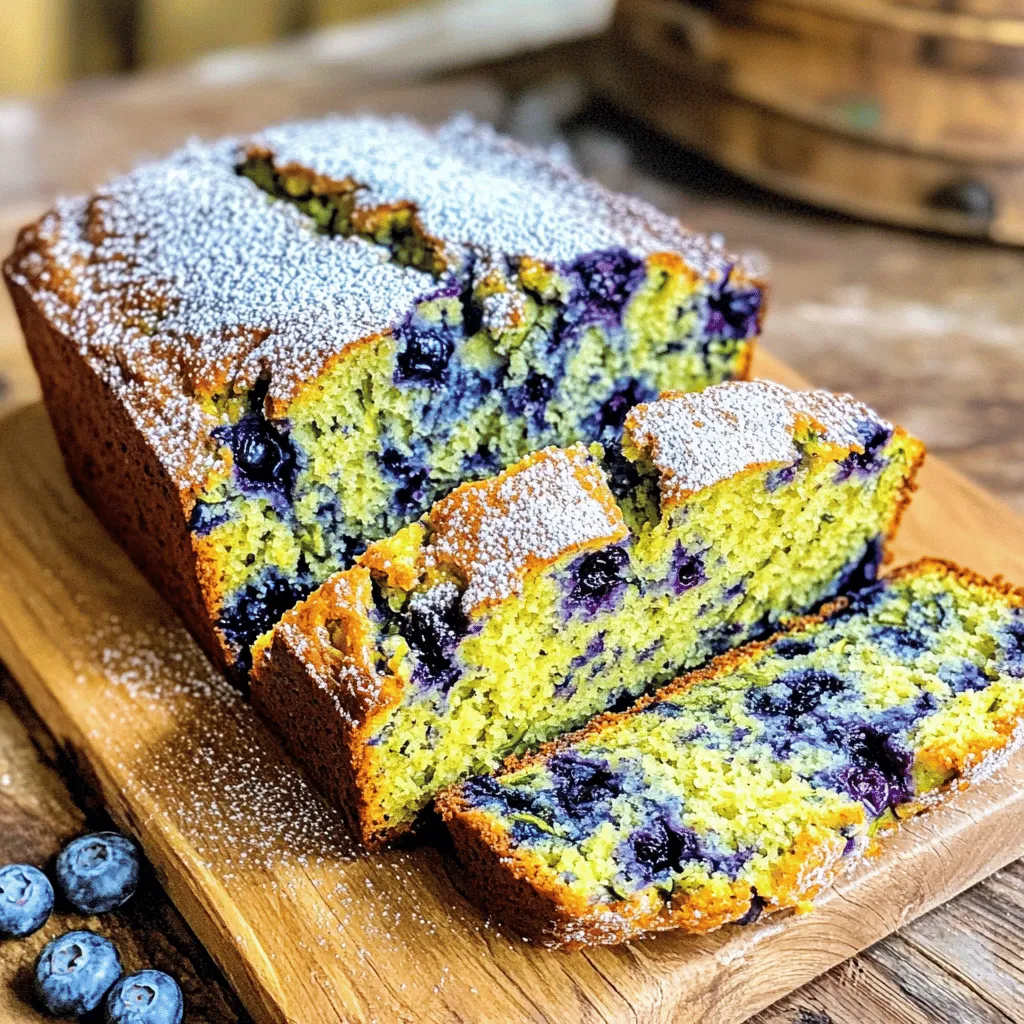
Easy Blueberry Zucchini Bread Simple and Tasty Treat
Have you ever craved a sweet treat that’s both tasty and healthy? Let me introduce you to Easy Blueberry Zucchini Bread, a simple and delightful
![- 2 cups grated zucchini - 1 ½ cups all-purpose flour - 1 cup granulated sugar - ½ cup packed brown sugar - 1 teaspoon baking soda - 1 teaspoon baking powder - 1 teaspoon ground cinnamon - ½ teaspoon ground nutmeg - ½ teaspoon salt - ¾ cup vegetable oil - 3 large eggs - 2 teaspoons pure vanilla extract - Optional: 1 cup chopped walnuts or pecans - Optional: 1 cup unsweetened shredded coconut - Cream cheese frosting for topping Gather these ingredients to create your delicious zucchini cake. The grated zucchini keeps the cake moist and adds a nice texture. You can use about two medium zucchinis to get the two cups you need. The sugars help in balancing the flavors. Brown sugar adds a hint of caramel flavor. The spices, like cinnamon and nutmeg, make it warm and inviting. If you want to take it up a notch, consider adding walnuts or pecans for crunch. Shredded coconut can add sweetness and chewiness. Don't forget the cream cheese frosting; it brings everything together with its creamy richness. You can find the full recipe for this delightful dish in the earlier section. Happy baking! - Preheat your oven to 350°F (175°C). Prepare a 9x13 inch baking pan by greasing and flouring it, or line it with parchment paper for easy removal later. This step makes sure your cake comes out clean and easy to serve. - In a large bowl, combine 2 cups of grated zucchini, 1 cup of granulated sugar, and ½ cup of brown sugar. Let this mix sit for about 10 minutes. This helps the zucchini release moisture, giving you a moist cake. - In another bowl, mix 1 ½ cups of all-purpose flour, 1 teaspoon of baking soda, 1 teaspoon of baking powder, 1 teaspoon of ground cinnamon, ½ teaspoon of ground nutmeg, and ½ teaspoon of salt. Whisk until everything is well combined. - Add ¾ cup of vegetable oil, 3 large eggs, and 2 teaspoons of pure vanilla extract to the zucchini mixture. Stir gently until everything blends well and is smooth. - Gradually fold the dry mix into the wet mix with a wooden spoon. Stop mixing once you see no dry flour. If you want, fold in 1 cup of chopped walnuts or pecans, and 1 cup of unsweetened shredded coconut. - Pour the batter into the prepared baking pan. Use a spatula to spread it evenly. - Place your pan in the oven and bake for 30-35 minutes. Check if a toothpick comes out clean. If it does, your cake is ready! - Let it cool in the pan for about 15 minutes. After that, transfer the cake to a wire rack to cool completely. - Once cooled, spread cream cheese frosting on top for a tasty finish. For the complete recipe, refer to the [Full Recipe]. - Ensuring a moist cake: To keep your zucchini cake moist, grate the zucchini finely. This helps it blend better into the batter. Always measure the zucchini after grating. Too much or too little can change the texture. - Choosing the right spices: Use fresh ground spices for the best flavor. Ground cinnamon and nutmeg add warmth and depth. You can also mix in a pinch of ginger for a hint of spice. - Importance of resting the zucchini mixture: Letting the zucchini and sugars sit for ten minutes allows the zucchini to release moisture. This step is key to a moist cake. Don’t skip it! - Best cream cheese frosting practices: For a smooth frosting, soften the cream cheese first. Mix it well with butter until fluffy before adding sugar. This creates a light and creamy texture. - Alternatives if you prefer a different frosting: If cream cheese isn't your style, try a simple glaze. Mix powdered sugar with a bit of milk and vanilla. It adds sweetness without being heavy. You can also use chocolate ganache for a rich twist. For the full recipe, follow the instructions carefully, and you’ll create a delightful zucchini cake that impresses everyone! {{image_4}} You can make zucchini cake fit your diet. For gluten-free needs, use almond flour or coconut flour instead of all-purpose flour. These options keep the cake moist and tasty. If you want to swap sugars, try coconut sugar or honey. Both add sweetness without the guilt. Remember, honey is liquid, so reduce other liquids in the recipe. Want to make your cake even better? Add chocolate chips! They melt and create pockets of gooey goodness. Use semi-sweet or dark chocolate for a rich taste. You can also experiment with nuts. Chopped walnuts or pecans add crunch and flavor. If you want something different, try hazelnuts or almonds. They give your cake a unique twist. For the full recipe, check the earlier section. Enjoy creating your own delicious zucchini cake! To keep your zucchini cake fresh, store it properly. - Room temperature storage: If you plan to eat the cake within a few days, store it at room temperature. Place it in an airtight container. It will stay moist for up to three days. - Refrigeration tips: If you want it to last longer, place it in the fridge. Wrap the cake in plastic wrap or foil. This keeps it fresh for about a week. If your cake has frosting, store it in a container with a lid to avoid drying out. You can freeze zucchini cake for later enjoyment. - Best practices for freezing: Allow the cake to cool completely. Slice the cake into pieces. Wrap each piece tightly in plastic wrap and then in foil. This helps prevent freezer burn. - Thawing tips for optimal taste: When ready to eat, remove a slice from the freezer. Place it in the fridge overnight to thaw. For a quick thaw, set it out on the counter for about an hour. Enjoy your delicious cake just like fresh! Can I use frozen zucchini for this recipe? Yes, you can use frozen zucchini. Just thaw it first and drain excess water. This keeps the cake moist. How can I tell when the cake is done? Check the center with a toothpick. If it comes out clean, the cake is ready. You can also look for a golden color. Can I make this cake ahead of time? Yes, you can bake it a day or two in advance. Store it in an airtight container to keep it fresh. What are the best ways to serve zucchini cake? Serve it warm or at room temperature. I love adding a slice of cream cheese frosting on top. You can also sprinkle nuts or coconut for extra flavor. How long does zucchini cake last? Zucchini cake stays fresh for about 3 to 5 days at room temperature. For longer storage, place it in the fridge. Can I make a layered zucchini cake? Absolutely! Just double the recipe and bake in two round pans. Layer the cakes with cream cheese frosting for a stunning dessert. For the complete recipe, check the Full Recipe section above. This blog post shared how to make a delicious zucchini cake. We explored the key ingredients, step-by-step instructions, and helpful baking tips. I also covered variations and storage methods to keep your cake fresh. Remember, using the right spices and resting the zucchini mixture is crucial for taste. Enjoy baking this cake, and don't hesitate to experiment with flavors. Your zucchini cake will surely impress everyone!](https://tossedflavors.com/wp-content/uploads/2025/07/8c461c20-f184-4aed-b37c-6277e7e152a5.webp)
Irresistible Zucchini Cake Delightfully Moist Recipe
Craving a dessert that’s both delicious and unique? You’ve come to the right place! This Irresistible Zucchini Cake is rich, moist, and full of flavor.
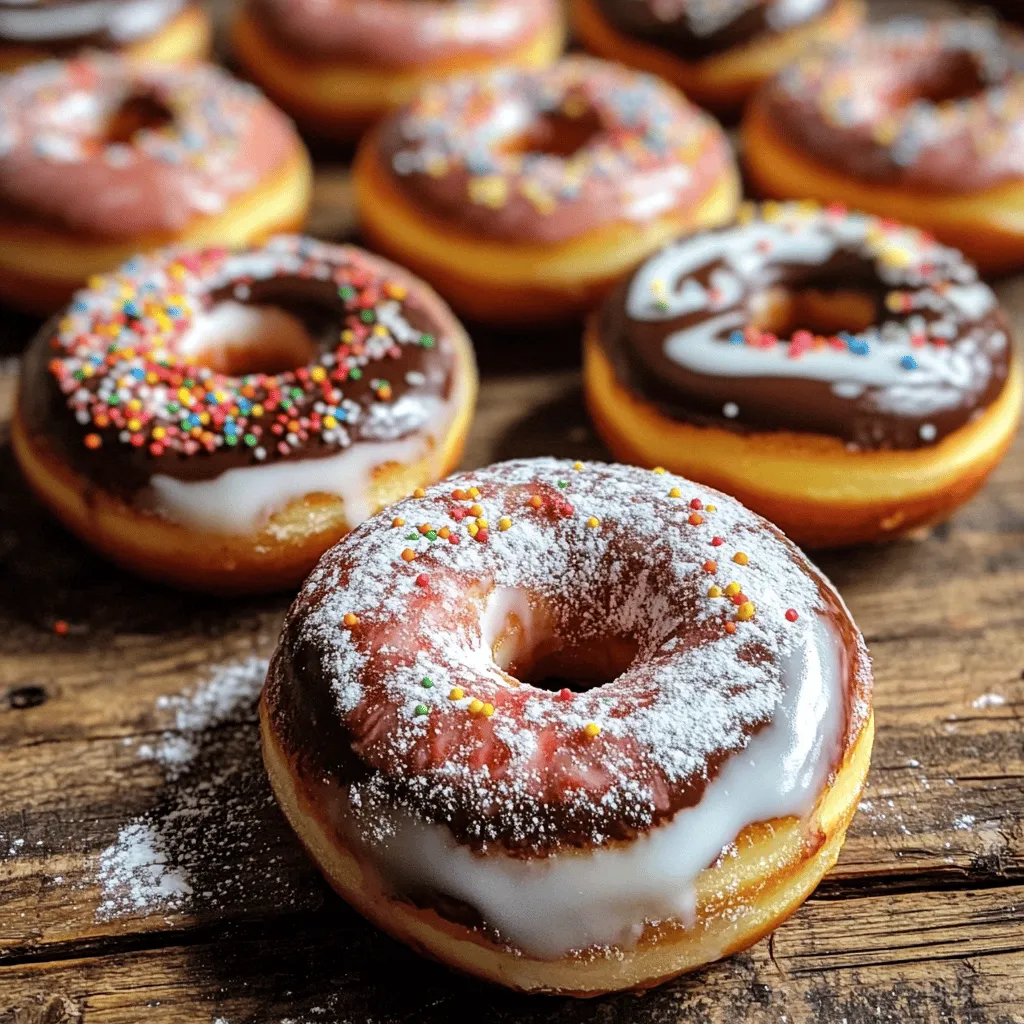
Baked Neapolitan Doughnuts Tasty and Fun Treat
Looking for a sweet treat that’s both fun to make and delicious to eat? Try my Baked Neapolitan Doughnuts! With three tasty flavors—rich chocolate, fruity
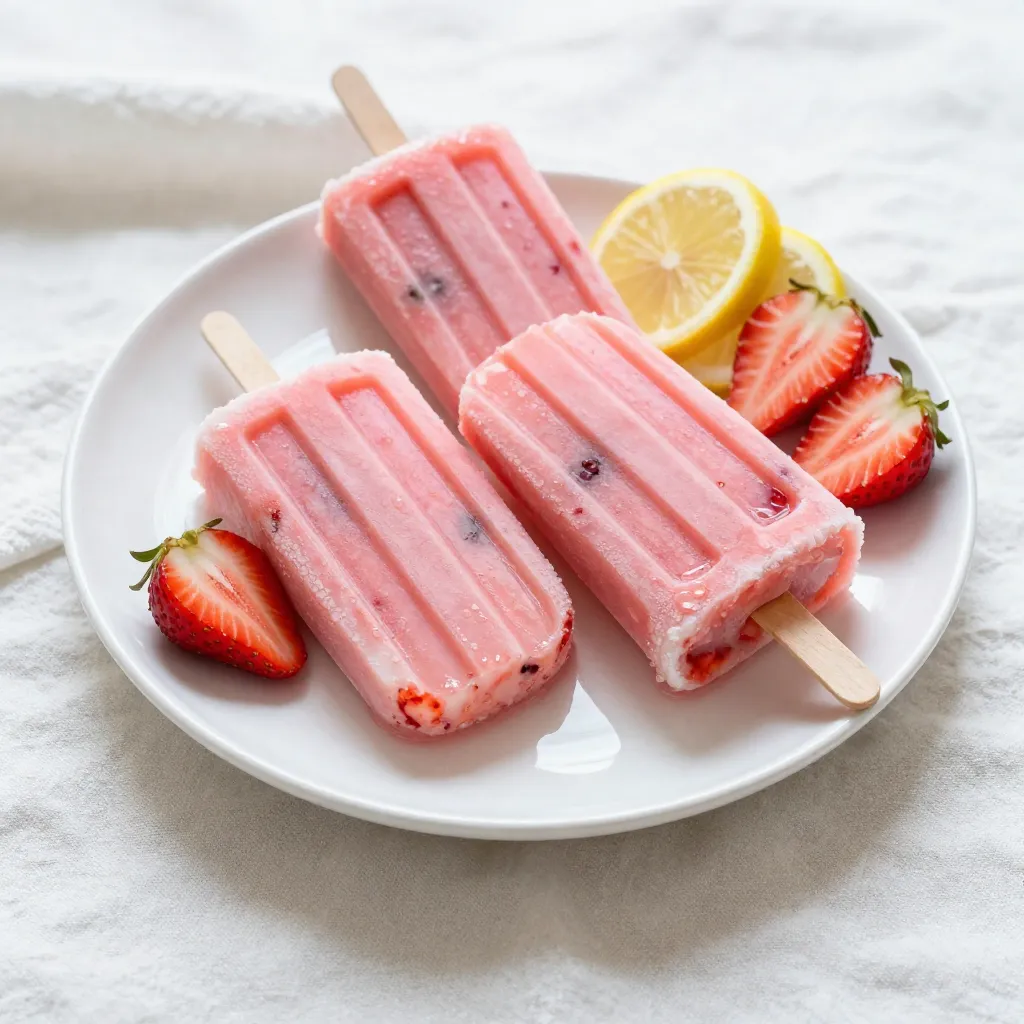
Strawberry Lemonade Popsicles Refreshing Summer Treat
Looking for the perfect way to cool off this summer? Strawberry lemonade popsicles are a delicious, refreshing treat that you’ll love making and enjoying. With
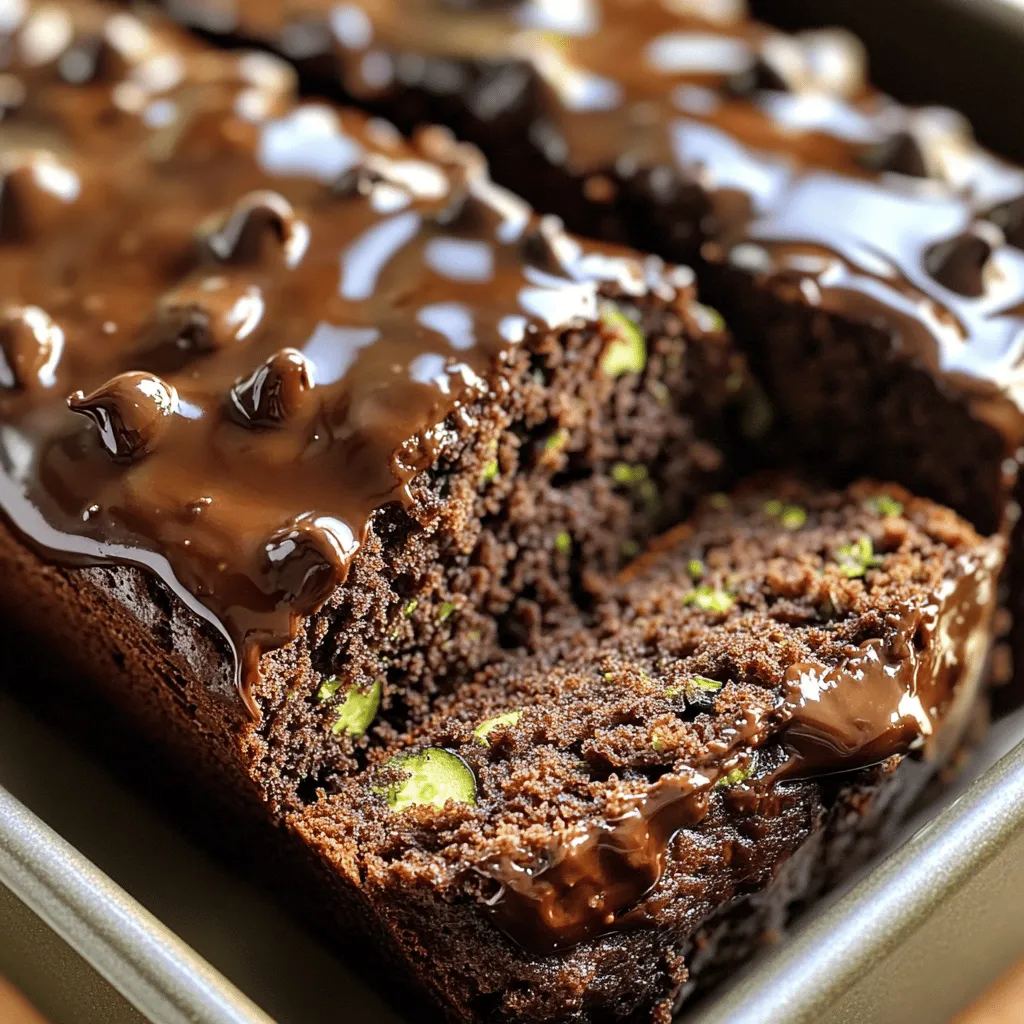
Gluten-Free Chocolate Zucchini Bread Easy and Delicious
Are you ready to try a treat that’s both easy and delicious? This gluten-free chocolate zucchini bread is a game-changer for anyone seeking a sweet
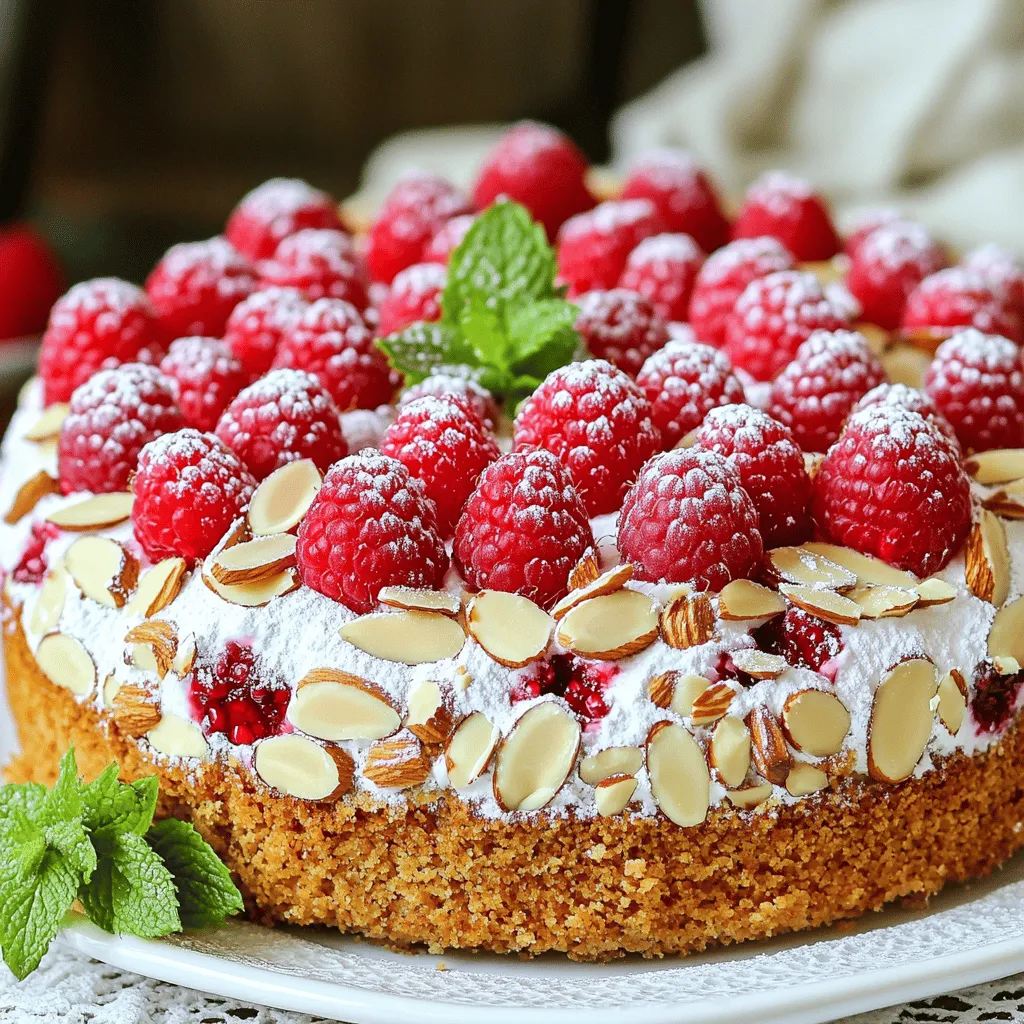
White Chocolate Almond Raspberry Cake Delight Recipe
Are you ready to create a stunning cake that impresses everyone? This White Chocolate Almond Raspberry Cake is a delightful treat you won’t want to
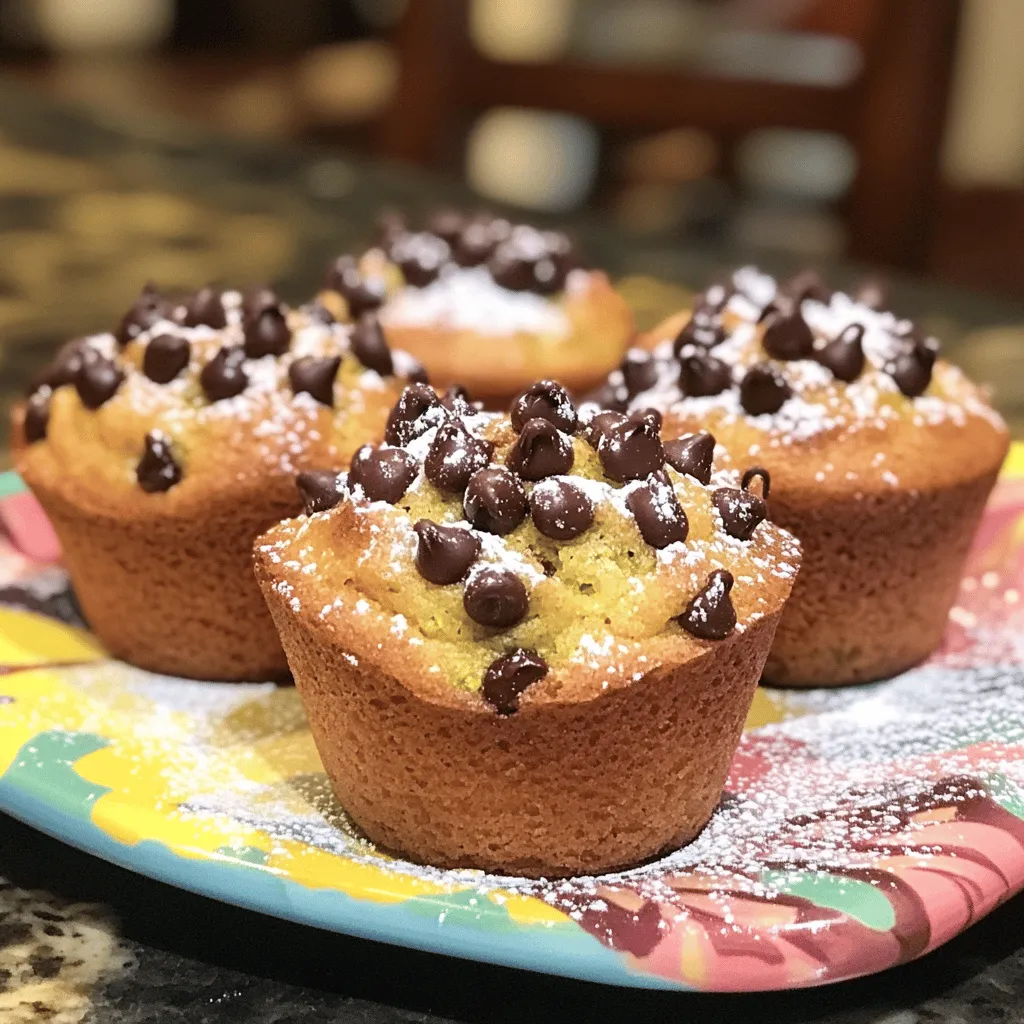
Zucchini Chocolate Chip Muffins Easy and Delicious Recipe
If you’re looking for an easy and tasty treat, these Zucchini Chocolate Chip Muffins hit the spot! They mix moist zucchini with sweet chocolate chips
Vegan Chocolate Zucchini Bread Rich and Tasty Recipe
Ready to indulge in a treat that’s both rich and guilt-free? This Vegan Chocolate Zucchini Bread combines healthy zucchini with delicious chocolate for a mouth-watering
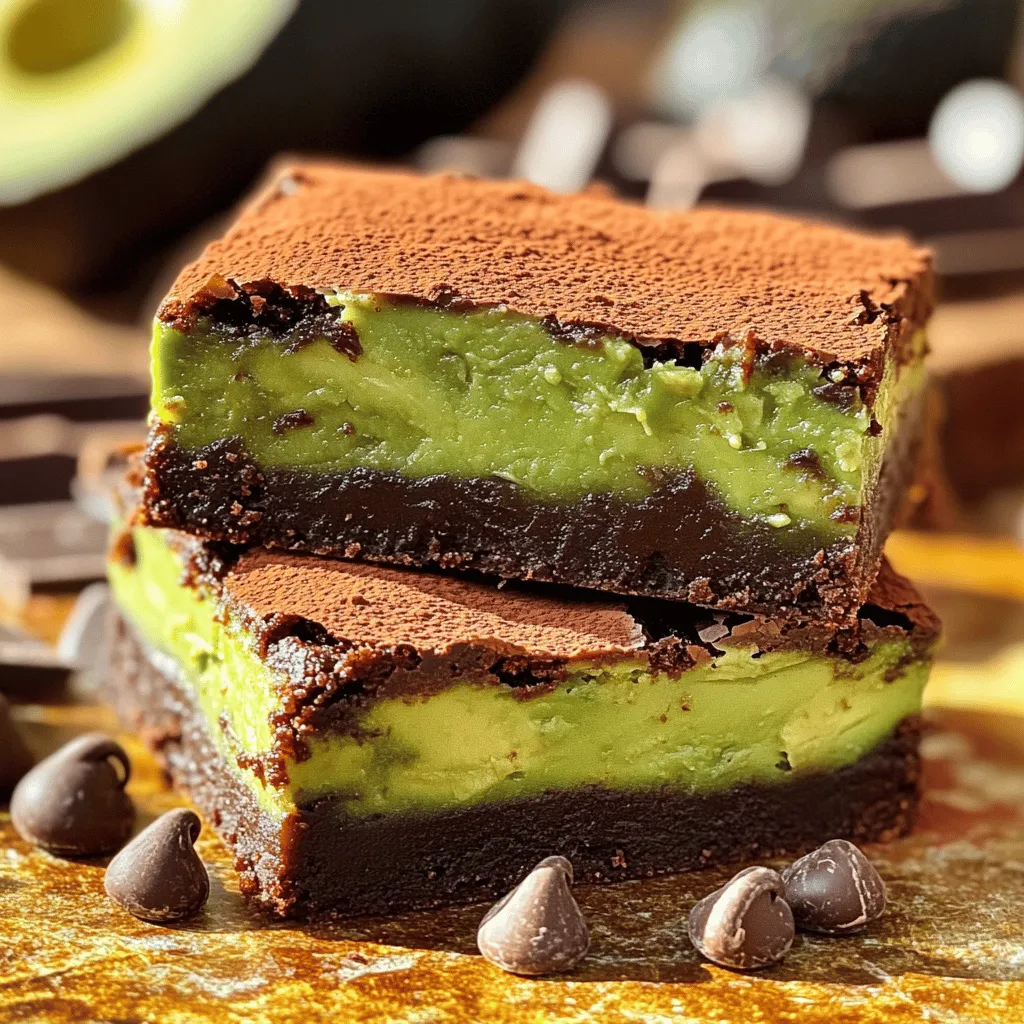
Avocado Brownies Rich and Healthy Dessert Option
Looking for a dessert that’s both rich in flavor and healthy? Avocado brownies might just be your new favorite treat! These tasty squares mix ripe
![- 1 medium zucchini, grated - 1 cup almond butter (or any nut or seed butter of your choice) - 1/2 cup unsweetened cocoa powder - 1/2 cup pure maple syrup (or honey) - 2 large eggs - 1 teaspoon pure vanilla extract - 1/2 teaspoon baking soda - 1/4 teaspoon fine sea salt - 1/2 cup dark chocolate chips (optional) To make these flourless zucchini brownies, you need simple ingredients. The grated zucchini is key. It keeps the brownies moist and adds nutrition. Almond butter gives them a rich, nutty flavor. You can swap almond butter for any nut or seed butter you prefer. This keeps it flexible for different diets. Next, unsweetened cocoa powder provides the deep chocolate taste. I like using pure maple syrup for sweetness. It’s a great alternative to refined sugar. You can also use honey if you prefer. The eggs bind everything together, making the brownies hold their shape. For flavor, pure vanilla extract is essential. It enhances the overall taste. Baking soda helps the brownies rise a bit, while fine sea salt balances the sweetness. Finally, dark chocolate chips are optional but highly recommended. They add little bursts of chocolate joy in every bite. - For almond butter, try cashew, peanut, or sunflower seed butter. - Use honey, agave, or coconut sugar instead of maple syrup for sweetness. - Ensure cocoa powder is labeled gluten-free if needed. If you don’t have almond butter, you can use other nut or seed butters. Each type gives a unique flavor. If you want a healthier option, agave or coconut sugar works well as sweeteners. Just make sure to adjust the amounts since they vary in sweetness. For cocoa powder, check that it is gluten-free if that’s a concern. - Zucchini adds fiber and vitamins to your brownies. - Almond butter is rich in healthy fats and protein. - Maple syrup has minerals like manganese and zinc. Zucchini is not just for savory dishes; it’s great in desserts too. It packs in fiber and vitamins while keeping the brownies moist. Almond butter is a healthy fat source and full of protein. This makes the brownies more filling. Maple syrup provides a touch of sweetness along with essential minerals. These ingredients make your treat not only delicious but also healthier than regular brownies. For the full recipe, check out [Full Recipe]. 1. Preheat oven and prepare baking pan Start by preheating your oven to 350°F (175°C). This step is key for even baking. Prepare a 9x9 inch baking pan by lightly greasing it or lining it with parchment paper. This makes it easy to remove the brownies later. 2. Mixing dry and wet ingredients In a large mixing bowl, combine the grated zucchini and almond butter. Use a spatula to mix until the two blend well. Next, add the cocoa powder, maple syrup, eggs, and vanilla. Stir until the mixture is smooth and creamy. Then, sprinkle in the baking soda and sea salt. Gently fold them in to keep the batter light. If you want extra chocolate flavor, fold in the dark chocolate chips. 1. Overview of key steps in baking Pour the brownie batter into your prepared pan. Use a spatula to spread it out evenly. Place the pan in your preheated oven and bake for 25-30 minutes. The brownies are done when a toothpick comes out with a few moist crumbs. 2. Importance of cooling and cutting Once baked, let the brownies cool in the pan for about 10 minutes. Then, transfer them to a wire rack to cool completely. This step helps keep them from becoming too dry. After they cool, cut them into squares of your choice. 1. Overmixing the batter Be careful not to overmix your batter. Doing so can make your brownies tough. Mix just until combined for the best texture. 2. Incorrect baking time and temperature Always keep an eye on the baking time. If you bake them too long, they can dry out. Check them early to make sure they stay fudgy and moist. To keep your brownies fudgy and moist, focus on the moisture in the zucchini. Grate it finely and squeeze out some water before mixing. This step adds richness to the batter. Avoid overbaking these treats as they can dry out. A toothpick should come out with a few moist crumbs, not clean. To incorporate air into the batter, whisk your eggs well. This adds lightness. Mix gently when folding in the dry ingredients. Be careful not to overmix; you want to keep that airy feel. Boost the chocolate flavor by adding a bit of espresso powder. Just a teaspoon can deepen the taste. You can also mix in some dark chocolate chips for richer bites. For spices, consider a pinch of cinnamon or a dash of sea salt. Both enhance the chocolate flavor. A splash of vanilla extract adds a warm note, making these brownies even more delicious. For a stunning presentation, dust your brownies with cocoa powder or powdered sugar. This adds a nice touch. You can also serve them with fresh berries or a drizzle of chocolate sauce for flair. Pair these brownies with a glass of cold milk or a scoop of vanilla ice cream. The coolness of the ice cream contrasts well with the warm brownies. This combination makes for a delightful treat! {{image_4}} You can easily make flourless zucchini brownies vegan. To do this, replace the eggs with a flax egg. Just mix one tablespoon of ground flaxseed with three tablespoons of water. Let it sit for about five minutes until it thickens. This works great in keeping the brownies moist. For a low-carb version, use sweeteners like erythritol or stevia instead of maple syrup. This swap helps cut down on sugar while keeping the taste rich and sweet. Enhance your brownies by adding nuts, seeds, or dried fruits. Chopped walnuts or pecans add a nice crunch. Sunflower seeds or dried cherries can offer a delightful twist, too. You can also explore different flavorings. Adding a few drops of mint extract gives a fresh taste. Or, try orange zest for a bright, citrusy kick. These small changes can make a big difference in flavor. To keep your brownies gluten-free, ensure all ingredients are certified gluten-free. This includes your cocoa powder and any nut butters you use. If you need extra thickness, you can use alternatives like ground oats or almond flour. They blend well and keep the brownies rich and fudgy. To keep your brownies fresh, use airtight containers. Glass or plastic containers work well. Store them at room temperature for up to three days. If you want them to last longer, refrigerate them for about a week. Freezing brownies is easy. First, let them cool completely. Then, cut them into squares. Wrap each piece in plastic wrap. Place the wrapped brownies in a freezer bag. Make sure to remove as much air as possible. You can freeze them for up to three months. When you're ready to eat, thaw them in the fridge overnight. For a warm treat, reheat them in the microwave for about 15 seconds. Check your brownies for signs of spoilage. If they smell off or have a strange texture, it's best to toss them. Look for mold or a dry surface, which can mean they are no longer good. To keep your brownies fresh, always store them in a cool, dark place. To check if flourless brownies are ready, look for a few key signs: - The edges pull away from the pan. - The top appears set and slightly glossy. - A toothpick inserted in the center comes out with a few moist crumbs. These signs show that your brownies are fudgy and not overbaked. Keep an eye on them during the last few minutes of baking! Yes, you can! Zucchini is great, but other veggies can work too. Here are some options: - Sweet potato: Adds natural sweetness and moisture. - Carrot: Offers a nice flavor and extra nutrition. - Beet: Gives a rich color and earthy taste. Each of these will change the flavor a bit but can make tasty brownies. Feel free to get creative! You can serve flourless brownies in many fun ways. Here are a few ideas: - As-is: They’re tasty right out of the pan. - With ice cream: A scoop of vanilla or chocolate ice cream pairs perfectly. - Topped with fruit: Fresh berries or sliced bananas add a nice touch. - Sprinkled with nuts: Chopped nuts can give a nice crunch. These options make your brownies even more special! Yes, flourless zucchini brownies can be a healthier choice. Here’s how they compare to traditional brownies: - Less sugar: They often use natural sweeteners like maple syrup. - More fiber: Zucchini adds fiber, which is good for digestion. - Nut butters: Almond butter provides healthy fats and protein. These brownies are lower in carbs and higher in nutrients, making them a smart treat! For the full recipe, check out the details above. In this post, we explored how to make delicious flourless zucchini brownies. We covered key ingredients like almond butter and cocoa powder, plus their health benefits. I shared tips on achieving the perfect texture and avoiding common mistakes. You can even customize these brownies with healthier alternatives or different flavors. These brownies are a tasty way to enjoy a treat while keeping it healthy. Use your favorite ingredients and enjoy the process of baking something delightful. Happy baking!](https://tossedflavors.com/wp-content/uploads/2025/07/42505126-fd24-4724-82b4-9c124c81eb8c.webp)
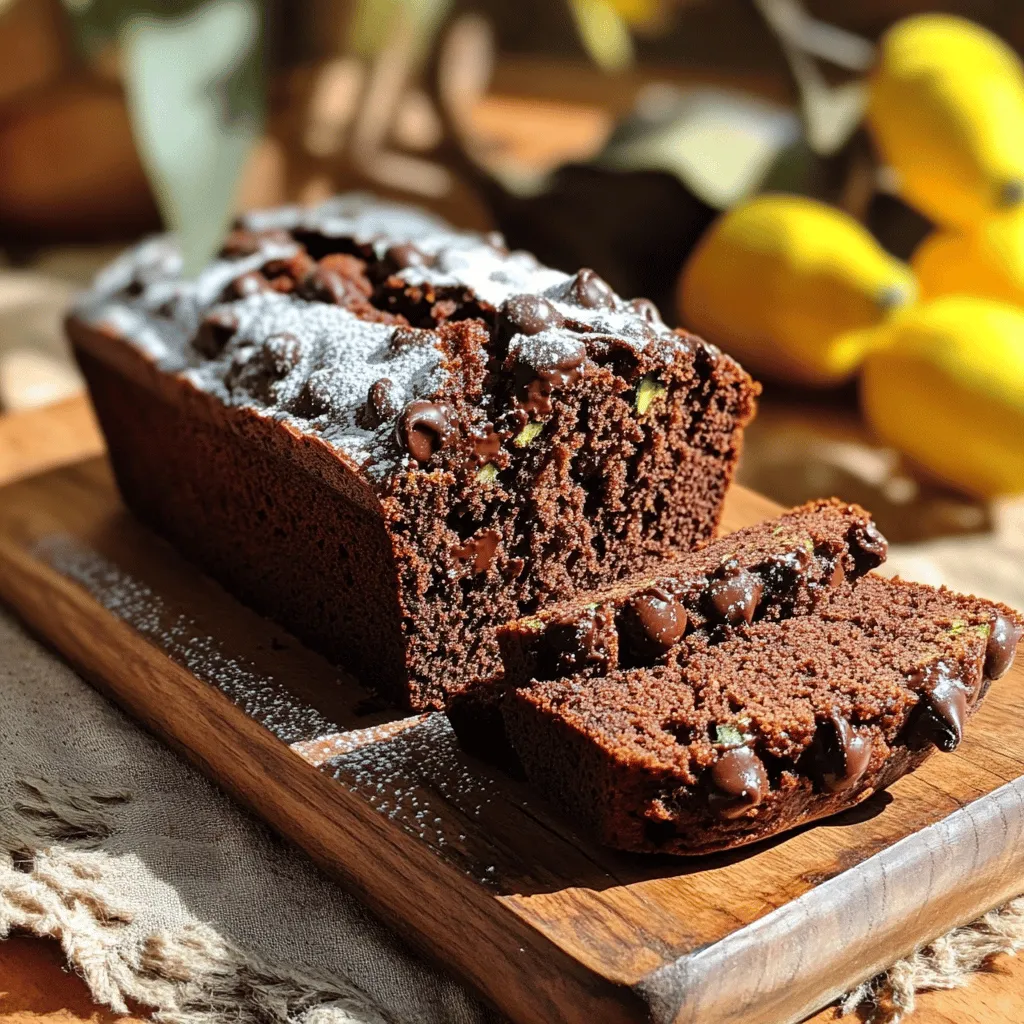
Flourless Zucchini Brownies Healthy and Fudgy Treat
Looking for a delicious treat that’s also healthy? Look no further! These Flourless Zucchini Brownies are fudgy, chocolatey, and packed with nutrition. You won’t believe