Desserts
![To make soft pumpkin cookies, you need: - 1 cup canned pumpkin puree - 1/2 cup unsalted butter, softened - 1 cup granulated sugar - 1/2 cup brown sugar, firmly packed - 1 large egg - 1 teaspoon vanilla extract - 2 cups all-purpose flour - 1 teaspoon baking soda - 1 teaspoon baking powder - 1 teaspoon ground cinnamon - 1/2 teaspoon ground nutmeg - 1/2 teaspoon salt - 1/4 teaspoon ground ginger These ingredients blend to give cookies their soft and moist texture. The pumpkin puree adds a lovely flavor and makes the cookies tender. For the cream cheese frosting, gather: - 8 oz cream cheese, softened - 1/2 cup unsalted butter, softened - 2 cups powdered sugar - 1 teaspoon vanilla extract This frosting is creamy and sweet, making it the perfect topping for your cookies. You can change some ingredients if needed: - Use coconut oil instead of butter for a dairy-free option. - Swap brown sugar with coconut sugar for a different flavor. - If you lack pumpkin puree, use mashed banana or applesauce. These substitutes can still give you great results while catering to different diets. For the full recipe, check the complete instructions. Start by preheating your oven to 350°F (175°C). This helps the cookies bake evenly. Line a baking sheet with parchment paper. This will keep the cookies from sticking. In a big bowl, beat the softened butter, granulated sugar, and brown sugar. Use an electric mixer at medium speed. Mix until the mixture is smooth and creamy. Next, add the canned pumpkin, egg, and vanilla extract. Mix until everything is blended well. In a separate bowl, whisk together the flour, baking soda, baking powder, cinnamon, nutmeg, salt, and ginger. This step ensures the spices and leavening agents are evenly spread throughout the cookies. Slowly add the dry mixture to the wet mixture. Use a spatula or wooden spoon. Mix gently until just combined. Be careful not to overmix. Overmixing can make the cookies tough. Scoop dollops of dough onto the prepared baking sheet. Leave about 2 inches of space between each scoop. Bake in the preheated oven for 12-15 minutes. The edges should be set, but the centers should stay soft. After baking, take the cookies out of the oven. Let them cool on the baking sheet for about 5 minutes. Then, move them to a wire rack to cool completely. This cooling step is key for the perfect texture. Enjoy the process and the delicious smell! For the complete recipe, check out the [Full Recipe]. To make soft pumpkin cookies, focus on mixing. Do not overmix your dough. Stir until just combined. This keeps your cookies tender and light. Make sure the butter is soft. Cold butter leads to tough cookies. Also, use the right amount of flour. Too much flour makes cookies dry. If your cookies spread too much, chill the dough for 30 minutes before baking. For the perfect cream cheese frosting, start with room temperature ingredients. If the frosting is too thick, add a splash of milk. If it’s too thin, add more powdered sugar. Beat the mixture until fluffy. This adds air and makes it light. Remember, a good frosting should spread easily but hold its shape. Serve your cookies on a colorful platter to catch the eye. Sprinkle cinnamon or nutmeg on top for flair. Add a few pumpkin seeds for a nice touch. You can also stack the cookies high for a fun look. Garnish with fresh mint leaves for a pop of color. These small touches make your cookies stand out. For the full recipe, check out the detailed instructions. {{image_4}} While cream cheese frosting is a classic choice, you can try other frostings too. A simple vanilla buttercream can add a sweet touch. You can also use chocolate ganache for a rich flavor. For a lighter option, consider whipped cream or a glaze made with powdered sugar and milk. Each option gives the cookies a new twist, keeping them fun and exciting. Want to make your cookies even better? Try adding mix-ins. Chopped nuts like pecans or walnuts add a nice crunch. You could also mix in chocolate chips for a sweet bite. Dried cranberries or raisins bring a fruity touch. Each addition enhances the taste and texture, creating a unique cookie every time. If you need gluten-free cookies, swap all-purpose flour for almond or oat flour. Check that your pumpkin puree is gluten-free too. For a dairy-free option, use coconut cream instead of cream cheese in the frosting. You can also use dairy-free butter for the cookies. These swaps ensure everyone can enjoy these tasty treats without worry. For the full details on making these cookies, check out the Full Recipe. To keep your soft pumpkin cookies fresh, store them in an airtight container. This method helps keep them moist. Place parchment paper between layers to prevent sticking. They can last for about five days at room temperature. If you want them to last longer, consider refrigerating them. Just ensure they are well-wrapped to avoid drying out. Freezing these cookies is easy and a great way to save them. First, let the cookies cool completely. Then, place them in a single layer on a baking sheet. Freeze until firm. Once frozen, transfer them to a freezer-safe bag or container. Label the bag with the date. They can last for up to three months in the freezer. When you're ready, just thaw them at room temperature. Reheating soft pumpkin cookies is simple. Preheat your oven to 350°F (175°C). Place the cookies on a baking sheet and heat for about 5-7 minutes. This warms them up nicely. If you prefer the microwave, heat them for about 10-15 seconds. Just be careful not to dry them out. Enjoy them warm with the cream cheese frosting for a delightful treat! Yes, you can use fresh pumpkin. To do this, roast the pumpkin first. Cut it in half, remove the seeds, and bake it at 400°F (200°C) for about 45 minutes. After it cools, scoop out the flesh and mash it. This gives a nice flavor to your cookies. Fresh pumpkin may need more water, so adjust your recipe if needed. To sweeten the cookies, add more sugar. Start with an extra 1/4 cup. For less sweetness, reduce the sugar by the same amount. You can also use different sweeteners. Brown sugar adds a deeper taste, while white sugar keeps it light. To soften cream cheese fast, cut it into small cubes. Place it in a bowl and microwave it in short bursts of 10 seconds. Check after each burst to avoid melting it. This helps it blend smoothly into the frosting. Look for the edges of the cookies to be set. The centers will look soft and slightly puffy. A toothpick inserted in the center should come out clean or with just a few crumbs. If they look too wet, bake them a few more minutes. Yes, you can make the dough ahead! Chill it in the fridge for up to 24 hours. This makes it easier to scoop and bake later. If you want to keep it longer, you can freeze the dough. Just wrap it well in plastic wrap and store it in a freezer bag. When ready to use, let it thaw in the fridge overnight. For the full recipe, check the details above. In this article, we explored the core elements of baking cookies. We covered key ingredients, from cookie dough to delicious cream cheese frosting. You learned step-by-step instructions to bake and cool your cookies perfectly. I shared tips for texture and presentation, along with fun variations for added flavor. Finally, we discussed storage methods to keep your treats fresh. Baking cookies can be fun and rewarding. Enjoy the process and share your tasty creations with others!](https://tossedflavors.com/wp-content/uploads/2025/07/aaef6ab2-b5b7-49ef-864e-d0fab853af20.webp)
Soft Pumpkin Cookies with Cream Cheese Frosting Delight
Are you craving something sweet and cozy? Soft Pumpkin Cookies with Cream Cheese Frosting are here to satisfy that need! These cookies blend the warm
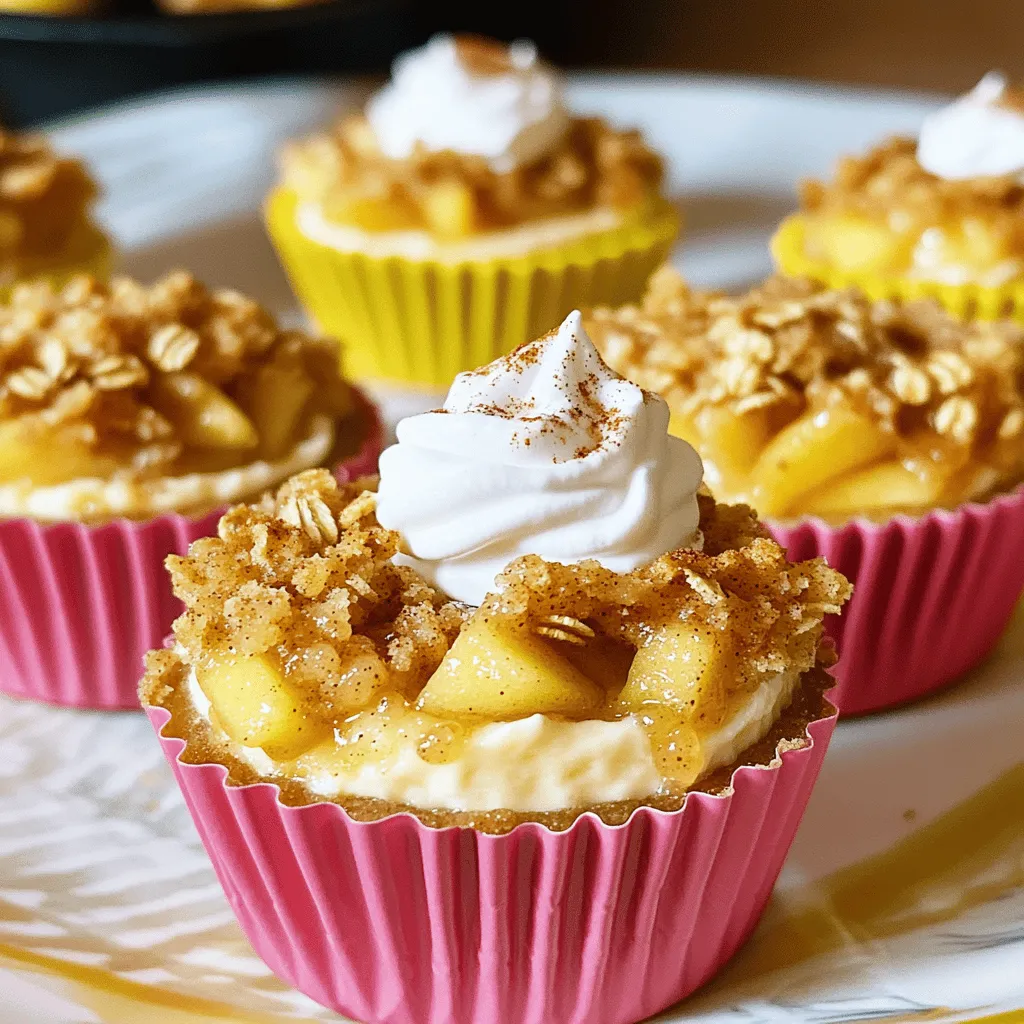
![For these tasty Caramel Apple Dessert Cups, you need simple yet delicious ingredients. Here’s what you will need: - Apples (Granny Smith or Honeycrisp) - Caramel Sauce (store-bought or homemade) - Spices (cinnamon and nutmeg) - Lemon Juice - Whipped Cream or Topping - Granola - Nuts (optional: pecans or walnuts) - Mint Leaves for garnish Using Granny Smith apples gives a nice tartness. Honeycrisp apples add sweetness. Choose what you like best. For the caramel sauce, store-bought is quick. Homemade sauce lets you show off your cooking skills. The spices, cinnamon, and nutmeg, enhance the apple flavor. A splash of lemon juice keeps the apples fresh and bright. Whipped cream adds a light touch to the dessert. Granola brings crunch, and nuts can add a lovely texture. Finally, mint leaves brighten up the look. This dessert is all about layers of flavor and texture. With these ingredients, you set the stage for a fun treat. Check out the Full Recipe for exact measurements and instructions! First, gather your diced apples in a bowl. You can use Granny Smith or Honeycrisp apples for this recipe. Squeeze fresh lemon juice over the apples to keep them bright. Then, add ground cinnamon and nutmeg. Mix everything gently. Make sure all the apple pieces get coated in the spices. This adds a warm flavor to the apples. Set the bowl aside while you prepare the cups. Now, take your serving cups. Start by layering the spiced apples at the bottom. Use a generous amount to create a tasty base. Next, drizzle caramel sauce over the apples. You can use store-bought or homemade sauce. Aim for an even coat; this sweet touch balances the tartness of the apples. After layering the apples and caramel, it’s time to add whipped cream. Scoop or pipe a soft layer over the apples. This makes it fluffy and fun. Then, sprinkle granola on top for a nice crunch. If you like, you can add chopped pecans or walnuts for extra flavor. Finally, add another drizzle of caramel sauce for sweetness. Finish with a fresh mint leaf to brighten up your dessert cups. You can find the complete recipe here: [Full Recipe]. For the best flavor, I recommend using Granny Smith or Honeycrisp apples. Granny Smith apples are tart and crisp. They balance the sweetness of the caramel perfectly. Honeycrisp apples add a juicy and sweet touch to your dessert. Both types hold their shape well when mixed with the caramel. Making your own caramel sauce is simple and fun. Here’s a quick recipe to try: 1. In a saucepan, melt 1 cup of sugar over medium heat. 2. Stir the sugar with a wooden spoon until it melts and turns golden. 3. Carefully add 6 tablespoons of butter and stir until melted. 4. Slowly pour in 1/2 cup of heavy cream while stirring. 5. Remove from heat and let it cool before using. This homemade caramel sauce adds a personal touch to your dessert cups. Presentation makes your caramel apple dessert cups shine. Use clear cups to show off the layers. Start with spiced apples at the bottom, then drizzle caramel on top. Add whipped cream in a swirl for a beautiful finish. Sprinkle granola and nuts for crunch. Finally, add a fresh mint leaf on top for a pop of color. This makes your dessert look as good as it tastes! {{image_4}} You can change the nuts for different flavors. Almonds and cashews are great choices. They add a nice crunch and a hint of sweetness. If you want a nutty taste, try using toasted almonds. Cashews give a creamy texture that blends well with the apples. To make your dessert even yummier, think about adding chocolate or toffee layers. A drizzle of melted chocolate adds richness and depth. You can also sprinkle bits of toffee on top for a sweet crunch. Both options bring a fun twist to the classic caramel apple flavor. Seasonal fruits and spices can change this recipe for different occasions. In fall, add pears or cranberries for a festive touch. In winter, spices like ginger or cloves can warm things up. These small changes create new flavors and keep your dessert fresh and exciting. For the full recipe, check out the detailed instructions above. To keep your caramel apple dessert cups fresh, store them in the fridge. Use airtight containers to prevent air exposure. This helps avoid sogginess from the whipped cream and apples. Place parchment paper between layers if stacking cups. This extra step keeps them looking great. You can freeze the components for later use. Store the spiced apples in a freezer-safe bag. Remove as much air as possible to prevent freezer burn. For best results, freeze the apples without the caramel and whipped cream. When ready, thaw in the fridge overnight. Assemble your dessert cups fresh for the best taste. In the fridge, prepared dessert cups last about 2-3 days. After this time, the apples may lose their crunch. The whipped cream can also start to separate. For the best flavor, enjoy them soon after making. Yes, you can! If you want to switch it up, try pears or berries. Both fruits blend well with caramel. You can also use bananas for a creamy texture. Just remember to adjust the spices slightly to match the fruit's taste. It takes only 15 minutes to prep and serve. This quick treat is perfect for last-minute guests or a fun family dessert. You can make it in no time! Yes, you can prepare it ahead of time. Just layer the apples and caramel, then add whipped cream right before serving. This way, the cream stays fluffy. You can also store the cups in the fridge for up to a day. If you want a dairy-free option, use coconut whipped cream. For a lighter choice, try Greek yogurt or a low-calorie whipped topping. Both will still give you a nice texture and taste. These caramel apple dessert cups are easy to make and fun to enjoy. We covered the ingredients, tips, and storage methods. By using fresh apples, tasty caramel, and your choice of toppings, you can create a delightful treat. Don't hesitate to try different flavors and nuts. You can impress friends with this simple yet delicious dessert. Enjoy crafting and sharing your creation, and remember to make it your own!](https://tossedflavors.com/wp-content/uploads/2025/07/1ecd00e3-df58-4095-b5d7-e36ba14d34b2.webp)
Caramel Apple Dessert Cups Tasty and Fun Treats
Get ready for a sweet treat that’s fun to make and eat! These Caramel Apple Dessert Cups combine crisp apples with rich caramel and whipped
Apple Crisp Mini Cheesecakes Delightful and Easy Treat
Are you ready to impress your friends and family with a delicious dessert? Look no further! These Apple Crisp Mini Cheesecakes are not only delightful
![To make these delightful pumpkin chocolate chip cupcakes, you will need a mix of tasty ingredients. Here’s what you need: - 1 cup pumpkin puree (can be fresh or canned) - 1 cup granulated sugar - 1/2 cup brown sugar, packed - 1/2 cup vegetable oil - 2 large eggs - 1 teaspoon vanilla extract - 1 1/2 cups all-purpose flour - 1 teaspoon baking soda - 1/2 teaspoon baking powder - 1/2 teaspoon salt - 1 teaspoon ground cinnamon - 1/2 teaspoon ground nutmeg - 1/4 teaspoon ground ginger - 1 cup semi-sweet chocolate chips - Optional: Cream cheese frosting for topping Each ingredient plays a key role in creating the perfect balance of flavors. The pumpkin puree adds moisture and a lovely autumn taste. The sugars sweeten the cupcakes while the vegetable oil keeps them soft. Eggs bind everything together, and vanilla extract adds a warm touch. The all-purpose flour gives structure, while baking soda and baking powder help them rise. The spices bring warmth and depth, making every bite feel like a cozy hug. The chocolate chips add a delicious surprise in each cupcake. If you want an extra treat, cream cheese frosting on top makes a perfect finish. For the full recipe, follow the instructions carefully to create these tasty treats that everyone will love! 1. Preheat your oven to 350°F (175°C). 2. Line a cupcake pan with paper liners. 3. In a bowl, mix the pumpkin puree, granulated sugar, brown sugar, and vegetable oil. 4. Use a whisk or mixer to blend until smooth. 5. Crack the eggs into the bowl one at a time. Mix well after adding each egg. 6. Add the vanilla extract and mix again until it’s all combined. 1. In another bowl, whisk together the all-purpose flour, baking soda, baking powder, salt, cinnamon, nutmeg, and ginger. 2. Make sure there are no lumps in the dry mixture. 3. Gradually add the dry mixture to the wet ingredients. 4. Stir gently with a spatula until just combined. 1. Carefully fold in the semi-sweet chocolate chips into the batter. 2. Using a scoop or spoon, divide the batter into each cupcake liner. Fill them about two-thirds full. 3. Bake in the preheated oven for 18-20 minutes. 4. To check if they are done, insert a toothpick in the center; it should come out clean or with a few crumbs. 5. Once baked, let them cool in the pan for 5 minutes. 6. Transfer the cupcakes to a wire rack to cool completely. For the complete recipe, check out the [Full Recipe]. To get the best texture in your pumpkin chocolate chip cupcakes, avoid overmixing the batter. When you mix the flour into the wet ingredients, do it gently. Stir just until you see no dry flour. This keeps your cupcakes light and fluffy. To check if your cupcakes are done, use a toothpick. Insert it into the center of a cupcake. If it comes out clean or with a few moist crumbs, they are ready. If you see wet batter, bake a few more minutes. For a lovely presentation, frost your cupcakes with cream cheese frosting. You can pipe it high for a fancy look. Dust the tops with a sprinkle of cinnamon for extra flair. For seasonal fun, use candy pumpkins or colorful sprinkles. Place a candy pumpkin on top of each cupcake for a festive touch. This makes them perfect for fall celebrations! {{image_4}} You can make these cupcakes even better with some fun twists. Try adding different spices like allspice or cardamom. These spices add warmth and a unique taste. You can also mix in nuts or dried fruits. Chopped walnuts or cranberries give a nice crunch and flavor. Want to make your cupcakes healthier? Use whole wheat flour instead of all-purpose flour. This adds fiber and makes them more filling. You can also swap out white sugar for a sugar alternative, like honey or maple syrup. If you need a dairy-free option, look for dairy-free cream cheese for your frosting. You still get that creamy taste while keeping it light and delicious. Check out the Full Recipe for all the details! To keep your pumpkin chocolate chip cupcakes fresh, store them at room temperature. Use an airtight container to prevent them from drying out. Place a piece of wax paper between the cupcakes and the lid. This helps with airflow and keeps them soft. If the weather is humid, consider placing them in the fridge. This can help them last longer. Just remember, cold cupcakes may not taste as good, so let them warm up a bit before serving. You can freeze both un-frosted and frosted cupcakes. For un-frosted ones, let them cool completely. Wrap each cupcake in plastic wrap. Then, place them in a freezer bag. This prevents freezer burn. For frosted cupcakes, freeze them on a tray first. Once frozen, wrap them individually. This keeps the frosting intact. To thaw, take the cupcakes out of the freezer. Leave them at room temperature for about an hour. If you want to warm them, pop them in a microwave for a few seconds. Enjoy your delicious cupcakes whenever you like! For the full recipe, check the earlier section. Can I make these cupcakes ahead of time? Yes, you can make these cupcakes ahead of time. Bake them and let them cool completely. Store them in an airtight container at room temperature. They stay fresh for up to three days. You can also freeze them for longer storage. Just remember to frost them after thawing. What are the best substitutes for pumpkin puree? If you can't find pumpkin puree, you have options. You can use butternut squash puree or sweet potato puree. Both have a similar texture and flavor. If you want a lighter option, try using applesauce. Just keep in mind it will change the flavor slightly. How can I make my cupcakes more moist? To add moisture to your cupcakes, use more pumpkin puree. You can also add a bit of sour cream or yogurt. Both will keep your cupcakes soft and tender. Another tip is to not overmix the batter. This keeps the texture light and fluffy. For the best results, follow the Full Recipe closely. This blog post covered how to make delicious pumpkin cupcakes. You learned about the key ingredients and step-by-step instructions. I shared tips for perfect baking and ideas for decoration. You can explore flavor and health variations, too. Lastly, I provided storage info to keep your treats fresh. Enjoy making these cupcakes and impressing your friends with your baking skills!](https://tossedflavors.com/wp-content/uploads/2025/07/3e8a6150-12a3-4cef-8090-2a0d20566656.webp)
Pumpkin Chocolate Chip Cupcakes Delightful Treat Recipe
Are you ready to enjoy a delightful treat that combines the best of fall flavors? It’s time to whip up some Pumpkin Chocolate Chip Cupcakes!
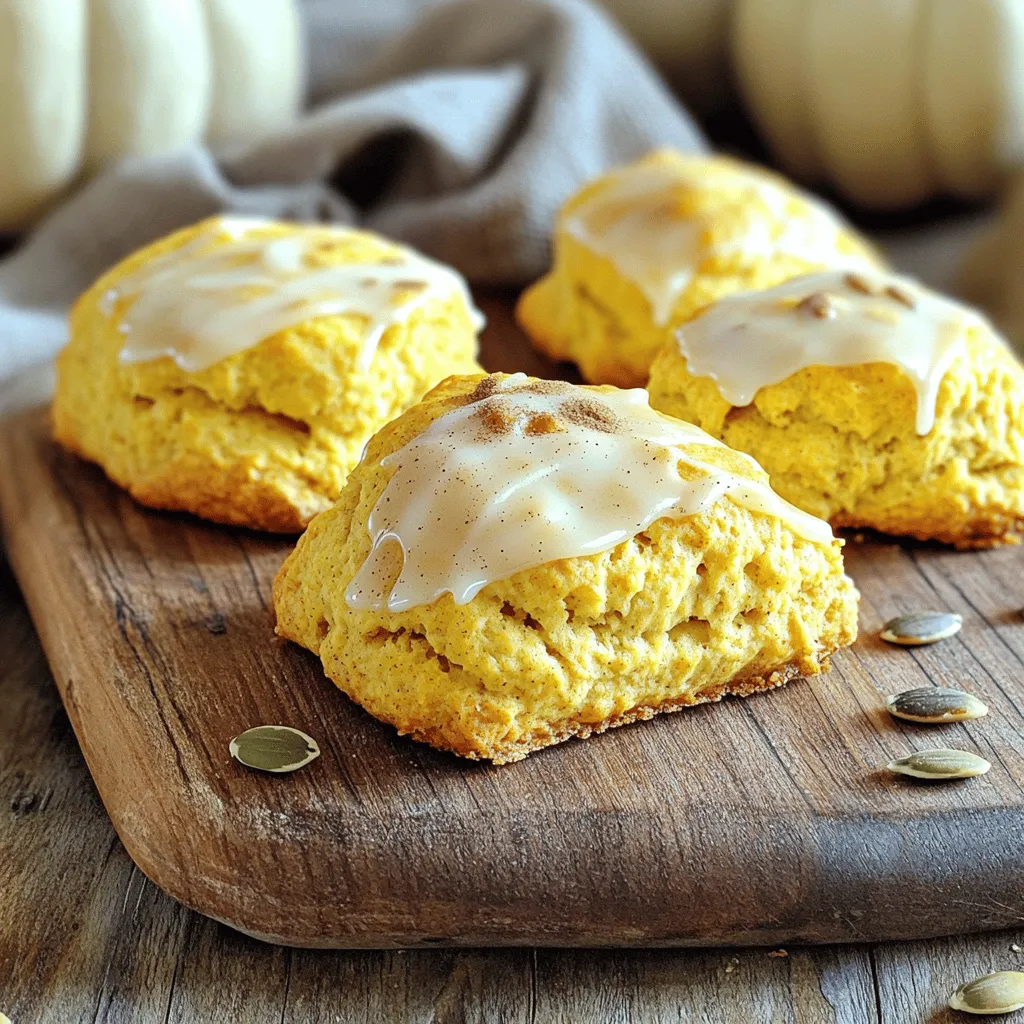
Pumpkin Scones Delightful Treat for Fall Mornings
Fall mornings are perfect for warming up with homemade pumpkin scones. These tasty treats fill your kitchen with sweet, spicy aromas that invite you to
![To make Mini Pumpkin Pie Pops, you will need the following key ingredients: - 1 cup pure pumpkin puree - 1/2 cup packed brown sugar - 1/4 cup granulated sugar - 1 teaspoon pumpkin pie spice - 1/2 teaspoon pure vanilla extract - 1 package of ready-made pie crusts (contains 2 crusts) - 1 egg, beaten (for egg wash) - Lollipop sticks (optional) - Whipped cream for serving These ingredients create a sweet, rich filling that pairs perfectly with a flaky crust. The pumpkin puree gives the pops their classic flavor, while the sugars add just the right amount of sweetness. Pumpkin pie spice brings warmth and depth, making each bite feel like fall. You can customize your Mini Pumpkin Pie Pops with these optional ingredients: - Chopped nuts (like pecans or walnuts) for added crunch - Chocolate chips for a sweet twist - A pinch of sea salt to enhance flavors Feel free to experiment with flavors. These options can take your pops to the next level. If you have dietary restrictions, consider these substitutions: - Use gluten-free pie crusts if you need a gluten-free option. - Replace brown sugar with coconut sugar for a healthier choice. - Use a plant-based egg wash, like almond milk, if you want a vegan version. Always check ingredient labels for allergens. This care ensures everyone can enjoy these delightful treats! For the full recipe, check out the details mentioned earlier. Start by preheating your oven to 375°F (190°C). This step is key for a crispy crust. Next, line a baking sheet with parchment paper. This will help prevent any sticking while baking. In a medium bowl, combine the following ingredients: - 1 cup pure pumpkin puree - 1/2 cup packed brown sugar - 1/4 cup granulated sugar - 1 teaspoon pumpkin pie spice - 1/2 teaspoon pure vanilla extract Whisk all these together until the mixture is smooth. This filling should taste sweet and spicy, perfect for fall. Lightly flour your work surface. Roll out your ready-made pie crusts, which usually come in a package with two crusts. Use a round cookie cutter to cut out circles, about 3 inches wide. Aim for 12 circles total. Take one circle and place about 1 tablespoon of your pumpkin filling in the center. If you use lollipop sticks, insert one into the filling now. Place another crust circle on top. Press the edges together to seal them well. Crimp the edges with a fork for a nice look. Repeat this until all your pops are ready. Brush the tops of your pie pops with a beaten egg to give them a golden finish. Place them on the prepared baking sheet, leaving some space between each. Bake for 15-18 minutes. They are done when they look golden brown. After baking, let them cool for a few minutes on the baking sheet. Once cooled, transfer them to a serving plate. Enjoy your mini pumpkin pie pops! For the full recipe, check the section above. The crust is key for great mini pumpkin pie pops. Use ready-made pie crusts for ease. They save time and taste good. Roll out the crust gently. If it’s too thick, it won't bake well. Aim for a thin, even layer. This helps the pops stay crisp and flaky. After cutting, make sure the edges are sealed. You can crimp them with a fork for a pretty look. You can change the flavor of your pie pops easily. Try adding chocolate chips for a sweet twist. You can also add a pinch of nutmeg for warmth. If you like a bit of zest, mix in some orange zest. It adds freshness and brightens the flavor. For a spicier kick, add a dash of cayenne pepper. Get creative and find your favorite mix! How you serve these pops can make a big difference. Place them on a colorful platter. It adds a festive touch to your table. Top each pop with whipped cream. A sprinkle of pumpkin pie spice on top makes it look nice too. For a fun twist, use lollipop sticks. They make great handheld treats. Pair them with warm drinks, like cider or coffee, for a cozy fall vibe. For the full recipe, check out the details above. {{image_4}} You can change the filling to keep things fun. Try using sweet potato puree instead of pumpkin. It gives a nice twist. For a chocolate version, mix in cocoa powder. You could also add some chopped nuts or chocolate chips for crunch. Fruit fillings are great too. Apple or pear can bring a fresh taste. Mix in cinnamon or nutmeg for a warm flavor. The options are endless, so get creative! If you need a gluten-free option, use almond flour or gluten-free pie crusts. These work well and taste great. You can also try puff pastry for a flakier texture. For a lower-carb choice, consider using a crust made of crushed nuts. If you're vegan, replace the egg wash with almond milk. This will give your crust a nice shine without eggs. For Halloween, add a little food coloring to your filling. This makes it spooky and fun! For Thanksgiving, decorate the pops with fall leaves using icing. Christmas is great for peppermint flavors. Add crushed candy canes to the filling for a minty kick. You can even make mini apple pie pops for a summer picnic. Themed variations make your treats festive and exciting! For the full recipe, check out the [Full Recipe]. To keep your mini pumpkin pie pops fresh, place them in an airtight container. You can store them at room temperature for up to two days. If you want to keep them longer, refrigeration is best. They will stay fresh in the fridge for about a week. Just make sure to cover them well to avoid drying out. Freezing is a great option for long-term storage. First, let the pops cool completely. Then, wrap each one tightly in plastic wrap. After wrapping, place them in a freezer-safe bag or container. They can last in the freezer for up to three months. When ready to enjoy, simply thaw them in the fridge overnight. To reheat your mini pumpkin pie pops, preheat your oven to 350°F (175°C). Place the pops on a baking sheet and heat for about 10-15 minutes. This will make them warm and crispy again. Avoid using the microwave. Microwaving can make the crust soggy, and we want that nice crunch. Enjoy your pops with a dollop of whipped cream! For the full recipe, check out the link above. Yes, you can make Mini Pumpkin Pie Pops ahead of time. Prepare the pops and freeze them before baking. Wrap each one in plastic wrap or place them in a freezer bag. When you're ready to bake, just remove them from the freezer. Bake directly from frozen, adding a few extra minutes to the baking time. This way, you can enjoy fresh pops whenever you want. You will know the Mini Pumpkin Pie Pops are done when they turn golden brown. Keep an eye on them around the 15-minute mark. The crust should look flaky and cooked through. If you press gently on the top, it should feel firm. A good sign is the warm, sweet aroma filling your kitchen. Mini Pumpkin Pie Pops pair well with whipped cream. You can also serve them with a scoop of vanilla ice cream. A drizzle of caramel sauce adds a nice touch too. For a festive feel, sprinkle a bit of extra pumpkin pie spice on top. These toppings enhance the flavors and make the pops even more special. Yes, you can use fresh pumpkin instead of canned puree. Start by cooking the pumpkin until it is soft. You can roast it or boil it. Then, scoop out the flesh and mash it until smooth. Make sure to strain any excess water. This fresh pumpkin will add a unique flavor to your pops, making them even more delicious. Making Mini Pumpkin Pie Pops is fun and easy. I love to start with the right ingredients. Here’s what you need: - 1 cup pure pumpkin puree - 1/2 cup packed brown sugar - 1/4 cup granulated sugar - 1 teaspoon pumpkin pie spice - 1/2 teaspoon pure vanilla extract - 1 package of ready-made pie crusts (contains 2 crusts) - 1 egg, beaten (for egg wash) - Lollipop sticks (optional) - Whipped cream for serving This recipe brings fall flavors to life. You’ll mix the pumpkin puree with sugars and spices. The brown sugar adds depth, while the vanilla gives a lovely aroma. I recommend using ready-made pie crusts to save time. They make the process smoother, and you can focus on the filling. If you want, you can make your own crust from scratch. Just keep it simple. When assembling the pops, use a round cookie cutter. Cut out circles about 3 inches wide. You will need around 12 circles. This helps create the perfect shape for your mini pies. For the filling, place a spoonful in the center of each circle. Use about 1 tablespoon to avoid overfilling. Then, insert a lollipop stick if you want. This makes them easier to eat and adds a fun touch. Once you press the top crust on, crimp the edges with a fork. This step seals in the filling and looks great too. After that, brush the tops with the beaten egg. This gives them a nice golden finish. Bake them at 375°F (190°C) for 15-18 minutes. They should be golden brown and flaky. Let them cool before serving. For a special touch, serve them on a pretty plate with whipped cream on top. You can sprinkle a bit of extra pumpkin pie spice for flair. Enjoy your mini pumpkin pie pops! You learned how to make Mini Pumpkin Pie Pops with simple steps. We covered key ingredients, customizations, and allergen alternatives. I shared tips for the perfect crust and fun filling variations. You now have storage methods to keep them fresh. The joy of baking these treats adds to any gathering. Remember, the options are endless. Enjoy creating your delicious Mini Pumpkin Pie Pops!](https://tossedflavors.com/wp-content/uploads/2025/07/be48e959-470b-45e1-bc73-53d401f24939.webp)
Mini Pumpkin Pie Pops Irresistible Fall Treat
Fall is here, and it’s time to indulge in cozy treats! If you love pumpkin pie, you’ll adore these Mini Pumpkin Pie Pops. These tiny
![When making pumpkin streusel muffins, you need some core ingredients. These give your muffins a tasty base. - 1 cup all-purpose flour - 1 cup whole wheat flour - 1 cup canned pumpkin puree Next, sweeteners and fats add flavor and moisture to your muffins. - 1/2 cup light brown sugar, packed - 1/2 cup granulated sugar - 1/2 cup vegetable oil To make your muffins extra special, flavorings and toppings come into play. - Ground spices: cinnamon, nutmeg, ginger - Streusel topping ingredients: rolled oats, butter These ingredients combine to create a warm, spiced treat. You can find the full recipe to get started on these delicious muffins. Enjoy the process of baking! Prepping Your Kitchen Start by preheating your oven to 350°F (175°C). This ensures your muffins bake evenly. Next, prepare your muffin tin. You can use paper liners or lightly grease each cup with butter or oil. This step keeps the muffins from sticking. Mixing Dry Ingredients In a large bowl, combine your flours, baking powder, baking soda, cinnamon, nutmeg, ginger, and salt. Whisk these dry ingredients together until they mix well. This helps the leavening agents to work properly. Preparing Wet Ingredients In another bowl, mix the pumpkin puree, vegetable oil, granulated sugar, light brown sugar, milk, and eggs. Whisk until the mixture is smooth. This combination adds flavor and moisture to your muffins. Now, gently fold the dry ingredients into the wet ingredients. Use a rubber spatula for this. Be careful not to overmix. Overmixing can make your muffins tough, while a gentle stir keeps them light and fluffy. Making the Streusel Topping For the streusel, combine rolled oats, all-purpose flour, light brown sugar, and cinnamon in a small bowl. Add the cold diced butter. Use your fingers or a fork to mix until it looks like coarse crumbs. This topping adds a crunchy texture that complements the muffins. Assembling and Baking Spoon the muffin batter into the prepared muffin tin. Fill each cup about two-thirds full. This allows room for the muffins to rise. Generously sprinkle the streusel topping over the batter in each cup. Bake your muffins for 20-25 minutes. They are done when a toothpick inserted in the center comes out clean. The tops should look golden and spring back when touched. Cooling and Serving After baking, let the muffins cool in the pan for about 5 minutes. Then, transfer them to a wire rack to cool completely. For serving, arrange the muffins on a platter. A light dusting of powdered sugar adds a nice touch. Pair them with mini pumpkins for a festive look. For the full recipe, check out the detailed instructions above! To make light and fluffy muffins, avoid overmixing. When you combine wet and dry ingredients, mix just until they blend. If you mix too much, the muffins can turn tough. Using fresh ingredients is also key. Fresh flour and spices give better flavor and texture. You can boost the flavor of your muffins with add-ins. Nuts, like walnuts or pecans, add a nice crunch. Chocolate chips can make them sweet and fun! Adjust the spices to your liking too. If you love cinnamon, feel free to add more. You can also try other spices for a unique taste. To check if your muffins are done, use a toothpick. Stick it in the center of a muffin. If it comes out clean, they are ready! Keep in mind that different ovens may bake at different speeds. You might need to adjust the time by a few minutes. Always keep an eye on them while baking. For the full recipe, you can refer to the complete guide above. {{image_4}} You can easily make these muffins gluten-free. Just use a gluten-free flour blend instead of regular flour. Most blends work well in baking. Look for blends that contain xanthan gum for the best texture. This change keeps the muffins soft and fluffy. If you want a vegan version, replace the eggs with flaxseed meal. Mix one tablespoon of flaxseed meal with three tablespoons of water. Let it sit for about five minutes to thicken. This mixture works great as an egg substitute. Also, use plant-based milk and oil. Almond milk or coconut milk are excellent choices. They add flavor without dairy. You can customize your muffins with different flavors. Add dried cranberries or chocolate chips for a sweet twist. These ingredients add texture and taste. You can also mix in spices like allspice or cloves for an extra kick. Feel free to experiment and find your favorite combination. For the complete recipe, check out the [Full Recipe]. After baking, let your pumpkin streusel muffins cool. Place them in an airtight container. This keeps them fresh. You can store them at room temperature for up to three days. If it's hot or humid, the fridge may help. However, refrigeration can dry them out. Want to enjoy them later? You can freeze your muffins! Wrap each muffin in plastic wrap. Then, place them in a freezer bag. They can last up to three months in the freezer. When you're ready to eat, take out a muffin. Let it thaw in the fridge overnight for best results. To bring back their warmth, use an oven or microwave. If using the oven, preheat it to 350°F (175°C). Place the muffin on a baking sheet for about 10 minutes. If you use a microwave, heat for about 15-20 seconds. This way, your muffins stay moist and tasty. Enjoy your pumpkin streusel muffins warm! For the full recipe, check out the earlier section! To stop muffins from sticking, use paper liners. You can also grease each cup with butter or oil. This step is key for easy removal. Greasing helps create a barrier between the muffin and the pan. Always make sure to coat the sides and bottom well. Yes, you can use fresh pumpkin. To make fresh pumpkin puree, cook and blend the pumpkin flesh until smooth. Use about 1 cup of fresh puree in place of canned. Be sure to drain any excess water from fresh pumpkin to keep your muffins from getting soggy. When stored in an airtight container, these muffins last up to 3 days at room temperature. For longer storage, place them in the fridge for up to a week. You can also freeze them for up to 3 months. Just remember to wrap them tightly to keep them fresh. Pumpkin muffins pair well with many tasty options. Try serving them with butter or cream cheese for breakfast. They also go great with a cup of coffee or tea. For a snack, enjoy them with a side of fruit or yogurt for a balanced treat. Yes, it is normal for muffins to dome. A good muffin should rise and form a nice dome on top. This means the batter has risen well and baked properly. The dome shows that the leavening agents worked to create a light, airy texture. In this blog post, we explored the core ingredients for delicious pumpkin streusel muffins. You learned how to mix dry and wet ingredients effectively. We discussed tips for achieving the perfect texture and shared variations for gluten-free and vegan options. Baking these muffins is easy and rewarding. With fresh ingredients and care, you create delightful snacks. Enjoy sharing them with friends or savoring them yourself. Happy baking!](https://tossedflavors.com/wp-content/uploads/2025/07/589bcb16-ea71-45c4-a153-458ea7b9e632.webp)
Pumpkin Streusel Muffins Delightful and Easy Recipe
Are you ready to fill your kitchen with the warm scent of fall? My Pumpkin Streusel Muffins are easy to make and packed with flavor.
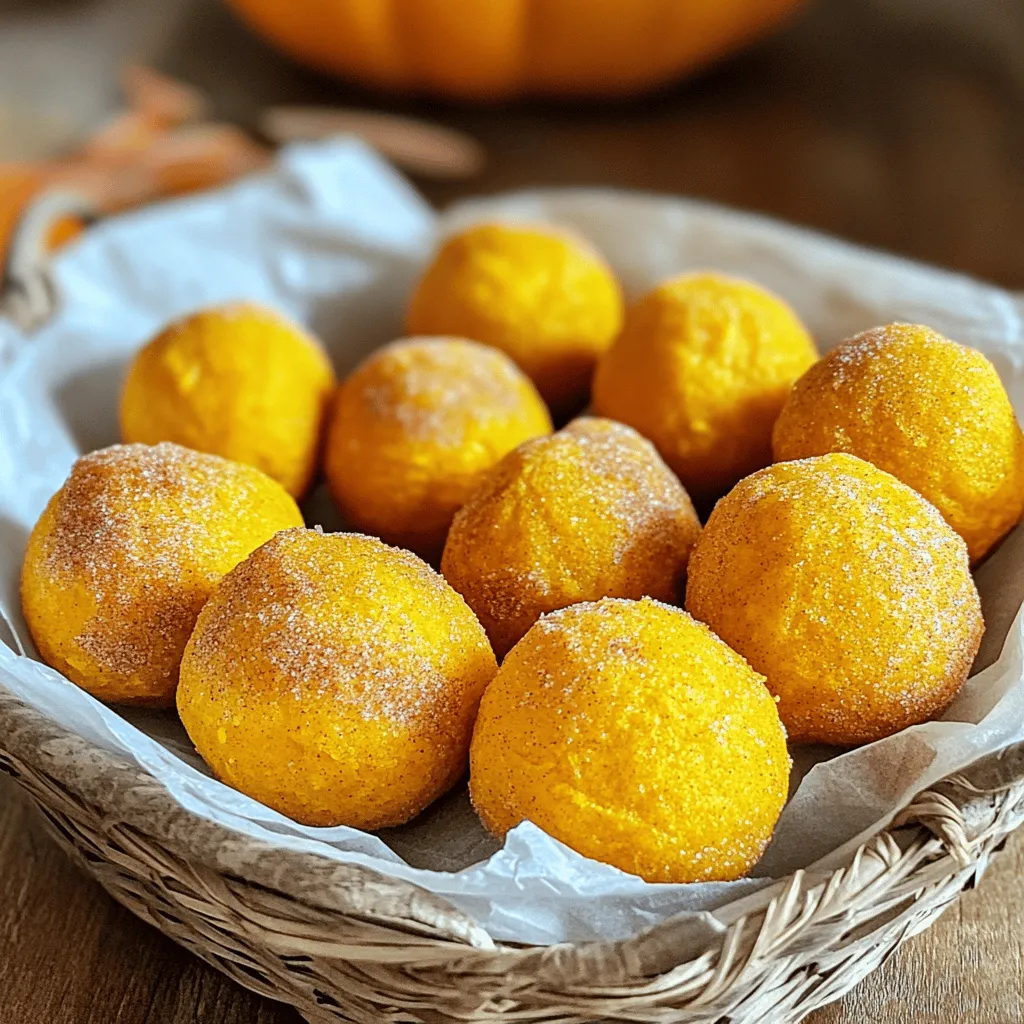
Healthy Pumpkin Donut Holes Simple and Tasty Treat
Looking for a tasty treat that’s also healthy? You’ve come to the right place! In this blog, I’ll show you how to make simple and
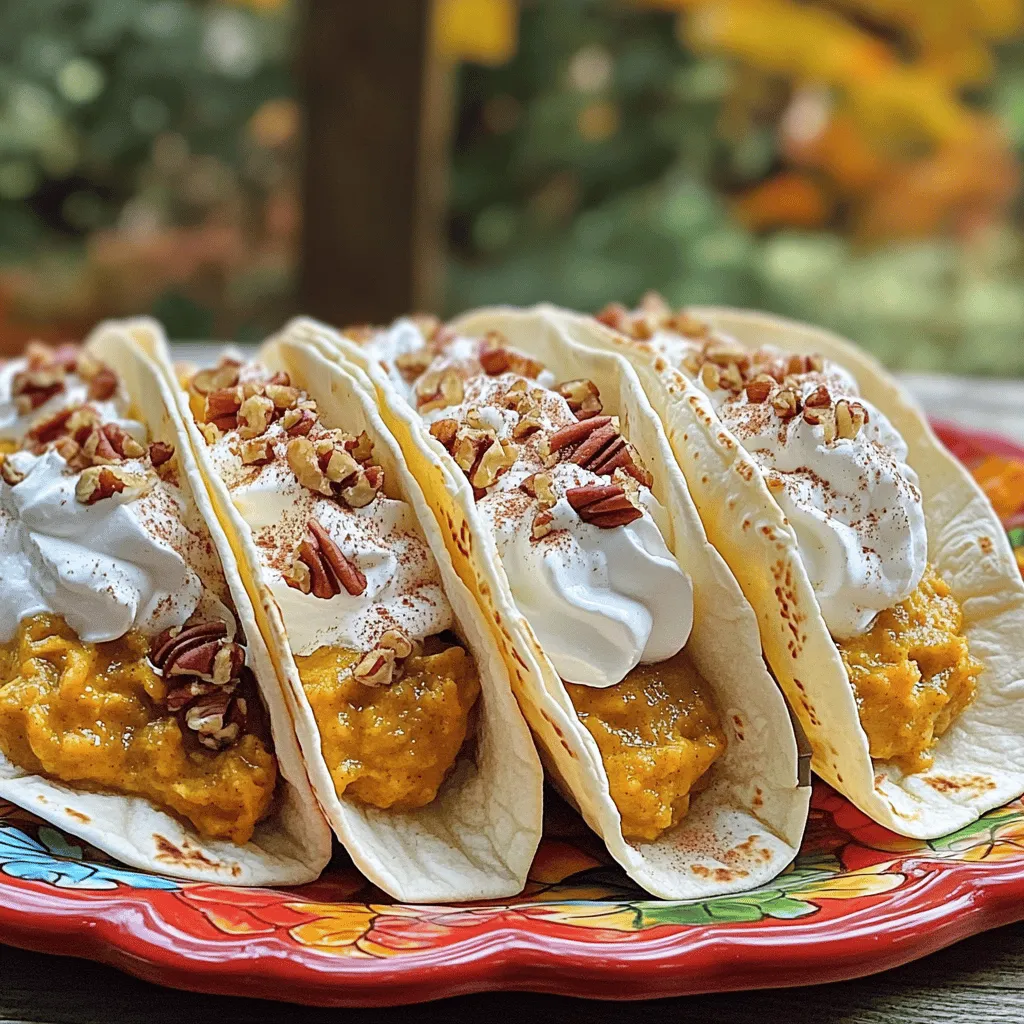
Pumpkin Pie Tacos Irresistible Fall Treat to Enjoy
Pumpkin pie tacos are the ultimate fall treat you didn’t know you needed! Imagine warm, soft tortillas filled with creamy pumpkin goodness, sweetened just right.
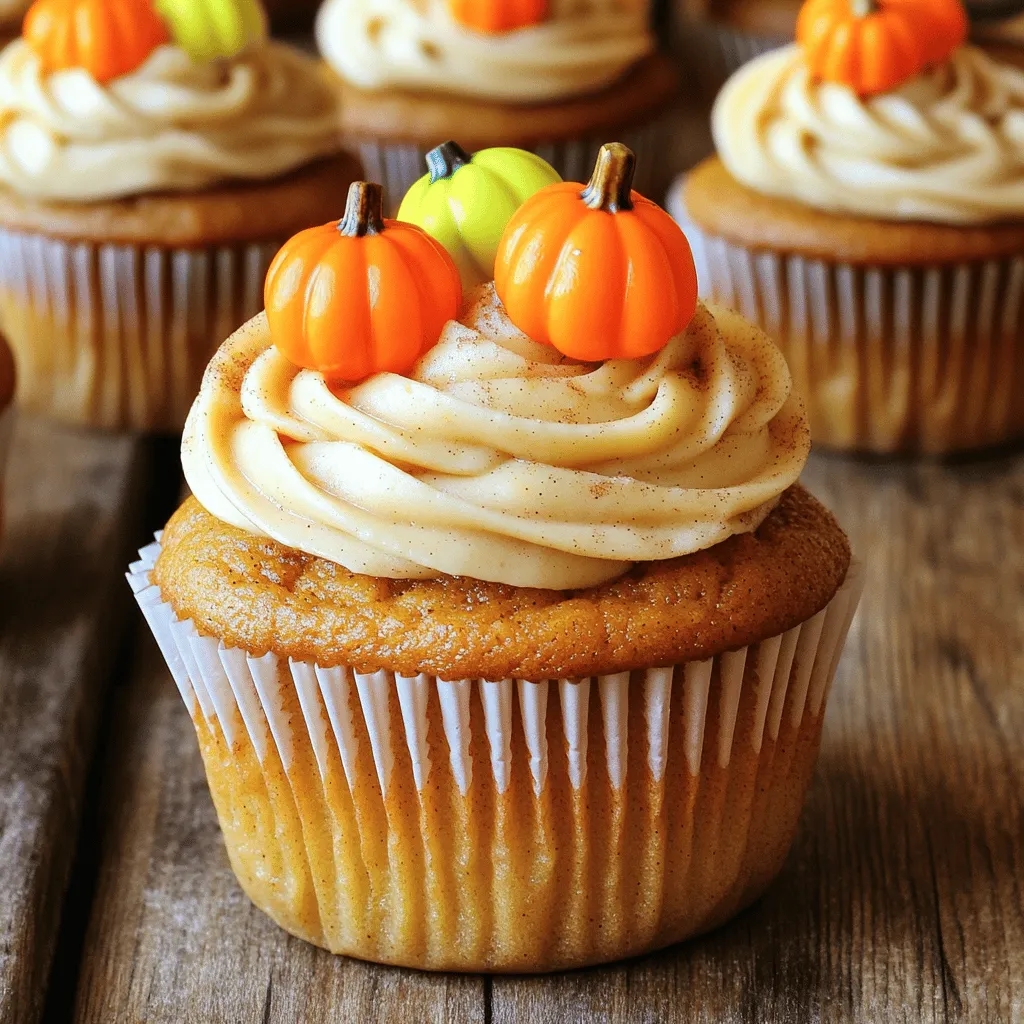
Pumpkin Cupcakes with Cinnamon Cream Cheese Frosting Delight
Get ready to savor autumn with my easy Pumpkin Cupcakes topped with rich Cinnamon Cream Cheese Frosting! These moist, spiced treats are perfect for any