Desserts
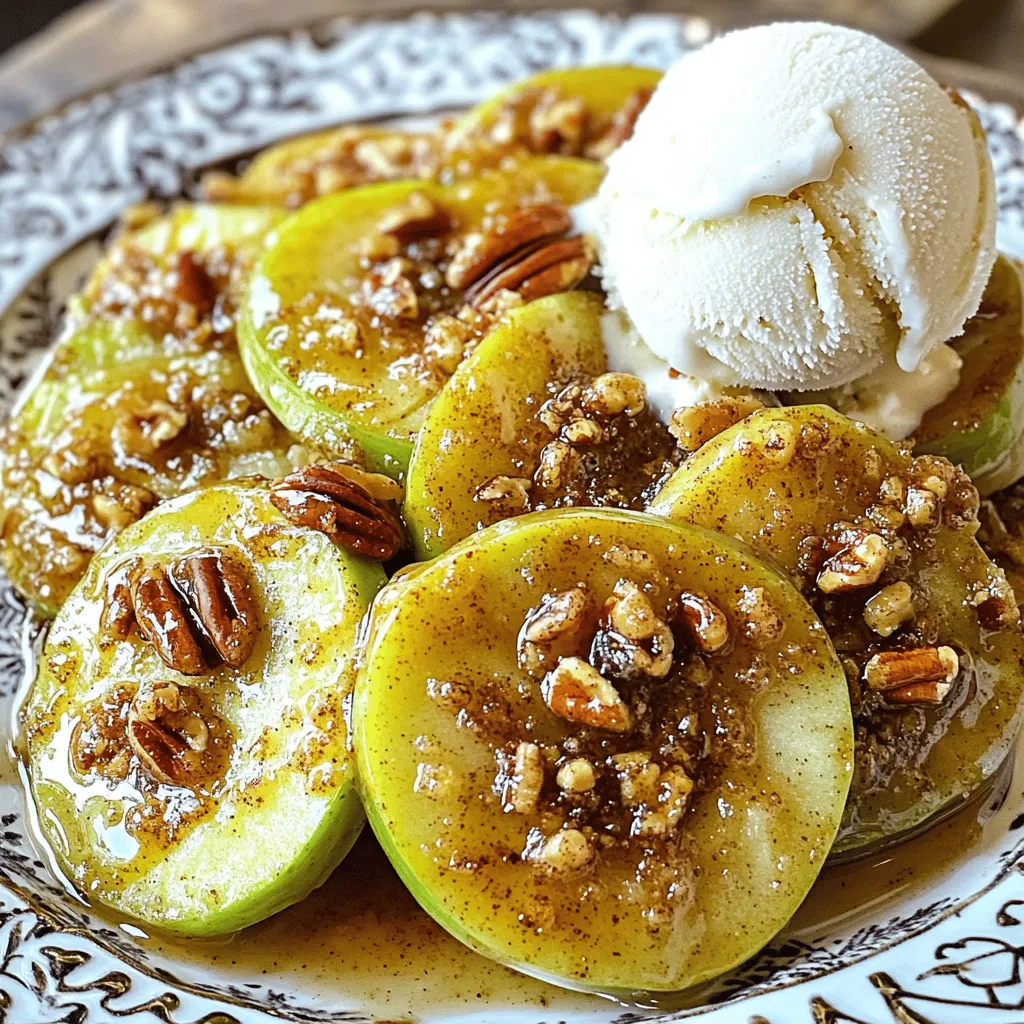
Southern Fried Apples Simple Sweet Comfort Dish
If you’re craving a simple and sweet comfort food, look no further than Southern Fried Apples. This delightful dish transforms fresh Granny Smith apples into
![- 1 ½ cups apple cider - 2 cups all-purpose flour - 1 teaspoon baking powder - ½ teaspoon baking soda - ½ teaspoon salt - 1 teaspoon ground cinnamon - ¼ teaspoon ground nutmeg - ½ cup granulated sugar - ½ cup packed brown sugar - 2 large eggs - ½ cup unsweetened applesauce - ⅓ cup vegetable oil - 1 teaspoon vanilla extract - 4 tablespoons unsalted butter, melted (for brushing) - ½ cup cinnamon sugar (for coating) I love using fresh apple cider for these donuts. It gives them a rich taste. The spices like cinnamon and nutmeg add warmth and flavor. Don't skip the brown sugar; it adds moisture and depth. As for the eggs, they help bind everything together. The applesauce keeps the donuts soft and tender. - Donut pan - Mixing bowls - Whisk and spatula - Saucepan - Piping bag or zip-top bag To make these donuts, you need a donut pan. This pan gives them their fun shape. Mixing bowls help you combine ingredients easily. A whisk works well for blending, and a spatula ensures you get every bit of batter out. A saucepan is a must for reducing the cider. Lastly, a piping bag or zip-top bag helps fill the donut pan without mess. With these ingredients and tools, you are set to make baked apple cider donuts. For the complete recipe, check out the [Full Recipe]. - Preheat the oven to 350°F (175°C). - Grease the donut pan with cooking spray or oil. Start by setting your oven to the right temperature. This step is key for even baking. Grab your donut pan and give it a light coat of cooking spray. This will help the donuts slide out easily after baking. - Heat apple cider in a saucepan. - Simmer until reduced to ¾ cup. Next, pour the apple cider into a small saucepan. Turn the heat to medium and bring it to a boil. After it boils, lower the heat to a simmer. Let it bubble gently for about 15 to 20 minutes. You want it to reduce down to about ¾ cup. This step concentrates the flavor and makes the donuts taste amazing. - Mix dry ingredients in one bowl. - Blend wet ingredients in another bowl. - Combine both mixtures without overmixing. In a large bowl, whisk together your dry ingredients: flour, baking powder, baking soda, salt, and spices. In another bowl, mix the wet ingredients: sugars, eggs, applesauce, vegetable oil, vanilla, and the cooled apple cider. Make sure both mixtures are well combined. Then, slowly pour the wet mix into the dry bowl. Stir gently. You want to mix them just enough—let some lumps stay. Too much mixing can make the donuts tough. - Fill donut pan cavities with batter. - Bake for 12-15 minutes until done. Now, it’s time to fill the donut pan. You can use a piping bag or a zip-top bag with one corner cut off. Fill each cavity about ¾ full. This gives them room to rise. Slide the pan into your preheated oven. Set a timer for 12 to 15 minutes. To check if they’re done, stick a toothpick in a donut. If it comes out clean, they are ready! - Cool donuts in the pan, then transfer to a wire rack. - Brush with melted butter and coat in cinnamon sugar. Once they’re baked, take the pan out and let the donuts cool for about 5 minutes. Then, carefully move them to a wire rack to cool completely. While they’re still warm, brush each donut with melted butter. This makes the cinnamon sugar stick. Next, roll them in the cinnamon sugar mixture. This step adds a sweet crunch that you will love. Enjoy warm or save them for later. You can find the full recipe above for more details! To get the best texture, avoid overmixing the batter. Mix just until combined. A few lumps are okay. Mix too much, and your donuts may turn out dense. Also, ensure all ingredients are at room temperature. This step helps them blend well, creating a light and fluffy donut. For a flavor boost, add spices like cloves or ginger. These spices add warmth and depth. You can also incorporate chopped apples or nuts for added texture. Chopped apples will give a fresh crunch, while nuts add a delightful bite. Both options enhance the taste and make each bite exciting. Baked apple cider donuts taste great with coffee or hot apple cider. The warm drinks pair perfectly with the sweet, spiced donuts. For the best flavor, serve them warm or at room temperature. Warm donuts melt in your mouth, making for a cozy treat. Enjoy them fresh, or share with friends for a delightful snack. {{image_4}} You can easily tweak this baked apple cider donut recipe to suit your needs. Here are some fun variations to try. To make these donuts gluten-free, simply swap the all-purpose flour for a gluten-free flour blend. Look for one that works well for baking. This swap keeps the texture light and fluffy, just like the original. If you want a vegan version, it’s simple! Replace the eggs with flaxseed meal or unsweetened applesauce. Use 1 tablespoon of flaxseed meal mixed with 2.5 tablespoons of water for each egg. You can also use plant-based butter and non-dairy milk instead of regular ones. This way, everyone can enjoy these tasty treats! Add a fun twist with flavored glazes! A maple glaze is perfect for that sweet, fall vibe. Mix powdered sugar with a bit of maple syrup and some non-dairy milk until smooth. You can also try chocolate or caramel drizzles for a richer taste. These glazes make your donuts even more special. For the full recipe, check out the details above and start baking! To keep your donuts fresh, store them in an airtight container at room temperature. This helps maintain their soft texture and delightful taste. They will stay good for about three days. If you want them to last longer, consider freezing them. You can freeze these donuts for up to 2 months. Make sure they are completely cool before wrapping them tightly. Place them in a freezer-safe bag or container. When you're ready to enjoy them, just thaw them at room temperature before serving. To warm up your donuts, you can use a microwave or oven. If using the microwave, heat them for about 10-15 seconds. For the oven, preheat it to 350°F (175°C) and warm the donuts for about 5-7 minutes. Warming brings back that fresh-baked flavor. Enjoy them as if they just came out of the oven! Baked apple cider donuts stay fresh for 2 to 3 days at room temperature. Store them in an airtight container to keep them soft. If you want to keep them longer, you can freeze them. Wrap each donut well in plastic wrap, then place them in a freezer bag. They can last up to 2 months in the freezer. When you want to enjoy them, just thaw at room temperature. Yes, you can use store-bought apple cider! It works well in this recipe. Homemade cider gives a deeper flavor, but store-bought is a great option if you are short on time. Just make sure to choose a quality cider. Look for one that is pure with no added sugars. To check if your donuts are done, use a toothpick. Insert it into the center of a donut. If the toothpick comes out clean, your donuts are fully baked. If it comes out with batter on it, let them bake for a few more minutes. The baking time is usually around 12 to 15 minutes, but always check early. In this blog post, we explored how to make delicious baked apple cider donuts. We covered essential ingredients, equipment needed, and provided a clear step-by-step guide. I shared tips for perfect texture and flavor enhancements to elevate your baking. You can even tweak the recipe for dietary needs or add fun glaze options. Enjoy storing your leftovers and reheating them for a tasty treat. Now, gather your ingredients and get baking! These donuts will bring warmth and joy to your kitchen.](https://tossedflavors.com/wp-content/uploads/2025/07/6dbdb309-cde7-4ba6-be44-62a1bd3f8c80.webp)
Baked Apple Cider Donuts Delightful and Simple Treat
Craving a sweet, fall-inspired treat that’s easy to make? Look no further! Baked Apple Cider Donuts are your perfect solution. These delightful donuts combine warm
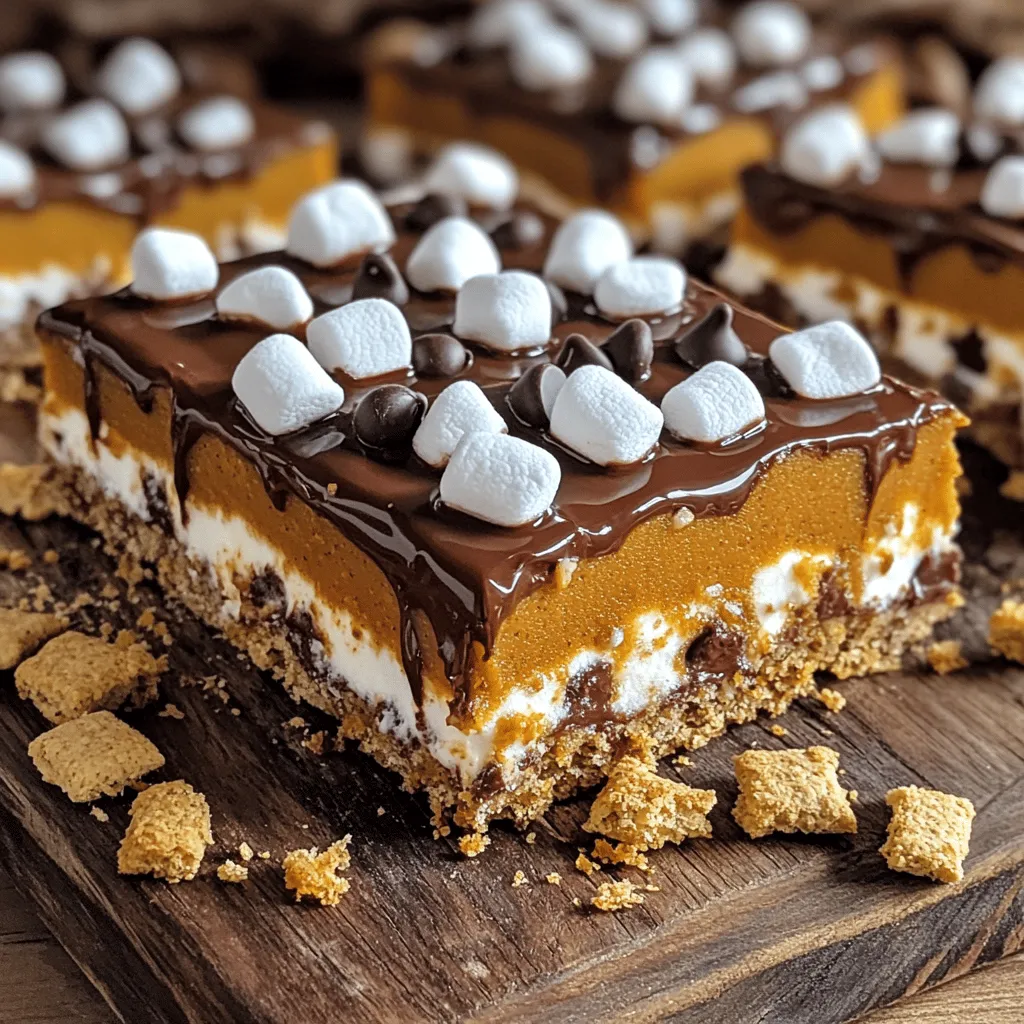
Pumpkin S’mores Bars Irresistible Fall Treat
Get ready for a cozy fall treat that’s hard to resist: Pumpkin S’mores Bars! These bars combine gooey marshmallows, rich chocolate, and spiced pumpkin filling,
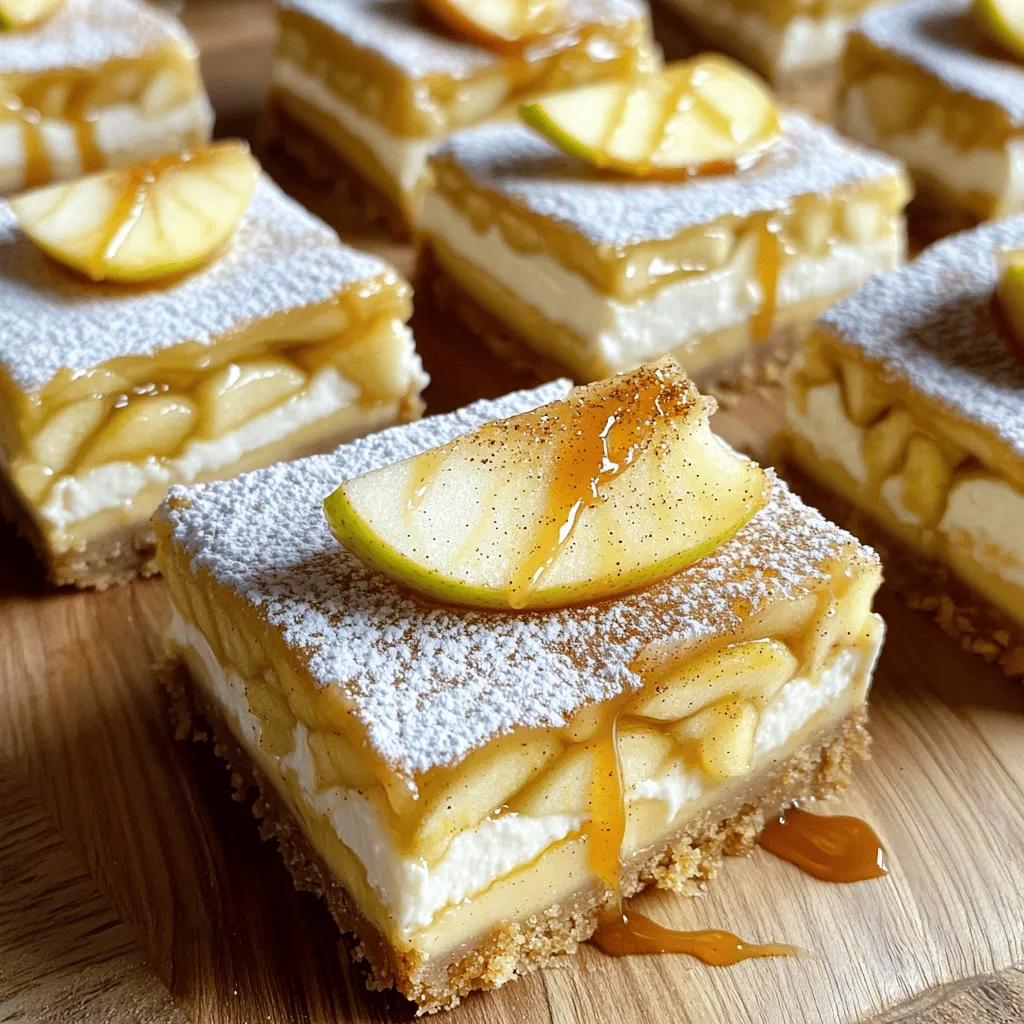
Apple Pie Cheesecake Bars Irresistible Sweet Treat
Are you ready to indulge in a dessert that combines the best of two worlds? Picture this: creamy cheesecake meets warm, spiced apple pie in

Pumpkin Dream Cupcakes Irresistible Festive Treats
Get ready to savor the season with my Pumpkin Dream Cupcakes! These moist and spicy delights are the perfect festive treat, bursting with cozy autumn
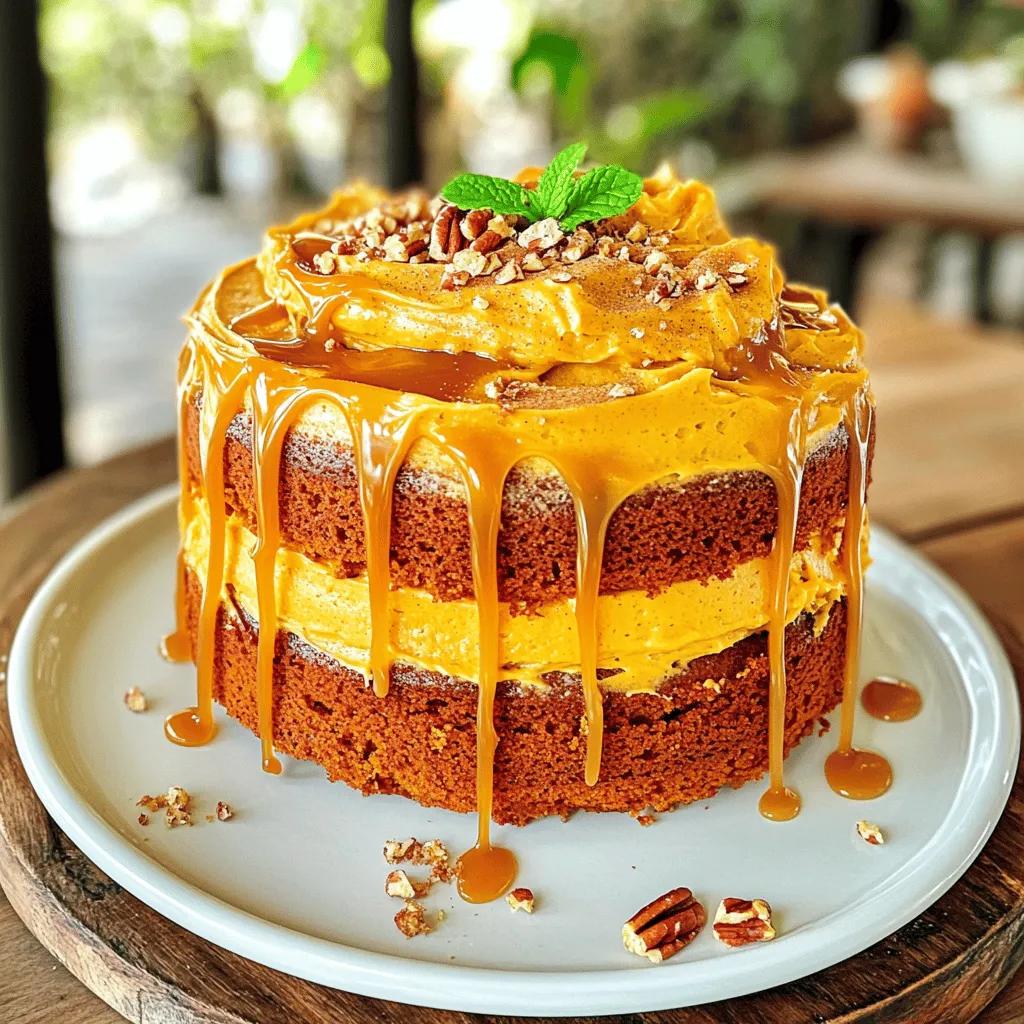
Pumpkin Cake with Caramel Cream Cheese Frosting Delight
If you’re craving a sweet and spiced treat, you’ll love my Pumpkin Cake with Caramel Cream Cheese Frosting. This moist cake blends warm spices with
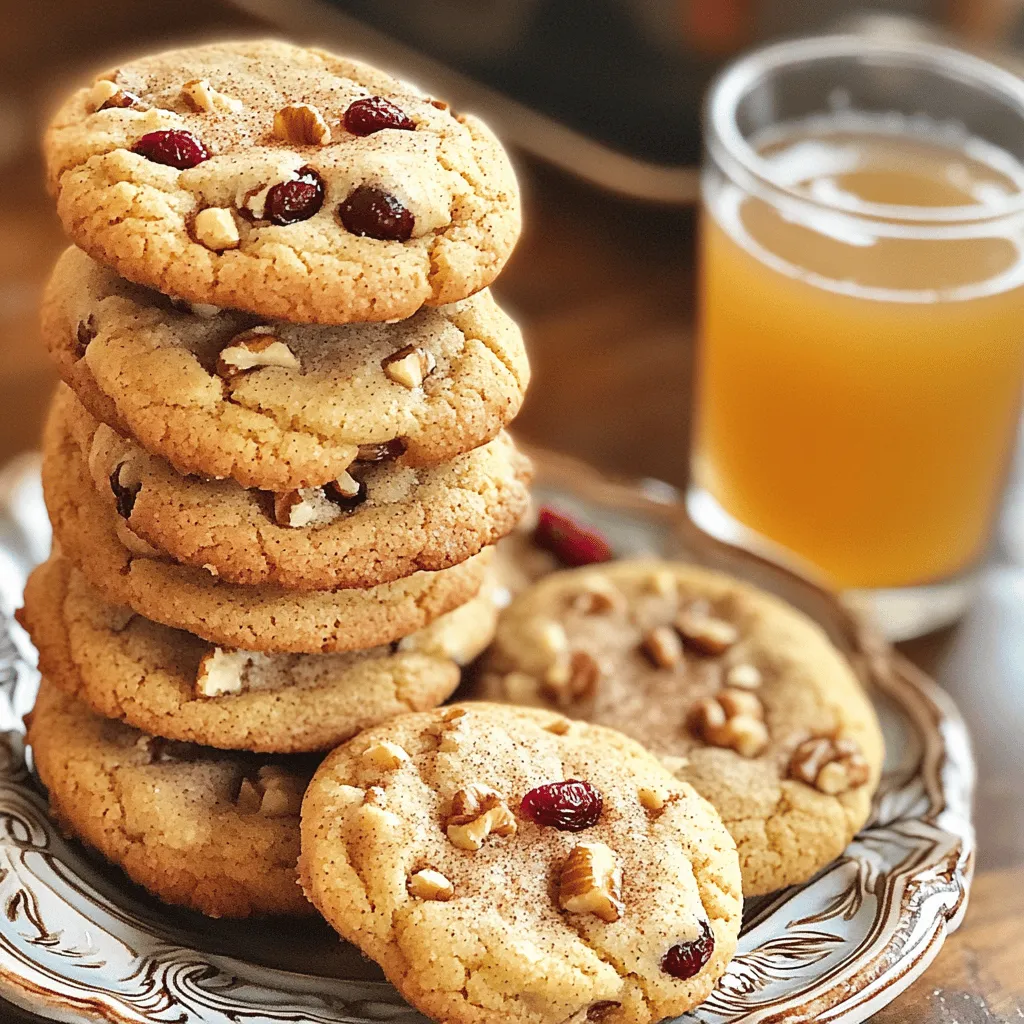
Apple Cider Cookies Delightful Fall Treat Recipe
Fall is here, and what better way to celebrate than with warm, spiced Apple Cider Cookies? These delightful treats blend comforting flavors into each bite.
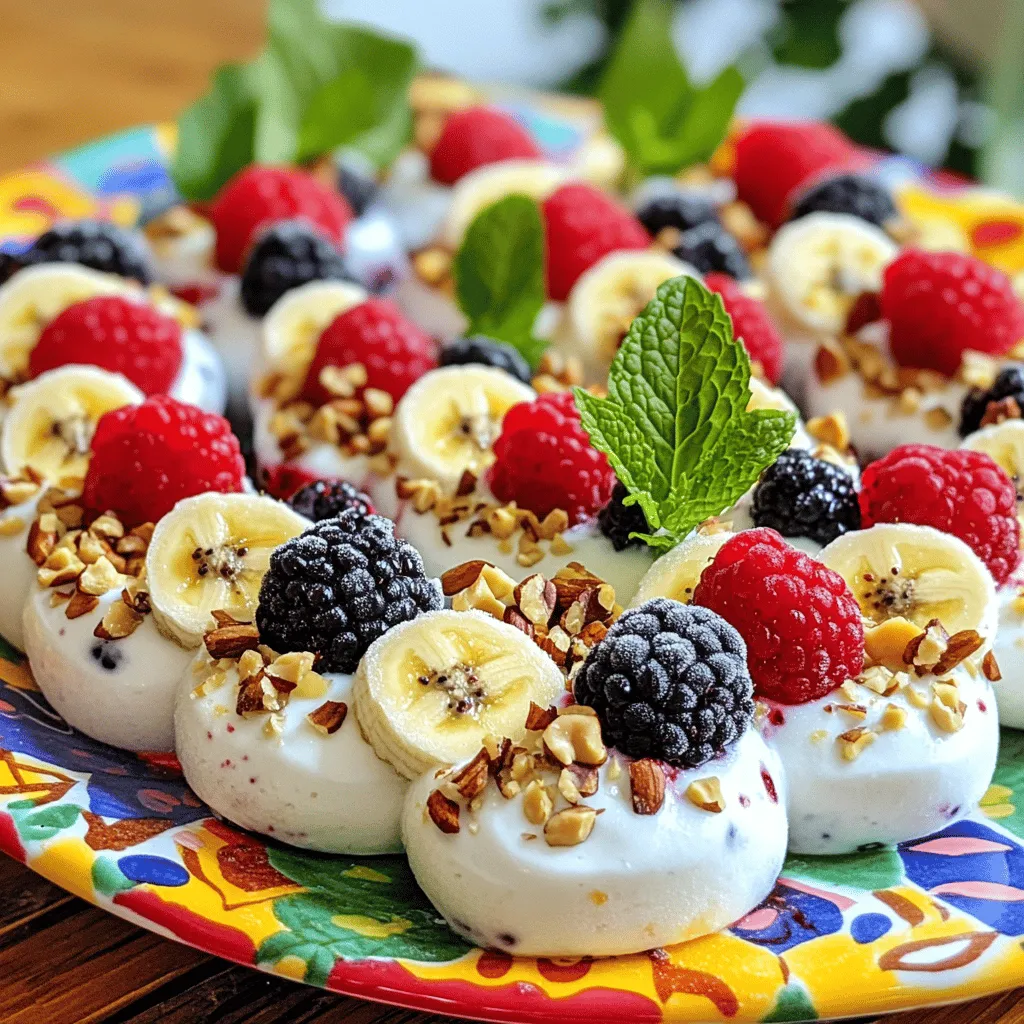
Easy Frozen Yogurt Bites Simple and Fun Recipe
Looking for a simple and fun way to beat the heat? You’re in the right place! Easy Frozen Yogurt Bites are your perfect treat. With
![- 1 cup all-purpose flour - 1/2 cup old-fashioned oats - 1/2 teaspoon baking powder - 1/2 teaspoon baking soda - 1/4 teaspoon salt - 1/2 cup unsalted butter, softened - 1 cup packed brown sugar - 1/4 cup granulated sugar - 2 large eggs - 1/2 cup pure pumpkin puree - 1/4 cup pure maple syrup - 1 teaspoon vanilla extract - 1 teaspoon ground cinnamon - 1/4 teaspoon ground nutmeg - 1/4 teaspoon ground ginger - 1/2 cup chopped pecans - 1/4 cup powdered sugar for dusting - Mixing bowls - Electric mixer (or whisk) - 9x9-inch baking pan To make the Brown Sugar Maple Pumpkin Butter Bars, you need a few key ingredients. The base starts with brown sugar and pure maple syrup. These two ingredients create a sweet and rich flavor. Pumpkin puree adds a smooth and creamy texture. All-purpose flour binds everything together and gives the bars a nice structure. You can add optional ingredients for extra fun. Chopped pecans give a nice crunch and a nutty taste. A light dusting of powdered sugar on top makes the bars look fancy. For the best results, gather your equipment. Mixing bowls help you blend your ingredients. An electric mixer or a whisk is perfect for creaming the butter and sugars. A 9x9-inch baking pan is essential for baking the bars evenly. Check the [Full Recipe] for detailed steps and tips. 1. First, preheat your oven to 350°F (175°C). This step is key for even baking. 2. Next, prepare a 9x9-inch baking pan. You can grease it lightly or line it with parchment paper for easy removal. 3. In a medium bowl, mix the dry ingredients. Combine 1 cup of all-purpose flour, 1/2 cup of old-fashioned oats, 1/2 teaspoon of baking powder, 1/2 teaspoon of baking soda, and 1/4 teaspoon of salt. Whisk these together and set them aside for later. 1. Now, let’s cream the butter and sugars together. In a large bowl, use an electric mixer or a whisk to mix 1/2 cup of softened unsalted butter, 1 cup of packed brown sugar, and 1/4 cup of granulated sugar. Beat until creamy and light in color. 2. Add in 2 large eggs, one at a time. Mix well after each addition. Then stir in 1/2 cup of pure pumpkin puree, 1/4 cup of pure maple syrup, and 1 teaspoon of vanilla extract. Keep mixing until everything is smooth. 1. Gradually fold the dry mixture into the wet ingredients. Mix just until combined; a few lumps are okay for texture. 2. If you want a crunch, fold in 1/2 cup of chopped pecans at this stage. 3. Carefully pour the batter into your prepared pan. Use a spatula to spread it evenly. 4. Place the pan in the preheated oven and bake for 25-30 minutes. They are done when the edges are golden brown. A toothpick should come out clean from the center. 5. Once done, take the pan out and let the bars cool for about 10 minutes. After that, transfer them to a wire rack to cool completely. For the full experience, check out the Full Recipe. - Use a toothpick to check for doneness. Insert it in the center. If it comes out clean, the bars are ready. - Let the bars cool for about ten minutes before slicing. This helps them set and makes cutting easier. - Add spices for more depth. Try nutmeg, ginger, or even cloves for a kick. - Experiment with different sugars. Using brown sugar gives a rich flavor. You can mix in some granulated sugar for sweetness. - Arrange the bars elegantly on a platter. A rustic wooden platter works well. - Serve with maple syrup on the side. This adds a sweet touch and looks inviting. For the full recipe, check out Brown Sugar Maple Pumpkin Butter Bars. {{image_4}} You can easily switch things up with your Brown Sugar Maple Pumpkin Butter Bars. One simple change is to swap out pumpkin for sweet potato. This gives a unique taste and a lovely color. Sweet potatoes are just as creamy and sweet, making them a great choice. Another fun idea is to mix in chocolate chips or dried fruit. Chocolate adds a rich twist, while dried fruit can give a chewy texture. These choices make the bars even more delicious. If you need a gluten-free option, try using almond flour. It works well and keeps the bars moist. You can follow the full recipe and just replace all-purpose flour with almond flour. You might need to adjust the amount slightly, so keep an eye on the texture. For those looking for a vegan version, use egg replacements like flax eggs or applesauce. This keeps the bars light and fluffy without using eggs. The flavor stays rich and delightful, just like the original recipe. Adding seasonal ingredients can make these bars feel festive. For the holidays, consider mixing in cranberries or chopped pecans. These ingredients add a lovely touch and a burst of flavor. You can also sprinkle in some festive spices. Think about using nutmeg, allspice, or cloves. These spices give your bars a warm, cozy feel that’s perfect for any holiday gathering. After baking, let the bars cool completely. Place them in an airtight container. This helps keep them fresh. Store at room temperature for up to four days. If you want to keep them longer, try freezing them. To freeze the bars, wrap them tightly in plastic wrap. You can also use aluminum foil for extra protection. Place the wrapped bars in a freezer-safe bag. They will last for up to three months in the freezer. When ready to enjoy, thaw them in the fridge overnight. For the best taste, eat the bars within the first few days. They taste great fresh. If stored well, the bars still taste good for up to a week. I recommend enjoying them at room temperature. A light dusting of powdered sugar adds a nice touch too! If you want a warm treat, heat them in the oven for a few minutes. Enjoy your delicious Brown Sugar Maple Pumpkin Butter Bars! Look for a few key signs. First, check the edges. They should be a lovely golden brown. Next, insert a toothpick into the center. If it comes out clean or with a few crumbs, the bars are done. Finally, the top should feel set and not jiggle. You can use pumpkin pie filling, but it will change the taste. Pumpkin pie filling has added spices and sugar. This can make your bars sweeter and more spiced than intended. If you want to control the flavor, stick with pure pumpkin puree. These bars pair well with many treats. A scoop of vanilla ice cream adds creaminess. You can also serve them warm with whipped cream on top. For a cozy touch, drizzle maple syrup over the bars. A cup of spiced tea or coffee makes a great drink pairing too. For the full recipe, check the earlier section. You now have a clear path to making delicious Brown Sugar Maple Pumpkin Butter Bars. Start with essential ingredients like brown sugar and pumpkin puree. Follow the step-by-step instructions for baking and let your creation shine with tips and variations. Whether you choose to enhance flavors or adapt for dietary needs, your bars will impress. Store them properly, and enjoy them fresh. Baking these treats can bring joy to any occasion, so get started and make something special.](https://tossedflavors.com/wp-content/uploads/2025/07/7d096b71-ea8a-4525-a8ea-12f4a7717278.webp)
Brown Sugar Maple Pumpkin Butter Bars Delightful Treat
Are you ready to enjoy a mouthwatering treat that captures the essence of fall? Brown Sugar Maple Pumpkin Butter Bars are the perfect dessert for
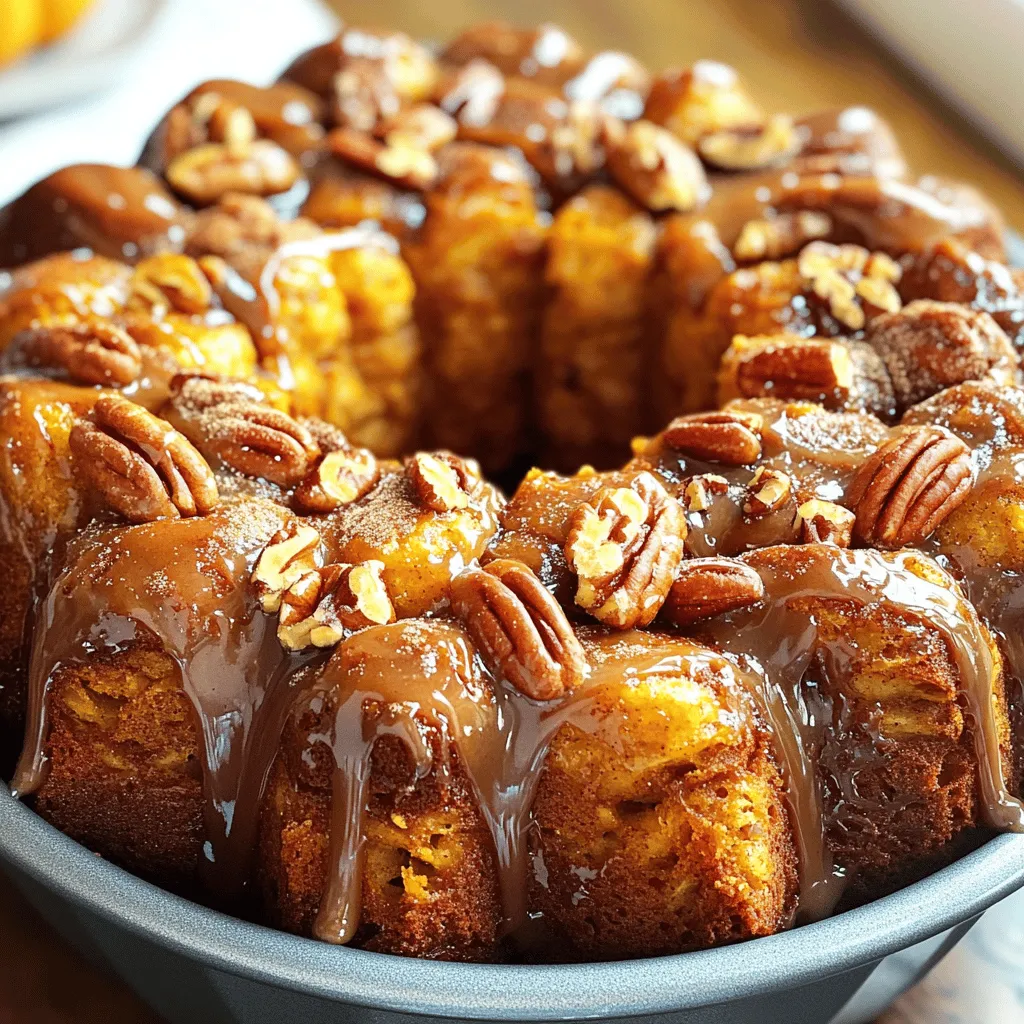
Pumpkin Spice Monkey Bread Irresistible Fall Treat
Fall is here, and that means it’s time to indulge in the warm, spicy flavors of the season. Imagine pulling a golden-brown Pumpkin Spice Monkey