Desserts
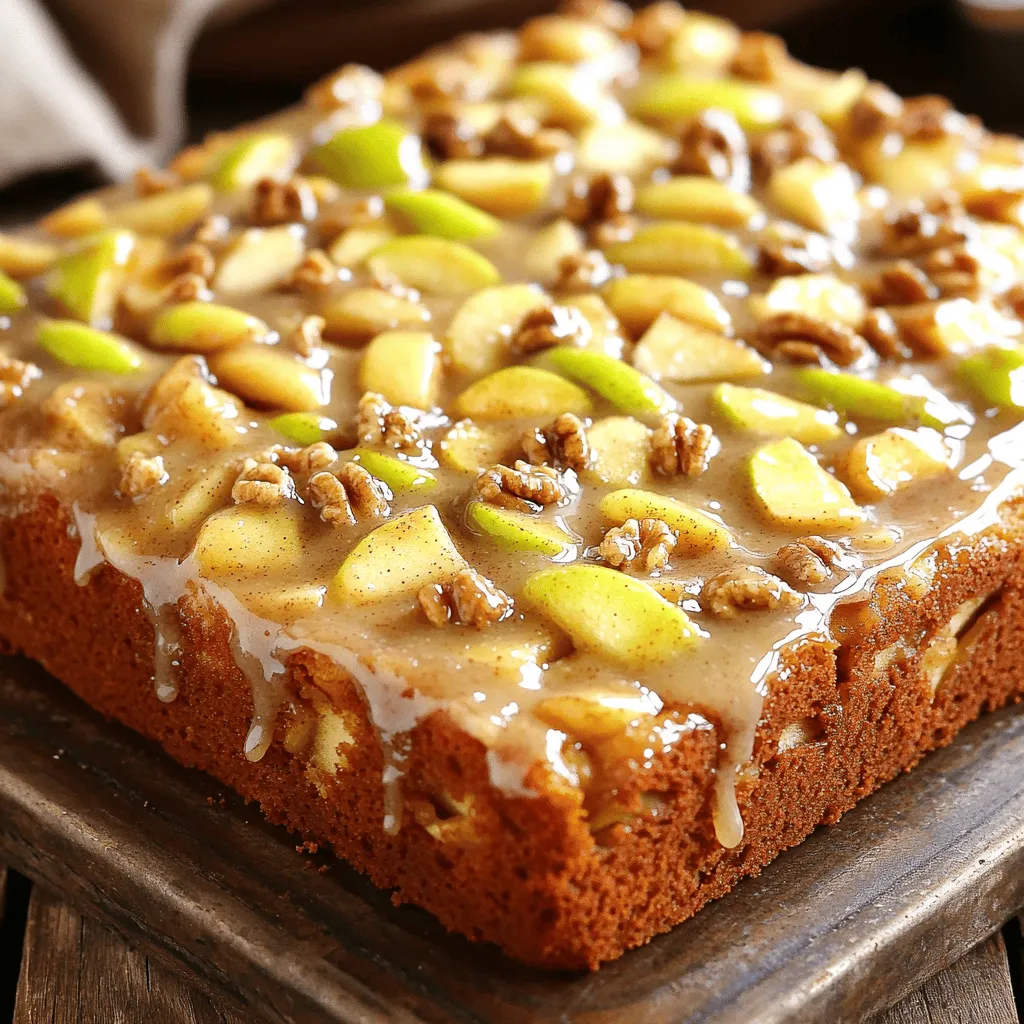
![The key ingredients make this apple cider pound cake rich and flavorful. Here’s what you need: - 1 ½ Cups all-purpose flour - 1 Teaspoon baking powder - ½ Teaspoon baking soda - ½ Teaspoon salt - ½ Teaspoon ground cinnamon - ¼ Teaspoon ground nutmeg - ¾ Cup unsalted butter, softened to room temperature - 1 Cup granulated sugar - 3 Large eggs, at room temperature - 1 Teaspoon vanilla extract - ½ Cup apple cider, preferably fresh - ½ Cup unsweetened applesauce - 1 Cup chopped fresh apples (preferably Granny Smith or Honeycrisp) These ingredients create a moist and tender cake. The butter and sugar add richness, while the apples provide texture and flavor. For those who want to elevate their cake, consider these optional ingredients: - Chopped walnuts or pecans for a nutty crunch - A pinch of ground ginger for extra spice - Dried cranberries or raisins for sweetness These additions can make your cake unique and even more delicious. To make your baking easier, gather these tools: - A 9x5-inch loaf pan - Parchment paper or cooking spray - Mixing bowls (one large and one medium) - Electric mixer or whisk - Rubber spatula for folding in ingredients - Toothpick to check for doneness Having the right tools helps you bake with ease. You’ll enjoy the process and the final result! For the full recipe, refer to the details above. Start by preheating your oven to 350°F (175°C). This step ensures even baking. Next, grab a 9x5-inch loaf pan. Grease it well with butter or oil. You can also use parchment paper. This helps with easy removal later. In a medium bowl, mix the dry ingredients. Combine 1 ½ cups of all-purpose flour, 1 teaspoon of baking powder, ½ teaspoon of baking soda, ½ teaspoon of salt, ½ teaspoon of ground cinnamon, and ¼ teaspoon of ground nutmeg. Whisk these until they blend well. In a larger bowl, cream ¾ cup of softened unsalted butter with 1 cup of granulated sugar. Use an electric mixer. Beat it on medium speed for about 3-4 minutes. It should look light and fluffy. Add 3 large eggs, one at a time. Mix well after each egg. Finally, add 1 teaspoon of vanilla extract. Now, it’s time to mix the dry and wet ingredients. Gradually add the dry mixture to the wet one. Alternate this with ½ cup of apple cider and ½ cup of unsweetened applesauce. Start and end with the dry mix. Mix until just combined to keep the cake fluffy. After that, gently fold in 1 cup of chopped fresh apples. This adds texture and flavor. Pour the batter into your prepared loaf pan. Smooth the top with a spatula. Now, place it in the preheated oven. Bake for 55-65 minutes. To check if it’s done, insert a toothpick into the center. If it comes out clean, the cake is ready. Let it cool in the pan for 10 minutes. Then, transfer it to a wire rack to cool completely. Enjoy your delicious apple cider pound cake! For the complete recipe, refer to the [Full Recipe]. To make your cake fluffy, start with room temperature ingredients. Butter and eggs mix better when they’re warm. Cream the butter and sugar well. You need air in your mix. This step takes about 3-4 minutes. Don’t rush it! When you add the dry mix, do it slowly. Mix until just blended. Overmixing can lead to a dense cake. Measure your flour correctly. Use a spoon to fill your measuring cup. Don’t scoop the flour directly. This can pack it down and add too much. Always level off the top with a knife. For liquids, use a clear measuring cup. Pour until you reach the right line. Accuracy matters for the best outcome. One common mistake is forgetting to preheat your oven. Always set it to 350°F (175°C) first. Another error is not greasing the pan. This can lead to your cake sticking. Also, avoid using cold eggs or butter. They won’t mix well. Finally, don’t skip the apple cider. It adds flavor and moisture. For the full recipe, check out the detailed instructions above. {{image_4}} You can boost your cake's flavor with spices. Try adding ground ginger or cloves for a warm touch. Use one teaspoon of ground ginger or half a teaspoon of cloves. These spices pair well with apple cider and create a cozy taste. While apples shine in this recipe, feel free to experiment. Pears also work well; they add sweetness and moisture. Diced peaches or berries can bring a fresh twist. Just keep the total fruit amount similar for the best result. A glaze can make your cake even more special. Mix powdered sugar with apple cider to create a simple glaze. Drizzle it on top for a sweet finish. You can also serve the cake with a scoop of vanilla ice cream or whipped cream. These toppings enhance the flavors and add a fun element to each slice. For a more colorful presentation, add some sliced almonds or pecans. Enjoy these ideas to personalize your cake from the full recipe. To keep your apple cider pound cake fresh, wrap it tightly in plastic wrap. This helps it stay moist. You can also place it in an airtight container. Store it at room temperature for up to three days. If you live in a humid area, refrigerate it to prevent spoilage. Freezing is a great way to save your pound cake. First, let the cake cool completely. Then, wrap it well in plastic wrap and foil. This prevents freezer burn. You can freeze it for up to three months. When you’re ready to enjoy it, thaw it in the fridge overnight. When it comes to serving, slice the cake after thawing. You can dust it with powdered sugar for a nice touch. Pair each slice with whipped cream or vanilla ice cream. Fresh apple slices make a lovely addition too. This enhances the flavor and adds a nice crunch. Enjoy your delicious cake! For the complete recipe, check out the Full Recipe section above. Yes, you can use different types of cider. Hard cider adds a nice kick, while sweet cider gives a gentle taste. Experimenting with flavored ciders can also create fun twists. Just remember to adjust sugar levels in the recipe. Always taste the cider first to see how it fits your cake. Apple cider pound cake stays fresh for about 4-5 days at room temperature. Keep it in an airtight container to lock in moisture. If you want to save it longer, refrigerate it for up to a week. For even more time, freeze the cake. Wrap it well to avoid freezer burns. You can serve this cake with many tasty options. A scoop of vanilla ice cream pairs perfectly. Fresh whipped cream adds a light touch. You might also enjoy it with caramel sauce or a sprinkle of nuts. Fresh apple slices make a lovely garnish too. Yes, you can make this recipe gluten-free. Substitute all-purpose flour with a 1:1 gluten-free blend. Check the blend for xanthan gum, which helps with texture. Always follow the package instructions for best results. Enjoy your gluten-free apple cider pound cake! If you want the full recipe, check out the Apple Cider Bliss Pound Cake. You learned how to make a delicious apple cider pound cake. We covered key and optional ingredients, essential tools, and easy steps for baking. I shared tips for a fluffy cake and ways to add more flavor through variations. Remember to store any leftovers properly and try different ciders for variety. This cake is sure to impress at any gathering. Enjoy the sweet, warm taste of fall in every bite!](https://tossedflavors.com/wp-content/uploads/2025/07/84bb3a9f-ee77-4719-b8c2-9078448cd614.webp)
Apple Cider Pound Cake Rich and Flavorful Delight
Welcome to your next favorite dessert: Apple Cider Pound Cake! This rich and flavorful delight will warm your home and heart. I’ll guide you through
Apple Cinnamon Sheet Cake Delightful and Moist Recipe
Looking for a simple yet delicious dessert? This Apple Cinnamon Sheet Cake is moist, flavorful, and easy to make. With wholesome ingredients and warm spices,
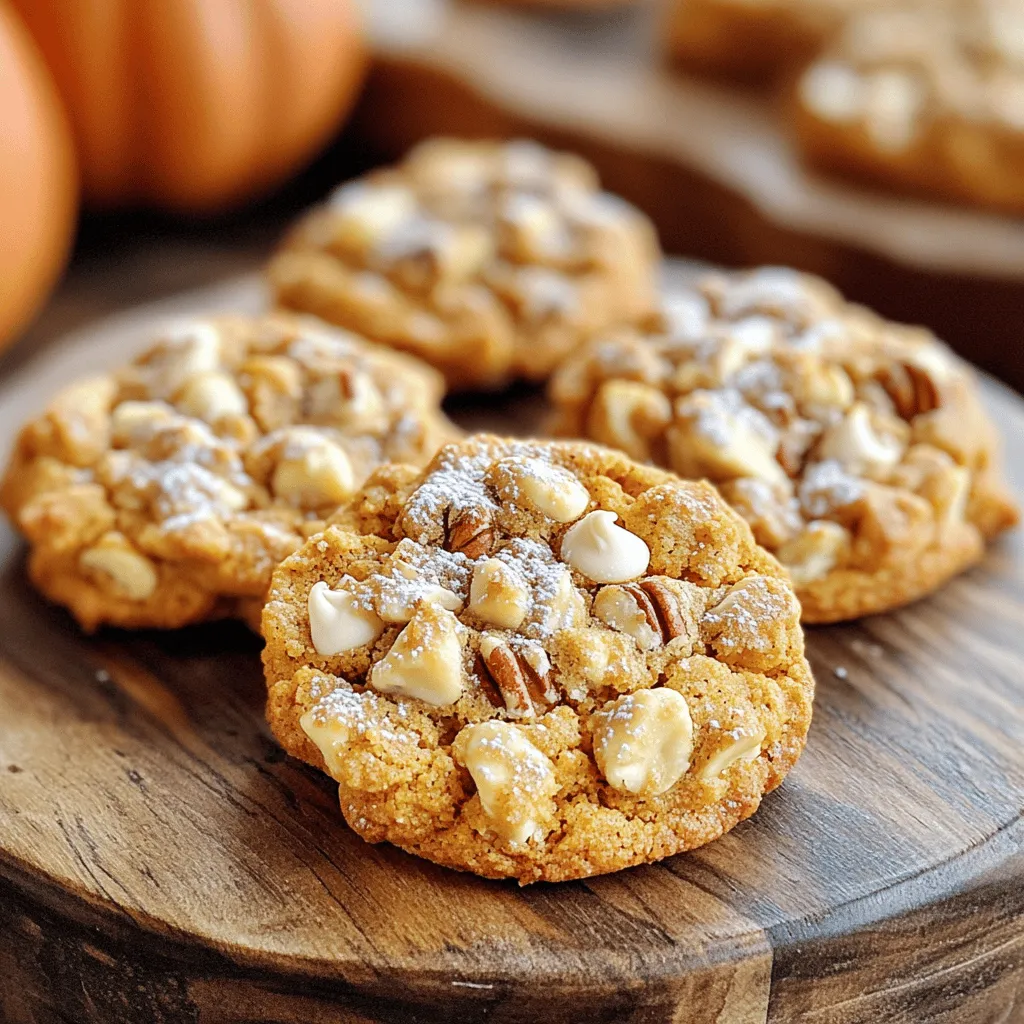
Crumbl Pumpkin Pie Cookies Irresistible Fall Treat
Fall is here, and that means it’s time for cozy flavors! If you love pumpkin spice, you need to try these Crumbl Pumpkin Pie Cookies.

Caramel Apple Bark Delightful Fall Treat Recipe
Fall is here, and with it comes the craving for cozy treats! I have a special recipe just for you: Caramel Apple Bark. This sweet
![To make the best apple cider cinnamon rolls, you need these key ingredients: - 2 cups apple cider - 2 tablespoons unsalted butter, melted - 1/4 cup granulated sugar - 1 packet (2 1/4 teaspoons) active dry yeast - 4 cups all-purpose flour, plus additional for dusting - 1/2 teaspoon salt - 1 teaspoon ground cinnamon - 1/2 teaspoon nutmeg - 1/2 cup brown sugar, packed - 1/2 cup chopped apples (Granny Smith or Honeycrisp recommended) - 1 cup powdered sugar (for glaze) - 2-3 tablespoons milk (for glaze) These ingredients make your rolls soft, sweet, and full of flavor. The apple cider helps bring out the apple taste, while the spices add warmth. If you want to add more flavor to your rolls, consider these optional ingredients: - 1/4 cup raisins - A pinch of salt for the glaze - Chopped nuts like walnuts or pecans for crunch Adding raisins gives a nice touch. Nuts can add texture and a deeper taste. You can swap some ingredients if needed. Here are some ideas: - Use maple syrup instead of granulated sugar for a different sweet taste. - Substitute almond milk for regular milk in the glaze for a nutty flavor. - For a gluten-free option, try using a gluten-free flour blend. These substitutions can change the taste and texture a bit, but they still keep the rolls delicious. You can find the full recipe in the main section to help you follow along! To start, you need to reduce the apple cider. Pour 2 cups of apple cider into a small saucepan. Heat it over medium heat until it boils. Once it starts boiling, lower the heat. Let it simmer for about 10-15 minutes. You want it to reduce to 1 cup. After that, take it off the heat and let it cool a little. Next, we activate the yeast. In a large bowl, mix the warm apple cider, melted butter, and sugar. The cider should be about 110°F. Sprinkle the active dry yeast on top. Let this sit for about 5 minutes. You will see it foam up. This shows that the yeast is alive and ready to work. Now, let’s prepare the dough. In a separate bowl, whisk together the flour, salt, cinnamon, and nutmeg. Gradually add this dry mix to the yeast mix. Stir until a dough forms. Transfer the dough to a floured surface. Knead it for about 5-7 minutes. You want it smooth and elastic. Place the dough in a greased bowl and cover it with a towel. Let it rise in a warm spot for about 1 hour. It should double in size. Once your dough has risen, gently punch it down. This releases any air bubbles. Roll it out on a floured surface. Aim for a large rectangle, about 12x18 inches. Spread the packed brown sugar evenly over the dough. Scatter the chopped apples and optional raisins on top. Roll the dough tightly from one long side to form a log shape. With a sharp knife, cut the log into 12 equal slices. Place these rolls in a greased baking dish, cut side up. Cover loosely with a towel and let them rise for 30-45 minutes. Preheat your oven to 350°F (175°C). Bake the cinnamon rolls for 25-30 minutes. They should be golden brown. While they bake, mix the powdered sugar and milk in a bowl for the glaze. Drizzle it over the hot rolls right after you take them out of the oven. Enjoy your warm, soft, and flavorful apple cider cinnamon rolls! For the full recipe, check out the section above. When making apple cider cinnamon rolls, some mistakes can spoil the fun. Here are a few to watch out for: - Not measuring ingredients properly: Use measuring cups and spoons for accuracy. - Using cold cider: Always warm your cider to activate the yeast. - Skipping the rise time: Letting the dough rise is key for soft rolls. - Overbaking the rolls: Keep an eye on your rolls to avoid dryness. Dough consistency is vital for great rolls. Here’s how to get it just right: - Start with warm cider: The ideal temperature is about 110°F. - Use enough flour: Add flour gradually until the dough is not sticky. - Knead well: Knead for 5-7 minutes until it feels smooth and elastic. - Don’t rush the rising: Ensure the dough doubles in size for light rolls. To make your apple cider cinnamon rolls even tastier, try these tips: - Add spices: Extra cinnamon or nutmeg adds warmth and depth. - Use different apples: Mix sweet and tart apples for a complex flavor. - Incorporate nuts: Chopped walnuts or pecans add a nice crunch. - Experiment with glazes: Try adding vanilla or maple syrup to your glaze. These tips will help you create the best apple cider cinnamon rolls. For a detailed guide, you can follow the Full Recipe. {{image_4}} You can add a fun twist to your rolls with pumpkin spice. Simply mix in 1 teaspoon of pumpkin pie spice with your dry ingredients. This spice blend adds warmth and a cozy flavor. You can also fold in some pumpkin puree into the filling. This addition will give your rolls a rich texture and flavor. If you need a nut-free or dairy-free version, it’s easy! Use vegan butter instead of regular butter. For the milk in the glaze, choose almond, soy, or oat milk. Ensure that your apple cider is free from any allergens. You can still enjoy soft and tasty cinnamon rolls that everyone can share. Get creative with your toppings and fillings! Try adding chopped nuts, like walnuts or pecans, for a crunch. You can also swap the apples for pears or berries. For a fun glaze, mix in a bit of maple syrup with the powdered sugar and milk. This adds a sweet touch that pairs well with the cinnamon flavor. You can explore more ideas by checking out the [Full Recipe]. To keep your cinnamon rolls soft and fresh, store them in an airtight container. You can leave them at room temperature for up to two days. If you want them to last longer, place them in the fridge. They can stay fresh for about a week this way. When you're ready to enjoy your leftover rolls, reheating them is easy. You can use a microwave for quick warmth. Heat them for about 10-15 seconds. For a crispier finish, place them in an oven at 350°F for about 5-10 minutes. This will bring back their soft texture and warm flavor. If you want to save some rolls for later, freezing is a great option. Wrap each roll tightly in plastic wrap, then place them in a freezer bag. They can stay good for up to three months. When you're ready to eat, thaw them in the fridge overnight. Reheat them as mentioned above for the best taste. Enjoy these treats anytime! For the full recipe, check the section above. Yes, you can use store-bought apple cider. It saves time and works well. Look for cider with no added sugars or preservatives. Fresh cider gives a better taste. The rolls should be golden brown on top. You can also poke one with a toothpick. If it comes out clean, they are done. The rolls should feel soft to the touch. You can add nutmeg or cardamom for warmth. A pinch of ginger gives a nice zing. Try adding cloves for a deeper spice flavor. Mix and match to find your perfect blend. You can prepare the dough and let it rise. Then, shape the rolls and cover them. Place them in the fridge overnight. In the morning, let them sit at room temp before baking. This makes it easy for busy mornings. For the full recipe, check the section above. Making apple cider cinnamon rolls is fun and tasty. You learned about key ingredients, how to prepare the dough, and ways to avoid common mistakes. We also explored fun variations like pumpkin spice rolls. Remember to store leftovers well and consider freezing them for later. With these tips, you can enjoy fresh cinnamon rolls anytime. Now, go ahead and create your delicious treats! You have all the tools to succeed.](https://tossedflavors.com/wp-content/uploads/2025/07/75d1cf33-b39f-45c4-a7cf-87c6b24950e9.webp)
Apple Cider Cinnamon Rolls Soft and Flavorful Treat
If you love warm, soft treats that burst with fall flavor, you’ve come to the right place. Apple Cider Cinnamon Rolls are a delight that
![- Flour, Baking Powder, and Baking Soda You need 1 ½ cups of all-purpose flour. It gives structure to the cupcakes. Add 1 teaspoon of baking powder and ½ teaspoon of baking soda. These help the cupcakes rise and stay light. - Sweeteners: Brown Sugar and Caramel Sauce Use 1 cup of packed brown sugar. It adds a rich flavor that pairs perfectly with apples. You also need ½ cup of caramel sauce. This will add sweetness and a gooey texture. - Apples: Types and Preparation Tips I suggest using Granny Smith or Honeycrisp apples. They add a nice tartness to balance the sweet flavors. Peel and finely dice 1 cup of apples. This helps them cook evenly in the batter. - Toppings: Whipped Cream and Nuts Whipped cream is a fun topping. It adds creaminess and looks great on your cupcakes. Chopped pecans or walnuts give a nice crunch and flavor. They are optional but add a lovely touch. - Flavor Enhancers: Ground Cinnamon and Vanilla Extract A ½ teaspoon of ground cinnamon adds warmth. It makes your cupcakes taste like fall. Use 1 teaspoon of pure vanilla extract for a sweet aroma. This enhances the overall flavor profile of your cupcakes. These ingredients create a delightful balance of flavors that make these cupcakes a must-try. For the full recipe, please refer to the recipe section. - Prepping the Oven and Muffin Tin Start by preheating your oven to 350°F (175°C). This ensures even baking. Next, grab a standard 12-cup muffin tin. Place cupcake liners in each cup. This will help prevent sticking and make serving easy. - Mixing Dry Ingredients In a medium bowl, whisk together these dry ingredients: - 1 ½ cups all-purpose flour - 1 teaspoon baking powder - ½ teaspoon baking soda - ½ teaspoon salt - ½ teaspoon ground cinnamon Mix until fully combined and set it aside for later. - Creaming Butter and Sugar In a large bowl, cream together: - ½ cup unsalted butter, softened - 1 cup packed brown sugar Use a hand mixer or stand mixer at medium speed. Mix for about 3-4 minutes until light and fluffy. - Incorporating Eggs and Vanilla Add in 2 large eggs, one at a time. Mix well after each egg. Then, pour in 1 teaspoon of pure vanilla extract. Mix gently until everything is well blended. - Combining Wet and Dry Mixtures Slowly add the dry mixture to the wet mixture. Alternate with: - ½ cup buttermilk, at room temperature Start and end with the dry mixture. Gently fold in 1 cup of peeled and finely diced apples. - Filling Muffin Cups and Baking Evenly fill each muffin cup about two-thirds full. This allows for rising. Bake in the preheated oven for 18-20 minutes. Check with a toothpick; it should come out clean. - Cooling the Cupcakes After baking, let the cupcakes cool in the pan for about 5 minutes. Then, transfer them to a wire rack. Allow them to cool completely. - Filling with Caramel Sauce Once cooled, use a small paring knife to carve out a core from the center of each cupcake. Fill the cores with caramel sauce. You can use store-bought or homemade, whichever you prefer. For the complete recipe, check out the Full Recipe. Enjoy your baking! Ensuring Even Baking To bake cupcakes evenly, use an oven thermometer. Your oven may not show the right temperature. Rotate the muffin tin halfway through baking to ensure all cupcakes rise evenly. Avoid opening the oven too soon; this can cause them to sink. Avoiding Common Mistakes Do not overmix the batter. This can make your cupcakes tough. Also, be sure to use room temperature ingredients. Cold ingredients may not mix well, affecting the texture. Fill each liner about two-thirds full for the best rise. Creative Topping Ideas For a fun twist, try topping your cupcakes with caramel popcorn. It adds crunch and a sweet surprise. Other options include chopped apples, or even a sprinkle of sea salt to enhance the caramel flavor. Presentation Techniques Arrange cupcakes on a colorful platter. Add a few apple slices around them for a fresh touch. Drizzling caramel sauce on top makes them look irresistible. You can even place a small bowl of caramel sauce nearby for dipping. {{image_4}} - Gluten-Free Options: You can easily make these cupcakes gluten-free. Just swap regular flour with a gluten-free baking mix. Look for one that has a good blend of starches and flours. This will keep the texture light and fluffy. - Vegan Modifications: To make these cupcakes vegan, use plant-based butter and replace eggs with flax eggs. Mix 1 tablespoon of ground flaxseed with 3 tablespoons of water for each egg. Let it sit until it thickens. For buttermilk, use plant-based milk with a splash of lemon juice or vinegar. - Adding Spices: Nutmeg and Allspice: For a warm twist, add a pinch of nutmeg or allspice to your dry ingredients. These spices blend well with cinnamon and enhance the autumn flavor. - Other Fruit Combinations: You can mix in other fruits with apples. Try diced pears or cranberries for a tart kick. These fruits will add a unique layer of flavor to your cupcakes. Feel free to experiment with these swaps and variations. They let you enjoy caramel apple cupcakes in new ways. Check out the Full Recipe for all the details on creating these delicious treats! To keep your caramel apple cupcakes fresh, store them in an airtight container. This helps maintain their moisture. If you want to refrigerate them, put them in the fridge. They stay good for about a week this way. If you prefer to freeze your cupcakes, place them in a freezer-safe container. Wrap each cupcake in plastic wrap before placing them in the container. They last for up to three months in the freezer. When you want to eat one, just thaw it in the fridge overnight. How long do they last? Fresh caramel apple cupcakes can last up to a week at room temperature if stored correctly. If refrigerated, expect them to stay fresh for up to a week as well. Avoiding sogginess is key. Make sure the cupcakes cool completely before sealing them in a container. This stops moisture from building up inside, which can make them soggy. If you fill them with caramel, do it just before serving for the best taste and texture. Can I use different types of apples? Yes, you can! While Granny Smith or Honeycrisp apples are best, you can try others too. Sweet apples like Fuji or Gala will work well. Just make sure to chop them small. This helps them mix into the batter nicely. How do I make homemade caramel sauce? Making caramel sauce is easy! You need sugar, butter, and cream. Cook sugar in a pan until it melts into a golden color. Add butter, then slowly stir in cream. Let it cool, and you have sweet caramel! You can find a full recipe for this in the [Full Recipe]. What can I substitute for buttermilk? If you don't have buttermilk, don’t worry! Mix 1 cup of milk with 1 tablespoon of vinegar or lemon juice. Let it sit for a few minutes. This will give you a great substitute for buttermilk! Why are my cupcakes dry? Dry cupcakes can happen for a few reasons. You may have overbaked them or added too much flour. Be sure to measure accurately and check them a few minutes early. A toothpick should come out clean but not dry. How to fix over-sweetened frosting? If your frosting is too sweet, you can add a pinch of salt. This helps balance the sweetness. You can also mix in some cream cheese or unsweetened whipped cream to tone it down. Best Pairings for Cupcakes These cupcakes pair well with warm beverages. Try serving them with hot apple cider or spiced tea. A scoop of vanilla ice cream also makes a nice treat alongside them! Ideas for Events and Celebrations Caramel apple cupcakes are perfect for fall gatherings. Serve them at birthday parties or harvest festivals. They also make great treats for school events or family get-togethers. In summary, we explored the key ingredients for caramel apple cupcakes, like flour and apples. I shared step-by-step instructions to help you bake perfect cupcakes. Tips on storage and variations made it easy to personalize your treats. These cupcakes are fun and tasty for any occasion. With the right ingredients and methods, you can impress everyone with your baking skills. Enjoy creating these delicious cupcakes that blend sweet caramel with crisp apples!](https://tossedflavors.com/wp-content/uploads/2025/07/4ab0365a-a7b3-4136-93a0-bf8ff37eaabb.webp)
Caramel Apple Cupcakes Delightful Fall Treat Recipe
Fall is here, and what better way to celebrate than with Caramel Apple Cupcakes? This sweet treat combines warm apple flavors with rich caramel, creating
![To make Cinnamon and Spice Sweet Potato Bread, you need the following ingredients: - 1 cup cooked and mashed sweet potatoes - 1/2 cup packed brown sugar - 1/4 cup granulated sugar - 1/2 cup unsweetened applesauce - 1/3 cup vegetable oil - 2 large eggs, at room temperature - 1 teaspoon pure vanilla extract - 1 1/2 cups all-purpose flour - 1 teaspoon baking soda - 1 teaspoon baking powder - 1 teaspoon ground cinnamon - 1/2 teaspoon ground nutmeg - 1/4 teaspoon ground ginger - 1/4 teaspoon fine salt - 1/2 cup chopped walnuts or pecans (optional) Want to make your bread even more special? Here are some fun add-ins: - Chocolate chips for a sweet twist - Dried fruit, like raisins or cranberries - Shredded coconut for a tropical taste - A sprinkle of seeds, like sunflower seeds If you lack some items, here are easy swaps: - Use maple syrup instead of brown sugar for a different sweetness. - Replace applesauce with yogurt for a creamier texture. - Use coconut oil instead of vegetable oil for a hint of coconut flavor. - Substitute almond flour for all-purpose flour to make it gluten-free. Feel free to explore these options. You can find the full recipe above. Start by preheating your oven to 350°F (175°C). This step is key for even baking. While the oven warms, prepare a 9x5-inch loaf pan. You can grease it lightly or line it with parchment paper. This makes it easy to take the bread out later. In a large bowl, mix cooked and mashed sweet potatoes with brown sugar, granulated sugar, applesauce, vegetable oil, eggs, and vanilla extract. Use a whisk to mix these until they are smooth. This blend gives your bread its sweet and moist texture. In another bowl, sift together all-purpose flour, baking soda, baking powder, cinnamon, nutmeg, ginger, and salt. Sifting helps spread the flavors evenly. Next, gently fold the dry mix into the wet ingredients. Use a spatula or wooden spoon for this. Mix until just combined, leaving some small lumps. Overmixing can make the bread tough. If you want some crunch, fold in chopped walnuts or pecans at this stage. Now, carefully pour the batter into your prepared loaf pan. Use a spatula to smooth the top. This helps it bake evenly. Place the loaf pan in the oven and bake for 50-60 minutes. Check for doneness by inserting a toothpick into the center. If it comes out clean, the bread is ready. If the top browns too fast, cover it with aluminum foil. Once baked, remove the loaf from the oven. Let it cool in the pan for about 10 minutes. Then, gently transfer the bread to a wire rack to cool completely. This step is important for the best texture. Once cool, slice the bread. Enjoy it warm or at room temperature, perhaps with some butter or cream cheese. For a nice touch, sprinkle cinnamon on top! For the full recipe, you can refer back to the initial recipe section. To keep your sweet potato bread moist, use fresh, well-cooked sweet potatoes. Overcooking them can dry them out. Mash them until smooth for even mixing. You can also add unsweetened applesauce. It adds moisture and flavor. Be careful not to overmix your batter; it can make the bread dense. Gently fold the dry ingredients into the wet mixture until just combined. This method keeps your bread light and fluffy. One common mistake is using too much flour. Always measure it correctly. Spoon flour into your measuring cup without packing it down. Another mistake is overbaking the bread. Keep an eye on it near the end of the baking time. Use a toothpick to check for doneness. If it comes out clean, it’s ready. Lastly, don’t skip the cooling step. Letting it cool in the pan helps set the flavors. A good mixing bowl is key for making the batter. A sturdy spatula helps fold in the dry ingredients without overmixing. Use a 9x5-inch loaf pan for the best shape. A whisk mixes the wet ingredients well. Finally, have a wire rack ready for cooling. This setup will make your baking process smooth and easy. For the full recipe, check the [Full Recipe]. {{image_4}} If you love chocolate, try adding chips! Use 1 cup of semi-sweet chocolate chips. Fold them into the batter right before you pour it into the pan. The warm bread and melted chocolate make a perfect match. This twist will delight anyone who bites in. You can also use dark chocolate for a richer taste. Feel free to adjust the spices to suit your taste. You can add a pinch of allspice for warmth. Cardamom also brightens the flavor. If you want a bit of heat, a dash of cayenne can make it interesting. Mixing in a teaspoon of orange zest can add a fresh twist. Each spice brings a unique flavor, so get creative! If you need a nut-free bread, simply skip the nuts. You can replace the nuts with seeds like pumpkin or sunflower. These seeds add texture without the nut allergy risk. For a sweeter touch, consider adding dried fruits like raisins or cranberries. They’ll add chewiness and a burst of flavor. Remember, this sweet potato bread is versatile and can fit your needs! For the full recipe, be sure to check out the details above. To keep your cinnamon and spice sweet potato bread fresh, store it in an airtight container. This helps prevent it from drying out. If you plan to eat it within a few days, you can keep it at room temperature. Just place it in a cool, dry spot. For longer storage, I suggest refrigerating it. This slows down spoilage and keeps it tasty. Freezing your sweet potato bread is easy and effective. First, let the bread cool completely after baking. Then, wrap it tightly in plastic wrap. You can also use aluminum foil for extra protection. Place the wrapped bread in a freezer-safe bag. It can last up to three months in the freezer. When you're ready to enjoy it, just thaw it in the fridge overnight. Reheating your sweet potato bread is simple. You can use the oven or microwave. For the oven, preheat it to 350°F (175°C). Place the slices on a baking sheet and heat for about 10 minutes. If you're using a microwave, heat one slice at a time for about 15 to 20 seconds. You can add a little butter or cream cheese on top when serving to enhance the flavor. This makes each bite delightful! Yes, you can use canned sweet potatoes. They save time and add flavor. Make sure to drain them well before mashing. This helps keep the bread from being too wet. Using canned sweet potatoes can also make this recipe easier for busy cooks. To make cinnamon and spice sweet potato bread gluten-free, use gluten-free flour. You can find many brands that work well in baking. Just replace the all-purpose flour with the same amount of gluten-free flour. You may need to adjust the baking soda and powder slightly, so check the package for guidance. Serve the bread warm, sliced, with butter or cream cheese. You can add a sprinkle of cinnamon on top for a nice touch. This bread pairs well with coffee or tea. For a fun twist, try it with a drizzle of honey or maple syrup. Enjoy it for breakfast or as a snack! For the full recipe, check out the link. This blog post covered how to make sweet potato bread. We looked at ingredients, step-by-step instructions, and tips for making moist bread. You learned about variations like chocolate chips and spice mix options. Storage advice ensures your bread stays fresh, while the FAQs answered common questions. Making sweet potato bread is fun and rewarding. With practice and creativity, you can bake delicious treats. Enjoy the process and share your tasty creations with others. Happy baking!](https://tossedflavors.com/wp-content/uploads/2025/07/097958b3-1d14-429b-adcc-cdd67157b62e.webp)
Cinnamon and Spice Sweet Potato Bread Recipe Delight
Want to enjoy a warm slice of joy? This Cinnamon and Spice Sweet Potato Bread Recipe is your answer. Bursting with flavor and easy to
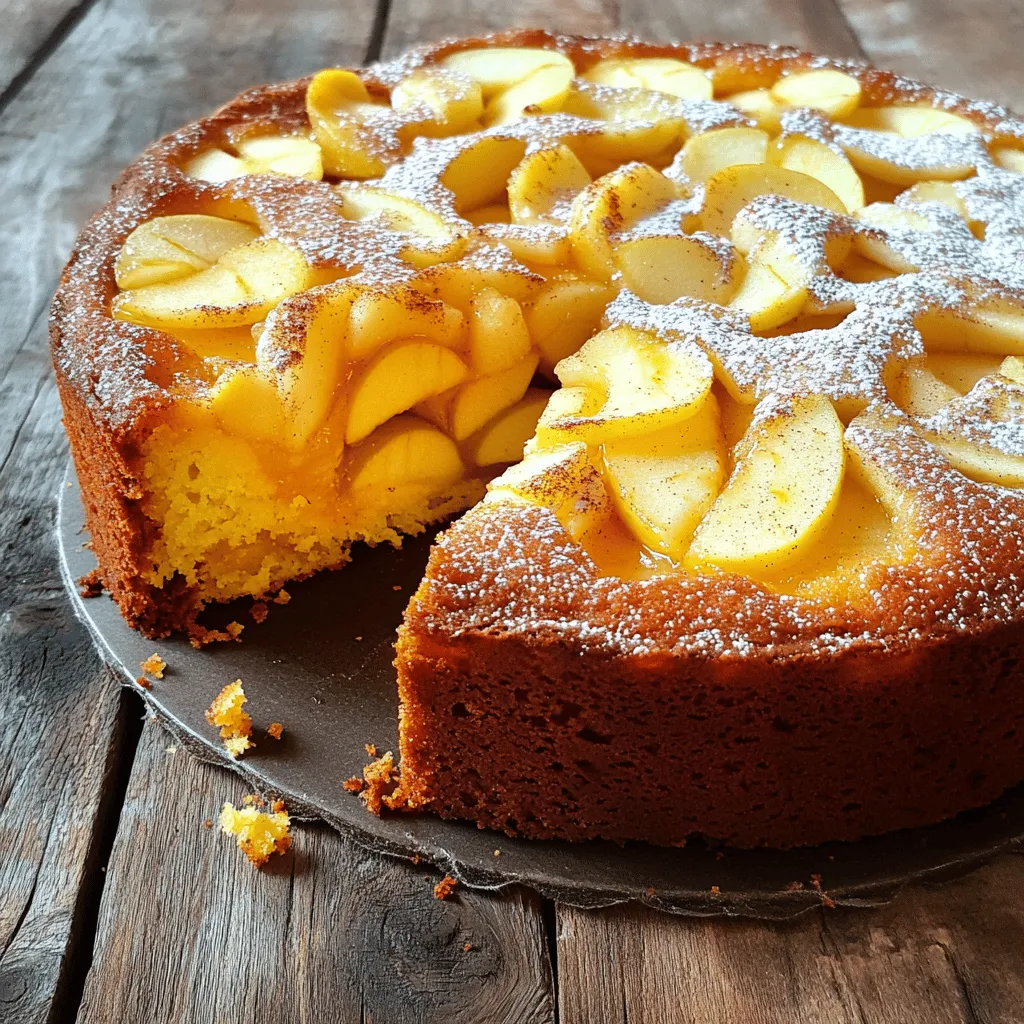
Baking a Delicious Swedish Apple Cake Recipe Guide
Welcome to your ultimate guide for baking a delicious Swedish apple cake! This recipe combines the warm flavors of apples, cinnamon, and lemon juice to
Pumpkin Snickerdoodle Cookies Irresistible Treat
Get ready to delight your taste buds with Pumpkin Snickerdoodle Cookies! This cozy treat blends the warm flavors of pumpkin, cinnamon, and nutmeg for a
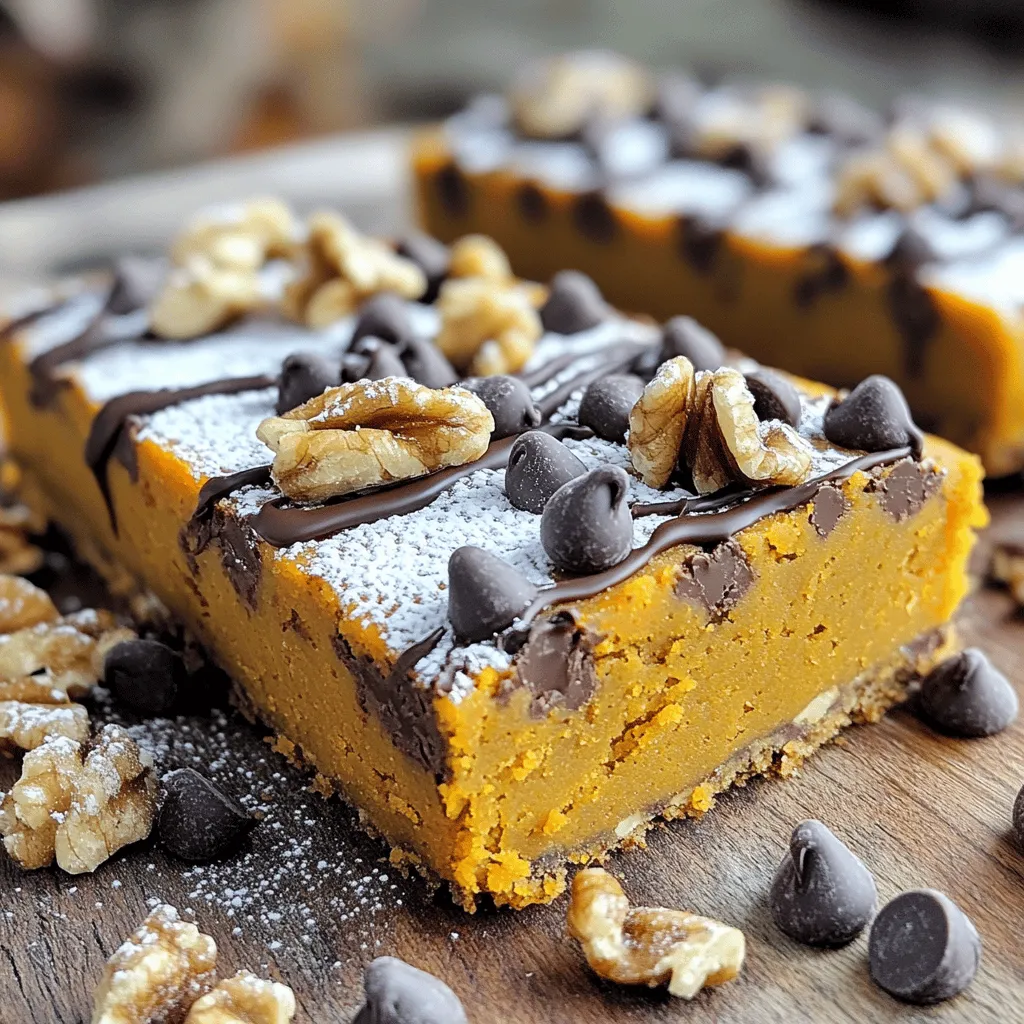
Pumpkin Chocolate Chip Bars Easy and Delicious Recipe
Are you ready to try a treat that’s both easy and tasty? These Pumpkin Chocolate Chip Bars blend warm spices and sweet chocolate in the