Breakfast

Fireman’s Overnight Breakfast Casserole Flavor Boost
Are you ready to whip up a dish that will kickstart your day? The Fireman’s Overnight Breakfast Casserole is not just filling; it’s packed with
![- 1 can refrigerated cinnamon roll dough - 3 large eggs - 1/2 cup milk - 1 teaspoon vanilla extract - 1 teaspoon ground cinnamon - 1 tablespoon brown sugar - 1/4 cup maple syrup (for drizzling) - Powdered sugar (for dusting) - Fresh berries (for garnish, optional) To make these Cinnamon Roll French Toast Bites, you will need simple ingredients. The main star is the cinnamon roll dough. It adds a sweet and soft base. Eggs, milk, and vanilla create a rich custard. Ground cinnamon and brown sugar boost the flavor. Maple syrup brings sweetness, while powdered sugar gives a nice touch. Fresh berries are optional but add color and nutrition. - Nutmeg or cardamom for extra spice - Whipped cream as a topping - Nuts or granola for added crunch If you want to spice things up, nutmeg or cardamom works well. These spices give a warm, cozy taste. You can also add whipped cream on top for a rich finish. For crunch, sprinkle some nuts or granola. Each addition creates a unique flavor and texture. For the full recipe, you can check out the complete instructions. Enjoy making these tasty bites! 1. First, preheat your oven to 375°F (190°C). This helps the bites bake evenly. 2. Next, prepare your baking sheet. Line it with parchment paper. This keeps the bites from sticking. 3. Open the can of cinnamon roll dough. Carefully separate each roll. 4. Use a sharp knife or kitchen scissors. Cut each roll into quarters. This makes bite-sized pieces. 1. In a medium bowl, whisk together the eggs and milk. 2. Add the vanilla extract, ground cinnamon, and brown sugar. Mix well until smooth. 3. Take each piece of cinnamon roll dough. Dip it into the egg mixture. Make sure each piece is fully coated. 1. Arrange the coated pieces on the baking sheet. Give them space to bake evenly. 2. Place the baking sheet in the oven. Bake for about 15-20 minutes. 3. Watch for them to turn golden brown. They should be cooked through. 4. After baking, let the bites cool on the baking sheet for a few minutes. This helps them set before serving. 5. Drizzle warm bites with maple syrup. Dust with powdered sugar for sweetness. 6. For a fresh touch, add berries as a garnish. They make your dish colorful and tasty. [Full Recipe] To get the best results with your Cinnamon Roll French Toast Bites, focus on two key factors: baking time and temperature. Bake them at 375°F (190°C) for 15 to 20 minutes. Check for a golden brown color. This ensures they cook evenly and don’t get dry. To avoid soggy bites, don't soak the dough too long in the egg mixture. Just dip each piece quickly. You want a nice coating, not a soggy mess. This little tip helps keep the bites fluffy and soft. When serving, think about how to make the dish pop. Use a fun, colorful platter. Arrange the bites neatly and sprinkle fresh berries around them. This adds color and makes the dish more inviting. For beverages, pair these bites with a hot cup of coffee or a sweet tea. A glass of cold milk also works great. These drinks complement the sweet flavors and add a cozy touch. To take your bites to the next level, try flavored syrups. Instead of just maple syrup, use vanilla or caramel syrup for extra sweetness. Drizzle it generously over the warm bites for a delightful finish. Don't shy away from experimenting with spices. Add a pinch of nutmeg or cardamom to the egg mixture for a unique twist. These spices add warmth and depth to the flavor, making each bite exciting. {{image_4}} You can switch up the flavors to make your Cinnamon Roll French Toast Bites even better. Here are two fun ideas: - Chocolate chip cinnamon roll bites: Add chocolate chips to the dough before baking. This makes the bites rich and sweet. - Pumpkin spice version for autumn: Mix in pumpkin puree and pumpkin spice to the egg mixture. This adds warmth and makes it perfect for fall. Want to make these bites fit your diet? Here are some easy swaps: - Gluten-free cinnamon roll options: Use gluten-free cinnamon roll dough. Many brands offer tasty versions that work well. - Dairy-free substitutions for milk and eggs: Try almond milk or oat milk in place of regular milk. You can also use flax eggs instead of regular eggs. You can change how you serve these bites, making them even more fun: - Mini muffins instead of bites: Pour the egg-coated dough into a muffin tin. This creates adorable mini muffins everyone will love. - Skewered for fun finger food presentation: Thread the baked bites onto skewers. This makes for an easy and fun way to eat them at parties. For the full recipe, be sure to check out the details above! To keep your cinnamon roll French toast bites fresh, store them in an airtight container. Place parchment paper between layers to prevent sticking. You can refrigerate them for up to three days. If you want to save them longer, freeze the bites. Just make sure they cool completely before freezing. Use a freezer-safe bag or container for best results. When you're ready to enjoy your leftover bites, reheat them in the oven. Preheat the oven to 350°F (175°C) and place the bites on a baking sheet. Warm them for about 10 minutes. This method keeps their crispy texture. You can also reheat them in the microwave for about 30 seconds, but they may get soft. For the best taste, drizzle a little maple syrup on top before reheating. These delightful bites stay fresh for about three days in the fridge. In the freezer, they can last for up to three months. Be on the lookout for signs of spoilage. If they smell sour or have a strange color, it’s best to toss them. Always trust your nose and eyes when it comes to food safety. Can I make these bites ahead of time? Yes, you can prepare these bites in advance. Mix the egg mixture and cut the cinnamon roll dough. Store them in the fridge. When you're ready, just dip and bake! What can I use instead of cinnamon rolls? You can use biscuit dough or puff pastry. Both options work well and give a nice flavor. You can even try croissants for a richer taste. Why are my bites not cooking evenly? If your bites are uneven, check your oven temperature. An oven thermometer can help. Also, make sure to space the bites well on the baking sheet. This helps them bake evenly. How to fix a runny egg mixture? If your egg mixture is too runny, add another egg or a bit more milk. This will help thicken it up. Whisk well to combine all the ingredients before dipping. Can I use eggs substitutes? Yes, you can use flaxseed meal or applesauce. For each egg, use 1 tablespoon of flaxseed mixed with 2.5 tablespoons of water or 1/4 cup of applesauce. What’s a good alternative to maple syrup? Honey or agave syrup works great as a substitute. You can also use a fruit sauce for a fresh twist. This blog post covered how to make delicious cinnamon roll French toast bites. You learned the key ingredients, preparation steps, and baking tips. Remember, you can enhance this treat with spices or toppings. Variations are fun, too, allowing you to customize flavors or even adjust for diets. Store leftovers properly to enjoy later. Now, get in the kitchen, have fun, and create your own tasty bites!](https://tossedflavors.com/wp-content/uploads/2025/05/65aac2df-3428-4c50-aa9e-b7df757d73c2.webp)
Cinnamon Roll French Toast Bites Simple and Tasty Treat
Looking for a quick and tasty breakfast idea? Try making Cinnamon Roll French Toast Bites! This fun twist on classic favorites combines warm cinnamon rolls
. To start, you need to prep the cinnamon rolls. If you have store-bought rolls, carefully unroll each one. This creates a long strip of dough. If you're using homemade dough, roll it out into flat rectangles. Aim for even thickness so they cook well. Next, create the filling. In a small bowl, mix 2 tablespoons of maple syrup with a sprinkle of ground cinnamon. Spread this mixture on each unrolled cinnamon roll. Cover every bit for the best flavor. This sweet layer will make your rolls shine. Now, re-roll the cinnamon rolls. Begin at one end and roll tightly. Make sure each roll seals in the filling. This step keeps the yumminess inside while cooking. Next, let’s make the egg mixture. You will need 4 large eggs, 1 cup of milk, 1 teaspoon of vanilla extract, 1 teaspoon of ground cinnamon, and 2 tablespoons of maple syrup. In a medium bowl, whisk these together until smooth and frothy. A good blend helps the flavors mix well as they cook. Now it's time to cook the rolls. First, dip each cinnamon roll in the egg mixture. Make sure they are evenly coated. Be quick; don’t soak them too long, or they may fall apart. Heat a large skillet over medium heat and add 2 tablespoons of unsalted butter. Once the butter sizzles, add the coated rolls. Leave space between them for even cooking. Cook for about 3-4 minutes on each side. You want them to turn a golden brown color and be cooked through. When they’re done, place the rolls on a serving plate. Dust them lightly with powdered sugar while they're warm. This adds a sweet touch. You can serve them with fresh berries and drizzle more maple syrup on top for a perfect finish. Check out the Full Recipe for more details. To make perfect cinnamon roll French toast rolls, keep a few tips in mind. To avoid sogginess, do not soak the rolls in the egg mixture for too long. A quick dip is all you need. This prevents them from falling apart. When it comes to cinnamon rolls, you can choose store-bought or homemade. Store-bought rolls save time, while homemade ones let you control flavor and ingredients. If you want to impress, try making your own. It adds a personal touch. Serving is key to making your rolls look tempting. Arrange the rolls on a large platter. Nestle fresh berries around them for a colorful display. You can also dust powdered sugar on top for a sweet finish. For special occasions, get creative with your plating. Use a simple white plate to let the rolls shine. A small pitcher of maple syrup on the side invites guests to drizzle their own. To spice things up, consider adding nutmeg for warmth. You can also swap maple syrup for honey or agave for a different taste. Each option brings a unique flavor to your rolls. Pair your cinnamon roll French toast rolls with fresh fruit or yogurt. They also go well with coffee or tea for a delightful breakfast or brunch. Enjoy the mix of flavors and textures! For the complete recipe, check [Full Recipe]. {{image_4}} You can make these rolls even sweeter. Try adding chocolate chips or nuts. Just sprinkle some on the filling before rolling it back up. The chocolate will melt and make a gooey center. You can also swap the filling for a cream cheese mix. Blend softened cream cheese with a bit of sugar and vanilla for a rich, sweet treat. Want to try something different? You can make a savory version. Add cheese and ham inside the rolls for a tasty twist. Use a sharp cheese for a strong flavor. For the egg mixture, add some herbs or spices. A pinch of garlic powder or Italian seasoning can give it a nice kick. Change it up with the seasons! In fall, add pumpkin spice to the egg mixture. Mix in pumpkin puree for added flavor and creaminess. In summer, try berry-infused rolls. Blend fresh berries into the egg mixture or add them inside the rolls. This brings a bright and fruity taste to your breakfast. These variations keep the recipe exciting and fun. Explore these options to find your favorite! For the full recipe, check the main article. To keep your cinnamon roll French toast rolls fresh, place them in an airtight container. This method prevents them from drying out. Store the rolls in the fridge for up to three days. When you are ready to eat, reheat them. The best way is to use a skillet. Heat the skillet over medium heat and warm the rolls for about 2-3 minutes on each side. This method revives their crispy texture. If you want to save some rolls for later, freezing works great. First, let the cooked rolls cool completely. Then, wrap each roll in plastic wrap tightly. Place the wrapped rolls in a freezer-safe bag or container. They can stay frozen for up to three months. To enjoy later, take out the rolls and let them thaw in the fridge overnight. Once thawed, reheat them in a skillet for the best taste. You can keep the cinnamon roll French toast rolls in the fridge for about three days. After this time, they may start to lose flavor and texture. Look for signs that the rolls have gone bad. If they smell sour or have mold, it’s best to toss them. Always trust your senses when checking food freshness. Yes, you can use other types of bread. Brioche or challah work well. They add richness and flavor. You can even try whole wheat for a healthier option. Just ensure the bread can hold the filling. To make cinnamon rolls from scratch, mix flour, sugar, yeast, and salt. Add warm milk and melted butter to form a dough. Knead it until smooth. Let it rise until doubled in size. Roll out the dough and spread a mix of butter, sugar, and cinnamon. Roll it up and cut into pieces. Bake until golden brown. Yes, you can prepare the rolls ahead of time. Make them, then store in the fridge overnight. The next day, cook them straight from the fridge. This saves time and makes mornings easier. Some tasty toppings include: - Whipped cream - Chopped nuts - Chocolate chips - Caramel sauce These add flavor and texture. Fresh fruits like sliced bananas or berries also make great toppings. Absolutely! You can prepare these rolls for meal prep. Make a batch and store them in the fridge. Reheat them in the morning for a quick breakfast. They hold up well and taste great even after a day or two. Check out the Full Recipe for more details. This blog post covered how to make Cinnamon Roll French Toast Rolls. We explored key ingredients like cinnamon rolls, eggs, and milk, along with flavor boosters. I provided step-by-step instructions and useful tips to enhance your cooking. We even discussed creative variations and storage methods. In summary, this dish is versatile and fun. It’s perfect for breakfast or brunch gatherings. Whether you keep it simple or get creative, these rolls will impress anyone you serve them to. Enjoy making this tasty treat!](https://tossedflavors.com/wp-content/uploads/2025/05/411a8026-5769-4567-bbd0-98219481663b.webp)
Cinnamon Roll French Toast Rolls Irresistible Recipe
Are you ready for a breakfast treat that will make your mornings extra special? Look no further! This Cinnamon Roll French Toast Rolls recipe combines
. After baking the blueberry buttermilk pancake casserole, let it cool. Cut it into squares. Store them in an airtight container. You can keep it in the fridge for up to three days. Just make sure it is well sealed to avoid drying out. If you want to save some for later, freezing works great. First, let the casserole cool completely. Cut it into squares and wrap each piece tightly in plastic wrap. Place the wrapped squares in a freezer bag or container. This way, they stay fresh for up to two months. To reheat, take a piece out and let it thaw in the fridge overnight. You can warm it in the oven at 350°F (175°C) for about 10-15 minutes. This keeps the texture nice and fluffy! If you prefer, you can also microwave it for quick heat. Enjoy your delicious treat anytime! Can I use frozen blueberries? Yes, you can use frozen blueberries. Just remember to thaw and drain them first. This keeps the batter from getting too watery. How do I make mini pancake casseroles? To make mini casseroles, use a muffin tin instead of a baking dish. Fill each cup halfway with batter and bake for about 15-20 minutes. This creates perfect single servings. Can I prepare the batter in advance? You can prepare the batter ahead of time. Store it in the fridge for up to 24 hours. Just give it a gentle stir before baking. What's the best way to serve this dish? Serve warm, drizzled with maple syrup. Add whipped cream or fresh fruit on the side for extra fun. It looks great and tastes even better! Can it be made the night before? Yes, you can make it the night before. Bake it, let it cool, and store it in the fridge. Reheat it in the morning for a quick breakfast. Why didn't my casserole rise? If your casserole didn't rise, check your baking powder and baking soda. They need to be fresh to help the batter rise well. What if my casserole is dry? If your casserole turns out dry, try reducing the bake time next time. Adding a bit more buttermilk can also help keep it moist. This blog post covers how to make a delicious blueberry pancake casserole. You learned the key ingredients and got easy steps for preparation. I shared tips for perfect texture and ways to enhance flavors. You also found options for dietary needs and storage tips. In closing, enjoy experimenting with this recipe. Make it your own and share it with friends. It’s a great dish for breakfast or brunch, and it will impress everyone. Remember to have fun in the kitchen and enjoy the process!](https://tossedflavors.com/wp-content/uploads/2025/05/8b760795-bd8d-4bdd-ab51-ad19254a5396.webp)
Blueberry Buttermilk Pancake Casserole Delightful Dish
Start your mornings with a warm hug in the form of Blueberry Buttermilk Pancake Casserole! This delightful dish blends fluffy pancakes and sweet blueberries into
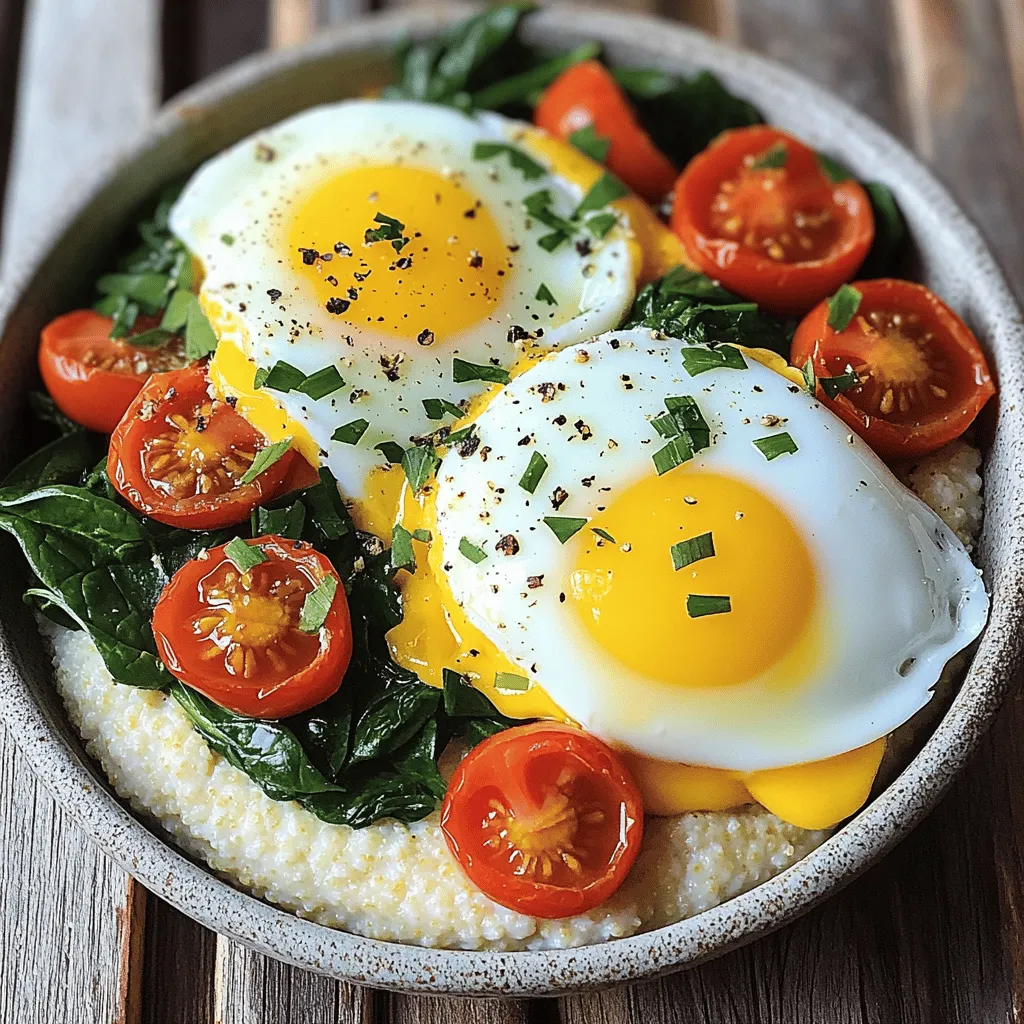
Savory Grits Breakfast Bowl Easy and Flavorful Meal
Start your day with a Savory Grits Breakfast Bowl that’s easy to make and packed with flavor. This delightful dish features creamy stone-ground grits topped
![To make Hawaiian Sweet Roll French Toast Bake, you need a few simple ingredients. Here’s what you’ll need: - 12 Hawaiian sweet rolls, cut into quarters - 6 large eggs - 1 cup whole milk - 1/2 cup heavy cream - 1/2 cup packed brown sugar - 1 tablespoon pure vanilla extract - 1 teaspoon ground cinnamon - 1/4 teaspoon grated nutmeg - 1/4 cup crushed pineapple, drained thoroughly - 1/2 cup shredded coconut (toasted if preferred) - 1/4 cup chopped pecans or walnuts (optional) - Maple syrup, for serving Each ingredient plays a key role in creating a soft, sweet, and flavorful dish. The Hawaiian sweet rolls give a lovely, fluffy base. The eggs, milk, and cream form a rich custard that soaks into the rolls. Brown sugar adds sweetness, while vanilla and spices bring warmth. Adding crushed pineapple and coconut gives a tropical twist. You can top this bake with nuts for crunch and serve with maple syrup for extra sweetness. You can find the full recipe to help guide your cooking journey. - Preheat your oven to 350°F (175°C). This is key for even baking. - Grease a 9x13 inch baking dish with non-stick spray or butter. This helps prevent sticking. - In a large bowl, whisk together 6 eggs, 1 cup of whole milk, and 1/2 cup of heavy cream. This mix will create a rich custard. - Add 1/2 cup of packed brown sugar, 1 tablespoon of pure vanilla extract, 1 teaspoon of ground cinnamon, and 1/4 teaspoon of grated nutmeg. Stir until smooth and well blended. - Cut 12 Hawaiian sweet rolls into quarters. Add them to the egg mix. Gently stir to coat each piece. - Fold in 1/4 cup of crushed pineapple, drained well. If you like, add 1/2 cup of shredded coconut and 1/4 cup of chopped pecans or walnuts for extra flavor. - Pour the mixture into the greased baking dish. Spread it out evenly for best results. - Cover the dish with aluminum foil. Let it rest at room temperature for about 30 minutes. This helps the rolls soak in the flavors. - After resting, bake for 25 minutes covered. Then, remove the foil and bake for another 15-20 minutes. Look for a golden brown top. The custard should be set and firm. - Once baked, take it out and let it cool for a few minutes. This will make it safer to handle. - Serve warm with maple syrup for a sweet touch. You can find the full recipe above! To make the best French toast bake, soaking time is key. Aim for at least 30 minutes. This lets the bread soak up all the yummy flavors. If you have more time, soak it overnight. The rolls will soak in even more custard. This gives a rich and creamy texture. When baking, keep an eye on the time. Bake for 25 minutes covered, then take off the foil. Bake for another 15-20 minutes. This helps the top get golden brown. If you want a softer bake, adjust the time down. If you like a crispier top, extend the baking time a little. Now, let’s talk toppings. Maple syrup is a must. It adds a sweet, sticky touch. Fresh fruit is also a great choice. Try adding slices of banana or a handful of berries. You can also sprinkle some toasted coconut on top for extra crunch. For side dishes, consider serving this bake with crispy bacon or sausage. Their salty flavor pairs well with the sweet rolls. Fresh fruit salad can also brighten up the plate. Want to change things up? You can add fun flavors! Try mixing in some chocolate chips for a sweet twist. Or, swap crushed pineapple for fresh diced apples. They add a nice crunch and sweetness. For mix-ins, consider adding nuts for texture. Chopped pecans or walnuts bring a great crunch. If you want to add spices, try a pinch of cardamom or allspice. These will add warmth and depth to the flavor. This recipe is all about creativity. Use your favorite flavors to make it your own! For the complete recipe, see the [Full Recipe]. {{image_4}} You can swap Hawaiian rolls for other breads. Use brioche or challah for a rich taste. For a twist, try cinnamon rolls. They add a warm spice flavor. If you need gluten-free options, look for gluten-free bread. Most grocery stores carry these. Choose a bread with a soft texture for the best results. To make your French toast bake exciting, add fruit. Chopped bananas, berries, or diced apples work well. Each fruit brings a unique taste. You can also use nuts or spices. Try adding walnuts or pecans for crunch. A hint of nutmeg or ginger can brighten the dish. If you follow a vegan diet, swap the eggs with a flaxseed mixture. Use plant-based milk instead of whole milk. You can also use coconut cream in place of heavy cream. For lower sugar options, reduce the brown sugar. You can replace it with applesauce for sweetness without extra sugar. This keeps the dish tasty and friendly for many diets. To store your Hawaiian Sweet Roll French Toast Bake, let it cool first. Place the leftovers in an airtight container. You can keep it in the fridge for up to three days. This way, you can enjoy the flavors later without losing taste. For reheating, the oven works best. Preheat your oven to 350°F (175°C). Place the French toast bake in an oven-safe dish. Cover it with foil to keep it moist. Heat for about 15 to 20 minutes. You can also use the microwave for quick reheating. Just heat it for about one minute. Check if it’s warm all the way through. If you want to freeze the French toast bake, do so after it cools. Wrap the dish tightly in plastic wrap, then in foil. This prevents freezer burn. You can freeze it for up to two months. To thaw, move it to the fridge overnight. Then, bake it at 350°F (175°C) for 25 to 30 minutes. Enjoy it fresh from the oven, just like the first time! For the full recipe, check out the details above. It takes about one hour to make this dish. You need 15 minutes for prep and 45 minutes for baking. Yes, you can prepare it ahead of time. Mix the ingredients and let it sit overnight in the fridge. This allows the rolls to soak up more flavor. You can use whole milk, almond milk, or coconut milk. These options will still give you a creamy texture. The bake is done when the top is golden brown. The custard should feel set and slightly firm when touched. Yes, you can use gluten-free sweet rolls. Just make sure to check the labels for any gluten content. Absolutely! Adding chocolate chips will give your bake a sweet twist. Just fold them in with the other ingredients. This article walks you through making a delicious Hawaiian Sweet Roll French Toast Bake. We covered the key ingredients, step-by-step instructions, and useful tips for the best results. You learned about storage options and variations to fit your needs. In the end, this dish is easy to prepare and a crowd-pleaser. Whether you serve it for brunch or dessert, it won’t disappoint. Enjoy all the tasty flavors and make it your own!](https://tossedflavors.com/wp-content/uploads/2025/05/5714a37f-d837-4071-988d-87c861b8d8c4.webp)
Hawaiian Sweet Roll French Toast Bake Simple Delight
If you’re ready for a breakfast treat that combines sweet and savory, you’ll love my Hawaiian Sweet Roll French Toast Bake. This dish is simple

Savory Breakfast Poptarts Flavorful and Quick Recipe
Are you tired of the same old breakfast routine? Let’s shake things up with Savory Breakfast Poptarts! These flaky pastries are not only packed with

Breakfast Bombs Flavorful Morning Treats for Everyone
Imagine starting your day with a burst of flavor that’s both fun and satisfying! Enter Breakfast Bombs: the morning treat everyone loves. Packed with savory
![When making a Tater Tot Breakfast Bowl, you'll need some key ingredients. Here’s what you should gather: - 4 cups frozen tater tots - 4 large eggs - 1 cup cooked breakfast sausage, crumbled - 1 cup shredded cheddar cheese - 1/2 cup diced bell peppers (mix of red, yellow, and green) - 1/4 cup finely chopped green onions - 1/2 teaspoon garlic powder - 1/2 teaspoon paprika - Salt and freshly ground black pepper, to taste - 1/4 cup sour cream (for serving) - Fresh cilantro or parsley for garnish (optional) These ingredients create a warm and hearty meal. The tater tots give crunch, while the eggs and sausage offer protein. The cheese adds creaminess, and the veggies bring color and flavor. This dish is fun to make and even better to eat. Check the [Full Recipe] for exact steps and tips! - Preheat the oven to 425°F (220°C). - Spread tater tots in a single layer on a baking sheet. - Bake for 25-30 minutes, flipping halfway. I love starting with the tater tots because they add a crunchy base. Make sure they are spread out. This helps them cook evenly. When they come out golden brown, they will look amazing! - Heat a non-stick skillet over medium heat. - Add diced bell peppers and sauté for 3-4 minutes. While the tater tots bake, I cook the veggies. The bell peppers add color and flavor. I stir them gently so they do not stick. The smell is mouthwatering as they soften. - Introduce crumbled sausage to the skillet. - Prepare the egg mixture with seasoning and cook. Next, I add crumbled sausage to the skillet. It cooks for about 4-5 minutes. This step mixes the sausage flavors with the veggies. In a bowl, I whisk the eggs with garlic powder and paprika. I pour this into the skillet and stir until the eggs are fluffy and cooked. - Layer baked tater tots with scrambled egg mixture. - Add cheddar cheese on top to melt. Once the tater tots are ready, it’s time to build the bowl. I place the crispy tater tots at the bottom. Then, I spoon the egg and sausage mix on top. Finally, I sprinkle the shredded cheddar cheese. As it melts, the bowl looks so inviting. For the full recipe, check out the complete details to get started on this delightful morning meal! To make great tater tots, spread them out. Avoid crowding the baking sheet. This helps them cook evenly. For an extra crispy finish, broil them for a few minutes at the end. Just watch closely so they do not burn. For fluffy scrambled eggs, whisk them well. Mix air into the eggs for a light texture. Cook them on low heat, stirring gently. This keeps them soft and moist. Overcooking can make them dry, so stay alert while cooking. Garnish your bowl with green onions and sour cream. This adds flavor and color. You can add fresh herbs like cilantro or parsley for a pop of freshness. For drinks, consider coffee, juice, or herbal tea. They pair well with the meal. {{image_4}} You can make your Tater Tot Breakfast Bowl even better with some fun twists. Here are some ideas to try. - Substitute sausage with plant-based alternatives. Options like tempeh or veggie sausage work great. - Add more veggies like spinach or mushrooms. These add flavor and nutrition to your meal. - Swap cheddar with other cheeses like feta or mozzarella. Both melt nicely and add unique flavors. - Consider dairy-free options like nutritional yeast or vegan cheese for a creamy taste. - Experiment with different herbs or sauces. Try fresh basil, cilantro, or a spicy sauce for a kick. - Ideas for spicy twists include jalapeños or hot sauce. These can make your breakfast bowl extra exciting. Explore these variations to create your perfect bowl. You can mix and match to find what you love! Check out the Full Recipe for more ideas. To keep your Tater Tot Breakfast Bowl fresh, store leftovers in the fridge. Use airtight containers to prevent moisture loss. Place the bowl in the fridge within two hours of cooking. This helps keep your breakfast safe and tasty. Enjoy the leftovers within three days for the best flavor. Yes, you can freeze the Tater Tot Breakfast Bowl! To freeze, let the bowl cool completely. Divide it into portions and place them in freezer-safe containers. Seal them tightly to avoid freezer burn. When ready to eat, thaw in the fridge overnight before reheating. To reheat without losing texture, use the oven. Preheat your oven to 350°F (175°C). Place the bowl in an oven-safe dish. Cover it with foil to keep it moist. Heat for about 20 minutes. You can also use a microwave for quick reheating. Microwave on medium power for 2-3 minutes, stirring halfway through. Enjoy your meal warm and delicious! To make a Tater Tot Breakfast Bowl, first, preheat your oven to 425°F. Spread frozen tater tots on a baking sheet. Bake them for 25-30 minutes until crispy. While they bake, sauté diced bell peppers in a skillet. After a few minutes, add crumbled breakfast sausage. Cook until the sausage is warm. Whisk eggs with garlic powder and paprika, then pour this mix into the skillet. Stir until the eggs are fluffy. Layer baked tater tots with the egg mixture and top with cheese. Serve warm with sour cream and green onions. You can find the full recipe above. Yes, you can prepare parts of this bowl in advance. Bake the tater tots and cook the sausage and peppers a day before. Store them in the fridge. In the morning, just reheat them and scramble the eggs fresh. You can also layer everything in bowls and keep them in the fridge. Just warm them up when you're ready to eat. If you need an egg substitute, you have options. You can use tofu, flaxseed meal, or chickpea flour. Silken tofu works well when blended for a creamy texture. Flaxseed meal mixed with water can mimic eggs in scrambles. For a quick option, use chickpea flour mixed with water to create a batter. These options allow you to enjoy the bowl without eggs. To adjust the spice level, add more paprika or some cayenne pepper. If you like mild flavors, keep it simple with garlic powder and salt. For those who enjoy heat, consider adding jalapeños or hot sauce. Start small, taste, and add more until you find your perfect spice balance. Yes, this recipe is great for meal prepping! You can batch cook the tater tots, sausage, and peppers. Store them in separate containers in the fridge. When ready to eat, just reheat and add fresh eggs. This way, you have a quick and tasty breakfast ready to go all week. The Tater Tot Breakfast Bowl is a tasty and easy meal. We covered all the key ingredients and steps, from baking tater tots to making fluffy scrambled eggs. Don't forget the tips for crispiness and cool variations to suit your tastes. This dish is versatile and fun. You can make it faster or customize it any way you like. Give it a try; it’s a meal your whole family will love. Enjoy your cooking and the delicious results!](https://tossedflavors.com/wp-content/uploads/2025/05/dce2a502-6d3e-4308-9035-7cef890a10de.webp)
Tater Tot Breakfast Bowl Delightful Morning Meal
Start your day right with a Tater Tot Breakfast Bowl, a delightful morning meal that combines crispy tater tots with fluffy eggs, savory sausage, and

Cornbread Waffle Bites with Honey Butter Syrup Delight
Looking for a new twist on breakfast or snacks? You’re in the right place! These Cornbread Waffle Bites with Honey Butter Syrup are not only