Appetizers
![To make oven-roasted corn in foil with garlic butter, gather these simple ingredients: - 4 fresh ears of corn, husked - 1/2 cup unsalted butter, softened to room temperature - 4 cloves garlic, finely minced - 2 tablespoons fresh parsley, finely chopped - 1 teaspoon smoked paprika - 1 teaspoon sea salt - 1/2 teaspoon freshly ground black pepper - Aluminum foil These fresh ingredients bring out the best flavors in your corn. The unsalted butter acts as a base, while garlic adds a rich taste. Fresh parsley offers a burst of color and freshness. Smoked paprika gives a nice depth to the flavor. Sea salt and black pepper enhance all the tastes. Using aluminum foil to wrap the corn ensures it cooks perfectly. The foil traps the steam, making the corn tender and juicy. With these ingredients, you will create a tasty dish that everyone will love. For the full recipe, check the instructions below. First, you need to preheat your oven to 400°F (200°C). This step is key for even cooking. A hot oven makes the corn tender and flavorful. Next, grab a medium bowl. Mix the softened butter, minced garlic, chopped parsley, smoked paprika, salt, and black pepper. Use a fork to combine them well. You want a smooth garlic butter paste. This mixture adds rich flavor to the corn. Now, take a large piece of aluminum foil, about 12 inches long. Lay each ear of corn in the center of the foil. Take a generous scoop of your garlic butter mixture and spread it over the corn. Make sure to cover all sides. This helps the corn soak up that tasty butter. Carefully fold the foil around the corn to create a sealed packet. This keeps the steam inside while it roasts. Place the packets directly on the oven rack or on a baking sheet. Roast the corn for 25 to 30 minutes. When done, the kernels will be tender and smell amazing. After cooking, unwrap the foil carefully to avoid hot steam. You can drizzle any leftover garlic butter over the corn for even more flavor. Enjoy your delicious oven-roasted corn! To make the best garlic butter, start with room-temperature butter. This helps it mix well. Use fresh garlic for a strong flavor. Finely mince the garlic so it spreads evenly. Adding fresh parsley gives a nice color and taste. Smoked paprika adds a warm depth. Mix all these ingredients well until creamy. You want a smooth paste that clings to the corn. For even roasting, wrap each ear of corn tightly in foil. This keeps the steam inside, cooking the corn evenly. Make sure the foil is sealed well to trap heat. Place the packets directly on the oven rack or a baking sheet. This allows hot air to circulate all around. Roast for 25 to 30 minutes for tender kernels. Check after 25 minutes to avoid overcooking. Serve the corn warm right after roasting. Unwrap carefully to avoid steam burns. Drizzle any leftover garlic butter over the corn for extra flavor. For a nice touch, place the corn on a wooden cutting board. A sprinkle of parsley and smoked paprika on top makes it look great. Pair it with grilled meats or fresh salads for a delightful meal. If you want to try more, check out the Full Recipe for variations! {{image_4}} For those who love some heat, add chili flakes to the garlic butter. Start with 1 teaspoon for a mild kick. You can increase it if you want more spice. Mix the flakes into the butter as you combine the other ingredients. This spicy twist adds a lively flavor to the sweet corn. Try mixing different herbs into your garlic butter. You can use thyme, basil, or even dill. Fresh herbs work best, but dried ones are fine too. Just chop them finely and blend them in with the garlic and butter. This herb-infused butter brings a fresh taste to your corn. If you're a cheese lover, this variation is for you! After roasting, sprinkle your favorite cheese over the corn. Feta, parmesan, or even cheddar work well. The cheese will melt into the warm corn, adding a creamy texture. This cheesy version is a sure crowd-pleaser at any gathering. For the full recipe and more details, check out the [Full Recipe]. You might have some corn left after a feast. To store it, let the corn cool first. Wrap it tightly in plastic wrap or foil. Place it in your fridge. It stays fresh for about three to five days. This way, you can enjoy it later! To reheat your corn, keep it simple. You can use the microwave. Just place the corn on a plate and cover it with a damp paper towel. Heat it for 1-2 minutes. Check if it's hot enough. If not, heat it a bit more. You can also reheat it in the oven. Wrap the corn in foil and bake at 350°F (175°C) for about 10 minutes. If you want to save corn for later, freezing is a great option. First, let the corn cool completely. Wrap each ear in plastic wrap, then in foil. Place the wrapped corn in a freezer bag. Remove excess air and seal it. It can last up to six months in the freezer. When you're ready to eat, just thaw it in the fridge overnight and reheat as needed. Yes, you can use frozen corn. Just thaw it first. Frozen corn works well in this recipe. The taste may be slightly different, but it's still tasty. The key is to ensure the corn is well-seasoned with the garlic butter. This way, it will have a great flavor, even if it’s not fresh. Oven-roasted corn in foil pairs well with many dishes. You can serve it with grilled meats like chicken or steak. It also goes great with a fresh salad or baked potatoes. For a simple meal, enjoy it with some crusty bread. The corn adds a sweet, buttery flavor to any plate. To make this recipe vegan, replace the butter with plant-based butter. You can also use olive oil instead of butter for a lighter option. Use the same garlic and spices to keep the flavors bold. This way, you can enjoy the dish without animal products. For the complete instructions, check the Full Recipe. This recipe is simple and rewarding. You’ll love the ease of making this delicious side dish. This blog post explored how to make delicious oven-roasted corn in foil. We covered key ingredients, tips for perfect garlic butter, and variations to spice things up. I shared how to store leftover corn and answered common questions. Roasting corn brings out its natural sweetness and enhances flavors. Remember, adapting this recipe allows you to make it your own. Enjoy your tasty creation and share it with friends!](https://tossedflavors.com/wp-content/uploads/2025/06/05325e7e-394d-4b6a-a362-ac8a5703618f.webp)
Oven-Roasted Corn in Foil with Garlic Butter Delight
Are you ready to take your corn game to the next level? In this Oven-Roasted Corn in Foil with Garlic Butter Delight recipe, you’ll learn

The BEST Tomato Tart Simple and Tasty Recipe
If you’re after a delicious dish that looks as good as it tastes, you’ve found it! This simple tomato tart recipe is both easy to

Buttermilk Chicken Tenders Juicy and Flavorful Recipe
Are you ready to make the perfect buttermilk chicken tenders? This juicy and flavorful recipe will elevate your dinner game. I’ll guide you through each
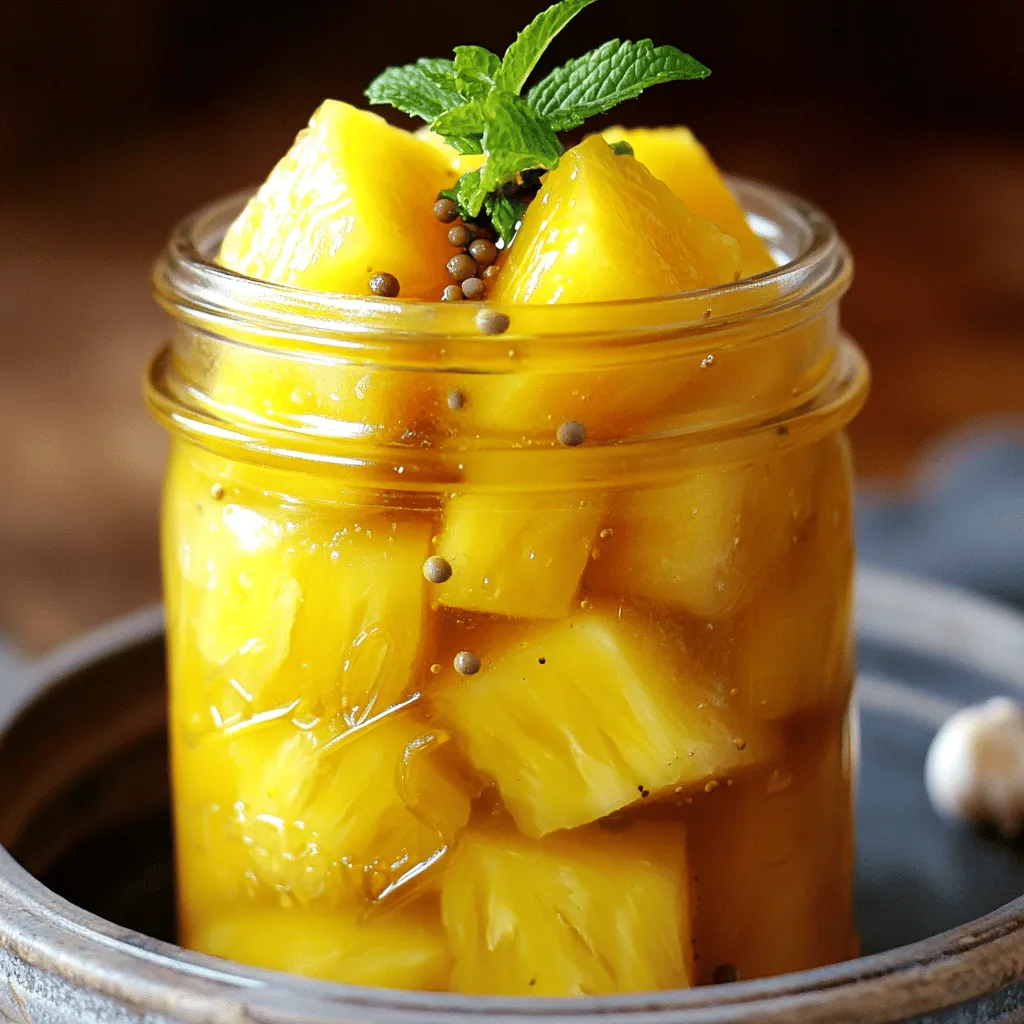
Easy Pickled Pineapple Flavorful and Simple Recipe
Do you want an easy way to spice up your meals? Try my Easy Pickled Pineapple recipe! With just a few simple ingredients, you can
![- Bell Peppers - Apple Cider Vinegar - Water - Sugar - Sea Salt - Crushed Red Pepper Flakes - Fresh Dill Sprigs - Sweet Bell Peppers - Spicy Peppers - Mixed Color Peppers When making easy pickled peppers, you need just a few key ingredients. The main star is bell peppers. I love using a mix of colors for a bright look. The apple cider vinegar adds a nice tang. Water balances the flavors. Sugar gives it a hint of sweetness, while sea salt enhances the taste. You can also add some optional ingredients. If you enjoy heat, crushed red pepper flakes will spice things up. Fresh dill sprigs can add a nice touch of flavor and beauty to the jars. For the types of peppers, sweet bell peppers are always a hit. You can also use spicy peppers if you want more heat. Mixing colors like red, yellow, and green makes the dish pop. For the full recipe, check out the complete guide. This gives you all the steps to create these tasty pickled peppers! - Washing and Cutting Start by washing the bell peppers. Rinse them well under cool water. This step removes any dirt or wax. Next, cut off the tops. Remove the stems so you can slice easily. - Slicing Techniques You can slice the peppers into rings or strips. Rings give a fun look and work great on sandwiches. Strips are perfect for dipping. Choose the shape you like best! - Mixing Ingredients In a medium saucepan, mix the apple cider vinegar, water, sugar, salt, mustard seeds, black peppercorns, garlic powder, and red pepper flakes. This mix will give your peppers a tangy flavor. - Heating and Dissolving Place the saucepan on medium heat. Stir the mix gently as it heats up. Bring it to a gentle simmer. Keep stirring until all the sugar and salt dissolve in the liquid. - Jar Preparation While the brine cools, grab clean, sterilized jars. Pack the sliced peppers tightly inside. Mix up the colors for a pretty look. Fill the jars to the top, but leave some space. - Pouring the Brine Once the brine cools for about 10 minutes, carefully pour it over the peppers. Make sure they are fully covered. Leave about half an inch at the top of each jar. This space allows for any expansion. Now, you’re almost ready to enjoy your easy pickled peppers! For more details, check out the Full Recipe. To make your pickled peppers truly shine, consider adding more spices. You can use: - 1 teaspoon coriander seeds - 1 teaspoon dill seeds - 1 teaspoon turmeric for color These spices add depth to the flavor. For a sweet and spicy twist, add more sugar or crushed red pepper flakes. Adjust these to create your perfect mix! When serving your pickled peppers, use a clear glass bowl. This lets their bright colors show off. You can layer the colors for a stunning look. Garnishing with fresh dill sprigs adds a nice touch. Dill brings a fresh scent and makes your dish more inviting. If your brine is too salty, add water to dilute it. Taste as you go. You can also add more sugar to balance the saltiness. Choosing the right jar is key. Use clean, sterilized jars to keep your peppers fresh. Wide-mouth jars are great for easy packing. Make sure they seal well to keep the flavors locked in. For the full recipe, check out the details above. Enjoy making your pickled peppers! {{image_4}} You can change the taste of your pickled peppers easily. Try a sweet and tangy mix. This adds a hint of fruitiness. Just add more sugar to the brine. You can also use honey for a natural sweetness. Another fun option is the garlic-infused version. To do this, add fresh garlic cloves to the brine. You can crush them slightly to release more flavor. This twist makes the peppers savory and rich. Do you like mild or spicy? You can adjust the heat level with ease. For mild peppers, stick to sweet bell peppers. If you want heat, use jalapeños or serranos. Slice them thinly or leave them whole for a bolder bite. You can also play with crushed red pepper flakes. Add more for an extra kick. Just remember to taste as you go. There are two main ways to pickle. Quick pickling is fast and easy. It takes just a few hours. Traditional methods use longer soaking times, often days. This gives deeper flavors. Choose what suits your time and taste. Another fun idea is to use different vinegars. Apple cider vinegar is great, but you can try rice or white wine vinegar. Each type adds a unique twist. Experiment with what you have at home. For the full recipe, check out the zesty quick pickled peppers. Store your pickled peppers in the fridge. This keeps them fresh and safe to eat. Use clean, airtight containers. Glass jars work best, as they do not react with the brine. Make sure the jars are tightly sealed to avoid air exposure. In the fridge, your pickled peppers last about two weeks. After this time, they may lose flavor and crunch. Signs of spoilage include a bad smell, mold, or changes in color. If you see these signs, it’s best to throw them away. You can freeze pickled peppers for longer storage. First, let them cool completely. Use freezer-safe bags or containers. Remove as much air as you can before sealing. This prevents freezer burn. When you're ready to use them, thaw the peppers in the fridge overnight. You can also soak them in cold water for a quick thaw. Enjoy your pickled peppers later in salads or on sandwiches! For the best taste, let your pickled peppers sit for 24 hours. This time helps the flavors blend well. If you are in a hurry, you can eat them sooner, but they will taste better after a day. The longer they sit, the more tangy and flavorful they become. You can keep them in the fridge for up to two weeks, but they are best enjoyed within the first week. Yes, you can use other types of vinegar for pickling. White vinegar works well and gives a sharp taste. Red wine vinegar adds a nice color and flavor. Rice vinegar is milder and sweeter. Each type changes the flavor of the peppers slightly. So feel free to try different vinegars to find your favorite. Pickled peppers shine as a side dish or topping. They add a nice crunch to sandwiches and burgers. You can also serve them with cheese and crackers for a fun snack. If you want to spice up salads or tacos, these peppers are perfect. Their bright colors and tangy taste make any dish more appealing. For a great look, serve them in a clear bowl and add fresh dill on top. Want the full recipe? Check out the [Full Recipe]. You've learned how to pickle peppers with ease. We covered the key ingredients, like bell peppers and vinegar. You now know how to prepare the brine and pack the jars perfectly. Plus, we explored fun variations to make your pickled peppers unique. Remember to follow storage tips so they last longer. Pickling is not just about taste; it’s also fun and creative. Enjoy your delicious pickled peppers and impress your friends with your new skills. Happy pickling!](https://tossedflavors.com/wp-content/uploads/2025/06/c8e551db-b3c4-431e-ad77-24747c35b331.webp)
Easy Pickled Peppers Tangy and Flavorful Recipe
If you’re looking to add a burst of flavor to your meals, this Easy Pickled Peppers recipe is for you! You’ll love how easy it
. First, wash the fresh okra well. This step is key to remove any dirt. Next, trim the stems carefully. Avoid cutting into the pods so they stay whole. This helps the okra hold its shape while pickling. To make the brine, take a medium saucepan. Combine 2 cups of distilled white vinegar and 1 cup of water. Add in 3 tablespoons of kosher salt and 1 tablespoon of sugar. Heat this mixture over medium heat. Stir until both the salt and sugar dissolve completely. Once they dissolve, take the saucepan off the heat. Let it cool down to a mild temperature before using it. Now, grab your sterilized jars. I like to use pint-sized mason jars for this. Place 4 cloves of peeled garlic, 2 teaspoons of mustard seeds, 1 teaspoon of black peppercorns, 1 teaspoon of red pepper flakes, and 3-4 sprigs of fresh dill at the bottom of each jar. These spices will give the okra a great flavor. Next, pack the okra upright into the jars. Make sure to leave enough space for the brine. You don’t want to crush the pods. Pour the cooled brine over the okra, ensuring every piece is fully submerged. If the okra isn’t fully covered, add a bit more vinegar. Seal the jars tightly. This keeps air out and helps the okra pickle well. Allow the jars to cool to room temperature. After they cool, put them in the fridge. Let the okra pickle for at least 48 hours before tasting. They can stay in the fridge for up to 3 months. For a full recipe, check out the details above. To get that ideal crunch, choose fresh okra. Look for okra that is bright green and firm. Avoid any that feels soft or looks dull. Trim the stems carefully without cutting into the pods. This keeps them from getting mushy. When packing the jars, stand the okra upright. This helps them stay crisp by allowing the brine to flow around each pod evenly. One mistake is using old or overripe okra. This can lead to a soggy texture. Another error is not cooling the brine properly before pouring it over the okra. Hot brine can cook the okra slightly, ruining the crispness. Also, don’t skip the salt. It helps draw out moisture and keeps the okra crunchy. Lastly, ensure you seal the jars tightly to keep air out. Clean all your jars and lids with hot soapy water. This helps prevent spoilage. Use a vinegar with a high acidity level. This ensures safe pickling and great flavor. Let the okra pickle for at least 48 hours before tasting. The flavors deepen as they sit. For the best taste, try to use your pickled okra within three months. You can find the Full Recipe online for detailed steps. {{image_4}} To make your pickled okra spicy, add more heat. Use extra red pepper flakes or include sliced fresh jalapeños. A teaspoon of cayenne pepper can also boost the heat level. Mix these spicy ingredients with the garlic and mustard seeds in the jar. This will give each bite a fiery kick. For a sweet twist, increase the sugar in your brine. Try adding two tablespoons instead of one. You can also mix in brown sugar for a deeper flavor. Another option is to add sliced onions or bell peppers with the okra. They will add a nice sweetness and texture to the mix. Pickling is not just for okra. You can pickle other veggies too. Try adding carrots, cucumbers, or green beans. Make sure to cut them to size so they fit in the jars. Each vegetable will absorb the brine and add its unique flavor to the mix. This variety will make your pickled okra even more exciting. Check out the Full Recipe for more tips on combining flavors. To store crisp pickled okra, keep it in the fridge. Use clean, airtight jars. Make sure the okra is fully submerged in the brine to stay fresh. This helps maintain its crunch. Always choose a cool spot in your fridge for storage. Crisp pickled okra lasts about three months in the fridge. After that, it may start to lose its flavor and texture. Always check the date you made it. If you eat it within this time frame, it will taste best. Look for changes that mean your okra is spoiled. Signs include a sour smell, cloudy brine, or visible mold. If the okra looks mushy, it is time to throw it away. Always trust your senses. If it doesn’t seem right, don’t eat it. Pickled okra tastes best after it sits for at least 48 hours. This time allows the flavors to blend well. You can eat it after this period, but the taste improves the longer it sits. If you wait a week, it gets even better! The brine seeps into the okra, giving it a tangy kick. I do not recommend using frozen okra for pickling. Frozen okra has a different texture and can become mushy. Fresh okra stays crisp during the pickling process. If you want that crunchy bite, always choose fresh. It's worth the extra effort! Crisp pickled okra pairs well with many dishes. You can serve it as a side with fried chicken or barbecue. It also makes a great topping for salads. Try adding it to sandwiches for a tasty crunch. For a fun twist, use it in cocktails like a Bloody Mary. The options are endless! Crisp pickled okra is easy to make and full of flavor. You need the right ingredients, a well-prepared brine, and smart storage tips to get it just right. Remember to avoid common mistakes for that perfect crunch. Try different variations for fun flavors. With proper care, it’ll last a while. Enjoy this tasty treat in salads or on its own. Happy pickling!](https://tossedflavors.com/wp-content/uploads/2025/06/45a0bdfc-7792-41ff-9530-5e0ce4a2bf2e.webp)
Crisp Pickled Okra Tangy Flavor in Every Bite
If you crave a tangy snack that adds a punch to any meal, crisp pickled okra is your answer. This simple yet tasty treat boasts

Chili Cheese Fries Irresistibly Cheesy and Flavorful
Get ready to indulge in the ultimate comfort food: Chili Cheese Fries! This dish combines crispy fries, hearty chili, and gooey cheese for a flavor
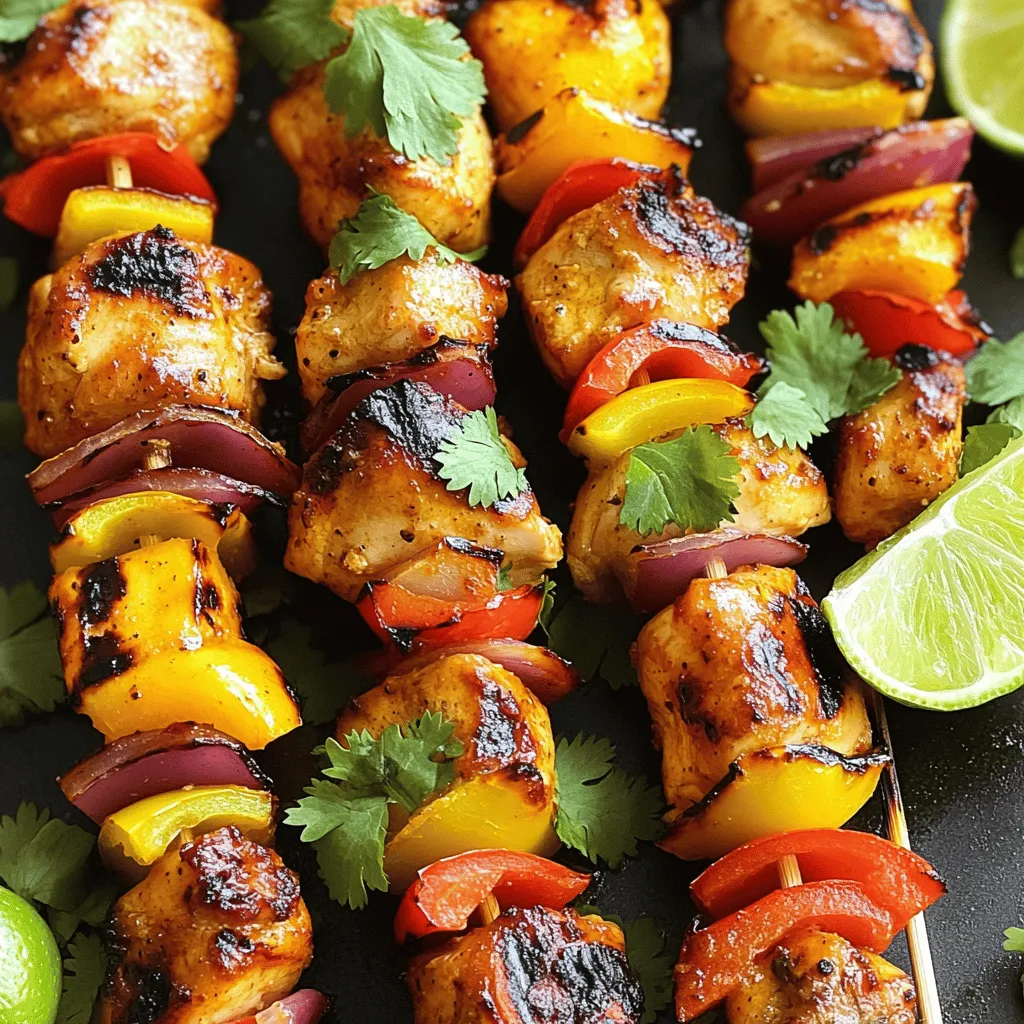
Pinchos Puerto Rican Chicken Skewers Flavor Explosion
Are you ready to fire up your grill and impress your guests? Pinchos, Puerto Rican chicken skewers, offer a flavor explosion that’s hard to resist.
![To make the best garlic steak bites, you need simple and fresh ingredients. Each item adds flavor and texture. This recipe is quick and easy. You can whip it up in under 40 minutes. Serve it hot for a tasty meal. - 1 lb sirloin steak, cut into 1-inch cubes - 4 cloves garlic, finely minced - 2 tablespoons extra virgin olive oil - 1 tablespoon fresh rosemary, finely chopped - 1 teaspoon smoked paprika - Salt and freshly ground black pepper, to taste - 1 tablespoon unsalted butter - Fresh parsley, chopped, for garnish Each ingredient plays a key role. The sirloin steak gives a juicy bite. Garlic adds a strong flavor. Olive oil keeps everything moist. Rosemary brings a fresh touch. Smoked paprika adds depth. Salt and pepper balance the dish. The butter creates a rich sauce. A sprinkle of fresh parsley makes your steak bites pop. It adds color and freshness. You can also serve with lemon wedges for a zesty touch. This brightens the flavors and adds a nice contrast. Enjoy these steak bites as a main dish or appetizer! Start by cutting your sirloin steak into 1-inch cubes. This size helps the steak cook evenly. Take a medium bowl and add the steak cubes. Next, finely mince four cloves of garlic. Add the garlic to the bowl. Then, pour in two tablespoons of extra virgin olive oil. This oil adds richness to the flavor. Now, chop one tablespoon of fresh rosemary and sprinkle it in. Add one teaspoon of smoked paprika for a hint of warmth. Don’t forget to season with salt and black pepper to taste. Mix everything well, so each piece is covered. Let this marinate for at least 30 minutes. If you have time, refrigerate for two hours. This will deepen the flavor. Heat a large cast-iron skillet over medium-high heat. Once the skillet is hot, add the marinated steak bites. Make sure not to overcrowd the pan. This helps them get a nice sear. Cook the steak for about 2-3 minutes on each side. You want to see a rich, brown crust form. For medium-rare, aim for a temperature of 135°F. Use a meat thermometer if you have one. When the steak is done, remove it from the skillet and set it aside. Now, lower the heat to medium-low. Add one tablespoon of unsalted butter to the same skillet. Let this melt, mixing it with the tasty juices left in the pan. This creates a rich garlic butter sauce. Toss the cooked steak bites back into the skillet. Stir them in the garlic butter for about one minute. This allows them to soak up the flavors. Finally, take the skillet off the heat and transfer the steak bites to a platter. Garnish with fresh parsley for color. Serve hot for the best taste. Enjoy your delicious garlic steak bites! For the full recipe, see above. Marinating your steak is key for flavor. I suggest marinating for at least 30 minutes. This time allows the garlic and herbs to soak in. For the best taste, try to marinate for up to 2 hours. If you have more time, refrigerate overnight. This makes each bite burst with flavor. The right doneness makes all the difference. For medium-rare, aim for 135°F. Use a meat thermometer for accuracy. Cook the steak bites for 2-3 minutes on each side. This gives them a nice brown crust. If you like your steak more done, just add a minute or two. Always let the steak rest for a few minutes before serving. To boost the flavor, try different herbs. Fresh thyme or oregano works well. You can also add a splash of Worcestershire sauce to the marinade. For a little heat, mix in red pepper flakes. These small changes can turn good steak bites into great ones. For more tips on making these steak bites shine, check the full recipe. {{image_4}} You can use many cuts for garlic steak bites. Sirloin is great, but try flank or ribeye for more flavor. Each cut has its own texture and taste. Flank steak is lean and cooks fast, while ribeye is rich and juicy. Adjust your cooking time based on the cut you choose. Adding vegetables can make your dish more colorful and healthy. You can toss in bell peppers, zucchini, or mushrooms. Cut them into bite-sized pieces, and add them to the skillet with the steak. They will soak up the garlic flavor and add a nice crunch. Experiment with different seasonings to change the taste. Try adding soy sauce for an Asian twist or chili powder for some heat. You can also use herbs like thyme or oregano. Mix and match to find your favorite flavor combo. Each change makes the dish unique and exciting. For the full recipe, check the section above. After you enjoy your garlic steak bites, store any leftovers in a safe way. Place them in an airtight container. Try to use a container that fits the amount you have. Keep the container in the fridge. The steak bites will stay fresh for about three days. Make sure to cool them down before sealing the container. This helps keep them tasty. When you're ready to eat your leftovers, reheating them is easy. The best way is to use a skillet. Heat it over medium heat. Add a little olive oil or butter to the pan. Once hot, add the steak bites. Cook for a few minutes until they get warm. Stir them often to avoid burning. You can also use a microwave. Just put them on a plate and cover with a damp paper towel. Heat them for about 30 seconds, check, and repeat until warm. If you want to save steak bites for later, freezing them is a great option. First, let them cool completely. Then, put them in a freezer-safe bag. Try to remove as much air as possible. This helps prevent freezer burn. You can freeze them for up to three months. When you're ready to eat, thaw them overnight in the fridge. After thawing, reheat them using the skillet method for the best taste. Enjoy your delicious garlic steak bites even after some time! You should marinate the steak for at least 30 minutes. This time helps the meat soak up the flavors. For even better taste, you can marinate it for up to 2 hours in the fridge. The longer you marinate, the more flavor your steak will have. Just remember to take it out of the fridge 30 minutes before cooking. This brings the meat to room temperature, which helps it cook evenly. Yes, you can use frozen steak, but it's best to thaw it first. Thaw the steak overnight in the fridge for safety. This keeps the texture nice and tender. If you are in a hurry, you can use a microwave on the defrost setting. Just be careful not to start cooking it. Once thawed, you can follow the recipe as usual. This will ensure your garlic steak bites turn out juicy and flavorful. Garlic steak bites pair well with many sides. Some great options are: - Garlic mashed potatoes - Steamed broccoli - Grilled asparagus - A fresh garden salad - Rice or quinoa These sides balance the rich flavors of the steak. You can also serve them in tacos or on a bed of greens for a tasty twist. For the full recipe, check out the [Full Recipe]. To sum up, this blog post covered how to make delicious garlic steak bites. We explored essential ingredients, step-by-step cooking instructions, and helpful tips. You learned about marinating, cooking time, and flavoring your steak. We also discussed variations like different cuts and added veggies. Finally, we talked about storing and reheating leftovers. I hope you feel ready to cook these steak bites soon. Enjoy every bite and share your results!](https://tossedflavors.com/wp-content/uploads/2025/06/f875a3fd-7f15-44b4-9e97-03716fa97a98.webp)
The Best Garlic Steak Bites Mouthwatering and Easy Recipe
Get ready to delight your taste buds with my easy recipe for garlic steak bites! This dish is packed with flavor and is quick to
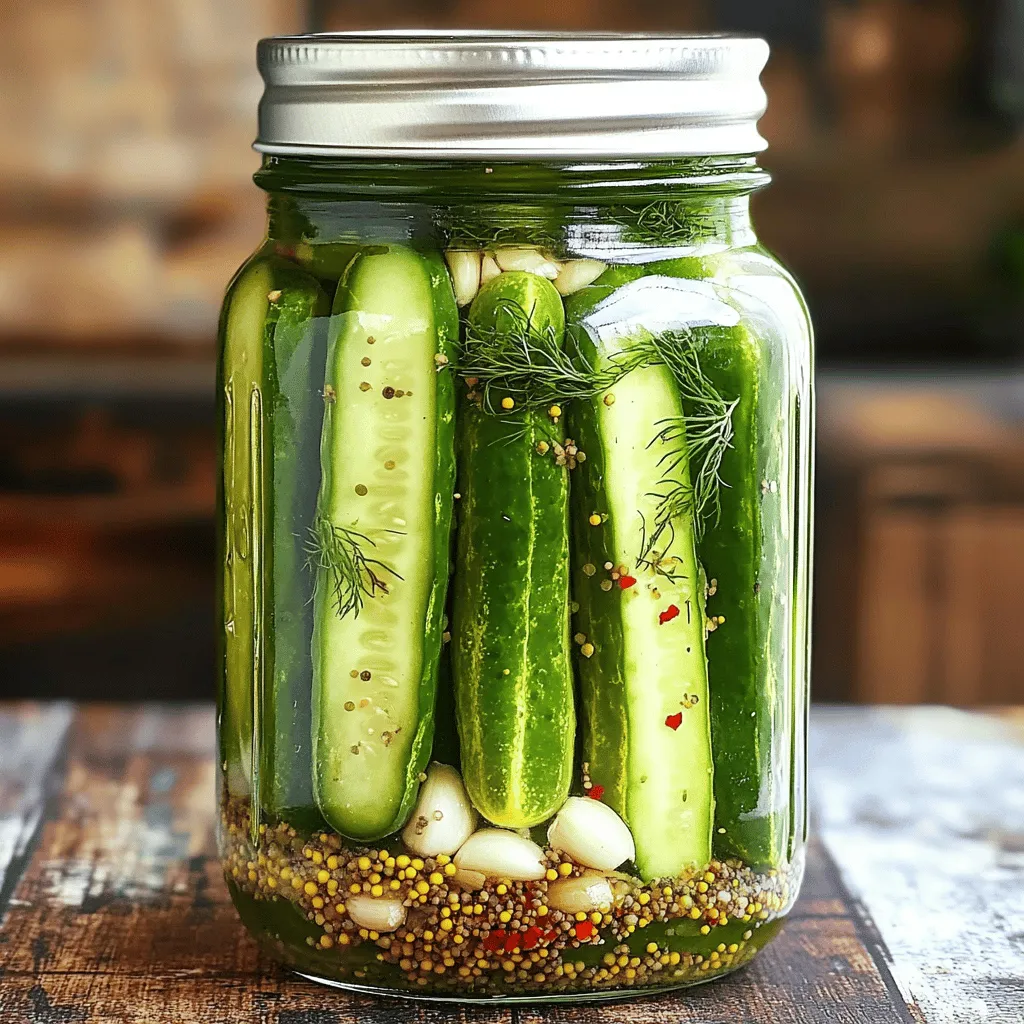
Garlic Dill Pickles Flavorful and Simple Recipe Guide
Are you ready to turn fresh cucumbers into crunchy garlic dill pickles? This simple recipe guide will help you master the art of pickling with