Appetizers
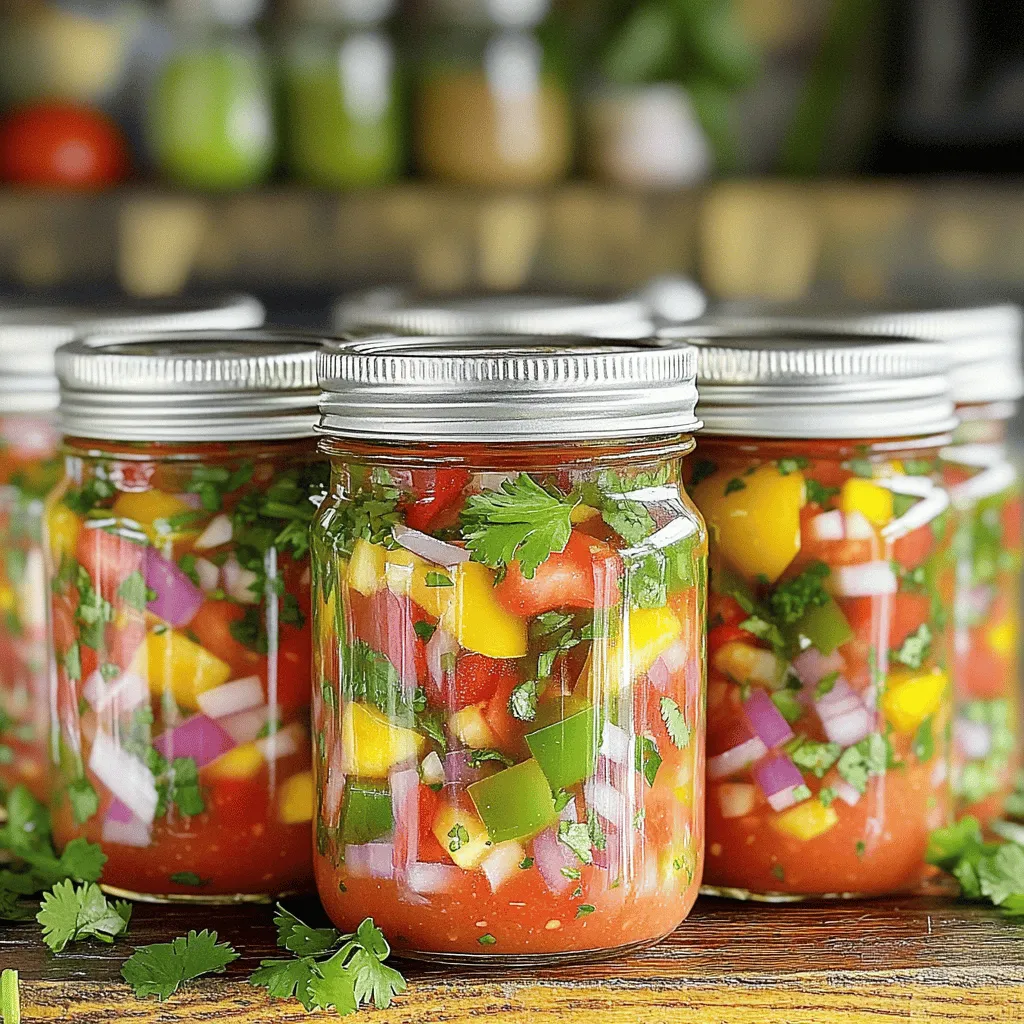
How to Can Salsa Tasty and Easy Homemade Recipe
Are you ready to master the art of canning salsa? In this guide, I’ll show you how to create a tasty and easy homemade salsa
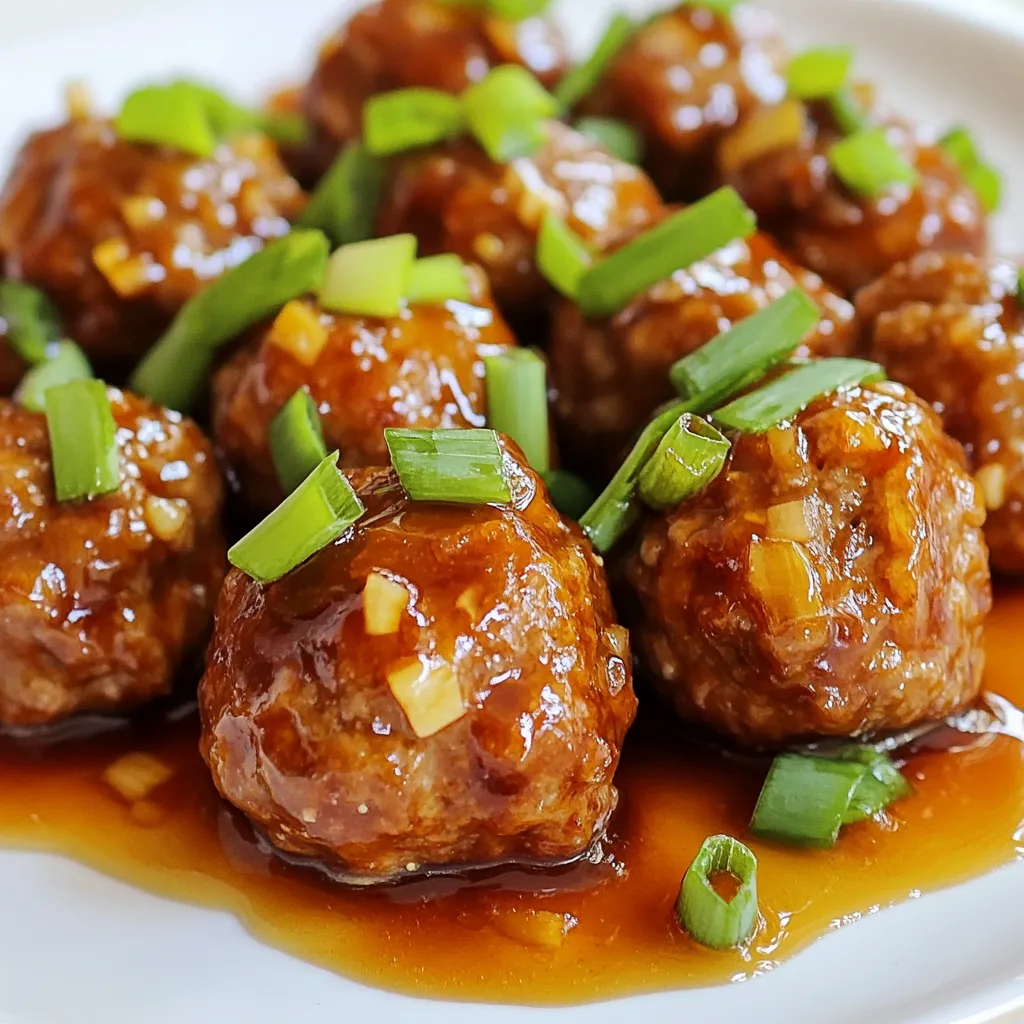
Spicy Honey Garlic Meatballs Flavorful and Simple Dish
Are you ready to spice up your dinner routine? These Spicy Honey Garlic Meatballs are not just simple, but also bursting with flavor. Packed with
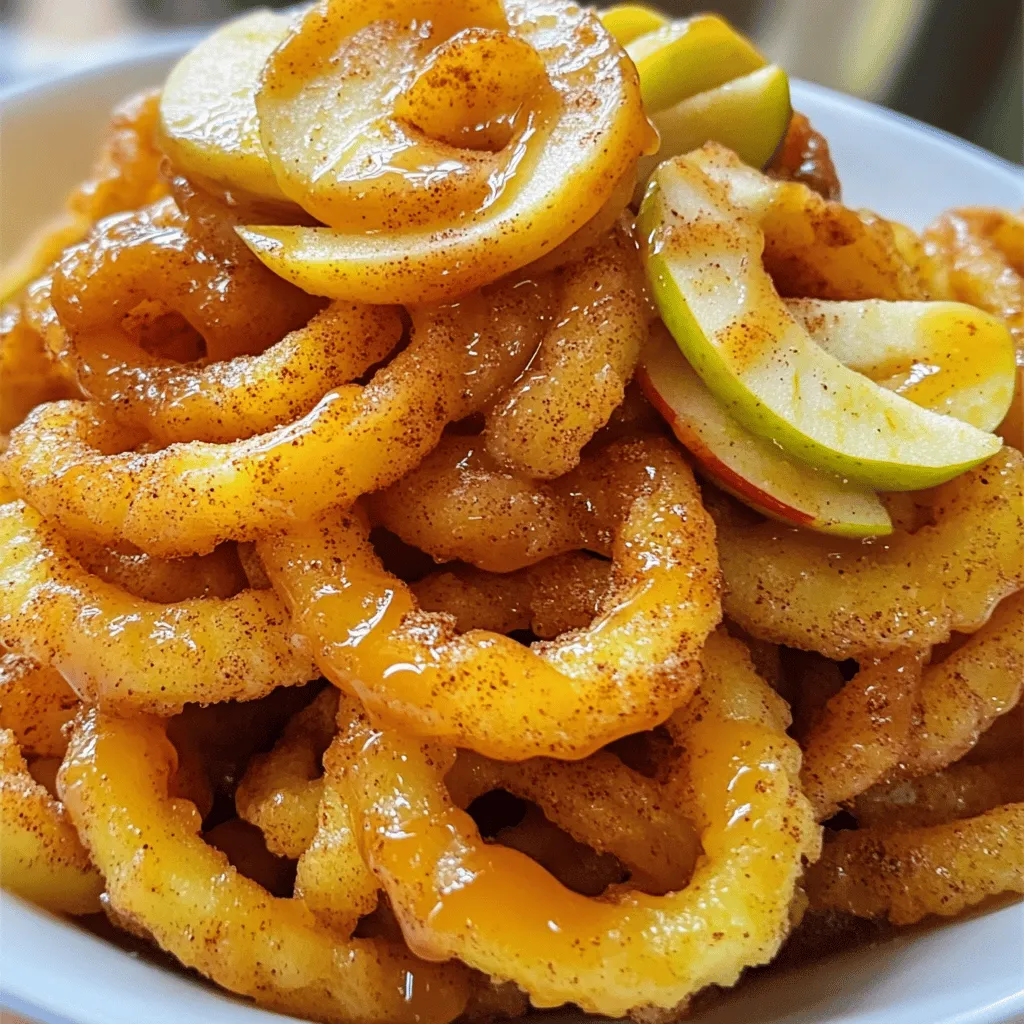
Irresistible Apple Cinnamon Curly Fries Recipe
Ready for a sweet twist on a classic? You’ll love my Irresistible Apple Cinnamon Curly Fries recipe! These are not your average fries. With crispy,

Blender Salsa Fresh and Flavorful Recipe Guide
If you’re craving a fresh and zesty salsa, you’ve come to the right place! This Blender Salsa recipe is easy, quick, and packed with flavor.
![- 1 can of refrigerated biscuit dough - 1/2 cup pizza sauce - 1 cup shredded mozzarella cheese - 1/4 cup sliced pepperoni - 1/4 cup diced bell peppers - Fresh basil leaves for garnish - 1/4 teaspoon dried oregano - Salt and pepper to taste The main ingredients for these mini biscuit pizzas are simple and fun. You start with a can of refrigerated biscuit dough. This makes a great base that kids can help shape. Then, you need pizza sauce. You can use store-bought or make your own if you’re feeling creative. The cheese is the star here, so grab a cup of shredded mozzarella. It melts perfectly and tastes great! For optional ingredients, you can add sliced pepperoni for a classic touch. Diced bell peppers add color and nutrition. Fresh basil leaves on top give a nice finish and a fresh taste. Lastly, seasonings are key. A pinch of dried oregano gives a nice herb flavor. Don't forget salt and pepper to taste! These ingredients work together to create a fun and tasty snack for kids. If you want the full details, check out the Full Recipe. - Preheat the oven to 375°F (190°C). - Separate and flatten the biscuit dough. Start by opening the can of refrigerated biscuit dough. You will see eight biscuits inside. Take them out and place them on a baking sheet. Use parchment paper or grease the sheet lightly. Flatten each biscuit with your hands or a rolling pin. Aim for about 1/2 inch thick. This will create a nice base for your mini pizzas. - Bake the flattened biscuits for 10 minutes. - Allow to cool slightly before adding toppings. Now, place the baking sheet in the preheated oven. Bake the biscuits for about 10 minutes. They should become light golden brown. This step makes sure that the base is sturdy. After baking, carefully take them out and let them cool for a couple of minutes. This helps avoid burns when you add the toppings. - Spoon pizza sauce onto each biscuit. - Add mozzarella cheese and toppings. Once the biscuits are cool enough, grab a tablespoon. Spoon some pizza sauce onto each biscuit. Spread it out evenly. Then, take shredded mozzarella cheese and sprinkle it over the sauce. You want to cover it well. Next, add your favorite toppings like sliced pepperoni or diced bell peppers. These add great taste and color to your mini pizzas. - Bake until cheese is melted and bubbly. - Cool briefly before serving. After topping the pizzas, put the baking sheet back in the oven. Bake for another 5 to 7 minutes. The cheese should melt and get all bubbly. Keep an eye on them so they don’t burn. Once done, take them out and let them cool for about a minute. If you like, you can garnish with fresh basil leaves before serving. For the complete process, you can check the [Full Recipe]. Enjoy making these easy and fun mini biscuit pizzas! - Involve kids in the assembly process: Let your kids help spread sauce and add toppings. This makes cooking fun and teaches them skills. - Use colorful ingredients to attract attention: Bright veggies like bell peppers and olives make the pizzas pop. Kids love colorful food! - Add different cheeses for more flavor: Try cheddar, gouda, or even pepper jack. Each cheese brings a new taste. - Experiment with various toppings: Mix things up with toppings like pineapple, mushrooms, or even cooked chicken. Let kids choose their favorites! - Presentation ideas for fun and engagement: Serve mini pizzas on a vibrant plate. Arrange them in shapes, like a smiley face or a star. Kids enjoy creative plates! - Pairing ideas for side dishes and dips: Serve with carrot sticks, fruit skewers, or a side of ranch for dipping. These add fun and nutrition to the meal. {{image_4}} You can make mini biscuit pizzas healthier. One great way is to replace pepperoni with veggies. Try mushrooms, spinach, or even zucchini. These options add nutrients and flavor. Another smart choice is using whole wheat biscuit dough. This swap boosts fiber and makes them more filling. Get creative with mini biscuit pizzas. You can make BBQ chicken mini pizzas. Just use BBQ sauce instead of pizza sauce. Add cooked chicken, cheese, and red onions for a tasty twist. Another fun idea is taco-style mini pizzas. Top with seasoned ground beef, cheese, and salsa. Kids will love these different flavors. Let kids customize their mini pizzas. This makes it more fun for them. You can cater to dietary needs, too. If someone is gluten-free, use gluten-free biscuit dough. For dairy-free options, try dairy-free cheese. Encourage kids to pick their favorite toppings. This way, everyone gets a pizza they love. For more ideas, check the Full Recipe. To keep your mini biscuit pizzas fresh, store them in an airtight container in the fridge. This helps to lock in flavors and moisture. Enjoy them within 2-3 days for the best taste. If you store them longer, they may lose their crispness and flavor. For the best texture, reheat your mini pizzas in the oven. Set the oven to 350°F (175°C) and bake for about 5-10 minutes. This helps the crust regain its crunch. If you're short on time, the microwave is a quick option. Heat them for about 30-60 seconds, but know the crust may become soft. You can freeze mini pizzas for later fun! Freeze them either assembled or cooked. Wrap each pizza well in plastic wrap and then place them in a freezer bag. They are best used within 1-2 months. When you're ready to eat, thaw them in the fridge overnight and reheat as mentioned above. This way, you always have a tasty snack on hand! For the full recipe, check out Mini Biscuit Pizzas for Kids. Yes, you can use other types of dough. Pizza dough works great for mini pizzas. You can also try using pastry dough for a flakier base. Each option offers a different taste and texture. Just remember to adjust baking times based on the dough you choose. To make mini pizzas healthier, opt for low-fat cheese. You can also add more veggies like spinach or mushrooms. These options boost nutrition without losing flavor. Try using whole wheat biscuits for added fiber, too. Kids won’t even notice the difference! Mini pizzas taste great with marinara sauce. Ranch dressing adds a creamy touch. Garlic sauce also pairs well for a nice flavor kick. Offer a variety of dips for kids to explore. It makes snacking more fun and interactive. Yes, you can prepare these mini pizzas ahead of time. Assemble them and keep them in the fridge. Bake them fresh when you’re ready to eat. This way, you save time on busy days. Enjoy tasty snacks without the hassle! If you double the recipe, adjust the baking time slightly. Keep an eye on the mini pizzas as they bake. They might need an extra 2-3 minutes to cook through. Make sure the cheese is bubbly and slightly golden for the best results. These mini pizzas are simple to make and fun to eat. We explored the key ingredients, steps for preparation, and ways to customize your pizza. Remember, you can get creative with toppings and flavors. These pizzas will be a hit with kids and guests alike. Enjoy them fresh or store leftovers for later. Your next pizza night will be a tasty success!](https://tossedflavors.com/wp-content/uploads/2025/07/b456e780-5923-42b6-9fa3-1d180e94b81a.webp)
Mini Biscuit Pizzas for Kids Fun and Tasty Snack
Looking for a fun and tasty snack for your kids? These Mini Biscuit Pizzas are a hit! Made with simple ingredients like biscuit dough and
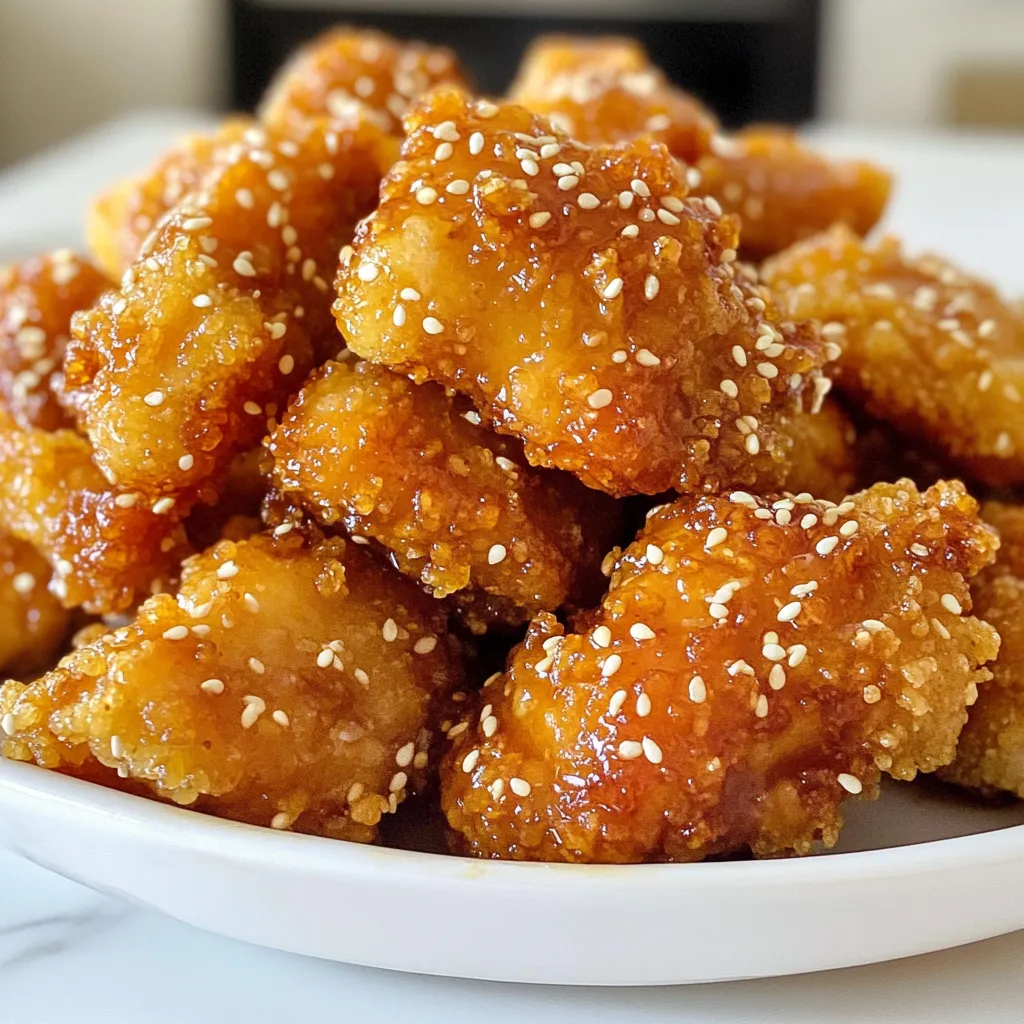
Honey Sesame Chicken Bites Crunchy and Flavorful Treat
If you’re craving a crunchy and flavorful treat, look no further than my Honey Sesame Chicken Bites! This recipe combines tender chicken with a crispy

Mini Pizza Pot Pies Flavorful and Easy Dinner Idea
Do you love pizza but want something new? Try Mini Pizza Pot Pies! They’re quick, fun, and packed with flavor. In this guide, I’ll share

Corn Dog Muffins Flavorful and Easy Snack Recipe
If you’re craving a snack that’s fun and tasty, you’ll love corn dog muffins! Trust me, they’re easy to make and packed with flavor. This
![- 1 lb boneless, skinless chicken thighs - 1 cup buttermilk or vegan alternative - 1 cup all-purpose flour - Garlic powder - Onion powder - Paprika - Cayenne pepper - Mayonnaise - Sweet chili sauce - Sriracha - Lime juice When I make Air Fryer Bang Bang Chicken, I love using chicken thighs. They stay juicy and tender. But you can also use chicken breasts if you prefer. The buttermilk is key for marinating. It adds flavor and helps the chicken stay moist. For the coating, I mix flour with garlic powder, onion powder, paprika, and cayenne pepper. This blend gives a nice kick. You can adjust the cayenne pepper based on how spicy you want the chicken. The Bang Bang sauce is what makes this dish special. I mix mayonnaise, sweet chili sauce, sriracha, and lime juice. This sauce is creamy and tangy. You can change the amount of sriracha to suit your taste. Follow the [Full Recipe] to pull this dish together. The balance of flavors will impress everyone at your table. To start, take one pound of boneless, skinless chicken thighs. Cut them into bite-sized pieces. In a large bowl, combine the chicken with one cup of buttermilk. Make sure each piece is well-coated. Cover the bowl with plastic wrap. Place it in the fridge for at least 30 minutes. This step is crucial. The buttermilk helps make the chicken tender and juicy. Next, we need to prepare the dredge. In another bowl, mix one cup of all-purpose flour with spices. Add one teaspoon each of garlic powder, onion powder, and paprika. Then, add half a teaspoon of cayenne pepper. Don’t forget a pinch of salt and black pepper. Whisk it all together until well combined. This mixture will give your chicken a lovely flavor. An even coating is key for that perfect crunch. Now, let’s get to the air frying. Preheat your air fryer to 400°F (200°C). This takes about five minutes. While it heats, spray the basket lightly with cooking spray. This helps prevent sticking. Arrange the chicken pieces in a single layer. Leave space between them. You may need to cook in batches. Lightly spray the tops of the chicken with more cooking spray. Cook for 12 to 15 minutes. They should turn golden brown and crispy. Remember to shake the basket halfway through to help them cook evenly. For the full recipe, check out the complete details to make this dish pop! To get your Air Fryer Bang Bang Chicken nice and crispy, use cooking spray. Lightly spray both the chicken and the air fryer basket. This helps create a golden crust. Cook in batches to ensure even cooking. If you crowd the basket, the chicken may steam instead of fry. You can adjust the spice levels to fit your taste. If you want more heat, add a bit more cayenne or sriracha. Always taste the sauce as you mix. This way, you can tweak it to make it just right for you. For a colorful dish, serve the chicken over shredded lettuce. This adds a nice crunch and bright color. Don’t forget to garnish with chopped scallions and sesame seeds. This gives a fresh look and extra flavor. For a fun touch, add a lime wedge on the side for a zesty kick! {{image_4}} You can make Air Fryer Bang Bang Chicken healthier by switching some ingredients. Instead of all-purpose flour, try almond flour. Almond flour adds a nutty taste and fewer carbs. You can also use gluten-free flour for a gluten-free version. This keeps the dish crisp and tasty. When using a vegan alternative for buttermilk, consider almond or oat milk. They work well for marinating the chicken pieces. The classic Bang Bang sauce is delicious, but you can get creative! For a twist, mix in some honey for a sweeter flavor. You can also use Greek yogurt instead of mayonnaise for a lighter sauce. If you love heat, add more sriracha or even chili garlic sauce. Other dipping sauces work great, too! Sweet and sour sauce or even a simple ranch dressing can elevate your dish. If you're looking for different proteins, you have options! Tofu is a great plant-based choice. Just make sure to press and drain it well before marinating. Shrimp also works beautifully in this recipe. They cook quickly and absorb the sauce well. You can even use pork or beef if you want something heartier. Each option brings its own unique flavor to the dish. For more ideas, check out the Full Recipe for inspiration! To keep your Air Fryer Bang Bang Chicken fresh, store it properly. Place any leftovers in an airtight container. This helps keep moisture in. Refrigerate the chicken right after it cools down. It can stay fresh for up to 3 days in the fridge. If you want to keep it longer, freeze the chicken. When frozen, it can last for up to 3 months. Just remember to let it cool completely before freezing. This way, you maintain its taste and texture. When it's time to enjoy your leftovers, reheating them right is key. A great way to reheat the chicken is to use the air fryer again. Set your air fryer to 350°F (175°C) and reheat for about 5 to 7 minutes. This keeps the chicken crispy. If you don’t have an air fryer, you can use an oven. Place the chicken on a baking sheet and heat it at 350°F (175°C) for about 10 minutes. To avoid sogginess, don’t cover the chicken while reheating. This allows the moisture to escape. Meal prepping makes busy days easier. You can prepare the chicken and sauce ahead of time. Start by marinating the chicken in buttermilk. Then, coat it in the flour mix and store it in the fridge. You can also make the bang bang sauce in advance. Just keep it in a sealed jar in the fridge. When you’re ready to eat, air fry the chicken and toss it in the sauce. This way, you enjoy a fresh meal with minimal effort. For quick meals, consider making a big batch. You can easily pull it out and have a tasty dish ready in minutes. For the full recipe, check the detailed steps. Bang Bang Chicken is a fun dish that brings flavor and crunch. This dish features crispy chicken pieces tossed in a creamy, spicy sauce. The sauce usually combines mayonnaise, sweet chili sauce, and a kick of sriracha. You can serve it as an appetizer or a main dish. Yes, you can make Bang Bang Chicken in an oven. First, preheat your oven to 425°F (220°C). After marinating the chicken and coating it, place the pieces on a baking sheet lined with parchment paper. Bake for about 20-25 minutes. Flip the chicken halfway through for even cooking. You will not get the same crispiness, but it still tastes great. To adjust the heat, you can modify the cayenne pepper in the flour mixture. For less spice, use just a pinch. If you want more heat, add extra cayenne or sriracha to the sauce. Taste the sauce after mixing to find the right balance for you. Yes, you can use frozen chicken. However, it is best to thaw it first. This ensures even cooking and proper marination. If you are short on time, you can cook the chicken from frozen. Just increase the cooking time by a few minutes. Check that the chicken reaches an internal temperature of 165°F (75°C). Bang Bang Chicken pairs well with many sides. Here are some great options: - Jasmine rice for a filling meal - Shredded lettuce for a fresh crunch - Steamed broccoli or green beans for a healthy touch - Dipping sauces like extra sweet chili or soy sauce for added flavor For the full recipe, check out the Air Fryer Bang Bang Chicken. This blog covered all you need for Air Fryer Bang Bang Chicken. We explored main ingredients like chicken and buttermilk. You learned marinating and dredging techniques for crispiness. We reviewed tips to enhance flavor and ideas for serving. Variations provide choices for health and protein type. Storing leftovers and reheating methods help keep your meal fresh. Now, you’re ready to create this tasty dish. Enjoy the crunch and the zing of the Bang Bang sauce!](https://tossedflavors.com/wp-content/uploads/2025/07/68f8025d-b25a-4930-81a1-f9b848c6faf1.webp)
Air Fryer Bang Bang Chicken Crispy and Flavorful Dish
Get ready to elevate your dinner game with Air Fryer Bang Bang Chicken! This crispy, flavorful dish will have your taste buds dancing in delight.
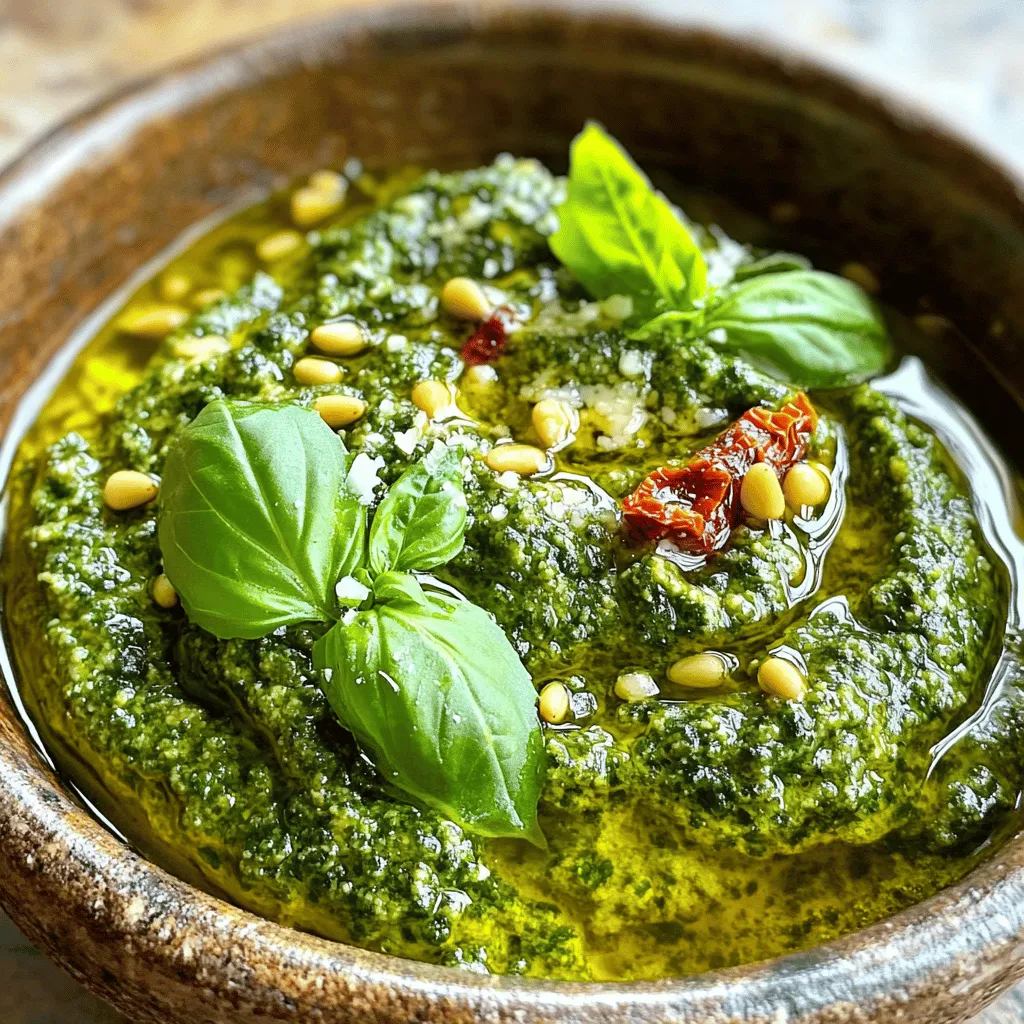
Tomato Pesto Recipe Simple and Flavorful Guide
Are you ready to elevate your meals with a burst of flavor? My simple Tomato Pesto recipe packs fresh, vibrant ingredients into every bite. I’ll