Appetizers

- 1 pound ground beef or turkey - 1/2 cup breadcrumbs - 1/4 cup grated Parmesan cheese - 1/4 cup chopped green onions - 1 egg - 2 cloves garlic, minced - 1 teaspoon ginger, grated - Salt and pepper to taste For these meatballs, you can choose ground beef for a richer taste or turkey for a lighter option. The breadcrumbs help bind the meatballs, while Parmesan adds flavor. Green onions give a fresh crunch, and garlic adds depth. Don't forget the ginger for that extra zing! - 1/4 cup honey - 1/4 cup Sriracha sauce - 1 tablespoon soy sauce - Sesame seeds for garnish The glaze is where the magic happens. Honey adds sweetness, while Sriracha brings heat. Soy sauce adds a rich umami flavor. Once you mix these, you'll have a sticky, shiny glaze that will coat the meatballs perfectly. For a finishing touch, sprinkle sesame seeds on top for a nice crunch and look. {{ingredient_image_1}} First, set your oven to 400°F (200°C). This heat helps the meatballs cook evenly. Next, line a baking sheet with parchment paper. This step makes cleaning easy and keeps the meatballs from sticking. In a large bowl, add the ground beef or turkey. Then, mix in the breadcrumbs and grated Parmesan cheese. Add the chopped green onions, minced garlic, and grated ginger for flavor. Crack the egg into the bowl, then sprinkle in salt and pepper. Use your hands to mix everything until it is well combined. Be sure not to overmix; just combine until it holds together. Now it’s time to form the meatballs. Roll the mixture into small balls, about 1 inch wide. Place them on the lined baking sheet, leaving some space between each meatball. Bake in the oven for 20-25 minutes. Look for a nice golden color, and make sure they are cooked through. While the meatballs bake, prepare your glaze. In a small saucepan, whisk together the honey, Sriracha sauce, and soy sauce. Heat this mixture over medium heat. Let it simmer for about 3-5 minutes. You want it to thicken slightly but not too much. Stir it often to keep it from burning. When the meatballs are done, take them out of the oven. Toss them in the Sriracha honey glaze until they are fully coated. If you want them extra caramelized, put them back in the oven. Broil them for 2-3 minutes. This step adds more flavor and a nice finish. Finally, sprinkle sesame seeds on top and add more green onions for a pop of color. Enjoy your tasty meatballs! You can make simple swaps for a lighter meal. - Choose ground turkey instead of beef for fewer calories. - Use gluten-free breadcrumbs if you want to avoid gluten. These changes keep the dish tasty while making it healthier. Texture and flavor matter. Follow these tips: - Mix the meatballs gently. Over-mixing makes them tough. - Use grated cheese for flavor and moisture. - Bake for 20 to 25 minutes until golden brown. Check with a meat thermometer; they should reach 165°F. Adjust baking time if your meatballs are larger or smaller. Getting the glaze just right is key. - Cook the glaze on medium heat. This helps it thicken nicely. - Simmer it for 3 to 5 minutes until it coats the back of a spoon. - Toss the meatballs in the glaze right after baking. This gives them a nice, even coat. For a shiny finish, broil the glazed meatballs for a few minutes. Pro Tips Use Fresh Ingredients: Fresh garlic and ginger will enhance the flavor of your meatballs significantly. Avoid using pre-minced versions for the best taste. Adjust Spice Levels: If you prefer a milder glaze, reduce the amount of Sriracha or add a bit more honey to balance the heat. Rest Before Serving: Allow the meatballs to rest for a few minutes after glazing to let the sauce set and intensify the flavors. Experiment with Proteins: Try substituting ground beef with ground chicken, turkey, or even plant-based meat alternatives for a healthier or vegetarian option. {{image_2}} You can make Sriracha honey glazed meatballs even more exciting. Try adding spices or herbs. For a twist, mix in some cumin or smoked paprika. This adds warmth and depth to the flavor. Fresh herbs like cilantro or basil can brighten the dish. These small changes can transform your meatballs into something unique. You do not have to stick with beef. You can use chicken or turkey for a lighter meal. Ground pork adds a nice richness too. For a plant-based option, use lentils or chickpeas. Just mash them and mix them with the other ingredients. This makes a delicious and hearty meatball. How you serve these meatballs can change the meal. You can pair them with rice or noodles for a filling dish. Serve with a side of steamed veggies for a healthy touch. Dipping sauces like sweet chili or soy sauce add extra flavor. You can also use them in a sandwich for a fun twist. To store leftovers, let the meatballs cool first. Place them in an airtight container. You can keep them in the fridge for up to three days. If you want to save them longer, freeze the meatballs. Use freezer-safe bags or containers. They will last for about three months in the freezer. Label the bags with the date. This way, you won’t forget when you made them. For reheating, the best method is the oven. Preheat it to 350°F (175°C). Place the meatballs on a baking sheet. Cover them with foil to keep them moist. Heat for about 10-15 minutes. You can also use a microwave if you’re in a hurry. Place the meatballs on a microwave-safe plate. Heat in short bursts of 30 seconds, checking in between. Add a splash of water to keep them from drying out. Sriracha honey glazed meatballs stay safe in the fridge for three days. If frozen, they are good for three months. After that, they may lose flavor and texture. Always check for any off smell or color before eating. Enjoy your meatballs while they're fresh for the best taste! Yes, you can prepare these meatballs ahead of time. Just mix and shape the meatballs, then store them in the fridge for up to 24 hours. When you are ready to cook, place them on the baking sheet and bake as directed. If you want to freeze them, do so before baking. Just thaw them in the fridge overnight before cooking. This way, you can enjoy fresh meatballs with less effort on busy days. The spice level of these meatballs can vary based on your taste. Sriracha is hot, but you can adjust the amount. If you prefer milder meatballs, start with less Sriracha, maybe just a tablespoon. You can always add more glaze after cooking. For those who love spice, feel free to add more Sriracha to the glaze. This dish is all about your preference! There are many fun ways to serve Sriracha honey glazed meatballs. You can place them on a platter and sprinkle sesame seeds on top. They pair well with rice, noodles, or even a fresh salad. You can also serve them as party snacks with toothpicks. For a fun twist, try them in a sandwich or on a slider. The glaze makes them shine, making any plate look great! Sriracha honey glazed meatballs are tasty and easy to make. You learned about key ingredients, how to prepare and bake them, and ways to modify the recipe. I shared tips for healthy swaps and storing leftovers. Experimenting with flavors and proteins can add fun to your meals. These meatballs are not just a snack; they pair well with many sides. Now, it’s time to try making them yourself! Enjoy delicious meatballs that will impress your family and friends.
Sriracha Honey Glazed Meatballs Flavorful and Easy Dish
Are you ready to spice up your dinner routine? Sriracha Honey Glazed Meatballs offer a delightful mix of sweet and spicy flavors that you can
To make Lemon Garlic Butter Scallops, you need a few simple ingredients. Here’s what you’ll need: - 1 pound sea scallops, patted dry - 4 tablespoons unsalted butter - 3 cloves garlic, minced - Juice and zest of 1 lemon - 2 tablespoons fresh parsley, chopped - Salt and pepper to taste - Lemon wedges for serving Each ingredient plays a key role in creating a rich taste. The sea scallops are the star. They should be fresh and dry to get that perfect sear. The unsalted butter adds a creamy flavor, while garlic gives it a nice kick. Lemon juice and zest bring brightness, balancing the richness. Fresh parsley adds color and a fresh taste. Don’t forget salt and pepper; they enhance all the flavors. Serve with lemon wedges to add a zesty touch at the end. Gathering these ingredients is easy. You can find them in any grocery store. Having everything ready makes cooking smooth and fun. Enjoy the process, and get ready for a tasty meal! {{ingredient_image_1}} Start by ensuring the scallops are dry. This step is key for a good sear. I pat them dry with a paper towel. Next, I season the scallops with salt and pepper. A light sprinkle on both sides is enough. In a large skillet, I melt 2 tablespoons of butter over medium-high heat. Once the butter sizzles and foams, I add the scallops. I make sure not to overcrowd the pan. I cook them for 2-3 minutes without moving them. This helps form a golden crust. Then, I flip them carefully and check for doneness. They should cook for another 2-3 minutes until they are opaque. Once done, I transfer the scallops to a plate and cover them to keep warm. In the same skillet, I add the remaining 2 tablespoons of butter and minced garlic. I sauté the garlic for about 1 minute until it gets fragrant. I am careful not to burn it. Then, I add the lemon juice and zest, stirring to combine. I let the sauce simmer for 1-2 minutes to blend the flavors. Finally, I return the scallops to the skillet. I gently coat them in the lemon garlic butter sauce. This adds a bright, zesty flavor to the dish. To sear scallops well, start with dry scallops. Pat them with a paper towel. Dry scallops will get a nice crust. If they are wet, they will steam instead of sear. Space is key too. Do not overcrowd the pan. This way, the heat stays high, and your scallops cook evenly. To boost the flavor, try adding fresh herbs. Thyme or basil works great. You can also sprinkle in some red pepper flakes for heat. A dash of smoked paprika adds depth. Feel free to experiment with your favorite spices. When serving, use a nice plate. Arrange the scallops in a circle or in a line. Drizzle the sauce over them for a glossy look. Garnish with fresh parsley and lemon wedges. This adds color and freshness to your dish. Enjoy your beautiful creation! Pro Tips Dry Scallops for Perfect Sear: Ensure your scallops are patted dry before cooking. Moisture will prevent them from searing properly and developing a golden crust. Use High Heat: Cooking scallops on medium-high heat is essential. This helps achieve that beautiful caramelization on the outside while keeping the inside tender. Don’t Overcrowd the Pan: Give your scallops space in the skillet. Overcrowding will lower the temperature of the pan and lead to steaming instead of searing. Finishing Touch with Parsley: Stir in fresh parsley at the end for a burst of color and flavor. It enhances the dish and adds a fresh, aromatic note. {{image_2}} You can swap butter for olive oil for a lighter option. Olive oil adds a nice flavor, too. For a dairy-free choice, avocado oil works well. Try different seasonings like thyme or rosemary for a twist. You can also add red pepper flakes for some heat. If you want to serve more people, it’s easy to scale up this dish. Just double or triple the ingredients. Keep the same cooking time, but you may need a bigger pan. Cook in batches if your skillet can’t hold all the scallops at once. This helps them sear nicely. Pair your scallops with fresh sides. A simple green salad adds a nice crunch. You can also serve them with garlic bread to soak up the sauce. Roasted asparagus or sautéed spinach make great sides, too. For a heartier meal, try them with creamy risotto or pasta. To keep your lemon garlic butter scallops fresh, store them in an airtight container. Place the container in the fridge within two hours of cooking. They will stay good for up to two days. Make sure to separate the scallops from the sauce if possible. This way, they won’t get too soggy. When reheating scallops, the goal is to keep them tender. You can use a skillet or microwave. For the skillet, add a little butter or oil and heat on low. Cook for about 2-3 minutes until warmed through. In the microwave, heat them in short bursts of 30 seconds, checking often. This keeps them from overcooking. While I recommend eating scallops fresh, you can freeze them if needed. Place the scallops in a single layer on a baking sheet. Freeze until solid, then transfer them to a freezer-safe bag. They can last for up to three months. To thaw, place them in the fridge overnight or run them under cold water. Avoid using a microwave for thawing, as it may cook them unevenly. Scallops should cook for about 4 to 6 minutes total. Start with 2 to 3 minutes on one side. When they turn golden brown, flip them. Cook for another 2 to 3 minutes. You want them opaque and firm. If they are overcooked, they become rubbery. Yes, you can use frozen scallops. Make sure to thaw them first. Place them in the fridge overnight or run cold water over them. Frozen scallops need a little more cooking time. They might also release more water, so dry them well before cooking. Lemon Garlic Butter Scallops pair well with many sides. Try serving them with: - Garlic mashed potatoes - Steamed asparagus - Fresh salad with lemon vinaigrette - Crusty bread to soak up the sauce For drinks, a crisp white wine or sparkling water enhances the meal. This post gave you a clear guide to making Lemon Garlic Butter Scallops. We covered the ingredients, cooking steps, and tips for perfect scallops. I shared ideas for variations and storage methods too. Now, you can impress your family and friends with this dish. Follow these steps, and enjoy the fresh flavors. Cooking can be fun and easy with the right tools and tips! Enjoy your meal!
Lemon Garlic Butter Scallops Quick and Flavorful Meal
Are you ready to impress your taste buds? Lemon Garlic Butter Scallops are quick, easy, and full of flavor. With just a few ingredients, you
- 2 ripe avocados - 1 ripe mango, diced - 1 small red onion, finely chopped - 1-2 small jalapeños, deseeded and minced - 2 tablespoons fresh lime juice - 1 garlic clove, minced - Salt and pepper to taste - 2 tablespoons fresh cilantro, chopped - Optional: tortilla chips for serving The key to amazing Spicy Mango Guacamole lies in its fresh ingredients. Start with two ripe avocados. They should be slightly soft to the touch. Next, choose a ripe mango. It adds sweetness and a lovely texture. The red onion adds a nice crunch. Use a small one for a milder flavor. For heat, use one or two small jalapeños. Be sure to remove the seeds to control the spice. The fresh lime juice brightens the dish. It also helps keep the avocado from browning. Minced garlic brings in a strong, savory taste. Make sure to season with salt and pepper. This step enhances all the flavors. Finally, fresh cilantro adds a burst of freshness. You can serve this guacamole with crispy tortilla chips. They make a great pairing to scoop up all that flavor! {{ingredient_image_1}} 1. Cutting and scooping avocados: Start by cutting the avocados in half. Remove the pit carefully. Use a spoon to scoop the flesh into a mixing bowl. You want to get every bit of that creamy avocado goodness. 2. Mashing to desired creaminess: Grab a fork or a potato masher. Mash the avocado to your liking. If you want it smooth, keep mashing. If you prefer chunks, stop when you get small pieces. 3. Mixing in additional ingredients: Now it’s time to add flavor! Toss in the diced mango, chopped red onion, and minced jalapeños. Make sure to mix it well but gently, so the mango stays nice and chunky. - How to fold ingredients without over-mashing: Use a spatula to gently fold in the ingredients. This keeps everything combined without turning the mango mushy. You want to see those bright yellow mango pieces! - Adjusting seasoning as needed: After mixing, give it a taste. Add salt and pepper to your liking. If you want it zesty, squeeze in more lime juice. Adjust until it sings with flavor! - Presentation tips for serving: Serve your spicy mango guacamole in a fun bowl. A colorful dish can make it pop! - Garnishing suggestions: Top it off with extra chopped cilantro for a fresh look. You can also add a few thin slices of jalapeño for a spicy kick. Serve with crispy tortilla chips on the side for the perfect crunch! When making guacamole, the right avocados are key. Look for avocados that yield slightly when pressed. This means they're ripe and ready to use. Avoid hard ones, as they won’t mash well. For the mango, pick one that is soft but not mushy. A ripe mango should feel gentle when you press it. This will add a sweet touch to your guacamole. To change the heat of your guacamole, adjust the jalapeño amount. Start with one jalapeño if you want less heat. You can always add more if needed. If you prefer a different heat source, consider using diced serrano peppers or a splash of hot sauce. Want to jazz up your guacamole? Add extra ingredients like diced tomatoes or corn for crunch. You can also mix in a dash of cumin for warmth. Balancing sweetness and spice is key. The mango's sweetness should shine but not overpower the other flavors. Taste often and adjust as needed. Pro Tips Choose Ripe Avocados: Make sure your avocados are ripe for the best flavor and creaminess. They should yield slightly to gentle pressure when squeezed. Adjust Spice to Taste: Start with one jalapeño and taste before adding more. You can always add extra heat, but it's hard to take it out! Fresh Lime Juice is Key: Use fresh lime juice instead of bottled for a brighter and more vibrant flavor in your guacamole. Store Properly: If you need to store leftover guacamole, press plastic wrap directly onto the surface to minimize oxidation and browning. {{image_2}} You can switch up the fruits in your guacamole. Try using pineapple for a tropical twist. Blueberries add a nice pop of flavor, too. Consider adding diced peaches for a sweet touch. For herbs, you can use parsley instead of cilantro. Mint gives a fresh note. If you want more spice, add a pinch of cayenne or smoked paprika. These swaps keep your guacamole exciting. This recipe is already vegan and gluten-free. Use fresh lime juice for flavor without added sodium. For low-sodium adjustments, skip the salt or use a salt substitute. You can also add diced bell peppers for crunch. They are low in sodium and add color. This makes your guacamole healthy and tasty. Spicy mango guacamole pairs well with many dishes. Serve it with grilled chicken or fish for a burst of flavor. It also goes great with tacos or burritos. You can use guacamole as a topping for salads or baked potatoes. It makes any meal special. Try it on toast for a quick snack. The options are endless! To keep your guacamole fresh, use an airtight container. Glass or plastic containers both work well. Press plastic wrap directly on the guacamole's surface. This helps keep air out and stops browning. Guacamole lasts about 2 to 3 days in the fridge. Look for signs of spoilage. If it turns brown or develops a sour smell, it’s time to let it go. You can freeze guacamole! Use a freezer-safe container for best results. When you’re ready to eat it, thaw it in the fridge overnight. Stir well before serving to restore its creamy texture. What is the best avocado for guacamole? Hass avocados are the best choice for guacamole. They are creamy and rich. Their flavor is smooth and buttery. Look for ones that yield slightly when you press them. Can I make this recipe in advance? Yes, you can make it ahead of time. Store it in an airtight container. Add a layer of lime juice on top to help prevent browning. It stays fresh for about one day. How can I make it less spicy? To reduce heat, use fewer jalapeños. You can also remove the seeds and membranes. These parts contain most of the spice. Another option is to add more mango for sweetness. Caloric content per serving Each serving of Spicy Mango Guacamole contains about 150 calories. This may vary based on ingredient amounts. Key nutritional benefits of ingredients - Avocados offer healthy fats and fiber. - Mango adds vitamins A and C. - Red onion provides antioxidants. - Jalapeños can boost metabolism. - Cilantro has detoxifying properties. Other ways to enjoy guacamole You can use guacamole as a sandwich spread. It also makes a great topping for tacos or burritos. Try it in salads for a fresh twist. Creative serving ideas beyond tortilla chips Serve guacamole with veggie sticks like carrots or cucumbers. You can also pair it with pita chips or crackers. For a fun treat, use it as a dip for sweet potato fries. In summary, we explored how to make spicy mango guacamole with fresh ingredients. We found tips for preparation, mixing, and serving to boost flavor. You can adjust spice levels and make variations to suit your taste. Storage tips help keep your guacamole fresh longer. Overall, this recipe offers a fun, healthy option for snacks or meals. Enjoy your culinary adventure and impress friends with your tasty guacamole!
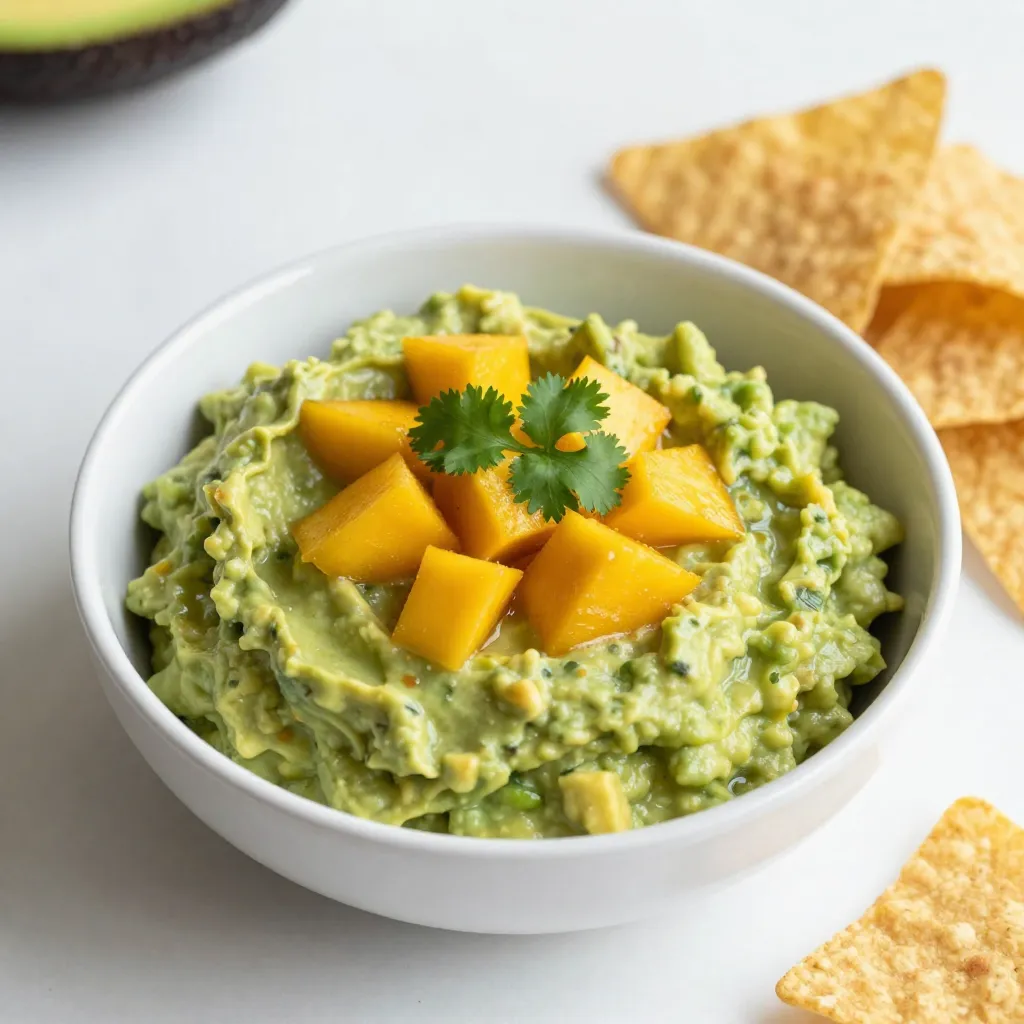
Spicy Mango Guacamole Flavors That Amaze Your Tastebuds
Ready for a flavor explosion? My Spicy Mango Guacamole combines creamy avocados with sweet mango and a kick of heat. This fresh dip will take
To make crispy coconut chicken tenders, gather these key ingredients: - 1 lb chicken tenders - 1 cup all-purpose flour - 2 large eggs - 1 cup shredded coconut (sweetened or unsweetened) - 1 cup panko breadcrumbs - 1 teaspoon garlic powder - 1 teaspoon onion powder - 1 teaspoon paprika - 1 teaspoon salt - 1/2 teaspoon black pepper - 1/4 teaspoon cayenne pepper (optional for heat) - 1/2 cup vegetable oil (for frying) - Fresh lime wedges (for serving) These ingredients work together to create a crunchy and flavorful dish. The chicken tenders provide the protein base, while the breading gives that satisfying crunch. Sometimes, you may not have all the ingredients. Here are some easy swaps: - Use almond flour instead of all-purpose flour for a gluten-free option. - Swap eggs with a flaxseed mixture (1 tablespoon flaxseed meal + 2.5 tablespoons water) for a vegan option. - Use sweetened coconut if you like a sweeter flavor, or unsweetened for a more savory taste. These substitutions keep the dish tasty and allow you to cater to dietary needs. Want to change things up? Consider adding these optional ingredients: - Fresh herbs like cilantro or parsley for a fresh taste. - A squeeze of lime juice right before serving to brighten the flavors. - A pinch of curry powder for a unique twist. These additions can enhance the dish and make it your own. Enjoy experimenting with flavors! {{ingredient_image_1}} To start, you need three shallow dishes. In the first dish, mix 1 cup of flour with garlic powder, onion powder, paprika, salt, black pepper, and cayenne pepper. This mix adds great flavor. In the second dish, whisk two large eggs until they are smooth. The eggs help the coating stick to the chicken. In the third dish, combine 1 cup of shredded coconut with 1 cup of panko breadcrumbs. This mix creates a crunchy coating. Take one chicken tender and dip it into the flour mix. Make sure it is fully coated. Then, shake off the extra flour. Next, dip the floured chicken into the beaten eggs. Let any extra egg drip off. Finally, press the chicken into the coconut-panko mix, ensuring it is well covered. Repeat this for all chicken tenders. This process makes the chicken extra crispy. Heat 1/2 cup of vegetable oil in a large skillet over medium-high heat. To check if the oil is ready, drop in a breadcrumb. If it sizzles, you are good to go. Carefully add the breaded chicken tenders to the hot oil. Fry them in batches. This keeps them from sticking together. Cook each side for about 4-5 minutes, or until they are golden brown. Use a meat thermometer to check that the chicken reaches 165°F (75°C). Once cooked, transfer the chicken to a paper towel-lined plate to drain excess oil. Serve them warm with fresh lime wedges for a tasty touch. To get that crunchy bite, use panko breadcrumbs. They add a great crunch. Mix them with shredded coconut for extra flavor. You want to coat the chicken well. Press the mixture on firmly. This helps it stick during frying. Heat your oil to medium-high. This keeps the chicken crispy. If the oil is too cool, the tenders will soak up oil. Test the oil by dropping in a breadcrumb. If it bubbles, the oil is ready. Fry in small batches. This prevents crowding and ensures even cooking. Cook for about 4-5 minutes on each side. Use a meat thermometer to check for doneness. The internal temperature should reach 165°F (75°C). Serve your coconut chicken tenders with fresh lime wedges. The lime adds a nice zesty flavor. You can also add a sprinkle of fresh herbs like cilantro or parsley. This not only looks pretty but adds fresh taste. For a fun twist, try a dipping sauce like sweet chili or honey mustard. Pro Tips Use Fresh Ingredients: Always opt for fresh chicken and high-quality coconut for the best flavor and texture in your tenders. Control the Oil Temperature: Maintaining the right oil temperature is crucial; too hot and the outside will burn before the inside cooks, too cool and they'll absorb oil and become greasy. Experiment with Flavors: Feel free to add your favorite spices to the flour mixture to customize the flavor profile to your liking. Serve with Dipping Sauce: Pair your crispy coconut chicken tenders with a tangy dipping sauce like sweet chili or mango salsa for an extra burst of flavor. {{image_2}} If you want a lighter option, try baking the chicken tenders. Preheat your oven to 400°F (200°C). Line a baking sheet with parchment paper. Follow the same breading steps, then place the tenders on the sheet. Spray them lightly with cooking oil. Bake for about 20-25 minutes, flipping halfway through. This method gives you crispy tenders with less oil. To spice things up, add more flavor to your tenders. Mix cayenne pepper or chili powder into the flour mixture. You can also add some hot sauce to the eggs for extra heat. For a sweet twist, try a dash of honey mixed into the egg wash. These small changes make a big difference in taste! If you need a gluten-free version, swap out the flour and panko. Use gluten-free all-purpose flour and gluten-free breadcrumbs. Make sure to check the labels, as some coconut brands may add gluten. This way, everyone can enjoy crispy coconut chicken tenders without worry! After enjoying your crispy coconut chicken tenders, store any leftovers in an airtight container. I suggest letting them cool to room temperature first. Keep them in the fridge for up to three days. This way, they stay fresh and tasty for your next meal. To reheat your chicken tenders, use an oven for the best results. Preheat the oven to 375°F (190°C). Place the tenders on a baking sheet. Heat them for about 10-15 minutes. This warms them through and keeps them crispy. You can also use a toaster oven if you don’t want to heat the big oven. Avoid the microwave, as it can make them soggy. If you want to save some for later, freezing is a great option. First, let the chicken tenders cool completely. Arrange them in a single layer on a baking sheet and freeze for about an hour. Once frozen, transfer them to a freezer bag. Be sure to remove as much air as you can. They can stay in the freezer for up to two months. When you're ready to eat them, thaw in the fridge overnight before reheating. You can tell if chicken tenders are cooked by checking their color and texture. The outside should be golden brown and crispy. The best way to check is with a meat thermometer. Insert it into the thickest part of the chicken. It should read 165°F (75°C) to be safe to eat. If you don’t have a thermometer, cut one open. The meat should be white and the juices should run clear. Yes, you can use frozen chicken tenders. Thaw them first in the fridge to ensure even cooking. If you fry them straight from the freezer, they may not cook evenly. This can lead to a soggy texture. Always make sure the internal temperature reaches 165°F (75°C) to keep it safe. Coconut chicken tenders go well with many sauces. Here are some tasty options: - Sweet chili sauce adds a nice kick. - Honey mustard gives a sweet and tangy flavor. - BBQ sauce offers a smoky taste. - A lime cilantro sauce brings freshness. - Spicy mayo gives a creamy, spicy twist. Feel free to mix and match until you find your favorite! This blog post covers how to make great coconut chicken tenders. We looked at ingredients, including main and optional ones. We also shared step-by-step instructions for coating and frying. You learned tips for crispy texture and best frying methods. We explored fun variations, like oven baking and flavor changes. Lastly, you discovered storage tips and answers to common questions. Enjoy your delicious tenders! With practice, you’ll make them just right every time. Now, go ahead and create your own tasty version!
Crispy Coconut Chicken Tenders Easy and Tasty Recipe
Craving a fun and tasty meal? You’ve found it! Crispy Coconut Chicken Tenders are easy to make and burst with flavor. This recipe guarantees a
For these tasty teriyaki meatballs, you can use ground chicken or turkey. Both options are lean and pack great flavor. I prefer ground chicken for its juicy texture. However, turkey is just as good and healthy. Aromatic ingredients make this dish shine. You will need: - 1/4 cup breadcrumbs - 1/4 cup green onions, chopped - 1 clove garlic, minced - 1 teaspoon ginger, freshly grated These add depth and a wonderful smell to the meatballs. The green onions give a nice crunch. Garlic and ginger add warmth and zest. To create that delicious teriyaki flavor, gather these sauces: - 1/4 cup soy sauce (low-sodium) - 2 tablespoons honey - 2 tablespoons rice vinegar - 1 tablespoon sesame oil - 1 teaspoon cornstarch mixed with 1 tablespoon water (for thickening) The soy sauce offers saltiness, while honey brings sweetness. Rice vinegar adds a tangy kick, and sesame oil gives a nutty aroma. The cornstarch helps the sauce thicken perfectly. Garnishes enhance the presentation and taste. For this recipe, I suggest: - Sesame seeds - Additional chopped green onions Sprinkling sesame seeds gives a nice crunch. Extra green onions add freshness and color. These little touches make your lettuce boats look and taste gourmet! {{ingredient_image_1}} To start, grab a large mixing bowl. Add 1 pound of ground chicken or turkey. Next, toss in 1/4 cup of breadcrumbs. Then, chop 1/4 cup of green onions and add them to the bowl. Don't forget to mince 1 clove of garlic and grate 1 teaspoon of ginger. Mix all these ingredients together until they are well combined. It should look evenly mixed and feel sticky. Now, form this mixture into small meatballs, about 1 inch wide. This size helps them cook evenly. Heat a large skillet over medium heat. Add a drizzle of olive oil to the pan. When the oil is hot, gently place the meatballs in the skillet. Cook them for about 8 to 10 minutes. Remember to turn them occasionally. You want them to be golden brown and fully cooked. Once they are done, remove them from the skillet and set them aside on a plate. In the same skillet, lower the heat. Pour in 1/4 cup of soy sauce, 2 tablespoons of honey, 2 tablespoons of rice vinegar, and 1 tablespoon of sesame oil. Stir the mixture well and let it come to a simmer. This will take just a couple of minutes. Once it simmers, add 1 teaspoon of cornstarch mixed with 1 tablespoon of water. Stir continuously until the sauce thickens. This should only take about 1 to 2 minutes. Now it’s time to bring it all together! Return the cooked meatballs to the skillet. Gently toss them in the thickened teriyaki sauce until they are well coated. Cook for an additional 2 to 3 minutes to let the flavors blend. To serve, take a leaf from a head of butter lettuce. Place a few teriyaki meatballs inside each leaf. If you like, drizzle with extra teriyaki sauce. Finish with a sprinkle of sesame seeds and some chopped green onions for a pop of color and taste. Enjoy your fresh and flavorful meal! To make juicy meatballs, use ground chicken or turkey. Lean meat keeps it moist. Add breadcrumbs to the mix; they help hold in moisture. Don't overwork the meat when mixing. Form the meatballs gently, about 1 inch in size. Cook them in a hot skillet to get a nice crust. This helps seal in the juices. Let them rest briefly after cooking. This keeps them tender and juicy. Butter lettuce is the best choice for these boats. Its leaves are soft and wide, perfect for holding meatballs. Romaine is another option; it has a nice crunch. Avoid crispy lettuce types like iceberg. They can break easily under the weight of the filling. Choose fresh, green leaves for a great presentation and taste. Store any leftover meatballs and sauce in an airtight container. Keep them in the fridge for up to three days. If you have extra lettuce, keep it separate. Wrap lettuce leaves in a damp paper towel for freshness. You can freeze meatballs, too. Just make sure they cool completely. Place them in freezer bags for up to three months. Reheat them gently in a skillet or microwave. This keeps their flavor and texture. Pro Tips Use Fresh Ingredients: The flavor of your meatballs will significantly improve with the use of fresh garlic and ginger. Opt for freshly grated ginger instead of powdered for a vibrant taste. Don’t Overcrowd the Skillet: When cooking the meatballs, ensure there’s enough space in the skillet. Overcrowding can cause them to steam rather than brown, affecting both texture and flavor. Garnish Generously: Adding sesame seeds and extra green onions not only enhances the visual appeal of your dish but also adds a delightful crunch and fresh flavor. Serve Immediately: For the best experience, serve the lettuce boats right after assembling. The lettuce will retain its crispness, making each bite refreshing and enjoyable. {{image_2}} You can switch the ground chicken or turkey for other meats. Ground beef or pork works well too. If you want lighter options, try ground lamb or bison. Each meat gives a unique taste. Just remember, cooking times may change based on the meat you choose. For a vegetarian or vegan choice, use plant-based meat. Products like lentils, chickpeas, or black beans are great. You can mash them and add breadcrumbs for texture. Mix in some minced veggies for extra flavor. This way, you still enjoy the tasty teriyaki sauce while keeping it plant-based. While teriyaki sauce is a classic, you can try other sauces too. Sweet and sour sauce adds a nice tang. Hoisin sauce gives a rich flavor. For a spicy kick, use sriracha mixed with soy sauce. Each sauce changes the dish while keeping it fresh and fun. Explore different flavors to find your favorite! To keep your teriyaki meatball lettuce boats fresh, store them in the fridge. Place the meatballs in an airtight container. Wrap the lettuce leaves in a damp paper towel. This helps them stay crisp. The meatballs will last for about 3 days. Enjoy them cold or reheated. You can freeze the meatballs for later use. First, let them cool completely. Then, place them in a freezer-safe bag. Squeeze out the air before sealing. The meatballs will stay good for about 3 months. When ready to eat, thaw them in the fridge overnight. To reheat, warm the meatballs in a skillet over low heat. Add a splash of water or sauce to keep them moist. Stir them gently until they are heated through. You can also use the microwave. Heat in short intervals, stirring in between for even warmth. Serve with fresh lettuce leaves for a great meal! Yes, you can. Ground beef, pork, or lamb work great in this recipe. Each type brings its own flavor. If you want a leaner option, go for ground turkey or chicken, as I often do. Mixing different meats can add depth and variety. Just remember to adjust cooking times if needed. To make it gluten-free, use gluten-free breadcrumbs. You can also swap soy sauce for tamari, which is gluten-free. Always check labels to ensure your ingredients are safe. This way, everyone can enjoy the teriyaki meatball lettuce boats without worry. These boats are a great meal on their own. However, you can pair them with rice or quinoa for extra carbs. Steamed veggies like broccoli or snap peas add color and nutrients. For a refreshing touch, serve a side salad with sesame dressing. Leftovers can last up to three days in the fridge. Store them in an airtight container to keep them fresh. You can also freeze leftovers for up to a month. Just reheat in a skillet or microwave when you're ready to eat again. This blog post covered how to make tasty Teriyaki Meatball Lettuce Boats. We explored ground meat options, aromatic ingredients, sauces, and garnishes. I shared step-by-step cooking methods and gave tips for juicy meatballs. We also discussed variations for different diets, storage guidelines, and answered common questions. In simple terms, try new flavors and ingredients to create your favorite version. Enjoy these fun and healthy bites!
Teriyaki Meatball Lettuce Boats Flavorful and Fresh Meal
Craving a meal that’s quick, fresh, and packed with flavor? Look no further! These Teriyaki Meatball Lettuce Boats are the perfect choice for a tasty,
To make these herb grilled vegetable skewers, you need a mix of colorful veggies: - 1 zucchini, sliced into rounds - 1 bell pepper (red, yellow, or green), cut into chunks - 1 red onion, cut into wedges - 1 cup cherry tomatoes - 1 cup mushrooms, halved These veggies not only taste great but also look beautiful on the grill. The zucchini adds a nice softness, while the bell pepper brings a sweet crunch. The red onion provides a sharp contrast, and the cherry tomatoes add a burst of juicy flavor. Don't forget the mushrooms; they soak up the marinade and deliver a savory bite. To create a flavorful marinade, gather these simple ingredients: - 2 tablespoons olive oil - 2 cloves garlic, minced - 1 teaspoon dried oregano - 1 teaspoon dried thyme - 1 teaspoon dried basil - Salt and pepper, to taste This marinade is where the magic happens! The olive oil helps the veggies cook nicely while keeping them moist. Garlic adds a punch of flavor, and the herbs bring depth. You can adjust the salt and pepper to match your taste. Mixing these together creates a fragrant blend that will coat your veggies perfectly. You will also need the following to assemble your skewers: - Skewers (wooden or metal) - Fresh herbs for garnish If you use wooden skewers, make sure to soak them in water first. This prevents them from burning on the grill. Fresh herbs, like basil or parsley, make a lovely garnish. They not only look good but also add extra flavor. Now that you have your ingredients ready, you're set to create a tasty meal! {{ingredient_image_1}} First, if you use wooden skewers, soak them in water for 30 minutes. This helps prevent them from burning on the grill. While they soak, wash and cut your vegetables. Slice the zucchini into rounds. Cut the bell pepper into chunks and the red onion into wedges. Halve the cherry tomatoes and mushrooms. Make sure all pieces are about the same size. This helps them cook evenly. In a large bowl, mix 2 tablespoons of olive oil, 2 minced garlic cloves, 1 teaspoon of dried oregano, 1 teaspoon of dried thyme, and 1 teaspoon of dried basil. Add salt and pepper to taste. Stir well to combine. Add your chopped vegetables into the bowl. Toss everything together until the veggies are well coated with the marinade. Let them sit for 15 to 20 minutes. This allows the flavors to soak in. Preheat your grill to medium-high heat. While it heats, thread the marinated vegetables onto the skewers. Alternate the veggies for a colorful look. Once the grill is hot, place the skewers on it. Grill for 10 to 12 minutes. Turn them occasionally to get nice grill marks. The veggies should become tender and tasty. After grilling, take them off the heat and let them rest for a couple of minutes. You can sprinkle some fresh herbs on top before serving. To get the best taste from your herb grilled vegetable skewers, marinate the veggies for at least 15-20 minutes. This time helps the vegetables soak up the flavors from the marinade. You can adjust the seasoning based on your taste. If you like it spicy, add red pepper flakes. For a sweeter flavor, use more bell peppers or add a pinch of sugar. To prevent burning, soak wooden skewers in water for 30 minutes before grilling. This step keeps them from catching fire. When grilling, keep the heat at medium-high. Turn the skewers every few minutes for even cooking. This way, all sides get those lovely grill marks and stay tender. If you notice any veggies browning too fast, move them to a cooler part of the grill. For a stunning presentation, serve the skewers on a large platter. You can garnish them with fresh herbs like basil or parsley. Add a side of dipping sauce, like tzatziki or balsamic glaze, for extra flavor. This not only looks great but also invites your guests to enjoy the skewers in a fun way. Pro Tips Soak Wooden Skewers: Make sure to soak wooden skewers in water for at least 30 minutes prior to grilling to prevent them from burning on the grill. Marinate for Flavor: Allow the vegetables to marinate for 15-20 minutes to enhance their flavor and ensure they absorb the herbs and spices. Veggie Size Matters: Cut vegetables into uniform sizes to ensure even cooking and optimal grill marks. Rest Before Serving: Let the skewers rest for a couple of minutes after grilling to allow the juices to redistribute, enhancing the texture and flavor. {{image_2}} You can change up the veggies for fun flavors. Try seasonal vegetables for a fresh taste. Use asparagus, eggplant, or even sweet corn. Each season brings new options. Think about what veggies are at your local market. Different colors make your skewers pop. This not only looks good but tastes great too. Want to make your skewers heartier? Add proteins like chicken or shrimp. Cut them into small pieces for easy grilling. Tofu is a great choice for vegetarians. Simply marinate it with the same mix. This adds protein and keeps it filling. You can also try fish, like salmon, for a tasty twist. Want more heat? Add a pinch of red pepper flakes. This gives your skewers a spicy kick. You can mix in herbs like cilantro or dill for unique flavors. Experiment with different spices like cumin or smoked paprika. These can change the whole taste. Don't be afraid to get creative with your herbs! To keep your herb grilled vegetable skewers fresh, store them in the fridge. Place leftovers in an airtight container. They stay good for 3 to 5 days. Make sure the skewers cool first before sealing them. This helps avoid extra moisture which can make them soggy. When reheating, I suggest using an oven or a grill. Preheat your oven to 350°F (175°C). Place the skewers on a baking sheet. Heat them for about 10 minutes. If using a grill, reheat on medium heat for around 5 minutes. This keeps the veggies juicy and flavorful. You can freeze leftover vegetable skewers too. Wrap each skewer tightly in plastic wrap. Then place them in a freezer bag. They can last up to 3 months in the freezer. To thaw, simply leave them in the fridge overnight. You can also use the microwave for quick thawing. Just be careful not to cook them! For perfect herb grilled vegetable skewers, grill them for about 10-12 minutes. This time works well for most vegetables. You want them to be tender and have lovely grill marks. - Zucchini: 10-12 minutes - Bell peppers: 10-12 minutes - Red onion: 10-12 minutes - Cherry tomatoes: 6-8 minutes - Mushrooms: 8-10 minutes Make sure to turn the skewers occasionally. This helps all sides cook evenly. Yes! You can prep these skewers ahead of time. Here are some tips: - Marinate the vegetables: You can marinate them in the fridge for up to 24 hours. This makes the flavors even better. - Assemble and store: You can thread the veggies onto skewers and cover them. Keep them in the fridge for a few hours before grilling. - Soaking skewers: If using wooden skewers, soak them for at least 30 minutes. This helps prevent burning. These skewers pair well with many sides. Here are some tasty ideas: - Dipping sauces: Try tzatziki or a balsamic glaze for added flavor. - Salads: A fresh green salad or quinoa salad complements the skewers well. - Grains: Serve with rice or couscous for a hearty meal. Feel free to mix and match these ideas for a fun and flavorful meal! In this guide, we explored how to make delicious herb-grilled vegetable skewers. We covered ingredients, step-by-step instructions, and tips for the best flavor. You can now use fresh veggies, marinades, and cooking techniques to create tasty skewers. Remember to experiment with different vegetables and proteins. Make your skewers unique! With these tips, your meals will be colorful, flavorful, and fun to share. Enjoy your cooking and grilling adventures!
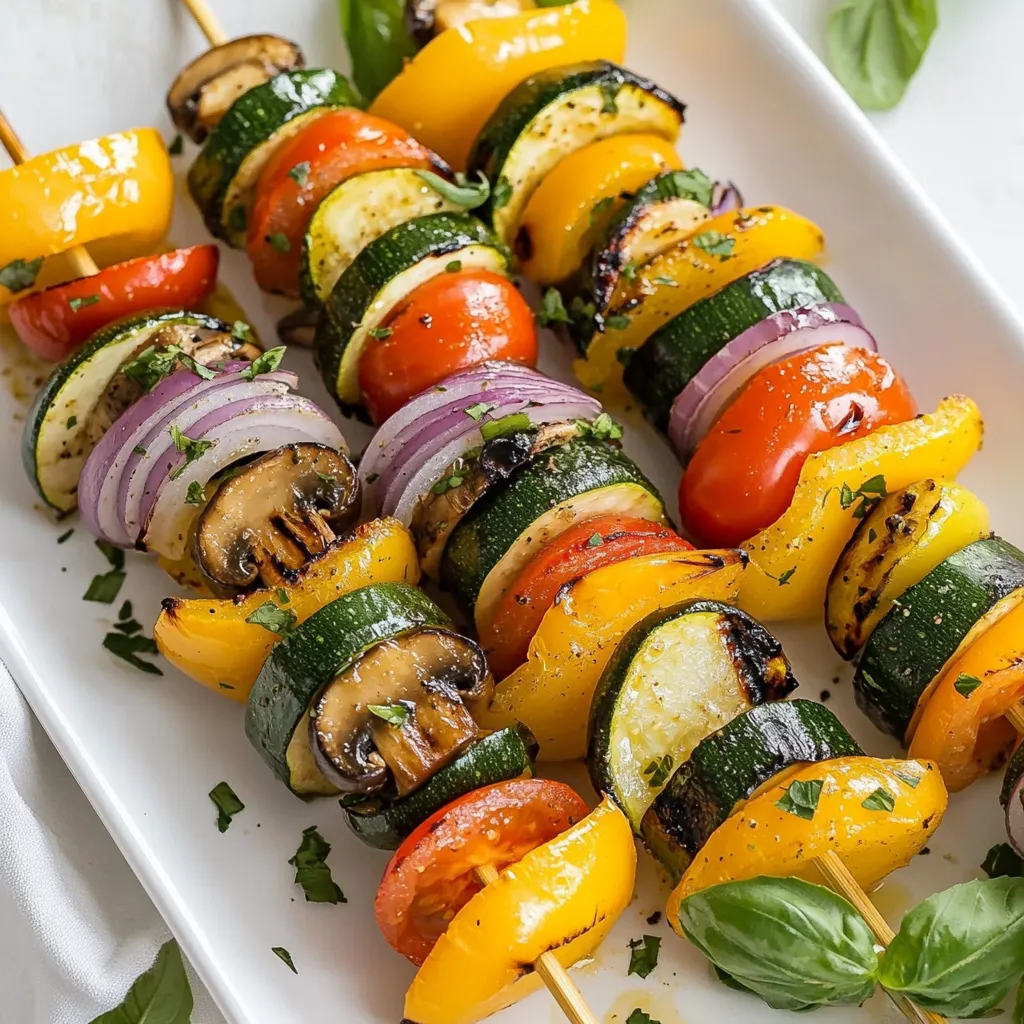
Herb Grilled Vegetable Skewers Flavorful and Easy Meal
Looking for a tasty and easy meal? Herb Grilled Vegetable Skewers are perfect for you! These colorful skewers pack a punch of flavor with fresh
To make teriyaki glazed meatballs, you need some key ingredients. Here’s what you’ll need: - 1 lb ground chicken or turkey - 1/2 cup breadcrumbs (preferably panko) - 1/4 cup green onions, finely chopped - 1/4 cup fresh cilantro, chopped - 1 egg - 2 cloves garlic, minced - 1 teaspoon fresh ginger, grated - Salt and pepper to taste These ingredients help create a tasty and juicy meatball. Ground chicken or turkey keeps them light. Panko breadcrumbs ensure a nice texture. Fresh herbs add flavor, while garlic and ginger give a fragrant touch. For the teriyaki glaze, you will need: - 1/2 cup soy sauce (low sodium) - 1/4 cup honey or maple syrup - 1 tablespoon rice vinegar - 1 tablespoon sesame oil - 1 teaspoon cornstarch mixed with 1 tablespoon water (for thickening) This glaze is sweet and savory. The soy sauce gives it a rich umami flavor. Honey or maple syrup adds sweetness. Rice vinegar brings a nice tang, while sesame oil adds a touch of nuttiness. To enhance your meatballs, consider these seasonings: - Additional green onions for garnish - Sesame seeds for garnish - A pinch of red pepper flakes for heat These extras add a nice finish to your dish. Green onions and sesame seeds give a fresh look. If you like some spice, red pepper flakes can give that extra kick. {{ingredient_image_1}} Start by gathering your ingredients. You will need ground chicken or turkey, breadcrumbs, green onions, cilantro, an egg, garlic, ginger, salt, and pepper. In a large bowl, mix these ingredients well. Use your hands to blend them evenly. The mixture should feel slightly sticky but hold together. This step is crucial for a great texture in your meatballs. Next, preheat your oven to 400°F (200°C). While the oven heats, form the meat mixture into small balls, about one inch wide. Place the meatballs on a baking sheet lined with parchment paper. This helps prevent sticking and makes cleanup easy. Bake them for 20 to 25 minutes. Look for a golden-brown color to know they are done. While the meatballs bake, it's time to make the teriyaki glaze. In a small saucepan, combine low-sodium soy sauce, honey or maple syrup, rice vinegar, and sesame oil. Heat this mixture over medium heat while stirring. When it starts to simmer, add a cornstarch mixture. This will help thicken the glaze. Stir for about 2 to 3 minutes until it gets nice and thick. When the meatballs are ready, drizzle the teriyaki glaze over them. Gently toss to coat each meatball evenly. For a little extra flavor, you can pop them back in the oven for 5 more minutes. This will caramelize the glaze. Serve them warm and enjoy! You can garnish with extra green onions or sesame seeds if you like. To get soft and juicy meatballs, use ground chicken or turkey. These meats keep moisture better. Add breadcrumbs for lightness. I like panko for its crisp texture. Mix well but do not overmix the meat. Overmixing makes the meatballs tough. Aim for about 1-inch size for even cooking. One common mistake is not seasoning enough. Salt and pepper boost flavor. Another mistake is baking at too high a temperature. Stick to 400°F (200°C) for even cooking. Avoid opening the oven door too often. This lets heat escape and can dry out your meatballs. To amp up the flavor, add more herbs. Fresh cilantro and green onions work great. You can also try adding chili flakes for heat. If you love garlic, add more cloves. For a sweet twist, use maple syrup in the glaze. Experiment and find what you like best! Pro Tips Use Panko Breadcrumbs: Panko breadcrumbs provide a light and crispy texture, enhancing the meatballs' overall crunchiness. Let the Glaze Cool: Allow the teriyaki glaze to cool slightly before drizzling over the meatballs for better adhesion and a shinier finish. Experiment with Proteins: Feel free to substitute ground chicken or turkey with beef, pork, or even plant-based alternatives for a different flavor profile. Garnish Creatively: Top your meatballs with toasted sesame seeds or chopped nuts for added texture and a gourmet touch. {{image_2}} You can swap the ground chicken or turkey for other meats. Try using ground beef, pork, or lamb for richer flavors. For a lighter option, ground fish, like salmon, works well too. Each choice brings a unique taste that pairs nicely with teriyaki glaze. If you need gluten-free meatballs, use gluten-free breadcrumbs. You can also grind oats into a fine powder as a substitute. Look for tamari instead of soy sauce for the glaze to keep it gluten-free. These swaps ensure everyone can enjoy this dish. You can spice things up by adding red pepper flakes to the teriyaki glaze. For a fruitier twist, mix in some orange or pineapple juice. This adds a sweet and tangy touch. You can also try a sesame ginger glaze by adding more ginger and sesame oil. Each variation lets you explore new flavors while keeping the fun of teriyaki meatballs. To store leftover meatballs, let them cool first. Place them in an airtight container. Keep them in the fridge for up to four days. If you have extra teriyaki glaze, store that separately. This way, your meatballs stay moist and tasty. When you are ready to eat the leftovers, reheating is easy. Preheat your oven to 350°F (175°C). Place the meatballs on a baking sheet. Cover them with foil to keep them moist. Heat for about 10-15 minutes. If using a microwave, pop them in for 1-2 minutes. Make sure they are hot all the way through. For longer storage, you can freeze the meatballs. After they cool, lay them on a baking sheet in a single layer. Freeze them for about an hour. Then, transfer them to a freezer bag. They will last up to three months in the freezer. When you’re ready to use them, just thaw overnight in the fridge. Reheat as mentioned above, and enjoy! You have many choices for sides! Rice is a classic option. White rice or brown rice works well. You can also serve these meatballs with steamed veggies. Broccoli, snap peas, or carrots add great color and crunch. For a fun twist, try them in a lettuce wrap. The crisp lettuce adds a nice touch. You can also pair them with a simple salad for freshness. Yes, you can make these meatballs ahead of time! Prepare the meatballs and bake them as directed. Let them cool, then store in an airtight container. They can stay in the fridge for up to three days. You can also freeze them for longer storage. Just make sure to separate them with parchment paper to avoid sticking. When you are ready, thaw and reheat them in the oven or microwave. To thicken the teriyaki glaze, use cornstarch. Mix one teaspoon of cornstarch with one tablespoon of water. Stir this mixture into the sauce while it simmers. Keep stirring for two to three minutes. The glaze will thicken nicely. If it is too thin, repeat the process. Adjust to your preferred thickness for a perfect sauce. In this blog post, we covered how to make teriyaki glazed meatballs. We talked about main ingredients and how to prepare both the meatballs and glaze. I shared tips for texture and common mistakes to avoid. You can try different proteins or sauces for unique flavors. Proper storage keeps leftovers fresh for later. Remember, cooking is fun, so enjoy every step. Get creative with your own twists on this dish!
Teriyaki Glazed Meatballs Quick and Tasty Recipe
Get ready to enjoy a quick and tasty treat with my Teriyaki Glazed Meatballs! This easy recipe brings bold flavors and juicy goodness to your
To make Spicy Mango Guacamole, you need just a few fresh ingredients. Here’s what you’ll need: - 2 ripe avocados - 1 ripe mango, diced - 1 small red onion, finely chopped - 1 jalapeño, seeded and minced - 2 tablespoons fresh lime juice - 1/4 cup fresh cilantro, chopped - Salt and pepper, to taste - 1/2 teaspoon ground cumin (optional) - Tortilla chips, for serving Each ingredient adds a unique flavor. The creamy avocado forms the base. The sweet mango adds a fruity twist. Red onion gives a nice crunch. Jalapeño adds heat, so adjust it to your taste. Lime juice keeps everything fresh and zesty. Fresh cilantro brightens the dish. Seasoning with salt, pepper, and cumin enhances the flavor. Using fresh ingredients is key for the best taste. Choose ripe avocados and mangoes for creaminess and sweetness. This guacamole pairs perfectly with crispy tortilla chips. It’s simple to make and sure to impress your guests! {{ingredient_image_1}} - Halving and Pitting the Avocados Start by cutting the avocados in half. Use a sharp knife. Carefully twist the halves to separate them. Take out the pit using a spoon or knife. This step is key to get to the creamy flesh. - Mashing the Avocado Scoop the avocado flesh into a medium mixing bowl. Grab a fork and mash it gently. You want some smoothness but also some chunks. This gives your guacamole a perfect texture. - Adding Additional Ingredients Now, add the diced mango, finely chopped red onion, and minced jalapeño to the bowl. Each of these adds a unique flavor. The sweetness from the mango balances the heat from the jalapeño. - Incorporating Seasonings Drizzle the fresh lime juice over the mixture. Season with salt and pepper to taste. If you like, add ground cumin for a warm flavor. Mix everything gently. This ensures all ingredients blend well but stay chunky. - Serving Recommendations Serve your guacamole right away with crispy tortilla chips. For a pop of color, use a bright bowl. Garnish with cilantro leaves and lime slices. Enjoy your tasty, flavor-packed guacamole! - Choosing Ripe Avocados and Mango Look for avocados that feel soft but not mushy. Gently press the skin to check ripeness. For mangoes, choose ones that have a slight give when squeezed. The color should be vibrant, indicating ripeness. - Customizing Spice Levels If you love heat, add more jalapeño or use a spicier pepper. For milder guacamole, use less jalapeño or remove the seeds. You can also add a pinch of cayenne pepper for extra kick. - Adjusting for Creaminess and Texture Mash the avocado to your liking. For a chunkier texture, leave some pieces intact. If you prefer smooth guacamole, mash it well. Adding a bit more lime juice can help with creaminess too. - Serving Bowls and Garnishing Serve your guacamole in a bright, colorful bowl. Top it with cilantro leaves and lime slices. This adds visual appeal and freshness. You can even use a hollowed-out mango shell for a fun twist. - Creative Ways to Serve with Chips Pair your guacamole with homemade tortilla chips. You can cut corn tortillas into triangles and bake them for a healthier option. For a fun touch, try serving with different types of chips like sweet potato or beet chips. Pro Tips Choose Ripe Avocados: Ensure the avocados are perfectly ripe; they should yield slightly to gentle pressure for the best flavor and creaminess. Fresh Ingredients Matter: Use fresh lime juice and cilantro for the best taste; bottled juices can alter the flavor profile. Adjust Spice Level: Modify the amount of jalapeño based on your heat preference; you can also use other peppers for different heat levels. Prevent Browning: To keep the guacamole fresh and green, press plastic wrap directly onto the surface before refrigerating. {{image_2}} You can change up your guacamole by using different fruits. Pineapple adds a sweet twist. Just chop it small like you do with mango. Kiwi gives a tangy flavor too. Try it for a fun taste change! You can also swap spices to fit your taste. If you don’t have jalapeño, try a milder pepper like green bell pepper. You can add garlic powder for a new flavor. Cumin is nice but not a must. This recipe is vegan and gluten-free. All the ingredients come from plants. So, anyone can enjoy it without worry. If you're watching calories, you can adjust the amount of avocado. Use one avocado instead of two. You can also skip the salt or use less. This way, you cut calories but keep the taste. You can make it fit your needs and still enjoy every bite! To keep your guacamole fresh, you need to store it right. First, place leftovers in a bowl. Press plastic wrap directly against the guacamole’s surface. This helps keep air out. Less air means less browning. If you have a tight lid, that can work too. Just make sure it seals well. How long will it last in the fridge? Normally, guacamole stays fresh for 1 to 2 days. After that, it may start to brown and lose flavor. Signs of spoilage include a dark color or off smell. If it looks or smells bad, toss it out. Enjoy your guacamole while it’s fresh! Can I make this guacamole ahead of time? Yes, you can make this guacamole ahead of time. However, it tastes best fresh. If you need to prepare it early, store it in the fridge. Use a tight lid or cover it with plastic wrap. Press the wrap against the surface to limit air exposure. What dishes pair well with Spicy Mango Guacamole? Spicy Mango Guacamole pairs well with many dishes. Try it with tacos, burritos, or nachos. It also complements grilled meats and fish. Serve it as a dip for fresh veggies or tortilla chips for a tasty snack. How do I prevent browning after making guacamole? To prevent browning, use fresh lime juice. Lime juice slows down the oxidation process. Another tip is to cover the guacamole tightly with plastic wrap. Press it directly onto the surface of the guacamole. You can also add extra avocado on top before sealing. This guide explains how to make tasty Spicy Mango Guacamole. You learned about key ingredients and steps for perfect flavor. I shared tips on selecting ripe fruits and personalizing spice levels. You can even store leftovers properly to enjoy later. Remember, guacamole is versatile. You can switch up ingredients to fit your needs. Experiment with fruits and spices for new tastes. Enjoy your fresh dips, and let your creativity shine!
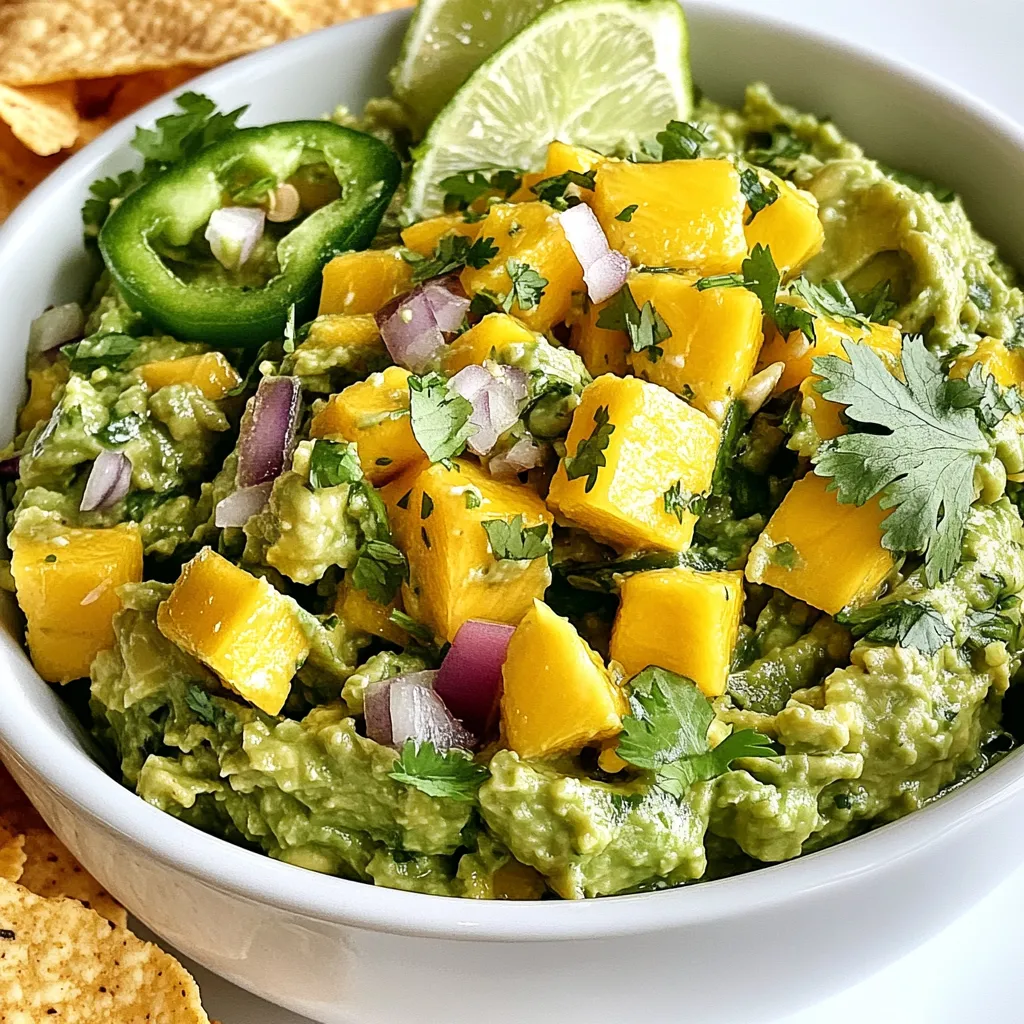
Spicy Mango Guacamole Flavor-Packed Easy Recipe
Get ready to elevate your snack game with my Spicy Mango Guacamole! This flavor-packed recipe combines creamy avocados, sweet mango, and a kick of jalapeño.
- 2 ripe avocados - 1 cup cherry tomatoes, halved - 1 cup fresh mozzarella balls, halved or diced - 1/4 cup fresh basil leaves, chopped - 2 tablespoons balsamic glaze - 1 tablespoon olive oil - Salt and pepper to taste If you can't find fresh mozzarella, you can use feta cheese. It adds a different flavor but still tastes great. For a dairy-free option, try using avocado or cashew cheese. If you want a bit more crunch, add some diced cucumber or bell pepper. You can switch cherry tomatoes for regular tomatoes, just chop them up smaller. If you love spicy food, add some red pepper flakes to kick up the heat. You need a sharp knife to cut the avocados and tomatoes. A mixing bowl helps to combine the filling. Use a spoon to scoop out the avocado and fill it. A small measuring spoon makes it easy to drizzle olive oil and balsamic glaze. Lastly, having a cutting board is useful for chopping the ingredients. {{ingredient_image_1}} Start by cutting the avocados in half lengthwise. Be careful with the knife. Remove the pit with a spoon or knife safely. If you want more filling space, scoop out a bit of the flesh. This makes room for the tasty Caprese filling. Place the avocado halves on a plate, cut side up. This helps keep them steady. In a mixing bowl, combine the halved cherry tomatoes and fresh mozzarella. You can use diced mozzarella if you prefer. Add in the chopped basil leaves. This gives the filling a fresh taste. Drizzle the mixture with olive oil and balsamic glaze. The glaze adds a sweet touch. Sprinkle with salt and pepper to taste. Gently toss everything together until well mixed. Be careful not to mash the tomatoes. Now, it's time to fill the avocados. Spoon the Caprese mixture into each half. Fill them generously for a hearty bite. After that, drizzle a little more balsamic glaze on top. This adds extra flavor and a pretty look. If you have more basil leaves, use them to garnish. This gives your dish a fresh pop of color. Enjoy your creation; it looks and tastes amazing! Choosing the right avocado is key. Look for avocados that feel slightly soft when you press them. If they feel hard, they are not ripe yet. If they feel very mushy, they might be overripe. Dark skin often means ripeness, but check for softness too. A ripe avocado should have a slight give but not feel squishy. If you find one that is not ripe, place it in a paper bag. This helps it ripen faster. Presentation matters when serving Caprese stuffed avocados. First, use a colorful plate. It makes the dish pop! Place the stuffed avocados on the plate with room between them. Add fresh basil leaves around them for a green touch. Drizzle extra balsamic glaze over the plate for flair. This creates a nice contrast with the green and red from the tomatoes. If you want, you can sprinkle a bit of salt on top for a finishing touch. There are a few mistakes to watch out for. First, don’t use avocados that are too hard or too soft. This affects the taste and texture. Second, be careful not to overfill the avocado halves. They can spill over and make a mess. Third, don’t skip seasoning! Salt and pepper enhance the flavors of the dish. Lastly, avoid cutting the avocados too early. They can brown quickly once cut. Prepare them just before serving for the best look and taste. Pro Tips Choosing Ripe Avocados: Ensure your avocados are ripe by gently pressing them; they should yield slightly to pressure. This will give a creamy texture to your stuffed avocados. Balsamic Glaze Alternatives: If you don't have balsamic glaze, you can reduce balsamic vinegar over low heat until it thickens or use a store-bought version for convenience. Add Extra Flavor: For an additional flavor kick, consider adding a pinch of garlic powder or red pepper flakes to the Caprese mixture. Serving Suggestions: Pair your stuffed avocados with a side of crusty bread or tortilla chips for a delightful appetizer or light meal. {{image_2}} You can easily add protein to your Caprese stuffed avocados. Cooked chicken or shrimp works great. If you use chicken, shred it and mix it with your Caprese filling. For shrimp, cook them until they are pink, then chop and add them. This change makes the dish heartier. Plus, it adds more flavor and nutrition. If you want a vegan option, swap out the mozzarella. Use vegan cheese or leave it out. You can also add cooked quinoa or chickpeas for protein. These ingredients help keep the dish filling and tasty. Don't forget to use balsamic glaze that is vegan-friendly. You can enhance the flavors in your stuffed avocados with spices and nuts. Add a pinch of garlic powder or red pepper flakes for heat. Chopped nuts like pine nuts or walnuts add crunch and richness. You can also add a squeeze of lemon juice for brightness. These small changes can make a big difference in taste. To keep your Caprese stuffed avocados fresh, wrap them tightly in plastic wrap. This helps stop air from getting in and turning them brown. Place the wrapped avocados in an airtight container. This extra layer keeps them safe and fresh for your next meal. Freezing stuffed avocados isn’t the best idea. The texture will change, and they may become mushy. However, you can freeze the filling. Store it in a sealed bag or container. When ready to eat, thaw it in the fridge overnight and fill fresh avocados later. In the fridge, your Caprese stuffed avocados can last about one day. They taste best when fresh, so try to eat them soon. If you only have leftover filling, it can last up to three days. Always check for any signs of spoilage before eating. Yes, you can prepare some parts ahead. You can chop the tomatoes, mozzarella, and basil. Mix them with olive oil and balsamic glaze. Store this mix in the fridge. Cut the avocados just before serving to keep them fresh. If you prep ahead, the flavors meld nicely, but the avocados should stay bright and green. Caprese stuffed avocados are great on their own. You can pair them with a simple green salad or garlic bread. They also work well as a side with grilled chicken or fish. For a fun twist, serve them with tortilla chips for crunch. You can even add a light soup for a full meal. Absolutely! Avocados are full of healthy fats that are good for your heart. They also provide fiber and nutrients. The tomatoes and basil add vitamins and antioxidants. Fresh mozzarella gives you protein and calcium. Overall, this dish is a tasty and healthy choice for a snack or meal. In this blog post, we explored how to make delicious Caprese Stuffed Avocados. We covered key ingredients, their alternatives, and tools you need. I shared steps for preparing, filling, and assembling the avocados. You learned tips for choosing ripe avocados and how to present your dish nicely. I also suggested variations, storage tips, and answered common questions. Enjoy this dish's fresh flavors, and don't hesitate to experiment. With a few tweaks, you can make it your own.
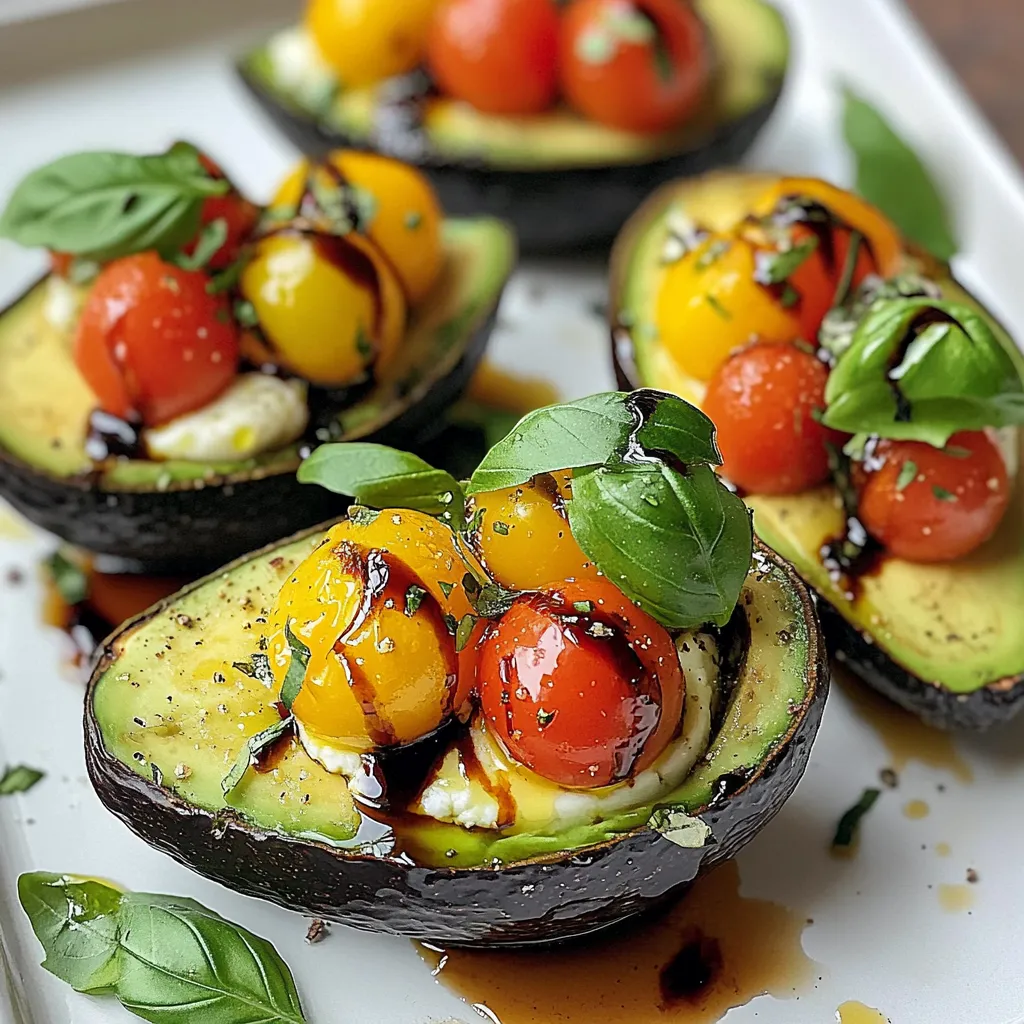
Caprese Stuffed Avocados Flavorful and Simple Dish
Looking for a fresh and easy dish that impresses? Caprese Stuffed Avocados are the perfect choice. With creamy avocados, ripe tomatoes, and fresh basil, this
- 4 cups all-purpose flour - 1 tablespoon instant yeast - 2 teaspoons salt - 1 tablespoon sugar - 1 ½ cups warm water (about 110°F) - 1/4 cup olive oil (plus more for drizzling) - 6 cloves garlic, minced - 2 teaspoons dried oregano - 2 teaspoons dried rosemary - Freshly cracked black pepper (to taste) - Sea salt for topping - Fresh rosemary sprigs for garnish To make garlic herb focaccia bread, gather your ingredients first. High-quality ingredients make great bread. Use all-purpose flour for the best texture. Instant yeast makes rising fast and easy. Salt and sugar balance the flavors. Warm water activates the yeast and helps the dough rise. Olive oil adds moisture and richness. Now, let’s talk about the herbs. Fresh herbs add bright flavor. I love using garlic, oregano, and rosemary. You can adjust these herbs based on your taste. - Cheese (like Parmesan or mozzarella) - Olives or sundried tomatoes - Additional fresh herbs Feel free to customize your focaccia. Adding cheese like Parmesan gives it a savory twist. Chopped olives or sundried tomatoes add a nice touch of flavor. You can also toss in extra fresh herbs for more aroma and taste. {{ingredient_image_1}} Start by mixing warm water, sugar, and instant yeast in a large bowl. Let this sit for 5 minutes until it gets frothy. This shows the yeast is alive. Next, add 4 cups of all-purpose flour, 2 teaspoons of salt, and 1/4 cup of olive oil to the yeast mix. Use a wooden spoon or your hands to mix until you have a shaggy dough. Now, move the dough to a lightly floured surface. Knead the dough for about 5 to 7 minutes. You want it to be smooth and elastic. Once done, place the dough in a greased bowl and cover it with a kitchen towel. Let it rise in a warm spot for about 1 hour. It should double in size. After the first rise, punch the dough down. Transfer it to a greased baking sheet or large pan. Gently stretch and press the dough to fit the shape of the pan, about 1 inch thick. Cover it again with a towel and let it rise for another 30 minutes. Preheat your oven to 425°F (220°C). After the second rise, use your fingers to poke deep dimples all over the dough. In a small bowl, mix minced garlic, dried oregano, dried rosemary, and some cracked black pepper. Drizzle olive oil over the dough, then sprinkle the garlic and herb mix on top. Finish with a sprinkle of sea salt. Bake for 20 to 25 minutes, or until golden brown. When done, let it cool slightly before serving. Enjoy the delicious aroma and flavor! To get the best texture, knead the dough well. Kneading builds gluten, making bread chewy. Aim for about 5-7 minutes of kneading. After kneading, let the dough rest. This helps it rise. Place the dough in a warm spot and cover it. When the dough doubles in size, it’s ready. A good tip is to poke the dough lightly. If it springs back slowly, it’s risen enough. To boost the garlic flavor, try using roasted garlic. Roasting gives it a sweet, rich taste. Mix it into your dough or add it to the topping. For herbs, combine fresh rosemary and thyme. They add a bright, earthy taste. You can also sprinkle in some fresh basil for a twist. Experiment with different herbs to find your favorite mix. Focaccia is best served warm. Cut it into squares and place it on a wooden board. Drizzle some olive oil on top for a nice shine. You can also add a sprig of fresh rosemary for a pretty look. For dips, balsamic vinegar pairs well. Olive oil with herbs is another great choice. Both add more flavor to your focaccia experience. Enjoy it fresh with friends or family! Pro Tips Use Fresh Herbs: Fresh rosemary and oregano can elevate the flavor of your focaccia significantly compared to dried herbs, providing a more aromatic and vibrant taste. Experiment with Toppings: Try adding sliced olives, sun-dried tomatoes, or caramelized onions for a unique twist on traditional focaccia. Resting Time Matters: Allow the dough to rest longer during the second rise for an even more airy texture. This can enhance the overall lightness of the bread. Serve Warm: Focaccia is best enjoyed fresh out of the oven. Serve it warm with a drizzle of quality olive oil or a side of balsamic vinegar for dipping. {{image_2}} You can switch up the herbs in your focaccia to match your taste. Using fresh herbs adds a bright flavor. Try fresh rosemary, thyme, or basil instead of dried. Always chop them finely for even distribution. You can also mix different herbs for a unique blend. Customizable toppings make the focaccia fun. Add sliced olives, sun-dried tomatoes, or even roasted red peppers. Sprinkle cheese like mozzarella or Parmesan on top for extra flavor. If you prefer a spicy kick, add red pepper flakes. The options are endless! Incorporating cheese takes your focaccia to another level. Instead of just herbs, try mixing in Parmesan or mozzarella into the dough. The cheese will melt and create a delicious, gooey texture. You can also play with sweet variations. Caramelized onions add a rich, sweet taste. Try adding figs or honey for a sweet twist. These toppings give the focaccia a nice balance of sweet and savory. The joy of focaccia is in its versatility, so feel free to experiment! How do you store leftover focaccia? Start by letting it cool completely. Wrap it tightly in plastic wrap. You can also place it in a sealable bag. This keeps it fresh for up to three days. Store it at room temperature, away from heat. What are the best containers for freshness? Use an airtight container. A glass or plastic container works well. Make sure it is big enough for the focaccia. This helps avoid any squishing. How can you freeze focaccia? First, let it cool. Then, slice it into pieces. Wrap each piece in plastic wrap. Place the wrapped pieces in a freezer-safe bag. Squeeze out the air and seal it tight. You can freeze it for up to three months. What are the best thawing and reheating tips? To thaw, remove the focaccia from the freezer. Leave it in the fridge overnight. For quick thawing, you can leave it at room temperature for a few hours. To reheat, place it in a preheated oven at 350°F. Heat for about 10 minutes, or until warm. Enjoy it fresh again! Focaccia needs to rise twice. The first rise takes about 1 hour. This allows the dough to double in size. After shaping, let it rise again for 30 minutes. This second rise helps create a light texture. Yes, you can! Use baking powder instead of yeast. The dough will not rise the same way. It will be denser and less chewy. You can also try using sourdough starter for more flavor. If your dough isn’t rising, check the yeast. Make sure it’s fresh and active. Warm water must be the right temperature, about 110°F. If it’s too hot or too cold, the yeast won’t work. Try placing the dough in a warmer spot. If all else fails, you can let it rise longer. You now have all the tools to make perfect focaccia. We covered ingredients, steps, and tips to elevate your baking. Remember, kneading and resting are key for great texture. You can also personalize your focaccia with different toppings and herbs. Store leftovers properly or freeze them for later. Embrace creativity in your cooking and enjoy the process. Homemade focaccia will impress your friends and family. Happy baking!
Garlic Herb Focaccia Bread Fresh and Easy Recipe
Looking to impress your family with a warm, fluffy treat? My Garlic Herb Focaccia Bread recipe is fresh and easy to make! With just a