Appetizers

- 1 pound large shrimp, peeled and deveined - 2 cups green cabbage, finely shredded - 1 cup carrots, grated - 3 green onions, finely chopped - 2 cloves garlic, minced - 1 tablespoon fresh ginger, minced - 1 teaspoon soy sauce - 1 teaspoon sesame oil - 1 package of egg roll wrappers (about 20 wrappers) - Vegetable oil for frying - Salt and pepper to taste For the best crispy shrimp and cabbage egg rolls, fresh ingredients matter. Shrimp should be plump and firm. Fresh cabbage adds crunch, while carrots bring sweetness. Green onions give a nice bite. Garlic and ginger add warmth and depth. When combining flavors, soy sauce and sesame oil enhance the dish. These help bind the filling while adding rich umami. I prefer using high-quality vegetable oil for frying. It creates a golden, crispy texture that makes every bite delightful. While you can find all of these ingredients at your local store, consider visiting a farmer's market for fresher options. You can also find the full recipe here to guide you through the process. Start by mixing the shrimp and vegetables. In a large bowl, combine: - 1 pound large shrimp, peeled and deveined - 2 cups green cabbage, finely shredded - 1 cup carrots, grated - 3 green onions, finely chopped - 2 cloves garlic, minced - 1 tablespoon fresh ginger, minced Mix these ingredients gently. This helps to blend the flavors. Next, season the mixture with soy sauce and sesame oil. Add: - 1 teaspoon soy sauce - 1 teaspoon sesame oil - Salt and pepper to taste Stir well. This step ensures each bite is full of flavor. Now, let's fill and roll the egg rolls. Take one egg roll wrapper and lay it flat. Position one corner towards you. Spoon about 2 tablespoons of the shrimp mixture onto the nearest corner. Fold the corner over the filling. Then, bring the side corners in towards the center. Roll the wrapper tightly away from you. Make sure to seal the edges with a bit of water if needed. Repeat these steps until you use all the wrappers and filling. Next, it’s time to fry the egg rolls. Heat vegetable oil in a deep frying pan over medium heat. The oil should reach 350°F (175°C). This temperature is key for crispiness. Carefully place a few egg rolls in the hot oil. Do not overcrowd the pan. Fry them for 3-4 minutes. They should turn golden brown and crispy on all sides. Once done, use a slotted spoon to remove the egg rolls. Place them on a plate lined with paper towels to drain excess oil. Allow them to cool a bit before serving. For the full recipe, check the detailed instructions above. Enjoy the crispy delight! To get that perfect crispy texture, aim to heat your oil to 350°F (175°C). This temperature helps the egg rolls fry quickly. If the oil is too cool, the egg rolls absorb more oil and become soggy. Do not overcrowd the pan. Fry only a few egg rolls at a time. Overcrowding lowers the oil temperature, which leads to less crispness. Give each roll enough space to cook evenly. For a beautiful presentation, arrange your crispy egg rolls on a platter. Use a small bowl of sweet chili sauce for dipping. This sauce adds a nice sweetness to balance the savory flavors. You can garnish the platter with chopped cilantro or sesame seeds for color. Pair these egg rolls with a fresh salad or some steamed rice. A light cucumber salad complements the flavors well. Want to spice things up? Try adding some red pepper flakes or a dash of five-spice powder to your filling. These spices give the rolls an extra kick. Feel free to customize your filling. You can swap out the shrimp for tofu or mushrooms. Adding different vegetables like bell peppers or snap peas keeps things fresh and exciting. {{image_4}} You can easily swap shrimp for tofu or mushrooms. Tofu gives a nice texture and absorbs flavors well. Mushrooms add a savory taste. Choose firm tofu for the best results. Adjust the seasonings to match the vegetarian taste. You might want to add more soy sauce or some chili flakes for a kick. Fresh herbs like cilantro or basil can also boost flavor. You can try many different vegetables in your egg rolls. Carrots, bell peppers, and bean sprouts work great. Think about adding spinach or zucchini for more color and crunch. Adding cheese can create a creamy texture. Consider using cream cheese or mozzarella for a tasty twist. You could also mix in cooked chicken or pork if you want more protein. Using an air fryer is a fantastic way to make these egg rolls. Preheat your air fryer to 375°F (190°C). Place the egg rolls in a single layer in the basket. Cook them for about 10-12 minutes until golden brown. Flip them halfway through for even cooking. This method cuts down on oil and keeps them crispy. Check them often to avoid burning. For the full recipe, follow the steps listed in the earlier sections. To store leftover crispy shrimp and cabbage egg rolls, place them in an airtight container. Refrigerate them right away. This keeps them fresh and safe to eat. Aim to eat leftovers within three days for the best taste. You can freeze both uncooked and cooked egg rolls. For uncooked egg rolls, arrange them on a baking sheet. Freeze them until solid, then transfer to a freezer bag. For cooked egg rolls, let them cool first. Then, store them in an airtight container. To thaw, leave them in the fridge overnight. For quick thawing, you can use the microwave. Reheat cooked egg rolls in the oven at 350°F (175°C) for about 10 to 15 minutes until warm and crispy. When storing seafood, always follow safety rules. Keep shrimp in the fridge at 40°F (4°C) or below. Use it within one to two days after buying. Look out for signs of spoilage in shrimp. These include a strong fishy smell, slimy texture, or discoloration. Always trust your senses; when in doubt, throw it out! For the full recipe, check out the details above. To keep your egg rolls crispy, follow these tips: - Use dry ingredients: Make sure your vegetables are well-drained before mixing. Excess moisture can lead to soggy rolls. - Fry at the right temperature: Heat your oil to 350°F (175°C). Too low of a temperature makes them soggy. - Avoid overcrowding: Fry only a few rolls at a time. Overcrowding lowers the oil temperature and leads to sogginess. Yes, you can use frozen shrimp, but follow these guidelines: - Thaw properly: Place them in the fridge overnight or run them under cold water. Do not use hot water, as it affects the texture. - Pat dry: Make sure to dry the shrimp with a paper towel before adding them to your mixture. This will prevent extra moisture. Some popular sauces that enhance flavors include: - Sweet chili sauce: It adds a nice sweetness and spice. - Soy sauce: A classic choice that adds saltiness. - Peanut sauce: Creamy and rich, it pairs well with shrimp. - Sriracha mayo: For those who love a little heat and creaminess. You can reduce calories and fat content by considering these options: - Baking instead of frying: Brush the rolls with a little oil and bake at 400°F (200°C) until golden. - Reduce oil: Use less oil when frying or opt for air frying. - Add more veggies: Increase the amount of cabbage and carrots to boost fiber and nutrients without many calories. For the full recipe, check out the Crispy Shrimp and Cabbage Egg Rolls section. This blog post covers shrimp and cabbage egg rolls from start to finish. We discussed ingredients, detailed preparation steps, and frying techniques for perfect crispiness. I offered tips for serving and flavor variations, as well as storage and safety information. Try customizing your egg rolls to fit your taste. Whether you opt for the vegetarian version or add special spices, the options are endless! Enjoy creating delicious, crunchy treats at home. Your friends will love these egg rolls!
Crispy Shrimp and Cabbage Egg Rolls Delightful Treat
Looking for a tasty treat that’s crispy and packed with flavor? My Crispy Shrimp and Cabbage Egg Rolls recipe brings a delightful crunch and a
To make these wraps, you need a few key items. Here is the list: - 1 lb boneless, skinless chicken thighs, diced - 1/4 cup low-sodium soy sauce - 1/4 cup honey - 1 tablespoon sesame oil - 2 cloves garlic, minced - 1 tablespoon fresh ginger, grated - 1/2 cup bell peppers, finely chopped (any color) - 1/2 cup carrots, grated - 2 green onions, sliced - 1 tablespoon sesame seeds - 1 head of butter or iceberg lettuce, leaves separated These ingredients come together to create a sweet and savory flavor that makes these wraps so tasty. You can add fun toppings to make your wraps even better. Here are some suggestions: - Sriracha for heat - Chopped cilantro for freshness These options let you customize your wraps to fit your taste. If you have allergies or dietary needs, you have choices. Here are some easy swaps: - Use chicken breast instead of thighs for a leaner option. - Swap honey for maple syrup for a vegan choice. - Choose tamari instead of soy sauce for gluten-free wraps. These substitutions help everyone enjoy Teriyaki Chicken Lettuce Wraps. {{ingredient_image_1}} To start, grab a mixing bowl. Add 1/4 cup of low-sodium soy sauce. Then, add 1/4 cup of honey. Next, pour in 1 tablespoon of sesame oil. Now, mince 2 cloves of garlic and grate 1 tablespoon of fresh ginger. Toss these in the bowl too. Whisk all the ingredients together until they blend well. This sauce brings sweetness and depth to the dish. Heat a splash of sesame oil in a large skillet over medium heat. Once hot, add 1 pound of diced boneless, skinless chicken thighs. Cook the chicken for about 5 to 7 minutes. Look for a nice brown color and ensure it’s cooked through. Now, pour the teriyaki sauce you made earlier over the chicken. Let it simmer for 2 to 3 minutes. This step thickens the sauce and coats the chicken perfectly. Next, stir in 1/2 cup of finely chopped bell peppers and 1/2 cup of grated carrots. Cook for another 2 to 3 minutes to soften the veggies. Finally, turn off the heat and mix in 2 sliced green onions and 1 tablespoon of sesame seeds. Now, let’s put it all together! Take a leaf from a head of butter or iceberg lettuce. Spoon some of the teriyaki chicken mixture into the center. If you like it spicy, add a squirt of Sriracha on top. You can also sprinkle on some chopped cilantro for extra flavor. Finally, wrap the lettuce around the filling and enjoy every bite! To cook chicken thighs well, start with a hot skillet. I prefer using sesame oil for its rich flavor. When you add the chicken, don’t crowd the pan. This helps the chicken brown nicely. Cook it for about 5 to 7 minutes. The chicken should be golden and cooked through. Always cut the chicken into small pieces for even cooking. The sauce for teriyaki chicken should be thick, so use low-sodium soy sauce and honey. When you mix these, whisk them together well. Once the chicken is cooked, pour the sauce over it. Let it simmer for 2 to 3 minutes. This step helps the sauce coat the chicken evenly. If your sauce is too thin, cook it longer. If it’s too thick, add a splash of water. Serve your teriyaki chicken in crispy lettuce leaves. I like to use butter or iceberg lettuce. You can add fresh toppings like Sriracha for heat and cilantro for freshness. For sides, consider rice or quinoa. They balance the meal well and soak up extra sauce. Enjoy your wraps with a cool drink to enhance the flavors! Pro Tips Marinate for More Flavor: If you have time, marinate the diced chicken in the teriyaki sauce mixture for at least 30 minutes before cooking. This will enhance the flavor and juiciness of the chicken. Use Fresh Ingredients: Opt for fresh garlic and ginger rather than powdered versions for a more vibrant and authentic taste in your teriyaki sauce. Experiment with Veggies: Feel free to add or substitute other vegetables like zucchini, mushrooms, or snap peas to customize your wraps and add more nutrients. Choose the Right Lettuce: Butter lettuce is ideal for wraps due to its flexible leaves, but you can also use romaine or iceberg if you prefer a crunchier texture. {{image_2}} You can swap the chicken thighs for different proteins. Ground turkey or diced tofu works great. Both options soak up the teriyaki sauce well. For a vegan twist, try chickpeas. They add protein and a nice texture. You can also mix in other veggies. Try zucchini, mushrooms, or snap peas. These can complement the flavors and add more crunch. The goal is to make it your own, so feel free to experiment. If you need a gluten-free version, choose tamari instead of soy sauce. Tamari is a gluten-free soy sauce that tastes similar. It works well in this recipe. Make sure to check the labels on all your ingredients. Some sauces or toppings may contain gluten. With careful choices, you can enjoy these wraps without worry. Want to spice things up? Add Sriracha straight into the teriyaki sauce. Start with a teaspoon and adjust to your taste. You can also sprinkle some red pepper flakes for an extra kick. For more heat, top your wraps with sliced jalapeños or a drizzle of spicy mayo. These additions will make your wraps pop with flavor. Enjoy the heat while savoring the sweet teriyaki sauce! To keep your teriyaki chicken lettuce wraps fresh, start by cooling them down. Place any leftover chicken mixture in an airtight container. Make sure to separate the chicken from the lettuce leaves. Store them in the fridge for up to three days. This helps keep the lettuce crisp and the chicken tasty. When you’re ready to enjoy your leftovers, take out the chicken mixture. You can reheat it in a skillet over medium heat. Stir it gently for about five minutes until it’s hot. You can also use the microwave. Heat it in short bursts for about one minute, stirring in between. Always check that it’s heated through. If you want to freeze your teriyaki chicken mix, do it before adding the veggies. Store the chicken in an airtight container or freezer bag. It can last for up to three months in the freezer. When ready to eat, thaw it overnight in the fridge. Then, heat it up and add fresh veggies before serving. This way, you keep everything fresh and full of flavor! You can add heat in different ways. First, try Sriracha. Just a few drops can give your wraps a nice kick. You could also mix in some red pepper flakes. If you like fresh flavors, add sliced jalapeños. They bring both heat and crunch. For a unique twist, try spicy sesame oil instead of regular. This will make your wraps stand out! Yes, you can use chicken breast! Chicken breast is leaner and cooks faster. Just make sure to cut it into small pieces. This helps it cook evenly. Keep an eye on it as it cooks. It might need less time than thighs. The flavor will be different, but it will still taste great. Butter lettuce is my top choice. It is soft and easy to fold. Iceberg lettuce also works well. It is crunchy and holds up nicely. Both types create a perfect base for your filling. You can also use romaine, but it’s a bit tougher. Choose whatever you like best! In this post, we explored the tasty world of teriyaki chicken lettuce wraps. We covered the main ingredients, optional toppings, and dietary substitutions. I shared step-by-step instructions, tips for cooking, and various wrap variations. Don't forget about storage tips for leftovers and helpful FAQs. These wraps are fun to make and easy to customize. Enjoy your cooking and share these wraps with friends and family!
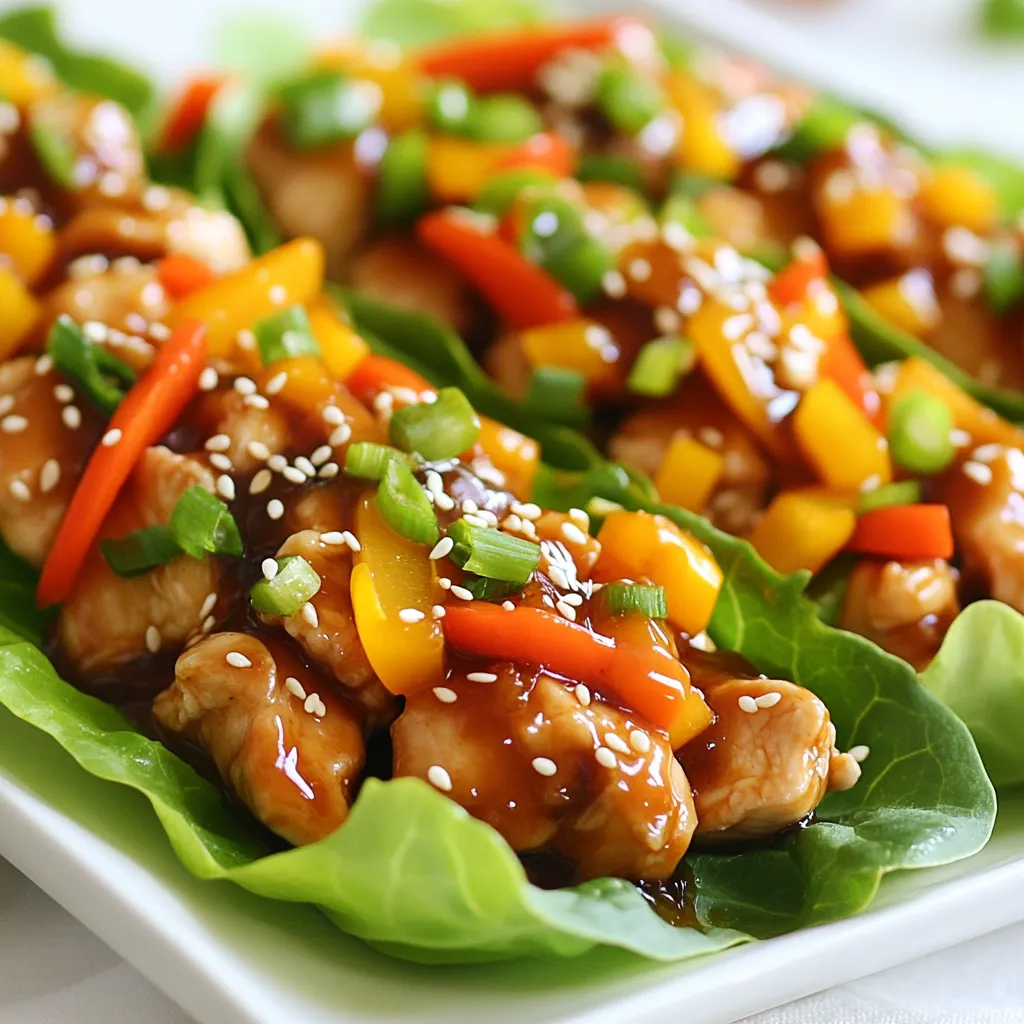
Irresistible Teriyaki Chicken Lettuce Wraps Recipe
Craving a tasty and healthy meal? Try these Irresistible Teriyaki Chicken Lettuce Wraps! They are simple to make and packed with flavor. Using fresh ingredients,
- 1 can (15 oz) chickpeas, drained and rinsed - 1/4 cup tahini - 2 cloves garlic, minced - 2 tablespoons fresh lemon juice - 2 tablespoons extra-virgin olive oil - 1/2 teaspoon ground cumin - Salt to taste - Water (2-4 tablespoons as needed) - Lemon zest (for garnish) - Paprika (for garnish) - Fresh parsley, chopped (for garnish) To make lemon garlic hummus, gather these ingredients first. Each one plays a key role in flavor. The chickpeas are the base. They add creaminess and protein. Tahini brings a nutty taste and smooth texture. Garlic gives a sharp bite that balances the dish. Fresh lemon juice adds brightness and tang. Extra-virgin olive oil enriches the mix and adds depth. Ground cumin gives a warm, earthy note. Salt enhances all the flavors. Water helps adjust the hummus to your desired thickness. Lemon zest, paprika, and parsley are for the finishing touches. They make the dip look beautiful and taste fresh. With this list, you're ready to create a tasty dip that everyone will love. {{ingredient_image_1}} Start by gathering your ingredients. You need a can of chickpeas, tahini, garlic, lemon juice, olive oil, ground cumin, salt, and water. Drain and rinse the chickpeas to remove the canning liquid. Mince the garlic cloves to release their flavor. Zest the lemon to add a fresh touch later. Measure out the tahini and olive oil. This prep makes blending easy. In a food processor, combine the chickpeas, tahini, minced garlic, lemon juice, olive oil, ground cumin, and salt. Process the mix until it is smooth. You may need to scrape down the sides to get everything blended well. If the hummus is thick, add water one tablespoon at a time. Blend until you reach a creamy texture. Taste your hummus and adjust the salt or lemon juice for the best flavor. Scoop the hummus into a serving bowl. Use a spoon to create a small well in the center. Drizzle some olive oil into the well. For garnishing, sprinkle lemon zest, paprika, and chopped parsley on top. This adds color and flavor. Serve your hummus with pita, veggies, or chips for a delicious snack! To get the right texture in your hummus, start by blending the chickpeas and tahini well. If the mixture is too thick, add water slowly. Use 1 tablespoon at a time until it’s creamy. You want a smooth dip, not a paste. Scrape the sides of the food processor often. This step makes sure everything mixes evenly. Taste your hummus after blending. If it needs more zing, add extra lemon juice. For more depth, sprinkle in more cumin. Don’t forget to adjust the salt. A pinch can change the whole flavor. You can also try adding a little garlic powder if you want a stronger garlic taste. Remember, balance is key. For the best results, use a good food processor. A blender can work, but it might not blend as smoothly. Make sure to have a spatula handy for scraping down the sides. A measuring spoon set is useful for the exact amounts. Using these tools will help you create a perfect dip every time. Pro Tips Use Fresh Ingredients: Fresh garlic and lemon juice will give your hummus a vibrant flavor that canned alternatives can't match. Adjust Consistency: If your hummus is too thick, add water gradually until you reach the desired creaminess; this helps in achieving the perfect texture. Experiment with Flavor: Feel free to add other spices like smoked paprika or cayenne pepper for an extra kick, or try roasted garlic for a different profile. Chill Before Serving: Let your hummus sit in the fridge for at least 30 minutes before serving; this allows the flavors to meld beautifully. {{image_2}} To make spicy lemon garlic hummus, add some heat. Mix in 1 to 2 teaspoons of your favorite hot sauce. You can also add a pinch of cayenne pepper for a kick. This version wakes up your taste buds and brings a new level of flavor. Roasting garlic changes its flavor. It becomes sweet and smooth. Try using 1 to 2 bulbs of roasted garlic instead of fresh. Just blend the roasted cloves into the mix. This version has a rich taste that is perfect for garlic lovers. Herbs add freshness to your hummus. You can mix in fresh herbs like basil, cilantro, or dill. Start with 1/4 cup of chopped herbs. Blend them in for a burst of flavor. This option makes your hummus unique and bright. Feel free to explore these variations. Each one offers a different taste experience to enjoy! To store leftover hummus, place it in an airtight container. This helps keep it fresh. Make sure to press plastic wrap directly onto the hummus to avoid air exposure. It will stay fresh for about five days in the fridge. If you notice any changes in smell or color, throw it out. You can freeze lemon garlic hummus for longer storage. Transfer it to a freezer-safe container. Leave some space at the top, as hummus expands when frozen. It can last up to three months in the freezer. When ready to eat, thaw it overnight in the fridge. Stir well before serving. To keep your hummus at its best, always use clean utensils. This prevents bacteria from spoiling the dip. If you want to keep it fresh, consider making smaller batches. Enjoy it fresh for the best taste and texture. Adding a drizzle of olive oil on top can also help keep it moist. Hummus works great with many foods. You can dip fresh veggies like carrots, cucumbers, and bell peppers. Pita bread and chips also make tasty choices. You can spread hummus on sandwiches or wraps too. It adds flavor and creaminess. Yes, you can use canned garlic. It saves time and is easy to find. However, fresh garlic gives a stronger taste. If you use canned, try starting with a small amount. Adjust to your liking as you blend. Lemon garlic hummus is not just tasty; it’s healthy too. Chickpeas provide protein and fiber. Garlic can boost your immune system. Lemon juice adds vitamin C, which is great for skin and health. Olive oil has healthy fats that are good for your heart. Homemade hummus lasts about one week in the fridge. Store it in an airtight container. If you notice any off smells or colors, it’s best to toss it. Always check before you eat. You can find pre-made lemon garlic hummus at many grocery stores. Look in the deli section or near the dips. Brands vary, so check the ingredients for what you like. Local markets may have fresh options as well. This blog post shared how to make delicious hummus with simple ingredients and clear steps. You learned about preparing, blending, and presenting hummus. I also provided tips for the right texture and flavor. Variations let you get creative, while storage tips keep your hummus fresh. Homemade hummus is easy, healthy, and tasty. Enjoy making it your way!
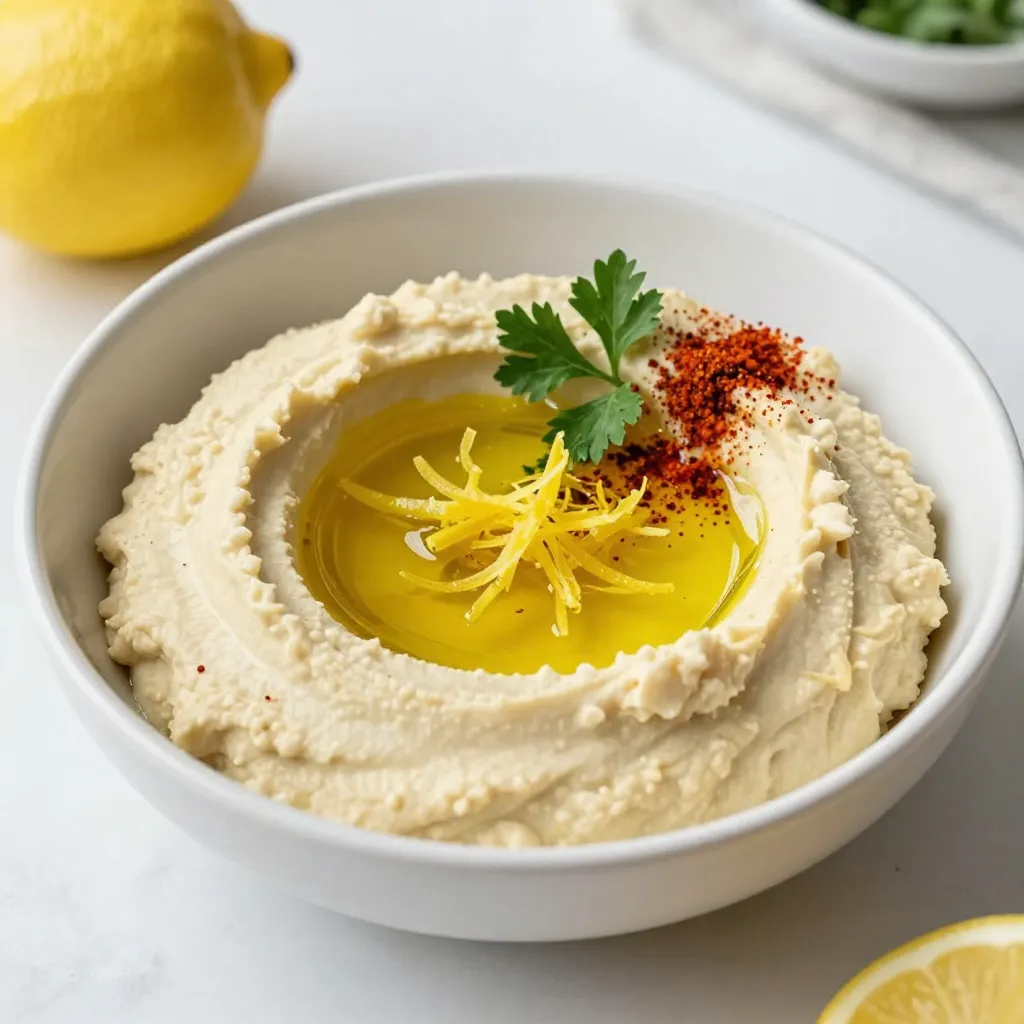
Lemon Garlic Hummus Flavorful and Easy Dip Recipe
Looking for a dip that’s easy to make and packed with flavor? Lemon Garlic Hummus is your answer! In this guide, I’ll share a simple
- 2 large sweet potatoes - 3 tablespoons olive oil - 1 teaspoon ground cinnamon - 1/2 teaspoon paprika - 1/2 teaspoon garlic powder - Salt and pepper to taste - 1 tablespoon honey (optional) When making baked sweet potato fries, choose large sweet potatoes. They provide more fries and a better taste. The olive oil helps the fries crisp up in the oven. Ground cinnamon adds a warm touch that pairs well with sweet potatoes. Paprika gives a mild kick, while garlic powder adds depth to the flavor. You can adjust the salt and pepper to fit your taste. If you want a hint of sweetness, drizzle honey over the fries before serving. This option can make them extra special. Gather these ingredients so you’re ready to create a crispy and flavorful treat. {{ingredient_image_1}} To start, peel your sweet potatoes. Use a sharp peeler to remove the skin. Then, cut them into thin strips. Aim for uniform thickness. This helps them cook evenly. If some pieces are thick, they will cook slower. If you cut them all the same size, they will bake perfectly. Next, grab a large bowl. Add the sweet potato strips into the bowl. Pour in three tablespoons of olive oil. This oil helps the fries crisp up. Now, sprinkle one teaspoon of ground cinnamon, half a teaspoon of paprika, and half a teaspoon of garlic powder over the sweet potatoes. Don’t forget salt and pepper to taste! Use your hands to toss them well. Make sure every strip gets coated. The oil and spices should cover all the fries. Now it's time to bake! First, preheat your oven to 425°F (220°C). This step is key for crispy fries. While the oven heats up, line a large baking sheet with parchment paper. Spread the sweet potato strips on the sheet in a single layer. Avoid overcrowding; this ensures they crisp up well. Bake your fries for 25 to 30 minutes. Halfway through, flip them over for even browning. When they turn golden brown, they are ready to eat! If you like, drizzle honey on top for a sweet touch before serving. Spacing is key when baking sweet potato fries. If you crowd them on the pan, they will steam instead of crisp up. Make sure each fry has space to breathe. This helps hot air circulate and creates a nice crunch. Different ovens heat in different ways. If your oven runs hot, reduce the heat slightly. For ovens that don't get hot enough, you might need to bake a bit longer. Keep an eye on your fries, so they don’t burn. You can change the seasoning to match your taste. Try using chili powder for some heat or cumin for a deeper flavor. You can also mix in herbs like rosemary or thyme for a fresh twist. To adjust flavors, taste before cooking. If you love garlic, add more garlic powder. If you prefer sweeter fries, drizzle more honey on top. This is your chance to get creative! Dipping sauces can take your fries to the next level. Try ranch, honey mustard, or spicy ketchup. Each adds a fun flavor that pairs well with sweet potatoes. For main dishes, serve these fries with grilled chicken or fish. They also go great with a fresh salad. Mixing and matching makes every meal special! Pro Tips Cut Evenly: Ensure that all sweet potato strips are cut to the same thickness for even cooking and crispiness. Soak for Extra Crisp: Soaking the sweet potato strips in cold water for 30 minutes before baking can help remove excess starch and enhance crispiness. Don’t Overcrowd: Spread the fries out on the baking sheet in a single layer, leaving space between them to allow hot air to circulate and make them crispier. Adjust Seasoning: Feel free to adjust the spices to your taste; a pinch of cayenne pepper can add a nice heat to balance the sweetness. {{image_2}} You can change the flavor of sweet potato fries to suit your taste. For a spicy kick, add cayenne pepper. Just a sprinkle can make a big difference. It gives the fries a nice heat that you will enjoy. If you prefer something sweet, try maple syrup. Drizzle it on the fries before baking. This adds a rich flavor that complements the sweet potatoes perfectly. You can boost the nutrition of your fries by adding other vegetables. Try mixing in carrots or zucchini strips. This not only adds color but also gives more vitamins to your meal. Incorporating herbs can also enhance the flavor. Fresh rosemary or thyme works well. Just chop them finely and mix them in with the sweet potato strips. This adds a delicious aroma and taste. An air fryer is a great way to cook sweet potato fries. It makes them crispy without using a lot of oil. Set your air fryer to 400°F (200°C) and cook for about 15-20 minutes. Shake the basket halfway through for even cooking. Grilling is another fun option. Preheat your grill and place the fries in a grill basket. Cook them for about 10-15 minutes, turning often. This gives the fries a nice smoky flavor that is hard to beat. To keep your leftover sweet potato fries fresh, let them cool first. Once cooled, place them in an airtight container. This will help prevent sogginess. You can also use a zip-top bag, but remove as much air as you can. Store them in the fridge for up to three days. If you have a lot of fries, divide them into smaller portions. This makes it easier to reheat only what you need. For the best result, reheat your fries in the oven. Preheat your oven to 400°F (200°C). Spread the fries on a baking sheet in a single layer. Bake them for about 10-15 minutes. This method helps regain their crispiness. You can also use an air fryer if you have one. Set it to 350°F (175°C) and cook for about 5-8 minutes. Make sure to check often to avoid burning. Yes, you can make sweet potato fries without oil. Try baking them in an air fryer or oven. Coat the fries with spices and a bit of water. This helps them crisp up without adding fat. You can also use parchment paper to prevent sticking. Baked sweet potato fries last about 3-5 days in the fridge. Store them in an airtight container. If you see any mold or an off smell, throw them away. These signs mean the fries are spoiled. You can freeze baked sweet potato fries! Let them cool completely first. Then, place them in a freezer-safe bag. Make sure to remove as much air as possible. For reheating, bake them at 425°F for about 15-20 minutes. This helps restore their crispiness. You now know how to make amazing baked sweet potato fries. We covered key ingredients, step-by-step instructions, helpful tips, and different variations. Remember, the right seasoning and cooking method can elevate your dish. Don’t forget to store leftovers properly for freshness. With a few simple tweaks, you can make these fries fit any taste. Enjoy your cooking journey and impress everyone with your delicious fries!
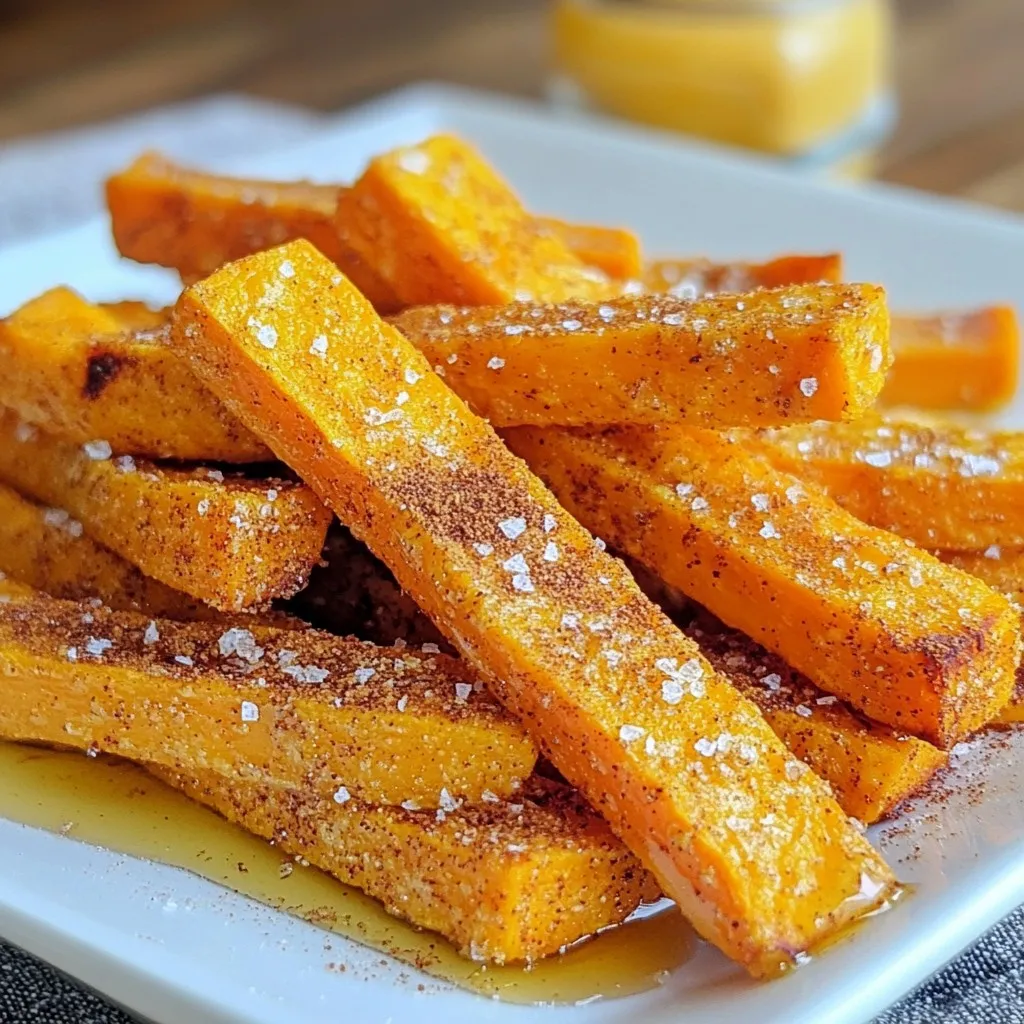
Baked Sweet Potato Fries Crispy and Flavorful Treat
Looking for a tasty snack that’s both healthy and fun? Baked Sweet Potato Fries are your go-to treat! These fries are crispy, flavorful, and easy
To make Garlic Parmesan Roasted Cauliflower, gather these items: - 1 medium head of cauliflower, cut into florets - 3 tablespoons olive oil - 4 cloves garlic, minced - 1/2 cup grated Parmesan cheese - 1 teaspoon smoked paprika - 1/2 teaspoon salt - 1/4 teaspoon black pepper - 2 tablespoons fresh parsley, chopped (for garnish) - Zest of 1 lemon (for added brightness) You may already have some of these pantry staples at home. Olive oil adds richness. Garlic gives a bold taste. Smoked paprika adds warmth and depth. Salt and black pepper enhance the flavors. These simple ingredients create a big taste. To make this dish your own, consider these optional additions: - A pinch of red pepper flakes for heat - A sprinkle of nutritional yeast for a cheesy vibe - Other herbs like thyme or rosemary for extra flavor These easy tweaks can make your Garlic Parmesan Roasted Cauliflower even more exciting! {{ingredient_image_1}} To start, gather your ingredients. You need one medium head of cauliflower, olive oil, garlic, and spices. Here’s how to prep: 1. Preheat your oven to 425°F (220°C). This helps the cauliflower roast well. 2. Cut the cauliflower into florets. Aim for bite-sized pieces. 3. In a large bowl, mix the florets with three tablespoons of olive oil. 4. Add four cloves of minced garlic, one teaspoon of smoked paprika, half a teaspoon of salt, and a quarter teaspoon of black pepper. 5. Toss everything until the florets are coated. This step makes sure every bite is tasty. Roasting brings out the best flavors in cauliflower. Here’s how to do it right: 1. Spread the florets on a baking sheet lined with parchment paper. Make sure they have space. 2. Roast them in the oven for about 20 minutes. You want them to soften and start to char. 3. After 20 minutes, take the baking sheet out. Sprinkle half a cup of grated Parmesan cheese over the florets. 4. Return the baking sheet to the oven for another 5-10 minutes. The cheese should melt and turn golden. Finishing touches make the dish pop. 1. Once the cauliflower is done, take it out of the oven. 2. Zest one lemon over the top. This adds brightness to the rich flavors. 3. Lastly, garnish with two tablespoons of chopped fresh parsley. This adds color and freshness to your dish. Now, your Garlic Parmesan Roasted Cauliflower is ready to impress! Enjoy this tasty side dish with your favorite meals. To get that perfect roast, you want to start with dry cauliflower. If it’s wet, it won't crisp well. After cutting the cauliflower, pat it dry with a paper towel. Use enough olive oil to coat each floret. This helps them brown nicely. Spread them out on the baking sheet. If they are too close, they will steam instead of roast. Garlic is the star of this dish, but you can mix it up! Try roasting whole garlic cloves instead of minced garlic. This gives a sweet, mellow flavor. You can also add garlic powder for an extra kick. For a twist, add roasted garlic with a pinch of red pepper flakes. This adds some heat and depth. Parmesan cheese is fantastic, but feel free to be creative! You can use Pecorino Romano for a stronger taste. If you want a nutty flavor, try using Grana Padano. For a dairy-free option, nutritional yeast works wonders. It adds a cheesy flavor without the milk. Experiment with these choices to find your perfect match! Pro Tips Choose Fresh Cauliflower: Select a cauliflower head that is firm and compact, with no brown spots or blemishes, to ensure the best flavor and texture. Experiment with Seasonings: Feel free to add your favorite spices or herbs, like thyme or oregano, to customize the flavor profile to your liking. Don’t Overcrowd the Baking Sheet: Spread the cauliflower in a single layer to promote even roasting and prevent steaming, which keeps the florets crispy. Serve Immediately: For the best taste and texture, serve the roasted cauliflower right out of the oven while it's still hot and crispy. {{image_2}} You can spice things up with a spicy version. Just add red pepper flakes to your mix. Start with 1/2 teaspoon. You can adjust based on your taste. This will give your cauliflower a nice kick. It pairs well with the garlic and cheese. You still follow the same steps for roasting. Enjoy the heat with every bite. For a fresh twist, add herbs to the mix. Try thyme or rosemary for great flavor. Chop about 1 tablespoon of fresh herbs. Toss them in with the olive oil. This adds a lovely earthiness to your dish. You can also use dried herbs if fresh is not available. They still bring out great flavor. If you want a vegan option, replace Parmesan cheese. Use nutritional yeast instead. It gives a cheesy flavor without dairy. Mix 1/2 cup of nutritional yeast into your cauliflower. Follow the same steps for roasting. You’ll still enjoy a tasty side dish that everyone can savor. To store your leftover Garlic Parmesan roasted cauliflower, let it cool first. Place it in an airtight container. It will stay fresh in the fridge for about three to five days. Use a spoon to scoop out portions when you want to enjoy it again. To reheat your cauliflower, you have a few options. The best way is to use the oven. Preheat it to 350°F (175°C). Spread the cauliflower on a baking sheet. Heat for about 10-15 minutes until warm and crispy again. You can also use a microwave if you're in a hurry. Just warm it in short bursts, checking often. If you want to freeze your Garlic Parmesan roasted cauliflower, do it before you add the cheese. After roasting, let the cauliflower cool down. Place it in a freezer-safe bag or container. It can last for up to three months in the freezer. When you're ready to eat it, thaw it in the fridge overnight, then reheat as mentioned above. Yes, you can make Garlic Parmesan Roasted Cauliflower ahead of time. Prepare the dish up to the roasting step. Store the coated cauliflower in the fridge for up to a day. When you are ready, roast it as directed. This saves time and keeps the flavors fresh. Garlic Parmesan Roasted Cauliflower pairs well with many dishes. Serve it as a side with grilled chicken or fish. It also goes great with pasta and salads. For a fun twist, toss it into a grain bowl. Add some lemon zest or extra parsley for a fresh touch. Yes, eating roasted cauliflower is healthy. Cauliflower is low in calories and high in fiber. It also contains vitamins C, K, and B6. Regularly enjoying this dish can support a balanced diet. Just watch the cheese and oil if you want to keep it light. This article covers everything about Garlic Parmesan Roasted Cauliflower. We talked about key ingredients and helpful pantry staples. You learned how to prepare, roast, and finish this dish perfectly. I shared tips to achieve a great roast and tasty variations for all diets. Finally, we covered how to store and reheat leftovers effectively. In summary, you can enjoy a delicious and healthy dish using simple steps. Try out these ideas tonight and make it your own!
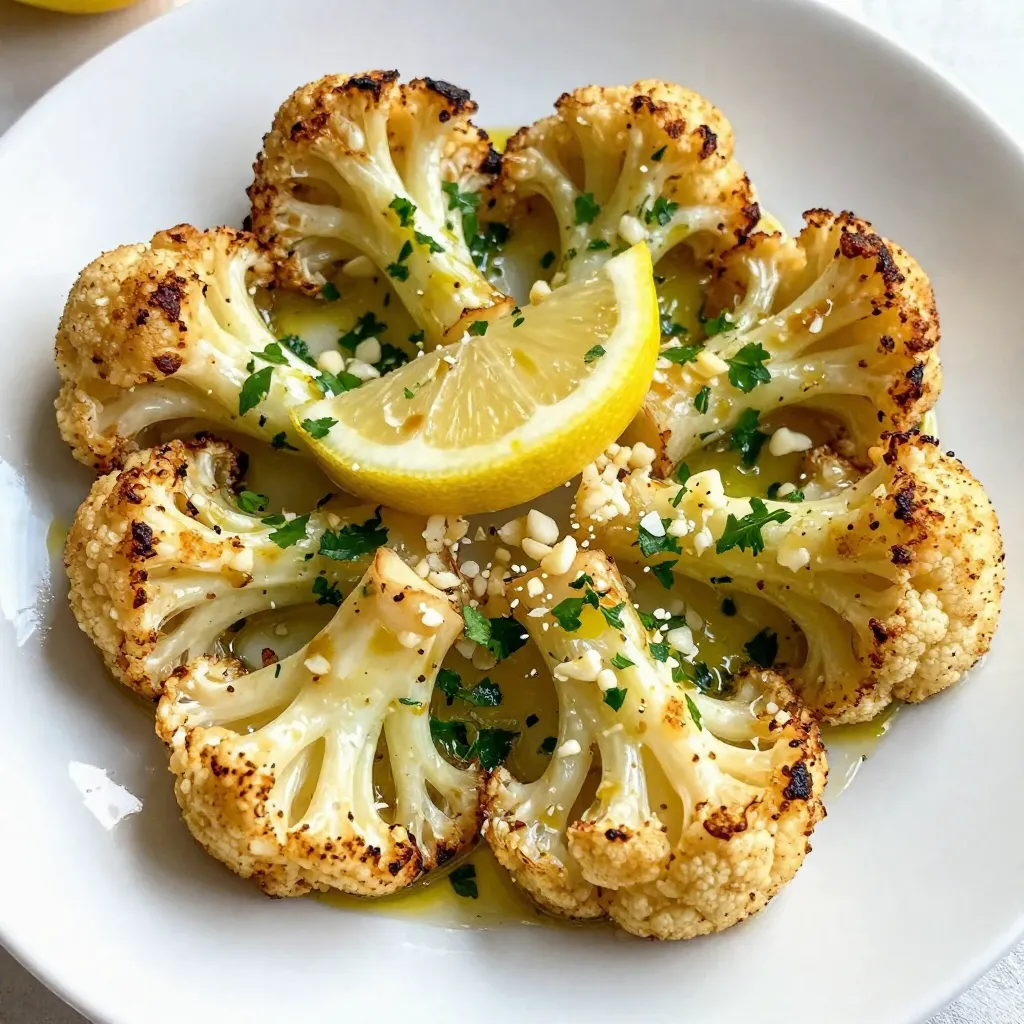
Garlic Parmesan Roasted Cauliflower Tasty Side Dish
Looking for a side dish that steals the show? Try my Garlic Parmesan Roasted Cauliflower! It’s easy, quick, and packs a punch of flavor. Whether
- Potatoes: Use 4 large russet potatoes. They make the best fries with a fluffy inside. - Seasoning ingredients: - 1 tablespoon olive oil adds richness. - 1 teaspoon garlic powder gives a nice, savory flavor. - 1 teaspoon dried oregano brings a hint of the Mediterranean. - Salt and pepper enhance all the flavors. - Toppings and garnishes: - 1 cup crumbled feta cheese adds creaminess and a salty bite. - 1/2 cup Greek yogurt gives a cool, tangy touch. - 1/2 cup halved cherry tomatoes adds freshness and color. - 1/4 cup sliced Kalamata olives brings a briny flavor. - 1/4 cup thinly sliced red onion gives a crunchy texture. - Fresh parsley, chopped, makes the dish look vibrant and fresh. These ingredients work together, creating a tasty experience with each bite. Each element plays a role in making this dish a delightful treat! {{ingredient_image_1}} 1. Preheating the oven: Start by setting your oven to 425°F (220°C). This hot temperature helps the fries become crispy. 2. Tossing fries with oil and seasonings: In a large bowl, take your cut fries. Add 1 tablespoon of olive oil, 1 teaspoon of garlic powder, and 1 teaspoon of dried oregano. Sprinkle in some salt and pepper. Mix until all fries are well coated. 3. Arranging fries on a baking sheet: Line a baking sheet with parchment paper. Spread the seasoned fries in a single layer so they cook evenly. 1. Baking time and temperature: Place the baking sheet in the preheated oven. Bake the fries for 25 to 30 minutes. 2. Flipping fries during baking: Halfway through baking, take out the sheet and flip the fries. This helps them cook evenly and get that golden color we love. 1. Preparing the Greek yogurt topping: While the fries bake, grab a small bowl. Mix 1/2 cup of Greek yogurt with a pinch of salt. This adds flavor and creaminess. 2. Layering the toppings after baking: Once the fries are crisp, take them out of the oven. Sprinkle 1 cup of crumbled feta cheese over the hot fries. Then, add 1/2 cup of halved cherry tomatoes, 1/4 cup of sliced Kalamata olives, and 1/4 cup of thinly sliced red onion on top. 3. Final garnishing: Drizzle your seasoned Greek yogurt over all the toppings. For a pop of color, finish with some freshly chopped parsley. Now, you have a plate of loaded Greek fries that burst with flavor! Enjoy every bite. - Choosing the right potatoes I love using large russet potatoes for fries. They have a high starch content, which gives you that fluffy inside and crisp outside. Make sure to cut them evenly. This way, they cook at the same rate. - Techniques for achieving maximum crispiness For crispier fries, soak the cut potatoes in cold water for at least 30 minutes. This removes excess starch. After soaking, dry them well before adding olive oil and seasonings. Bake them in a single layer on a lined sheet for best results. Flipping halfway through helps them get golden and crispy. - Additional spices or herbs to consider Try adding smoked paprika or cumin for a warm flavor. Fresh herbs like dill or mint can brighten the dish. You can also mix in some crushed red pepper for a kick. - Alternatives for proteins or toppings If you want to add protein, grilled chicken or lamb works great. You can swap feta with goat cheese for a different taste. For a vegetarian twist, add roasted chickpeas for extra crunch and protein. Pro Tips Use a Mandoline for Perfect Fries: A mandoline slicer can help achieve uniform fry sizes, ensuring they cook evenly and get crispy all around. Soak the Potatoes: Soaking the cut fries in cold water for at least 30 minutes before baking can help remove excess starch and result in crispier fries. Experiment with Seasonings: Feel free to add other spices like paprika or cumin to the fry seasoning for an extra kick of flavor tailored to your taste. Serve Immediately: Loaded fries are best enjoyed fresh out of the oven while they are still hot and crispy. Serve them right away for maximum enjoyment! {{image_2}} You can make loaded Greek fries even better by adding more veggies. Think bell peppers, zucchini, or spinach. These veggies add color and flavor. You can roast them alongside the fries. This way, they get soft and tasty. Another great option is using plant-based yogurt. This swap keeps the dish creamy. It also makes it vegan-friendly. Look for a good brand of plant-based yogurt that is thick. This will give you the same smooth texture as Greek yogurt. If you love meat, try adding grilled chicken or lamb. This addition makes the dish heartier. Simply slice the meat thin and layer it on top of the fries. The warm meat will melt the feta cheese nicely. You can also enhance the dish with other dairy options. Try using cheddar cheese or ricotta. Both add a different flavor that pairs well with the Greek toppings. Just sprinkle them over the fries after baking for a delicious twist. To keep your loaded Greek fries fresh, follow these tips: - Refrigeration: Place the fries in an airtight container. This helps prevent moisture loss. - Duration of freshness: They last about 2-3 days in the fridge. After that, they may lose flavor and texture. Reheating loaded Greek fries can be tricky. You want to keep them crispy. Here are some methods: - Oven method: Preheat your oven to 375°F (190°C). Spread the fries on a baking sheet. Heat for about 10-15 minutes. This helps regain their crispiness. - Air fryer option: If you have an air fryer, use it! Set it to 350°F (175°C) and cook for 5-7 minutes. This method also keeps them crispy. - Microwave warning: While it's quick, avoid using the microwave. It makes fries soggy. With these tips, you can enjoy your loaded Greek fries even after the first serving! Yes, you can use frozen fries. They save time and effort. Frozen fries are already cut and prepped. However, fresh fries taste better. Fresh russet potatoes give you a crispy texture. If you use frozen fries, check the packaging. Follow the cooking time on the bag. You may want to add extra seasoning for flavor. To make Loaded Greek Fries healthier, try these tips: - Use less olive oil, or spray the fries lightly. - Swap regular Greek yogurt for a low-fat option. - Add more veggies like bell peppers or spinach. - Use a smaller amount of feta cheese, or choose a reduced-fat version. These swaps will lower calories but keep the taste. Pair Loaded Greek Fries with these great options: - A fresh Greek salad for a light side. - Tzatziki sauce for an extra dip. - A cold glass of lemonade or sparkling water. These pairings will round out your meal and enhance the flavors. This article provided a clear guide to making loaded Greek fries. You learned about the right potatoes and seasonings to use. I shared tips for baking and assembling the dish to perfection. Plus, we discussed variations for different diets. With proper storage and reheating tips, leftovers can still taste great. I hope you feel ready to try this dish fun and easy. Filled with flavor, these fries can amaze your friends and family. Enjoy your cooking adventure!
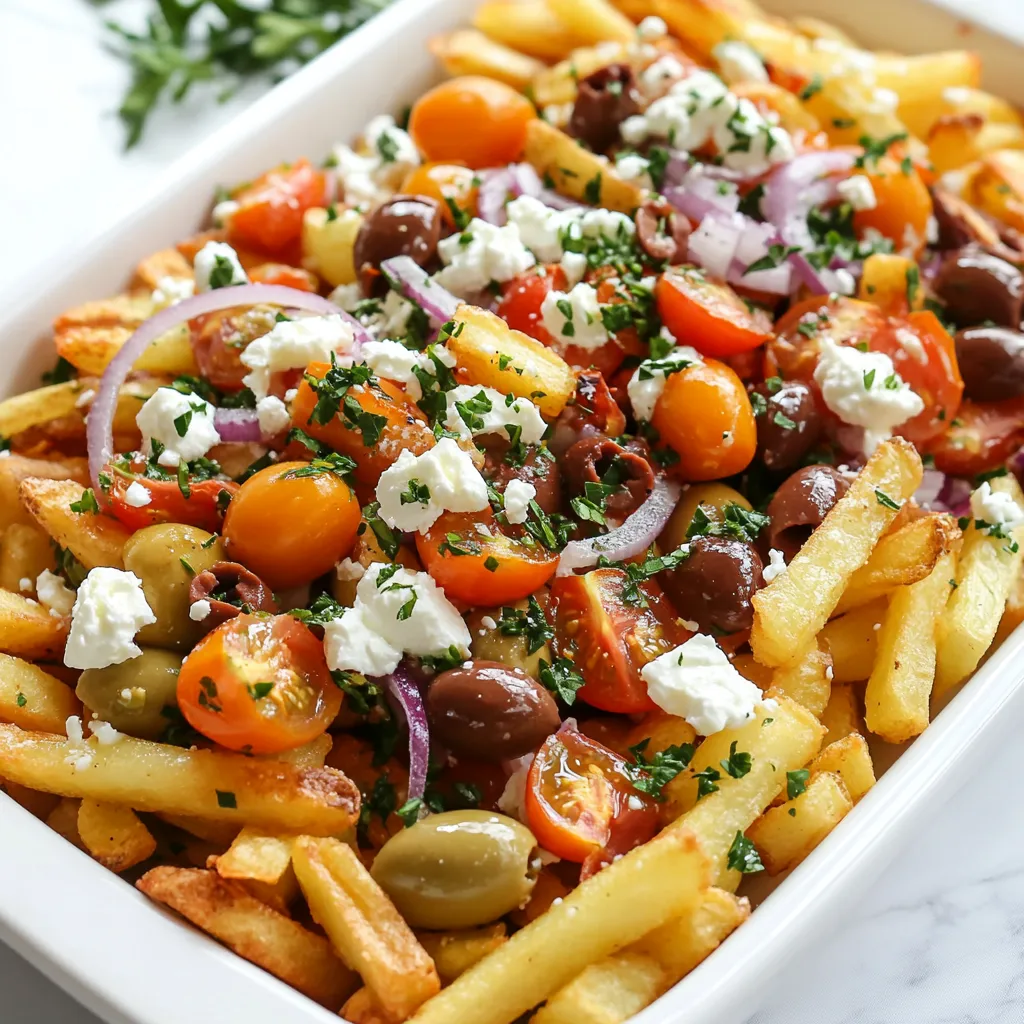
Loaded Greek Fries Irresistible Flavor in Every Bite
Looking for a dish that packs bold taste and a fun twist? Loaded Greek fries deliver irresistible flavor in every bite! Imagine crispy fries topped
- 2 pounds boneless, skinless chicken thighs - 1 cup BBQ sauce (store-bought or homemade) - 12 slider buns - 1 tablespoon olive oil - 1 onion, finely chopped - 2 cloves garlic, minced - 1 teaspoon smoked paprika - 1 teaspoon onion powder - 1 teaspoon garlic powder - 1 teaspoon cumin - Salt and pepper to taste - 1 cup coleslaw (store-bought or homemade) - Fresh cilantro, for garnish To make BBQ pulled chicken sliders, start with quality ingredients. Chicken thighs give a juicy and tender texture. You can use your favorite BBQ sauce, whether it's homemade or store-bought. The sauce adds rich flavor and moisture. For seasoning, olive oil helps to sauté the onions and garlic. The onion gives sweetness, while garlic adds depth. Smoked paprika gives a touch of smokiness, while onion powder, garlic powder, and cumin round out the flavors. Salt and pepper are essential for taste. When it comes to toppings, coleslaw provides a crunchy contrast to the tender chicken. You can buy it or make your own. Fresh cilantro adds a pop of color and a fresh taste that brightens the sliders. These ingredients come together to create a delicious meal that’s perfect for gatherings or a cozy night in. Each bite is a mix of flavors and textures that you and your guests will love. {{ingredient_image_1}} To start, heat 1 tablespoon of olive oil in a large skillet over medium heat. Once hot, add 1 finely chopped onion. Cook the onion for about 5 minutes until it turns soft and clear. Now, stir in 2 minced garlic cloves and cook for another minute. This will create a nice base for your chicken. Next, add 2 pounds of boneless, skinless chicken thighs to the skillet. Season the chicken with 1 teaspoon of smoked paprika, 1 teaspoon of onion powder, 1 teaspoon of garlic powder, 1 teaspoon of cumin, and a pinch of salt and pepper. This mix of spices will give your chicken great flavor. Now, it's time to sear the chicken thighs. Cook each side for about 3-4 minutes until they get a nice brown color. After searing, pour in 1 cup of your favorite BBQ sauce. Make sure the chicken is well-coated. Lower the heat to a gentle simmer, cover the skillet, and let it cook for 30-35 minutes. This slow cooking will make the chicken tender and juicy. Once the chicken is cooked, take it out and place it on a cutting board. Use two forks to shred the chicken into bite-sized pieces. Return the shredded chicken to the skillet and mix well with the BBQ sauce. While the chicken simmers, preheat your oven to 350°F (175°C). Slice 12 slider buns in half and place them on a baking sheet. Toast them in the oven for about 5-7 minutes until they are golden brown. Now it’s time to assemble! Spread a good amount of pulled chicken on the bottom half of each slider bun. Top it with a spoonful of coleslaw and place the top half of the bun on each slider. Enjoy your delicious BBQ pulled chicken sliders! Choosing the best BBQ sauce Pick a BBQ sauce that matches your taste. A tangy sauce adds zest. A sweet sauce gives a rich flavor. You can even mix sauces for a unique taste. Recommended seasoning adjustments Feel free to tweak the spices. Add more smoked paprika for a deeper flavor. A pinch of cayenne can bring some heat. Experiment until you find what you love. Ensuring chicken tenderness To keep the chicken tender, cook it low and slow. This method helps break down the meat fibers. Always check that the internal temperature reaches 165°F. Recommended cooking methods You can use various methods to cook the chicken. Slow-cook in a crockpot for ease. Grill it for a smoky flavor. Each method brings a different taste. How to layer the sliders Start with the bottom bun. Add a generous scoop of pulled chicken. Next, add a spoonful of coleslaw for crunch. Finally, place the top bun gently on top. Ensuring less soggy buns To avoid soggy buns, toast them lightly. This creates a barrier against moisture. You can also serve the coleslaw on the side. This keeps the buns crisp longer. Pro Tips Choose the Right Chicken: Using boneless, skinless chicken thighs ensures that your pulled chicken remains juicy and flavorful. Avoid chicken breasts, which can dry out during cooking. Homemade BBQ Sauce: For a unique flavor, consider making your own BBQ sauce. This allows you to customize the sweetness and spiciness to your liking. Coleslaw Variations: Experiment with different types of coleslaw, like spicy or vinegar-based, to add a twist to your sliders. This can enhance the overall flavor profile. Keep it Warm: If serving at a gathering, keep the pulled chicken warm in a slow cooker to maintain its temperature and moisture until it's time to serve. {{image_2}} You can change up the meat in this recipe. Pulled pork works great, too. If you want a plant-based option, try jackfruit. It shreds like chicken and takes on flavors well. You can also switch up the coleslaw. A vinegar-based slaw brings a bright taste. Try adding apples or nuts for a twist. Customize to fit your taste! Want more heat? Make spicy BBQ pulled chicken! Add hot sauce or cayenne pepper to the BBQ sauce. You can also mix in some chopped chipotle peppers for a smoky kick. Don’t forget toppings! Cheese adds creaminess, and jalapeños bring heat. Choose your favorite toppings to make each slider unique. Buns are key for sliders. Try brioche for a sweet touch or whole wheat for a healthy option. You can also use lettuce leaves for a low-carb version. For sides, fries and chips are classic. You could also serve with a fresh salad or some crunchy pickles. These sides balance the rich flavors of the sliders perfectly. To store BBQ pulled chicken, let it cool first. Place it in a sealed container. You can keep it in the fridge for up to four days. This helps keep the chicken tender and tasty. Always check for any off smell before eating. To freeze leftover sliders, wrap them tightly in plastic wrap. Place them in a freezer bag to avoid freezer burn. You can freeze them for up to three months. When you're ready to eat, take them out and let them thaw in the fridge overnight. For reheating, preheat your oven to 350°F (175°C). Unwrap the sliders and place them on a baking sheet. Heat for about 15 minutes, or until warm. This keeps the buns nice and soft. To keep flavor and texture, store the chicken and buns separately. This way, the buns do not get soggy. You can also add fresh coleslaw just before serving. This adds crunch and freshness. You can use several options for pulled chicken. Here are some great choices: - Chicken breasts: They are lean but can dry out. Cook them gently for best results. - Pulled pork: Use slow-cooked pork for a richer flavor. - Turkey: Ground turkey works well too. It’s lean and tasty. - Jackfruit: This plant-based option is great for a vegan version. It shreds nicely like meat. Yes, you can prepare the chicken ahead of time. Here are some tips: - Cook and store: You can cook the pulled chicken and keep it in the fridge for up to 3 days. - Freezing: Freeze the shredded chicken in airtight bags. It lasts for up to 3 months. - Reheat: When ready, reheat in a skillet or microwave until hot. If you want to add heat, try these simple ideas: - Hot sauce: Mix your favorite hot sauce into the BBQ sauce. - Jalapeños: Add sliced jalapeños to the sliders for fresh heat. - Spicy seasoning: Use cayenne pepper or chili powder when cooking the chicken. - Pepper jack cheese: Add a slice for a creamy, spicy kick. These tips will help you make BBQ pulled chicken sliders that fit your taste! This blog post guides you through making delicious BBQ pulled chicken sliders. You learned about key ingredients, step-by-step cooking, and tasty toppings. I also shared tips for better flavor and variations to suit your taste. Don’t forget proper storage for any leftovers. Try these sliders at your next gathering. They are easy to make and sure to impress everyone. Enjoy the fun of cooking, and please share your results!
BBQ Pulled Chicken Sliders Irresistible and Tasty Treat
Get ready for a treat with BBQ Pulled Chicken Sliders! These tasty bites are perfect for game day, parties, or a family dinner. With juicy
- 1 pound large shrimp, peeled and deveined - 4 tablespoons honey - 3 cloves garlic, minced - 2 tablespoons soy sauce - 1 tablespoon sriracha (adjust according to spice preference) - 1 tablespoon olive oil - 1 teaspoon freshly grated ginger - 1 tablespoon lime juice - Salt and pepper to taste The main ingredients create a sweet and spicy mix. The honey adds sweetness, while sriracha brings heat. Garlic and ginger enhance the dish with their rich flavors. Fresh shrimp soak up these tasty notes, making every bite special. - 2 green onions, thinly sliced - Sesame seeds Garnishes elevate your dish. Green onions add a fresh crunch. Sesame seeds provide a nutty flavor and pretty look. These extras make your meal pop on the plate. If you lack sriracha, use chili paste or red pepper flakes. For a gluten-free option, swap soy sauce for tamari. If you need a different sweetener, try maple syrup or agave instead of honey. These swaps keep the dish flavorful while catering to your needs. {{ingredient_image_1}} Start by making the marinade. In a medium bowl, mix together 4 tablespoons of honey, 3 cloves of minced garlic, and 2 tablespoons of soy sauce. Add 1 tablespoon of sriracha for some heat. If you want it spicier, add more sriracha. Then, include 1 teaspoon of freshly grated ginger and 1 tablespoon of lime juice. Whisk all ingredients until blended. Next, add 1 pound of peeled and deveined shrimp. Make sure each shrimp gets coated well. Let the shrimp sit in the marinade for 15-20 minutes. This time will help the shrimp soak up all the great flavors. Heat 1 tablespoon of olive oil in a large skillet over medium-high heat. Once the oil is hot, add the marinated shrimp along with the marinade. Cook the shrimp for about 2-3 minutes on one side. You will know they are ready to flip when they turn pink. Then, flip the shrimp and cook for another 2-3 minutes. Be careful not to overcook them. They should look pink and opaque when done. Season with salt and pepper to taste, adding just the right touch of flavor. After cooking, take the skillet off the heat. Transfer the shrimp to a serving dish. Drizzle any leftover sauce from the skillet on top of the shrimp. This adds extra flavor. For a lovely finish, garnish with thinly sliced green onions and a sprinkle of sesame seeds. These final touches make the dish look great and taste even better. Enjoy your spicy honey garlic shrimp! To make the best marinade, mix honey, garlic, soy sauce, sriracha, ginger, and lime juice. Whisk them well until they blend smoothly. The honey adds sweetness, while sriracha gives heat. Adjust the sriracha if you like it milder or spicier. Always let the shrimp sit in the marinade for 15-20 minutes. This step helps the flavors soak into each shrimp. Use a large skillet and heat olive oil over medium-high heat. This makes the shrimp cook evenly. Add the shrimp along with the marinade to the skillet. Cook them for 2-3 minutes on each side. Look for a pink, opaque color to know they are done. Avoid overcooking; this keeps them juicy. Season with salt and pepper for extra taste. Serve your shrimp on a bed of jasmine rice or a fresh green salad. This adds a nice crunch. Drizzle any leftover sauce from the skillet over the shrimp for more flavor. Garnish with sliced green onions and sesame seeds for a pop of color. Lime wedges on the side add a fresh, zesty twist. Enjoy your tasty creation! Pro Tips Marinate for Maximum Flavor: Allow the shrimp to marinate for at least 30 minutes, or even up to an hour, to really absorb the flavors of the honey, garlic, and spices. Use Fresh Ingredients: Fresh shrimp and freshly minced garlic will make a significant difference in taste compared to frozen shrimp and pre-minced garlic. Adjust Spice Level: If you prefer a milder dish, reduce the amount of sriracha or replace it with a milder hot sauce. Perfect Cooking Time: Keep an eye on the shrimp while cooking; they should be cooked just until they turn pink and opaque to avoid becoming tough. {{image_2}} You can add veggies to your Spicy Honey Garlic Shrimp for extra flavor. Bell peppers, snap peas, or broccoli work great. Start by sautéing the vegetables in olive oil before adding the shrimp. This way, you get a full meal with added crunch and nutrients. Not everyone loves heat, so you can adjust the spice. If you want less spice, use less sriracha. You can also replace it with a milder sauce, like sweet chili sauce. For more heat, add fresh chili slices or increase the sriracha. Taste as you go to find your perfect balance. You can switch up the sauce for a new twist. Try teriyaki sauce for a sweet touch. Or use a mix of soy sauce and lime for brightness. Each sauce brings a unique flavor to your dish. Experiment with what you have on hand to keep things exciting! Store any leftover Spicy Honey Garlic Shrimp in an airtight container. Keep it in the fridge for up to three days. This helps keep the shrimp fresh and tasty. If you want to keep it longer, freezing is a great option. To reheat the shrimp, use a skillet on low heat. Add a splash of water or broth to keep it moist. Cook for about five minutes until warmed through. You can also use a microwave. Just cover it and heat for one to two minutes. Stir halfway for even heating. To freeze, place the shrimp in a freezer-safe bag. Remove as much air as possible before sealing. Label the bag with the date. The shrimp will stay good for up to three months. When ready to eat, thaw in the fridge overnight before reheating. To reduce the heat, use less sriracha. You can also skip it entirely. If you want some heat, choose chili flakes instead. Adding more honey can balance the spice, making it sweeter. If you like mild flavors, use sweet soy sauce. This will keep the dish tasty without the heat. Yes, you can use frozen shrimp. Just make sure to thaw them first. Place the shrimp in cold water for about 15 minutes. This helps them thaw evenly. Drain and pat them dry before marinating. The flavor will still be great, so don't worry! Cook shrimp until they turn pink and opaque. This usually takes about 2-3 minutes per side. If they curl into a C shape, they are done. Be careful not to overcook them, or they will become rubbery. Keep an eye on them as they cook! This blog post shared a simple recipe for Spicy Honey Garlic Shrimp. You learned about key ingredients, marinating techniques, and cooking steps. There were also tips for flavor, variations with veggies, and storage information. Keep experimenting with spiciness and sauces to make this dish your own. Enjoy cooking and sharing these tasty shrimp with friends or family. You’ll impress them with your skills!
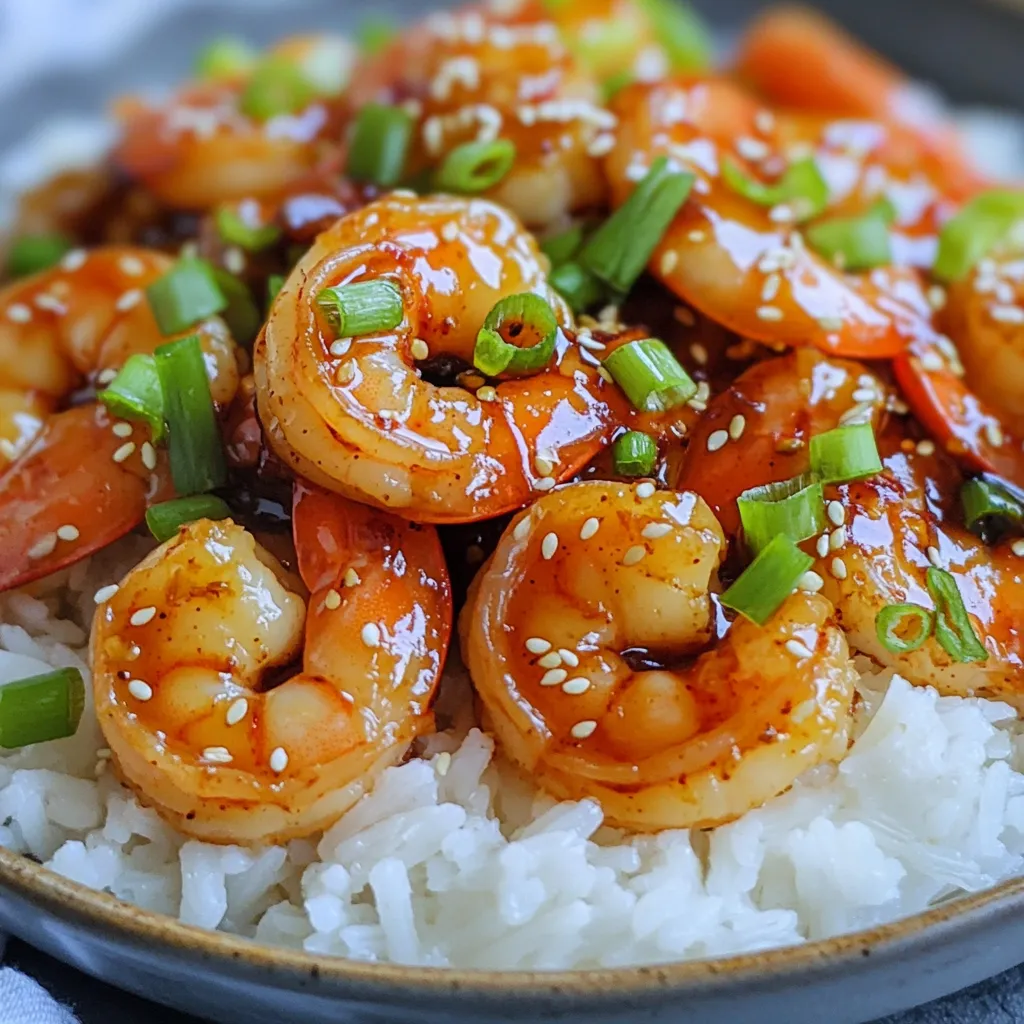
Spicy Honey Garlic Shrimp Irresistible Flavor Twist
Are you ready to elevate your dinner game? This Spicy Honey Garlic Shrimp serves up an irresistible flavor twist that you won’t forget. I’ll walk
- 1 pound ground beef (or ground turkey for a lighter option) - 1/2 cup breadcrumbs - 1/4 cup grated Parmesan cheese - 2 cloves garlic, minced - 1 egg, beaten - 1 tablespoon soy sauce - 1/4 teaspoon black pepper - 1/2 teaspoon salt - 1 tablespoon olive oil (for frying) For the meatballs, you can choose either ground beef or ground turkey. Beef gives a rich flavor, while turkey is lighter and leaner. Breadcrumbs act as a binder, helping the meatballs hold their shape. The Parmesan cheese adds a nice touch of flavor and creaminess. You’ll also need garlic for a bold taste. The egg helps bind everything together. Soy sauce adds umami, while salt and pepper season the mix perfectly. - 1/2 cup honey - 1/4 cup soy sauce - 2 cloves garlic, minced - 1 teaspoon grated fresh ginger (or 1/4 teaspoon ground ginger) - 1 tablespoon cornstarch mixed with 2 tablespoons water (for thickening) The honey garlic sauce is what makes these meatballs shine. The honey gives sweetness, while soy sauce brings saltiness. Garlic adds depth, and ginger gives a warm spice. To thicken the sauce, you’ll mix cornstarch with water. This creates a nice glaze that clings to the meatballs, making them even more delicious. {{ingredient_image_1}} To start, gather your ingredients. Place 1 pound of ground beef or turkey in a large bowl. Add 1/2 cup of breadcrumbs and 1/4 cup of grated Parmesan cheese. Next, include 2 minced garlic cloves, 1 beaten egg, 1 tablespoon of soy sauce, 1/4 teaspoon of black pepper, and 1/2 teaspoon of salt. Now, mix all these ingredients well. Use your hands to ensure everything combines evenly. Once mixed, shape the meat into small balls, about 1 inch wide. This step is crucial for even cooking. Heat 1 tablespoon of olive oil in a large skillet over medium heat. Once hot, carefully add the meatballs in batches. Avoid crowding the pan; this helps them brown evenly. Cook them for about 6-7 minutes, turning occasionally to get a nice golden color. Once browned, transfer the meatballs to a plate. In the same skillet, it’s time to make the sauce. Combine 1/2 cup of honey, 1/4 cup of soy sauce, 2 minced garlic cloves, and 1 teaspoon of grated fresh ginger. Mix well and bring the mixture to a simmer over medium heat. Once it simmers, add a thickening agent. Mix 1 tablespoon of cornstarch with 2 tablespoons of water. Stir this mixture into the sauce. Keep stirring for about 2 minutes until it thickens slightly. Now, it’s time to coat the meatballs. Add the cooked meatballs back to the skillet. Toss them gently in the honey garlic sauce. Make sure they are well coated and heated through, about 2-3 minutes. Serve these honey garlic meatballs warm. For a fun touch, arrange them on a platter, drizzle with extra sauce, and garnish with sliced green onions or sesame seeds. Toothpicks make for easy eating! To achieve perfectly browned meatballs, heat your olive oil well before adding them. This helps create a nice crust. Make sure not to overcrowd the pan. If you add too many at once, they will steam instead of brown. Cook them in batches for the best results. To ensure your meatballs are cooked thoroughly, use a meat thermometer. The inside should reach 160°F for beef or turkey. If you don’t have a thermometer, cut one open. The center should not be pink. Cooking time is usually about 6-7 minutes in the skillet. For a beautiful look, garnish your meatballs with sliced green onions or sesame seeds. This adds color and a fresh taste. Drizzle some extra honey garlic sauce on top for a glossy finish. Serving with toothpicks makes it easy for guests to enjoy these meatballs. Arrange them on a platter and watch them disappear! This simple touch makes your dish more inviting and fun. Pro Tips Use Fresh Ingredients: Always opt for fresh garlic and ginger for the best flavor in your sauce. Uniform Meatballs: Ensure your meatballs are uniform in size for even cooking; use a cookie scoop for precision. Rest Before Serving: Let the meatballs sit in the sauce for a few minutes before serving to enhance the flavor absorption. Customize the Sauce: Feel free to add a splash of sriracha or chili flakes to the sauce for a spicy kick! {{image_2}} You can swap ground beef for ground chicken or turkey. These lean meats work well. They keep the meatballs moist while reducing fat. If you want a plant-based option, try using lentils or chickpeas. Blend them into a smooth paste. Add breadcrumbs and spices for flavor. This way, you get a tasty, meat-free delight! Want some kick? Add chili flakes to the honey garlic sauce. Start with a pinch and taste. You can always add more heat. For extra sweetness, mix in brown sugar. It gives the sauce a nice depth. Just a tablespoon can make a big difference. Both options add fun twists to your dish! Pair these meatballs with rice, noodles, or fresh veggies. They soak up all the sauce, making every bite delicious. You can also create meatball subs. Just place the meatballs in a bun and drizzle with sauce. For a fun snack, make sliders. Small sandwiches are great for parties! To keep your honey garlic meatballs fresh, follow these tips: - Refrigeration: Place leftover meatballs in an airtight container. They stay good for 3-4 days in the fridge. Always let them cool down first. This prevents moisture buildup, which can make them soggy. - Freezing: For longer storage, freeze the meatballs. Use a baking sheet to arrange them in a single layer. Freeze for about 1-2 hours until firm. Then, transfer them to a freezer bag or container. They can last up to 3 months in the freezer. When it’s time to enjoy your leftovers, here’s how to reheat them: - Oven: Preheat your oven to 350°F (175°C). Place meatballs on a baking sheet. Heat for about 15-20 minutes or until warmed through. This method keeps them juicy. - Microwave: Place meatballs on a microwave-safe plate. Cover with a damp paper towel to keep moisture in. Heat for 1-2 minutes, checking every 30 seconds to avoid overcooking. - Creative Uses: Leftover meatballs are great in many dishes. You can add them to pasta, stir-fries, or even sandwiches. Try them in a meatball sub with melted cheese for a tasty twist! Yes, you can make honey garlic meatballs ahead of time. You can prepare the meatballs and store them in the fridge for up to a day. Just cover them tightly. When you're ready to cook, you can bake or fry them. This saves time on busy days. If you need a substitute for breadcrumbs, try crushed crackers or oats. You can also use almond flour for a low-carb option. Each substitute will give a different texture but will still hold the meatballs together well. Honey garlic meatballs can be gluten-free. Use gluten-free breadcrumbs or oats as a substitute. Make sure the soy sauce is gluten-free, as some brands contain wheat. This way, everyone can enjoy this tasty dish. Cooked meatballs should reach an internal temperature of 160°F. You can use a meat thermometer to check. If you don’t have one, cut a meatball in half. The inside should be no longer pink and juices should run clear. Yes, you can use a different sauce if you like. Try barbecue sauce for a smoky flavor or a spicy sauce for some heat. You can even mix honey with mustard for a tangy twist. Feel free to experiment with flavors you love! This blog post covered how to make honey garlic meatballs from start to finish. We explored main ingredients, step-by-step cooking, and tips for success. You learned about variations and how to store leftovers. In the end, these meatballs are tasty, easy to make, and fun to serve. Try these tips to impress friends and family. Enjoy making this dish, and get ready to savor real flavor!
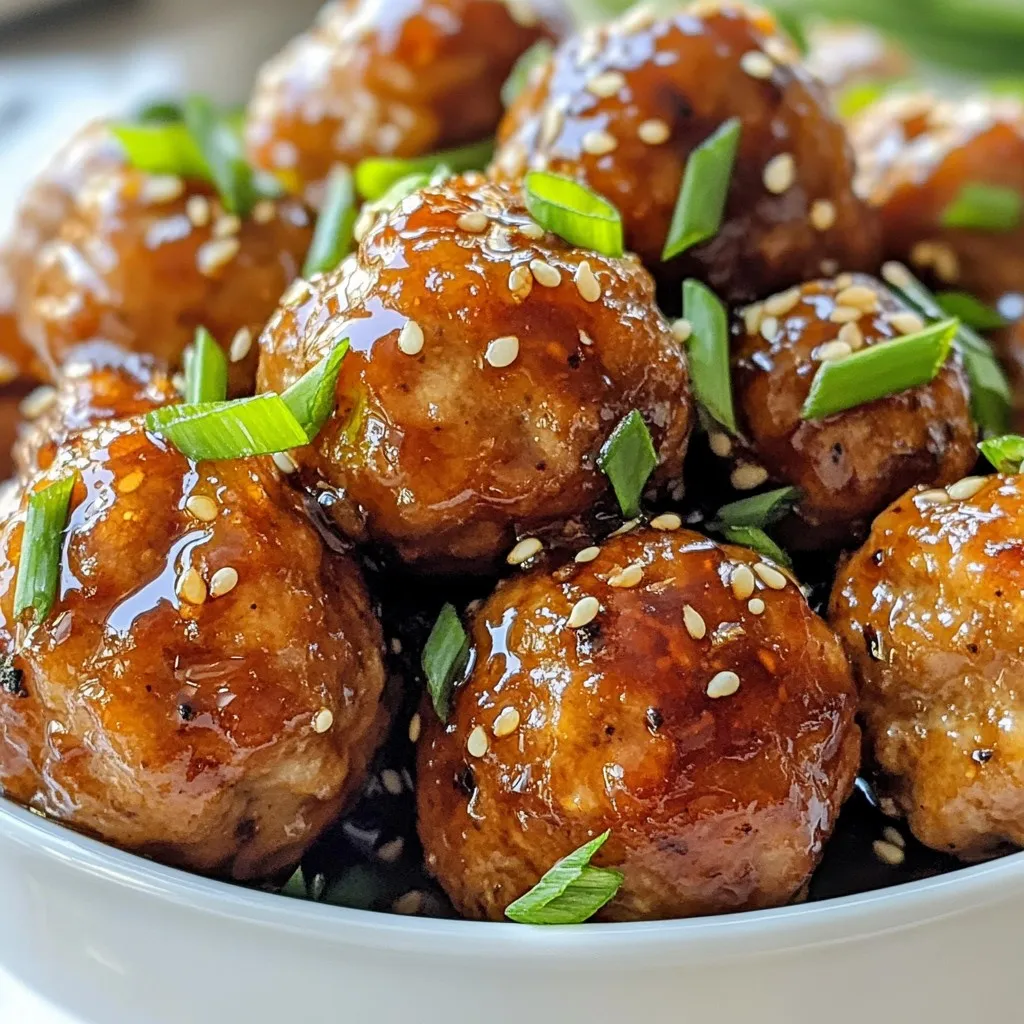
Honey Garlic Meatballs Flavorful Dish for Your Table
Are you looking for a dish that wows guests and delights the family? Honey Garlic Meatballs can do just that! With their sweet and savory
For Garlic Parmesan Roasted Radishes, you need a few simple items: - 1 lb radishes, trimmed and halved - 3 tablespoons olive oil - 4 cloves garlic, minced - 1/2 teaspoon salt - 1/4 teaspoon black pepper - 1/4 teaspoon smoked paprika - 1/2 cup grated Parmesan cheese - Fresh parsley, chopped (for garnish) These fresh radishes bring a crunchy texture. Olive oil helps them roast well. Garlic adds a savory touch, while salt and pepper give the right flavors. Smoked paprika adds a hint of warmth, and Parmesan cheese gives a nice cheesy crust. If you want to take your radishes to the next level, consider these optional ingredients: - Lemon zest for brightness - A dash of cayenne for heat - Fresh thyme or rosemary for an herbal note These options can change the flavor profile. Lemon zest brightens the dish, while cayenne adds spice. Fresh herbs bring a lovely aroma and taste. Each serving has important nutrients. Here’s a quick breakdown: - Calories: About 150 - Protein: 5g - Carbohydrates: 10g - Fiber: 3g - Fat: 11g Radishes are low in calories but high in fiber. The Parmesan adds a bit of fat and protein. This dish is a healthy choice that satisfies your taste buds. Enjoy Garlic Parmesan Roasted Radishes for a tasty side! {{ingredient_image_1}} First, gather your ingredients. You’ll need 1 pound of radishes, 3 tablespoons of olive oil, and 4 cloves of minced garlic. You will also need 1/2 teaspoon of salt, 1/4 teaspoon of black pepper, and 1/4 teaspoon of smoked paprika. Lastly, grab 1/2 cup of grated Parmesan cheese and some fresh parsley for garnish. Next, trim your radishes and cut them in half. This helps them roast evenly. In a large bowl, mix the halved radishes with olive oil, minced garlic, salt, black pepper, and smoked paprika. Toss everything well, so the radishes get a nice coat. Now, preheat your oven to 425°F (220°C). Spread the seasoned radishes on a baking sheet lined with parchment paper. Make sure they are in a single layer. This allows them to roast better. Roast the radishes for 20 minutes. After 20 minutes, take the baking sheet out of the oven. Sprinkle the grated Parmesan cheese evenly over the radishes. This adds a delicious flavor and texture. Return the baking sheet to the oven and roast for an additional 10 to 12 minutes. The radishes should become tender, and the cheese should melt and turn golden. Once the radishes are done, take them out of the oven. Let them cool for a few minutes to avoid burns. Then, transfer the radishes to a serving dish. Garnish with fresh chopped parsley for a pop of color and flavor. Serve warm and enjoy this tasty dish! When picking radishes, look for firm ones. They should feel heavy for their size. Avoid radishes with soft spots or dark marks. The color should be bright and vibrant. Fresh radishes have a crisp texture and a mild smell. Smaller radishes tend to be sweeter and less spicy. To roast radishes well, cut them in half for even cooking. Toss them with olive oil and spices to add flavor. Use parchment paper on your baking sheet to prevent sticking. Spread the radishes out in a single layer for even roasting. Roast them at a high temperature, around 425°F (220°C). This helps them caramelize and get a nice color. Stir them halfway through cooking for the best results. Garlic Parmesan roasted radishes make a great side dish. They pair well with grilled meats or fish. You can also serve them with pasta or rice. For a fresh touch, add a squeeze of lemon juice on top. Garnish with chopped parsley for color and flavor. These radishes are tasty hot or at room temperature. Enjoy them as a snack, too! Pro Tips Choose Fresh Radishes: Look for firm radishes with vibrant color to ensure the best flavor and texture. Adjust the Seasoning: Feel free to customize the spice levels by adding more smoked paprika or even a pinch of cayenne for extra heat. Experiment with Cheese: While Parmesan adds a delicious flavor, try swapping it with Pecorino Romano or a dairy-free alternative for different taste profiles. Serve Immediately: For the best texture and flavor, serve the roasted radishes right after they come out of the oven while they're still hot and crispy. {{image_2}} You can change the flavor of Garlic Parmesan Roasted Radishes. Try fresh herbs like thyme or rosemary. They add a lovely aroma and taste. You can also use dried herbs if fresh ones aren’t available. A pinch of oregano or basil can work well too. For a spicy kick, add red pepper flakes or cayenne pepper. This makes the dish more exciting and unique. To make this dish vegan, swap out the Parmesan cheese. Nutritional yeast gives a cheesy flavor without dairy. It’s a great choice for those who avoid animal products. You can also try a vegan cheese that melts well. Just be sure to check its ingredients. Use olive oil as your main fat. This keeps the dish rich and tasty. Pair your radishes with tasty dips or sauces. A simple garlic aioli works wonders. Just mix vegan mayo with garlic and lemon juice. You could also serve them with a spicy salsa or a tangy yogurt dip. For a refreshing touch, try a lemon vinaigrette. This adds brightness to each bite. Each option brings out the flavors of the radishes in a fun way. To keep Garlic Parmesan Roasted Radishes fresh, let them cool first. Place them in an airtight container. This helps to lock in flavor and moisture. Store them in the fridge. They stay good for about three to four days. Avoid leaving them out at room temperature for too long. When you're ready to enjoy leftovers, you can reheat them easily. Preheat your oven to 350°F (175°C). Spread the radishes in a single layer on a baking sheet. Heat them for about 10 to 15 minutes. This will help them regain their crispness. You can also use a microwave, but they may not be as crispy. Garlic Parmesan Roasted Radishes can last up to four days in the fridge. If you freeze them, they keep for about one month. However, freezing may change their texture. For the best flavor, try to eat them fresh. Enjoy the taste of this dish while it’s at its peak! Yes, you can prepare the radishes ahead. Toss them with oil and spices. Store in the fridge for up to a day. When ready, roast them as directed. The radishes will still taste great. Radishes are very healthy! They are low in calories and high in fiber. They also have vitamin C and antioxidants. Eating radishes can help with digestion and boost your immune system. Plus, they add a nice crunch to your meals. Yes, feel free to switch the cheese! Cheddar or feta can work well. Each cheese will give a different taste. Experiment to find your favorite. Just keep the amount similar to Parmesan for best results. We’ve explored garlic Parmesan roasted radishes, covering ingredients, preparation, and tips. You learned about optional flavor enhancers, nutritional info, and variations to suit your taste. Don’t forget storage tips to keep leftovers fresh. Enjoy experimenting with herbs or dairy-free options. This dish can fit any meal. With these insights, you can create delicious roasted radishes that everyone will love. Enjoy your cooking adventure!
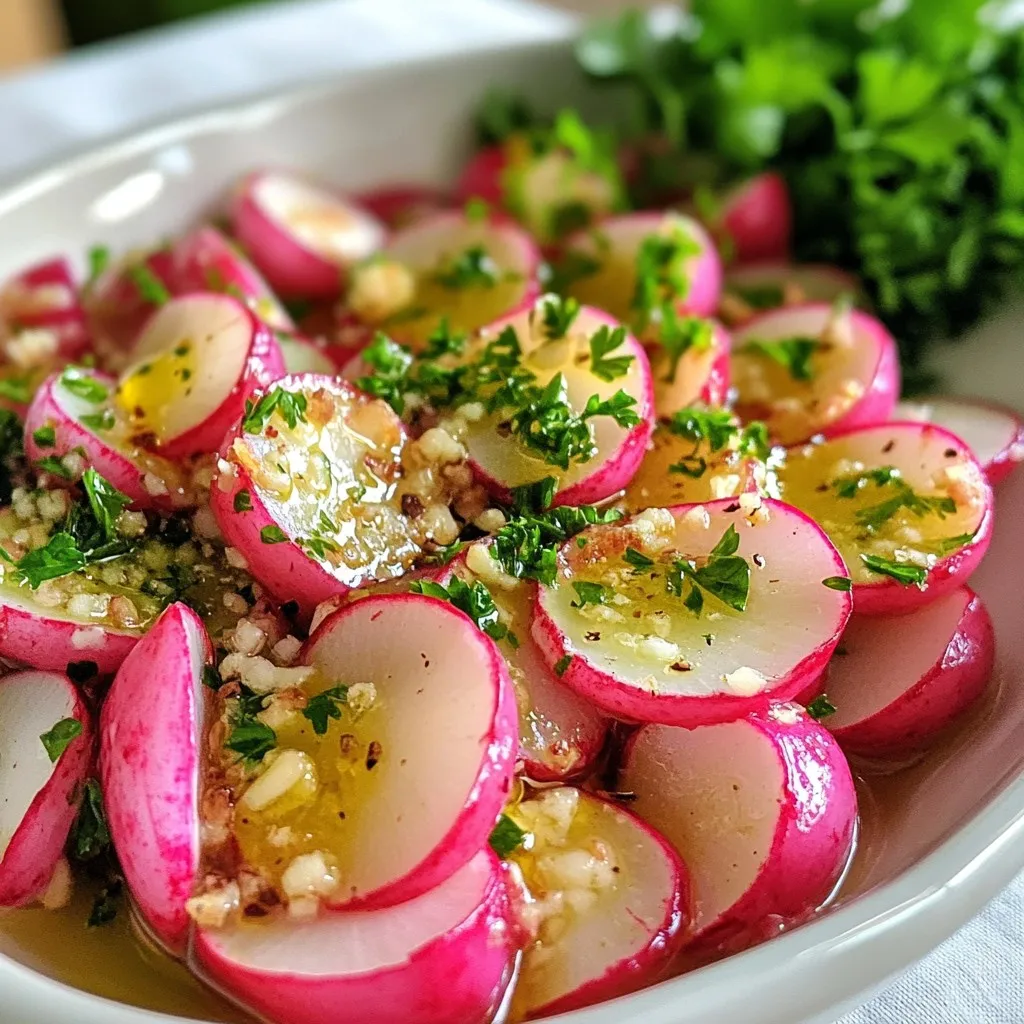
Garlic Parmesan Roasted Radishes Flavorful and Easy Dish
Looking for a fun and tasty dish that’s quick to make? You’ll love Garlic Parmesan Roasted Radishes! They are full of flavor and perfect as