Appetizers
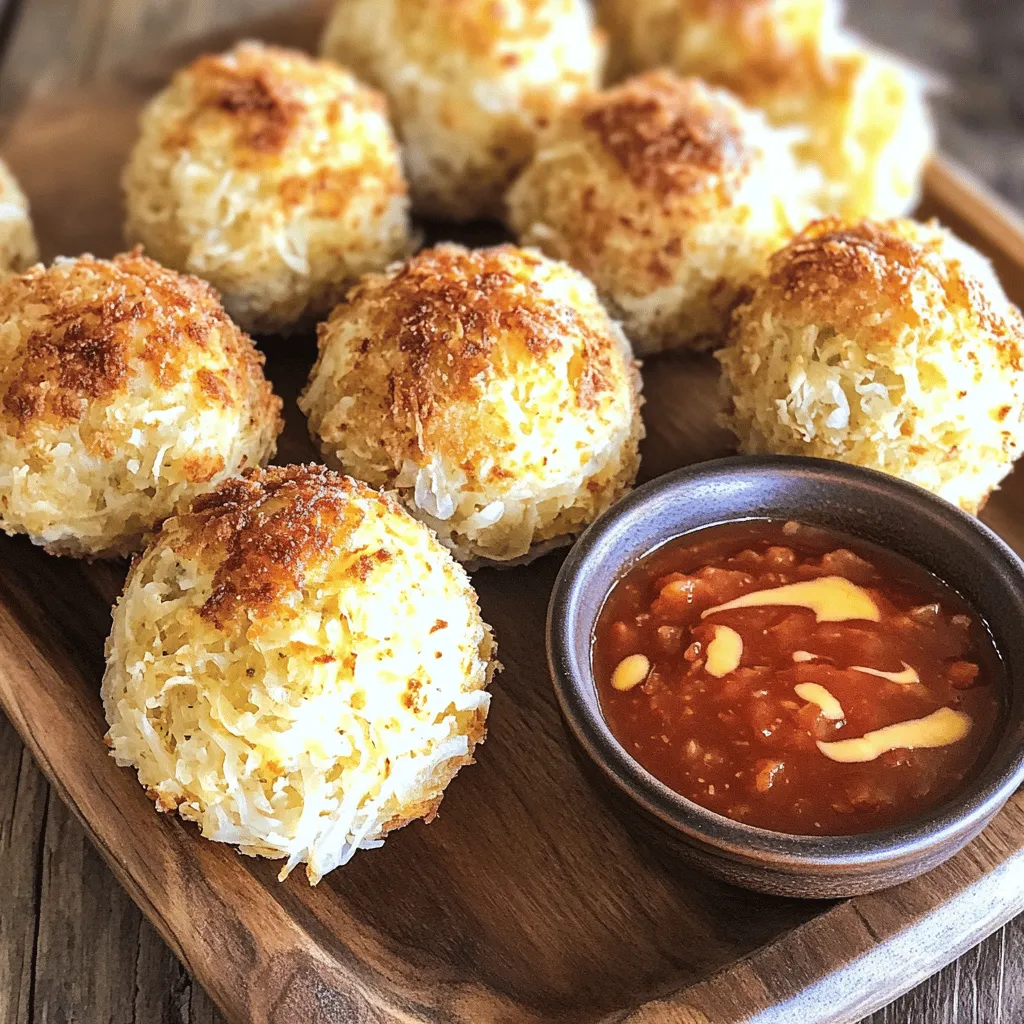
Reuben Balls with Spicy Thousand Island Dipping Sauce
If you love Reuben sandwiches, you’ll adore these Reuben Balls with Spicy Thousand Island Dipping Sauce! Imagine crispy, golden bites packed with corned beef, sauerkraut,
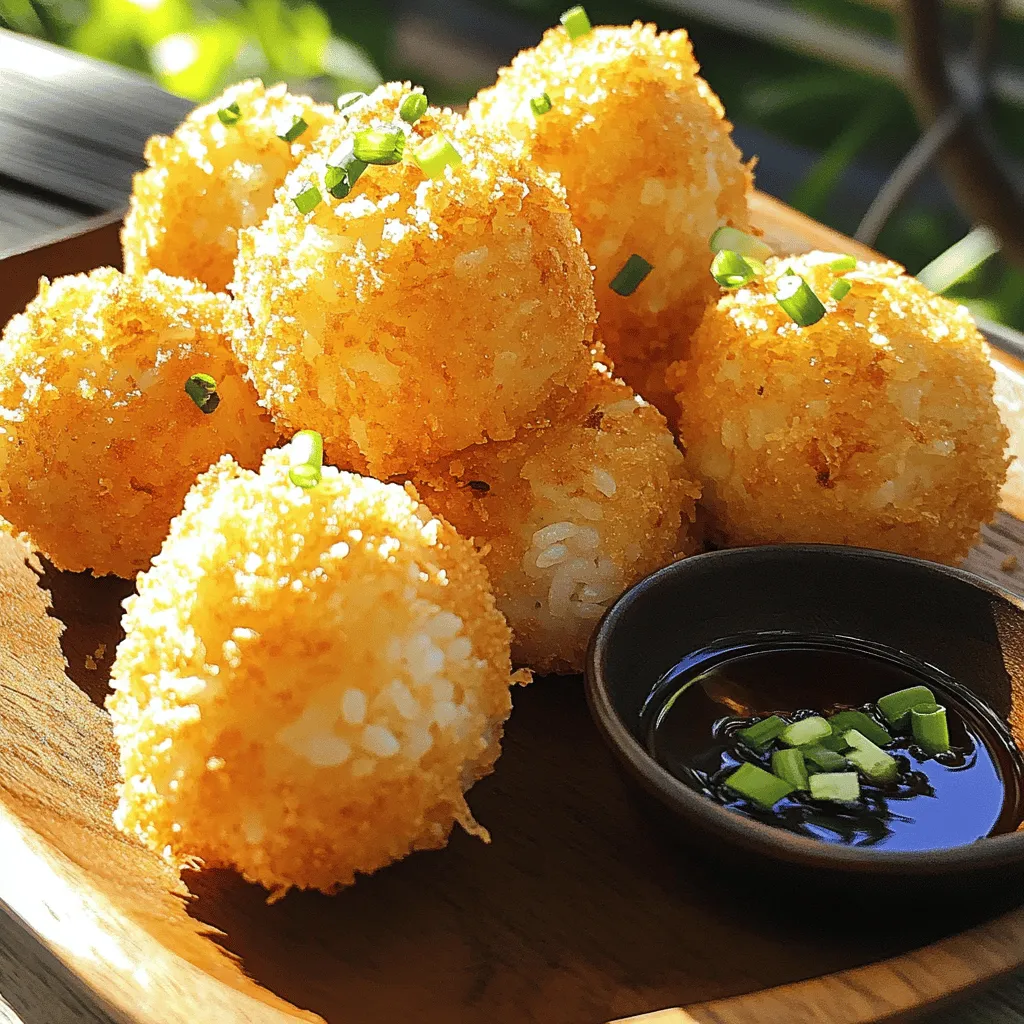
Easy Crispy Rice Balls Irresistible and Flavorful Treat
Are you ready for a tasty treat that you can easily make at home? These Easy Crispy Rice Balls will become your new favorite snack!
![To make Spicy Mexican Corn Bites, you need some simple ingredients. Here’s what you’ll require: - 2 cups corn kernels (fresh or canned, drained) - 1/2 cup all-purpose flour - 1/2 cup cornmeal - 1/4 cup freshly grated Parmesan cheese - 1 jalapeño, finely chopped - 1/4 cup fresh cilantro, chopped - 1 teaspoon baking powder - 1/2 teaspoon ground cumin - 1/2 teaspoon smoked paprika - 1/4 teaspoon cayenne pepper (adjust to taste) - Salt and freshly ground black pepper to taste - 1 large egg, beaten - 1/2 cup milk - Vegetable oil for frying These ingredients come together to create a tasty snack. The corn provides sweetness, while the jalapeño adds heat. The spices bring depth to each bite. Don't forget the cheese! It adds a nice savory touch. For the full recipe, check out the cooking section. It's an easy way to whip up this dish. - Combine corn kernels, flour, cornmeal, cheese, jalapeño, and cilantro in a bowl. - Whisk together baking powder, cumin, paprika, cayenne, salt, and pepper in another bowl. - Beat egg and mix with milk in a separate bowl. First, you need to gather all your ingredients. In a large bowl, mix the corn, flour, cornmeal, cheese, jalapeño, and cilantro. This combination gives your bites a great texture and flavor. In another bowl, whisk together the baking powder, cumin, paprika, cayenne, salt, and pepper until fully blended. This step adds a spicy kick. In a third bowl, beat the egg and combine it with milk until smooth. This mixture helps bind everything together. - Fold the egg mixture into the corn mixture, avoiding overmixing for fluffy bites. Next, carefully fold the egg mixture into the corn mixture. Do this gently to keep the texture fluffy. Overmixing can make the bites dense, which we want to avoid. - Heat vegetable oil and test for readiness. - Drop spoonfuls of the mixture into the oil, frying in batches until golden brown. Now, heat vegetable oil in a deep skillet over medium heat. You want enough oil to cover the bites. To test if the oil is ready, drop a small spoonful of the mixture in; if it sizzles and rises, you are good to go. Then, drop spoonfuls of the corn mixture into the hot oil. Fry them in batches, so they don’t crowd each other. Cook until they are golden brown, usually about 2-3 minutes per side. These Spicy Mexican Corn Bites are simple and fun to make, perfect for any snack time! For the full recipe, check below. To fry Spicy Mexican Corn Bites well, you need the right oil temperature. Aim for about 350°F (175°C). This heat helps them cook evenly and become crispy. To test the oil, drop a small spoonful of the mixture in. It should sizzle and float right away. If it sinks and bubbles slowly, the oil is too cool. Avoid overcrowding the skillet. If you add too many bites at once, they will steam instead of fry. This can lead to soggy bites. Fry them in small batches. This way, each one gets enough heat to become golden and delicious. Avoid overmixing the batter. When combining the egg mixture with the corn mixture, fold gently. If you stir too much, the bites can become tough. A light touch keeps them fluffy and airy. This is key to making them nice and enjoyable. For a light and fluffy texture, let the batter rest for a few minutes after mixing. This allows the baking powder to work its magic. The result will be a better rise and a softer bite. Present your corn bites with flair. Arrange them on a colorful platter. Add lime wedges and a sprinkle of fresh cilantro. This makes the dish look fresh and inviting. For dips, consider options like guacamole or sour cream. A spicy salsa can also bring a nice kick. These pairings enhance the flavors of the bites and make for a fun snack. You can find the full recipe [Full Recipe]. {{image_4}} You can easily change the flavor of your Spicy Mexican Corn Bites. One great swap is cheese. Instead of Parmesan, try feta or cheddar. Both add unique flavors. You can also add more vegetables. Bell peppers work well; they bring sweetness and crunch. Adding zucchini or spinach can boost nutrition and taste. Feel free to mix and match ingredients for your perfect bite. Want more heat? You can adjust the spice in your bites. Add more jalapeño or cayenne for a spicy kick. If you prefer milder bites, use fewer jalapeños and remove the seeds. You can also try different spices. Chili powder adds warmth without too much heat. Chipotle brings a smoky flavor that pairs well with corn. Experiment and find the level of spice you love. If you need gluten-free options, swap all-purpose flour for a gluten-free blend. Many brands work well in this recipe. For vegan versions, use flax eggs instead of real eggs. Combine one tablespoon of ground flax with three tablespoons of water. Let it sit until thick. For milk, use almond or oat milk as great substitutes. These swaps make everyone able to enjoy this tasty treat! For a complete guide on making these bites, refer to the Full Recipe. After making Spicy Mexican Corn Bites, let them cool. Place leftovers in an airtight container. Store them in the fridge. They stay fresh for up to three days. Reheat them in the oven for the best taste. Avoid the microwave for crispiness. To freeze corn bites, let them cool completely. Arrange them in a single layer on a baking sheet. Freeze for about two hours. Once frozen, transfer them to a freezer bag. They can last up to three months in the freezer. For reheating, use an oven preheated to 375°F. Bake for about 15 minutes until warm and crisp. You can also use an air fryer. This method will keep them crunchy. Use leftover bites in a salad for added crunch. Chop them up and mix with greens. They add a tasty twist to any dish. You can also serve them with salsa or guacamole. Pairing bites with a zesty lime crema enhances their flavor. For a fun snack, place them on mini tortillas with toppings. For the full recipe and more ideas, check out the Spicy Mexican Corn Bites section. Spicy Mexican Corn Bites can last for about 3-4 days in the fridge. Store them in an airtight container to keep them fresh. When you want to enjoy them, reheat in the oven for crispiness. Avoid microwaving, as this can make them soggy. Yes, you can use frozen corn kernels. They are a great option when fresh corn isn't available. Just thaw them first and drain any excess water. Fresh corn has a sweeter taste, but frozen corn works well too. Both options will give you tasty corn bites. These corn bites pair well with many sauces. Here are some great choices: - Sour cream: Its coolness balances the heat. - Guacamole: Adds creaminess and flavor. - Salsa: Choose mild or spicy, depending on your taste. - Chipotle mayo: For a smoky kick. - Cilantro lime dressing: Refreshing and zesty. Feel free to mix and match sauces to find your favorite! For the full recipe, refer to the earlier sections. To make Spicy Mexican Corn Bites, you need fresh ingredients, proper mixing, and frying techniques. Remember to maintain the right oil temperature for the best results. You can customize your bites with different cheeses or adjust spiciness based on your taste. Store leftovers in the fridge or freeze them for later. With these tips, you can enjoy a light, crispy snack anytime. Get creative with garnishes and dips, and have fun making this treat your own!](https://tossedflavors.com/wp-content/uploads/2025/05/da553872-629e-4476-b918-0a6027410f02.webp)
Spicy Mexican Corn Bites Flavorful and Easy Snack
If you’re craving a snack that’s both spicy and satisfying, look no further! These Spicy Mexican Corn Bites are packed with flavor and simple to

Crab Rangoon Delightful Recipe for Easy Appetizer
Crab Rangoon is one of the most popular appetizers, and for good reason! Its creamy crab filling and crispy, golden shell are a crowd-pleaser. In

Tarte Au Soleil Delightful Recipe for All Occasions
Are you ready to impress your family and friends with a dish that steals the show? Tarte Au Soleil, or “Sun Pie,” is a fun

Healthy Energy Balls Nutritious and Simple Recipe
Want a quick, healthy snack that energizes you and tastes great? You’ve come to the right place! In this post, I’ll share my simple recipe
![To make Korean BBQ meatballs, you will need: - 1 lb ground beef - 1/2 lb ground pork (optional for added flavor) - 1/4 cup Panko breadcrumbs - 1/4 cup green onions, finely chopped - 2 garlic cloves, minced - 1 large egg - 1 tablespoon sesame oil - 2 tablespoons soy sauce - 1 tablespoon gochujang (Korean chili paste) - 1 teaspoon fresh ginger, grated - Salt and black pepper, to taste These ingredients blend to create juicy meatballs with a rich taste. The mixture of beef and pork gives depth. Panko breadcrumbs keep them light and fluffy. For the spicy mayo dip, gather: - 1/2 cup mayonnaise - 2 tablespoons gochujang - 1 tablespoon fresh lime juice - 1 teaspoon sesame oil - 1 teaspoon honey (adjust to taste) - Optional: extra Sriracha for an additional kick This dip adds a creamy, spicy kick. Gochujang is the star, giving heat and depth. Adjust the honey to balance the spice. You can add more fun with these optional ingredients: - Chopped cilantro for freshness - Chopped bell peppers for crunch - Sesame seeds for garnish These extras boost the flavor and presentation. Feel free to mix and match to suit your taste. For the full recipe, check out [Full Recipe]. Start by gathering your ingredients. You need one pound of ground beef and half a pound of ground pork if you want extra flavor. In a big bowl, mix the ground meats with: - 1/4 cup Panko breadcrumbs - 1/4 cup green onions, finely chopped - 2 garlic cloves, minced - 1 large egg - 1 tablespoon sesame oil - 2 tablespoons soy sauce - 1 tablespoon gochujang - 1 teaspoon fresh ginger, grated - Salt and black pepper to taste Make sure to mix everything well. You can use your hands or a spoon. The goal is to blend the flavors nicely. Next, preheat your oven to 400°F (200°C). While waiting, shape the meat mixture into small balls, about one inch in diameter. This size helps them cook evenly. Place the meatballs on a baking sheet lined with parchment paper. This makes cleanup a breeze. Bake the meatballs for 20 to 25 minutes. They should be cooked through and have a nice golden-brown crust. You can check if they are done by cutting one open to see if it's no longer pink inside. While the meatballs bake, you can prepare the spicy mayo dip. In a small bowl, whisk together: - 1/2 cup mayonnaise - 2 tablespoons gochujang - 1 tablespoon fresh lime juice - 1 teaspoon sesame oil - 1 teaspoon honey Make sure the mixture is smooth. If you like it spicier, add some extra Sriracha. This dip adds a creamy and zesty touch to your meatballs. Once everything is ready, allow the meatballs to cool for a bit. Serve them on a platter and drizzle some spicy mayo over the top. Keep some extra dip on the side for dipping. Enjoy your Korean BBQ meatballs with spicy mayo dip! For the full recipe, refer to the earlier sections. To make the best Korean BBQ meatballs, focus on mixing. Start by combining the ground meats gently. If you mix too hard, the meatballs can become tough. Use your hands or a spoon. Make sure all the ingredients blend well for great flavor. When shaping the meatballs, keep them about 1 inch wide. This size cooks evenly and stays juicy. Baking is key for a crispy outside. Preheat your oven to 400°F (200°C) before you start. This helps the meatballs brown nicely. Arrange them on a lined baking sheet. This makes cleanup easy and helps with even cooking. Bake for 20-25 minutes. Use a meat thermometer to check for doneness; they should reach 160°F (71°C). Presentation matters! Serve your meatballs on a large platter. Drizzle spicy mayo dip over the meatballs before serving. This adds color and flavor. You can also use wooden skewers for easy serving. Sprinkle chopped green onions or sesame seeds on top for a fresh look. For a fun twist, serve the meatballs in lettuce wraps. This makes a great low-carb option. Provide extra spicy mayo on the side for dipping. Your guests can control the heat level. When it comes to drinks, light beers pair well with Korean BBQ flavors. You might also enjoy a fruity white wine or a refreshing iced tea. For sides, consider serving rice or quinoa. These grains soak up the tasty sauce. Kimchi is a classic side dish that adds tang and crunch. You can also serve pickled veggies to balance the rich meatballs. For a heartier meal, try a simple salad with sesame dressing. This gives freshness alongside the savory meatballs. For the complete recipe, check out the Full Recipe section. {{image_4}} You can switch up the meat in your Korean BBQ meatballs. Ground chicken or turkey works great. These meats keep the dish light and juicy. You can also use plant-based meat for a vegan option. It gives you a tasty choice while keeping it healthy. While spicy mayo is a star, you can try other dips. A sweet soy glaze adds a nice flavor. You can also use a peanut sauce for a nutty twist. If you want something creamy, try ranch dressing with a hint of gochujang. Each option brings a fun new taste. Feel free to make your meatballs unique. You can add shredded carrots for crunch. Chopped bell peppers give a sweet touch. For a spicy kick, mix in more gochujang or red pepper flakes. You can even add herbs like cilantro or basil for a fresh flavor. Each of these additions makes the dish more exciting. Explore the Full Recipe to see how these variations can fit into your cooking! After your feast, cool the leftover meatballs to room temperature. Gather a clean, airtight container for storage. Place the meatballs in the container, ensuring they fit snugly. Cover the lid tightly. Store them in the fridge for up to four days. If you want to keep them longer, freezing is a great option. To freeze meatballs, follow a simple process. First, let them cool completely. Then, arrange the meatballs in a single layer on a baking sheet. Place the sheet in the freezer for about an hour. This step helps them firm up. Once frozen, transfer them into a freezer-safe bag. Remove as much air as possible before sealing. Label the bag with the date. You can freeze them for up to three months. Reheating meatballs is easy. For the best taste, use the oven. Preheat your oven to 350°F (175°C). Spread the meatballs on a baking sheet. If they seem dry, drizzle a little broth over them. Bake for about 15 minutes or until hot. You can also reheat meatballs in the microwave. Place them on a microwave-safe plate and cover with a damp paper towel. Heat for 1-2 minutes, checking often. Enjoy your Korean BBQ meatballs with spicy mayo dip again! For the full recipe, see above. Korean BBQ meatballs are bite-sized treats packed with flavor. They mix ground beef and pork, along with fresh herbs and spices. The star ingredient is gochujang, a Korean chili paste that gives them a spicy and sweet kick. These meatballs are often served with a creamy spicy mayo dip for added richness. They are perfect for parties or a fun family meal. Yes, you can prepare these meatballs ahead of time. Mix the meatball ingredients in the morning and shape them into balls. Cover them and store them in the fridge until you are ready to bake. You can also freeze the raw meatballs. Just place them on a baking sheet, freeze until firm, then transfer them to a bag. Bake them straight from the freezer when you're ready. To adjust the spice level of the dip, change the amount of gochujang. Start with less if you prefer a milder flavor. You can also add more honey to balance the heat. For an extra kick, mix in some Sriracha. Taste as you go, and find the heat that suits your palate best. You can find the full recipe in the earlier sections. Korean BBQ meatballs are a fun way to enjoy a classic dish. This post covered key ingredients, easy steps, and helpful tips. You can customize flavors and try different proteins for variety. Storing leftovers and reheating them is simple. In short, making these meatballs is easy and rewarding. Enjoy them with your favorite drinks or sides. You’ll impress your friends and family with this tasty treat. I hope you try this recipe soon!](https://tossedflavors.com/wp-content/uploads/2025/05/598aba45-0438-44ce-8981-7d7e0f9aefc4.webp)
Korean BBQ Meatballs with Spicy Mayo Dip Delight
Ready for a flavor explosion? You’ll love these Korean BBQ Meatballs with Spicy Mayo Dip! This dish combines sweet, savory meatballs with a kick of
![- 2 cups cooked shredded chicken - 1 cup shredded cheese (cheddar or Mexican blend) - 1/2 cup black beans, rinsed and drained - 1/4 cup fresh cilantro, finely chopped - 1 teaspoon ground cumin - 1/2 teaspoon garlic powder - Salt and pepper, to taste For a tasty filling, I love using shredded chicken. It stays moist and flavorful. Cheese brings richness; I often use cheddar or a Mexican blend. Black beans add texture and protein. Fresh cilantro gives a bright taste. Ground cumin and garlic powder enhance these flavors. Don't forget to add salt and pepper to taste! - 12 small corn tortillas - Vegetable oil, for frying Corn tortillas are my go-to choice. They have a lovely flavor and crisp up nicely. You can use flour tortillas, but they may not be as crunchy. Smaller tortillas work better for taquitos. They roll easily and hold the filling well. - Optional toppings: sour cream, guacamole, salsa For toppings, I suggest sour cream for creaminess. Guacamole adds healthy fats and flavor. Salsa brings a zesty kick. You can also serve taquitos with sides like rice, beans, or salads. These help balance the meal and make it hearty. For the full recipe, check out the details I provided above! To start, we need to mix our filling. Grab a large bowl and add: - 2 cups cooked shredded chicken - 1 cup shredded cheese (cheddar or Mexican blend) - 1/2 cup black beans, rinsed and drained - 1/4 cup fresh cilantro, finely chopped - 1 teaspoon ground cumin - 1/2 teaspoon garlic powder - Salt and pepper, to taste Mix all these ingredients well. Make sure the flavors blend together. This helps create a tasty filling for our taquitos. Now it is time to roll our taquitos. First, we need to heat the tortillas. Preheat a dry skillet over medium heat. Warm each corn tortilla for about 30 seconds on each side. This makes them soft and easy to roll without tearing. Next, take a tortilla and lay it flat. Place about 2 tablespoons of the chicken filling near one edge. Roll the tortilla tightly from the filled edge to the other side. If the ends come loose, you can use a toothpick to hold them together. Repeat this with all the tortillas. For frying, we want the oil to be hot. In a deep skillet, heat about an inch of vegetable oil over medium-high heat. Once the oil shimmers, it's ready. Carefully place the rolled taquitos seam-side down into the skillet. Avoid overcrowding the pan. Fry for 3-4 minutes on each side, or until they are golden brown and crispy. You may need to fry them in batches to keep the oil hot. When they are crispy, move the taquitos to a plate lined with paper towels. This helps soak up any extra oil. Serve them hot with your favorite toppings from the Full Recipe! Frying vs. Baking Taquitos I often fry my taquitos for that perfect crunch. Frying gives them a golden, crispy shell. If you want a healthier option, you can bake them. Preheat your oven to 425°F (220°C) and place the taquitos on a baking sheet. Brush them lightly with oil. Bake for about 15-20 minutes until they are crispy. How to Keep Taquitos Crispy To keep your taquitos crispy, place them on a wire rack after frying. This allows air to circulate around them. If you stack them on a plate, they may get soggy. Serve them right away for the best crunch. Adjusting Seasoning Tips Taste your filling before rolling. Add more salt, pepper, or spices as needed. If you love heat, try adding chili powder or jalapeños. A little lime juice can also brighten the flavors. Recommended Cheese Melting Tips For great cheese melt, use a blend of cheeses. Cheddar and Monterey Jack work well. Ensure your cheese is at room temperature before mixing. This helps it melt smoothly when cooked. Plating Options for Serving Arrange the taquitos on a colorful platter. You can lean them against each other for a nice look. Serve small bowls of toppings like sour cream, guacamole, and salsa on the side. Garnishing Suggestions Add some fresh cilantro or chopped green onions on top for color. Lime wedges also add a fresh touch. These small details make a big difference in how your taquitos look and taste. For the full recipe, check out the Crispy Loaded Chicken Taquitos. {{image_4}} You can fill taquitos with many tasty options. For vegetarians, black beans and cheese work great. You can also add fresh veggies like bell peppers or spinach. Try using: - 1 can of black beans, rinsed and drained - 1 cup of shredded cheese (like cheddar or Monterey Jack) - Chopped veggies (like bell peppers or corn) For meat lovers, ground beef, pork, or even tofu are excellent choices. The flavor pairs well with spices. You can use: - 1 pound of ground beef or pork, cooked - 1 cup of crumbled tofu, seasoned Sauces add excitement to your taquitos. Homemade salsa is a must. You can make it fresh with tomatoes, cilantro, and lime juice. Try these easy recipes: - Tomato Salsa: Mix diced tomatoes, onion, cilantro, and lime juice. - Tomatillo Salsa: Blend tomatillos, jalapeños, garlic, and cilantro. Other dipping sauces are also fun. Try a creamy avocado dip or tangy ranch dressing to match your taste. You can get creative with taquitos beyond savory fillings. Dessert taquitos are a fun treat! Fill them with sweet options like: - Cinnamon sugar apples - Nutella and bananas Another twist is making taquito sliders. Use mini tortillas or cut larger ones in half. Fill them with your favorite ingredients. They make great snacks for parties! For a full recipe on making these delicious taquitos, check out the [Full Recipe]. - Refrigeration Guidelines: Place leftover taquitos in an airtight container. They stay fresh for about 3 days in the fridge. Make sure they cool down before sealing them. This keeps them crispy longer. - Freezing Taquitos: You can freeze taquitos too! Wrap them tightly in plastic wrap or foil. Place them in a freezer bag. They last up to 3 months. Thaw them in the fridge overnight when ready to eat. - Best Practices for Maintaining Crispiness: To keep taquitos crispy, use the oven. Preheat it to 400°F (200°C). Place the taquitos on a baking sheet. Bake for about 10-12 minutes until they are hot and crispy again. - Microwave vs. Oven Heating: The microwave is quick but can make them soft. If you need speed, use it. Heat on high for 30-60 seconds. For better texture, go with the oven. - How Long Taquitos Last in the Fridge: Taquitos last about 3 days in the fridge when stored properly. After that, the taste and texture may go downhill. - Signs of Spoilage: Check for any off smell or mold. If they look dry or hard, it's best to toss them. Always trust your senses! For a delightful taquito experience, try the Full Recipe for crispy loaded chicken taquitos! Taquitos are small rolled tortillas filled with meat, cheese, or beans. They are often crisp and golden. The name "taquito" means "little taco" in Spanish. They originated in Mexico, where they are a popular street food. Taquitos have deep roots in Mexican culture. They represent comfort food and family gatherings. People enjoy them at celebrations and parties. Each region has its own take on taquitos, often adding local ingredients and flavors. Yes, you can make taquitos ahead of time. Prepare the filling and roll them up. Store them in the fridge for up to a day. This way, they stay fresh and ready to fry. For freezing, place the rolled taquitos on a baking sheet. Freeze them for a few hours until firm, then transfer them to a freezer bag. They can last up to three months in the freezer. You can bake taquitos for a healthier option. Preheat your oven to 400°F (200°C). Place rolled taquitos on a baking sheet. Brush them lightly with oil for crispiness. Bake for 15-20 minutes or until golden brown. Using an air fryer is another great option. Set your air fryer to 375°F (190°C). Arrange the taquitos in a single layer. Cook them for about 10-12 minutes, flipping halfway through. Yes, taquitos can be gluten-free. Use corn tortillas instead of flour ones. Most corn tortillas are naturally gluten-free. Always check labels to ensure they don’t contain gluten. If you want more options, try using other alternatives. There are gluten-free tortilla brands available. You can also make your own using gluten-free flour. This allows you to enjoy taquitos while staying gluten-free. Taquitos are simple and fun to make. You learned about key ingredients like chicken, cheese, and tortillas. We covered how to prepare, assemble, and cook for the best taste. You now know ways to keep them crispy and tips for perfect flavor. Plus, I shared various filling ideas and storage tips. Whether you choose standard or creative versions, taquitos can fit any meal. Enjoy making them your way!](https://tossedflavors.com/wp-content/uploads/2025/05/cbfd469d-8f8e-4f10-a42e-6e951cb45e56.webp)
Taquitos That Wow Deliciously Crunchy Recipe
Get ready to impress your taste buds with taquitos that crunch and wow! This deliciously crunchy recipe will show you how to make taquitos bursting
Cheesy Taco Sticks Tasty Snack for Any Occasion
Looking for a fun and tasty snack? Cheesy Taco Sticks are perfect for any occasion! This easy recipe combines cheesy goodness with zesty taco flavors,

Fried Sliced Mushrooms with Ranch Delightful Dish
Are you ready to whip up a dish that’s crispy, tasty, and finger-licking good? Fried sliced mushrooms with ranch dressing are your new best friend