Appetizers

Cheesy Taco Sticks Flavorful Snack for Everyone
Looking for a fun and tasty snack? You’ll love these Cheesy Taco Sticks! They combine savory taco flavors with cheesy goodness in a crispy shell.

Beef Flautas or Taquitos Crispy and Flavorful Treat
Are you ready to indulge in a crispy and flavorful treat? Beef flautas, or taquitos, offer the perfect crunch with every bite. Made with seasoned

Classic Mexican Street Corn Off the Cob Delight
Are you ready to elevate your summer cookouts? Classic Mexican Street Corn Off the Cob Delight transforms this favorite street food into an easy, delicious

Philly Cheesesteak Sliders Easy and Flavorful Recipe
Craving a taste of Philly without leaving home? This Philly Cheesesteak Sliders recipe packs all the flavor in easy-to-make bites. With tender beef, sautéed veggies,

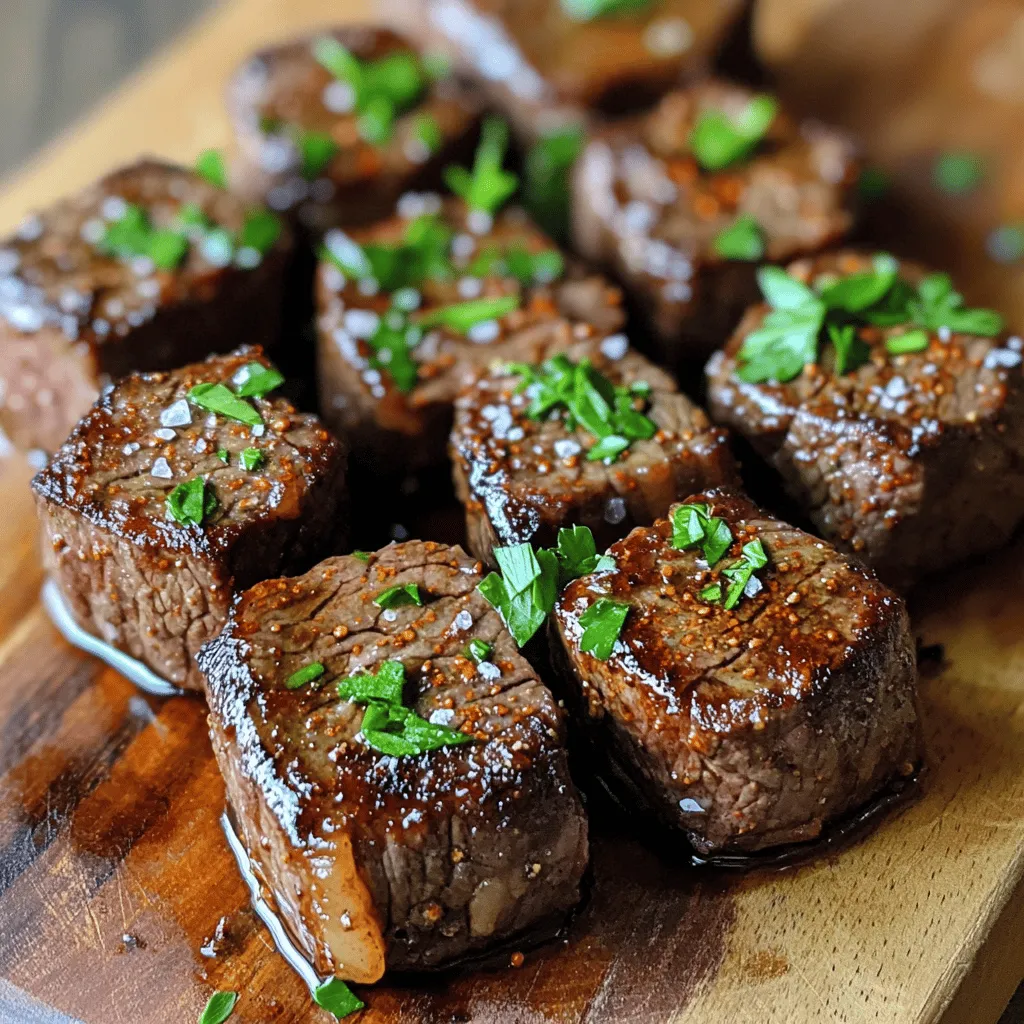
Air Fryer Steak Bites Tender and Flavorful Meal
Craving a tasty, easy meal? Let me show you how to make air fryer steak bites. They’re tender, juicy, and full of flavor. This dish
![- 1 can (10 oz) diced tomatoes with green chilies (like Rotel) - 1 package (8 oz) cream cheese, softened to room temperature - 1 cup shredded cheddar cheese (or a flavorful mix of Mexican cheeses) - 1 ½ cups sour cream - 1 packet ranch seasoning mix - 1 tablespoon diced jalapeños (optional for an extra kick) - Fresh cilantro, chopped (for garnish) - Tortilla chips or crunchy veggie sticks (for serving) For this Boat Dip, you need a mix of creamy and zesty flavors. The diced tomatoes with green chilies bring a nice kick. Cream cheese adds a rich base that binds all the flavors. Sour cream makes the dip smooth and tangy. Cheddar cheese adds a sharp taste that pairs well with ranch seasoning. If you like heat, jalapeños are a great choice. They add a spicy edge to the dip. Finally, fresh cilantro gives a pop of color and fresh flavor. You can serve this dip with tortilla chips for crunch. Veggie sticks also work well for a lighter option. This dip is easy to make and is perfect for any gathering. For the complete recipe, check out Full Recipe. Enjoy making this flavorful Boat Dip! 1. Start by mixing the cream cheese and sour cream in a medium bowl. Use a whisk or mixer to make it smooth and creamy. 2. Next, incorporate the ranch seasoning mix. Blend it well until you can’t see any lumps. 3. Add the can of diced tomatoes with green chilies. Make sure to mix in the juice from the can for extra flavor. 4. Finally, stir in the shredded cheese and diced jalapeños if you like some heat. Mix gently to keep some texture. 1. Transfer the dip into a serving bowl. Smooth the top with a spatula for a nice finish. 2. Cover the bowl with plastic wrap and refrigerate for at least 30 minutes. This step lets the flavors blend well. 3. Before serving, sprinkle fresh cilantro on top. This adds color and a fresh taste. For the full recipe, check out the [Full Recipe]. Enjoy your tasty Boat Dip! To get the best texture for your Boat Dip, blend the cream cheese and sour cream well. This makes the dip creamy and smooth. Use an electric mixer or a whisk to mix until no lumps are left. When adding the cheese, gently fold it in. Over-stirring can make the dip too thick and less enjoyable. You want small bits of cheese to stay intact for that perfect bite. Letting the dip chill in the fridge is key. Refrigeration allows the flavors to blend and taste even better. Aim for at least 30 minutes, but longer is fine too. If you want a unique twist, add some extra spices. A pinch of garlic powder or some smoked paprika can boost the flavor. Customize it to your taste, and make your Boat Dip truly yours! {{image_4}} You can mix up the cheese in Boat Dip to create new flavors. Here are some tasty ideas: - Use pepper jack cheese for a spicy kick. - Try a mix of Monterey Jack and Mexican blend cheeses for a creamy texture. - Swap in crumbled feta for a tangy twist. - Blend in some Gouda for a smoky flavor. Feel free to experiment with different cheese combinations. Each one will give your dip a unique taste. Adjust the heat of your Boat Dip by changing the jalapeños. Here are some options: - Add more diced jalapeños for extra spice. - Use pickled jalapeños for a tangy heat. - Skip the jalapeños for a milder dip. - Try diced serrano or habanero peppers for bold heat. Finding the right heat level makes your dip perfect for everyone. Boat Dip tastes great with various dippers. Here are some fun ideas: - Serve with tortilla chips for a classic crunch. - Use pita chips for a different flavor and texture. - Fresh veggie sticks, like carrots and celery, add a healthy crunch. - Try pretzel crisps for a salty bite. These options make your dip even more fun to enjoy! Boat Dip stays fresh in the fridge for about 3 to 5 days. Make sure to store it in an airtight container. This keeps the dip creamy and flavorful. When you’re ready to eat it, just give it a good stir. You might want to add a touch of sour cream if it seems a bit thick. You can freeze Boat Dip, but I recommend caution. Freezing may change the texture of the dip. If you choose to freeze it, use a freezer-safe container. It can last up to 2 months in the freezer. Thaw it in the fridge overnight before serving. Reheat it gently in the microwave or on the stove, stirring often. Enjoy the full recipe for the best flavor! Boat Dip, also known as Rotel Ranch Dip, is a creamy, savory treat. It blends cream cheese, sour cream, and flavorful spices. The star ingredient is diced tomatoes with green chilies, giving it a tasty kick. This dip is great for parties and gatherings. You can serve it with tortilla chips or crunchy veggies. It’s quick to make and always a hit! Yes, you can make Boat Dip ahead of time! It's best to prepare it a few hours in advance. This allows the flavors to blend well together. After mixing, cover the dip tightly and store it in the fridge. Just remember to let it chill for at least 30 minutes before serving. This cooling step makes the dip even better! Boat Dip can be gluten-free if you choose the right ingredients. Most of the base items are naturally gluten-free. However, check the ranch seasoning packet to ensure it’s gluten-free. Some brands may add gluten. Always read the label to be safe. Enjoy this dip with gluten-free chips or veggies for a perfect snack! This blog post covered how to make a tasty Boat Dip. We listed every ingredient, from diced tomatoes to ranch seasoning. You learned how to mix and serve it perfectly. Tips on texture and flavor helped boost your skills. Variations let you customize heat and cheese types. Finally, we discussed storage and answered common questions. Enjoy making this dip for your next gathering. It's easy, fun, and sure to please everyone!](https://tossedflavors.com/wp-content/uploads/2025/05/9aadeea9-5419-482e-8788-1bc79e6e6ac1.webp)
Boat Dip Rotel Ranch Dip Tasty and Simple Recipe
Looking for a crowd-pleasing dip? Your search ends here with my Boat Dip recipe! This Rotel Ranch Dip is simple, tasty, and perfect for any
![- 1 pound Brussels sprouts, cleaned, trimmed, and halved - 2 tablespoons extra virgin olive oil - 3 tablespoons sweet chili sauce - 1 tablespoon low-sodium soy sauce - 1 teaspoon garlic powder - Salt and freshly ground black pepper, to taste - 1 tablespoon toasted sesame seeds (for garnish) - 2 green onions, thinly sliced (for garnish) To make these savory sweet chili air fryer Brussels sprouts, gather the main ingredients first. Start with fresh Brussels sprouts, which are the star of this dish. Their earthy flavor pairs well with the sweet chili sauce. Next, you will need olive oil to help the sprouts crisp up nicely in the air fryer. For added depth, we mix in soy sauce and garlic powder. These ingredients enhance the flavor, making each bite a delight. Don't forget to season with salt and pepper. This will help balance the sweetness and bring out the sprouts' natural taste. Now, let's talk about garnishing. Toasted sesame seeds add a nutty crunch, while sliced green onions bring a fresh touch to the dish. This combination not only looks good but also adds layers of flavor. You can find the full recipe for these Sweet Chili Air Fryer Brussels Sprouts in the next section. Enjoy the process of making this dish; it’s simple yet rewarding! First, preheat your air fryer to 375°F (190°C). This step helps the sprouts cook evenly. Next, clean and trim your Brussels sprouts. Remove any yellow leaves and cut off the stem ends. Halve each sprout to ensure they cook well and soak up flavors. In a large bowl, combine the oil and sauces. Add 2 tablespoons of extra virgin olive oil, 3 tablespoons of sweet chili sauce, and 1 tablespoon of low-sodium soy sauce. Sprinkle in 1 teaspoon of garlic powder, along with salt and pepper to taste. Mix well, ensuring all ingredients blend together. Now, add the halved Brussels sprouts to the bowl. Toss them until each sprout gets a nice coat of the sauce mixture. Carefully spread the coated Brussels sprouts in a single layer in the air fryer basket. Avoid overcrowding; this helps them get crispy. Cook the sprouts for about 15 to 18 minutes. Remember to shake the basket halfway through. This ensures even cooking and crispiness. Keep an eye on them; they should be golden on the outside and tender inside. Once cooked, transfer the sprouts to a serving dish and enjoy your Sweet Chili Air Fryer Brussels Sprouts! For the full recipe, check out the detailed instructions above. - Spacing in the air fryer: Proper spacing is key. Make sure the Brussels sprouts are not crowded. Air needs room to flow for that crispness. A single layer works best. If you have too many, cook them in batches. - Monitoring cooking time: Keep an eye on the Brussels sprouts. Start checking them after 12 minutes. They should be golden brown and crispy. Adjust time if needed. - Additional seasoning suggestions: Want to kick it up a notch? Try adding a pinch of red pepper flakes for heat. You can also mix in some smoked paprika for a smoky twist. - Using different sauces: While sweet chili sauce shines here, you can swap it out. Try teriyaki or hoisin sauce for a different taste. Each sauce brings its own magic to the dish. For the full recipe, check out the [Full Recipe]. {{image_4}} You can easily boost the flavor and nutrition of your Brussels sprouts by adding protein. - Incorporating bacon or chicken: Cook crispy bacon and chop it into bits. Toss the bacon with the Brussels sprouts before air frying. You can also add diced chicken for a heartier dish. Season the chicken lightly with salt and pepper. Cook it until it's golden brown and safe to eat. - Vegetarian alternatives: If you want a vegetarian option, try adding chickpeas or edamame. These add protein and texture. Just mix them in with the Brussels sprouts before cooking. Don't be afraid to get creative with flavors in this recipe. - Spicy variations: If you like heat, add some red pepper flakes or sriracha to the sweet chili sauce. This adds a kick that balances the sweetness. Adjust the amount to fit your taste. - Use of other sauces: Try using teriyaki or hoisin sauce instead of sweet chili. This change will give your dish a different flair. You can also mix sauces for a unique taste. Just remember to keep the balance of flavors right. For the full recipe, check the Sweet Chili Air Fryer Brussels Sprouts section. To store leftover Sweet Chili Air Fryer Brussels Sprouts, first let them cool. Place them in an airtight container. You can keep them in the fridge for up to three days. If you want to keep them longer, freezing is an option. Just spread them on a baking sheet to freeze individually. Once frozen, transfer them to a freezer-safe bag. They can last up to three months in the freezer. When it’s time to enjoy your leftovers, the best method is to use the air fryer again. Preheat it to 350°F (175°C). Place the Brussels sprouts in the basket and heat for about 5-7 minutes. This method helps them stay crispy. You can also use an oven. Preheat it to 350°F (175°C) and spread the sprouts on a baking sheet. Heat for 10-15 minutes, checking for crispness. Avoid using a microwave as it can make them soggy. To make Sweet Chili Air Fryer Brussels Sprouts, follow these steps: 1. Preheat your air fryer to 375°F (190°C). 2. Clean and trim 1 pound of Brussels sprouts, then cut them in half. 3. In a large bowl, mix 2 tablespoons of olive oil, 3 tablespoons of sweet chili sauce, and 1 tablespoon of low-sodium soy sauce. 4. Sprinkle in 1 teaspoon of garlic powder, along with salt and pepper to taste. 5. Toss the halved Brussels sprouts in the sauce until well-coated. 6. Place the sprouts in the air fryer basket in a single layer. 7. Air fry for 15-18 minutes, shaking the basket halfway through. 8. When done, transfer to a serving dish and garnish with 1 tablespoon of toasted sesame seeds and 2 sliced green onions. This recipe is quick and very tasty! You can find the complete recipe above. Yes, you can use frozen Brussels sprouts! Just follow these steps: 1. Do not thaw the frozen Brussels sprouts. Use them straight from the freezer. 2. Increase the air frying time by a few minutes, about 20-22 minutes total. 3. Shake the basket halfway through, just like with fresh sprouts. 4. Check for crispiness and tenderness. They should turn out great! Frozen sprouts may not crisp up as much. But they still taste delicious! Brussels sprouts pair well with many dishes. Here are some great options: - Serve them alongside grilled chicken or steak. - Pair with mashed potatoes or rice for a filling meal. - Add to a salad for extra crunch and flavor. - They also work well with fish, like salmon or cod. Try these ideas to enjoy Brussels sprouts in different ways! Sweet Chili Air Fryer Brussels Sprouts are simple to make. You need just a few main ingredients, like Brussels sprouts, olive oil, and sweet chili sauce. Follow the steps to wash and prepare them, mix in flavors, and air fry for a tasty dish. Consider adding proteins or different sauces for variety. Store leftovers well, and reheat to keep them crispy. Enjoy experimenting with this fun, flavorful recipe!](https://tossedflavors.com/wp-content/uploads/2025/05/f1df7059-e624-4dc8-98f6-8ad50e5ae900.webp)
Savory Sweet Chili Air Fryer Brussels Sprouts Recipe
If you love crispy veggies with a sweet kick, you’ve got to try these Sweet Chili Air Fryer Brussels Sprouts! This recipe is packed with

Crispy Bang Bang Salmon Bites Flavorful Delight Recipe
Are you ready to turn dinner into a delicious adventure? My Crispy Bang Bang Salmon Bites are the perfect blend of flavor and crunch. Made
![- Leftover Mashed Potatoes: 2 cups - Cheddar Cheese: 1 cup shredded sharp - Parmesan Cheese: 1/2 cup grated - Green Onions: 1/4 cup finely chopped - Seasonings: 1/2 teaspoon garlic powder, 1/2 teaspoon onion powder, salt and pepper - Bread Crumbs: 1 cup (panko recommended) - Egg: 1 large, beaten - Olive Oil or Cooking Spray: for brushing To make these air fryer cheesy mashed potato balls, you need simple ingredients. First, leftover mashed potatoes are key. They create a great base. Next, sharp cheddar cheese adds a creamy and rich flavor. Parmesan cheese gives a salty kick and depth. Don’t forget the green onions for a fresh taste. For seasonings, use garlic powder, onion powder, salt, and pepper. These will enhance every bite. Panko bread crumbs work best for a crispy outside. The egg helps the breading stick to the balls. Finally, olive oil or cooking spray ensures they cook evenly and do not stick to the air fryer. This recipe is easy and full of flavors. The ingredients come together to make a delightful treat. You can view the Full Recipe for detailed steps on preparing these cheesy delights. - Combining Ingredients: Start by mixing the leftover mashed potatoes, cheeses, green onions, garlic powder, onion powder, salt, and pepper in a large bowl. Make sure everything blends well. This creates a creamy and flavorful base for your potato balls. - Forming the Balls: Once mixed, use clean hands to scoop and shape the mixture into balls. Aim for 1 to 2 inches in diameter. You should get about 12 to 15 balls from this mix. - Setting Up Breading Station: Next, set up your breading station. Place the beaten egg in one bowl and the bread crumbs in another. This makes breading easier and neater. - Dipping Process: Take each ball and dip it into the beaten egg first. Make sure it’s fully coated. Then roll it in the bread crumbs. Gently press the crumbs onto the ball so they stick well. - Preheating the Air Fryer: Preheat your air fryer to 375°F (190°C). This step is key to getting a nice, crispy exterior. - Arranging the Balls: Lightly spray the air fryer basket with cooking spray. Arrange the potato balls in a single layer, leaving space between them. This ensures even cooking. - Cooking Time: Air fry the balls for 10 to 12 minutes. Shake the basket halfway through cooking to help them brown evenly. When they turn golden brown, they are ready to enjoy. For the complete recipe, check the [Full Recipe]. For a crispy outer layer, choose panko over traditional bread crumbs. Panko gives a light and airy crunch. This texture makes each bite more enjoyable. Traditional bread crumbs can be denser. They may not provide that same delightful crunch. Even cooking is key to great potato balls. When you place them in the air fryer, space them out. Crowding the basket can lead to uneven cooking. Also, remember to shake the basket halfway through the cooking time. This helps ensure all sides get that perfect golden brown color. Adding extra seasonings can elevate your cheesy mashed potato balls. You might try herbs like parsley or chives. A pinch of smoked paprika adds a nice smoky flavor. Cayenne pepper can give it a spicy kick, too. When it comes to cheese, select varieties that melt well. Mozzarella is a fantastic option for extra gooeyness. Gouda offers a rich and creamy taste. Mixing different cheeses can create a flavor explosion. Just be sure to balance stronger flavors with the milder ones. For even more ideas, check out the Full Recipe for more tips on customizing your dish! {{image_4}} Gluten-Free Options: To make these cheesy mashed potato balls gluten-free, swap regular bread crumbs for gluten-free options. You can use crushed rice cereal or almond flour. Both provide a nice crunch without gluten. Just remember to check labels to avoid hidden gluten. Vegan Alternatives: If you're looking for vegan options, replace the cheese with dairy-free cheese. You can also use a flax egg instead of a real egg. Simply mix one tablespoon of ground flaxseed with three tablespoons of water. Let it sit for a few minutes to thicken. This will bind your potato balls just like an egg. Additional Ingredients: Want to spice things up? Try adding crispy bacon bits for a smoky flavor. You could also mix in diced jalapeños for a kick of heat. Fresh herbs like parsley or chives can really brighten up the taste too. Just be sure to chop them finely so they blend well. Sauce Pairings: Dipping sauces can elevate your potato balls. A creamy ranch or tangy buffalo sauce works great. You might also love a zesty garlic aioli. Each sauce adds a unique twist that complements the cheesy goodness of the balls. For more delicious ideas, check out the Full Recipe for Air Fryer Cheesy Mashed Potato Balls. To keep your cheesy mashed potato balls fresh, store them properly. For refrigeration, place the cooled potato balls in an airtight container. They stay good for about 3 to 5 days. When reheating, make sure to warm them gently to keep that crispy outside. For freezing, follow these steps: - Cool Completely: Let the potato balls cool down to room temperature. - Arrange on a Tray: Place them in a single layer on a baking sheet. - Freeze: Freeze the tray for a couple of hours until the balls are solid. - Transfer to Bags: Move them to a freezer-safe bag or container. They can last up to 3 months in the freezer. When it's time to enjoy your leftovers, you have two great options: the oven or the air fryer. Both methods help maintain the crispiness. - Oven: Preheat your oven to 375°F (190°C). Line a baking sheet with parchment paper and place the potato balls on it. Heat for 10 to 15 minutes, turning halfway through. - Air Fryer: This method is quicker. Preheat your air fryer to 375°F (190°C). Air fry the potato balls for about 5 to 8 minutes, shaking the basket halfway for even heating. Quick Reheat Tips: - For either method, check that the center is hot. - Avoid overcooking to keep them crispy. Can I use fresh mashed potatoes instead of leftover? Yes, you can use fresh mashed potatoes. Just make sure they are cool before mixing. This helps the balls hold their shape. What types of cheese work best for this recipe? I love using sharp cheddar and Parmesan. They melt well and add great flavor. You can also try mozzarella for a gooey texture. How can I make these potato balls ahead of time? You can shape the balls and store them in the fridge for up to a day. Just make sure to cover them well. You can also freeze them for later use. Are air fryer cheesy mashed potato balls suitable for freezing? Yes! After you shape the balls, freeze them on a baking sheet. Once solid, transfer them to a freezer bag. They last for about a month. What dipping sauces pair well with cheesy mashed potato balls? I recommend sour cream or ranch dressing. You can also try spicy ketchup or a creamy garlic dip. These add extra flavor to each bite. How do I know when the potato balls are fully cooked? Look for a golden brown color on the outside. This usually takes about 10 to 12 minutes in the air fryer. You can also poke one with a fork to check if it's hot inside. In this post, we covered how to make tasty air fryer cheesy mashed potato balls. We discussed the key ingredients, step-by-step instructions, and helpful tips for achieving the best results. You learned about variations for dietary needs and flavor enhancements too. These potato balls are a fun and delicious way to use leftovers. Try making them with your favorite cheeses or dipping sauces. Enjoy your creation!](https://tossedflavors.com/wp-content/uploads/2025/05/72fd3a45-faec-48d7-88cd-491534c964c9.webp)
Air Fryer Cheesy Mashed Potato Balls Delightful Treat
If you’re looking for a fun and tasty way to use up leftover mashed potatoes, these Air Fryer Cheesy Mashed Potato Balls are the answer!

Air Fryer Grilled Cheese Hot Dogs Simple and Tasty Snack
Are you ready for a snack that’s both simple and delicious? Look no further! In this blog, I will show you how to make air