Salted Caramel Chocolate Cookies Irresistible Delight
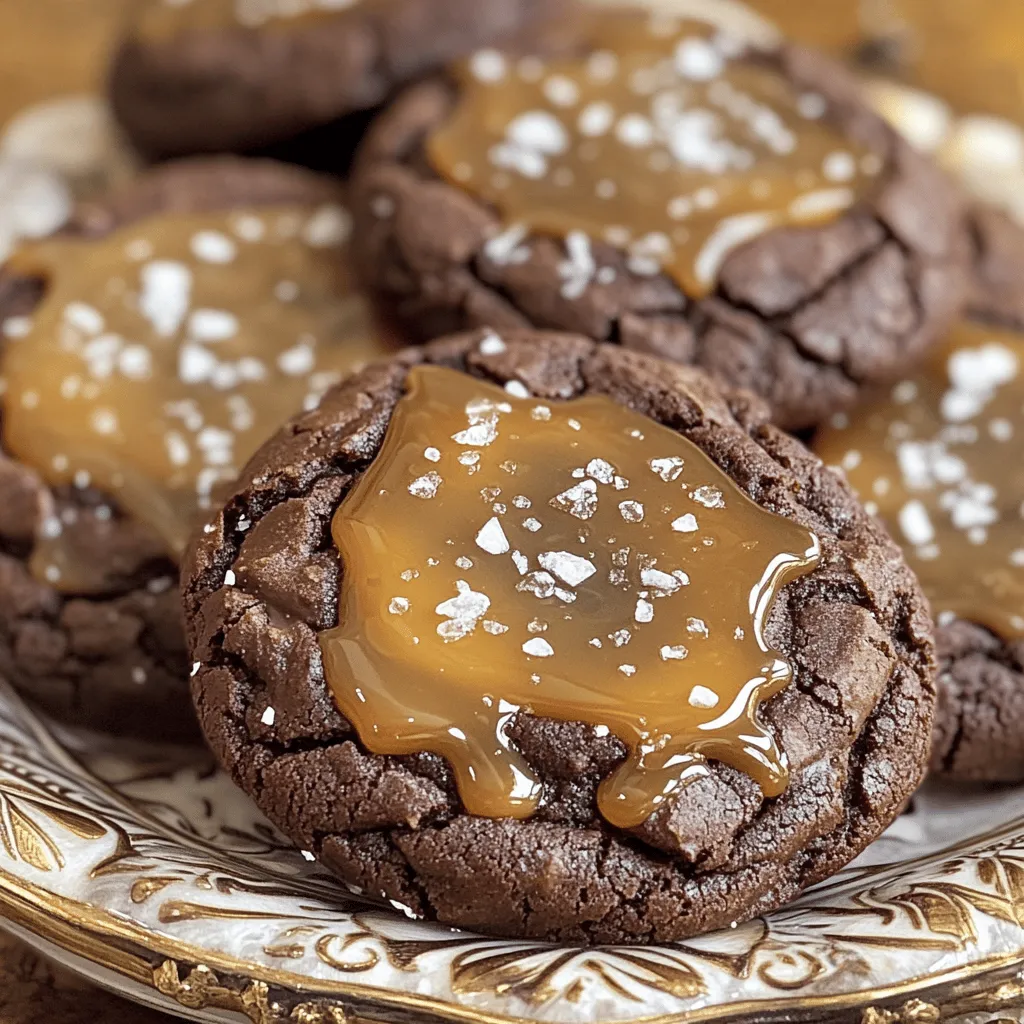
Are you ready to indulge in a sweet treat that’s both rich and simple to make? These Salted Caramel Chocolate Cookies will be your new favorite dessert. With gooey caramel …
Are you ready to indulge in a sweet treat that’s both rich and simple to make? These Salted Caramel Chocolate Cookies will be your new favorite dessert. With gooey caramel …

Looking for a refreshing drink without the alcohol? Try my Mango Jalapeño Margarita Mocktail! It’s a perfect balance of sweet mango and spicy jalapeño. This easy recipe is great for …
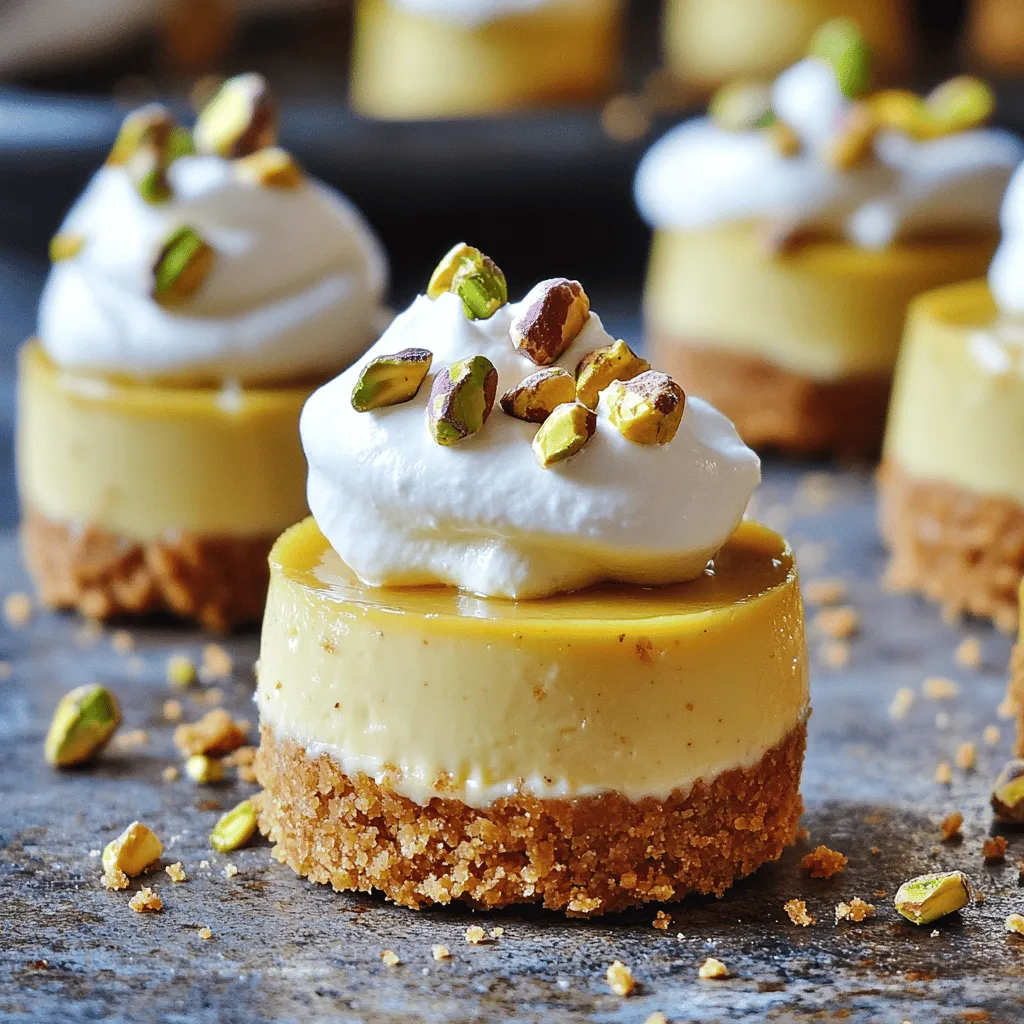
Craving a sweet treat that combines rich flavors and creamy textures? You’ve come to the right place! These Pistachio and Coffee Mini Cheesecakes are not only delightful but also easy …

Are you ready to take your taste buds on a savory adventure? If you love cheesesteaks, you’ll adore this Philly Cheesesteak Cheesy Bread recipe. It’s packed with all the classic …
![To make Soft and Chewy Cinnamon Roll Sugar Cookies, we need these key ingredients: - 2 ½ cups all-purpose flour - 2 teaspoons baking powder - ½ teaspoon baking soda - ½ teaspoon salt - ¾ cup unsalted butter, softened to room temperature - 1 cup granulated sugar - ½ cup brown sugar, packed firmly - 1 tablespoon pure vanilla extract - 2 large eggs, at room temperature - 2 teaspoons ground cinnamon - ½ cup powdered sugar (for icing) - 2 tablespoons milk (for icing) Each ingredient plays a big part in making these cookies soft and chewy. The flour gives structure, while the butter adds richness. The sugars provide sweetness and help with texture. When you mix in the eggs and vanilla, they create a lovely flavor base. The cinnamon brings that classic roll taste. You can find the full recipe with easy steps to follow. This will guide you through each part of the process. Trust me, you’ll love making these! - Preheat your oven to 350°F (175°C). - Prepare two baking sheets by lining them with parchment paper. This helps with easy cleanup. - In a medium bowl, whisk together the flour, baking powder, baking soda, and salt. Mix until all ingredients blend well. - In a large bowl, cream the softened butter with both sugars until fluffy. This should take about 2-3 minutes. - Add the eggs one at a time, mixing well after each. Then, stir in the vanilla extract. - Gradually mix the dry ingredients into the wet ingredients. Do this until just combined to avoid overworking the dough. - In a small bowl, mix 2 teaspoons of ground cinnamon with 2 tablespoons of granulated sugar to create the cinnamon sugar mixture. - Scoop about 1.5 tablespoons of dough. Roll each scoop into a smooth ball and coat it in the cinnamon sugar mixture. - Place the cookie balls on the prepared sheets, leaving about 2 inches between each one. This allows them to spread while baking. - Bake the cookies in the preheated oven for 10-12 minutes. The edges should be lightly golden, while the centers may look soft. They will firm up as they cool. For more detailed steps and tips, check out the Full Recipe. To get the best texture, keep your ingredients at room temperature. This means butter and eggs should be out for about 30 minutes before you start. Room temperature butter mixes well with sugar, making your cookies soft and chewy. Avoid overmixing the dough. Once you add the dry ingredients, mix just until combined. If you mix too much, the cookies can turn tough. You want them soft, not dense. For the icing, you want it smooth and easy to drizzle. If it seems too thick, add a little more milk. Start with a teaspoon at a time until you reach the right thickness. You can use a spoon for a simple drizzle or a piping bag for a fancy touch. Both methods work well, so choose what fits your style! To make your cookies look great, place them on a colorful platter. You can drizzle some extra icing on top for flair. A light sprinkle of cinnamon adds a nice touch, too. If you want to get creative, try stacking them or using cupcake liners. This makes the cookies easy to grab and adds a fun element to the presentation. {{image_4}} You can change the flavor of your cookies in fun ways. Try adding nuts like walnuts or pecans. Chopping them up and mixing them in gives a nice crunch. If you love chocolate, you can adapt this recipe by adding chocolate chips. Fold in 1 cup of chocolate chips right before you scoop the dough. This twist makes each bite extra sweet and rich. If you need gluten-free cookies, use a gluten-free flour blend. It works well in this recipe. Look for blends that can replace regular flour one-for-one. For a vegan option, swap the butter for coconut oil or vegan butter. You can also replace the eggs with flax eggs. Mix 1 tablespoon of ground flaxseed with 2.5 tablespoons of water. Let it sit for a few minutes to thicken before adding it to the dough. Seasonal flavors can make these cookies special. For fall, add pumpkin spice to your dough. Mix in 1 teaspoon of pumpkin spice with your dry ingredients. This adds a warm, cozy flavor. During the holidays, try using peppermint or ginger. You can mix in crushed peppermint candies or ground ginger. These flavors add a festive touch that everyone will love. For the full recipe, check out the detailed steps to make these delicious cookies. Store your cookies at room temperature. Use an airtight container to keep them soft. Place a slice of bread in the container to maintain moisture. This trick works wonders for keeping your cookies fresh. If they start to dry out, they lose their chewy texture. For added freshness, you can refrigerate them. Wrap each cookie in plastic wrap and place them in a zip-top bag. This method helps maintain their taste and texture. Just remember to let them come back to room temperature before enjoying. Freezing cookies is a great way to save some for later. To freeze the dough, scoop it into balls and place them on a baking sheet. Freeze them for about one hour, then transfer them to a zip-top bag. This way, you can bake fresh cookies anytime you want! If you prefer to freeze baked cookies, let them cool first. Wrap each cookie tightly in plastic wrap. Then, place the wrapped cookies in a freezer-safe bag. When you’re ready to eat, let them thaw at room temperature. You can also microwave them for a few seconds for a soft treat. Your cinnamon roll sugar cookies will last about one week at room temperature. If stored properly, they can stay fresh for up to two weeks in the fridge. Watch for signs of spoilage, like an off smell or a dry texture. If they lose their softness or become hard, it’s time to toss them. Enjoy your cookies while they’re at their best! For the complete recipe, check out the [Full Recipe]. You can use margarine, but there are pros and cons. Margarine can make the cookies softer. It may not give the same rich flavor as butter. If you want a lighter cookie, margarine works well. However, if you love that buttery taste, stick with butter. Look for a few visual cues. The edges should turn a light golden brown. The centers may look soft and puffy. This is okay! They will firm up as they cool on the baking sheet. If they look too dry, they may be overbaked. Yes, you can make the dough ahead. Store it in the fridge for up to three days. Just wrap it well in plastic wrap. If you want to keep it longer, freeze the dough. It can last up to three months in the freezer. Just thaw in the fridge before baking. To reheat cookies, use the oven. Preheat it to 350°F (175°C). Place cookies on a baking sheet for about 5 minutes. This keeps them soft and chewy. You can also use the microwave. Heat them for about 10 seconds. Be careful not to overheat them! You can add different flavors to the cinnamon sugar. Try adding nutmeg or ginger for spice. For a sweet twist, mix in some brown sugar. You can even add a bit of cocoa powder for a chocolatey flavor. Get creative and find what you like best! This blog covered the essential ingredients and steps to bake delicious cookies. You learned mixing, forming, and baking techniques. We also discussed tips for perfect texture and creative icing methods. Variations let you customize recipes for any season or diet. Finally, proper storage ensures your cookies stay fresh. Enjoy baking and sharing these cookies. With practice, you'll create treats everyone loves!](https://tossedflavors.com/wp-content/uploads/2025/05/23e23090-0265-4e2d-9cc7-4b53e0708ff8.webp)
If you love the warm, sweet taste of cinnamon rolls, you’ll adore these Soft and Chewy Cinnamon Roll Sugar Cookies. Imagine enjoying the flavors of cinnamon and sugar in a …

Looking for a sweet treat that’s both light and zesty? These Mini Lemon Cheesecakes are your answer! With a buttery crust and creamy filling, they are a breeze to make. …
![The ingredients for Cheesy Asparagus Casserole are simple and fresh. Here’s what you need: - 1 lb fresh asparagus - 1 cup cooked quinoa - 1 cup shredded cheddar cheese - 1 cup cream of mushroom soup - 1/2 cup sour cream - 1/2 cup grated Parmesan cheese - 1/2 cup breadcrumbs - 2 tablespoons olive oil - 1 teaspoon garlic powder - 1 teaspoon onion powder - Salt and pepper to taste - Fresh parsley for garnish Each ingredient plays a key role in making this dish rich and tasty. Fresh asparagus adds a crisp bite, while quinoa gives it a hearty base. Cream of mushroom soup and sour cream create a creamy texture that binds everything together. The cheeses melt beautifully, giving that gooey, cheesy goodness you crave. Breadcrumbs on top add a crunch, making each bite a delight. Olive oil helps in roasting and enhances the flavors of the dish. Garlic and onion powder boost the savory taste. Salt and pepper balance everything out, while parsley adds a pop of color. For the full recipe and cooking steps, check the [Full Recipe]. Enjoy this comforting dish with family or friends! First, you need to preheat your oven to 350°F (175°C). This step is key. A hot oven helps cook the casserole evenly and gives it a nice brown top. While the oven heats, you can get your dish ready. Next, grab a large mixing bowl. Combine the cooked quinoa, cream of mushroom soup, sour cream, garlic powder, and onion powder. Don’t forget to add salt and pepper! Mix it well until it looks smooth and creamy. This mixture is the heart of the dish. Now, it’s time to fold in the asparagus. Gently stir until all the pieces are coated in the creamy mix. Pour this mixture into your greased casserole dish. Spread it out evenly. This helps every bite be full of flavor. Sprinkle the shredded cheddar cheese over the top. This makes it rich and gooey. In another bowl, mix the breadcrumbs with the grated Parmesan cheese. Add a little olive oil and stir. This will create a crunchy topping. Spread it evenly over the cheese layer. Bake everything in the oven for 30-35 minutes. Look for a golden brown top and bubbling edges. After baking, let the casserole cool for a few minutes. This makes it easier to serve. Finish with a sprinkle of fresh parsley to add color. You can serve it right from the dish for a cozy feel or move it to a platter. Enjoy with a light salad to balance the richness! For the full recipe, check the earlier section. When choosing asparagus, look for firm and bright green stalks. They should snap easily when bent. Avoid any stalks that look limp or have dark spots. Fresh asparagus tastes best and gives you a nice crunch in your casserole. If you can, buy asparagus that is in season for the best flavor. To make your own soup, start with fresh mushrooms. Sauté them in butter until they are soft. Add flour to thicken, then slowly stir in broth and milk. Let it simmer until it’s creamy. This simple soup adds great flavor to your casserole. Plus, it lets you skip the cans! For a creamier texture, use full-fat sour cream and cream of mushroom soup. Mixing in a bit of cream cheese can also elevate the richness. Always stir until the mixture is smooth before adding the asparagus. This way, every piece gets coated well, creating a harmonious dish. Store any leftover casserole in an airtight container. It stays fresh in the fridge for up to four days. To reheat, use an oven at 350°F for about 15 minutes. This keeps the cheese melty and the topping crispy. If you want to freeze it, wrap it well and use it within three months. {{image_4}} You can add cooked chicken or turkey to your casserole. This will make it heartier. Simply shred the meat into small pieces, and mix it in with the other ingredients. This change adds flavor and protein. It turns the dish into a full meal. If you want a vegetarian twist, try chickpeas or lentils. These options are great for adding protein and fiber. Use one can of drained chickpeas or one cup of cooked lentils. Mix them in with the asparagus for a tasty, plant-based meal. Cheese lovers can have fun with this recipe. You can try different cheese types. Swap cheddar for mozzarella, gouda, or even feta. Each cheese gives a unique flavor. Mixing two or three types can boost the dish's creaminess and taste. For a gluten-free version, use crushed cornflakes or almond flour. These ingredients give a nice crunch. Just replace the breadcrumbs in the recipe with your choice. You can still enjoy a crispy topping without gluten. For the complete dish, check out the Full Recipe. To keep your cheesy asparagus casserole fresh, let it cool first. Once cooled, store it in an airtight container. Place it in the fridge. It will last for about 3 to 4 days. This way, you can enjoy it again! If you want to save it for later, freezing is a great option. First, let the casserole cool completely. Then, wrap it tightly in plastic wrap and aluminum foil. This helps prevent freezer burn. You can freeze it for up to 3 months. When you're ready to eat it, thaw it in the fridge overnight. To reheat, preheat your oven to 350°F (175°C). Remove the casserole from the fridge and cover it with foil. Bake it for about 20-25 minutes. This warms it through without drying it out. For a crispy top, remove the foil for the last 5 minutes. Enjoy your cheesy goodness! For the complete recipe, check out the Full Recipe section. Yes, you can prepare this casserole a day ahead. Just follow the recipe until you add the cheese topping. Cover and store it in the fridge. When you are ready to bake, add the cheese and bake as directed. This makes it easy for busy days. You can use Greek yogurt as a great substitute. It gives a nice creamy texture and adds protein. You can also try cream cheese or even plain yogurt if you prefer a lighter option. To make it healthier, reduce the cheese by half. You can also use low-fat sour cream and cream of mushroom soup. Adding more veggies, like spinach or bell peppers, boosts the nutrition too. Yes, frozen asparagus works well in this casserole. Just thaw and drain it first. This saves you time and can still give a great taste. The casserole is done when the top is golden brown and bubbly. You can also poke a knife into the center. If it comes out hot, it's ready to eat. For the full recipe, check out the details above. This blog post covered a tasty cheesy asparagus casserole. We explored the ingredients and step-by-step instructions for making it. You learned tips for choosing fresh asparagus, creating a creamy sauce, and storing leftovers. We also discussed variations like adding protein or trying different cheeses. In my final thoughts, this dish is flexible and easy to prepare. Feel free to customize it to fit your taste. Enjoy making this casserole for your next meal!](https://tossedflavors.com/wp-content/uploads/2025/05/5729ddf8-3cbd-43d6-a5d1-dd701129da62.webp)
If you’re looking for a dish that warms your heart and fills your belly, try my Cheesy Asparagus Casserole. It’s a delightful mix of fresh asparagus, creamy goodness, and cheesy …
If you love Reuben sandwiches, you’ll adore these Reuben Balls with Spicy Thousand Island Dipping Sauce! Imagine crispy, golden bites packed with corned beef, sauerkraut, and Swiss cheese. They’re easy …
![To make these delightful mini cakes, you will need: - 1 cup all-purpose flour - 1/2 cup almond flour - 1 teaspoon baking powder - 1/2 teaspoon baking soda - 1/4 teaspoon salt - 1/2 cup unsalted butter, softened - 3/4 cup granulated sugar - 2 large eggs, at room temperature - 1 tablespoon fresh lemon zest - 1/4 cup freshly squeezed lemon juice - 1 teaspoon pure vanilla extract - 1 cup fresh blueberries - 1/2 cup powdered sugar (for icing) - 1 tablespoon milk (for icing) These ingredients come together to create a moist and flavorful cake. If you need to swap out some ingredients, here are a few ideas: - Almond flour: Use an equal amount of more all-purpose flour if you can't find almond flour. - Unsalted butter: You can use coconut oil or margarine instead. - Granulated sugar: Substitute with brown sugar for a richer flavor. - Fresh blueberries: Frozen blueberries work too, but be careful not to overmix. Each substitution can change the flavor or texture a bit, so keep that in mind. To bake these mini bundt cakes, you will need: - Mini bundt cake pan - Mixing bowls - Electric mixer - Spatula or wooden spoon - Toothpick for testing doneness - Wire rack for cooling Having the right tools makes the baking process smoother and more enjoyable. Using a mini bundt pan gives these cakes their fun shape, making them perfect for any gathering. You can find the full recipe to guide you through each step. Start by preheating your oven to 350°F (175°C). This is key for even baking. Next, prepare your mini bundt pan. Grease it lightly with butter and dust it with flour. This helps the cakes release easily later on. In a medium bowl, combine the all-purpose flour, almond flour, baking powder, baking soda, and salt. Whisk these dry ingredients well. Set the bowl aside for now. In a large bowl, use an electric mixer to cream the softened butter and granulated sugar. Beat until light and fluffy, about 3-4 minutes. This step adds air to the batter, helping your cakes rise nicely. Now, add the eggs one at a time, mixing well after each addition. Follow this with the lemon zest, lemon juice, and vanilla extract. Mix until everything blends smoothly. Gradually add the dry mix into the wet mix. Stir gently until just combined. Don’t over-mix; this keeps your cakes light and fluffy. Gently fold in the fresh blueberries. Do this carefully to avoid mashing them. You want them evenly spread throughout the batter. Pour the batter into the prepared mini bundt pan. Fill each cavity about 3/4 full. This allows them to rise without spilling over. Place the pan in the preheated oven and bake for 20-25 minutes. Check doneness with a toothpick. It should come out clean or with a few crumbs. Once baked, let the cakes cool in the pan for about 10 minutes. Then, transfer them to a wire rack to cool completely. This step is crucial to avoid sogginess. For the icing, mix powdered sugar and milk in a small bowl. Stir until you get a smooth glaze. Drizzle this icing over the cooled cakes. Finish with a sprinkle of extra blueberries for a lovely touch. You can find the full recipe for these delightful mini cakes above. To get the best texture in your mini bundt cakes, focus on your mixing. Start by creaming butter and sugar well. This step adds air, making your cakes fluffy. Mix just until combined when adding dry ingredients. Over-mixing can make cakes dense. Use room-temperature eggs and ingredients for even mixing. To prevent sticking, grease your bundt pans well. Use unsalted butter or a baking spray. After greasing, dust the pans lightly with flour. This creates a barrier for the batter. Let the cakes cool for about ten minutes before removing them from the pan. This helps them firm up slightly, making them easier to release. Decorating your mini bundt cakes is fun and easy. A simple icing made of powdered sugar and milk gives a nice finish. You can also add fresh fruit like blueberries or raspberries for color. Try sprinkling some lemon zest on top for added flavor. Serving them on a pretty plate makes them look special. For more ideas, check the Full Recipe. {{image_4}} You can play with flavors to make mini bundt cakes your own. Chocolate lovers will enjoy chocolate mini bundt cakes. Just swap some flour for cocoa powder. For a spiced twist, try ginger or pumpkin spice. You can add cinnamon and nutmeg to the batter. If you like fruit, consider adding mashed bananas or pureed pumpkin for a moist texture. Almond or coconut extracts can bring in unique flavors too. Mix and match to find your favorite! Using seasonal ingredients can make your mini bundt cakes extra special. In spring, consider using fresh strawberries or rhubarb. For summer, try peaches or cherries. In fall, you can't go wrong with apples or pears. Winter brings citrus fruits like oranges or grapefruits. Each season offers unique flavors that enhance your cakes. You can also use herbs like rosemary or thyme for a fun twist. Making mini bundt cakes gluten-free or dairy-free is easy. For gluten-free, swap all-purpose flour with almond flour or a gluten-free blend. Make sure your baking powder is gluten-free too. If you want dairy-free cakes, use coconut oil or vegan butter instead of regular butter. You can also use non-dairy milk like almond or oat milk. These swaps let everyone enjoy your delicious mini bundt cakes! For a delightful start, check out the Full Recipe for Mini Lemon Blueberry Bundt Cakes. After baking, let your mini bundt cakes cool completely on a wire rack. This step is key to keeping them fresh. Once cool, place them in an airtight container. They can last for about 3 to 4 days at room temperature. If you want to keep them longer, consider refrigerating them. Just be sure to wrap them well to avoid any drying out. To freeze mini bundt cakes, allow them to cool completely first. Then, wrap each cake tightly in plastic wrap. After that, place them in a freezer-safe bag or container. This way, they can stay fresh for up to 3 months. When you are ready to enjoy, simply take them out and let them thaw in the fridge overnight. To reheat your mini bundt cakes, preheat your oven to 350°F (175°C). Place the cakes on a baking sheet and cover them with foil. Heat for about 10-15 minutes, or until warmed through. You can also use a microwave for a quicker option. Just heat on low power for 15 to 20 seconds. Enjoy your cakes warm with a drizzle of icing for that fresh-baked taste! Mini bundt cakes can last up to five days when stored properly. Keep them in an airtight container at room temperature. If you want to keep them longer, place them in the fridge for up to one week. You can also freeze them for up to three months. Just wrap each cake tightly in plastic wrap and then in aluminum foil. Yes, you can make the batter ahead of time. Mix the dry and wet ingredients separately. Store each in the fridge for up to 24 hours. When you are ready to bake, combine them and follow the baking instructions. This makes it easy to whip up fresh mini bundt cakes quickly. Serve mini bundt cakes on individual plates for a nice touch. You can drizzle icing over them and add fresh fruit or mint for garnish. This makes the cakes look pretty and inviting. Generally, you do not need to adjust baking times for different flavors. Most mini bundt cakes bake in the same range of 20 to 25 minutes. However, check for doneness by using a toothpick. If it comes out clean, your cakes are ready. Different flavors may alter the texture slightly, but baking times usually stay the same. For a delightful recipe, try the Mini Lemon Blueberry Bundt Cakes. [Full Recipe] In this blog post, we covered how to make mini lemon blueberry bundt cakes. We detailed the ingredients needed and provided tips for substitutes. Next, I shared step-by-step baking instructions, including cooling and icing secrets. We also explored ways to achieve the perfect texture and avoid sticking. These cakes are versatile, with flavor options and seasonal ingredients. Don’t forget to check our storage tips for keeping them fresh. I hope you feel ready to bake your own mini bundt cakes and enjoy every bite!](https://tossedflavors.com/wp-content/uploads/2025/05/3b7b31fb-5292-448a-9246-6c7c67132982.webp)
Looking for a fun dessert that pleases everyone? Dive into these delightful mini bundt cake recipes! Each recipe packs a burst of flavor, from zesty lemon to rich chocolate. With …

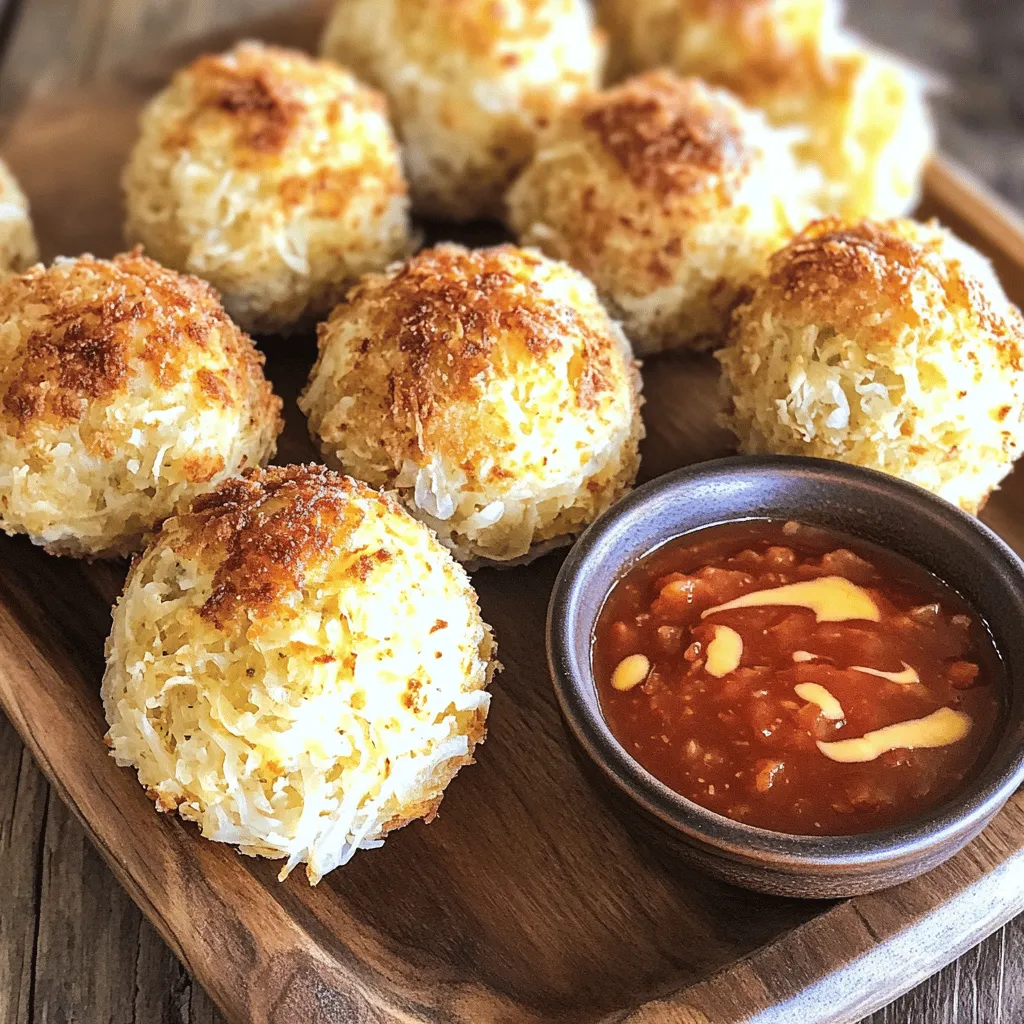
Are you ready for a tasty treat that you can easily make at home? These Easy Crispy Rice Balls will become your new favorite snack! With simple ingredients like sushi …