Skip to content
tossedflavors.com
  • Home
  • Appetizers
  • Desserts
  • Salads
  • Breakfast
  • Dinner
  • Privacy Policy
  • Contact
  • About

Chef Evan

Ultimate Crab Rangoon Crispy and Flavorful Snack

May 15, 2025 by Chef Evan
- Cream Cheese: Cream cheese is the star. It gives the rangoons a rich, creamy base. Softened cream cheese makes it easy to blend with other ingredients. This smooth texture makes each bite delightful. - Lump Crab Meat: For the best flavor, use sweet lump crab meat. Look for fresh crab at seafood counters. Canned crab can work in a pinch, but fresh is best. It adds a sweet, ocean taste that pairs perfectly with cream cheese. - Seasonings: Seasonings are key to great flavor. Use green onions for a fresh crunch. Soy sauce adds umami and depth. Garlic powder and ground ginger bring warmth. Sesame oil gives a nutty finish that ties it all together. Wonton wrappers are thin sheets that hold the filling. You can find them in the refrigerated section of grocery stores. Brands like Nasoya and Twin Dragon offer quality options. If you need a gluten-free choice, look for rice paper or gluten-free wonton wrappers. - Sweet and Sour Sauce: You can make a quick sweet and sour sauce with 1/4 cup sugar, 1/4 cup vinegar, and 1 tablespoon soy sauce. Mix and heat until the sugar dissolves. This sauce adds a nice tangy flavor to your crab rangoons. - Other Dipping Sauce Suggestions: Try soy sauce for a salty touch. You can also serve with chili sauce for a spicy kick. Experiment with your favorite sauces to find the best match! To start, blend the cream cheese and crab meat. I use a large bowl for this. First, soften the cream cheese to room temperature. This makes it easier to mix. Add the lump crab meat next. Choose sweet crab for the best taste. Then, add chopped green onions, soy sauce, garlic powder, ground ginger, and sesame oil. Mix it all until creamy and well combined. You want every bite to be packed with flavor. For balance, keep the seasonings in check. Too much soy sauce can be salty. If you want a kick, add more garlic powder or ground ginger. Taste as you go. This will help you find the right mix. Now it's time to assemble the rangoons. Start with a clean, flat surface. Lay out the wonton wrappers neatly. Place about 1 teaspoon of the crab mixture in the center of each wrapper. Don’t overfill! Dampen the edges of the wrapper with water using your finger or a pastry brush. This helps the edges stick together. Fold the wrapper in half diagonally to form a triangle. Press down firmly to seal the edges well. Next, take the two corners of the triangle and bring them together. Pinch tightly to secure them. Make sure there are no gaps. Sealing is key to stopping any filling from leaking while frying. Frying is where the magic happens. Heat vegetable oil in a deep frying pan over medium heat. Aim for a temperature of about 350°F (175°C). You want enough oil to fully submerge the rangoons. When the oil is hot, gently add the rangoons in batches. Avoid overcrowding the pan; this helps them cook evenly. Fry for about 3-4 minutes. Look for a golden brown color and a crispy texture. Once they are done, use a slotted spoon to lift them out. Let them drain on paper towels to remove excess oil. This step keeps them crispy. Enjoy your crispy, flavorful snack! For the full recipe, refer to the section above. To ensure crispy rangoons, use fresh wonton wrappers. Old wrappers can become dry and tough. Make sure your oil is hot enough, around 350°F (175°C). If the oil is not hot enough, the rangoons will soak up oil and become soggy. Fry them in small batches. This keeps the oil temperature steady and helps your rangoons cook evenly. Avoiding sogginess in fried foods is key. After frying, let the rangoons drain on paper towels. This removes excess oil and keeps them crispy. Serve them right away to enjoy that perfect crunch! Add extra herbs or spices to boost flavor. Fresh cilantro or chives can brighten the mix. A pinch of cayenne pepper adds a nice kick. If you want a sweeter taste, mix in a little sugar or honey. For saltiness, adjust the soy sauce to your liking. Just remember to balance flavors so none are too strong. Garnishing ideas for serving can elevate your dish. Sprinkle chopped green onions or sesame seeds on top of the rangoons. This adds color and texture. You can also serve them with a bowl of sweet and sour sauce in the center. Creating an appealing platter display is simple. Arrange the crispy rangoons in a circle around the sauce. This makes your dish look inviting and fun. Remember, we eat with our eyes first! Enjoy the process of making your crab rangoons shine. For the full recipe, check the Ultimate Crab Rangoon section. {{image_4}} To make vegetarian or vegan crab rangoon, swap cream cheese for a dairy-free option. Try using cashew cream or tofu as a base. For crab meat, use heart of palm or artichoke. Both mimic the texture well. You can also play with flavors. Add nutritional yeast for a cheesy taste. Mix in fresh herbs like dill or chives. You can spice it up with a squeeze of lemon juice for brightness. To add heat to your crab rangoon, consider spices like cayenne or red pepper flakes. You can also use hot sauce for a kick. Sriracha is a great option here! For an extra layer of flavor, mix in finely chopped jalapeños. They add crunch and heat. Adjust the amount based on your spice level preference. If you want a healthier version, try baking your crab rangoon. Preheat your oven to 375°F (190°C). Place the assembled rangoons on a baking sheet lined with parchment paper. Brush the tops with a little oil to help them crisp up. Bake for about 15-20 minutes, or until golden brown. Keep an eye on them to avoid overcooking. Baked rangoons are still tasty and lower in fat! For the full recipe, check out the Ultimate Crab Rangoon. To keep leftover crab rangoon fresh, place them in an airtight container. This helps maintain their flavor and texture. Store the container in the refrigerator. These tasty snacks last about 3 to 4 days in the fridge. Make sure they cool completely before sealing them up. This prevents moisture build-up, which can make them soggy. You can freeze crab rangoon for later enjoyment. For uncooked rangoons, lay them flat on a baking sheet. Freeze them until firm, then transfer to a freezer bag. This prevents them from sticking together. Cooked rangoons can also be frozen. Once cooled, place them in a freezer-safe container. They stay good for about 2 to 3 months. To thaw, just place them in the fridge overnight. For reheating, I like using the oven. Set it to 375°F (190°C) and bake for about 10-15 minutes. This keeps them crispy. To maintain crispiness, reheat your leftover crab rangoon in an oven or air fryer. Avoid using a microwave, as it makes them soggy. If using an oven, place them on a baking sheet. Heat for about 10 minutes, or until they warm up and crisp up again. For air fryers, set it to 350°F (175°C) and heat for 5-7 minutes. If you notice some sogginess, you can brush them lightly with oil before reheating. This helps restore their crunchiness and makes them taste fresh again. Yes, you can prepare Crab Rangoon ahead of time. Make the filling and assemble the rangoons. Store them in the fridge for up to one day. For longer storage, freeze them before frying. Just layer them between parchment paper to avoid sticking. When ready to cook, fry them straight from the freezer. This keeps them fresh and tasty. You have many options for dipping sauces. Sweet and sour sauce is a classic choice. It balances the rich flavor of crab and cream cheese. You can also try soy sauce for a salty kick. Hot sauce adds heat if you like spice. For a twist, mix mayo with a bit of sriracha. This gives a creamy and spicy dip. Look for a golden brown color on the rangoons. They usually take about 3-4 minutes to fry. Start with a test rangoons to check cooking time. Use a thermometer to ensure the oil is at 350°F (175°C). This temperature helps them cook evenly. If they float to the top, they are likely done. Let them drain on paper towels for extra crispiness. In this blog post, we explored how to make the ultimate Crab Rangoon. We covered the main ingredients like cream cheese and crab meat, plus important seasonings. We also discussed the best wonton wrappers and dipping sauces to try. With these tips and tricks, you can craft crispy, flavorful rangoons every time. Don't forget to try fun variations and proper storage methods. Enjoy your cooking, and share these tasty treats with friends and family!

Craving a delicious snack that’s both crispy and packed with flavor? Look no further than the Ultimate Crab Rangoon! These tasty bites will impress your family and friends at any …

Read more

Categories Appetizers Leave a comment

Cinnamon Roll Sugar Cookies Irresistibly Soft Treat

May 15, 2025 by Chef Evan
To make these soft cookies, you need a few key ingredients: - 2 ¾ cups all-purpose flour - 1 teaspoon baking powder - ½ teaspoon baking soda - ½ teaspoon salt - 1 cup unsalted butter, softened - 1 cup granulated sugar - 1 teaspoon pure vanilla extract - 1 large egg - 1 tablespoon ground cinnamon - ¾ cup packed brown sugar - 1 cup powdered sugar - 2 tablespoons milk These ingredients work together to create a soft, chewy texture and delicious flavor. You can customize your cookies with optional ingredients: - Chopped nuts like pecans or walnuts - Chocolate chips for a sweet twist - Dried fruits, such as raisins or cranberries - A pinch of nutmeg for extra warmth These additions can take your cookies to the next level. If you run out of an ingredient, here are some simple swaps: - Use coconut oil instead of butter for a dairy-free option. - Replace granulated sugar with coconut sugar for a different flavor. - For gluten-free cookies, try a 1:1 gluten-free flour blend. Always make sure to measure carefully for the best results. For the icing, add more milk for a thinner consistency or more powdered sugar for a thicker one. This will help you achieve your desired look for the cookies. You can find the full recipe to guide you through the process of making these delightful treats. To start, preheat your oven to 350°F (175°C). Line two baking sheets with parchment paper. In a medium bowl, whisk together 2 ¾ cups of all-purpose flour, 1 teaspoon of baking powder, ½ teaspoon of baking soda, and ½ teaspoon of salt. This mixture is your dry base. In a larger bowl, cream 1 cup of softened unsalted butter with 1 cup of granulated sugar using an electric mixer. Mix until light and fluffy, about 2-3 minutes. Then, add in 1 teaspoon of pure vanilla extract and 1 large egg. Mix until everything is smooth. Gradually combine your dry ingredients into the wet mix. Stir gently but do not overmix. For the filling, mix 1 tablespoon of ground cinnamon with ¾ cup of packed brown sugar in a small bowl. This blend gives your cookies that classic cinnamon roll taste. Take about one tablespoon of dough and flatten it into a disc. Place about a teaspoon of your cinnamon mixture in the center. Carefully fold the edges of the dough around the filling. Roll it into a ball, ensuring the filling stays inside. This step is crucial for a gooey center. Place the cookie balls on your baking sheets with space between them. Flatten each ball gently with the bottom of a glass or your palm to about half an inch thick. Bake these cookies for 10-12 minutes. Look for lightly golden edges while the centers stay soft. After baking, let the cookies cool on the sheets for 5 minutes. Then, transfer them to a wire rack to cool completely. For icing, mix 1 cup of powdered sugar with 2 tablespoons of milk in a small bowl until smooth. Drizzle it over your cooled cookies for a sweet finish. For the full recipe, refer to the complete section above. To make your cookies soft and chewy, follow these tips: - Use room temperature butter. Cold butter can cause cookies to spread too much. - Don’t overmix your dough. Mix until just combined for a softer texture. - Bake until the edges are golden but the centers are soft. This keeps the cookies chewy. You can also refrigerate your dough for about 30 minutes before baking. This helps the cookies keep their shape. If your cookies turn out too flat, check these points: - Ensure your baking powder and baking soda are fresh. Old leavening agents can affect rise. - Measure flour correctly. Too little flour can lead to flat cookies. Use the spoon-and-level method. - Avoid over-creaming the butter and sugar. This can add too much air and cause spreading. If your cookies are too dry, consider the following: - Mix in a bit more butter or milk to the dough. - Watch baking time closely. Overbaking can dry them out quickly. For perfect icing, keep these tips in mind: - Use powdered sugar and milk to create a smooth glaze. - Start with less milk and add more until you reach the right consistency. - Drizzle the icing over cooled cookies for a beautiful finish. Try placing the cookies on a wire rack for icing. This helps the icing drip off without pooling. For a fun touch, you can sprinkle cinnamon on top before the icing sets. {{image_4}} You can enjoy these cookies without gluten! Use a gluten-free flour blend in place of all-purpose flour. Look for one that has a good mix of flours. This mix will help keep your cookies soft and tasty. Just follow the same steps in the Full Recipe to make your gluten-free version. Want to twist the flavor? Add different spices or extracts! Try nutmeg for warmth or almond extract for a nutty touch. Chopped nuts like pecans or walnuts can also add a nice crunch. You can even mix in chocolate chips for a fun surprise. Just make sure to keep the total amount of add-ins to about 1 cup. Make your cookies match the seasons! For a fall treat, add pumpkin spice to the dough instead of just cinnamon. You can also use apple pie spice for a cozy autumn flavor. In winter, try adding a hint of peppermint extract for a festive touch. These variations will keep your baking fun and fresh throughout the year! To keep your cinnamon roll sugar cookies fresh, store them in an airtight container. This helps to keep them soft and chewy. Place a piece of bread in the container to maintain moisture. The cookies can last up to one week at room temperature. If you want to enjoy these treats later, freezing is a great option. Wrap each cookie in plastic wrap and place them in a freezer-safe bag. They can last up to three months in the freezer. When you're ready to eat them, just thaw at room temperature or pop them in the microwave for a few seconds. To enjoy that fresh-baked taste, reheat cookies before serving. Preheat your oven to 350°F (175°C). Place the cookies on a baking sheet and heat for about 5 minutes. If you prefer the microwave, heat them for 10-15 seconds. This will soften them back to their original glory. For the full recipe, check out the details above! Cinnamon roll sugar cookies blend two treats into one. They are soft cookies with a sweet cinnamon filling. You get the warm taste of a cinnamon roll in a cookie form. The dough is buttery and rich, just like a classic sugar cookie. Each bite gives you a hint of cinnamon and brown sugar. It is a delightful twist on a beloved favorite. Yes, you can make these cookies ahead of time! You can prepare the dough a day before baking. Wrap it well and store it in the fridge. This keeps the dough fresh and ready to bake. You can also bake the cookies and store them for later. They stay soft for a few days in an airtight container. Store leftover cinnamon roll sugar cookies in a sealed container. This keeps them soft and fresh. Place a slice of bread in the container to help retain moisture. For longer storage, you can freeze the cookies. Just place them in a freezer bag, and they will last for up to three months. You can find pre-made cinnamon roll sugar cookies at many grocery stores. Check the bakery section for fresh options. Some stores offer packaged cookies that taste great too. You can also find them online, from bakeries that ship nationwide. If you need an egg substitute, try using applesauce. Use ¼ cup of unsweetened applesauce for each egg. You can also use mashed banana or a flaxseed mixture. To make a flax egg, mix one tablespoon of flaxseed meal with three tablespoons of water. Let it sit for a few minutes until it thickens. Each substitute works well in this cookie recipe. In this post, I shared how to make delicious cinnamon roll sugar cookies. We covered essential and optional ingredients, plus substitutions. You learned step-by-step instructions for preparation and baking. I provided tips for soft, chewy cookies and how to troubleshoot common issues. There were also fun variations and storage tips to keep your cookies fresh. Try this recipe today, and enjoy a warm treat. Soon, these cookies will become your favorite go-to dessert for any occasion.

Are you ready to bake something special? These Cinnamon Roll Sugar Cookies are soft, chewy, and bursting with flavor. Imagine enjoying a cookie that tastes just like a warm cinnamon …

Read more

Categories Desserts Leave a comment

Lemon Cheesecake Squares Delightful and Easy Recipe

May 15, 2025 by Chef Evan
To make Lemon Cheesecake Squares, you need fresh and simple ingredients. Each one adds a special touch to the flavor and texture. Here is what you will need: - 1 ½ cups graham cracker crumbs - ½ cup unsalted butter, melted - 2 tablespoons sugar - 16 oz cream cheese, softened - 1 cup granulated sugar - 3 large eggs - 1 teaspoon vanilla extract - ½ cup fresh lemon juice - Zest of 2 lemons - ½ teaspoon salt These ingredients work together to create a smooth and tangy filling on a buttery crust. The cream cheese gives it a rich, creamy texture. Fresh lemon juice and zest add a bright flavor that makes each bite delightful. The graham cracker crust provides a nice crunch that contrasts with the soft filling. Using high-quality ingredients can make a big difference. For the best taste, always opt for fresh lemons over bottled juice. This small choice elevates the flavor of your cheesecake squares. For the complete recipe and detailed steps, check out the Full Recipe. - Preheat the oven to 325°F (160°C). - Line the baking pan with parchment paper. First, I set the oven to the right temperature. This ensures the cheesecake bakes evenly. While the oven heats, I grab an 8x8 inch baking pan. I line it with parchment paper, letting some paper hang over the edges. This makes it easy to lift the dessert out later. - Mix graham cracker crumbs, melted butter, and sugar. - Press the crumb mixture into the baking pan. Next, I mix graham cracker crumbs, melted butter, and sugar in a medium bowl. I stir until the crumbs look moist. Then, I press this mixture firmly into the bottom of my lined pan. This creates a solid crust. I bake it in the oven for about 10 minutes until it’s lightly golden. After that, I let it cool down. - Beat cream cheese and granulated sugar until smooth. - Incorporate eggs one at a time. - Add vanilla extract, lemon juice, zest, and salt. Now, I focus on the filling. In a large bowl, I beat together softened cream cheese and granulated sugar. I mix until it’s creamy and smooth. Then, I add the eggs one at a time, mixing gently each time. It’s key not to overmix at this stage. After that, I stir in vanilla extract, lemon juice, lemon zest, and salt. This adds bright flavor to the filling! - Pour the filling over the crust. - Bake in the oven for 25-30 minutes. I carefully pour the cheesecake filling over the cooled crust. I spread it evenly with a spatula. Then, I put the pan back in the oven. I bake it for 25-30 minutes. The edges should be firm, but the center can still jiggle a bit. - Cool in the oven after baking. - Chill in the refrigerator for at least 4 hours. Once it’s done baking, I turn off the oven and leave the cheesecake squares inside for 10 more minutes. This helps the center to set gently. Next, I take it out and let it cool at room temperature. I then refrigerate it for at least 4 hours, or even overnight. This waiting time is crucial for the best taste and texture. - Lift out of the pan using parchment paper. - Slice into squares for serving. Finally, I use the parchment paper to lift the cheesecake out of the pan. I place it on a cutting board. I slice it into squares with a sharp knife. If I want to add a special touch, I can sprinkle some lemon zest or add fresh berries on top. For the full recipe, check out the Lemon Zing Cheesecake Squares. - Avoid overmixing the filling: Mix just until smooth. Overmixing adds too much air, causing cracks. - Ensure even baking with a water bath: A water bath helps keep the cheesecake moist and prevents cracks. - Garnish with lemon zest or fresh berries: This adds bright color and fresh flavor. - Drizzle with lemon glaze or berry coulis: A sweet drizzle enhances the look and taste. - Using cold cream cheese: Always use soft cream cheese for a smooth filling. Cold cheese causes lumps. - Not chilling the cheesecake long enough: Patience is key! Chill for at least 4 hours to set properly. For more detailed steps, check out the Full Recipe. Enjoy making your lemon cheesecake squares! {{image_4}} You can add fun twists to your lemon cheesecake squares. Try adding lime or orange zest for a new taste. This will brighten the flavor and make it pop. You can also mix in chocolate or vanilla for a rich twist. Each option brings a unique taste to your dessert. If you need gluten-free options, use almond flour or gluten-free cookies for the crust. These choices keep the flavor while meeting dietary needs. For those looking for vegan alternatives, swap cream cheese with plant-based cream cheese. This keeps your cheesecake creamy without dairy. Change the flavors with the seasons. In winter, add spices like cinnamon or nutmeg for a cozy feel. For summer, top your squares with fresh fruits like strawberries or blueberries. These toppings add color and fresh taste to your dessert. You can even create festive variations for holidays, using themed decorations or flavors. For more details on making these delightful variations, check out the Full Recipe. To keep your lemon cheesecake squares fresh, use an airtight container. This will help avoid any unwanted odors or moisture. Place the squares in a single layer, if possible. If stacking, add parchment paper between layers. Store them in the refrigerator for the best taste. They stay tasty this way for about five days. You can freeze lemon cheesecake squares for longer storage. First, let them cool completely. Then, wrap each square in plastic wrap tightly. Place wrapped squares in a freezer-safe bag. Seal and label the bag with the date. For best results, eat them within two months. To thaw, move them to the fridge overnight. This helps maintain their creamy texture. Lemon cheesecake squares last about five days in the fridge. Look for any signs of spoilage. Check for an off smell or any mold. If they feel dry or hard, it’s best to toss them. Fresh is always best for that delightful taste! Look for a few key signs to know if your cheesecake squares are ready. The edges should feel firm, while the center should be slightly jiggly. You can also check for a light golden color on the top. If it cracks a bit, that’s okay! This often happens and won't affect the taste. Yes, you can make these cheesecake squares ahead of time. I suggest preparing them at least a day before serving. This allows the flavors to meld and improves the texture. Chill them in the fridge for at least four hours, or overnight for the best results. If you need a substitute for cream cheese, try using Greek yogurt or silken tofu. Both options can create a creamy texture. For a vegan choice, look for plant-based cream cheese. Ensure it has a similar consistency for the best results. You can use bottled lemon juice, but fresh is best. Fresh lemon juice gives a brighter, more vibrant flavor. Bottled juice often lacks the same zing. If you use bottled juice, make sure it is 100% lemon juice for the best taste. This blog post detailed how to make delicious cheesecake squares. You learned about the ingredients, step-by-step instructions, tips for perfection, variations, and storage. Remember to keep your cream cheese at room temperature for the best results. Feel free to experiment with flavors and toppings to make them your own. With these easy steps, you can impress your family and friends. Enjoy your creamy, tangy cheesecake squares, and happy baking!

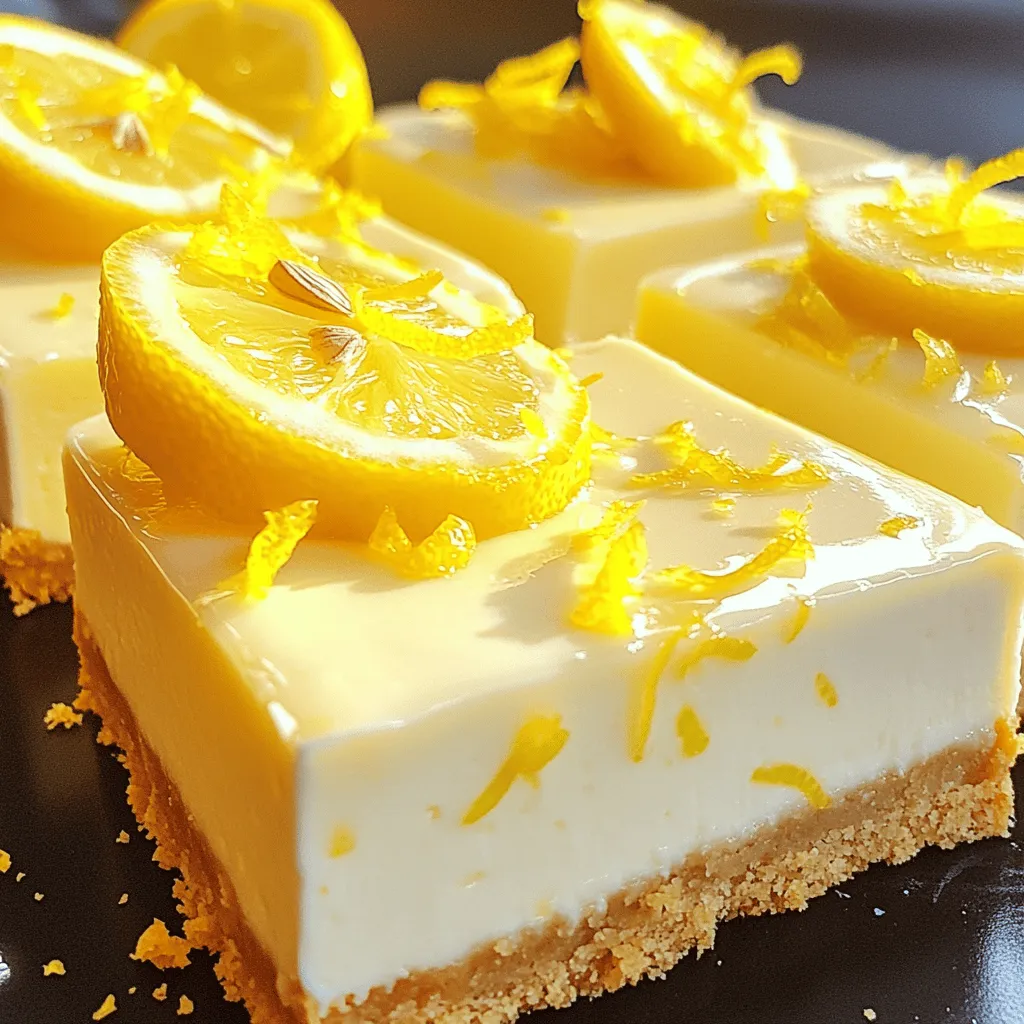
Are you craving a sweet treat that’s both zesty and creamy? Look no further! My Lemon Cheesecake Squares recipe combines the tang of fresh lemons with smooth cream cheese for …

Read more

Categories Desserts Leave a comment

Creamy Mini Lemon Cheesecakes Delightful Dessert Treat

May 15, 2025 by Chef Evan
To make creamy mini lemon cheesecakes, gather these simple ingredients: - 1 cup graham cracker crumbs - 1/4 cup granulated sugar - 1/2 teaspoon ground cinnamon - 1/4 cup unsalted butter, melted - 16 oz cream cheese, softened at room temperature - 1 cup powdered sugar - 2 large eggs - 1/4 cup fresh lemon juice (about 1-2 lemons) - Zest of 1 lemon - 1 teaspoon vanilla extract - Fresh berries for garnish (optional) - Whipped cream for topping (optional) These ingredients create a perfect balance of creamy and zesty flavors. The graham cracker crust gives a nice crunch. The cream cheese filling is rich and smooth. Using fresh lemon juice and zest adds a bright taste. You can top your cheesecakes with berries or whipped cream for extra flair. When I make these cheesecakes, I love using fresh lemons. They really boost the flavor. This recipe is fun to make, and the result is a treat everyone enjoys. If you want to see the full process, check out the Full Recipe. Set your oven temperature to 325°F (160°C). Line a muffin tin with paper liners. This makes it easy to take out the cheesecakes once they are baked. In a mixing bowl, combine the graham cracker crumbs, granulated sugar, and ground cinnamon. Pour the melted unsalted butter over the crumb mixture. Mix it well until the crumbs are coated. Take about 1 tablespoon of this mixture and press it firmly into the bottom of each muffin liner to create a crust. Place the muffin tin in the preheated oven. Bake for 8-10 minutes, or until the crusts turn lightly golden. Once done, take them out and let them cool while you prepare the cheesecake filling. In a large mixing bowl, beat the softened cream cheese using an electric mixer. Make sure it is smooth and creamy, with no lumps. This step is key for a great texture. Gradually add the powdered sugar to the cream cheese. Mix until it is well combined. Next, add the eggs one at a time. Beat well after each addition to keep the filling creamy. Mix in the fresh lemon juice, lemon zest, and vanilla extract. Stir until all the ingredients are fully combined. The mixture should be smooth and fragrant. Carefully pour the cheesecake filling into the cooled crusts. Fill each cup about 3/4 full. This allows room for the cheesecakes to rise slightly while baking. Put the filled muffin tin in the oven. Bake for 18-20 minutes. The edges should be set, while the center can be slightly jiggly. Once baked, remove them from the oven and let them cool at room temperature. After they cool, refrigerate the mini cheesecakes for at least 2 hours. This helps them set and develop their flavors. Patience is key for the best taste. Before serving, top each mini cheesecake with whipped cream and fresh berries, if you like. These delightful treats are now ready to impress! Enjoy them with friends or family. For the full recipe, check out the detailed steps above. To get a creamy texture, use room temperature ingredients. Cold ingredients can cause lumps in your filling. Let the cream cheese sit out for about 30 minutes before mixing. This simple step makes a big difference. You will notice how smooth the mixture becomes when all ingredients are at the same temperature. One common issue is cracks in the cheesecake. Cracks happen when the filling bakes too fast. To avoid this, bake at a low temperature. Also, do not overbeat the mixture once you add the eggs. Just mix until combined. Finally, let the mini cheesecakes cool slowly in the oven after baking. This helps them set without cracking. For the best presentation, garnish your mini cheesecakes with fresh berries. Strawberries, blueberries, or raspberries add color and flavor. A dollop of whipped cream on top makes them even more appealing. You can also sprinkle some lemon zest for extra zing. Arrange them on a nice platter for a stunning display. If you want more ideas, check out the Full Recipe for extra tips! {{image_4}} You can switch up the flavors of your mini cheesecakes easily. Try using other citrus fruits. Lime or orange can add a fresh twist. They bring a unique taste that complements the creaminess. You can also experiment with chocolate. Add melted dark chocolate to the filling. This gives a rich, decadent flavor. Another option is to mix in pureed fruits. Strawberries or raspberries provide a delightful surprise. The crust can change the whole vibe of the cheesecake. Instead of graham crackers, try using digestive biscuits. They add a nice crunch and flavor. If you want something nutty, almond or pecan flour works well. Simply mix it with butter and press it into the liners. This adds a unique texture and taste. For a healthier option, consider sugar substitutes. Stevia or monk fruit sweetener are great choices. They keep the sweetness without the calories. You can even use honey or maple syrup for a natural touch. Just adjust the amount since they are sweeter than sugar. This way, you can enjoy your mini cheesecakes guilt-free. These variations make the mini cheesecakes fun and versatile. You can find the full recipe to start making these delightful treats! To keep your mini lemon cheesecakes fresh, store them in the fridge. Place them in an airtight container. This helps keep them moist and prevents them from absorbing other smells. You can also cover them with plastic wrap, but the container works best. Make sure they stay chilled until you are ready to serve. Freezing these treats is easy! First, let them cool completely in the fridge. Once they are cold, remove them from the muffin tin. Wrap each cheesecake tightly in plastic wrap. Then place them in a freezer-safe container or a zip-top bag. This protects them from freezer burn. They can stay in the freezer for up to three months! In the fridge, these mini cheesecakes last about five days. If you freeze them, they can last for three months. Just remember to thaw them in the fridge overnight before serving. This keeps their creamy texture intact. Enjoy these delightful treats at your own pace! For the full recipe, check out the section above. Yes, you can make creamy mini lemon cheesecakes ahead of time. Prepare the cheesecakes and chill them for at least two hours. After chilling, cover them tightly with plastic wrap or place them in an airtight container. They will stay fresh in the fridge for up to five days. You can also freeze them for up to three months. Just remember to thaw them overnight in the fridge before serving. This makes them perfect for parties or surprise guests! If you want a dairy-free or vegan option, use non-dairy cream cheese. Brands like Tofutti or Daiya work well. You can also blend silken tofu with a bit of lemon juice and sugar. This gives a creamy texture that mimics cream cheese. Another option is to use soaked cashews blended with lemon juice and a sweetener. These alternatives still deliver a delicious flavor and texture for your mini cheesecakes. To check if your cheesecakes are ready, look for a few signs. The edges should be set, while the center remains slightly jiggly. When you gently shake the muffin tin, the middle should wobble a bit but not appear liquid. Remove them from the oven and let them cool at room temperature. They will continue to set as they cool. Proper doneness ensures a smooth texture and rich flavor in every bite. In this post, we explored how to make mini cheesecakes with a tasty lemon twist. We outlined all the necessary ingredients and gave clear steps to bake them perfectly. I shared tips to avoid common mistakes and ideas for fun variations. Remember, using room temperature items helps ensure a creamy texture. Enjoy these treats fresh or stored for later! You can even customize them to match your taste. Happy baking!

If you’re craving a sweet, tangy treat that’s easy to make, look no further! These Creamy Mini Lemon Cheesecakes are the perfect dessert for any occasion. With a buttery crust …

Read more

Categories Desserts Leave a comment

3-Ingredient Elegant Appetizers Simple and Tasty Treats

May 15, 2025 by Chef Evan
When making 3-ingredient appetizers, focus on simple yet tasty items. For the crispy sweet potato bites, you need: - 2 medium sweet potatoes, sliced into 1/2-inch thick rounds - 8 oz cream cheese, softened to room temperature - 2 tablespoons fresh herbs (like chives, dill, or parsley), finely chopped These ingredients create a nice balance of flavors and textures. Sweet potatoes offer a natural sweetness and a hearty base. Cream cheese adds creaminess, while fresh herbs give a burst of flavor. You can enhance your appetizers with some extra ingredients. These additions can make a big difference: - 2 tablespoons olive oil - Salt and pepper, to taste Olive oil helps achieve a crispy texture when baking sweet potatoes. Adding salt and pepper will elevate the overall taste. You can also try adding spices like paprika or garlic powder for extra depth. Having the right tools makes cooking easier and more fun. Here’s what you’ll need: - A sharp knife for slicing the sweet potatoes - A cutting board to keep your workspace clean - A baking sheet lined with parchment paper for easy cleanup - A mixing bowl for the herbed cream cheese - A spatula for flipping the sweet potatoes With these tools, you’ll be well-prepared to create your elegant appetizers. For the full recipe, click [Full Recipe]. To make crispy sweet potato bites, start by preheating your oven to 400°F (200°C). Grab two medium sweet potatoes and slice them into 1/2-inch thick rounds. This will help them bake evenly. Line a baking sheet with parchment paper. This step makes cleanup easy! Place the sweet potato slices on the baking sheet in a single layer. Drizzle olive oil over the rounds, and sprinkle with salt and pepper. This enhances the flavor. Bake for 25-30 minutes, flipping the rounds halfway. They should turn golden brown and get tender. The key to crispy sweet potatoes is even baking. Ensure the slices are uniform in thickness. If they are too thick, they will take longer to cook. If they are too thin, they may burn. Keep an eye on them in the oven. You want a nice golden color and a crisp texture. Using parchment paper helps the sweet potatoes crisp up nicely. The oil also helps. Olive oil adds flavor and ensures they do not stick to the pan. Flip them halfway for even cooking, so both sides get crispy. Once your sweet potatoes are baked, let them cool for about 5 minutes. This makes them easier to handle. While they cool, prepare the herbed cream cheese. In a bowl, mix 8 oz of softened cream cheese with 2 tablespoons of your choice of fresh herbs. After mixing, take each sweet potato round and add a generous dollop of the herbed cream cheese on top. For a beautiful presentation, place the bites on a vibrant platter. Garnish with extra herbs for color. You can also add toothpicks for easy picking. These bites will impress your guests and are perfect for any gathering. For the complete recipe, check out the Full Recipe. To make your sweet potato bites crispy, follow these steps: - Cut the sweet potatoes into even rounds. This helps them cook at the same rate. - Use parchment paper on your baking sheet. This prevents sticking and aids in crispiness. - Drizzle olive oil evenly. This helps the sweet potatoes brown nicely. - Flip them halfway through baking. This ensures both sides get that golden color. How you present your appetizers matters. Here are some easy tips: - Use a colorful platter to make the dish pop. Bright colors catch the eye. - Stack the sweet potato bites slightly. This adds height and makes it look fancy. - Garnish with extra herbs. Sprinkle them on top for a fresh look. - Offer toothpicks. They make it easy for guests to grab a bite. To boost the flavor of your sweet potato bites, consider these ideas: - Add spices like paprika or garlic powder before baking. This gives a nice kick. - Serve with a drizzle of balsamic glaze. It adds sweetness and tang. - Try adding crumbled feta cheese on top. This gives a creamy texture. - A sprinkle of sea salt right before serving enhances all the flavors. For the full recipe, check out Crispy Sweet Potato Bites with Herbed Cream Cheese. {{image_4}} You can add many toppings to your sweet potato bites. Try adding a slice of avocado for creaminess. A small dollop of spicy salsa adds a nice kick. You can also sprinkle crumbled feta cheese for a salty touch. Each topping brings a new taste, making the bites even more fun. You can create other easy appetizers with just three ingredients. For example, mix sliced cucumbers with hummus and cherry tomatoes. You can also use crackers, cheese, and smoked salmon for a classy snack. Just remember to keep your ingredients fresh for the best flavor. Use seasonal ingredients to keep your bites fresh all year. In spring, swap sweet potatoes for asparagus and top with cream cheese. In summer, use fresh peaches with goat cheese for a fruity treat. In fall, try pumpkin with a sprinkle of cinnamon and nutmeg. These swaps keep your appetizers exciting and tasty! For the full recipe, check out the crispy sweet potato bites with herbed cream cheese. After enjoying your crispy sweet potato bites, store any leftovers in an airtight container. This keeps them fresh and prevents drying out. Ensure they cool down first before sealing. Place the container in the fridge for up to three days. For best taste, eat them within this time frame. To reheat, use an oven set to 350°F (175°C). This method keeps the bites crispy. Arrange them on a baking sheet and heat for about 10-15 minutes. Check for warmth throughout. Avoid microwaving, as it will make them soggy. You can freeze these appetizers for later. Place the cooled sweet potato rounds in a single layer on a baking sheet. Freeze them for about an hour, then transfer to a freezer bag. They will stay fresh for up to three months. When ready to enjoy, bake from frozen, adding extra time to ensure they are heated through. For the full recipe, check out the details above! You can serve a variety of dips and spreads. Hummus or olive tapenade works well. A light salad can add freshness. Consider pairing them with crunchy veggies like carrots or celery. Cheese platters are also a great option. Use a mix of textures and flavors to please everyone. Yes, you can prepare some parts ahead. Slice the sweet potatoes a day before and store them in water. This keeps them fresh. You can also mix the herbed cream cheese in advance. Just store it in the fridge until you're ready to serve. Bake the sweet potatoes just before serving for the best taste. Try light white wines like Sauvignon Blanc or Pinot Grigio. These wines enhance the flavors of the sweet potatoes. If you prefer non-alcoholic drinks, serve sparkling water with lemon. This adds a refreshing touch. Craft cocktails with herbs can also complement the appetizers nicely. You learned how to make elegant appetizers with just three ingredients. We covered key ingredients, simple steps, and useful tips. You now know how to store leftovers and reheat them. Remember to try different toppings and seasonal swaps for variety. Your guests will love the quick, tasty bites you create. Keep experimenting and enjoy the rewards of your kitchen skills!

Looking to impress your guests without spending hours in the kitchen? You’re in the right place! My “3-Ingredient Elegant Appetizers” give you tasty treats that are both simple and stylish. …

Read more

Categories Appetizers Leave a comment

Mediterranean Chickpea Salad Fresh and Flavorful Mix

November 2, 2025May 15, 2025 by Chef Evan
- 1 can (15 oz) chickpeas, drained and rinsed - 1 cup cherry tomatoes, halved - 1 cucumber, diced - 1 bell pepper (red or yellow), diced - 1/4 red onion, finely chopped - 1/2 cup Kalamata olives, pitted and sliced - 1/4 cup feta cheese, crumbled - 1/4 cup fresh parsley, chopped - 3 tablespoons olive oil - 2 tablespoons lemon juice - 1 teaspoon dried oregano - Salt and pepper to taste Each of these ingredients adds a unique flavor and texture to the salad. Chickpeas provide a hearty base. Cherry tomatoes bring sweetness and color. Cucumbers add crunch. Bell peppers offer a hint of sweetness and more crunch. Red onion gives a sharp bite. Kalamata olives add a salty depth. Feta cheese introduces creaminess. Fresh parsley brightens the dish. Olive oil and lemon juice create a zesty dressing. Dried oregano adds an earthy note. Salt and pepper enhance all these flavors. You can swap out some ingredients if needed. Use canned white beans instead of chickpeas for a different taste. Any tomato can work, but grape tomatoes are great too. If you don't have cucumbers, try zucchini. For the bell pepper, any color works, or you can skip it. If you want a milder flavor, use green onion instead of red onion. For a vegan option, omit the feta. You can use avocado for creaminess instead. - Chickpeas: High in protein and fiber, chickpeas aid digestion and keep you full. - Cherry Tomatoes: Packed with vitamins like C and K, they support skin health. - Cucumber: Low in calories and hydrating, cucumbers are great for weight control. - Bell Pepper: Rich in antioxidants, they boost your immune system. - Red Onion: High in antioxidants, red onion may reduce inflammation. - Kalamata Olives: Full of healthy fats, these olives promote heart health. - Feta Cheese: Provides protein and calcium, good for strong bones. - Fresh Parsley: Loaded with vitamins, parsley aids in digestion. - Olive Oil: Contains healthy fats that can lower cholesterol levels. - Lemon Juice: High in vitamin C, it enhances iron absorption and boosts immunity. - Dried Oregano: Known for its antibacterial properties, it adds flavor too. - Salt and Pepper: Essential for flavor, they make all the ingredients shine. These ingredients not only taste great together but also contribute to your health. This salad is a delicious and nutritious choice. {{ingredient_image_1}} Making Mediterranean chickpea salad is easy and quick. You will need about 15 minutes to prep. Gather all your fresh ingredients first. This will help you stay organized and fast. 1. In a large mixing bowl, combine the chickpeas, cherry tomatoes, cucumber, bell pepper, red onion, and Kalamata olives. 2. In a small bowl, whisk together olive oil, lemon juice, dried oregano, salt, and pepper. Mix until it is smooth. 3. Pour the dressing over the chickpea mix. Gently toss to coat all ingredients well. 4. Add the crumbled feta cheese and chopped parsley. Carefully fold them in so they stay nice. 5. Taste your salad. Adjust salt and pepper if you like. Let it rest for 15 minutes. This helps the flavors come together. - Use a large bowl to give yourself space while mixing. This prevents spills. - Be gentle when tossing the salad. You do not want to break the feta cheese. - If you like more flavor, add extra lemon juice or herbs. - If you want a creamier texture, you can add yogurt or a bit more olive oil. Enjoy your fresh and colorful Mediterranean chickpea salad! To make this Mediterranean chickpea salad even better, add fresh herbs. Basil or mint can add a new layer of taste. Try using lemon zest for a citrus boost. You can also swap the feta for goat cheese for a creamier texture. A pinch of red pepper flakes can give your salad a nice kick! This salad is perfect for meal prep. You can prepare it a day in advance. Just keep the dressing separate until you are ready to eat. This helps the veggies stay crisp. You can store it in an airtight container in the fridge. It lasts for up to three days. Enjoy it for lunch or as a side dish! Serve the salad in a large bowl for sharing. For individual servings, use small cups. Top with extra parsley and a few whole olives to make it pop. This salad looks bright and fresh. You can pair it with pita bread or grilled meat for a complete meal. Pro Tips Use Fresh Ingredients: The flavor of your salad will greatly benefit from using the freshest vegetables and herbs available. Opt for in-season produce for the best taste. Chill Before Serving: Allowing the salad to sit in the fridge for about 30 minutes before serving enhances the flavors as they meld together beautifully. Experiment with Dressings: Feel free to customize the dressing by adding a splash of balsamic vinegar or a hint of garlic for an extra layer of flavor. Make it a Meal: To transform this salad into a hearty meal, add grilled chicken, tuna, or quinoa for added protein and texture. {{image_2}} You can easily make this salad fit your diet. For a vegan version, just skip the feta cheese. You can also use a vegan feta. It gives a similar taste and texture. Adding extra chickpeas boosts protein. Try using other beans too, like black beans or kidney beans. They add a nice twist. If you want more protein, consider adding cooked chicken or tuna. Grilled chicken adds a smoky flavor. Canned tuna is quick and easy. Just drain it well and mix it in. Both options make the salad more filling. You can even use shredded rotisserie chicken for great taste without much work. Feel free to get creative with your salad. Swap feta cheese for goat cheese or mozzarella. Each cheese gives a different flavor. You can also change the veggies. Try adding diced avocado for creaminess or radishes for crunch. Swap bell peppers for zucchini or carrots for a fresh taste. Mixing things up keeps your salad exciting! Store leftovers in an airtight container. Make sure to keep it in the fridge. The salad stays fresh for about three days. If you can, eat it within two days for the best taste. When prepping this salad, keep the dressing separate. Mix it with the salad just before serving. This keeps the veggies crisp and prevents sogginess. You can chop veggies ahead of time and store them in the fridge. Chickpeas and veggies last well in the fridge. However, the feta can lose its texture. If you want to keep the salad fresh longer, wait to add the feta until serving. Always check for any signs of spoilage before eating. Enjoy your Mediterranean delight! If you don’t have Kalamata olives, use green olives instead. Green olives add a nice tang. You can also try capers for a briny kick. If you want to skip olives, add more cucumbers or bell peppers for crunch. Each option changes the flavor a bit, but it will still taste great. Yes, you can make this salad ahead of time. Just mix all the veggies and chickpeas first. Keep the dressing separate until you are ready to serve. This keeps the salad fresh and crisp. It will taste even better after the flavors blend for a few hours. To keep your salad from getting soggy, drain the chickpeas well. Also, avoid adding salt to the salad before serving. Salt draws out moisture from the veggies. Store the salad in an airtight container in the fridge to keep it fresh. Enjoy your salad at its best! We explored key ingredients and their benefits, with easy substitutions. I shared step-by-step directions for preparing and mixing your salad. Tips for flavor and presentation help you impress. We also covered variations, storage tips, and answered common questions. Salads can be fun and flexible. With these ideas, you can enjoy tasty meals that fit your needs. Happy cooking!

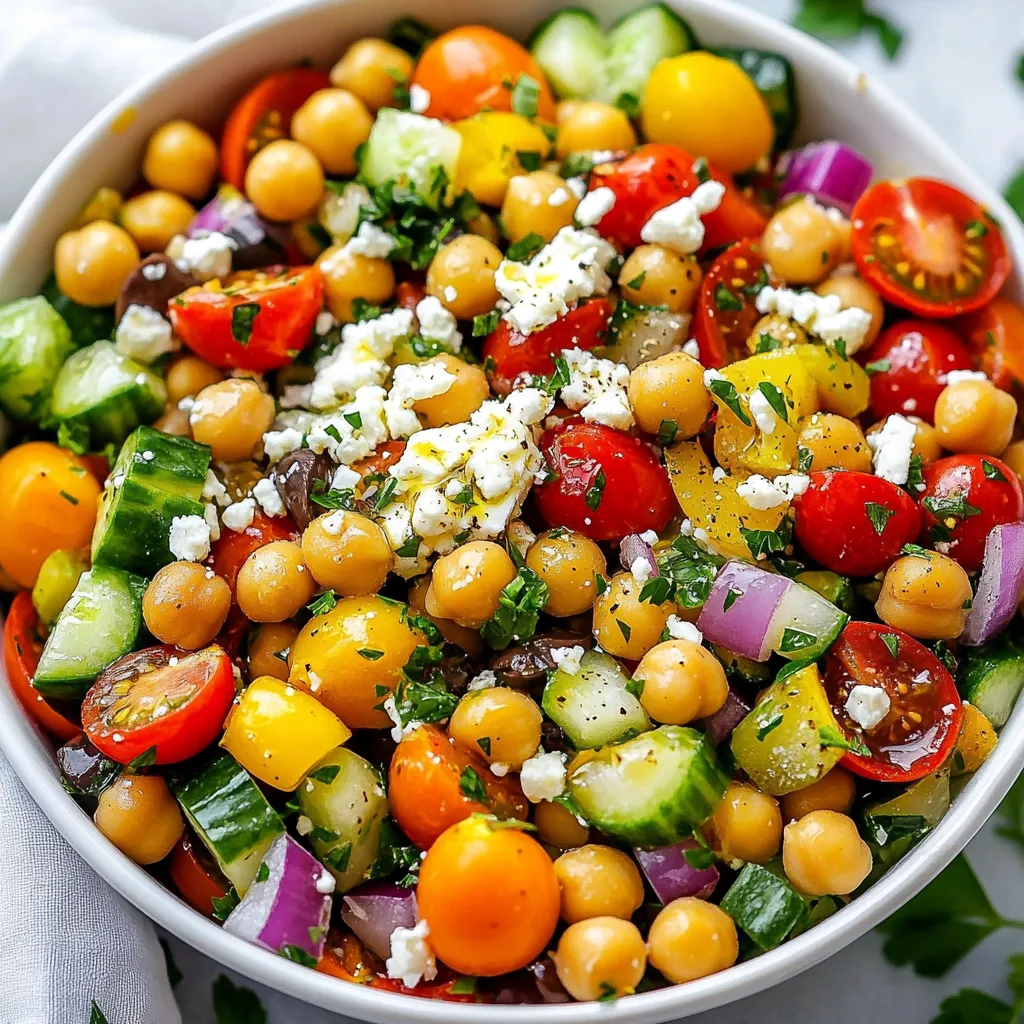
Looking for a fresh and tasty dish to brighten your meals? Try my Mediterranean Chickpea Salad! This vibrant mix of wholesome ingredients is not just easy to make; it’s also …

Read more

Categories Salads Leave a comment

Chocolate Orange Truffles Delightful and Simple Treat

December 19, 2025May 15, 2025 by Chef Evan
To make chocolate orange truffles, you will need: - 8 ounces dark chocolate (70% cacao), chopped - 1 cup heavy cream - Zest of 1 large orange - 1 tablespoon freshly squeezed orange juice - 1 teaspoon vanilla extract - 1 cup cocoa powder (for dusting) - 1/2 cup finely chopped unsalted nuts (e.g., hazelnuts or almonds) Using high-quality chocolate makes a big difference. Good chocolate has a rich flavor and smooth texture. I recommend 70% cacao dark chocolate. It balances sweetness and bitterness well. Lower-quality chocolate can taste waxy or dull. Always choose chocolate you enjoy eating on its own. The orange zest and juice add a bright, fresh taste. They cut through the richness of the chocolate. Vanilla extract brings warmth and depth. Chopped nuts give a nice crunch. You can mix and match flavors too. Try using lemon zest or even a hint of espresso. These tweaks keep the recipe exciting! {{ingredient_image_1}} To start, heat 1 cup of heavy cream in a small saucepan. Place it over medium heat. Watch the cream closely and remove it when it simmers. Do not let it boil. Next, add 8 ounces of chopped dark chocolate to the cream. Stir until the chocolate melts and the mix is smooth. This is your chocolate ganache. Now, add the zest of 1 large orange, 1 tablespoon of fresh orange juice, and 1 teaspoon of vanilla extract. Mix well to blend the flavors. For the best texture, let the ganache cool at room temperature. After it cools, cover it with plastic wrap. Place it in the fridge for about 2 hours. This will help it firm up. If your truffles are too soft, they may not hold their shape. If the ganache is too hard, leave it at room temperature for a few minutes. Then, it will be easier to scoop and shape. Once the ganache is set, use a small cookie scoop or your hands. Form small balls, about 1 inch in diameter. You can roll these balls in cocoa powder or finely chopped nuts. I recommend using hazelnuts or almonds for a tasty crunch. Place the coated truffles on a parchment-lined tray. Finally, refrigerate them for another 30 minutes. This will help them firm up before serving. Enjoy the rich flavors of chocolate and orange! To cool your chocolate orange truffles the right way, follow these steps. Once you mix your ganache, allow it to sit at room temperature. This helps the flavors meld together. Cover it with plastic wrap and place it in the fridge for about two hours. This waiting time is key for a firm texture. If you skip this, your truffles may not hold their shape. Truffles can easily stick to your hands and surfaces. To avoid this, keep your hands slightly damp while rolling. This small trick helps the chocolate stay smooth. You can also chill the ganache again before shaping. If you find it sticky, pop it back in the fridge for a few minutes. Then, try rolling again; it should work better. If you end up with leftover ganache, don’t waste it! You can make a lovely hot chocolate by mixing it with warm milk. Just heat the milk gently and stir in the ganache until smooth. You can also pour it over ice cream for a rich sauce. It’s a great way to enjoy every bit of that delicious chocolate flavor! Pro Tips Use Quality Chocolate: Choose high-quality dark chocolate for the best flavor and texture in your truffles. Chill Properly: Ensure the chocolate mixture cools completely before chilling it in the fridge to achieve the right consistency. Experiment with Coatings: Try rolling truffles in crushed nuts, powdered sugar, or even desiccated coconut for different flavor profiles. Enhance the Orange Flavor: For an extra punch, add a few drops of orange extract to the chocolate mixture before chilling. {{image_2}} You can make vegan chocolate orange truffles by using plant-based cream. Look for coconut cream or almond cream for a rich flavor. Use dark chocolate that is dairy-free. Many brands offer vegan options with at least 70% cacao. The rest of the recipe stays the same. The taste is still rich and creamy! To make gluten-free chocolate orange truffles, simply check the cocoa powder. Most cocoa powders are gluten-free. Also, ensure that your chocolate does not contain any gluten fillers. The nuts you roll the truffles in should also be gluten-free. This way, everyone can enjoy these truffles without worry. While orange shines in these truffles, you can mix it up! Try using lemon, lime, or even grapefruit. Just replace the orange juice and zest with an equal amount of your chosen citrus. Each fruit will add its unique twist. Lemon gives a fresh, zesty touch, while lime offers a fun tartness. You should store your chocolate orange truffles in an airtight container. This keeps them fresh and prevents them from absorbing other smells. Line the container with parchment paper for added protection. If you stack the truffles, place parchment between layers to avoid sticking. These truffles last about one week in the fridge. For longer storage, freeze them. To freeze, place the truffles on a tray and freeze them until solid. Then, transfer them to an airtight container. They can last up to three months in the freezer. Keep truffles away from heat and light. These factors can change their texture and taste. When ready to enjoy, move them from the fridge to room temperature. This helps them regain their creamy texture and full flavor. Always remember to enjoy them chilled for the best experience! To make your truffles smooth and creamy, use high-quality dark chocolate. When you heat the cream, keep it on medium heat and avoid boiling. Add the chocolate to the hot cream and stir until it melts completely. Mixing in the orange zest, juice, and vanilla enhances the flavor. Chill the mixture until firm, but not too hard. This will help you form perfect balls. Yes, you can use milk chocolate. It will make your truffles sweeter and creamier. Just remember, milk chocolate has less cocoa than dark chocolate. This may change the truffle's texture and flavor. If you prefer a stronger orange taste, consider adding a bit more zest or juice. You can roll your truffles in many different coatings. Try finely chopped nuts like hazelnuts or almonds for a crunchy texture. Sweetened coconut flakes add a tropical twist. You can even use crushed cookies or sprinkles for a fun look. Each coating gives a unique taste and style to your truffles. We explored how to make delicious truffles using high-quality chocolate and fresh ingredients. I shared step-by-step tips to help you prepare the perfect ganache, roll the truffles, and enhance flavors. We discussed vegan and gluten-free options and how to store your treats properly. Remember, using fresh ingredients is key to tasty truffles. Experiment with flavors and enjoy your chocolate-making journey. With practice, your truffles will impress everyone!

Indulge in the rich, zesty world of Chocolate Orange Truffles with my easy guide. In this post, you’ll discover how simple ingredients combine to create a delicious treat. I will …

Read more

Categories Desserts Leave a comment

Chocolate Chip Banana Bread Blondies Delightful Treat

December 11, 2025May 15, 2025 by Chef Evan
- 2 ripe bananas, mashed - 1/2 cup unsalted butter, melted - 1 cup brown sugar, packed - 1 large egg - 1 teaspoon vanilla extract - 1 cup all-purpose flour - 1/2 teaspoon baking powder - 1/4 teaspoon baking soda - 1/4 teaspoon salt - 1/2 cup chocolate chips - 1/4 cup walnuts, chopped (optional) When measuring the brown sugar, pack it firmly into the cup. This helps add sweetness. For the flour, use a spoon to fill your measuring cup. Avoid scooping directly from the bag, as this can lead to too much flour. The bananas should be very ripe for the best flavor and moisture. You can add walnuts for a nice crunch. If you want a nut-free version, just skip them. Feel free to swap in dark chocolate chips for a richer taste. You can also use mini chocolate chips for a fun twist! {{ingredient_image_1}} First, you need to prep your baking pan. Preheat your oven to 350°F (175°C). Now, take a 9x9-inch baking pan. You can grease it with butter or use parchment paper. Either way works well. This step helps the blondies not stick. Grab a mixing bowl and add two ripe bananas. Mash them until smooth. Then, pour in 1/2 cup of melted unsalted butter. Mix them together until they blend nicely. Next, add 1 cup of brown sugar and stir it in. Now, crack one large egg into the bowl. Add 1 teaspoon of vanilla extract, too. Mix everything until it is smooth and creamy. In another bowl, whisk together the dry ingredients. You need 1 cup of all-purpose flour, 1/2 teaspoon of baking powder, 1/4 teaspoon of baking soda, and 1/4 teaspoon of salt. Once mixed, slowly add this to your wet mixture. Gently stir until combined. It’s important not to overmix. Finally, fold in 1/2 cup of chocolate chips and 1/4 cup of chopped walnuts if you like. This step adds great flavor and texture. To get the right texture, use ripe bananas. They add moisture and sweetness. Mash them well for even mixing. Ensure your butter is melted but not hot. Hot butter can cook the egg. Mix the wet and dry ingredients just until combined. Overmixing can make your blondies tough. You can swap brown sugar for white sugar if needed. This change will give a lighter taste. For a nut-free option, leave out the walnuts. Add more chocolate chips to make them richer. You can also mix in peanut butter for a fun twist. If you like spices, try cinnamon or nutmeg too. Check your blondies around 25 minutes. If a toothpick comes out wet, bake longer. Every oven is different, so watch closely. For a softer texture, bake for less time. If you like them firmer, let them bake a bit longer. Remember to cool them before cutting for nice squares. Pro Tips Use Overripe Bananas: The riper the bananas, the sweeter and more flavorful your blondies will be. Look for bananas with lots of brown spots for the best results. Don't Overmix: When combining the wet and dry ingredients, mix just until incorporated to keep the blondies soft and chewy. Overmixing can lead to a dense texture. Customize Your Add-ins: Feel free to swap the walnuts for your favorite nuts or add in other mix-ins like dried fruit or peanut butter chips to create your own unique version. Storage Tips: Store the blondies in an airtight container at room temperature for up to 5 days, or freeze for longer storage. They make a great treat to have on hand! {{image_2}} You can make this treat a bit healthier. Swap the all-purpose flour for whole wheat flour. This change adds fiber and nutrients. You can also use coconut oil instead of butter. It gives a nice flavor and is a great fat choice. Try reducing the sugar, too. Use only 3/4 cup of brown sugar instead of 1 cup. You can also replace some sugar with unsweetened applesauce. This keeps the blondies moist and tasty. Want to mix things up? Add different flavors to the batter. Try using peanut butter chips instead of chocolate chips. This gives a nutty twist. You can also add spices like cinnamon or nutmeg for warmth. If you love fruit, throw in some chopped apples or berries. These add freshness and a pop of color. Another fun idea is to sprinkle in some shredded coconut for a tropical touch. If you need a gluten-free version, use gluten-free flour. Many brands work well in this recipe. For a vegan option, replace the egg with a flax egg. Just mix one tablespoon of ground flaxseed with two and a half tablespoons of water. Let it sit for a few minutes to thicken. Always check labels on chocolate chips, as some may contain dairy. Consider using dairy-free chocolate chips to fit your diet. To keep your chocolate chip banana bread blondies fresh, store them in an airtight container. I recommend placing a piece of parchment paper between layers if stacking. This step helps prevent them from sticking together. Keep your container in a cool, dry place. Avoid sunlight to maintain their taste and texture. Freezing blondies is simple and effective. First, let them cool completely. Then, wrap each blondie in plastic wrap. Place the wrapped blondies in a freezer-safe bag or container. Label with the date for your reference. They will freeze well for about three months. When you’re ready to enjoy, thaw them in the fridge overnight. Stored properly, chocolate chip banana bread blondies last about one week at room temperature. If you keep them in the fridge, they may last up to two weeks. However, I find they taste best within the first few days. Enjoy them while they’re fresh for the best flavor and texture. Yes, ripe bananas are perfect for this recipe. They add natural sweetness and moisture. The more spots on the banana, the better. They will mash easily and blend well into the batter. If you have overripe bananas, this is the best time to use them. If your batter feels too thick, add a splash of milk. Start with just a tablespoon, then mix. This will help loosen it up. Another option is to mash another banana. This adds moisture without changing the flavor. You can check the blondies at 25 minutes. Insert a toothpick in the center. If it comes out clean or with just a few crumbs, they are done. If there is wet batter, bake for a few more minutes. Let them cool for a bit before cutting. This helps them set up nicely. In this post, we covered all the essentials for baking blondies. We explored ingredients, measurements, and optional items. You learned step-by-step how to mix and bake the perfect blondies. Our tips helped you improve texture and adjust baking time. We also discussed healthier variations and storage tips to keep your treats fresh. Remember to experiment with add-ins and make the recipe your own. Now you have the tools to create delicious blondies any time! Happy baking!

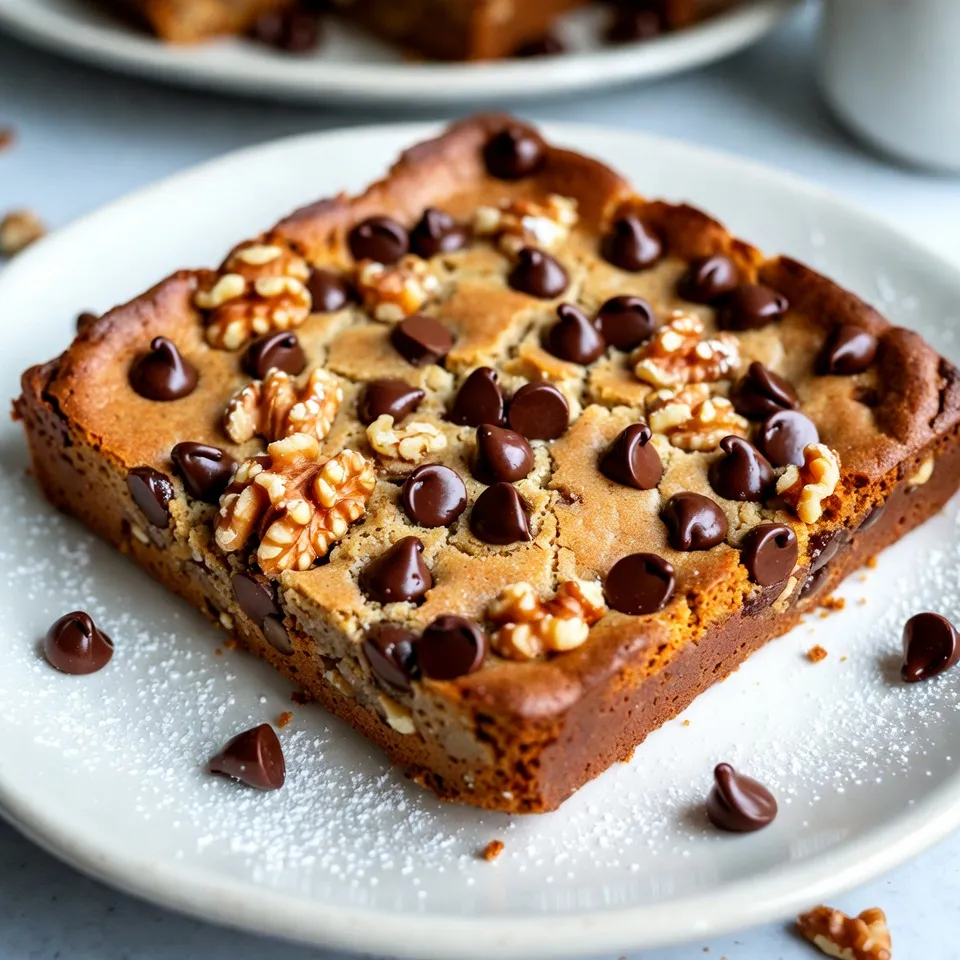
Are you ready to make a sweet treat that combines two favorites? Chocolate Chip Banana Bread Blondies are here to delight your taste buds! In this guide, I’ll share everything …

Read more

Categories Desserts Leave a comment

Mini Lemon Blueberry Cheesecakes Delightful and Easy

May 14, 2025 by Chef Evan
To create these delightful mini lemon blueberry cheesecakes, gather the following ingredients: - 1 cup graham cracker crumbs - 4 tablespoons unsalted butter, melted - 2 cups cream cheese, softened to room temperature - 1 cup powdered sugar - 1 teaspoon pure vanilla extract - Zest of 1 medium lemon - 2 tablespoons freshly squeezed lemon juice - 1 cup blueberries (fresh or frozen) - Whipped cream (for topping) - Lemon slices and extra blueberries (for garnish) These ingredients work together to make a creamy cheesecake with a zesty lemon flavor. The blueberries add a sweet burst with each bite. Using fresh ingredients can enhance the taste of your cheesecakes. If you choose frozen blueberries, make sure to thaw and drain them beforehand. This will prevent excess moisture in your cheesecakes. For the full recipe and detailed instructions, check out Mini Lemon Blueberry Cheesecakes 🫐. Enjoy making these tasty treats! - Preheat your oven to 325°F (160°C). - Line a muffin tin with paper liners. - Combine 1 cup of graham cracker crumbs with 4 tablespoons of melted butter. - Press about 1 tablespoon of the mixture into each muffin liner. - Beat 2 cups of cream cheese until smooth. - Gradually mix in 1 cup of powdered sugar, 1 teaspoon of vanilla extract, the zest of 1 lemon, and 2 tablespoons of lemon juice. - Gently fold in 1 cup of blueberries. - Distribute the filling evenly into the muffin liners. - Bake for 18 to 20 minutes. - Once baked, cool at room temperature and refrigerate for at least 2 hours. These steps create lovely mini lemon blueberry cheesecakes. Each step is simple yet crucial for the best results. For the full recipe, check out Mini Lemon Blueberry Cheesecakes 🫐. To make perfect mini cheesecakes, start with soft cream cheese. Cold cream cheese can create lumps. Let it sit at room temperature for about 30 minutes. This way, your filling becomes smooth and creamy. Also, when mixing, avoid overmixing. This keeps your blueberries whole and adds nice bursts of flavor. Presentation makes a big difference. Top each mini cheesecake with whipped cream. Add fresh lemon slices and extra blueberries for a pop of color. Serve them on decorative platters. This not only looks nice but will impress your guests. Be careful with the crust. Not pressing it firmly can lead to a crumbly base. Make sure to use a shot glass or your fingers for even pressure. Also, watch your baking time. Baking too long can lead to dry cheesecakes. Aim for a soft center that still feels slightly firm. {{image_4}} You can get creative with these mini cheesecakes! Instead of blueberries, try raspberries or strawberries. Both fruits add a fresh twist. If you love chocolate, mix in some chocolate chips. They will add a rich flavor and make the cheesecakes even more special. If you need a gluten-free option, use gluten-free graham crackers. They work just as well in the crust. For those watching their sugar intake, swap sugar with a sugar substitute. This change can make your mini cheesecakes a low-calorie delight. Enjoy these tasty tweaks to suit your needs! After you enjoy these mini lemon blueberry cheesecakes, store leftovers in an airtight container. Place them in the fridge to keep them fresh. They taste best when eaten within 3 to 5 days. This way, you can savor each delightful bite without worrying about spoilage. If you want to save some for later, freezing works well. First, let the cheesecakes cool completely. Then, wrap each mini cheesecake tightly in plastic wrap. Place them in a freezer-safe container. They can stay frozen for up to 2 months. When you’re ready to enjoy them, take them out and let them thaw in the fridge overnight. This keeps their creamy texture intact. The centers should appear just set and slightly firm to the touch. You can gently jiggle the muffin tin. If the cheesecakes wobble slightly, they need a bit more time. Keep a close eye on them. Overbaking can lead to dry cheesecakes. Yes, you can make these mini cheesecakes 1-2 days in advance. Just store them in the refrigerator. This allows the flavors to meld and makes your prep easier. When you're ready to serve, just add the toppings. Top each cheesecake with whipped cream and garnish before serving. This adds a lovely touch and enhances the look. Consider adding a slice of lemon and a few extra blueberries for color and flavor. Presentation matters! Yes, they can be made gluten-free by using gluten-free graham crackers. This small change allows more people to enjoy them. Always check the labels to ensure all ingredients meet your dietary needs. For the complete recipe and detailed instructions, refer to Mini Lemon Blueberry Cheesecakes 🫐. You’ve learned how to make delicious mini lemon blueberry cheesecakes. We covered each step, from gathering the ingredients to perfecting the crust and filling. Remember, the right texture matters, so keep the cream cheese smooth. Garnish to impress your guests, and explore fun variations. These treats will delight your taste buds and impress friends. Make them ahead and enjoy every bite. Your baking skills will shine with these cheesecakes!

Are you ready to treat yourself to a sweet, tangy delight? These Mini Lemon Blueberry Cheesecakes are not only easy to make, but they also pack a burst of flavor …

Read more

Categories Desserts Leave a comment

Southern Crab Pie Flavorful and Easy Recipe

May 14, 2025 by Chef Evan
- 1 ½ cups fresh lump crab meat, carefully picked for any shells - 1 cup creamy mayonnaise - 1 cup tangy sour cream - 4 large eggs, beaten - 2 tablespoons Dijon mustard - 1 tablespoon Worcestershire sauce - 1 teaspoon Old Bay seasoning, for that iconic flavor - ½ teaspoon smoked paprika, to add depth - Salt and freshly cracked pepper to taste - 1 pre-made pie crust (9-inch), thawed if frozen To create the perfect Southern crab pie, start with fresh lump crab meat. This is the star of the dish. Look for crab that is sweet and tender. Next, mix in creamy mayonnaise and tangy sour cream. These add richness to the filling. Be sure to beat four large eggs as they bind all the ingredients together. Seasonings are also key. Use Dijon mustard and Worcestershire sauce for a flavor boost. Old Bay seasoning is a must. It gives that classic taste. Smoked paprika adds a hint of warmth. Finally, adjust salt and pepper to your liking. - 1 cup shredded sharp cheddar cheese - ½ cup green onions, finely chopped - 2 tablespoons fresh parsley, finely chopped for garnish You can add cheese to make the pie even richer. Sharp cheddar works great, but feel free to experiment. You can also mix in finely chopped green onions. They provide a nice crunch and fresh flavor. For a pop of color, sprinkle fresh parsley on top before serving. For the complete guide on making this dish, check the Full Recipe. Start by gathering your ingredients. In a large bowl, whisk together the creamy ingredients. Combine the mayonnaise, sour cream, beaten eggs, Dijon mustard, Worcestershire sauce, Old Bay seasoning, smoked paprika, salt, and pepper. Mix until smooth. This step is key for a creamy filling. Next, gently fold in the crab meat. Use a spatula to keep the lumps intact. Add the chopped green onions and half of the shredded cheddar cheese. Make sure everything blends well without breaking the crab apart. This keeps the pie rich in flavor and texture. Now, pour the crab mixture into the pie crust. Use a spatula to spread it evenly. This ensures every slice has the same great taste. Once the filling is in the crust, sprinkle the remaining cheddar cheese on top. This adds a delicious, cheesy layer that melts nicely during baking. You can also add some extra green onions for an added flavor boost. Preheat your oven to 350°F (175°C). This step is crucial for even baking. Make sure your oven is fully warmed before putting the pie in. Bake the pie for 35-40 minutes. You will know it is done when the top is golden brown. Insert a toothpick in the center; it should come out clean. This means the filling has set well. After baking, let the pie cool for about 10 minutes. This allows the filling to firm up. Just before serving, garnish with freshly chopped parsley. It gives a nice pop of color and freshness. For the full experience, check out the Full Recipe for detailed steps and tips! Old Bay seasoning is key to this dish. It adds a unique taste. This blend has celery salt, paprika, and other spices. It brings out the crab’s natural sweetness. You will want to use this seasoning generously. Choosing fresh crab meat is crucial. Fresh crab offers sweet and tender bites. Look for lump crab meat, as it holds together well. If you can, buy it from a trusted fish market. Always check for any shells before you use it. To keep the crab intact, mix gently. After adding the crab meat to the filling, fold it in carefully. This way, you maintain those lovely lumps. They provide that desired texture in every bite. Baking is another important part. You want the pie to be golden and set. Watch the clock, but also check for doneness. A toothpick should come out clean when it's ready. This means the filling has firmed up nicely. {{image_4}} You can switch out the crab for other seafood. Shrimp or lobster make great choices. They add a sweet and rich flavor. You can even mix different seafood for a fun twist. If you're looking for vegan or vegetarian options, try using jackfruit or mushrooms. Both can mimic the texture of crab. Use a creamy vegan mayonnaise for richness. This keeps the pie tasty while being plant-based. To enhance the dish, add different spices or herbs. A pinch of cayenne pepper gives a nice kick. Fresh dill or thyme can also brighten the flavor. Experiment to find what you like best. Incorporating other cheeses can change the taste. Creamy goat cheese or zesty feta work well. You can also add vegetables like spinach or bell peppers. They add color and extra nutrients. To keep your Southern Crab Pie fresh, store it properly. After the pie cools, cover it tightly with plastic wrap or foil. Place it in the fridge if you plan to eat it within three days. For longer storage, freeze it. Wrap the pie well in plastic wrap and then in aluminum foil. This helps prevent freezer burn and keeps the flavors intact. When freezing, make sure to label the pie with the date. It can last up to three months in the freezer. When you're ready to eat it, thaw the pie in the fridge overnight. To reheat your Southern Crab Pie, preheat your oven to 350°F (175°C). Remove the plastic wrap and cover it with foil. This keeps the top from browning too much. Bake it for about 20-25 minutes until it is heated through. For optimal texture, avoid microwaving the pie. Microwaving can make the crust soggy. Serve leftovers on a plate with a sprinkle of parsley for a fresh look. You can also serve it with a slice of lemon to brighten the flavors. Can I use canned crab meat instead of fresh? Yes, you can use canned crab meat. It is a good option when fresh crab is not available. Just make sure to drain it well and check for shells. The flavor may not be as bright, but it still works. How can I make this dish gluten-free? To make this dish gluten-free, use a gluten-free pie crust. Many brands offer good options. You can also make your own using almond flour or another gluten-free flour. Just keep an eye on the ingredients in your crust. What to serve with Southern Crab Pie? Southern Crab Pie pairs well with a fresh salad. A simple green salad with lemon vinaigrette complements the dish nicely. You could also serve it with roasted veggies or corn on the cob for a complete meal. How to pair drinks with this dish? For drinks, consider serving a crisp white wine. A chilled Sauvignon Blanc works well with the pie. If you prefer cocktails, try a light gin and tonic with lime. It balances the rich flavors of the crab pie perfectly. In this post, we explored the key ingredients for a delicious crab pie. We covered how to prepare the filling, assemble the dish, and bake it to perfection. I also shared tips for flavor and texture, plus variations and storage info. Now, you can enjoy a tasty crab pie tailored to your taste. Try different cheeses or vegetables to make it your own. Whether serving it at a gathering or as a cozy dinner, this dish is sure to impress!

If you love seafood, you’ll adore this Southern Crab Pie recipe! Made with fresh crab meat, creamy goodness, and a blend of spices, it’s a delightful dish that’s both flavorful …

Read more

Categories Dinner Leave a comment
Older posts
Newer posts
← Previous Page1 … Page94 Page95 Page96 … Page124 Next →

TOSSED FLAVORS

Where flavors are fresh, vibrant, and ready to toss! 🥗

PAGES

Home About Contact Privacy Policy Terms & Conditions Cookie Policy GDPR Policy Copyright Policy Disclaimer

CATEGORIES

Appetizers Desserts Salads Breakfast Dinner

Contact

  • Pinterest
  • Mail
Copyright © 2026 Tossed Flavors. All rights reserved.