Skip to content
tossedflavors.com
  • Home
  • Appetizers
  • Desserts
  • Salads
  • Breakfast
  • Dinner
  • Privacy Policy
  • Contact
  • About

Chef Evan

Easy Blueberry Pie Bars Simple and Tasty Dessert

May 22, 2025 by Chef Evan
- 2 cups fresh or frozen blueberries - 1 cup granulated sugar, divided into two 1/2 cup portions - 2 tablespoons cornstarch - 1 tablespoon freshly squeezed lemon juice - 1 teaspoon pure vanilla extract - 1 cup all-purpose flour - 1/2 cup rolled oats - 1/4 cup packed brown sugar - 1/2 teaspoon baking powder - 1/4 teaspoon sea salt - 1/2 cup unsalted butter, melted and slightly cooled - 1/4 teaspoon ground cinnamon (optional for extra warmth) Each ingredient has a specific role in your blueberry pie bars. The blueberries give flavor and color. The sugar balances the tartness of the fruit. Cornstarch helps thicken the filling. Lemon juice adds brightness. Vanilla enhances the overall taste. Flour and oats form the crust and topping. Brown sugar adds richness. Baking powder gives the bars a light texture. Sea salt brings out flavors. Butter binds the crust together. Cinnamon, while optional, adds warmth. You can add a few things for extra fun. A pinch of nutmeg adds a different spice note. You could also mix in some chopped nuts for crunch. If you love chocolate, try adding chocolate chips. Whipped cream or ice cream can make serving even more special. These options let you personalize your dessert. First, gather your ingredients. You need blueberries, sugar, cornstarch, lemon juice, and vanilla. Also, grab flour, oats, brown sugar, baking powder, salt, and butter. Don't forget the optional cinnamon for extra taste! 1. Preheat the oven to 350°F (175°C). 2. Lightly grease an 8x8-inch baking dish or use parchment paper. This will help later when you take the bars out. 3. In a medium bowl, mix blueberries with 1/2 cup sugar, cornstarch, lemon juice, and vanilla. Toss gently and let it sit for 10 minutes. This helps the blueberries thicken. 4. In a large bowl, whisk flour, oats, brown sugar, baking powder, salt, and cinnamon together. This step blends dry ingredients well. 5. Pour in melted butter and mix. The mix should be crumbly but stick together when pressed. Set aside 1/2 cup of this mix for the topping. 1. Press the remaining mix into the bottom of the prepared dish. This forms your crust. 2. Spread the blueberry mix over the crust evenly. Use a spatula to cover every inch. 3. Crumble the reserved mix over the blueberries. This creates a nice topping. 4. Bake for 30-35 minutes. Look for a light golden brown on top and bubbling blueberries around the edges. 1. Let the bars cool in the dish for 10 minutes. 2. Use the parchment overhang to lift the bars out, or cut them while still in the dish. 3. Cool completely on a wire rack. Cut into 9 squares for serving. 4. Enjoy your easy blueberry pie bars warm or at room temperature. A sprinkle of powdered sugar or a scoop of ice cream makes it even better. To make a great crust, use cold butter. Cut it into small pieces. Mix it in with your dry ingredients. You want it crumbly but not too dry. Press it firmly into the pan. This helps it hold together. Bake it until it is a light golden color. This step gives your bars a nice base. One common mistake is overmixing the dough. This can make the crust tough. Mix just until combined. Another mistake is not letting the blueberry mix sit. Give it time to thicken. Lastly, check your oven temperature. An oven that is too hot can burn the topping. Add a pinch of salt to the blueberry mix. It helps to bring out the sweetness. You can also sprinkle a bit of cinnamon on top. This adds warmth and depth. For more texture, try adding nuts to the crust. Chopped almonds or walnuts work well. These tips make your blueberry pie bars even better. For the full recipe, check out the detailed instructions above. {{image_4}} You can change the blueberries for other fruits. Try chopped strawberries, raspberries, or peaches. Each fruit gives a new taste. Mix and match for fun flavors. You can even use mixed berries for a colorful twist. Just remember to adjust sugar based on the fruit’s sweetness. To make this recipe gluten-free, swap out the all-purpose flour. Use a gluten-free flour blend instead. You can also use almond flour or coconut flour for a unique taste. Check that all ingredients are certified gluten-free to avoid cross-contamination. Add some extra spices for warmth and depth. A pinch of nutmeg or allspice can enhance the flavor. You can also add a splash of almond extract for a nutty twist. If you love citrus, try adding orange zest for a bright note. Play with these flavors to make your pie bars unique. For the full recipe, you can refer back to the delicious blueberry pie bars section. To keep your blueberry pie bars fresh, store them in an airtight container. Place a piece of parchment paper between layers to avoid sticking. Keep them at room temperature for up to three days. If you want to save them longer, consider freezing. This method locks in freshness and flavor. You can freeze blueberry pie bars for up to three months. First, let them cool completely. Then, slice them into squares. Wrap each square in plastic wrap. After wrapping, place them in a freezer-safe bag. This way, you can grab a square whenever you crave a sweet treat. To reheat, take a square from the freezer and let it thaw in the fridge overnight. If you want it warm, place it in the oven at 350°F (175°C) for about 10 minutes. You can also microwave it for 20-30 seconds. This will make the crust soft and the blueberries warm. Enjoy your dessert just like fresh! For the full recipe, check out the entire guide. Yes, you can use frozen blueberries. They work well and save time. When using frozen blueberries, do not thaw them. This way, they keep their shape better during baking. Just mix them straight into your filling. You may need to bake a few minutes longer, so check for doneness. You can tell they are done when the topping turns a light golden brown. The blueberries will also bubble around the edges. You can insert a toothpick in the center. If it comes out clean or with just a few crumbs, it's ready! Blueberry pie bars taste great on their own. However, you can serve them with a dollop of whipped cream. A scoop of vanilla ice cream also pairs nicely. For a special touch, dust with powdered sugar before serving. This adds a nice look and flavor! You now have a full guide to making delicious blueberry pie bars. We covered the key ingredients, how to prepare and bake them, plus tips for a perfect crust. I shared ways to enhance flavor and texture, offered variations, and explained storage methods. Keep these pointers close as you bake. Enjoy your blueberry pie bars, and feel free to get creative with ingredients. Trust me, your friends will love them. Happy baking!

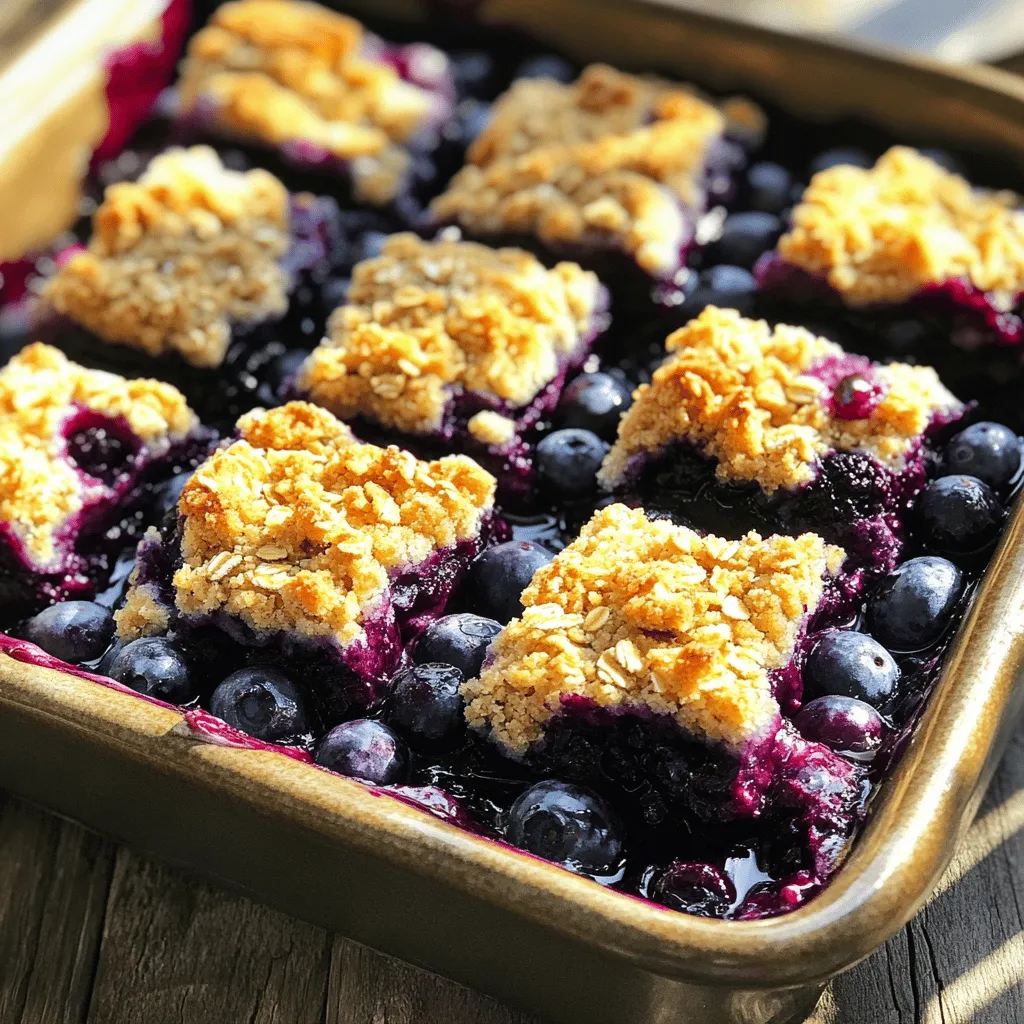
Are you ready for a delicious treat that’s easy to make? These Easy Blueberry Pie Bars are the perfect simple dessert for any occasion. With fresh blueberries and a buttery …

Read more

Categories Desserts Leave a comment

Blackened Shrimp Bowls Flavorful and Simple Recipe

May 22, 2025 by Chef Evan
- 1 pound large shrimp, peeled and deveined - 2 cups cooked brown rice or quinoa - 2 tablespoons smoked paprika - 1 teaspoon cayenne pepper (adjust for heat preference) - 1 teaspoon garlic powder - 1 teaspoon onion powder - 1 teaspoon dried oregano - 1 teaspoon dried thyme - Salt and freshly cracked black pepper to taste - 2 tablespoons extra-virgin olive oil - 1 ripe avocado, sliced - 1 cup cherry tomatoes, halved - 1 cup corn (fresh, frozen, or canned, drained if canned) - 1 lime, cut into wedges - Fresh cilantro, chopped, for garnish The main ingredients are shrimp and rice or quinoa. You can use either grain, but quinoa gives a nice nutty flavor. The seasoning is key for blackening your shrimp. Smoked paprika adds depth, while cayenne brings the heat. Don’t forget the garlic and onion powder for savory notes. Dried oregano and thyme add a lovely aroma. For garnishing, I love adding slices of avocado for creaminess. Cherry tomatoes give a burst of sweetness, and corn adds a nice crunch. Fresh cilantro brightens the dish, while lime wedges will give you that zesty kick. You can find the full recipe above. First, let's mix the spice blend. In a medium bowl, combine: - 2 tablespoons smoked paprika - 1 teaspoon cayenne pepper - 1 teaspoon garlic powder - 1 teaspoon onion powder - 1 teaspoon dried oregano - 1 teaspoon dried thyme - Salt and black pepper to taste Stir the spices until they blend well. This mix gives the shrimp its bold flavor. Next, coat the shrimp. Add 1 pound of peeled and deveined shrimp to the spice mixture. Toss the shrimp until each one is completely covered. This step is key for that tasty blackened crust. Now, let’s move on to cooking. Heat 2 tablespoons of extra-virgin olive oil in a large skillet over medium-high heat. When the oil shimmers, add the shrimp in a single layer. Cook for about 2-3 minutes on each side. To check for doneness, look for the shrimp to turn opaque. They should also have a nice blackened crust. Once cooked, remove the skillet from heat and set the shrimp aside on a plate. Now it’s time to assemble your bowl. Start with a base of 2 cups of cooked brown rice or quinoa. This gives your bowl a hearty foundation. Next, layer the blackened shrimp on top. Follow with slices of 1 ripe avocado, 1 cup of halved cherry tomatoes, and 1 cup of corn. For presentation, squeeze fresh lime juice over the bowl. This adds a zesty kick. Finally, sprinkle freshly chopped cilantro on top for color and flavor. You can find the Full Recipe for more details. Enjoy your blackened shrimp bowl! To make great blackened shrimp, start with your spice mix. You can adjust the cayenne pepper to fit your heat level. If you want it mild, use less. For a kick, add more. Cook the shrimp for about 2-3 minutes on each side. Look for a nice black crust and a firm texture. The shrimp should turn opaque when ready. Too long in the pan will make them rubbery. You can choose between brown rice or quinoa for your base. Quinoa gives a nutty flavor that works well with shrimp. If you use rice, opt for brown rice for extra fiber. When cooking, add a pinch of salt and a dash of olive oil to the water. This adds flavor to the grains. You can even toss in some chopped herbs for a fresh taste. Pair your blackened shrimp bowls with side dishes like a fresh salad or grilled veggies. They add color and crunch to your meal. For drinks, a crisp white wine or a cool iced tea can balance the heat. If you prefer something non-alcoholic, fresh lemonade or sparkling water with lime works great. Check out the Full Recipe for more details and get cooking! {{image_4}} Meal prepping makes busy days easier. Here are some storage tips: - Cooked Shrimp: Store blackened shrimp in an airtight container. It lasts for up to three days in the fridge. - Grains: Cook brown rice or quinoa ahead of time. They can be stored for up to five days. - Veggies: Slice the avocado and tomatoes fresh. But you can prep corn ahead. Just keep it in the fridge. You can make most components in advance. This saves time and helps with busy weeknights. Feel free to switch things up. Here are some ideas: - Alternative Proteins: If shrimp isn't your favorite, try chicken or tofu. Both blend well with the spices. - Seasonal Vegetable Options: Use bell peppers, zucchini, or spinach. They add color and flavor based on the season. These swaps keep the recipe fresh and exciting. You can always adapt it to what you have on hand. For the full recipe, check the earlier section. You can store leftover blackened shrimp bowls in the fridge for up to three days. To keep shrimp fresh, use an airtight container. This method helps seal in moisture and flavor. Avoid letting the shrimp sit at room temperature for too long, as it can lead to spoilage. To freeze blackened shrimp bowls, place the shrimp in a freezer-safe bag. Remove as much air as possible before sealing. You can also freeze the rice or quinoa separately. For the best taste, freeze the components for up to three months. When you’re ready to enjoy your meal, thaw it in the fridge overnight. You can also use a microwave for quick thawing, but be careful not to cook the shrimp. Once thawed, reheat the shrimp gently on the stove to maintain its texture. To make your own blackened shrimp spice blend, you need a few key spices. Combine: - 2 tablespoons smoked paprika - 1 teaspoon cayenne pepper - 1 teaspoon garlic powder - 1 teaspoon onion powder - 1 teaspoon dried oregano - 1 teaspoon dried thyme - Salt and black pepper Mix these spices well. Adjust the cayenne for more or less heat. This blend brings bold flavor to your shrimp. You can store any extra mix in a sealed jar for future use. Yes, frozen shrimp work great! It is best to thaw them first. Place the shrimp in the fridge overnight or run them under cold water for a few minutes. Pat them dry before seasoning. This helps the spices stick better. If you use frozen shrimp, check the package. Some may have added ingredients. Always read the label to ensure they are clean. You can swap rice or quinoa with other bases. Here are some ideas: - Cauliflower rice for a low-carb option - Couscous for a quick cook time - Barley for a chewy texture - Farro for a nutty flavor Choose what you enjoy the most. Each option adds its own flair to your bowl. Yes, this recipe is gluten-free! All the main ingredients, like shrimp, rice, and spices, do not contain gluten. Just ensure any packaged items, like spices, are labeled gluten-free. This way, you can enjoy your meal without worries. In this post, we explored how to make a delicious blackened shrimp bowl. We covered the main ingredients, including shrimp and brown rice or quinoa. I shared step-by-step instructions, cooking tips, and seasoning advice. You learned variations for meal prepping and ingredient swaps. Keeping leftovers fresh is key, along with freezing tips. This dish is easy, tasty, and full of flavor. Enjoy your cooking adventure and make it your own!

Craving a meal that packs a punch in flavor yet takes little time to make? Let me introduce you to my Blackened Shrimp Bowls, a dish that’s both bold and …

Read more

Categories Dinner Leave a comment

Easy Marry Me Chicken Pasta Flavorful and Quick Dish

May 22, 2025 by Chef Evan
For the Easy Marry Me Chicken Pasta, you'll need some simple ingredients. Here’s the list: - 2 boneless, skinless chicken breasts - 8 oz fettuccine or penne pasta - 1 cup heavy cream - 1 cup cherry tomatoes, halved - 1 cup fresh spinach - 1/2 cup grated Parmesan cheese - 2 cloves garlic, minced - 1 tablespoon olive oil - 1 teaspoon Italian seasoning - Salt and freshly cracked pepper to taste - Fresh basil leaves for garnish These ingredients come together to create a dish that is rich and flavorful. The chicken provides protein, while the pasta offers a satisfying base. The heavy cream and cheese blend to form a creamy sauce that pairs perfectly with the tomatoes and spinach. Each bite bursts with flavor and freshness. For the full recipe, you can follow the detailed instructions to bring this dish to life. Enjoy cooking! To start, fill a large pot with water and add salt. Bring this water to a rolling boil. Once boiling, add 8 oz of fettuccine or penne pasta. Cook the pasta for about 8 to 10 minutes. You want it to be al dente, which means it should be firm to the bite. To check, taste a piece of pasta a minute or two before the time is up. When it’s done, save 1/2 cup of pasta water. Then, drain the rest well and set it aside. While the pasta cooks, it's time for the chicken. Take 2 boneless, skinless chicken breasts and season both sides with salt, pepper, and 1 teaspoon of Italian seasoning. Heat 1 tablespoon of olive oil in a large skillet over medium heat. Place the chicken in the skillet and cook for about 5 to 7 minutes on each side. The chicken should be nicely browned and reach an internal temperature of 165°F. After cooking, remove the chicken from the skillet and let it rest for a few minutes. This resting step is key! It keeps the juices inside the chicken when you slice it. Now, let’s make the sauce. In that same skillet, add 2 cloves of minced garlic. Sauté for about one minute until it smells great. Next, toss in 1 cup of halved cherry tomatoes. Cook these for around 3 minutes until they soften and burst. This creates a lovely base for your sauce. Lower the heat and pour in 1 cup of heavy cream. Stir it in until smooth. Then, add 1 cup of fresh spinach, stirring gently until it wilts. The creaminess and color from the spinach will make your sauce pop! Once the chicken has rested, slice it into thin strips. Add the sliced chicken back into the skillet along with the drained pasta. Toss everything together so the flavors mix well. If the dish looks too thick, use the reserved pasta water to loosen it up. Gradually add the water until you get the right consistency. Finally, sprinkle in 1/2 cup of grated Parmesan cheese and stir well until it melts and makes everything creamy and cheesy. Now it’s time to serve! Use a large, shallow bowl to dish out the pasta and chicken. For a beautiful finish, drizzle any extra sauce over the top. Garnish with fresh basil leaves. This not only adds color but also a lovely aroma. A sprinkle of extra Parmesan cheese can make it even more appealing. Enjoy the love this dish inspires! For the full recipe, check out the details above. To ensure chicken is perfectly cooked, use a meat thermometer. The internal temperature should reach 165°F. This ensures it's safe to eat and juicy. Sear the chicken on medium heat. This browns the outside while locking in moisture. To avoid overcooked pasta, set a timer. Boil the pasta until it's al dente, which usually takes 8-10 minutes. Remember to reserve half a cup of pasta water before draining. This helps if you need to adjust the sauce's thickness later. Adding extra flavors can elevate your dish. Fresh herbs like basil or parsley work well. You can also use spices such as red pepper flakes for a kick. Consider adding a splash of lemon juice for brightness. Using different types of cheese can change the taste. Try adding mozzarella for a stretchier texture or goat cheese for a tangy flavor. Both will make your dish more exciting. For creative serving ideas, use a large, shallow bowl. This allows for a beautiful display of the pasta and chicken. Drizzle leftover sauce artfully over the top. To make your dish visually appealing, garnish with whole basil leaves and a sprinkle of Parmesan. This adds color and freshness, making the plate pop. Enjoy the love this dish inspires! {{image_4}} If you need a gluten-free option, try using gluten-free pasta. There are many brands available that taste great. You can find options made from rice, quinoa, or chickpeas. Each brings a unique flavor and texture. For a dairy-free version, use coconut cream instead of heavy cream. Nutritional yeast can replace Parmesan cheese for a cheesy flavor without dairy. To make your Marry Me Chicken Pasta even better, add more vegetables. Broccoli, bell peppers, or zucchini work well. You can toss in these veggies while cooking the chicken. If you grow your own vegetables, use what’s in season. Fresh produce adds flavor and nutrition. If you want to switch up the protein, use shrimp or turkey instead of chicken. Both cook quickly and add great taste. For a vegetarian option, try chickpeas or tofu. Cook the tofu until golden for a nice texture. You can also go plant-based by using lentils or tempeh. These options keep the dish hearty and filling. For the [Full Recipe], check the ingredients and instructions to create your own version of this dish! To keep your Marry Me Chicken Pasta fresh, store it in an airtight container. This helps prevent moisture loss and keeps flavors intact. Make sure to let the pasta cool down to room temperature before sealing it. Place the container in the refrigerator for up to three days. If you want to enjoy it later, consider freezing it. In the freezer, it lasts for about two months. Just remember to label your container with the date! When it’s time to enjoy your leftovers, choose safe reheating methods. You can use the microwave or the stovetop. If using the microwave, cover the dish with a microwave-safe lid. Heat in short intervals, stirring in between to ensure even warmth. To keep the creaminess of the sauce, add a splash of milk or extra cream while reheating. This will help revive the smooth texture. On the stovetop, place the pasta in a skillet over low heat. Stir in a bit of reserved pasta water to bring the sauce back to life. Enjoy your delicious meal once again! Marry Me Chicken Pasta is a creamy dish that combines chicken and pasta. The name comes from the idea that this dish is so good, it might make someone want to propose! It features tender chicken, rich cream, and vibrant veggies. The balance of flavors makes it a hit for romantic dinners or family meals. Yes, you can prepare this dish in advance. Cook the chicken and pasta first, then store them separately in the fridge. Make the sauce and combine everything just before serving. This keeps the pasta from getting mushy. You can keep the cooked chicken and pasta for up to three days. Absolutely! Marry Me Chicken Pasta works great for meal prep. Portion it into containers for easy lunches or dinners. When reheating, add a splash of water or cream to maintain creaminess. Pair it with a simple salad or garlic bread for a complete meal. Yes, you can! If you want a different protein, use shrimp or turkey. For a vegetarian option, try tofu or chickpeas. You can also use mushrooms for a hearty feel. Each option brings its own flavor and keeps the dish exciting. This recipe for Marry Me Chicken Pasta covers ingredients, cooking steps, and storage tips. It ensures you create a rich and tasty dish. Remember to adjust flavors and use fresh veggies for variety. Store leftovers properly and reheat for a delicious meal later. With these steps, you can whip up an impressive dinner that everyone will love. Enjoy making this dish and feel proud of your cooking skills!

Looking for a quick and tasty dish that can win anyone’s heart? Try this Easy Marry Me Chicken Pasta! With creamy sauce, tender chicken, and fresh ingredients, this dish is …

Read more

Categories Dinner Leave a comment

Greek Chicken Orzo Power Bowls Flavorful and Healthy Meal

May 22, 2025 by Chef Evan
To create delicious Greek Chicken Orzo Power Bowls, gather these ingredients: - 1 lb chicken breast, diced - 1 cup orzo pasta - 1 cup cherry tomatoes, halved - 1 cucumber, diced - 1/2 red onion, thinly sliced - 1 cup baby spinach or arugula - 1/2 cup feta cheese, crumbled - 1/4 cup Kalamata olives, pitted and halved - 3 tablespoons olive oil - Juice of 1 lemon - 1 teaspoon dried oregano - Salt and pepper to taste - Fresh parsley, chopped (for garnish) You can make this meal your own. Here are some optional ingredients: - Grilled bell peppers for added sweetness - Avocado for creaminess and healthy fats - Chickpeas for extra protein and fiber - Fresh herbs like dill or mint for added freshness - Red pepper flakes for some heat Each ingredient plays a role in flavor and health: - Chicken: This lean protein keeps you full and helps build muscle. - Orzo: This pasta adds a comforting texture and offers carbs for energy. - Cherry tomatoes: They provide sweetness and are rich in vitamins. - Cucumber: This adds crunch and hydration with low calories. - Red onion: It gives a sharp taste and is full of antioxidants. - Spinach/Arugula: These greens add vitamins and minerals, boosting nutrition. - Feta cheese: This adds creaminess and calcium for bone health. - Kalamata olives: They bring a briny flavor and healthy fats. - Olive oil: This heart-healthy fat enhances taste and helps absorb nutrients. - Lemon juice: This brightens the dish and adds vitamin C. - Dried oregano: This herb adds a classic Greek flavor and has anti-inflammatory properties. When you mix these ingredients, you create a meal that's tasty and packed with nutrients. For the full recipe, check out the detailed instructions. Start by boiling a large pot of salted water. Once it boils, add the orzo pasta. Cook it for about 8 to 10 minutes. You want it to be firm, or al dente. After cooking, drain the orzo and place it in a mixing bowl. This will be the base of your power bowl. Next, take 1 pound of diced chicken breast. In a medium bowl, mix the chicken with 1 tablespoon of olive oil, lemon juice, and dried oregano. Don't forget to add salt and pepper! Make sure you coat the chicken well. Heat a skillet over medium heat and add the marinated chicken. Cook it for 7 to 10 minutes. Stir it often until it’s golden and cooked through. While the chicken cooks, chop your veggies. Dice 1 cucumber, halve 1 cup of cherry tomatoes, and thinly slice 1/2 of a red onion. Also, get 1 cup of baby spinach or arugula ready. All these will add freshness and crunch to your bowl. Now it’s time to put everything together! In the bowl with the orzo, add the cooked chicken, chopped tomatoes, cucumber, red onion, baby spinach, and 1/4 cup of Kalamata olives. Crumble 1/2 cup of feta cheese on top. Drizzle 2 tablespoons of olive oil over the mix. Season with salt and pepper to taste. Gently toss everything until well combined. This colorful blend is your Greek Chicken Orzo Power Bowl. To make your orzo just right, start with salted water. Bring it to a boil first. Add the orzo and cook it until it's al dente. This means it should still have a slight bite. Drain the orzo and let it cool in a big bowl. For the chicken, marinating is key. Use lemon juice, olive oil, and oregano to add flavor. Sauté the chicken over medium heat. Cook until it's golden brown and fully cooked through. This usually takes about 7-10 minutes. For an extra flavor boost, add more herbs. Fresh parsley or dill can brighten the dish. You can also mix in more lemon juice for zest. If you like heat, try adding red pepper flakes. Kalamata olives add a nice salty punch, so don’t skip them. You can also toss in a pinch of smoked paprika for depth. Lastly, using good-quality feta cheese makes a big difference. When serving, make each bowl beautiful. Layer the orzo and chicken, then add the veggies on top. Arrange everything in sections for a colorful look. A sprinkle of chopped parsley on top adds a nice touch. You can also serve with lemon wedges on the side. This not only looks great but gives a fresh squeeze when eating. Remember, we eat with our eyes first! Check out the Full Recipe for more details on assembling. {{image_4}} You can easily make a vegetarian version of Greek Chicken Orzo Power Bowls. Instead of chicken, use chickpeas or grilled vegetables. These options add protein and flavor. For chickpeas, use one can, drained and rinsed. For grilled vegetables, try zucchini, bell peppers, or eggplant. Just toss them with olive oil and herbs before grilling. This will keep the dish hearty and satisfying. If you need a gluten-free option, swap orzo for quinoa or rice. Both grains work well and keep the meal filling. For a dairy-free version, leave out the feta cheese. You can use dairy-free cheese or avocado for creaminess. This still gives the bowl a rich taste without dairy. To boost protein, consider adding grilled shrimp or tofu. Both options are great choices and add different flavors. You can also mix in nuts or seeds for added crunch. Sunflower seeds or walnuts work well. They add nutrients and texture to your meal. Feel free to customize your bowl based on what you enjoy. For the full recipe, check out the Greek Chicken Orzo Power Bowls above! To keep your Greek Chicken Orzo Power Bowls fresh, store leftovers in airtight containers. This helps prevent moisture loss and keeps flavors intact. Make sure to separate the chicken from the orzo if possible. This keeps the orzo from getting too soggy. Leftovers can last in the fridge for about three days. Always check for any signs of spoilage before eating. Reheat your bowls gently to keep the chicken moist. I find the best method is using the microwave. Place your bowl in the microwave and cover it with a damp paper towel. Heat in short bursts, about 30 seconds at a time. Stir between intervals to ensure even heating. If you prefer, you can also reheat on the stove. Just add a splash of water to a pan, and warm over low heat. Stir until everything is heated through. To maintain freshness, consider these tips: - Use glass containers: They help reduce odors and keep food fresh. - Cool completely before sealing: This prevents condensation inside the container. - Label containers with dates: This makes it easy to track how long they've been stored. - Freeze for longer storage: If you want to keep leftovers for weeks, freeze individual portions. They can last up to three months in the freezer. For more details on preparing this dish, check out the Full Recipe. To make these bowls vegan, swap chicken with chickpeas or tofu. Cook the chickpeas or tofu as you would the chicken. Use vegetable broth instead of chicken broth to cook the orzo. You can also add more veggies, like bell peppers or zucchini, to boost flavor and nutrition. Yes, you can prepare these bowls in advance. Cook the orzo and chicken ahead of time. Store them separately in airtight containers. Chop the veggies and keep them in the fridge. Assemble the bowls just before serving to keep everything fresh. These bowls pair well with a light salad or some warm pita bread. You can also serve a side of tzatziki sauce for dipping. This adds a nice creamy texture and enhances the flavors. To make a simple dressing, mix 3 tablespoons of olive oil, juice of 1 lemon, and a pinch of salt and pepper. You can add a teaspoon of dried oregano for extra flavor. Whisk the ingredients together until blended. Drizzle this dressing over your bowls for a tasty finish. For the full recipe, check out the [Full Recipe]. Greek Chicken Orzo Power Bowls are simple and tasty. We covered the ingredients, cooking steps, and tips for the best flavor. You can easily customize your bowl to fit your diet. Learning to store and reheat leftovers helps minimize waste. I hope you feel inspired to make this dish. Enjoy healthy eating with these easy and fun bowls. Happy cooking!

Looking for a meal that combines flavor, health, and ease? Greek Chicken Orzo Power Bowls are the answer! Packed with protein, fresh veggies, and zesty herbs, these bowls make for …

Read more

Categories Dinner Leave a comment

Cilantro Lime Pasta Salad Fresh and Flavorful Dish

May 22, 2025 by Chef Evan
- 8 oz fusilli or rotini pasta - 1 cup cherry tomatoes, halved - 1 cup cucumber, diced - 1/2 cup red bell pepper, diced - 1/4 cup red onion, finely chopped - 1 ripe avocado, diced - 1/2 cup fresh cilantro, chopped - 1/4 cup extra virgin olive oil - 3 tablespoons freshly squeezed lime juice - 1 teaspoon lime zest - Salt and freshly ground black pepper to taste - 1/4 teaspoon garlic powder - 1/4 teaspoon ground cumin (optional for a flavor boost) - Pot for boiling pasta - Colander for draining pasta - Mixing bowl for combining ingredients - Whisk for dressing preparation To make a great cilantro lime pasta salad, you need a few key ingredients and tools. Use fusilli or rotini pasta as they hold the dressing well. Fresh veggies like cherry tomatoes, cucumber, red bell pepper, red onion, and avocado add color and crunch. Cilantro brings a fresh taste that shines in this salad. For the dressing, you’ll need extra virgin olive oil, lime juice, and lime zest for zing. Don’t forget salt, pepper, garlic powder, and cumin for added flavor. Make sure you have a pot for boiling the pasta and a colander for draining it. A mixing bowl helps you combine all the ingredients. Finally, a whisk is essential for blending your dressing smoothly. This simple list is all you need to create a fresh and flavorful dish. Check out the Full Recipe for complete details! To boil pasta perfectly for salads, start with a large pot. Fill it with water and add salt. Bring the water to a rolling boil. Add the fusilli or rotini pasta. Cook it according to the package instructions until it’s al dente, which means it should be firm but not hard. Once the pasta is done, drain it in a colander. Rinsing pasta after cooking is key. It stops the cooking process and cools the pasta quickly. This helps your salad stay fresh and tasty. While the pasta cooks, prepare your vegetables. To cut vegetables uniformly, use a sharp knife. For even bites, make sure all pieces are about the same size. This gives your salad a nice look and balanced flavor. When choosing produce for salads, pick fresh and crisp items. Look for bright colors and firm textures. For this salad, use ripe tomatoes, crunchy cucumbers, and sweet bell peppers. To make the dressing, start with a small bowl. Add extra virgin olive oil, freshly squeezed lime juice, and lime zest. Sprinkle in salt, pepper, garlic powder, and cumin if you like. Whisk these ingredients together until they blend well. This process combines the oil and juice, which is called emulsifying. A balanced dressing is key to a great salad. Taste it and adjust the flavors as needed. Follow these steps for a delicious Cilantro Lime Pasta Salad. You can find the full recipe for more details. To make your cilantro lime pasta salad sing, add fresh herbs. Consider using basil or mint for a new twist. You can also mix in spices like chili powder for heat or smoked paprika for depth. Always taste as you go! Adjust the seasoning with salt and pepper to ensure the flavors pop. Presentation matters! Serve the salad in a big, colorful bowl. Top it with a sprinkle of fresh cilantro and a few lime wedges for a bright look. This salad pairs well with grilled chicken or fish, adding protein and making it a complete meal. {{image_4}} If you want a gluten-free option, choose gluten-free pasta. Many brands offer great choices. Look for pasta made from rice, corn, or quinoa. These options work well in this salad, keeping it tasty and light. For a vegan twist, replace the avocado with a different creamy element. You could use tahini or a dollop of vegan mayo. Both will add richness and keep the salad fresh. You can switch up the citrus in your dressing. Instead of lime, use lemon for a bright taste. Or try orange for a sweet, tangy kick. Both options work wonderfully with the other flavors. Want to add protein? Try grilled chicken or shrimp for a heartier dish. Beans are also a great choice. Black beans or chickpeas add protein and texture. They make this pasta salad more filling and satisfying. For the full recipe, check out the details to make your own delicious cilantro lime pasta salad. To keep your cilantro lime pasta salad fresh, store it in an airtight container. This helps lock in the flavors and keep the salad crisp. It’s best to chill the salad for at least 30 minutes before serving. This time allows the flavors to blend beautifully. In the fridge, this pasta salad lasts about 3 to 5 days. If you notice any signs of spoilage, like odd smells or colors, it’s best to toss it. Always check before you dig in! Freezing pasta salad is not ideal. The texture of the pasta and fresh veggies changes when frozen. If you still want to freeze it, do so without the avocado. Add fresh avocado after you thaw and serve. This keeps the salad tasting fresh and vibrant. If you decide to freeze it, use a freezer-safe container. This way, you can enjoy your cilantro lime pasta salad later, but remember, it’s best fresh! I recommend chilling the salad for at least 30 minutes. This time lets the flavors blend well. The cold salad is refreshing and vibrant. If you have more time, chilling it for an hour or more enhances the taste even further. Yes, you can make this salad ahead of time. Prepare it up to a day in advance. Just keep it in the fridge, covered tightly. This allows the flavors to develop. If you add avocado, do so just before serving to keep it fresh. If your salad seems dry, you can fix it easily. Add a splash of olive oil or lime juice. You can also mix in a bit of yogurt for creaminess. Stir gently to combine. Taste it to check if you need more seasoning. In this post, I detailed the steps to create a delicious pasta salad. We covered required ingredients, kitchen tools, and easy cooking methods. You learned how to prepare fresh vegetables and make a tasty dressing. I also shared tips for serving and storage, along with variations to suit your diet. Pasta salad is versatile, quick, and perfect for any meal. Enjoy experimenting with ingredients and flavors. You’ll not only impress yourself but also those who share the meal with you. Happy cooking!

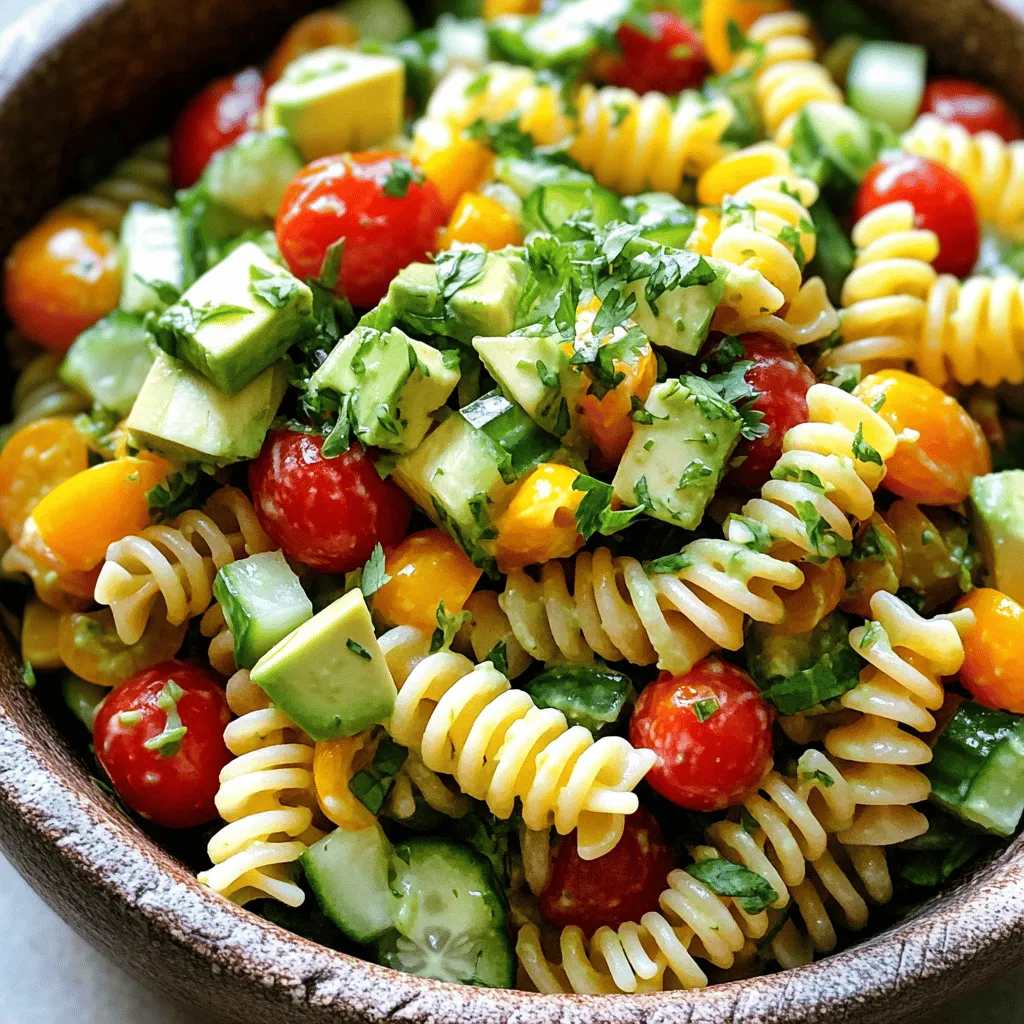
Are you ready to spice up your meal prep? Cilantro lime pasta salad is fresh, bright, and packed with flavor. This easy dish features colorful veggies and a zesty dressing …

Read more

Categories Salads Leave a comment

Nova Scotia Blueberry Cream Cake Delightful Recipe

May 22, 2025 by Chef Evan
- 1 ½ cups all-purpose flour - 2 teaspoons baking powder - ½ teaspoon salt - ½ cup unsalted butter, softened - 1 cup granulated sugar - 2 large eggs - 1 teaspoon vanilla extract - ½ cup milk - 1 ½ cups fresh blueberries (divided) - 1 cup heavy whipping cream - 2 tablespoons powdered sugar - Zest of 1 lemon - 1 teaspoon fresh lemon juice To make Nova Scotia Blueberry Cream Cake, gather these ingredients first. Each one plays a vital role in bringing this cake to life. The all-purpose flour forms the base. The baking powder helps it rise. Salt brings out the flavors. Softened butter adds richness. Granulated sugar sweetens the cake. Next, the eggs give structure and moisture. Vanilla extract adds warmth. Milk makes the batter smooth. Blueberries provide bursts of flavor. Heavy whipping cream will create the light frosting. Powdered sugar sweetens the cream, while lemon zest and juice brighten everything up. Using fresh blueberries is key. They give the cake a juicy pop. Make sure to divide the blueberries before baking. One cup goes into the batter, and the rest tops the cake. This makes each slice visually appealing and tasty. For the full recipe, follow the steps closely. Each ingredient matters. Remember, quality ingredients lead to better results. Enjoy the process and the delightful cake you'll create! 1. Preheat your oven to 350°F (175°C). This is key for even baking. 2. Grab a 9-inch round cake pan. Grease it lightly with butter and dust it with flour to stop sticking. 3. In a medium bowl, mix together the all-purpose flour, baking powder, and salt. Sifting helps with blending and aeration. 4. Set this dry mix aside for later. 1. In a large bowl, cream the softened butter and sugar. Use a hand mixer on medium speed for 3-5 minutes. Stop when it's light and fluffy. 2. Now, add two large eggs one at a time. Beat well after each egg. This makes the batter smooth. 3. Stir in 1 teaspoon of vanilla extract for that lovely flavor. 4. Gradually mix the dry ingredients into the wet mix. Do this in three parts, alternating with ½ cup of milk. Start and finish with dry ingredients. Be gentle; do not overmix! 1. Prepare 1 ½ cups of fresh blueberries. Toss 1 cup in a little flour to keep them from sinking. 2. Fold these floured blueberries into the batter. Be careful not to crush them. 3. Pour the batter into your prepared pan. Spread it evenly and sprinkle the remaining blueberries on top for extra fruitiness. 4. Bake for 30-35 minutes. A toothpick should come out clean when inserted into the center. 5. Let the cake cool in the pan for 10 minutes. Then, transfer it to a wire rack to cool fully. 6. While it cools, whip 1 cup of heavy cream in a different bowl. Mix until soft peaks form. 7. Gradually add 2 tablespoons of powdered sugar, lemon zest, and lemon juice. Whip until stiff peaks form. 8. Once the cake is cool, slice it in half horizontally. Spread half the whipped cream on the bottom layer. Place the top layer back on. 9. Cover the whole cake with the remaining whipped cream. Top it off with extra blueberries for a beautiful finish. Now, you have a lovely Nova Scotia Blueberry Cream Cake ready to enjoy! For more details, check the Full Recipe. To achieve the perfect cake texture, use room temperature ingredients. This helps them blend well. Always sift your dry ingredients. Sifting adds air and makes the cake light. Preventing blueberries from sinking is easy. Toss them in a little flour before adding them to the batter. This light coating helps them stay suspended while baking. Gently fold the floured blueberries into the batter to keep them whole. To achieve stiff peaks, start with cold heavy cream. Use a chilled bowl and beaters for the best results. Whip the cream on medium speed until it thickens. Gradually add powdered sugar for sweetness and flavor. For flavor variations, try adding lemon zest or vanilla extract to the cream. You can also mix in a bit of cocoa powder for a chocolate twist. Adjust the flavors to match your taste and the cake's fruity profile. For the full recipe, check [Full Recipe]. {{image_4}} You can make this Nova Scotia Blueberry Cream Cake even more exciting. Adding spices like cinnamon or nutmeg gives it a warm flavor. Just a pinch of cinnamon can make a big difference. You can also try nutmeg for a nutty taste. Substituting different fruits is another fun option. Consider using raspberries or strawberries instead of blueberries. They will add their own unique flair. Mix and match to find your favorite combination! If you need gluten-free options, you can use almond flour or a gluten-free blend. These flours work well in cakes. Just make sure the mix has a binding agent like xanthan gum. For those who prefer dairy-free cream, coconut cream is a great choice. It whips up nicely and has a rich taste. You can try other plant-based creams too. These options still give you a delicious, creamy topping without the dairy. Feel free to explore these variations. They let you customize the cake to fit your taste and dietary needs. For the full recipe, check out the details above! To keep your Nova Scotia blueberry cream cake fresh, store it in the fridge. Wrap the cake in plastic wrap or place it in an airtight container. This helps keep it moist and tasty. If you have leftover whipped cream, store it in a separate container. Want to save some for later? You can freeze the cake! Slice it first, then wrap each piece tightly in plastic wrap. Place the wrapped slices in a freezer bag. This way, you can enjoy it later. In the fridge, this cake lasts about 3 to 4 days. Check for signs of spoilage before enjoying. If the cake looks dry or has an off smell, it’s best to throw it away. When frozen, the cake can last up to 3 months. Just remember that freezing may change the texture a bit, but the flavor stays great! You can use frozen blueberries if fresh ones aren't available. Just thaw and drain them first. You can also try blackberries or raspberries for a different flavor. Keep in mind, these fruits may change the taste a bit. Yes, you can make this cake a day ahead. Just store it in the fridge, covered with plastic wrap. This will keep it fresh. You can add the whipped cream topping right before serving. This helps it look nice and taste great. Nova Scotia is known for its wild blueberries. The cake reflects the region's love for this fruit. The recipe combines local flavors with a creamy texture. It celebrates the harvest and brings a taste of the area to your table. To make the cake moister, try adding a bit more milk or oil. You can also use buttermilk instead of regular milk. Another option is to soak the cake layers with a simple syrup made of water and sugar. This will keep it soft and delicious. This blog post covers everything you need to make a delicious Nova Scotia Blueberry Cream Cake. We detailed the essential ingredients, step-by-step instructions, baking tips, and tasty variations. You can now create this cake with ease and even customize it to fit your needs. Remember to store leftovers properly, so they stay fresh. Enjoy the baking process and share this delightful cake with friends and family. Happy baking!

Are you ready to treat your taste buds? Discover the magic of Nova Scotia Blueberry Cream Cake! This delightful recipe combines fresh blueberries with creamy goodness for a dessert that …

Read more

Categories Desserts Leave a comment

Lucky Black Eyed Pea Salad for New Year’s Health

May 22, 2025 by Chef Evan
- 2 cups cooked black-eyed peas - 1 cup cherry tomatoes - 1 small red onion - 1 yellow bell pepper - 1 cup fresh corn kernels - 1 ripe avocado - 1/4 cup fresh parsley - 1 tablespoon extra virgin olive oil - 2 tablespoons apple cider vinegar - 1 teaspoon Dijon mustard - Salt and pepper I love using fresh ingredients for my Black Eyed Pea Salad. The black-eyed peas bring a hearty texture and a lot of good luck. Cherry tomatoes add a sweet burst. Red onion gives a nice crunch and a bit of sharpness. The yellow bell pepper adds color and a sweet flavor. Fresh corn kernels give a crunch and sweetness too. Avocado is a must for creaminess. I always add fresh parsley for a pop of green. The dressing combines olive oil, apple cider vinegar, and Dijon mustard. It ties everything together with a tangy kick. A sprinkle of salt and pepper enhances all the flavors. - Fresh herbs (e.g., cilantro, dill) - Spices (e.g., cumin, garlic powder) You can customize your salad with fresh herbs. Cilantro adds a pop of freshness. Dill gives a nice, unique taste. Adding spices like cumin or garlic powder can also boost the flavor. - High in fiber - Excellent source of protein - Rich in vitamins and minerals Black-eyed peas are not just tasty; they are also healthy. They are high in fiber, which is great for digestion. They provide a good amount of protein too. This makes them a perfect food for everyone. They are rich in vitamins and minerals, which help keep you strong and healthy. Check out the Full Recipe to start making your own Lucky Black Eyed Pea Salad! To start, you need to choose your black-eyed peas. If you use canned peas, rinse them well under cold water. This step removes excess sodium, making the salad healthier. After rinsing, drain them completely. If you prefer dried peas, soak them overnight in water. This helps them cook faster. The next day, boil the soaked peas in fresh water until tender. This usually takes about 45 minutes. Once cooked, drain them and let them cool. Next, take a large mixing bowl. Here, you will combine all your fresh ingredients. Add in the black-eyed peas, halved cherry tomatoes, diced red onion, diced yellow bell pepper, fresh corn kernels, diced avocado, and chopped parsley. When mixing, stir gently. This keeps the avocado from mashing. You want all the flavors to mix without losing the beautiful avocado pieces. Now, let’s make the dressing. In a small bowl, whisk together the extra virgin olive oil, apple cider vinegar, Dijon mustard, salt, and pepper. Whisk until all the ingredients blend smoothly. For the best results, focus on emulsification. This means the oil and vinegar should mix well, creating a creamy texture. Once the dressing is ready, drizzle it over your salad mixture. Gently toss everything together to coat evenly. Taste your salad and adjust the seasoning if needed. For a brighter flavor, let it sit in the fridge for about 30 minutes before serving. Enjoy the refreshing taste of this lucky black-eyed pea salad! For more details, check the Full Recipe. Marinating the salad is key for great taste. I suggest letting it sit in the fridge for at least 30 minutes. This step lets the flavors blend nicely. You can adjust seasonings before serving. If it needs more brightness, add a splash of vinegar. For more depth, sprinkle in some salt or pepper. Serving the salad in a bright bowl makes it pop. The colors of the ingredients attract attention. I like to garnish with extra parsley and whole cherry tomatoes on top. This adds a fresh touch and makes your dish look professional. This salad pairs well with grilled chicken or fish. You can also serve it with cornbread for a Southern twist. For drinks, try a light white wine or a refreshing iced tea. Both options complement the flavors of the salad and enhance your New Year's celebration. Looking for the full recipe? Check out the New Year's Lucky Black Eyed Pea Salad recipe for all the details. {{image_4}} You can boost the protein in your black-eyed pea salad. Add cooked bacon or smoked sausage for a savory touch. These meats add great flavor and richness. If you prefer a vegetarian option, consider tofu or chickpeas. Both options are high in protein and fit well in the salad. Tofu absorbs the flavors of the dressing and spices. You can give your black-eyed pea salad a twist with different flavors. For a Mexican-inspired salad, add lime juice and jalapeños. This adds a fresh and zesty kick. If you want a Mediterranean flair, try adding feta cheese and olives. The cheese adds creaminess, while olives give a nice briny taste. You can change the salad based on what is in season. In summer, add fresh cucumbers and bell peppers for a crunchy bite. For winter gatherings, consider adding hearty vegetables like roasted carrots or squash. These seasonal ingredients keep the dish fresh and exciting. To keep your Lucky Black Eyed Pea Salad fresh, store it in the fridge. Use an airtight container. This helps to keep out air and moisture. If you do not have one, wrap it tightly with plastic wrap. Make sure to press out any extra air. Your salad will stay fresh for about three days in the fridge. After this, the flavors may fade. Look for signs of spoilage like a sour smell or a change in color. If the salad looks watery or mushy, it is time to toss it. You can freeze Black Eyed Pea Salad, but the texture may change. If you choose to freeze it, pack it in a freezer-safe container. Leave some space at the top for expansion. When you are ready to eat it, thaw it in the fridge overnight. Stir well before serving to mix the flavors. Black-eyed peas have a long history. They symbolize good fortune in many cultures. In the Southern United States, people eat them on New Year's Day. This tradition started during the Civil War. Soldiers ate black-eyed peas because they were cheap and filling. They believed these peas would bring luck and prosperity. Today, many families serve them with greens and cornbread. This meal represents wealth and good health for the year ahead. Yes, you can prepare this salad ahead of time. It keeps well in the fridge for a few days. I recommend making it the day before. This allows the flavors to blend nicely. Store it in a sealed container to keep it fresh. Avoid adding avocado until just before serving. This keeps the avocado from browning. Absolutely, black-eyed pea salad is very healthy. Black-eyed peas are high in fiber and protein. They help keep you full and satisfied. This salad also includes fresh veggies like tomatoes and bell peppers. These add vitamins and minerals. The olive oil offers healthy fats. Overall, it's a nutritious dish that supports good health. Making this salad vegan is easy! The main ingredients are already plant-based. Use a vegan-friendly mustard for the dressing. Check the label to ensure there are no animal products. You can also add more veggies or beans to boost flavor. Consider adding some chopped nuts for crunch. Yes, you can modify the salad to meet your needs. If you have a gluten allergy, this recipe is safe as is. For nut allergies, avoid adding nuts. If you're sensitive to certain vegetables, swap them out. For example, replace bell peppers with cucumbers. You can also use canned black-eyed peas to save time. Just rinse them well before mixing. This Black Eyed Pea Salad is tasty and healthy. We covered the main and optional ingredients, plus how to make it. We also discussed tips to enhance the flavor and ideas for serving. You can customize the salad based on your taste and season. Remember, it's packed with nutrients and great for gatherings. Storing leftovers properly keeps it fresh longer. Feel free to try different variations for fun twists. A delicious, nutritious salad like this can bring good luck to your New Year! Enjoy making it your own.

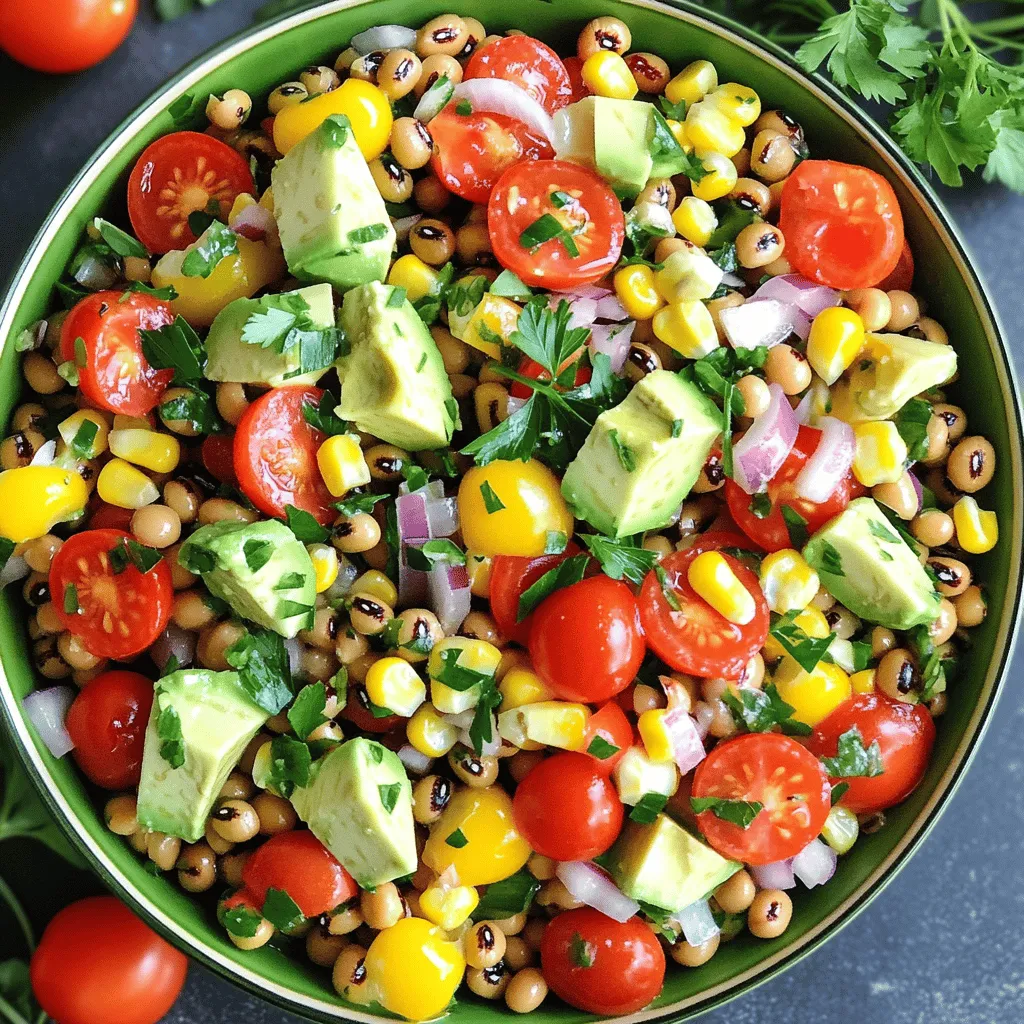
New Year’s Day is a time for fresh starts and good luck, and nothing says it better than a Lucky Black Eyed Pea Salad. Packed with colorful veggies and wholesome …

Read more

Categories Salads Leave a comment

Spicy Southwest Chicken Salad Zesty and Fresh Meal

May 22, 2025 by Chef Evan
- 2 boneless, skinless chicken breasts - 4 cups mixed salad greens (romaine, spinach, and arugula) - 1 cup canned black beans, rinsed and drained - 1 cup corn (canned or frozen, thawed if using frozen) - 1 cup cherry tomatoes, halved - ½ medium red onion, thinly sliced - 1 ripe avocado, diced - ½ cup fresh cilantro, chopped - 1 tablespoon extra virgin olive oil - 1 teaspoon smoked paprika - 1 teaspoon ground cumin - ½ teaspoon cayenne pepper (adjust based on heat preference) - Salt and black pepper, to taste - Juice of 1 lime - ½ cup ranch dressing or cilantro-lime dressing When I make Spicy Southwest Chicken Salad, I love how fresh it feels. The chicken breasts serve as the hearty base. They soak up the spices and bring a lot of flavor. The mixed greens add a crisp texture. You can use romaine, spinach, and arugula for variety. Black beans and corn provide protein and sweetness. They balance the heat from the spices well. Cherry tomatoes add a juicy burst of flavor. The red onion gives a nice crunch and slight bite. Avocado adds creaminess, making every bite rich. Finally, fresh cilantro brightens the whole dish. The spices are essential. Smoked paprika gives a warm, earthy flavor. Ground cumin adds depth, while cayenne pepper brings heat. Adjust the cayenne to match your taste. The olive oil and lime juice combine to create a zesty dressing. Ranch or cilantro-lime dressing adds a creamy finish. You can find the full recipe to create this delicious salad. It's a fun dish to make, and it tastes amazing! Start by preheating the grill. Set it to medium heat. This ensures even cooking. While it heats up, you can marinate the chicken. In a bowl, mix together: - 1 tablespoon extra virgin olive oil - 1 teaspoon smoked paprika - 1 teaspoon ground cumin - ½ teaspoon cayenne pepper (adjust for heat) - Salt and black pepper to taste Rub this spice mix over both sides of the chicken breasts. Make sure to coat them well. Now it’s time to grill the chicken. Place the chicken on the grill and cook for about 6-7 minutes on each side. You want the internal temperature to reach 165°F (75°C). This means the chicken is fully cooked. After grilling, let the chicken rest for a few minutes. This helps keep it juicy. Then, slice the chicken into thin strips. For the salad, grab a large bowl. First, mix the salad ingredients. Combine: - 4 cups mixed salad greens - 1 cup cherry tomatoes, halved - 1 cup canned black beans, rinsed and drained - 1 cup corn (canned or frozen, thawed if using frozen) - ½ medium red onion, thinly sliced Toss these gently to mix. Then, combine with the grilled chicken strips and diced avocado. Next, drizzle fresh lime juice over the salad. You can also add ½ cup ranch dressing or your choice of dressing. Gently toss everything together until all the ingredients are coated. For a final touch, sprinkle chopped cilantro on top just before serving. This adds a fresh burst of flavor. For the complete recipe, check the Full Recipe section. To make your chicken perfect, ensure it reaches 165°F (75°C). This way, you know it's safe to eat. Use a meat thermometer to check. If you want more spice, you can adjust the cayenne pepper. Start small, then add more if you like heat. Make this salad pop by using large, colorful bowls. Chill the salad before serving for a fresh taste. Garnish with extra cilantro and lime wedges. This adds a nice touch! Arrange avocado slices on top for a beautiful look. For a complete meal, pair the salad with warm tortillas or crusty bread. You could also serve a light soup on the side. This makes a nice contrast with the salad's flavors. You’ll need a grill or grill pan for cooking the chicken. A meat thermometer is a must for checking doneness. Use a sharp knife for slicing the chicken. A large salad bowl helps you mix the ingredients well. To save time, prep all your ingredients before cooking. This way, you’ll have everything ready when you need it. Enjoy making your Spicy Southwest Chicken Salad with these tips! For the full recipe, check the earlier section. {{image_4}} You can change the proteins in your Spicy Southwest Chicken Salad. Try tofu for a plant-based option. Shrimp also works well if you like seafood. Just grill or sauté them as you would the chicken. For vegetables, use seasonal picks. In summer, add fresh corn or zucchini. In fall, try roasted sweet potatoes or butternut squash. These swaps keep your salad exciting and fresh. Homemade dressings add a personal touch. Whisk together yogurt, lime juice, and herbs for a creamy option. You could also mix olive oil, vinegar, and spices for a zesty vinaigrette. If you want low-calorie options, use non-fat yogurt or a light vinaigrette. They keep the flavor without the extra calories. Want to amp up the taste? Consider adding spices like chili powder or garlic powder. These can give your salad an extra kick. Adding fruits like mango or pineapple can also enhance the flavor. Their sweetness balances the spice in the salad. You will love the bright taste they bring. Check out the Full Recipe for more ideas on making this salad your own! To keep your Spicy Southwest Chicken Salad fresh, store it in the fridge. Use an airtight container to prevent air from spoiling the ingredients. This helps the salad stay crisp for up to three days. I recommend separating the dressing from the salad. This keeps the greens from getting soggy. If you have grilled chicken leftovers, reheat them gently. You can use a microwave or a skillet. For the microwave, place the chicken on a microwave-safe plate. Heat it in short bursts to avoid drying it out. When using a skillet, add a splash of water and cover it to steam. Serve the chicken warm, but be careful not to reheat the entire salad. Keep the fresh veggies and dressing cold for the best taste. To save time, prepare ingredients in advance. Cook the chicken and let it cool before slicing. You can chop veggies the night before. Store them in separate containers. Use glass containers for the best results. They keep food fresh longer and are easy to clean. This way, you can assemble your salad quickly during the week. And don’t forget to try the full recipe for more delicious details! You can prep the salad a day before. Cook the chicken and let it cool. Slice the chicken and store it in a sealed container. Mix the salad greens, beans, corn, and veggies in another container. Keep the dressing separate. When ready to eat, combine all parts. This keeps everything fresh and tasty. Yes, you can! Just make sure to thaw it first. Place the frozen chicken in the fridge overnight. If you're in a hurry, you can use the microwave. Cook it until it's fully thawed. Then, follow the recipe to marinate and cook the chicken. This salad is quite healthy! Each serving has about: - Calories: 350 - Protein: 30g - Carbohydrates: 30g - Fat: 15g - Fiber: 10g These numbers can vary based on your dressing choice and any extras you add. Yes, it can be! To lower carbs, skip the corn and beans. Focus on the chicken and greens. You can also use a low-carb dressing. This way, you still enjoy a filling salad without too many carbs. This salad pairs well with many sides. Try serving it with: - Cornbread for a sweet touch - Tortilla chips for crunch - Grilled vegetables for extra flavor - A light soup for warmth Explore these options to make a complete meal! For the full recipe, check out the Spicy Southwest Chicken Salad section above. This blog post detailed how to make a tasty Spicy Southwest Chicken Salad. We explored key ingredients, cooking steps, and tips for perfection. You learned about fun ways to customize your salad and how to store leftovers. In closing, this dish is easy to prepare and great for all meals. It's healthy, flavorful, and packed with nutrients. Enjoy being creative with it!

Looking for a fresh meal bursting with flavor? Try my Spicy Southwest Chicken Salad! This salad combines juicy grilled chicken, crunch salad greens, and zesty spices, creating a dish that’s …

Read more

Categories Salads Leave a comment

Blueberry Breakfast Bundt Cake Delightful Morning Treat

May 22, 2025 by Chef Evan
Here is what you need for the Blueberry Breakfast Bundt Cake: - 2 cups all-purpose flour - 1 teaspoon baking powder - 1 teaspoon baking soda - ½ teaspoon salt - ½ cup unsalted butter, softened - 1 cup granulated sugar - 2 large eggs - 1 teaspoon vanilla extract - 1 cup plain Greek yogurt - 1 cup fresh blueberries (plus extra for garnish) - Zest of 1 lemon - ½ cup powdered sugar (for glaze) - 1-2 tablespoons lemon juice (for glaze) Gather these ingredients before you start. The fresh blueberries will give the cake a sweet burst. The Greek yogurt adds moisture and a slight tang. Lemon zest brightens the flavor, making every bite a delight. Enjoy mixing these simple yet tasty ingredients to create a wonderful morning treat. For the full recipe, check the details above. - Preheat oven to 350°F (175°C). - Grease bundt pan with butter or non-stick spray. - Combine all-purpose flour, baking powder, baking soda, and salt. - Beat softened butter and granulated sugar until fluffy. - Incorporate eggs one at a time, followed by vanilla extract and lemon zest. - Alternate between mixing dry ingredients and Greek yogurt into the wet mix. - Gently fold in blueberries, being careful not to break them. - Pour batter into prepared bundt pan and bake for 40-45 minutes. - Cool for 10 minutes before transferring to a wire rack. - Mix powdered sugar with lemon juice for a smooth glaze. For the complete instructions, check the Full Recipe. - Always make sure the butter is at room temperature. This helps the cake rise well. - When you fold in the blueberries, avoid over-mixing. This keeps the berries whole and pretty. - You can use whole wheat flour for a healthier option. It adds a nutty flavor too. - Try honey or maple syrup instead of sugar for a unique sweetness. - Garnish the cake with fresh blueberries. They add a pop of color and flavor. - Sprinkle powdered sugar on top for a sweet touch and extra charm. For more details, check the Full Recipe. {{image_4}} You can change the taste of your Blueberry Breakfast Bundt Cake in fun ways. Adding spices can make it special. Try mixing in: - 1 teaspoon ground cinnamon for warmth - ½ teaspoon nutmeg for a cozy touch - 1 teaspoon almond extract for a nutty flavor Each of these options brings a new twist. You may find your favorite mix! Want to make a healthier cake? You have choices! Here are some options: - Substitute ½ cup of applesauce for ½ cup of butter. This cuts fat and adds moisture. - Use ¾ cup honey instead of sugar for a natural sweetener. - Try gluten-free flour for a gluten-free version. Just use a 1:1 blend. These swaps keep the cake tasty but lighter. You can also switch up the fruit in your Bundt cake. While blueberries are a star, other berries work great too. Consider these ideas: - Use 1 cup of chopped strawberries for a sweet twist. - Swap in 1 cup of raspberries for a tart flavor. - Mix in blackberries for a rich, deep taste. Feel free to experiment! Each fruit gives a unique taste and look to your cake. If you want to dive deeper, check out the Full Recipe for all the details. To keep your blueberry breakfast bundt cake fresh, use an airtight container. This helps seal in moisture and flavor. Store the cake at room temperature for up to three days. If you want it to last longer, refrigerate it. Just remember that chilling can change the cake's texture slightly. If you want to freeze the cake, first allow it to cool completely. Then, wrap it tightly in plastic wrap. After that, place it in a freezer-safe bag. This method prevents freezer burn. The cake can stay frozen for up to three months. When you're ready to enjoy it, simply thaw it in the fridge overnight. To warm up your leftovers, slice the cake and place it on a microwave-safe plate. Heat each slice for about 10-15 seconds. Check to see if it's warm enough. You can also reheat the whole cake in the oven at 350°F (175°C) for about 10-15 minutes. This method keeps the cake moist and fresh. Yes, you can use frozen blueberries. They may make the cake a bit wetter. This can change the texture, so you may need to bake it a little longer. Keep an eye on the cake as it bakes. Check for doneness with a toothpick. If you need a dairy-free option, you can use coconut yogurt or almond yogurt. These work well and keep the cake moist. You can also use applesauce or mashed bananas. They may change the flavor a bit but add great moisture. To check if the cake is done, insert a toothpick into the center. If it comes out clean or with a few crumbs, the cake is ready. You can also look for a golden-brown color on top. The cake should spring back when lightly pressed. Yes, you can make this cake ahead of time. Bake it and let it cool completely. Wrap it in plastic wrap and store it at room temperature for up to three days. For longer storage, freeze it for up to three months. This recipe makes about 10 servings. Each serving is a slice of the Bundt cake. You can adjust the portion size based on your needs. If you are serving a crowd, consider cutting smaller slices. This blog post detailed a step-by-step guide to making a delicious blueberry bundt cake. You learned about the ingredients, from flour to blueberries, and the simple mixing method. I shared tips for perfect texture, baking alternatives, and decoration ideas. You can easily adapt this recipe with different flavors or fruits. With these insights, you can create a tasty treat that impresses anyone. Enjoy baking and sharing this delightful cake!

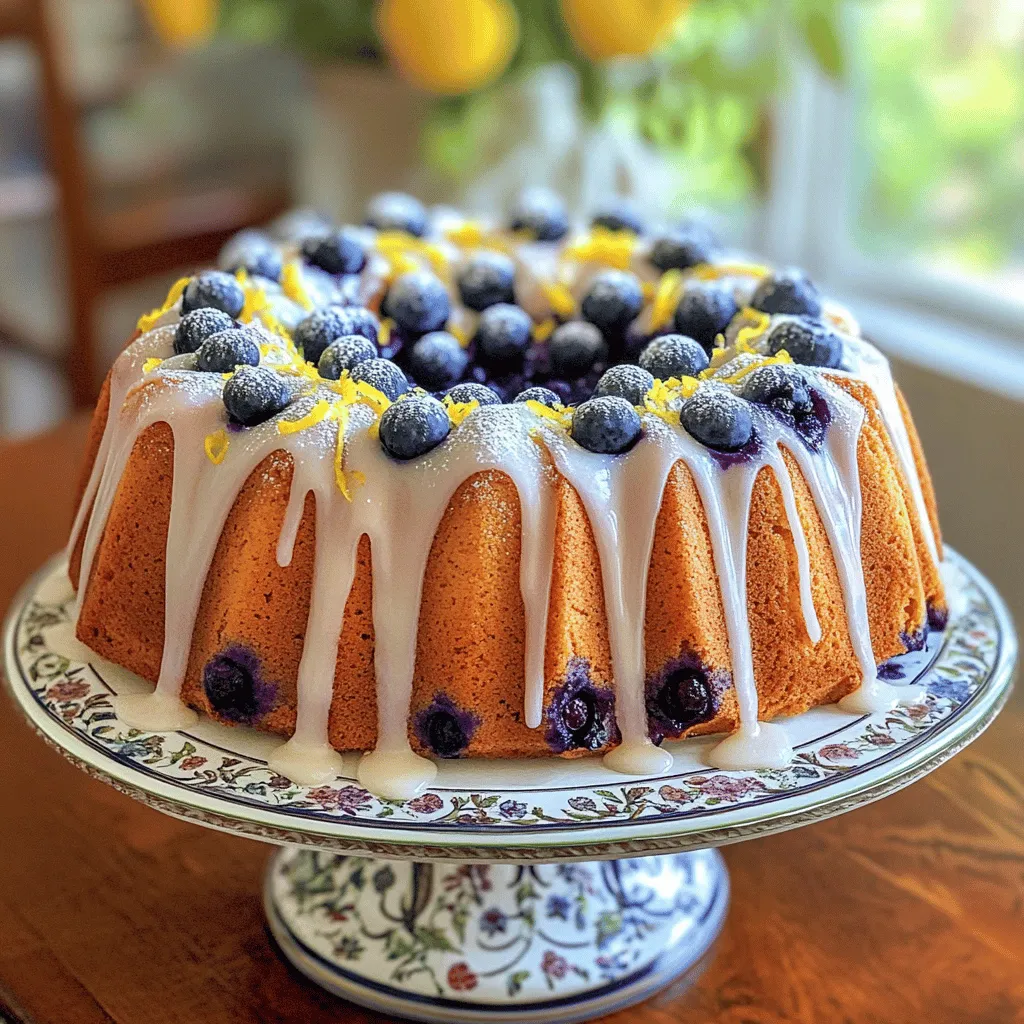
Start your morning off right with this Blueberry Breakfast Bundt Cake! Bursting with fresh blueberries and a hint of lemon, this cake is both delicious and easy to make. Whether …

Read more

Categories Breakfast Leave a comment

Blueberry Muffin Streusel Cake Delightful and Easy Recipe

May 22, 2025 by Chef Evan
When I bake my Blueberry Muffin Streusel Cake, I gather fresh and simple ingredients. Each one plays a key role in making this cake rich and tasty. Here’s what you need: - 2 cups all-purpose flour - 1 cup granulated sugar, divided into 1/2 cup and 1/2 cup - 1 teaspoon baking powder - 1 teaspoon baking soda - 1/2 teaspoon salt - 1/2 cup unsalted butter, softened to room temperature - 2 large eggs - 1 cup sour cream - 1 teaspoon pure vanilla extract - 2 cups fresh blueberries, rinsed and dried - 1 cup packed brown sugar - 1 teaspoon ground cinnamon - 1/2 cup rolled oats Using fresh blueberries makes the cake juicy and flavorful. The streusel topping adds a crunch that everyone loves. The balance of sweet and tangy is just perfect. You can find the full recipe to make this delicious cake. It’s a great way to enjoy baking at home! Set your oven to 350°F (175°C). It is key for baking. While it warms up, prepare your baking pan. Generously grease a 9x13 inch pan with non-stick spray or butter. This helps the cake come out easily. In a large bowl, combine 2 cups of all-purpose flour, 1/2 cup of granulated sugar, 1 teaspoon of baking powder, 1 teaspoon of baking soda, and 1/2 teaspoon of salt. Whisk this mix well. No lumps should remain. This step is vital for a fluffy cake. In a separate bowl, use an electric mixer to beat 1/2 cup of softened butter with the other 1/2 cup of granulated sugar. Mix it on medium speed. Continue until the mixture is light in color and fluffy, which takes about 2-3 minutes. This adds air to your batter. Add 2 large eggs one at a time to the butter mix. Mix well after each addition. Then stir in 1 cup of sour cream and 1 teaspoon of pure vanilla extract. Keep mixing until the batter is smooth. This will enrich the flavor. Slowly add the dry ingredients to the wet mix. Stir gently with a spatula or wooden spoon. Mix just until combined; do not overmix. This keeps the cake from becoming tough and ensures the right texture. Gently fold in 2 cups of fresh blueberries using a spatula. Be careful not to crush them. This helps to keep their shape and burst of flavor intact in the cake. In a small bowl, combine 1 cup of packed brown sugar, 1 teaspoon of ground cinnamon, and 1/2 cup of rolled oats. Mix in melted butter until crumbly. This topping adds a sweet crunch to your cake. Pour the batter into the greased pan, spreading it evenly. Evenly sprinkle the streusel topping over the cake batter. This creates that perfect crumbly finish. Bake the cake for 40-45 minutes. It is done when a toothpick inserted in the center comes out clean or with a few moist crumbs. Once baked, remove the cake from the oven. Let it cool in the pan for 10 minutes. Then, carefully transfer it to a wire rack to cool completely. For presentation, slice the cake into squares and arrange them on a pretty platter. Optionally, dust the top with powdered sugar and add fresh blueberries on the side. Enjoy your delicious Blueberry Muffin Streusel Cake! For the complete recipe, check the [Full Recipe]. - Avoiding overmixing: Mix your batter just until the dry and wet ingredients blend. Overmixing makes the cake tough. Stir gently and stop when you see no dry flour. - Choosing the right baking pan: Use a 9x13 inch pan for this recipe. A glass or metal pan works well. Grease it properly to ensure easy removal. - Suggestions for flavor add-ins: Try adding lemon zest or almond extract for a twist. These flavors brighten the cake and complement the blueberries. - Substituting ingredients: For a lighter cake, swap half the sour cream for Greek yogurt. You can also use whole wheat flour for a healthier option. - How to use a toothpick: Insert a toothpick in the center of the cake. If it comes out clean or has a few moist crumbs, your cake is done. - Signs that the cake is ready: Look for a golden top and a springy texture. The edges should pull away slightly from the pan. {{image_4}} You can switch up the flavors in your Blueberry Muffin Streusel Cake. Using other fruits adds a fun twist. Try raspberries, strawberries, or even peaches. These fruits bring their own unique taste and color. You can also add nuts for crunch. Walnuts or pecans work well. If you want a sweeter cake, toss in some chocolate chips. They melt and create gooey pockets of goodness. If you need gluten-free options, use a gluten-free flour blend. This swap keeps the cake moist and tasty. For a dairy-free version, try almond milk or coconut yogurt. Both can replace sour cream without losing flavor. Make sure to check labels for any hidden dairy in other ingredients. Seasons change, and so can your cake! Use fresh, seasonal fruits for a new taste. In summer, try juicy blackberries or cherries. In fall, consider apples or pumpkin spice for a cozy vibe. Holiday-themed variations are also fun. For Christmas, add cinnamon or nutmeg for warmth. You can even decorate with festive sprinkles or edible glitter. These ideas make your Blueberry Muffin Streusel Cake a year-round delight. For the full recipe, check out the [Full Recipe]. To keep your Blueberry Muffin Streusel Cake fresh, use an airtight container. Place the cooled cake in the container and seal it well. This helps prevent it from drying out. Store it at room temperature for up to three days. If you want to keep it longer, refrigeration is a good option. In the fridge, the cake lasts about a week. Make sure you cover it well to avoid any fridge odors. If you want to freeze your cake, slice it first. Wrap each slice tightly in plastic wrap. Then, place the wrapped slices in a freezer bag. Remove as much air as possible to prevent freezer burn. The cake can stay good in the freezer for up to three months. When you're ready to enjoy a slice, take it out of the freezer. Leave it at room temperature for about one hour to thaw. You can also thaw it in the fridge overnight for a slower, even thaw. Enjoy your delicious Blueberry Muffin Streusel Cake anytime! For the full recipe, check the recipe section above. Yes, you can use frozen blueberries. They work well in this cake. Keep in mind, frozen blueberries may release more juice. This can make the cake a bit wetter. To help with this, toss the frozen blueberries in some flour before adding them to the batter. This can help them hold their shape. The cake lasts about 3 to 4 days at room temperature. If you store it in the fridge, it can last up to a week. Make sure to cover it well to keep it fresh. You can use plastic wrap or an airtight container. Yes, you can make this cake ahead of time. I recommend storing it in the fridge. Wrap it well to keep it moist. When you are ready to serve, let it sit at room temperature. You can also warm it in the oven for a few minutes for a fresh taste. This cake pairs nicely with coffee or tea. You can also serve it with a scoop of vanilla ice cream. For a fruity twist, try it with fresh whipped cream or yogurt. Adding a side of fresh fruit can also enhance your experience. Yes, you can adjust the sugar. To lower the sugar, cut the granulated sugar by 1/4 cup. You may also add a bit of cinnamon for extra sweetness without sugar. This keeps the flavor great while reducing the sweet taste. You can try different toppings for fun. A cream cheese frosting adds a rich flavor. You can also use a simple glaze made of powdered sugar and milk. For a crunchy twist, consider adding chopped nuts or coconut flakes. This blog post covered everything from ingredients to baking tips for Blueberry Muffin Streusel Cake. You learned how to mix, bake, and even store your cake. Remember, choosing the right fruits or flavors can make a big difference. Don’t hesitate to try variations; they can add a fun twist. With these simple steps and tips, you can bake a delicious cake. Enjoy the process, and share your creations with others. Happy baking!

Get ready for a treat! This Blueberry Muffin Streusel Cake is easy and delicious. Perfect for breakfast or dessert, it combines soft cake with sweet blueberries and a crunchy topping. …

Read more

Categories Desserts Leave a comment
Older posts
Newer posts
← Previous Page1 … Page86 Page87 Page88 … Page124 Next →

TOSSED FLAVORS

Where flavors are fresh, vibrant, and ready to toss! 🥗

PAGES

Home About Contact Privacy Policy Terms & Conditions Cookie Policy GDPR Policy Copyright Policy Disclaimer

CATEGORIES

Appetizers Desserts Salads Breakfast Dinner

Contact

  • Pinterest
  • Mail
Copyright © 2026 Tossed Flavors. All rights reserved.