Skip to content
tossedflavors.com
  • Home
  • Appetizers
  • Desserts
  • Salads
  • Breakfast
  • Dinner
  • Privacy Policy
  • Contact
  • About

Chef Evan

Breakfast Chili and Eggs Flavorful Morning Delight

May 22, 2025 by Chef Evan
For this tasty dish, we need some key ingredients that bring flavor and texture. Here’s what you should gather: - 1 can (15 oz) black beans, thoroughly drained and rinsed - 1 can (14.5 oz) diced tomatoes with green chiles - 1 small onion, finely diced - 1 bell pepper (your choice of color), finely diced - 2 cloves garlic, minced These ingredients form the base of our breakfast chili. The black beans add protein, while the tomatoes give moisture and zest. Onions, bell peppers, and garlic bring sweetness and depth. Spices can elevate any dish, and this recipe is no different. Grab these seasonings to boost the flavor: - 1 tablespoon chili powder - 1 teaspoon ground cumin - 1 teaspoon smoked paprika - Salt and freshly ground black pepper, to taste Chili powder gives warmth and spice. Cumin adds earthiness, and smoked paprika enhances the dish with a subtle smokiness. Garnishes make the meal pop with color and flavor. You might want to include: - Fresh cilantro, chopped, for garnish - Slices of ripe avocado, for serving (optional) - Crumbled feta cheese, for garnish (optional) Fresh cilantro adds brightness. Avocado brings creaminess, and feta adds a salty bite. These garnishes turn your breakfast chili into a beautiful and hearty dish. For the full recipe, check out the details above. Enjoy crafting this delightful morning meal! Start by heating the olive oil in a large skillet over medium heat until it shimmers. Then, add the finely diced onion and bell pepper. Cook them for about five minutes. You want them to be soft and translucent. Next, add the minced garlic and sauté for one minute. Be careful not to let it burn. This step keeps the flavors bright. Now, stir in the black beans and diced tomatoes with green chiles. Add the chili powder, ground cumin, and smoked paprika. Mix everything well and let it simmer for about ten minutes. Stir it occasionally to blend the flavors. Taste the chili and adjust the seasoning with salt and freshly ground black pepper as needed. Using the back of a spoon, create four little wells in the simmering chili mixture. Carefully crack an egg into each well. Cover the skillet with a lid. Cook for five to seven minutes. The eggs should be set to your liking. I prefer mine a bit runny, but you can adjust this to suit your taste. Once cooked, remove the skillet from heat and sprinkle fresh cilantro over the dish. If you like, add slices of ripe avocado and crumbled feta cheese on top. For serving, scoop portions of the chili and eggs into deep bowls. This dish looks great when garnished with cilantro and avocado. It makes for a hearty and colorful breakfast. For the full recipe, check out the details to make your morning meal a delightful experience! To get the eggs just how you like them, you can follow these tips: - Soft Eggs: Cover the skillet and cook for 5 minutes. The yolk remains runny, and the white is set. - Medium Eggs: Cook for 6 minutes. The yolk will be slightly firm but still creamy. - Hard Eggs: For fully cooked yolks, let them cook for 7 minutes. The yolk will be firm. You can easily adjust the flavors in your breakfast chili. Here are some ideas: - Spice it Up: Add cayenne pepper or crushed red pepper flakes for heat. - Fresh Herbs: Stir in fresh cilantro or parsley for a bright touch. - Smoky Flavor: Use chipotle powder instead of chili powder for a smoky twist. Pair your chili and eggs for a delightful meal. Here are some great options: - With Bread: Serve with crusty bread or toast to soak up the chili. - Tortillas: Use warm tortillas to scoop up the chili and eggs. - Breakfast Sides: Add fruit or yogurt for a balanced breakfast. For more ideas, check out the Full Recipe for Breakfast Chili and Eggs. {{image_4}} You can make a tasty vegetarian version of breakfast chili and eggs. Replace the black beans with lentils or chickpeas for a protein boost. Add a mix of colorful vegetables like zucchini, corn, or spinach. They will add flavor and texture. This version still tastes great and is filling. If you like heat, go for a spicy version. Add sliced jalapeños to the chili base. You can also drizzle in hot sauce while cooking. This will give your dish a nice kick. Adjust the spice level to fit your taste. For a hearty breakfast bowl style, serve this chili over rice or quinoa. This adds extra fiber and makes it more filling. You can also layer it with avocado slices for creaminess. This option is perfect for a bigger meal to start your day. For the full recipe details, check out the Spicy Breakfast Chili & Eggs recipe. After you make your breakfast chili and eggs, store any leftovers in an airtight container. Refrigerate them within two hours of cooking. This helps keep your dish fresh and safe to eat. If you want to keep it longer, you can freeze it. Just make sure to use a freezer-safe container or bag. This way, it stays tasty for later meals. To reheat your breakfast chili and eggs, do it gently. Use a skillet over low heat. This helps keep the eggs from getting rubbery. Stir the chili as it warms up. If it looks a bit dry, add a splash of water or broth. You can also use a microwave, but cover the dish to avoid splatters. Heat in short bursts, stirring in between, to keep everything nice. In the fridge, your breakfast chili and eggs will last about three to four days. Keep an eye on it, and if it starts to smell off, it’s time to toss it. In the freezer, it can last up to three months. Just remember to label your container with the date. This helps you know when to eat it by. Yes, you can prep ahead! You can chop the veggies and store them in the fridge. Cook the chili base without eggs, and cool it down. When you are ready to eat, heat it up, add the eggs, and finish cooking. This saves time during busy mornings. If you want an egg-free dish, try these options: - Tofu: Crumbled or sliced firm tofu works well. - Chickpea flour: Mix with water to create a batter. - Silken tofu: Blend it to a creamy texture. - Vegan egg replacers: Check store-bought options for easy use. Make this dish your own! Here are some ideas: - Add more beans for extra protein. - Use different veggies like zucchini or corn. - Experiment with spices: add cayenne for heat or oregano for a twist. - Top with different garnishes like green onions or hot sauce. These tips help you create a breakfast chili and eggs that fits your taste! For the full recipe, visit the previous section. Breakfast chili and eggs provide a fun and tasty way to start your day. You learned about key ingredients, cooking steps, and garnishes. Tips helped you perfect egg doneness and explore flavor variations. You can even store leftovers for later enjoyment. With all these insights, you’ll make a delicious breakfast that suits your taste. Embrace creativity in each step, and enjoy your tasty dish!

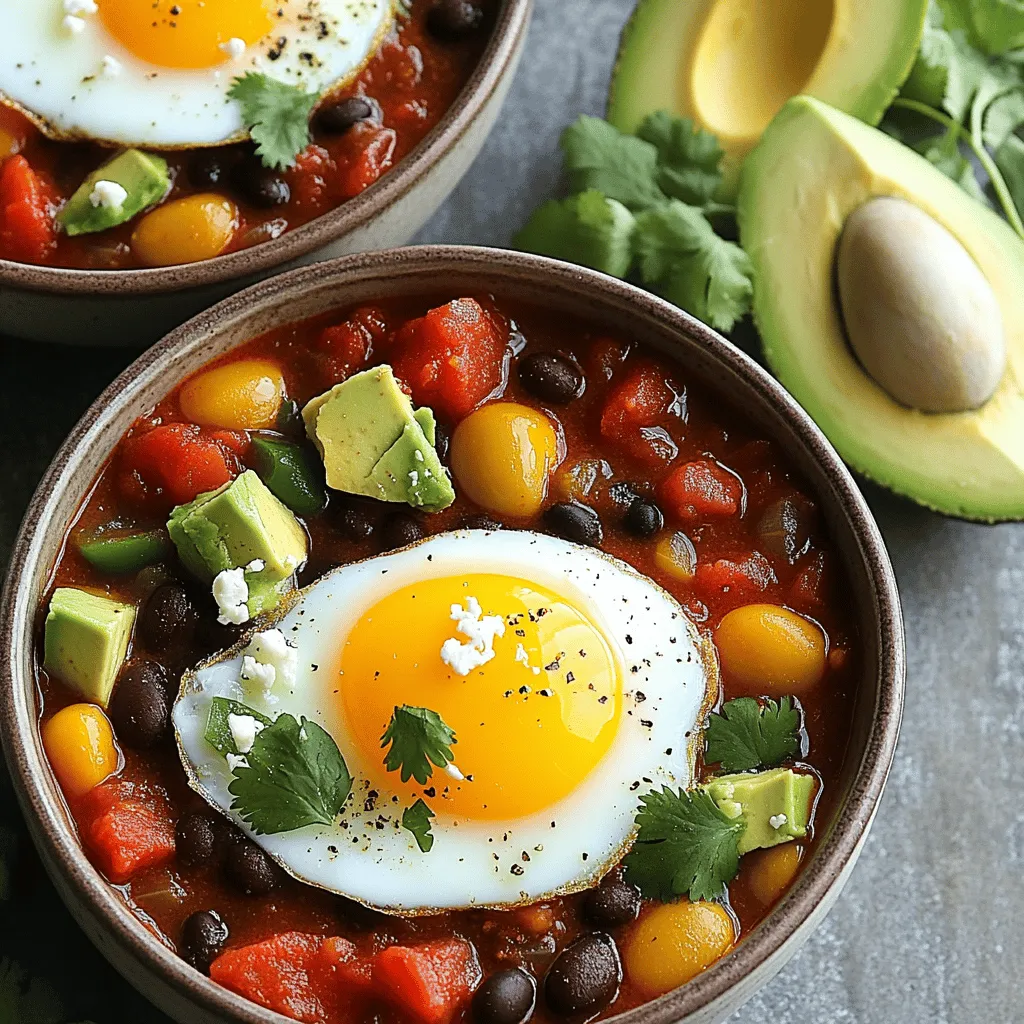
Are you ready to spice up your mornings? Breakfast Chili and Eggs is the perfect dish to awaken your taste buds and start your day right. This warm, hearty meal …

Read more

Categories Breakfast Leave a comment

Savory Steak & Queso Rice Satisfying Dinner Delight

May 22, 2025 by Chef Evan
- 1 lb flank steak, thinly sliced - 1 cup long-grain white rice - 2 cups chicken broth - 1 cup queso cheese (store-bought or homemade) - 1 bell pepper, diced - 1 small onion, finely chopped - 2 cloves garlic, minced - 1 tablespoon olive oil - 1 teaspoon ground cumin - 1 teaspoon smoked paprika - Salt and freshly ground black pepper to taste - Fresh cilantro, chopped - Lime wedges To make Steak & Queso Rice, you need a mix of fresh ingredients and bold flavors. The flank steak is the star here. It brings a rich, juicy taste that pairs perfectly with the creamy queso. This dish is also quick and simple to prepare. For the rice, I use long-grain white rice. It cooks fluffy and absorbs all the flavors from the chicken broth. This adds depth to the dish. Chicken broth makes a big difference in taste. You can also use homemade broth if you have it. The veggies are just as important. I like to use a bell pepper. It adds a sweet crunch. Onions bring a mild flavor, and garlic gives a nice kick. These sauté together to create a warm, inviting base. Don’t forget the spices. Ground cumin and smoked paprika boost the flavor. They add warmth and depth. Salt and pepper help bring all the tastes together. For garnishing, fresh cilantro brightens the dish. Lime wedges add a zesty finish. You can squeeze lime juice right before you eat. It really wakes up the flavors! This savory mix of ingredients creates a fantastic dinner. You can find the full recipe above to guide you through each step. Enjoy the process and the delicious results! - Combine rice with chicken broth. - Bring to a boil and lower heat. - Cover and simmer for 15 minutes. - Fluff the rice with a fork and set aside. Cooking rice properly is key. Using chicken broth adds a rich flavor. It brings depth to the dish. Ensure you fluff the rice. This keeps it light and prevents clumping. - Season flank steak with spices. - Heat olive oil in a skillet. - Sear the steak until browned, about 3-4 minutes. Searing the steak is important for flavor. The spices add a nice kick. Use a hot skillet to get a good sear. Don’t overcrowd the pan; cook in batches if needed. This keeps the steak juicy and tender. - Add onions, bell peppers, and garlic to the skillet. - Sauté until softened and aromatic. Sautéing the veggies enhances their flavors. The aroma alone will make your mouth water. Stir occasionally to avoid burning. This step adds color and texture to your dish. - Return cooked steak to the skillet. - Fold in cooked rice evenly. Mixing everything together is where the magic happens. Make sure to combine well. Each bite should have steak, rice, and veggies. This ensures a well-balanced dish. - Pour queso over the steak and rice mixture. - Stir until melted and creamy. The queso brings everything together. It adds creaminess and a cheesy goodness. Stir gently to coat all the ingredients. This step elevates the dish to a new level. - Garnish with cilantro. - Serve with lime wedges. Garnishing with cilantro adds freshness. Lime wedges offer a zesty kick. This brightens the flavors and makes it fun. Enjoy your Steak & Queso Rice as a satisfying meal. To cook steak just right, follow these timings based on how you like it: - Rare: 2-3 minutes per side - Medium Rare: 3-4 minutes per side - Medium: 4-5 minutes per side - Medium Well: 5-6 minutes per side - Well Done: 6-7 minutes per side Let the steak rest for 5-10 minutes after cooking. This keeps the juices in. If you slice right away, the juices run out. Seasoning can change your dish. Here are some ideas: - Add chili powder for heat. - Use fresh herbs like thyme or oregano for freshness. - Try a splash of lime juice for brightness. For toppings, consider: - Avocado slices for creaminess. - Sour cream for tang. - Fresh jalapeños for heat. Making queso is easy! Here’s a quick recipe: 1. Melt 1 cup of cheese (like cheddar) in a pot. 2. Stir in 1/2 cup milk until smooth. 3. Add diced tomatoes or green chilies for flavor. For thicker queso, use less milk. For thinner, add more. Customize it with spices or extra cheese to suit your taste. You can find the Full Recipe for a complete guide on creating this dish. {{image_4}} You can easily swap the flank steak for chicken or shrimp. Chicken offers a lighter option and cooks quickly. Shrimp cooks fast and adds a nice seafood twist. If you prefer a meatless dish, use black beans or lentils. Both options provide protein and keep the meal hearty. Want some heat? Add jalapeños or other spicy peppers to the skillet. Fresh or pickled jalapeños work well. You can also use spicy seasoning blends like taco seasoning or cayenne pepper. Just sprinkle them in while cooking for a kick that suits your taste. If you want a healthier twist, try brown rice or quinoa. Brown rice has more fiber, but it needs a longer cook time. Quinoa cooks faster and adds a nutty flavor. Adjust your cooking time based on your choice of grain to ensure everything is perfect. For the full recipe, check out the complete guide. To store leftovers, let your Steak & Queso Rice cool down first. Use airtight containers to keep it fresh. Glass or plastic containers work well. Make sure to seal them tightly. This helps prevent odors from mixing in your fridge. Store it in the fridge for up to three days. If you want to save portions for later, freezing is a great option. Divide the rice mixture into individual servings. Use freezer-safe bags or containers. Label each with the date, so you know when to use them. To reheat, thaw the portion in the fridge overnight. Heat it in the microwave or on the stove until hot. Add a splash of broth if it seems dry. Refrigerated Steak & Queso Rice lasts about three days. Frozen leftovers can stay good for up to three months. Always check for signs of spoilage before eating. Look for off smells, discoloration, or mold. If you see any of these, it’s best to throw it away. Making this dish takes about 45 minutes total. Here’s how it breaks down: - Prep time: 15 minutes - Cook time: 30 minutes This timing includes cooking the rice, searing the steak, and sautéing the veggies. It all comes together quickly. Yes, you can use other cheese types! Here are some great options: - Cheddar cheese for a sharp flavor - Monterey Jack for a creamy touch - Pepper Jack for a spicy kick Feel free to mix cheeses for a unique taste! To balance the rich flavors, I recommend these side dishes: - A fresh green salad with light dressing - Grilled vegetables, like zucchini or asparagus - Cornbread for a sweet, fluffy addition These sides pair well and complete the meal. For the full recipe, check out the section above! This dish combines tasty steak, creamy queso, and fragrant rice. You learned how to cook it step by step. Remember to adjust spices and try different proteins for variety. Store leftovers properly to enjoy later. Whether you're serving this at a gathering or just for yourself, it’s sure to please. This meal is fun, easy, and full of flavor. Enjoy your cooking journey and the delicious results.

Looking for a dinner that packs a punch in flavor? Let me introduce you to my Savory Steak & Queso Rice. This dish combines tender flank steak, creamy queso, and …

Read more

Categories Dinner Leave a comment

Creamy Garlic Mushroom Stuffed Shells Delightful Dish

May 22, 2025 by Chef Evan
Let's gather everything we need for these creamy garlic mushroom stuffed shells. Here's the list of ingredients: - 20 large jumbo pasta shells - 2 cups fresh mushrooms (button and cremini) - 1 tablespoon olive oil - 4 cloves garlic, minced - 1 cup ricotta cheese - 1 cup shredded mozzarella cheese, divided - 1/2 cup grated Parmesan cheese - 1/4 cup fresh parsley, finely chopped - 1 cup spinach, wilted and roughly chopped - 1 teaspoon dried Italian herbs (oregano, basil, thyme) - Salt and freshly ground black pepper to taste - 2 cups marinara sauce Each ingredient plays a key role in creating the rich flavors and creamy texture of the dish. The jumbo shells serve as a perfect vessel for the filling. The mix of button and cremini mushrooms adds depth. Garlic brings a bold taste that pairs well with the creamy cheeses. Ricotta and mozzarella create a rich and smooth filling. Fresh parsley and spinach add brightness and color. The dried herbs enhance the overall flavor profile, while the marinara sauce adds a lovely tang that ties it all together. This combination of ingredients makes the creamy garlic mushroom stuffed shells a delightful dish. For further preparation steps, check the Full Recipe. - Cook jumbo pasta shells until al dente. - Drain and set aside to cool. - Warm olive oil in a skillet. - Sauté mushrooms for 5 minutes. - Add minced garlic and sauté for 1 additional minute. - Combine the sautéed mixture with cheeses and herbs. - Season with salt and pepper. - Mix thoroughly until well combined. - Fill each shell with the creamy mushroom mixture. - Arrange in a greased baking dish. - Pour marinara sauce over the stuffed shells. - Sprinkle with remaining mozzarella. - Cover with foil and bake for 20 minutes. - Remove foil and bake for an additional 10-15 minutes. This recipe is easy to follow. I love how the flavors blend and create magic! Check out the Full Recipe for all the details you need. If you want to make this dish vegan, swap the cheese. Use vegan ricotta and vegan mozzarella. You can find these at most grocery stores. They melt well and taste great. For mushrooms, try different kinds. Shiitake or portobello will add unique flavors. Mix them with the button and cremini for a fun twist. When cooking pasta shells, follow these tips. Boil them in salted water for the best flavor. Make sure to cook them al dente. This helps them hold up when stuffed. After draining, rinse them with cold water. This stops the cooking. For sautéing, always use medium heat. This keeps the garlic from burning. Stir often to keep the flavors bright. To make your dish even better, add herbs and spices. Fresh basil or thyme can boost the taste. A pinch of red pepper flakes adds a nice kick. If you want a twist, try different sauces. A creamy Alfredo sauce works well. You can also add a touch of pesto for an herby note. Experiment and find your favorite flavors! For the full recipe, click here: [Full Recipe]. {{image_4}} You can make these stuffed shells even heartier. Adding cooked chicken or sausage boosts flavor and protein. Shredded rotisserie chicken works well. You can also use spicy Italian sausage for a kick. Ground turkey or beef is another great choice. Brown the meat first, then mix it with the mushroom filling. Cheese makes this dish rich and creamy. While ricotta, mozzarella, and Parmesan are classic, you can explore other options. Try goat cheese for a tangy twist. Aged cheddar adds depth, while creamy feta can enhance flavor. Mixing different cheeses can balance the taste, too. Combine mozzarella with a sharp cheese for a delightful contrast. Feel free to get creative with veggies! Bell peppers or zucchini can enhance the filling. Chop them finely and sauté with the mushrooms. You can also add other greens apart from spinach. Kale or Swiss chard works well. Just make sure to wilt them first for the best texture. For the full recipe, check out the Creamy Garlic Mushroom Stuffed Shells 🧄. To keep your Creamy Garlic Mushroom Stuffed Shells fresh, let them cool first. Place leftovers in an airtight container. This helps keep the flavors intact. You can store them in the fridge for up to three days. I recommend using glass or BPA-free plastic containers for best results. When you’re ready to enjoy your leftovers, the best way to reheat them is in the oven. Preheat the oven to 350°F (175°C). Cover the dish with aluminum foil to keep moisture in. This helps the cheese stay creamy and the pasta soft. Heat for about 20 minutes, or until warmed through. You can also microwave them, but the oven gives better flavor. To freeze your stuffed shells, let them cool completely. Arrange the shells in a single layer on a baking sheet. Freeze them for about an hour until solid. Then, transfer the shells to a freezer-safe container or a zip-top bag. Make sure to remove as much air as possible to avoid freezer burn. They can last up to three months in the freezer. When you’re ready to eat, thaw them overnight in the fridge. Bake from frozen at 375°F (190°C) for about 35-40 minutes. Enjoy the deliciousness anytime! For the full recipe, check out the entire process. It takes about 20 minutes to prep and 30 minutes to cook. You will spend 50 minutes in total to make this dish. Yes, you can make these stuffed shells ahead of time. Prepare the filling and stuff the shells. Then, cover and refrigerate them up to a day before baking. These stuffed shells pair well with a simple green salad or garlic bread. You can also serve them with steamed broccoli or a fresh vegetable medley for balance. Yes, this recipe is great for meal prep. You can batch cook and store the shells in the fridge. Just reheat in the oven before serving. This blog post covered how to make Creamy Garlic Mushroom Stuffed Shells. We went through the ingredients you need, from jumbo pasta shells to fresh herbs. I shared step-by-step instructions, including cooking techniques and filling variations. You can swap ingredients, add proteins, or choose different cheeses for new flavors. Storing and reheating your leftovers was also discussed. I hope this guide inspires you to try making this tasty dish at home! Enjoy your cooking!

Are you ready to elevate your dinner game with a comforting dish? Creamy Garlic Mushroom Stuffed Shells are packed with flavors and are easy to make. In this post, I’ll …

Read more

Categories Dinner Leave a comment

Lemon Raspberry Cookies Easy and Delightful Treat

May 22, 2025 by Chef Evan
To make lemon raspberry cookies, gather these items: - 1 cup all-purpose flour - 1/2 cup powdered sugar, plus extra for dusting - 1/4 teaspoon salt - 1/2 teaspoon baking soda - 1/2 cup unsalted butter, softened to room temperature - 1 tablespoon fresh lemon zest - 2 tablespoons fresh lemon juice - 1/4 teaspoon pure vanilla extract - 1/2 cup fresh raspberries, lightly crushed Measuring ingredients correctly is key. Use dry measuring cups for flour and sugar. For butter, pack it into the cup, then level off. When measuring liquids, use a clear measuring cup. This ensures each cookie bakes evenly. The right balance of flour to butter gives your cookies the perfect texture. If you lack certain ingredients, don’t worry! You can use these swaps: - All-purpose flour: Use whole wheat flour for more fiber. - Unsalted butter: Replace with coconut oil for a dairy-free option. - Powdered sugar: Use granulated sugar, but blend it to a fine powder. - Fresh raspberries: Frozen raspberries work too. Just thaw and drain excess water. These substitutions will still yield tasty results while keeping your cookies delightful! For the full recipe, check out the detailed instructions above. First, preheat your oven to 350°F (175°C). Line a baking sheet with parchment paper. This helps the cookies not stick. In a medium bowl, mix the all-purpose flour, powdered sugar, salt, and baking soda. Use a whisk to blend these dry ingredients well. In another bowl, take your softened butter and cream it. Use a hand mixer on medium speed for about 3 minutes. It should look light and fluffy. Add in fresh lemon zest, lemon juice, and vanilla extract. Mix until smooth. Now, slowly add the dry mix to the wet mix. Use low speed to combine them. Don't overmix! Finally, gently fold in the crushed raspberries. Be careful to keep some raspberry chunks. Using a tablespoon or cookie scoop, drop rounded dough balls onto the baking sheet. Space them about 2 inches apart. This allows even baking. Bake the cookies in your preheated oven for 12-15 minutes. Watch them closely. They should turn lightly golden at the edges. The centers will stay soft. Once baked, take the cookies out of the oven. Let them cool on the baking sheet for 5 minutes. After that, move them to a wire rack to cool fully. Before serving, dust the cooled cookies with extra powdered sugar. This adds sweetness and makes them look pretty. For an extra touch, serve them on a platter with fresh raspberries and lemon slices. This makes a colorful display that matches the flavors. For the full recipe, check the details above. To get the right texture, be careful not to overmix your dough. Mix until you see no dry flour. This helps keep the cookies soft and light. When folding in the raspberries, do it gently. You want some chunks for nice bites. Also, remember to cream the butter well. This adds air and makes them fluffy. Want a flavor boost? Try adding some lemon extract. It gives a deeper lemon taste. You can also mix in some white chocolate chips for a sweet twist. Adding a pinch of almond extract can also enhance the flavor. Lastly, using fresh lemons is key. Their zest and juice bring brightness to every bite. One common mistake is baking too long. Keep an eye on the cookies. They should be golden at the edges but soft in the center. Another pitfall is using old baking soda. Check your baking soda for freshness to help cookies rise well. Lastly, don’t skip cooling them on a wire rack. This prevents sogginess and keeps them crisp. For more details, check the Full Recipe. {{image_4}} You can easily customize your Lemon Raspberry Cookies. Consider adding chocolate chips for a sweet twist. White chocolate pairs nicely with the tart raspberries. You can also mix in nuts like chopped almonds or walnuts for a crunchy texture. Coconut flakes can add a tropical feel. Just remember to keep the total mix-ins under one cup to maintain cookie shape. If you need a gluten-free version, swap the all-purpose flour for a gluten-free blend. Look for blends that include xanthan gum for the best results. Almond flour is another great choice, but it can change the cookie's texture. Adjust the baking time slightly, as gluten-free cookies may bake faster. Feel free to explore different flavors! Instead of lemon, try using lime or orange zest. These citrus fruits provide a fresh taste too. For berry lovers, consider using blueberries or strawberries in place of raspberries. Adding a hint of almond extract can give your cookies a lovely depth. Try different combinations to find your perfect cookie! For the full recipe, click here. To keep your Lemon Raspberry Cookies fresh, use an airtight container. Place a piece of parchment paper between layers to prevent sticking. Store them at room temperature for the best texture. They will stay fresh for several days this way. If you enjoy a soft cookie, try to eat them within three days. Freezing is a great way to save cookies for later. To freeze, first let the cookies cool completely. Then, place them in a single layer on a baking sheet. Freeze for about an hour until firm. Next, transfer the cookies to a freezer-safe bag or container. They can last up to three months in the freezer. When you're ready to eat, thaw them at room temperature. Lemon Raspberry Cookies have a short shelf life. When stored properly, expect them to last about five days at room temperature. If frozen, their flavor and texture stay great for about three months. Always check for signs of spoilage before eating. Enjoy these delightful treats while they are fresh! For the full recipe, check out the details provided above. To make Lemon Raspberry Cookies from scratch, follow the steps in the Full Recipe. Start by mixing the dry ingredients, then cream the butter and add lemon zest, juice, and vanilla. Combine the mixtures, fold in raspberries, and scoop onto a baking sheet. Bake until lightly golden. Yes, you can use frozen raspberries. Just make sure to thaw and drain them first. This helps prevent excess moisture, which can make your cookies soggy. Gently fold them into the dough, keeping some chunks for texture. To make these cookies more lemony, add extra lemon zest or juice. You can also try using lemon extract for a stronger flavor. Just be careful not to add too much, as it can change the dough's balance. Lemon Raspberry Cookies pair well with tea or lemonade. You can also serve them with a scoop of vanilla ice cream. For a lovely touch, add fresh raspberries and lemon slices for garnish. Enjoy the burst of flavors! In this article, we explored how to make delicious Lemon Raspberry Cookies. We covered the key ingredients and their measures, plus helpful substitutions. The step-by-step instructions guided you through making the dough, baking, and cooling. I shared tips for texture, flavor, and common mistakes. We also discussed fun variations and how to store your cookies properly. Now you have all the tools to bake tasty cookies anytime. Enjoy experimenting and sharing your sweet creations!

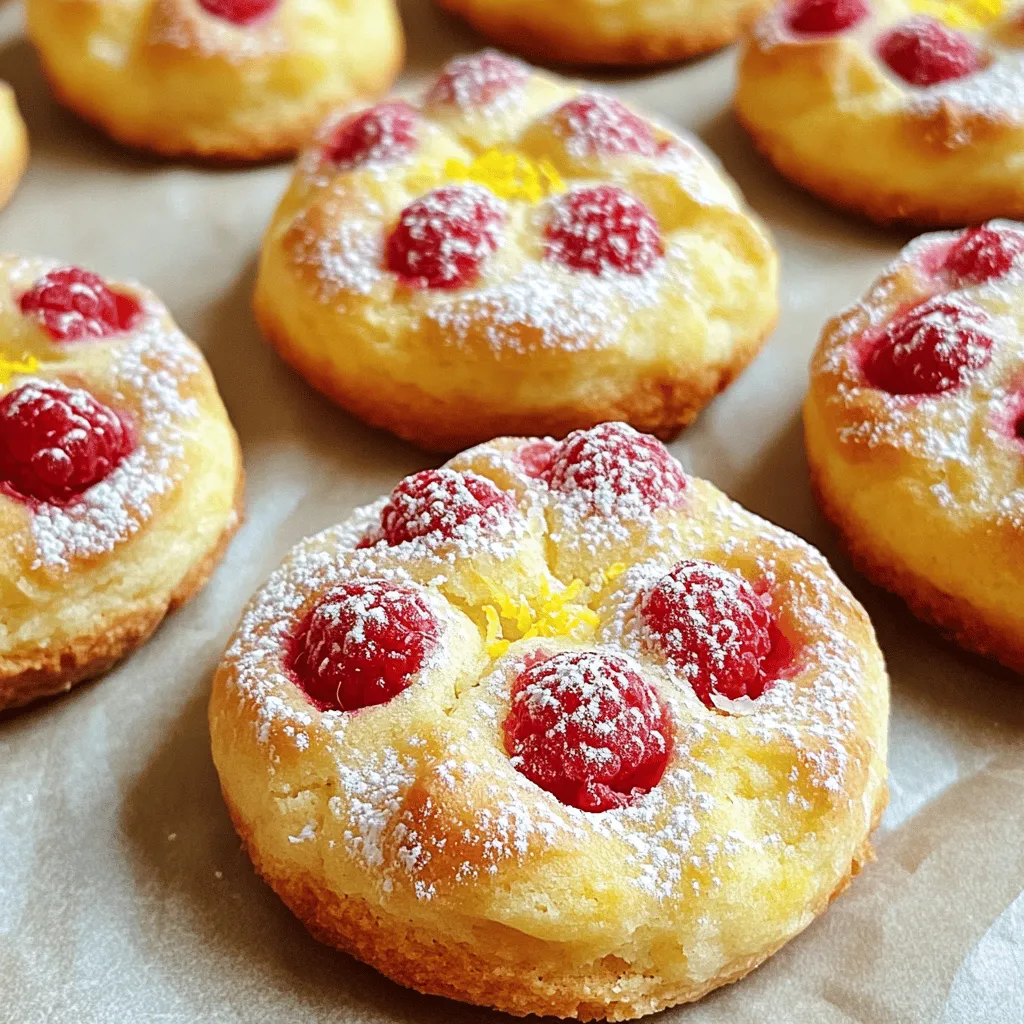
Looking for a sweet treat that bursts with flavor? You’ve come to the right place! My easy Lemon Raspberry Cookies combine zesty lemon and juicy raspberries for a delicious twist. …

Read more

Categories Desserts Leave a comment

Chocolate Cake Recipe Crafted for Delightful Flavor

May 22, 2025 by Chef Evan
To make a great chocolate cake, you need some key ingredients. Here’s what you’ll need: - 1 ¾ cups all-purpose flour - 1 ¾ cups granulated sugar - ¾ cup unsweetened cocoa powder - 1 ½ teaspoons baking powder - 1 ½ teaspoons baking soda - 1 teaspoon salt These ingredients form the base of your cake, giving it structure and sweetness. The flour provides the body, while cocoa powder adds that rich chocolate flavor. Baking powder and baking soda help the cake rise, making it light and fluffy. Salt balances the sweetness and enhances all the flavors. Next, let’s move to the liquid ingredients. You will need: - 2 large eggs - 1 cup whole milk - ½ cup vegetable oil - 2 teaspoons vanilla extract - 1 cup brewed coffee (cooled to room temperature) Eggs act as a binder and add moisture. Whole milk gives your cake richness and a tender crumb. Vegetable oil keeps the cake moist and fluffy. Vanilla extract adds a warm, sweet note. Finally, brewed coffee enhances the chocolate flavor, making it deeper and more complex. For an extra touch, consider adding some optional ingredients. You might like: - ½ cup semi-sweet chocolate chips Chocolate chips bring an extra burst of sweetness and texture. When choosing chocolate chips, go for high-quality brands. They melt beautifully and add a delightful surprise in every bite. Always look for chocolate with a high cocoa content for the best flavor. This recipe is all about balance and using the right ingredients. You can find the Full Recipe at the beginning of this article. Enjoy your baking! 1. Preheat oven and prepare pans: Start by preheating your oven to 350°F (175°C). This helps the cake bake evenly. Next, grease and flour two 9-inch round cake pans. This step stops the cake from sticking. 2. Mix dry ingredients in a bowl: In a large bowl, combine the flour, sugar, cocoa powder, baking powder, baking soda, and salt. Sift these dry ingredients well. Mixing them now helps the cake rise perfectly later. 3. Add wet ingredients and mix: Now, add the eggs, whole milk, vegetable oil, and vanilla extract to your dry mix. Use an electric mixer to beat this mixture on medium speed for about two minutes. This should make a smooth batter. 4. Stir in brewed coffee: Next, slowly stir in the cooled brewed coffee. This makes the batter thin, but it adds a rich flavor. Make sure it's mixed well, so every bite is delicious. 5. Fold in chocolate chips: Gently fold in the semi-sweet chocolate chips. This adds little bursts of chocolate in each slice. Make sure they are spread out evenly. 6. Bake and cool the cakes: Pour the batter into the prepared cake pans. Bake them in the preheated oven for 30 to 35 minutes. To check if they are done, insert a toothpick in the center. It should come out clean. After baking, let the cakes cool in the pans for about 10 minutes. Then, transfer them to wire racks to cool completely. Following these steps carefully ensures you create a delightful chocolate cake that everyone will love. For the full recipe, check out the recipe section above. Enjoy every bite of this sweet treat! To ensure even baking, always preheat your oven. Place the cake pans in the center of the oven. This helps the cakes bake evenly. Rotate the pans halfway through baking. This simple trick can help avoid uneven edges. Common mistakes can ruin your cake. Avoid overmixing the batter; it can lead to a dense cake. Make sure your ingredients are at room temperature for better mixing. Use fresh baking powder and baking soda for the best rise. Choosing the right frosting is key. For a rich chocolate cake, a classic buttercream works well. Try a mocha ganache for a coffee twist. For a lighter touch, whipped cream adds a nice contrast. Presentation matters, too. Dust the cake with powdered sugar for a nice finish. Chocolate shavings or whole coffee beans can make it look fancy. Serve each slice with whipped cream or ice cream for extra delight. If your cake is too dry, it may have baked too long. Consider checking for doneness a few minutes early next time. Adding a simple syrup can help moisten dry cake. For a cake that is too moist, it may have too much liquid or not enough baking time. Make sure to measure your ingredients carefully. If your cake sticks to the pan, run a knife around the edges. Let it cool before flipping it. This will help keep your cake intact. {{image_4}} You can easily make a vegan chocolate cake. Replace the eggs with flaxseed meal or applesauce. Use plant-based milk like almond or soy. Instead of regular sugar, consider coconut sugar for a healthier choice. This keeps the cake moist and delicious without dairy. For those who need gluten-free options, use a gluten-free flour blend. Make sure it has a good balance of starches and proteins. This way, your cake will still rise and taste great. You can also add a bit of xanthan gum to help with the texture. Want to spice things up? Adding a pinch of cinnamon or a dash of chili powder gives your cake a unique twist. You can also try extracts like mint or almond for a different flavor profile. Just a teaspoon goes a long way. Fruits and nuts can take your chocolate cake to the next level. Chopped walnuts or pecans add crunch and richness. You can also fold in raspberries or cherries for a fruity surprise. They add moisture and a burst of flavor. Pair your chocolate cake with different drinks. A hot cup of coffee enhances the chocolate taste. If you prefer something cold, a glass of milk complements the cake perfectly. Got leftovers? Use them in creative ways. Crumble the cake over ice cream for a sundae. You can also turn it into cake pops by mixing crumbled cake with frosting. This way, you enjoy every last bite! To keep your chocolate cake fresh, start with proper storage. If you plan to eat it within a few days, wrap it tightly in plastic wrap. This keeps moisture in and prevents it from drying out. You can also place it in an airtight container. For longer storage, freeze the cake. Slice it before freezing for easy serving later. Just make sure each slice is wrapped well. If you want to enjoy warm cake, reheat it gently. The best method is to use an oven. Preheat your oven to 350°F (175°C). Place the cake on a baking sheet and cover it with foil. Heat for about 10-15 minutes. You can also use a microwave, but only for a short time. Avoid reheating if the cake has frosting, as it may melt or become too soft. Homemade chocolate cake lasts about 3-5 days at room temperature. In the fridge, it can last up to a week. If frozen, it can stay good for about three months. Watch for signs of spoilage like off smells or mold. If the cake feels dry or crumbly, it may not taste good. Enjoy your cake while it’s fresh for the best flavor! How do I make my chocolate cake moist? To make your chocolate cake moist, use whole milk and eggs. Adding brewed coffee helps too. You can also add sour cream or yogurt. These ingredients add moisture and flavor. Can I use cocoa powder instead of chocolate for frosting? Yes, you can use cocoa powder for frosting. Mix cocoa with butter, sugar, and a splash of milk. This makes a smooth, rich chocolate frosting. Adjust sugar to your taste. What is the best way to transport a chocolate cake? To transport a chocolate cake, let it cool first. Use a cake box or a sturdy plate. Wrap it in plastic wrap for extra safety. Keep it flat to avoid any mess. Why is my cake sinking in the middle? A cake sinks in the middle for a few reasons. It might be undercooked or the oven temperature might be too low. Make sure to test with a toothpick for doneness. Also, avoid opening the oven door too soon. Can I substitute ingredients in this chocolate cake recipe? Yes, you can substitute some ingredients. Use almond milk for whole milk or coconut oil for vegetable oil. Keep in mind that these swaps may change the flavor a bit. Can I enhance the flavor of my chocolate cake? You can enhance the flavor by adding espresso powder or vanilla. A pinch of salt also brings out the chocolate taste. Try adding spices like cinnamon for a unique twist. What are the best chocolates for baking? The best chocolates for baking are semi-sweet and dark chocolate. Look for bars with at least 60% cocoa. These chocolates melt well and add rich flavor to your cake. You now have a complete guide to baking an amazing chocolate cake. We covered the main ingredients, step-by-step instructions, and creative variations. You’ve learned essential tips for perfect baking and storage, plus answers to common questions. Chocolate cake can be simple or special. With this knowledge, you can create a treat that everyone will love. Let your baking journey begin, and enjoy every bite!

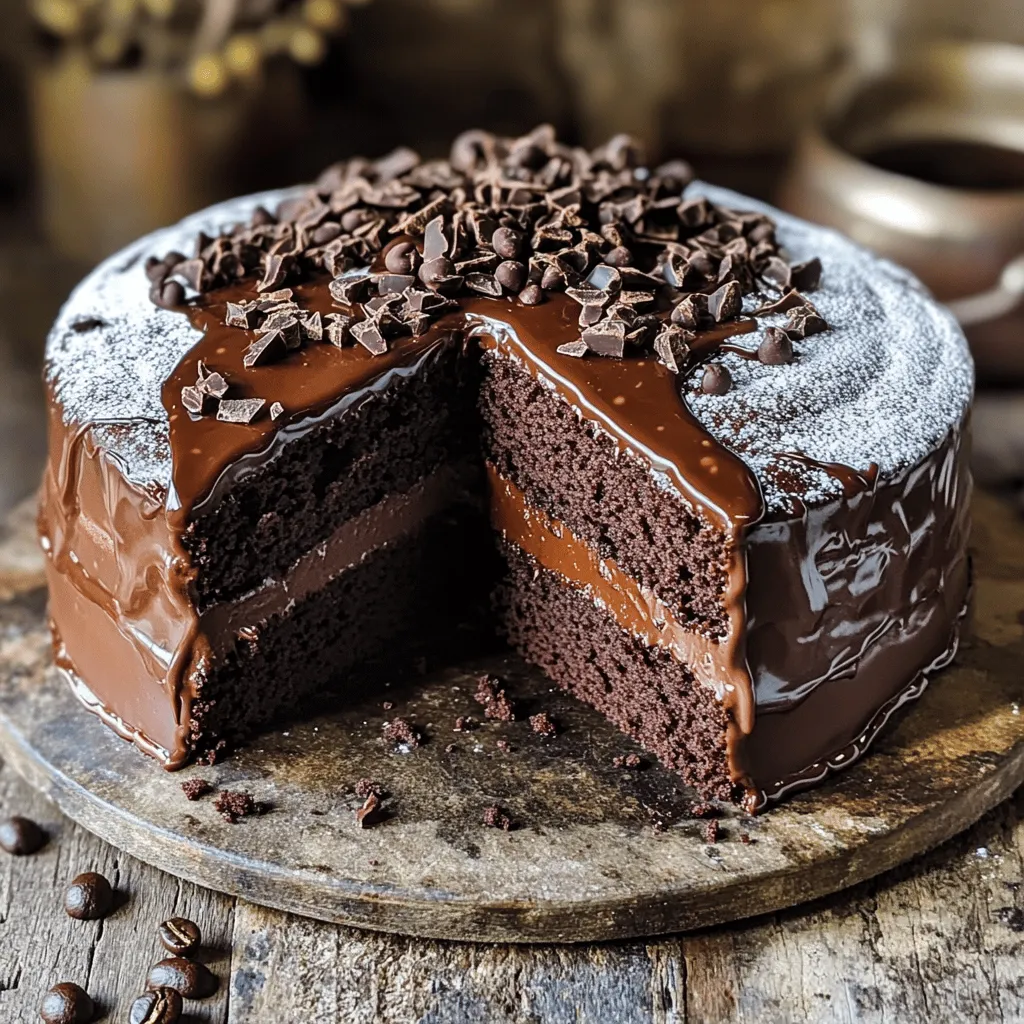
Get ready to indulge in a heavenly slice of chocolate cake! With this simple recipe, you can create a rich and moist dessert that will delight your family and friends. …

Read more

Categories Desserts Leave a comment

Death By Chocolate Poke Cake Irresistible Dessert Delight

May 22, 2025 by Chef Evan
- 1 box chocolate cake mix - 1 cup brewed coffee (cooled to room temperature) - 1 can (14 oz) sweetened condensed milk The main ingredients for this cake are simple yet powerful. The chocolate cake mix gives a rich base. Adding brewed coffee enhances the chocolate flavor. Sweetened condensed milk acts as a delicious filling, soaking into the cake for extra moisture. - 1 cup chocolate fudge sauce (store-bought or homemade) - 1 cup heavy whipping cream - A handful of chocolate shavings or chocolate chips Toppings make this cake shine. Chocolate fudge sauce adds a sweet, gooey layer. Whipped cream brings a light texture that contrasts the dense cake. Chocolate shavings or chips add crunch and beauty to the final dish. - Different cake mixes (vanilla, red velvet, etc.) - Additional flavored extracts - Fresh fruits or nuts Customization is fun! You can swap the chocolate cake mix for vanilla or red velvet. A splash of flavored extract can add a new twist. Fresh fruits or nuts can also add texture and flavor, making each bite unique. For the complete recipe, check out the Full Recipe. Begin by preheating your oven to 350°F (175°C). This step is key for even baking. Next, take a 9x13 inch baking pan. Generously grease and flour it to prevent sticking. This will help you serve the cake later without any hassle. In a large mixing bowl, combine the chocolate cake mix, cooled brewed coffee, eggs, and vegetable oil. Use an electric mixer at medium speed. Mix for about 2 minutes until everything is smooth and well combined. Now, carefully pour the cake batter into your prepared pan. Use a spatula to smooth it out evenly. Then, place it in the oven and bake for 30-35 minutes. To check if it’s done, insert a toothpick into the center. If it comes out clean, the cake is ready. Once baked, remove the cake from the oven. Let it rest in the pan for about 10 minutes to cool. After that, take the end of a wooden spoon or a fork. Poke holes all over the top of the cake. Be generous with the holes so the filling can seep in. In a separate bowl, mix the sweetened condensed milk and chocolate fudge sauce. Blend them until fully combined. Pour this mixture evenly over the warm cake. Make sure it fills all the holes you created. Allow the cake to cool completely on a wire rack. While the cake cools, whip the heavy cream in a medium bowl using an electric mixer. Mix until it starts to thicken. Then, add the powdered sugar and vanilla extract. Continue whipping until soft peaks form. Once the cake is cool, spread the whipped cream evenly over its top. For a final touch, sprinkle chocolate shavings or chips on top. If you want to make it look fancy, drizzle some extra chocolate fudge sauce over the whipped cream. Now your Death By Chocolate Poke Cake is ready to chill in the refrigerator for 1-2 hours. This extra time allows all the flavors to blend perfectly. You can find the full recipe online if you need more details. Mixing time is key when making this cake. Blend the ingredients just right to avoid a tough texture. Overmixing can make the cake dense and dry. Aim for about two minutes on medium speed. This ensures the batter is smooth but not overworked. Let the cake cool completely before adding the filling. This step helps the cake absorb the chocolate mixture better. If you add it too soon, the filling can make the cake soggy. Allowing the cake to cool also helps maintain its structure. To make perfect whipped cream, aim for soft peaks. Start by whipping the heavy cream until it thickens. Then, add powdered sugar and vanilla extract. Keep whipping until the cream holds its shape but is still soft. Stabilizing your whipped cream is a smart move. You can do this by adding a bit of powdered sugar. This helps the cream hold its form longer, especially if you plan to serve the cake later. Avoid overmixing the batter. It might seem harmless, but it can ruin the cake's lightness. Remember, a gentle hand is best here. Don't forget to poke enough holes in the cake. These holes let the chocolate filling seep in. If you skip this step, the cake won’t be as rich and flavorful. Use the end of a wooden spoon or a fork for this task. Make sure the holes are deep enough to soak up all the goodness from the filling. For the Full Recipe, check out the complete instructions to create this delicious dessert! {{image_4}} You can easily customize your Death By Chocolate Poke Cake to suit your taste. One fun option is to add espresso powder. This gives a nice coffee flavor that pairs well with chocolate. Just mix in a tablespoon of espresso powder into your cake batter for a rich twist. Another option is to swap chocolate fudge with caramel. Using caramel adds a sweet, buttery taste. It creates a new layer of flavor that makes the cake even more special. Pour the caramel mixture over the cake to fill those holes. For those with dietary needs, you can make this cake gluten-free. Simply use a gluten-free chocolate cake mix. Most brands work well, and they taste great. You won’t miss the gluten at all. If you need a dairy-free version, switch the heavy cream with coconut cream. It whips up nicely and adds a light coconut taste. Also, use dairy-free chocolate fudge sauce for the filling. You can also create themed versions of this cake. For holiday cheer, try adding peppermint extract for Christmas. This gives a cool, minty flavor that pairs perfectly with chocolate. In the summer, consider adding fresh raspberries. They add a bright, fruity note that contrasts well with the rich chocolate. Just sprinkle them on top of the whipped cream for a pop of color and flavor. Feel free to explore these variations and make this dessert your own! For the full recipe, check out the Death By Chocolate Poke Cake section. To keep your Death By Chocolate Poke Cake fresh, store it in the fridge. Cover it with plastic wrap or aluminum foil. You can also use an airtight container. This helps keep the cake moist and tasty. The cool air in the fridge slows down spoilage. Make sure to eat it within a few days for the best flavor. If you want to save some cake for later, freezing is a great option. Cut the cake into individual slices. Wrap each slice tightly in plastic wrap. Then, place them in a freezer-safe bag or container. When you're ready to enjoy, take a slice out and let it thaw in the fridge. This keeps the cake from getting soggy. It’s best to eat the frozen cake within three months for the best quality. In the fridge, your cake will last about 4 to 5 days. Look for signs of spoilage like mold or an off smell. If the cake starts to look dry or tough, it’s time to toss it. Make sure to check it before each serving. Proper storage helps maintain the delicious taste of this rich dessert. For the full recipe, check out the cooking guide. If you don't have brewed coffee, don't worry! You can use milk or water instead. Milk will give a nice creaminess to the cake. Water will work too, but it might not add as much flavor. Yes, you can make this cake ahead of time! Bake it, poke holes, and add the filling. Then, cover it and store it in the fridge. You can whip the cream and add it just before serving. This way, your cake stays fresh and delicious. Want more chocolate? You can add chocolate chips to the batter. You can even use dark chocolate fudge sauce instead of regular. Another great option is to sprinkle cocoa powder over the whipped cream. These tips will make your cake even richer in flavor! For the perfect presentation, cut the cake into nice squares. Place each piece on a dessert plate. You can drizzle some extra chocolate fudge sauce around each slice. This makes it look fancy and even more tempting! For a pop of color, add fresh berries on the side. Enjoy! Death By Chocolate Poke Cake is a rich and joyful treat. We explored key ingredients, like chocolate cake mix, coffee, and sweetened condensed milk. I shared tips for perfect texture and common mistakes to avoid. Variations make it fun, with options for dietary needs and seasonal flavors. Lastly, proper storage keeps this cake fresh for longer. Enjoy your baking journey as you create this delightful dessert! Trust me, it’s worth it.

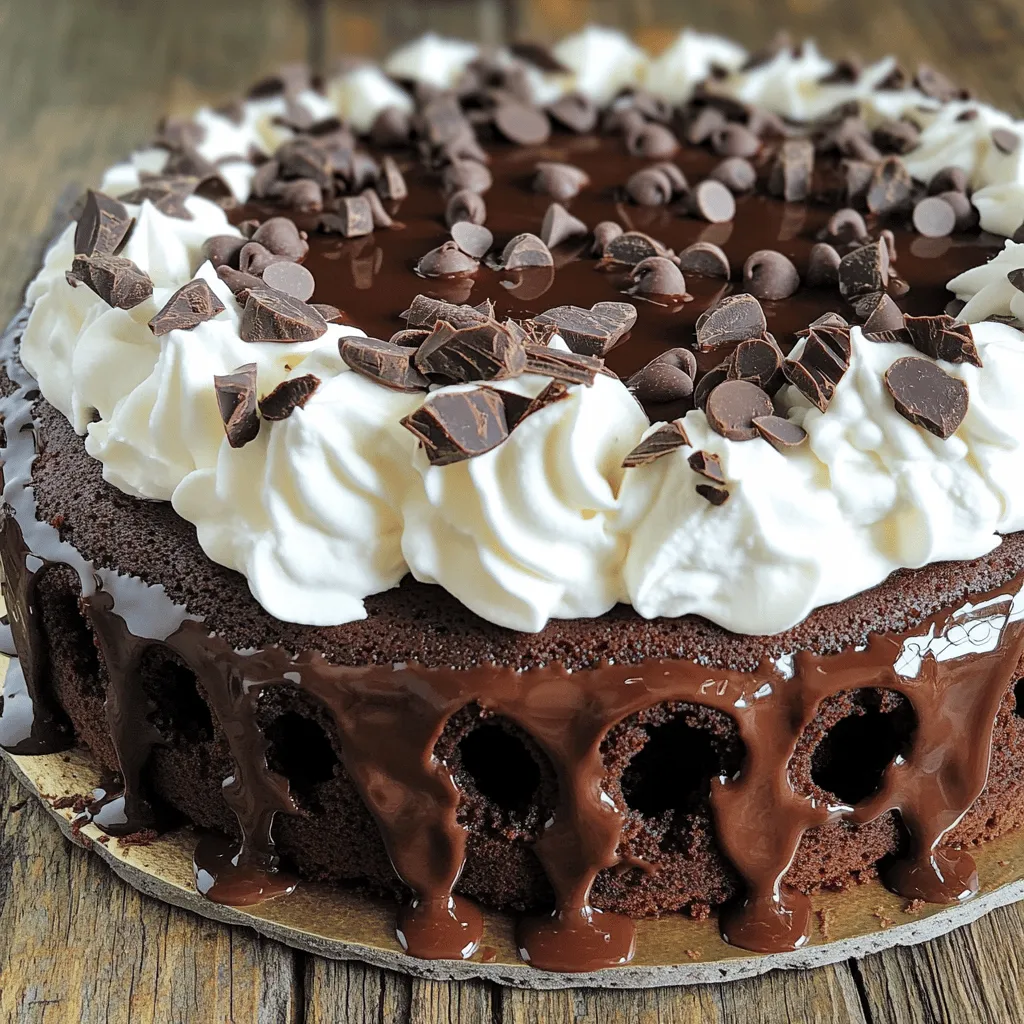
Are you ready to indulge in a dessert that’s pure chocolate heaven? Meet the Death By Chocolate Poke Cake, a treat that combines rich flavors and creamy toppings to create …

Read more

Categories Desserts Leave a comment

Blueberry Buttermilk Pancake Casserole Delightful Dish

May 22, 2025 by Chef Evan
- 2 cups all-purpose flour - 2 tablespoons sugar - 1 tablespoon baking powder - ½ teaspoon baking soda - ½ teaspoon salt - 2 large eggs - 2 cups buttermilk - 4 tablespoons unsalted butter - 1 teaspoon pure vanilla extract - 2 cups fresh blueberries - Powdered sugar (for dusting) - Maple syrup (for serving) To me, the ingredients are the heart of this dish. They come together to create magic. You can find most of these items in your kitchen. All-purpose flour gives the casserole its lovely base. Sugar adds a sweet touch. Baking powder and baking soda help it rise. Salt balances all the flavors. Next, the eggs and buttermilk create a rich batter. Buttermilk adds depth and moisture. If you don’t have buttermilk, mix milk with lemon juice. Melted butter gives a nice richness, while vanilla extract adds a warm flavor. Blueberries are the star here! They burst with flavor and color. You can use fresh or frozen ones. Just make sure they are plump and juicy. Don’t forget the powdered sugar for dusting and maple syrup for drizzling. These finishing touches will elevate your dish. They add sweetness and a beautiful look. For the full recipe, check out the complete instructions. You will love making this dish! - Preheat the oven to 350°F (175°C). This helps cook the casserole evenly. - Prepare a 9x13-inch baking dish by greasing it. Use cooking spray or butter. This makes it easy to serve. - In a large bowl, combine the dry ingredients: flour, sugar, baking powder, baking soda, and salt. Mix well with a whisk. This helps break up lumps. - In another bowl, crack the eggs and whisk them. Add buttermilk, melted butter, and vanilla extract. Mix until smooth. - Gradually pour the wet mixture into the dry ingredients. Stir gently with a spatula until just combined. A few lumps are okay; overmixing makes tough pancakes. - Fold in the blueberries gently. This ensures they stay whole and spread evenly. - Carefully transfer the batter into the prepared baking dish. Spread it evenly with a spatula. - Place the dish in the preheated oven and bake for 25 to 30 minutes. It's done when the top is golden brown. A toothpick inserted in the center should come out clean. - Once baked, remove the casserole and let it cool for about 5 minutes. This helps set the dish for cutting. - Cut the casserole into squares for serving. Dust with powdered sugar and drizzle with maple syrup. Enjoy this delightful dish! For the complete recipe, check out the Full Recipe section above. To make your casserole fluffy, avoid overmixing the batter. Mix just until the dry ingredients blend in. Lumps in the batter are okay! This keeps the pancakes light. Fresh blueberries are the best choice. They burst with flavor when baked. Frozen blueberries work too, but they can make the batter a bit watery. If you use frozen berries, make sure to thaw and drain them first. You can enhance the flavor by adding spices or extracts. A hint of cinnamon or nutmeg can make a big difference. You might also try a splash of almond extract for a nice twist. For extra texture, consider adding a crumble topping. A mix of oats, brown sugar, and butter can create a delightful crunch on top. When serving, pair the casserole with a dollop of whipped cream. This adds richness and creaminess to each bite. You can also serve fresh berries on the side. They add color and freshness. A drizzle of warm maple syrup is a must! It brings all the flavors together and makes each piece even more delicious. {{image_4}} You can swap the blueberries for other fruits. Strawberries are a sweet choice. Just slice them thinly and mix them in. Bananas work well too. They add a nice creamy texture. If you're feeling adventurous, try chocolate chips. The melty chocolate complements the pancake base perfectly. For those who need gluten-free options, use gluten-free flour. Look for a blend that works for baking. It will still taste great! You can also make this dish dairy-free. Use almond milk or oat milk instead of buttermilk. Coconut oil can replace the butter for a rich flavor. Add seasonal flavors to switch things up. In fall, a Pumpkin Spice variation will warm your heart. Just mix in pumpkin puree and pumpkin spice for a cozy dish. In summer, fresh lemon zest adds brightness. It gives a refreshing twist that pairs well with blueberries. For the full recipe, check out the Blueberry Buttermilk Pancake Casserole. To keep your leftover blueberry buttermilk pancake casserole fresh, follow these tips: - Refrigeration: Place the casserole in an airtight container. You can also cover it with plastic wrap. Store it in the fridge for up to 3 days. This helps keep the flavors and texture nice. - Freezing: If you want to save it longer, freeze it. Cut the casserole into squares and wrap each piece in plastic wrap. Then, place them in a freezer bag. It can stay good for up to 2 months. When you're ready, thaw it in the fridge overnight before reheating. For the best taste when reheating, follow these steps: - Oven Method: Preheat your oven to 350°F (175°C). Place the casserole in an oven-safe dish. Cover it with foil to keep it moist. Heat for about 15 to 20 minutes. Check that it is warmed through. - Microwave Method: Put a piece on a microwave-safe plate. Heat it for about 30 seconds. Check if it needs more time. Microwaves can heat unevenly, so be careful. After you reheat, drizzle more maple syrup on top. You can also add fresh fruit or whipped cream to make it even better. Enjoy your delicious leftovers! Can I make this casserole ahead of time? Yes, you can prepare the casserole the night before. Mix the dry and wet ingredients separately. Keep them in the fridge. The next morning, combine them and bake. This saves time and makes breakfast easier! How do I know when it's fully cooked? Check the casserole after 25 minutes. Insert a toothpick in the center. If it comes out clean, your casserole is done. You want a nice golden top, too. What can I serve with blueberry buttermilk pancake casserole? Serve it with whipped cream, fresh berries, or maple syrup. You can also add bacon or sausage for a hearty meal. Caloric content per serving Each serving has about 200 calories. This can vary based on your ingredients. Breakdown of key nutrients - Protein: 6g - Carbohydrates: 30g - Fat: 7g - Fiber: 1g Can I use whole wheat flour? Yes, you can swap all-purpose flour for whole wheat flour. This gives a nutty flavor and adds fiber. Alternatives for buttermilk and eggs For buttermilk, mix milk with lemon juice. For eggs, use applesauce or mashed bananas. Each serves as a binder and keeps it moist. You learned how to make a delicious blueberry buttermilk pancake casserole. We covered the complete ingredient list, step-by-step instructions, and helpful tips. You now know variations to try and how to store leftovers. This dish is flexible and perfect for any occasion. Whether you enjoy it for brunch or dessert, your family will love it. Try experimenting with fruits or flavors to make it your own. Enjoy your tasty creation!

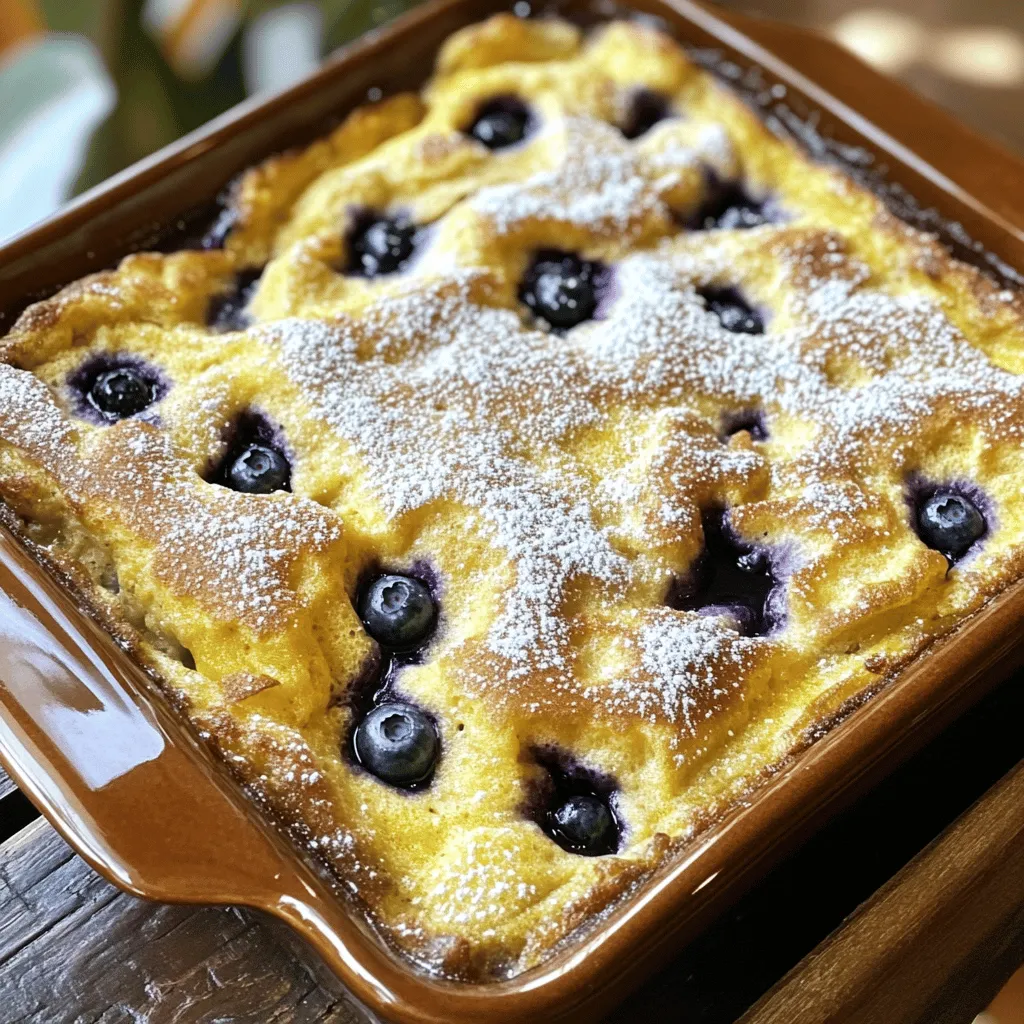
Looking for an easy and delicious breakfast? This Blueberry Buttermilk Pancake Casserole is the perfect solution! Bursting with juicy blueberries and fluffy buttermilk pancake goodness, this dish satisfies everyone at …

Read more

Categories Breakfast Leave a comment

Chewy French Toast Cookies Simple and Delicious Treat

May 22, 2025 by Chef Evan
- 1 cup all-purpose flour - 1 cup rolled oats - 1/2 teaspoon baking soda - 1/2 teaspoon ground cinnamon - 1/4 teaspoon salt - 1/2 cup unsalted butter, softened to room temperature - 1/2 cup packed brown sugar - 1/4 cup granulated sugar - 1 large egg - 2 tablespoons pure maple syrup - 1 teaspoon vanilla extract - 1/4 cup chopped pecans (optional) - 1/4 cup raisins (optional) Using fresh ingredients is key for great flavor. For the best taste, choose quality butter, pure maple syrup, and fresh eggs. If you want a gluten-free option, swap the all-purpose flour for a gluten-free blend. For a vegan twist, replace the egg with a flax egg and use vegan butter. This will change the texture slightly, but it still tastes good! Start by preheating your oven to 350°F (175°C). This helps the cookies bake evenly. Line a baking sheet with parchment paper. This keeps the cookies from sticking. In a medium bowl, mix the dry ingredients. Combine 1 cup of all-purpose flour, 1 cup of rolled oats, 1/2 teaspoon of baking soda, 1/2 teaspoon of ground cinnamon, and 1/4 teaspoon of salt. Whisk them well until they blend nicely. In a larger bowl, cream together 1/2 cup of softened unsalted butter, 1/2 cup of packed brown sugar, and 1/4 cup of granulated sugar. Use a hand mixer or whisk to beat until it’s light and fluffy. This step adds air to the mix, making the cookies soft. Next, add 1 large egg, 2 tablespoons of pure maple syrup, and 1 teaspoon of vanilla extract to the butter mixture. Mix well until everything is smooth and creamy. Now, gently add the dry mix to the wet mix. Stir just until combined. It’s okay if you see a few streaks of flour. Overmixing can lead to tough cookies. If you want, fold in 1/4 cup of chopped pecans and 1/4 cup of raisins. These add great texture and flavor. Scoop rounded balls of dough onto your baking sheet. Leave about 2 inches between each ball. This allows room for spreading. Flatten each ball slightly with a spoon or your fingers. Bake for 12-15 minutes. Watch for the edges to turn golden brown. The centers should still feel soft. This ensures they stay chewy. After baking, let the cookies cool on the baking sheet for about 5 minutes. This helps them set. Then, transfer them to a wire rack to cool completely. For serving, enjoy these cookies warm. A light dusting of powdered sugar makes them look pretty. You can drizzle some maple syrup on top for extra flavor. Pair them with coffee or cold milk for a perfect treat. For the complete recipe, check out the Full Recipe section above. To make your Chewy French Toast Cookies even better, add spices or extracts. Ground nutmeg or a hint of ginger can add warmth and depth. You can also try almond or maple extract for a unique twist. Always remember, do not overmix the dough. Mixing too much can make cookies tough. Stir just until the ingredients blend. A few flour streaks are okay; they will bake in nicely. For the best results, use quality kitchen tools. A heavy-duty mixing bowl helps you mix better. A good cookie scoop ensures even portions. Choose a sturdy cookie sheet and line it with parchment paper. This prevents sticking and helps cookies bake evenly. If you do not have parchment paper, you can grease the sheet lightly. Just make sure the cookies have room to spread while baking. {{image_4}} You can easily swap out some ingredients for your needs. If you want gluten-free cookies, use almond flour or gluten-free all-purpose flour instead of regular flour. For a nut-free version, skip the pecans or use sunflower seeds. If you have a sensitivity to oats, you can replace them with more flour or use ground flaxseed. Mix-ins can also change your cookies. Instead of raisins, try dried cranberries for a tart twist. You can add chocolate chips for a sweet kick or coconut flakes for a tropical flavor. These swaps keep the recipe fun and fresh! For a burst of flavor, add some orange or lemon zest to the dough. This brightens the taste and adds a nice aroma. You could also try different syrups. Swap maple syrup for honey or agave for a new flavor profile. Topping your cookies can be just as creative. A simple drizzle of icing made from powdered sugar and milk can add sweetness. If you want something richer, a cream cheese glaze works great too. Sprinkle some cinnamon sugar on top for an extra touch. These ideas make each batch unique and delicious! Be sure to check the [Full Recipe] for all the details to create your perfect chewy French toast cookies! To keep your Chewy French Toast Cookies fresh, store them in an airtight container. This method preserves their moisture and flavor. You can keep them at room temperature for up to five days. If you want them to last longer, refrigerate them. In the fridge, they will stay good for about two weeks. You can freeze both the dough and the baked cookies. To freeze the dough, scoop it into balls and place them on a baking sheet. Freeze until firm, then transfer to a freezer bag. The dough can last for up to three months. For baked cookies, let them cool completely. Then, layer them in an airtight container with parchment paper in between. They will stay fresh for about three months in the freezer. When you're ready to enjoy, thaw the dough overnight in the fridge. Bake them straight from the fridge for a warm treat. If you freeze baked cookies, heat them for a few minutes in the oven to restore their chewy texture. Enjoy your cookies just like they were fresh out of the oven! Chewy cookies get their texture from a few key factors. The right balance of ingredients plays a big role. Using more brown sugar than white sugar adds moisture and chewiness. Brown sugar has more moisture due to its molasses content. Also, adding an egg gives structure and a soft feel. When baking, the cookie dough should remain slightly undercooked in the center. This keeps the cookie soft and chewy. Yes, you can use different sweeteners in these cookies. Options include honey, agave syrup, or coconut sugar. Each sweetener will change the flavor a bit. For example, honey adds a floral note, while coconut sugar gives a caramel touch. Just remember that each sweetener has a different sweetness level. Adjust the amount to taste. If your cookies come out dry, don't worry. You can fix this in the dough. First, check the flour measurement; too much flour can cause dryness. You can also add a bit more butter or an extra egg. A splash of milk or cream works well too. If you realize your cookies are too dry after baking, enjoy them with a glass of milk. They will still taste great! For more details, refer to the [Full Recipe]. In summary, we covered key ingredients for delicious cookies, focusing on freshness and dietary options. I shared step-by-step instructions, from mixing the dough to baking, cooling, and serving. You learned tips to enhance flavor and texture, along with the best tools to use. We explored variations for dietary needs and creative toppings. Lastly, I provided storage tips to keep your cookies fresh. Enjoy experimenting and baking your perfect batch of cookies!

If you love cookies and breakfast, you’re in for a delight with Chewy French Toast Cookies! These treats blend the warm flavors of cinnamon and maple syrup into each chewy …

Read more

Categories Desserts Leave a comment

How to Make Chicken Taco Dip Flavorful and Easy

May 22, 2025 by Chef Evan
To make a tasty chicken taco dip, you need the right ingredients. Here’s what you’ll need: - 2 cups shredded cooked chicken - 1 cup cream cheese, softened - 1 cup sour cream - 1 packet taco seasoning - 1 cup shredded cheddar cheese - 1 cup black beans, rinsed and drained - 1 cup corn (canned or frozen) - 1 small red onion, finely chopped - 1 jalapeño, deseeded and minced (optional) - ½ cup fresh cilantro, chopped (for garnish) - Tortilla chips (for serving) Each ingredient adds its unique flavor and texture to the dip. The cream cheese and sour cream make it creamy. The taco seasoning gives that classic taste. Shredded chicken brings protein and heartiness to the mix. Black beans and corn add fiber and sweetness. Fresh cilantro gives a burst of color and flavor. Feel free to customize this list! You can add more cheese or skip the jalapeño if you prefer it milder. Just remember, the key to a great chicken taco dip is balance. You want each bite to be rich and flavorful. For the full recipe, check out the Chicken Taco Dip Delight. 1. Preheat your oven to 350°F (175°C). This step gets your oven ready for baking. 2. In a large bowl, combine one cup of softened cream cheese and one cup of sour cream. Use a hand mixer or whisk to blend them together until smooth. 3. Next, add one packet of taco seasoning to the cream mixture. Mix well to spread the flavor throughout. 4. Now, gently fold in the chicken, black beans, corn, finely chopped onion, and minced jalapeño if you like heat. Make sure everything is well combined for a tasty dip. 5. Transfer your mixture to a baking dish, about 9x9 inches. Smooth the top for even baking. 6. Sprinkle one cup of shredded cheddar cheese over the dip, covering it completely. 7. Place the dish in your preheated oven. Bake for 20-25 minutes until bubbly and the cheese melts beautifully. For the full recipe, check the ingredients and enjoy making this delicious dish! To make your chicken taco dip the best it can be, focus on texture. Start with softened cream cheese. This helps blend smoothly with sour cream. Whip them together well to avoid lumps. A smooth base is key to a creamy dip. To prevent sogginess, be mindful of moisture in your ingredients. Rinse and drain black beans well. If using frozen corn, make sure it’s thawed and dried off. This keeps the dip from getting too wet. No one likes a watery dip! When it comes to dipping options, tortilla chips are classic. They add a nice crunch and flavor. You can also use veggie sticks like carrots or celery for a fresh twist. This can make the dip feel lighter while still being delicious. For a beautiful presentation, serve the dip in the same baking dish. This keeps it warm and inviting. Add a colorful platter of tortilla chips around the dish. Garnish the dip with fresh cilantro or sliced black olives for pops of color. It makes the dish look more appealing and festive. Want to spice it up? Consider adding diced jalapeños or hot sauce. This will give your dip extra heat. You could also mix in some diced tomatoes for a fresh taste. For vegetarian options, swap out the chicken for more beans or lentils. You can also add extra veggies like bell peppers or zucchini. This keeps the dip hearty and satisfying while making it meat-free. {{image_4}} To make your chicken taco dip stand out, try adding unique seasonings. You can mix in smoked paprika for a smoky touch or cumin for warmth. A dash of lime juice can brighten the flavors. Experiment with your favorites! You can also switch up the cheese. Instead of cheddar, try pepper jack for heat or cream cheese for a richer dip. Mixing different cheeses adds depth and makes each bite exciting. For gluten-free options, use corn tortillas instead of regular chips. You can also check labels on your taco seasoning to ensure it’s gluten-free. For a dairy-free version, substitute cream cheese and sour cream with cashew cream or a dairy-free yogurt. These swaps keep the dip creamy while fitting different diets. If you’re watching carbs, try using cauliflower instead of beans. You can also skip the corn or use less to cut down on carbs. This way, you can enjoy the dip without the guilt! Using fresh, seasonal ingredients can elevate your dip. In summer, add diced tomatoes or fresh corn for sweetness. In fall, roasted pumpkin or butternut squash can give a warm flavor. Fresh herbs, like basil or dill, can also brighten up the dish. Get creative with seasonal flavors! You could add diced apples in autumn or fresh mango in summer for a sweet twist. Your chicken taco dip can change with the seasons and always taste fresh and new. To keep your chicken taco dip fresh, store it in an airtight container. This helps prevent drying out. Place it in the fridge as soon as you finish eating. It will last for about 3 to 5 days. Make sure to check for any signs of spoilage before eating. You can reheat the dip in the microwave or oven. For the microwave, put it in a bowl and heat it for 1 to 2 minutes. Stir it halfway through for even heating. If you prefer the oven, set it to 350°F (175°C). Bake for about 10 to 15 minutes, until it's hot throughout. This method helps keep the dip's texture nice and creamy. To freeze the dip, place it in a freezer-safe container. Make sure to leave some space at the top for expansion. It can last for up to 2 months in the freezer. When you're ready to eat it, move it to the fridge for 24 hours to thaw. For the best flavor, reheat it in the oven after thawing. This method ensures you enjoy every bite of your chicken taco dip. It takes about 15 minutes to prep chicken taco dip. The total time is around 30 minutes, including baking. This means you can have a tasty snack ready in no time. Yes, you can make chicken taco dip ahead of time. Mix all the ingredients and put them in a baking dish. Cover the dish and put it in the fridge. You can bake it later when you are ready to serve. This makes it easy for parties or family gatherings. You can serve chicken taco dip with many tasty options. Here are some popular choices: - Tortilla chips - Sliced veggies like carrots and cucumbers - Pita chips - Crackers - Fresh guacamole or salsa on the side These options make your dip even more fun to enjoy! Yes, you can easily swap the chicken for other proteins. Here are some tasty ideas: - Ground beef or turkey - Shredded rotisserie chicken - Black beans for a vegetarian option - Tofu for a plant-based choice These swaps keep the dip delicious and cater to different diets. For the full recipe, check the section above! This article covered the easy and fun recipe for chicken taco dip. You learned about the key ingredients and how to prepare them step by step. We explored tips for perfecting texture and suggested ways to customize your dip. Storing and reheating your dip was also highlighted. Remember, you can get creative with flavors or make it vegetarian. Enjoy your cooking, and impress your friends with this tasty dip!

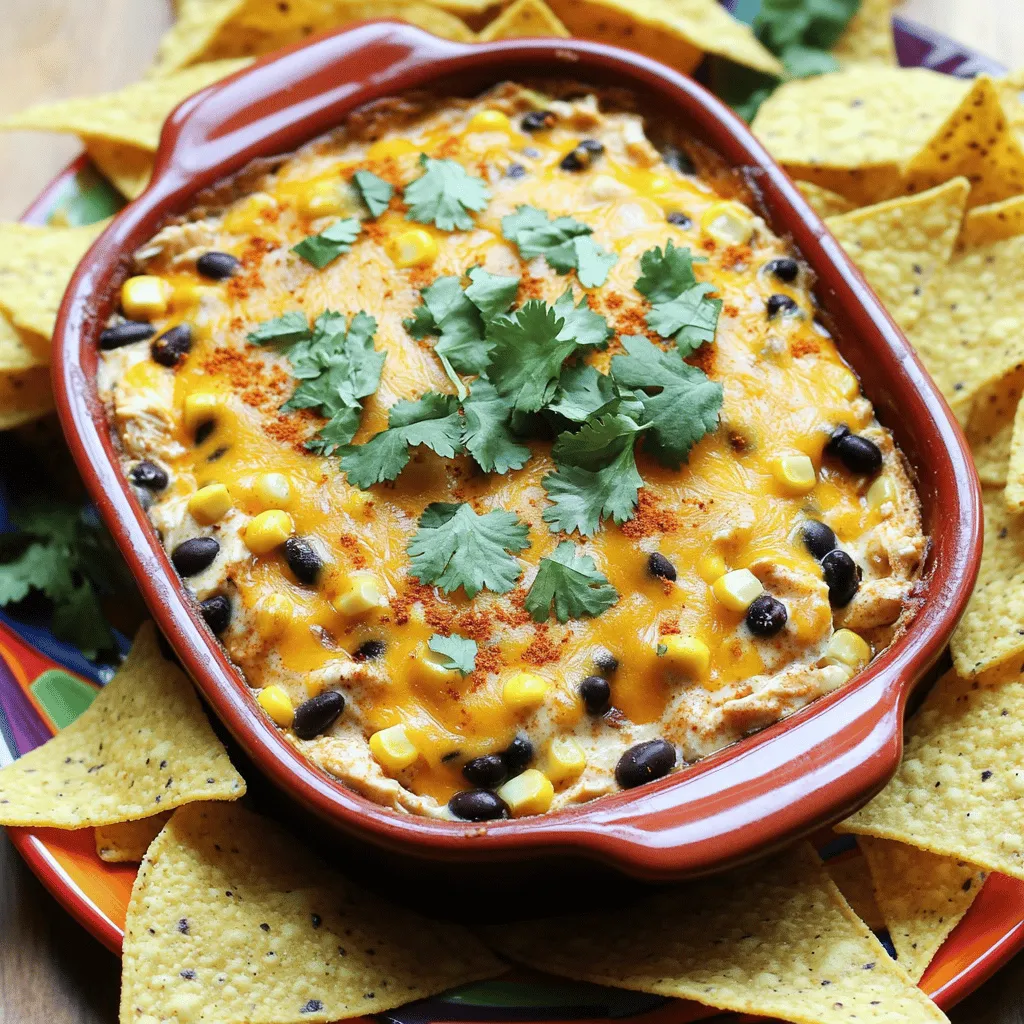
Do you love bold flavors and easy recipes? Then you’re in the right place! In this guide, I’ll show you how to make chicken taco dip that’s both flavorful and …

Read more

Categories Appetizers Leave a comment

Fresh Blueberry Brownies Irresistibly Delicious Treat

May 22, 2025 by Chef Evan
Fresh blueberries are the star of this recipe. They give the brownies a burst of flavor. You need 1 cup of fresh blueberries. Make sure to rinse them gently and pat them dry. This keeps them plump and juicy in your brownies. The dry mix creates the brownie base. Here’s what you need: - 1/2 cup unsweetened cocoa powder - 1/2 cup all-purpose flour - 1/2 cup granulated sugar - 1/4 cup packed brown sugar - 1/2 teaspoon baking powder - 1/4 teaspoon salt Mix these dry ingredients well. This helps the flavors blend perfectly in your brownies. The wet ingredients add moisture and richness. For this recipe, gather: - 2 large eggs, at room temperature - 1/3 cup unsalted butter, melted and slightly cooled - 1 teaspoon pure vanilla extract Whisk these together until smooth. This step is key for creamy brownies. Add-ins can take your brownies to the next level. Consider these: - 1/4 cup chopped walnuts (for added crunch) - Powdered sugar for dusting (for a sweet touch) Feel free to get creative! These options can add texture and flavor to your brownies. For the full recipe, check the earlier section. Start by preheating your oven to 350°F (175°C). This step is key for even baking. Next, take an 8x8-inch baking pan. Grease it lightly or line it with parchment paper. This makes it easy to remove the brownies later. In a medium bowl, whisk together the dry ingredients. Combine 1/2 cup of cocoa powder, 1/2 cup of flour, 1/2 teaspoon of baking powder, and 1/4 teaspoon of salt. Whisk until everything is well mixed. This step ensures that the leavening agent is evenly distributed. Next, grab a larger bowl. Whisk together 1/2 cup of granulated sugar, 1/4 cup of brown sugar, and 1/3 cup of melted butter. Add 2 large eggs and 1 teaspoon of vanilla extract. Mix until smooth and creamy. This shows that the sugars and eggs are well blended. Now, it's time to fold in the fresh blueberries. Add 1 cup of gently rinsed blueberries and 1/4 cup of chopped walnuts if you like. Be gentle when mixing to keep the blueberries whole. They will burst with flavor while baking. Pour the batter into your prepared baking pan, spreading it evenly. Bake for 25-30 minutes. To check if they are done, insert a toothpick into the center. It should come out mostly clean with a few moist crumbs. This means your brownies are fudgy and perfect. When the brownies are done, take them out of the oven. Let them cool in the pan for about 10 minutes. Then, transfer them to a wire rack to cool completely. Once cool, cut them into squares. For a special touch, dust the top with powdered sugar. Enjoy these treats with fresh blueberries or a scoop of ice cream for extra delight! For the full recipe, check out the detailed steps above. Choose fresh blueberries that are firm, plump, and dark blue. Avoid any with wrinkles or soft spots. You want sweet and juicy berries for perfect brownies. Look for berries with a silvery bloom; this shows freshness. If possible, buy organic to avoid pesticides. Rinse them gently before use to keep their shape. To get that perfect brownie texture, mix the wet and dry ingredients carefully. Overmixing can lead to tough brownies. You want a fudgy center, so bake until a toothpick shows a few moist crumbs. Always check around the 25-minute mark. Letting the brownies cool in the pan helps set their texture, making them easier to cut later. Store leftover brownies in an airtight container at room temperature. They stay fresh for up to three days. For longer storage, wrap them tightly and freeze. When ready to eat, thaw them overnight in the fridge. You can also reheat them in the microwave for a few seconds for that fresh-baked taste. Enjoy your brownies with a sprinkle of powdered sugar on top! {{image_4}} You can switch fresh blueberries for other berries. Raspberries, strawberries, or blackberries all work well. Each berry brings its own flavor. Raspberries add a tart kick, while strawberries give a sweet touch. Mixing berries can create a fun, colorful treat. Just make sure to adjust the amount to match the recipe for best results. If you want a gluten-free version, swap all-purpose flour for almond flour or coconut flour. These options give a nutty flavor and keep the brownies moist. You can also reduce sugar by using ripe bananas or unsweetened applesauce. Both choices keep the brownies sweet while adding nutrients. You can adjust the recipe for allergies. For egg-free brownies, use flaxseed meal or applesauce as a substitute. If you have nut allergies, skip walnuts or use seeds like sunflower seeds instead. These swaps keep the brownies safe for everyone without losing taste. Try these variations to make the recipe your own and keep it fun. For the full recipe, check the detailed instructions above. To keep your fresh blueberry brownies tasty, store them in an airtight container. This helps keep them moist and soft. Place parchment paper between layers if you stack them. Store them at room temperature for up to three days. If you want to keep them longer, refrigeration works, but it may change their texture slightly. If you want to freeze your brownies, let them cool completely first. Wrap each brownie tightly in plastic wrap, then place them in a freezer bag. Label the bag with the date. These brownies can last up to three months in the freezer. When you're ready to eat them, thaw them in the fridge overnight or let them sit at room temperature for a few hours. To reheat brownies, use a microwave. Place a brownie on a microwave-safe plate. Heat it for about 10-15 seconds. Check to see if it’s warm enough. If you prefer, you can also reheat them in an oven. Preheat the oven to 350°F (175°C) and heat for about 5-10 minutes. This method keeps the brownies nice and moist. For a warm treat, serve them with a scoop of vanilla ice cream. Enjoy your delicious treats! Yes, you can use frozen blueberries. Just make sure to thaw and drain them first. This keeps your brownies from becoming too soggy. Using frozen blueberries may change the texture slightly. They might burst more than fresh ones, which can create a fun swirl effect. Check your brownies after 25 minutes of baking. Insert a toothpick into the center. If it comes out with a few moist crumbs, they are done. If the toothpick is wet with batter, bake for a few more minutes. Remember, the brownies will continue to cook a bit after you take them out. Blueberry brownies pair well with many things. Try serving them with a scoop of vanilla ice cream or whipped cream. Fresh blueberries on top add color and taste. A light dusting of powdered sugar makes them look fancy, too. You could even serve them with coffee or tea for a cozy treat. To boost the chocolate flavor, add more cocoa powder. You can also mix in chocolate chips. Dark chocolate chips give a rich taste. Another option is to use a dark cocoa powder. This adds depth without changing the recipe much. Just remember to keep the balance. You learned how to bake delicious blueberry brownies today. We covered fresh blueberries, dry and wet ingredients, and some optional add-ins. I shared step-by-step instructions to ensure success. You now have tips for choosing the best blueberries and variations for different diets. Remember the right storage methods to keep your brownies fresh. Enjoy experimenting with flavors and textures. Trust your skills, and make these brownies your own. Happy baking!

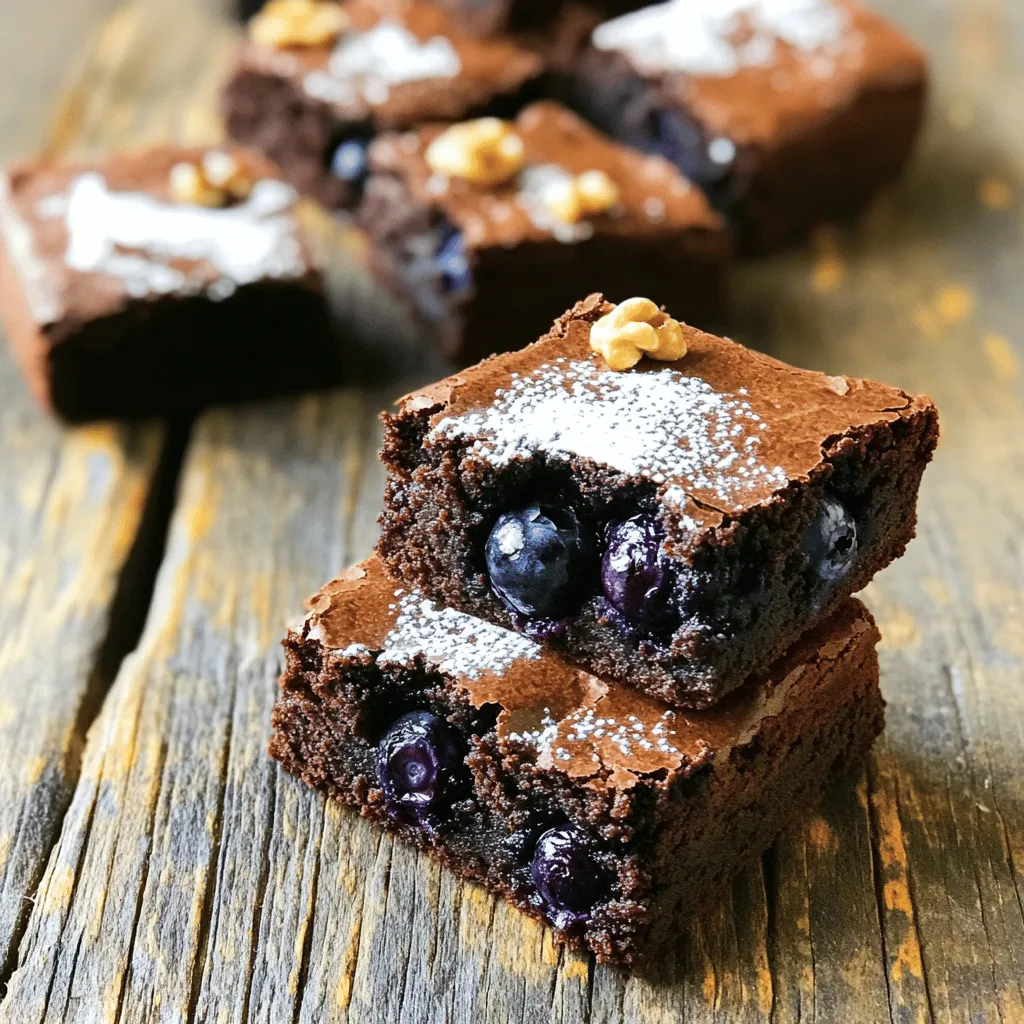
Are you ready to try something deliciously new? These Fresh Blueberry Brownies are a tasty twist on the classic. Packed with juicy blueberries, they offer a burst of flavor you’ll …

Read more

Categories Desserts Leave a comment
Older posts
Newer posts
← Previous Page1 … Page85 Page86 Page87 … Page124 Next →

TOSSED FLAVORS

Where flavors are fresh, vibrant, and ready to toss! 🥗

PAGES

Home About Contact Privacy Policy Terms & Conditions Cookie Policy GDPR Policy Copyright Policy Disclaimer

CATEGORIES

Appetizers Desserts Salads Breakfast Dinner

Contact

  • Pinterest
  • Mail
Copyright © 2026 Tossed Flavors. All rights reserved.