Tater Tot Breakfast Bowl Delightful Morning Meal
![When making a Tater Tot Breakfast Bowl, you'll need some key ingredients. Here’s what you should gather: - 4 cups frozen tater tots - 4 large eggs - 1 cup cooked breakfast sausage, crumbled - 1 cup shredded cheddar cheese - 1/2 cup diced bell peppers (mix of red, yellow, and green) - 1/4 cup finely chopped green onions - 1/2 teaspoon garlic powder - 1/2 teaspoon paprika - Salt and freshly ground black pepper, to taste - 1/4 cup sour cream (for serving) - Fresh cilantro or parsley for garnish (optional) These ingredients create a warm and hearty meal. The tater tots give crunch, while the eggs and sausage offer protein. The cheese adds creaminess, and the veggies bring color and flavor. This dish is fun to make and even better to eat. Check the [Full Recipe] for exact steps and tips! - Preheat the oven to 425°F (220°C). - Spread tater tots in a single layer on a baking sheet. - Bake for 25-30 minutes, flipping halfway. I love starting with the tater tots because they add a crunchy base. Make sure they are spread out. This helps them cook evenly. When they come out golden brown, they will look amazing! - Heat a non-stick skillet over medium heat. - Add diced bell peppers and sauté for 3-4 minutes. While the tater tots bake, I cook the veggies. The bell peppers add color and flavor. I stir them gently so they do not stick. The smell is mouthwatering as they soften. - Introduce crumbled sausage to the skillet. - Prepare the egg mixture with seasoning and cook. Next, I add crumbled sausage to the skillet. It cooks for about 4-5 minutes. This step mixes the sausage flavors with the veggies. In a bowl, I whisk the eggs with garlic powder and paprika. I pour this into the skillet and stir until the eggs are fluffy and cooked. - Layer baked tater tots with scrambled egg mixture. - Add cheddar cheese on top to melt. Once the tater tots are ready, it’s time to build the bowl. I place the crispy tater tots at the bottom. Then, I spoon the egg and sausage mix on top. Finally, I sprinkle the shredded cheddar cheese. As it melts, the bowl looks so inviting. For the full recipe, check out the complete details to get started on this delightful morning meal! To make great tater tots, spread them out. Avoid crowding the baking sheet. This helps them cook evenly. For an extra crispy finish, broil them for a few minutes at the end. Just watch closely so they do not burn. For fluffy scrambled eggs, whisk them well. Mix air into the eggs for a light texture. Cook them on low heat, stirring gently. This keeps them soft and moist. Overcooking can make them dry, so stay alert while cooking. Garnish your bowl with green onions and sour cream. This adds flavor and color. You can add fresh herbs like cilantro or parsley for a pop of freshness. For drinks, consider coffee, juice, or herbal tea. They pair well with the meal. {{image_4}} You can make your Tater Tot Breakfast Bowl even better with some fun twists. Here are some ideas to try. - Substitute sausage with plant-based alternatives. Options like tempeh or veggie sausage work great. - Add more veggies like spinach or mushrooms. These add flavor and nutrition to your meal. - Swap cheddar with other cheeses like feta or mozzarella. Both melt nicely and add unique flavors. - Consider dairy-free options like nutritional yeast or vegan cheese for a creamy taste. - Experiment with different herbs or sauces. Try fresh basil, cilantro, or a spicy sauce for a kick. - Ideas for spicy twists include jalapeños or hot sauce. These can make your breakfast bowl extra exciting. Explore these variations to create your perfect bowl. You can mix and match to find what you love! Check out the Full Recipe for more ideas. To keep your Tater Tot Breakfast Bowl fresh, store leftovers in the fridge. Use airtight containers to prevent moisture loss. Place the bowl in the fridge within two hours of cooking. This helps keep your breakfast safe and tasty. Enjoy the leftovers within three days for the best flavor. Yes, you can freeze the Tater Tot Breakfast Bowl! To freeze, let the bowl cool completely. Divide it into portions and place them in freezer-safe containers. Seal them tightly to avoid freezer burn. When ready to eat, thaw in the fridge overnight before reheating. To reheat without losing texture, use the oven. Preheat your oven to 350°F (175°C). Place the bowl in an oven-safe dish. Cover it with foil to keep it moist. Heat for about 20 minutes. You can also use a microwave for quick reheating. Microwave on medium power for 2-3 minutes, stirring halfway through. Enjoy your meal warm and delicious! To make a Tater Tot Breakfast Bowl, first, preheat your oven to 425°F. Spread frozen tater tots on a baking sheet. Bake them for 25-30 minutes until crispy. While they bake, sauté diced bell peppers in a skillet. After a few minutes, add crumbled breakfast sausage. Cook until the sausage is warm. Whisk eggs with garlic powder and paprika, then pour this mix into the skillet. Stir until the eggs are fluffy. Layer baked tater tots with the egg mixture and top with cheese. Serve warm with sour cream and green onions. You can find the full recipe above. Yes, you can prepare parts of this bowl in advance. Bake the tater tots and cook the sausage and peppers a day before. Store them in the fridge. In the morning, just reheat them and scramble the eggs fresh. You can also layer everything in bowls and keep them in the fridge. Just warm them up when you're ready to eat. If you need an egg substitute, you have options. You can use tofu, flaxseed meal, or chickpea flour. Silken tofu works well when blended for a creamy texture. Flaxseed meal mixed with water can mimic eggs in scrambles. For a quick option, use chickpea flour mixed with water to create a batter. These options allow you to enjoy the bowl without eggs. To adjust the spice level, add more paprika or some cayenne pepper. If you like mild flavors, keep it simple with garlic powder and salt. For those who enjoy heat, consider adding jalapeños or hot sauce. Start small, taste, and add more until you find your perfect spice balance. Yes, this recipe is great for meal prepping! You can batch cook the tater tots, sausage, and peppers. Store them in separate containers in the fridge. When ready to eat, just reheat and add fresh eggs. This way, you have a quick and tasty breakfast ready to go all week. The Tater Tot Breakfast Bowl is a tasty and easy meal. We covered all the key ingredients and steps, from baking tater tots to making fluffy scrambled eggs. Don't forget the tips for crispiness and cool variations to suit your tastes. This dish is versatile and fun. You can make it faster or customize it any way you like. Give it a try; it’s a meal your whole family will love. Enjoy your cooking and the delicious results!](https://tossedflavors.com/wp-content/uploads/2025/05/dce2a502-6d3e-4308-9035-7cef890a10de.webp)
Start your day right with a Tater Tot Breakfast Bowl, a delightful morning meal that combines crispy tater tots with fluffy eggs, savory sausage, and fresh veggies. This dish is …
Start your day right with a Tater Tot Breakfast Bowl, a delightful morning meal that combines crispy tater tots with fluffy eggs, savory sausage, and fresh veggies. This dish is …

Get ready to elevate your snack game with my Philly Cheesesteak Stuffed Cheesy Breadsticks Delight! Imagine tender ribeye, sautéed onions, and melted cheese wrapped in warm pizza dough. This treat …
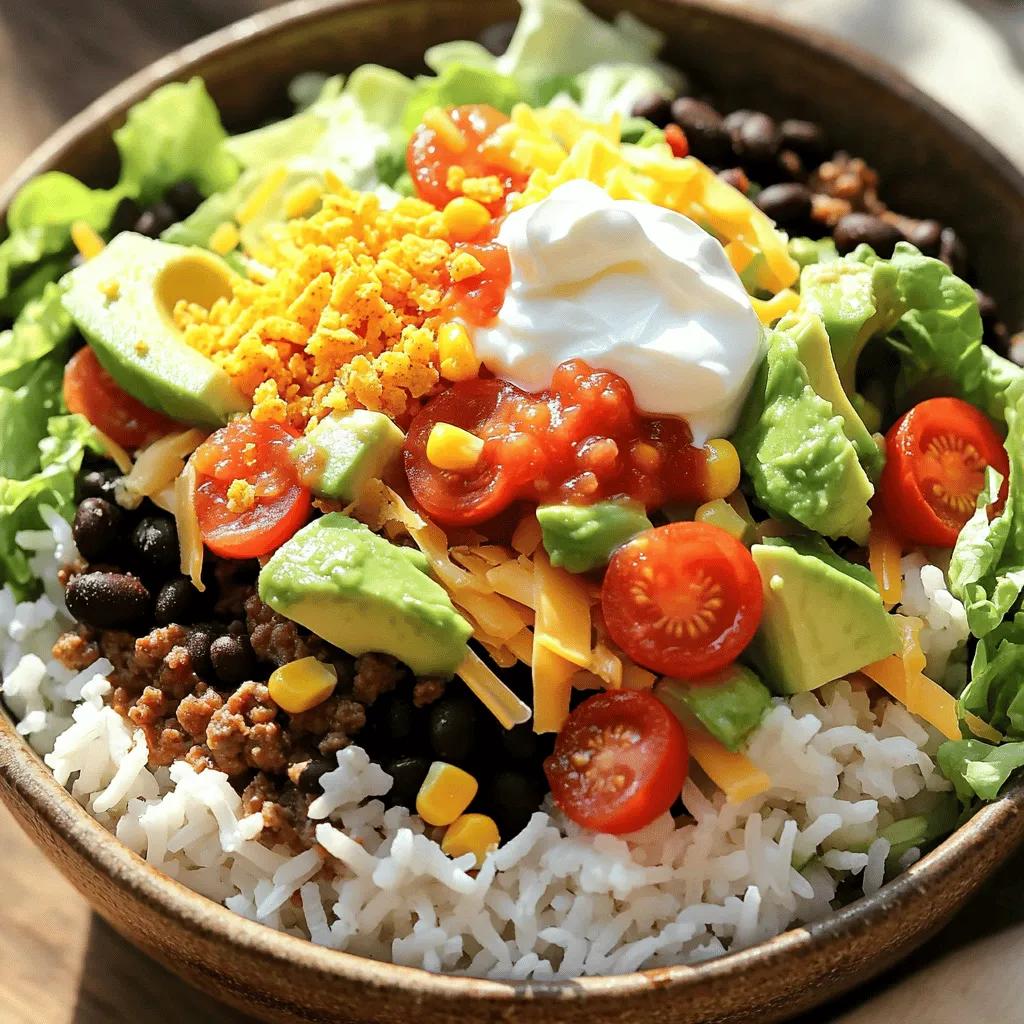
Craving a fun and tasty meal? Let’s dive into making a Taco Rice Bowl with Doritos! This easy recipe mixes bold flavors with crunchy chips, perfect for any weeknight dinner. …

Looking for a new twist on breakfast or snacks? You’re in the right place! These Cornbread Waffle Bites with Honey Butter Syrup are not only tasty but also easy to …
![- 1 lb salmon fillet, skin removed, cut into cubes - ½ cup cornstarch - 1 large egg - 1 teaspoon garlic powder - 1 teaspoon smoked paprika - ½ teaspoon salt - ½ teaspoon black pepper - ½ cup creamy mayonnaise - 2 tablespoons sweet chili sauce - 1 tablespoon sriracha - 1 teaspoon fresh lime juice - 1 teaspoon honey You need fresh salmon for this recipe. Look for a nice fillet that is bright and firm. Cut it into bite-sized cubes. This will help them cook evenly. The cornstarch gives the salmon a nice crunch. It helps create a golden crust when you fry the bites. Pair the cornstarch with garlic powder, smoked paprika, salt, and black pepper for flavor. This mixture makes each bite tasty and exciting. You will also need one egg. It acts as a glue. It helps the cornstarch stick to the salmon. For the Bang Bang sauce, you want creamy mayonnaise as your base. The sweet chili sauce adds a hint of sweetness. Sriracha brings heat, so adjust it based on your taste. Fresh lime juice and honey round out the sauce with brightness and balance. This simple mix of ingredients makes the dish fun and flavorful. For the full recipe, check the section above. Start by mixing your sauce. Combine mayonnaise, sweet chili sauce, sriracha, lime juice, and honey in a bowl. Use a whisk to blend everything until smooth. If you want more spice, add a bit more sriracha. Set the sauce aside to let the flavors mix. In another bowl, mix cornstarch, garlic powder, smoked paprika, salt, and black pepper. Make sure to stir well so the spices spread evenly. Next, get your beaten egg ready for dipping. You want it in a separate bowl to make coating easier. Take each salmon cube and dip it into the beaten egg. Let any extra egg drip off. Then, coat the salmon cube in the cornstarch mixture. Make sure each piece is fully covered. Once coated, place the salmon bites on a plate and set them aside for frying. Heat vegetable oil in a large skillet. You need enough oil to cover the bottom by about half an inch. Wait until the oil shimmers, showing it is hot enough. Carefully add the salmon cubes to the hot oil in batches. Fry them for 2-3 minutes on each side until they turn golden brown. Once cooked, take them out and drain on a paper towel. Arrange your crispy salmon bites on a serving platter. Drizzle the Bang Bang sauce over them generously. For a nice touch, add chopped green onions or sesame seeds on top. Enjoy your tasty Bang Bang Salmon Bites! For the complete recipe, visit the [Full Recipe]. - Ensure the oil is hot enough before frying. Hot oil gives a crispier bite. - Avoid overcrowding the skillet for even cooking. Cook in batches to keep the temperature steady. - Experiment with additional spices in the cornstarch mixture. Try adding cayenne or onion powder. - Adjust sriracha for desired spiciness. Start with a little and add more if you like heat. - Pair with a side salad or rice. Fresh greens balance the rich salmon flavor. - Offer extra Bang Bang sauce for dipping. It adds excitement and flavor to each bite. For the full recipe, check out the [Full Recipe]. {{image_4}} Healthy alternatives can make this dish even better. You can easily bake the salmon bites instead of frying them. Baking cuts down on extra oil and still gives you a tasty treat. Another option is to use almond flour instead of cornstarch. This swap makes the dish gluten-free and just as crispy. When it comes to flavor variations, you can jazz up the sauce. Adding lime zest brings a fresh, zesty kick that brightens every bite. You can also mix in fresh herbs like cilantro or parsley. These herbs add color and flavor, making your dish pop. Ingredient swaps can lead to fun new dishes. Instead of salmon, try using shrimp or chicken for a different protein. Each option works great with the Bang Bang sauce. For a lighter touch, you can swap out the creamy mayonnaise for yogurt. This change gives a tangy flavor while cutting calories. With these variations, you can tailor the recipe to fit your taste. Enjoy the process of exploring new flavors and ingredients! For the full recipe, check out the section above. Store any leftover Bang Bang salmon bites in an airtight container. This keeps them fresh and tasty. You should eat them within 2-3 days for the best flavor. You can freeze uncooked, coated salmon bites for later. Lay them out in a single layer on a baking sheet. Once frozen, transfer them to a freezer bag. This method keeps them from sticking together. When you're ready to enjoy them, reheating is easy. For crispiness, use the oven. If you want a quick option, the microwave works fine too. Just remember to check that they’re hot all the way through. Yes, you can coat the salmon ahead and fry just before serving. This saves time and helps you enjoy more moments with your guests. Just keep the coated salmon in the fridge until you are ready to cook. You can pair these bites with rice, salads, or enjoy them as a finger food appetizer. They are great for parties or casual dinners. You can also serve them with extra Bang Bang sauce for dipping, which adds an even tastier touch. The spice level can be adjusted by varying the amount of sriracha used. If you prefer mild, start with less sriracha. For more heat, add more. This way, you can make it just right for your taste buds. Yes, it can be made ahead of time and stored for easy meals. You can prepare the sauce and the salmon bites. Then, just fry them when you are ready to eat. This makes dinner quick and simple on busy nights. Yes, but thaw completely before cooking for best results. Frozen salmon can work well, just be sure to pat it dry before coating. This ensures the batter sticks nicely during frying, giving you that perfect crunch. This blog covered how to make Bang Bang Salmon Bites from scratch. We discussed the main ingredients, seasonings, and the delicious Bang Bang sauce. You learned step-by-step instructions for preparing, coating, and frying the salmon. Plus, we shared helpful tips, serving ideas, and healthy variations. You now have a fun and tasty recipe that’s great for any occasion. Get creative with flavors or serving methods to make it your own! Enjoy your cooking adventure!](https://tossedflavors.com/wp-content/uploads/2025/05/555dbae0-10d2-436b-8f00-04f2993c61a0.webp)
If you’re craving a quick and tasty dish, you’ll love these Easy Bang Bang Salmon Bites! With just a few simple ingredients, you can whip up an appetizer or main …
![- 1 lb ground beef - 1 cup shredded sharp cheddar cheese - 1 cup shredded mozzarella cheese - 1 tablespoon garlic powder - 1 teaspoon onion powder - 1 teaspoon salt - 1 teaspoon black pepper - 1 can (16 oz) refrigerated biscuit dough - 1/2 cup grated parmesan cheese - 2 tablespoons fresh parsley, chopped (for garnish) - 1 tablespoon olive oil The ingredients are key to making these Garlic Parmesan Cheeseburger Bombs delicious. You want to start with fresh ground beef. It gives a rich flavor and juicy texture. I recommend sharp cheddar and mozzarella cheese for that gooey, melty goodness. For the seasonings, garlic powder adds a strong kick. Onion powder enhances the taste without being too sharp. Salt and black pepper bring out the flavors of the beef and cheese. Every bite should be packed with flavor. The biscuit dough is the outer layer that holds everything together. It’s soft and flaky, making it perfect for these bombs. Grated parmesan on top adds a nice crust as it bakes. Fresh parsley is your finishing touch. It brings color and a hint of freshness. For the full recipe, you can check the earlier section. It lists the steps to bring all these great ingredients together. Enjoy creating this tasty treat! - Preheat oven to 375°F (190°C). - Mix ground beef, sharp cheddar, mozzarella, garlic powder, onion powder, salt, and black pepper in a bowl. Start by turning on your oven. This step is key for the best cooking results. Then, in a large mixing bowl, combine all your ingredients. I like to use my hands to mix everything well. This ensures the meat is evenly coated with the spices and cheese. - Separate and flatten biscuit dough circles. - Fill each circle with the cheeseburger mixture. Next, open the can of biscuit dough. Carefully pull apart each biscuit. Place them on a clean surface. Use your hands or a rolling pin to flatten each biscuit into a circle about 4 inches wide. After that, scoop a generous tablespoon of the cheeseburger mix into the center of each circle. - Sear stuffed biscuit balls in heated olive oil. - Bake in the oven for 15-18 minutes. Heat olive oil in a skillet over medium heat. Once it is hot, add the stuffed biscuit balls. Sear them for about 2 minutes on each side until they turn golden brown. After searing, place the bombs on a baking sheet lined with parchment paper. This helps with easy cleanup. Sprinkle parmesan cheese on top before baking. Bake them in the oven for 15 to 18 minutes. They will be golden brown and delicious when done. For the full recipe, check the section above. To make sure your bombs stay sealed, pinch the edges tightly. This step is key. You want to avoid any filling leaking out while cooking. Use your fingers to fold the dough over the filling. It helps to create a strong seal. For flattening the biscuit dough evenly, use a rolling pin. Make each circle about 4 inches wide. If you don't have a rolling pin, you can use your hands. Just press the biscuit down gently. Aim for even thickness. To boost the flavor, consider adding spices. A pinch of paprika or cayenne adds heat. You can also mix in some chopped green onions for extra taste. These small changes make a big difference. For dipping sauces, ranch or barbecue sauce works well. You can even try a spicy mayo. These sauces complement the cheeseburger flavors nicely. Ovens can vary, so check your bombs often. If your oven runs hot, lower the temperature slightly. This way, you avoid burning the outside while the inside cooks. To prevent overcooking, keep an eye on the time. Use a meat thermometer to check doneness. The center should reach 160°F (70°C). This keeps your cheeseburger bombs juicy and tasty. For the [Full Recipe], follow all the steps carefully. Enjoy your cooking! {{image_4}} You can change the cheese for a new twist. Try using pepper jack for some heat. Feta adds a tangy kick. Cream cheese gives it a creamy texture. If you want a vegetarian option, use plant-based meat. It works just as well in this recipe. You can keep the same seasonings for great flavor. To boost the flavor, add spices like paprika or cayenne. Paprika gives a smoky taste, while cayenne adds heat. You can also try fresh herbs. Chopped basil or oregano can make it taste fresh and bright. Mixing in some chopped green onions can add a nice crunch too. These cheeseburger bombs pair well with many sides. Serve them with crispy fries for a classic combo. A fresh salad can lighten up the meal. You can also use them as appetizers at a party. Place them on a platter with dipping sauces. Try ranch, ketchup, or spicy mustard for extra fun. For a colorful touch, garnish them with fresh parsley before serving. For the full recipe, check out the section above. To keep your cheeseburger bombs fresh, use airtight containers. Glass or plastic containers work well. Place the bombs inside and seal them tight. In the fridge, they last about three days. If you want them to last longer, you can freeze them. In the freezer, they can stay good for up to three months. The best way to reheat the bombs is in the oven. Preheat it to 350°F (175°C). Place the bombs on a baking sheet and cover them with foil. Heat for about 10-15 minutes. This method keeps them crispy and warm. You can also use a microwave, but they may get soggy. If you use a microwave, heat for 30-60 seconds at a time. If you want to freeze uncooked cheeseburger bombs, place them on a baking sheet first. Freeze them for about one hour until firm. Then, transfer them to a freezer bag. For cooked bombs, let them cool completely before freezing. Use a freezer-safe container or bag. To thaw, you can leave them in the fridge overnight. If you need them fast, use the microwave. Just make sure to check them often. Enjoy your Garlic Parmesan Cheeseburger Bombs later with ease! For the full recipe, check above. Yes, you can make cheeseburger bombs ahead of time. To prepare them for meal prep, follow these steps: - Prepare the filling. Mix the ground beef and cheese as described. - Assemble the bombs but do not bake them. - Place them on a baking sheet and cover with plastic wrap. - Store in the fridge for up to 24 hours. When you are ready to cook, just bake them straight from the fridge. You have many options for different proteins or meat alternatives: - Use ground turkey for a leaner choice. - Ground chicken can also work well. - For a vegetarian option, try black beans or lentils. - Plant-based meat substitutes are great too. Make sure to adjust cooking times based on the protein you choose. To check if the cheeseburger bombs are cooked through, follow these tips: - Use a meat thermometer. The center should reach 160°F (71°C) for ground beef. - Look for a golden brown color on the outside. - If you cut one open, the filling should be hot and bubbly. This ensures they are safe to eat and fully cooked. In this blog post, I shared a simple and tasty recipe for cheeseburger bombs. You learned the ingredients needed, including beef and cheese, and how to prepare the dough. I provided cooking steps and tips for the best results. Lastly, I included variations, storage info, and answers to common questions. These cheeseburger bombs are fun and versatile. Try them for your next meal or snack. Enjoy creating your own delicious versions!](https://tossedflavors.com/wp-content/uploads/2025/05/6c53df0a-a5d5-4d29-beb2-1747369b6d2d.webp)
If you’re hungry for a tasty snack that’s easy to make, I’ve got the perfect recipe for you! Garlic Parmesan Cheeseburger Bombs are a fun twist on classic flavors. These …
![- 2 cups all-purpose flour - 2 cups granulated sugar - 1 cup unsalted butter - 1/2 cup unsweetened cocoa powder The main ingredients make this cake rich and moist. The flour gives structure. Sugar adds sweetness. Butter brings a lovely texture. Cocoa powder delivers the deep chocolate flavor. - 1 teaspoon baking soda - 1/2 teaspoon salt - 1/2 cup buttermilk - 2 large eggs Baking soda helps the cake rise and stay fluffy. Salt enhances all the flavors. Buttermilk adds moisture and tang. Eggs bind the mixture for a smooth and cohesive batter. - 1/2 cup unsalted butter, softened - 2/3 cup unsweetened cocoa powder - 3 cups powdered sugar - 1/3 cup milk Frosting is what makes this cake special. Softened butter creates a creamy base. Cocoa powder gives it a chocolate kick. Powdered sugar sweetens the mix. Milk helps achieve the perfect spreadable texture. For the complete recipe, check out the [Full Recipe]. - Preheat the oven to 350°F (175°C). - Grease and flour the sheet pan. Start by setting your oven to 350°F (175°C). This temperature helps the cake rise well. Next, take a 15x10-inch sheet pan. Grease it with some butter. Then, dust it with flour. This step is key for easy cake removal later. - Combine the dry ingredients in a mixing bowl. - Create the chocolate mixture in a saucepan. In a large mixing bowl, add the dry ingredients: 2 cups of all-purpose flour, 2 cups of granulated sugar, 1 teaspoon of baking soda, and 1/2 teaspoon of salt. Whisk these together until they blend well. Next, grab a medium saucepan. Over medium heat, melt 1 cup of unsalted butter. Once it melts, stir in 1 cup of water and 1/2 cup of cocoa powder. Bring this mixture to a gentle boil. This step gives the cake a rich chocolate flavor. - Mix the batters and pour into the pan. - Bake and prepare the frosting simultaneously. Now, combine the warm chocolate mixture with the dry ingredients. Stir just until mixed. Do not over-mix. In a separate bowl, whisk together 1/2 cup of buttermilk, 2 large eggs, and 1 teaspoon of vanilla extract. Pour this into the chocolate batter and stir until smooth. Pour the batter into the prepared sheet pan. Spread it evenly with a spatula. Bake it in the oven for 20 to 25 minutes. You can check if it's done by inserting a toothpick. It should come out clean. While the cake bakes, make the frosting. In another saucepan, melt 1/2 cup of softened butter over medium heat. Add 2/3 cup of cocoa powder and whisk until smooth. Then, remove it from heat and add 3 cups of powdered sugar, 1/3 cup of milk, and 1 teaspoon of vanilla extract. Whisk until creamy and smooth. Once the cake is baked, let it cool in the pan for about 10 minutes. While it’s warm, pour the frosting over the top. Spread it evenly with a spatula. Let the cake cool completely before slicing it into squares. Enjoy every delicious bite! For the full recipe, check the section above. To get a light and fluffy cake, use room temperature ingredients. This helps them mix well. Cold eggs or butter can make the batter dense. Also, avoid overmixing the batter. Stir until everything is just combined. Overmixing can lead to a tough cake. For the best frosting, aim for a creamy texture. Melt the butter and cocoa together first. Then, whisk in the powdered sugar and milk. The frosting should be spreadable but not runny. Timing is key. Frost the cake while it is still warm. This helps the frosting soak in a bit. Want to boost the flavor? Here are some suggestions. You can add a teaspoon of espresso powder to the batter. This deepens the chocolate taste. For the frosting, try using high-quality cocoa powder. It makes a noticeable difference in taste and richness. Ready to make this cake? Check out the Full Recipe for all the steps! {{image_4}} You might want to switch up your frosting for a new taste. Cream cheese frosting makes a great choice. It adds a tangy flavor that pairs well with the sweet cake. To make it special, try adding espresso or mint to the frosting. A hint of coffee enhances the chocolate, while mint gives a refreshing twist. Both options keep your cake exciting and full of flavor. Not everyone can enjoy traditional cake, but that’s okay! You can make gluten-free versions. Substitute all-purpose flour with a gluten-free blend. This keeps the texture light and fluffy. For those who follow a vegan diet, you can swap eggs with flaxseed or applesauce. Use almond milk instead of buttermilk. These changes make the cake accessible for everyone to enjoy. Want to level up your cake? Consider adding fun mix-ins! Chopped nuts, like pecans or walnuts, add a nice crunch. You can also toss in chocolate chips for extra richness. Diced fruit, like strawberries or raspberries, can bring a fresh taste. These add-ins let you customize the cake to fit your mood or occasion. To keep your leftover cake fresh, wrap it tightly in plastic wrap. This helps prevent it from drying out. You can also place it in an airtight container. For long-term storage, freeze the cake. Slice it first, then wrap each piece in plastic wrap. Place the slices in a freezer-safe bag or container. This method keeps them tasty for later. At room temperature, the cake stays fresh for about three days. Make sure to keep it covered, so it does not dry out. If you choose to refrigerate it, the cake can last up to a week. However, refrigeration can change its texture. It may become a bit denser and less moist. If you want to enjoy a slice warm, gently reheat it. Place a slice on a microwave-safe plate. Heat it for about 10-15 seconds. This warms it without drying it out. You can also use an oven. Preheat it to 350°F (175°C). Wrap the slice in foil and heat for about 5-10 minutes. This keeps the cake moist and tasty. This Texas Sheet Cake shines because of its rich, moist texture and deep chocolate flavor. The key ingredients are: - All-purpose flour for structure - Granulated sugar for sweetness - Cocoa powder for that intense chocolate taste - Buttermilk for moisture and tang - Unsalted butter for richness Each ingredient works together to create a cake that melts in your mouth. The balance of sweetness and chocolate is unmatched. Yes, you can easily prepare this cake ahead of time. Bake the cake and allow it to cool completely. Then, cover it tightly with plastic wrap or foil. This keeps it fresh for two to three days. You can frost it just before serving to maintain that creamy texture. To check if your cake is done, look for these signs: - The edges will pull away from the pan slightly. - The top should spring back when gently pressed. - A toothpick inserted in the center should come out clean or with a few moist crumbs. Using these tips ensures your cake is perfectly baked every time. You can double the recipe, but remember to adjust your baking time. Use a larger pan, such as a half sheet pan or two pans. Check for doneness a bit earlier than the original time. This way, you avoid overbaking. For a party, slice the cake into squares for easy serving. You can dust the top with powdered sugar for a nice touch. Adding a scoop of vanilla ice cream beside each slice elevates the experience. If you don't have buttermilk, you can make a quick substitute. Mix one cup of milk with one tablespoon of vinegar or lemon juice. Let it sit for about five minutes. This creates a similar tangy flavor and consistency to buttermilk. This article shared how to make a delicious Texas Sheet Cake. We covered key ingredients, step-by-step instructions, and tips for perfect texture and flavor. Remember to use room temperature ingredients for better mixing. You can even try different frostings or dietary adjustments to suit your needs. With proper storage, your cake will stay fresh and tasty. I hope this guide inspires you to bake your own amazing cake soon. Enjoy making and sharing this treat with family and friends!](https://tossedflavors.com/wp-content/uploads/2025/05/db8430da-0f6a-4a7c-af54-6ad4f1ba13f9.webp)
If you’re searching for a delicious chocolate cake that’s easy to bake, you’re in the right place! My recipe for the BEST Chocolate Texas Sheet Cake is crowd-pleasing and packed …
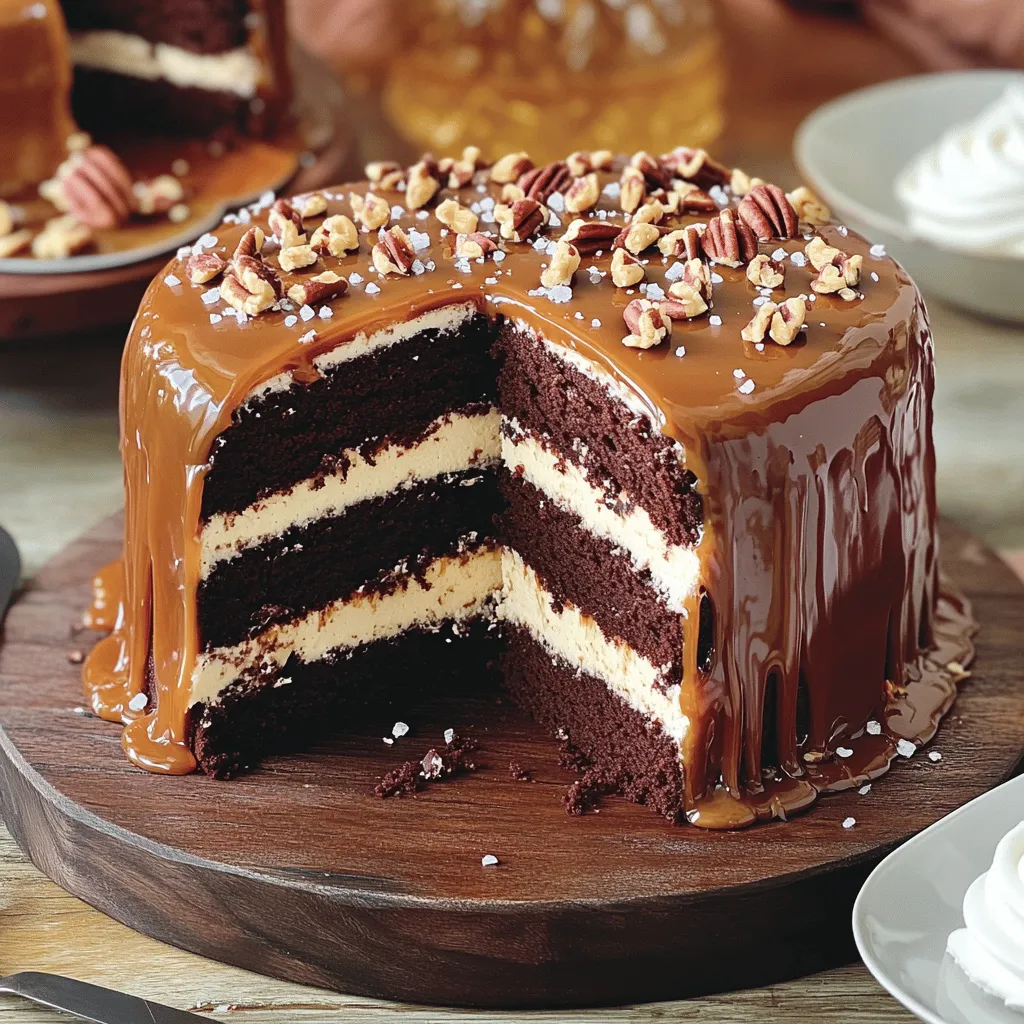
Welcome to the ultimate indulgence: Turtle Chocolate Layer Cake! If you crave rich chocolate, creamy caramel, and crunchy pecans, this recipe is for you. I’ll show you how to create …
![- Chicken and Pasta - 2 boneless, skinless chicken breasts, cut into bite-sized chunks - 12 oz rigatoni pasta - Seasonings and Sauces - 6 tablespoons unsalted butter, divided - 6 cloves garlic, minced - 1 teaspoon red chili flakes (optional, for heat) - 1 cup chicken broth (low sodium preferred) - 1 lemon, juiced and zested (keep zest separate) - 1 cup heavy cream - 1 cup freshly grated Parmesan cheese - Salt and freshly ground black pepper, to taste - Garnishes - Fresh parsley, chopped, for garnish Each ingredient plays a key role in creating the rich flavor of this garlic butter chicken with rigatoni. The chicken provides a hearty base, while the rigatoni adds a delightful texture. The garlic and butter work together for a savory aroma that fills your kitchen. Don't skip the lemon juice; it brightens the dish and balances the creaminess. Using fresh parsley as a garnish gives a pop of color and a fresh taste. You can adjust the heat with red chili flakes. If you prefer, feel free to experiment with other flavors or add-ins. This dish is all about making it your own while keeping that delicious garlic butter goodness at the forefront. For the full cooking experience, check out the Full Recipe to guide you through each step. Boiling the Pasta Start by bringing a large pot of salted water to a rolling boil. Add the rigatoni pasta and cook it according to the package instructions. You want it to be al dente, which means it should be firm but not hard. Draining and Setting Aside Once the pasta is cooked, drain it well using a colander. Make sure to shake off any excess water. Set the rigatoni aside in a large bowl, ready for mixing later. Seasoning the Chicken While the pasta cooks, grab your chicken. Cut the boneless, skinless chicken breasts into bite-sized chunks. Season these pieces generously with salt and freshly ground black pepper on all sides. Sautéing Instructions In a large skillet, melt 3 tablespoons of butter over medium heat. When the butter is bubbling, carefully add the seasoned chicken. Cook the chicken for about 5-7 minutes, stirring occasionally. You want it golden brown and fully cooked. Once done, transfer the chicken to a plate and set aside. Melting Butter and Sautéing Garlic In the same skillet, lower the heat to low. Add the remaining 3 tablespoons of butter. Once it melts, stir in the minced garlic and red chili flakes, if you want some heat. Cook for 1-2 minutes until fragrant, but watch closely to avoid burning the garlic. Incorporating Broth and Cream Next, carefully pour in the chicken broth and freshly squeezed lemon juice. Increase the heat to bring it to a gentle simmer. Once it simmers, add the heavy cream and lemon zest. Stir well and let the sauce simmer for 3-4 minutes until it thickens slightly. Mixing Chicken and Pasta Reduce the heat to medium-low. Add the cooked chicken and rigatoni back into the skillet. Toss everything together, ensuring the pasta and chicken are well coated in the creamy sauce. Adding Parmesan Cheese Gradually stir in the grated Parmesan cheese. This will melt into the dish, adding a rich flavor. Taste and adjust the seasoning with more salt and pepper if needed. For the complete recipe, check out the [Full Recipe]. Perfect Doneness for Chicken To ensure your chicken is juicy and safe to eat, cook it until it reaches 165°F. Use a meat thermometer for accuracy. The inside should no longer be pink. This gives you tender chicken that pairs well with the sauce. Ideal Pasta Texture When cooking rigatoni, aim for al dente. This means the pasta should be firm to the bite. Follow the package instructions, but start checking a minute early. Under-cooked pasta holds sauce better, giving you a delightful bite. Achieving the Right Consistency Your garlic butter sauce should be creamy and slightly thick. After adding the heavy cream, let it simmer. Stir often to avoid burning. If it's too thick, add a splash of chicken broth. Adjust until you reach that luscious feel. Flavor Enhancements For more flavor, add fresh herbs like thyme or basil when cooking the sauce. A dash of white wine can also brighten the taste. Don’t forget to adjust salt and pepper to make all the flavors pop. Presentation Ideas Serve the garlic butter chicken and rigatoni in deep bowls. Drizzle extra sauce on top for a glossy finish. Add more freshly grated Parmesan and a sprinkle of parsley for a colorful look. This makes the dish inviting! Pairing Recommendations This dish pairs well with a light salad or garlic bread. A crisp white wine, like Pinot Grigio, enhances the meal. For dessert, consider something light, like sorbet, to cleanse your palate after the rich flavors. For the complete cooking process, refer to the Full Recipe. {{image_4}} Different Proteins You can change the chicken to suit your taste. Try shrimp for a seafood twist. Salmon also works well; it adds richness. If you prefer plant-based meals, use tofu or tempeh. Both soak up flavors nicely. Each protein brings its own unique taste to this dish. Vegetable Additions Adding veggies can enhance the meal. Spinach adds color and nutrients. Broccoli gives a nice crunch. You can also use bell peppers for sweetness. Just sauté them in the garlic butter sauce. This way, you get a more balanced dish. Mild vs Spicy Options For a mild dish, skip the red chili flakes. The garlic butter sauce is still full of flavor. If you want heat, add more chili flakes or a dash of hot sauce. You can also mix in fresh jalapeños for a kick. Adjusting spice can fit everyone’s taste. Alternative Pasta Choices If you need a gluten-free option, use rice pasta or quinoa pasta. These options cook well and taste great. You can also try spiralized zucchini for a low-carb twist. This keeps the dish fresh and light. Just remember to adjust cooking times for different pasta. After you make garlic butter chicken with rigatoni, let it cool for about 30 minutes. This cooling helps keep the food safe. Store the chicken and pasta in an airtight container. It keeps well in the fridge for up to three days. If you want to keep it fresh longer, make sure to separate the chicken from the rigatoni. This prevents the pasta from getting too soggy. To warm up leftovers, the best method is to use the stove. Place the chicken and rigatoni in a skillet over medium heat. Add a splash of chicken broth or water to help with moisture. Stir often until everything is heated through. You can also use a microwave if you’re in a hurry. Just cover the dish with a lid and heat it for one to two minutes. Stir halfway to ensure even heating. If you want to freeze garlic butter chicken with rigatoni, do it carefully. Store the chicken and pasta in separate containers. Use freezer-safe bags or containers to avoid freezer burn. It can last in the freezer for up to three months. When you’re ready to eat, move it to the fridge to thaw overnight. Reheat it in a skillet to restore its creaminess. This way, you still enjoy that rich flavor! Can I use other types of pasta? Yes, you can use different pasta shapes. Penne or farfalle work well. Just adjust cooking times based on the pasta you choose. How can I make this dish lighter? To lighten it up, you can use less butter. You could also swap heavy cream for a lighter option like half-and-half. What can I substitute for heavy cream? You can use coconut milk or cashew cream for a dairy-free version. Greek yogurt can also add creaminess with fewer calories. How long to cook chicken thoroughly? Cook chicken pieces for 5-7 minutes until they are golden brown. Ensure they reach an internal temp of 165°F for safety. What is the ideal cook time for rigatoni? Rigatoni usually takes about 10-12 minutes to cook until al dente. Check the package for specific times. Can I replace Parmesan cheese? Yes, try Pecorino Romano for a sharper taste. Nutritional yeast is great for a vegan option. What to use instead of lemon juice? You can use lime juice or white vinegar as a tangy substitute. Both will add similar acidity to the dish. This blog post covered how to make garlic butter chicken with rigatoni. We went through the ingredients, step-by-step cooking instructions, and helpful tips for success. I shared variations to keep it exciting and storage info for leftovers. Dive into this dish with confidence! Remember, small tweaks can make a big difference. Enjoy your cooking journey and make this meal your own!](https://tossedflavors.com/wp-content/uploads/2025/05/0602eed4-19e6-4505-a246-5a36060504c3.webp)
If you’re looking for a delicious meal that’s quick and easy, you’ve found it! Garlic Butter Chicken with Rigatoni is a flavorful delight that will impress anyone at your table. …

If you’re looking for a fun, tasty start to your day, you’ve come to the right place! My Tater Tot Breakfast Bowl is packed with flavor and super easy to …