Savory Meat Lovers Pizza Casserole Recipe Delight

Get ready for a flavor-packed delight with my Savory Meat Lovers Pizza Casserole recipe! If you love pizza, you’ll adore this easy dish that combines all your favorite meats in …
Get ready for a flavor-packed delight with my Savory Meat Lovers Pizza Casserole recipe! If you love pizza, you’ll adore this easy dish that combines all your favorite meats in …
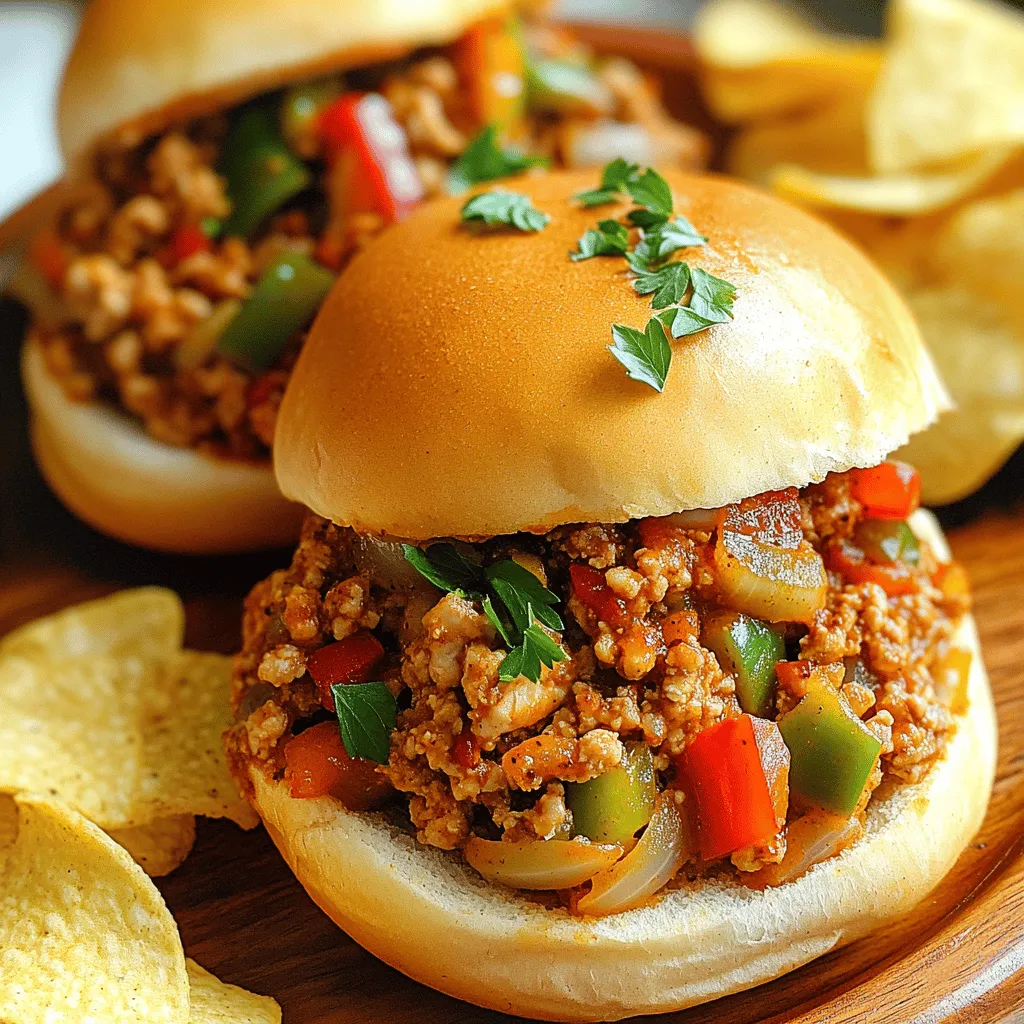
Are you ready to spice up dinner? My Cajun Chicken Sloppy Joes pack bold flavors into a fun, messy meal. With just a few key ingredients, you’ll create a satisfying …
![- 1 lb shrimp, peeled and deveined - 3 tablespoons honey - 3 tablespoons soy sauce - 3 cloves garlic, minced - 1 teaspoon fresh ginger, grated - 1 tablespoon sesame oil - 2 cups cooked jasmine rice - 1 cup broccoli florets - 1/2 red bell pepper, thinly sliced - 1 green onion, thinly sliced - Sesame seeds for garnish - Salt and pepper to taste You can swap shrimp for chicken or tofu if you prefer. Both options work well with the honey garlic sauce. For gluten-free needs, use tamari instead of soy sauce. This keeps the flavor while meeting dietary restrictions. Feel free to get creative with your veggies! You can add seasonal choices like snap peas or zucchini. This makes the dish colorful and nutritious. If you want extra crunch, include water chestnuts or bell peppers. They add great texture and flavor. For a fun twist, try mixing in some cooked quinoa instead of rice. It boosts protein and adds a nutty flavor. You can also experiment with different rice types, such as brown rice or cauliflower rice, for a lighter option. For more details and cooking tips, check out the Full Recipe. Enjoy your cooking! To make the sauce, start with a small mixing bowl. You need: - 3 tablespoons honey - 3 tablespoons soy sauce - 3 cloves garlic, minced - 1 teaspoon fresh ginger, grated Combine these ingredients. Whisk them together until mixed well. This honey-garlic sauce adds sweetness and flavor to the shrimp. Set it aside for later use. Next, you’ll cook the shrimp. Heat a large skillet over medium-high heat. Add 1 tablespoon of sesame oil. Once hot, add the shrimp. Season them with salt and pepper. Sauté the shrimp for about 2-3 minutes on each side. They should turn pink and be fully cooked. They cook fast, so keep an eye on them. When done, transfer them to a plate and set aside. Now, stir-fry the vegetables. In the same skillet, add: - 1 cup broccoli florets - 1/2 red bell pepper, thinly sliced Cook these for about 3-4 minutes. Stir frequently to keep them crisp. You want them tender but not mushy. This timing keeps the flavors fresh and bright. Time to combine everything! Return the cooked shrimp to the skillet with the vegetables. Pour the prepared honey-garlic sauce over the shrimp and veggies. Gently stir to coat everything evenly. Cook for an additional 2 minutes until heated through. This step ensures that every bite is packed with flavor. Serve the dish over warm jasmine rice. For a nice presentation, spoon the shrimp mixture generously on top. Garnish with: - Sliced green onions - A sprinkle of sesame seeds This not only adds color but also enhances the dish's flavor. Enjoy your meal! Check the Full Recipe for more details. To avoid overcooking shrimp, focus on timing. Cook them for just 2-3 minutes on each side. They should turn pink and opaque. If they curl tightly, you have cooked them too long. For seasoning, keep it simple. Use salt and pepper to enhance the shrimp's natural flavor. Add the honey-garlic sauce at the end for a sweet finish. This method keeps the shrimp tender and juicy. To prepare jasmine rice perfectly, rinse it first. Rinsing removes excess starch, which helps keep the rice fluffy. Use a 1:1.5 rice-to-water ratio. Bring water to a boil, then cover the pot and lower the heat. Let it simmer for about 15 minutes. If you want alternatives to jasmine rice, try basmati or brown rice. Both have unique flavors and textures. Quinoa is also a great option for a protein boost. For quicker cook time, consider meal prep. You can chop vegetables and marinate shrimp ahead of time. This way, dinner comes together fast on busy nights. Use kitchen tools like a rice cooker for perfect rice every time. A large skillet helps cook shrimp and veggies evenly. These tools will make your cooking process smooth and efficient. {{image_4}} You can make this dish ahead for busy weeks. Start by cooking the rice and shrimp. Store them in separate containers. Keep the sauce in a small jar. When you’re ready to eat, just reheat the rice and shrimp. Pour the sauce over and toss in the veggies. It’s that easy! To switch up the taste, try new sauces or spices. Add sriracha for heat or hoisin for sweetness. You can also swap out the veggies. Use snap peas, carrots, or bell peppers. Fresh herbs like cilantro or basil can add a nice touch too! You can make this dish vegan by using tofu instead of shrimp. Swap honey with maple syrup for a vegan option. For a low-carb version, use cauliflower rice instead of jasmine rice. This way, you keep the great flavor while fitting your diet. For the full recipe, check out the [Full Recipe]. To keep your honey garlic shrimp fresh, use airtight containers. Glass or plastic containers work well. Make sure they seal tight to trap moisture. Store leftovers in the fridge. They stay good for about three days. After that, they may lose their flavor and texture. When you reheat the shrimp, aim to keep them juicy. Use a skillet over low heat. Add a splash of water or broth to help steam them. This helps keep the shrimp tender. Stir gently to avoid breaking them apart. Another option is to use the microwave. Heat in short bursts, stirring in between. This way, you won’t overcook them. If you want to save some for later, freezing works great. First, let the dish cool completely. Then, portion it into freezer-safe bags or containers. Squeeze out as much air as you can. Label them with the date. They can stay in the freezer for up to three months. When ready to eat, thaw in the fridge overnight. Reheat gently for the best taste. This dish takes just 20 minutes. You need about 10 minutes to prep. The cooking time is around 10 minutes. In no time, you’ll have a tasty meal ready to enjoy. Yes, you can use frozen shrimp. Just make sure to thaw them first. Rinse the shrimp under cold water until they are soft. If you use frozen shrimp, they may need a little more time to cook. If you want a honey substitute, maple syrup works well. Agave syrup is another good choice. These options offer a sweet flavor similar to honey. Yes, you can make this dish gluten-free. Use tamari instead of soy sauce. Ensure your rice and other ingredients are gluten-free. You can easily add spice to this dish. Try adding red pepper flakes or sliced jalapeños. You can also add a splash of hot sauce to the honey-garlic mix for extra heat. Enjoy the kick! This blog post covered a tasty shrimp dish, from ingredients to cooking tips. You learned about shrimp preparation, flavorful sauce making, and ways to stir-fry veggies. We explored meal variations, storage, and reheating methods for leftovers. Cooking doesn’t have to be hard. With these easy steps, you can enjoy a delicious meal, even on busy days. Let your kitchen creativity shine with this versatile recipe. Enjoy crafting your dish and make it your own!](https://tossedflavors.com/wp-content/uploads/2025/05/57a1b6e5-dfd0-4a45-b5de-d7845c1b87c1.webp)
Want a quick and tasty meal? This 20 Minute Honey Garlic Shrimp & Rice Bowl is your new go-to! With juicy shrimp, sweet and savory sauce, and colorful veggies, dinner …
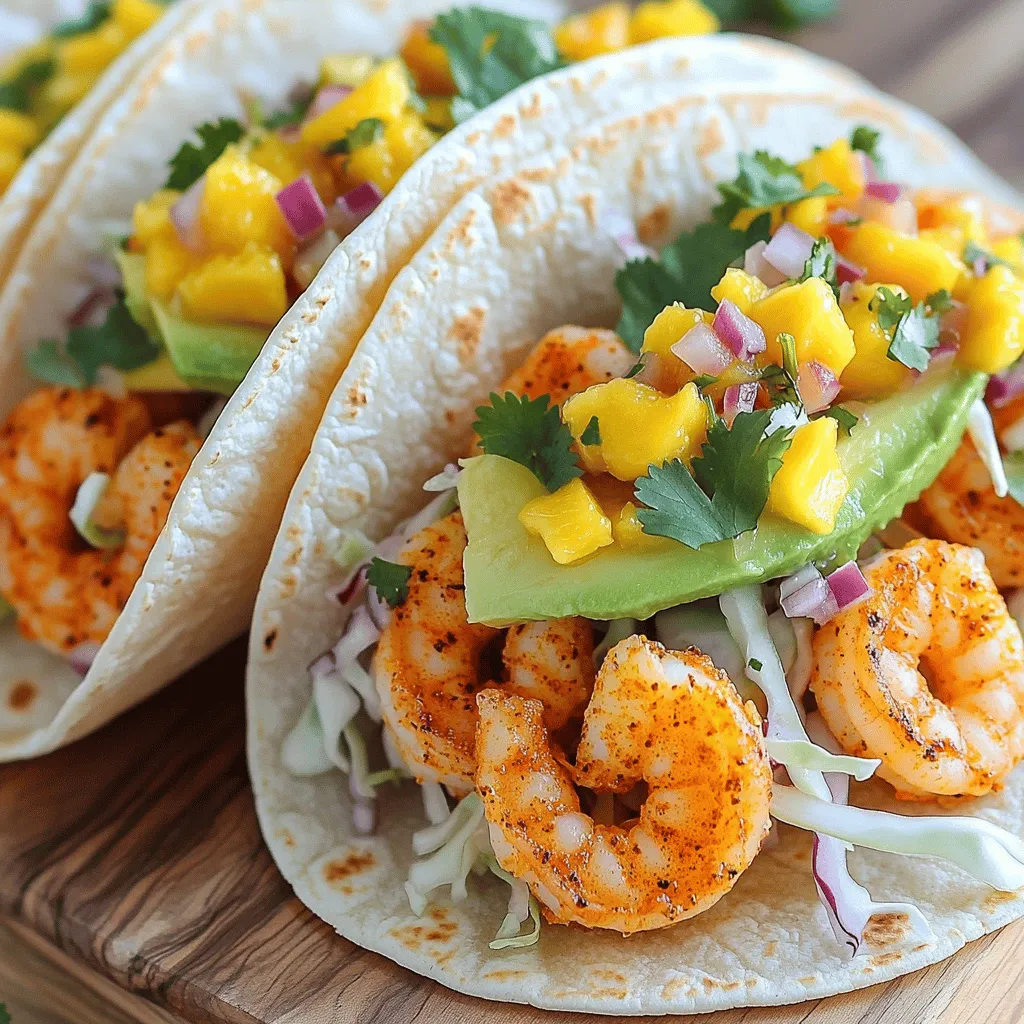
If you’re craving a vibrant meal that packs a flavor punch, look no further! My Spicy Shrimp Tacos with Mango Salsa will tantalize your taste buds and impress your friends. …
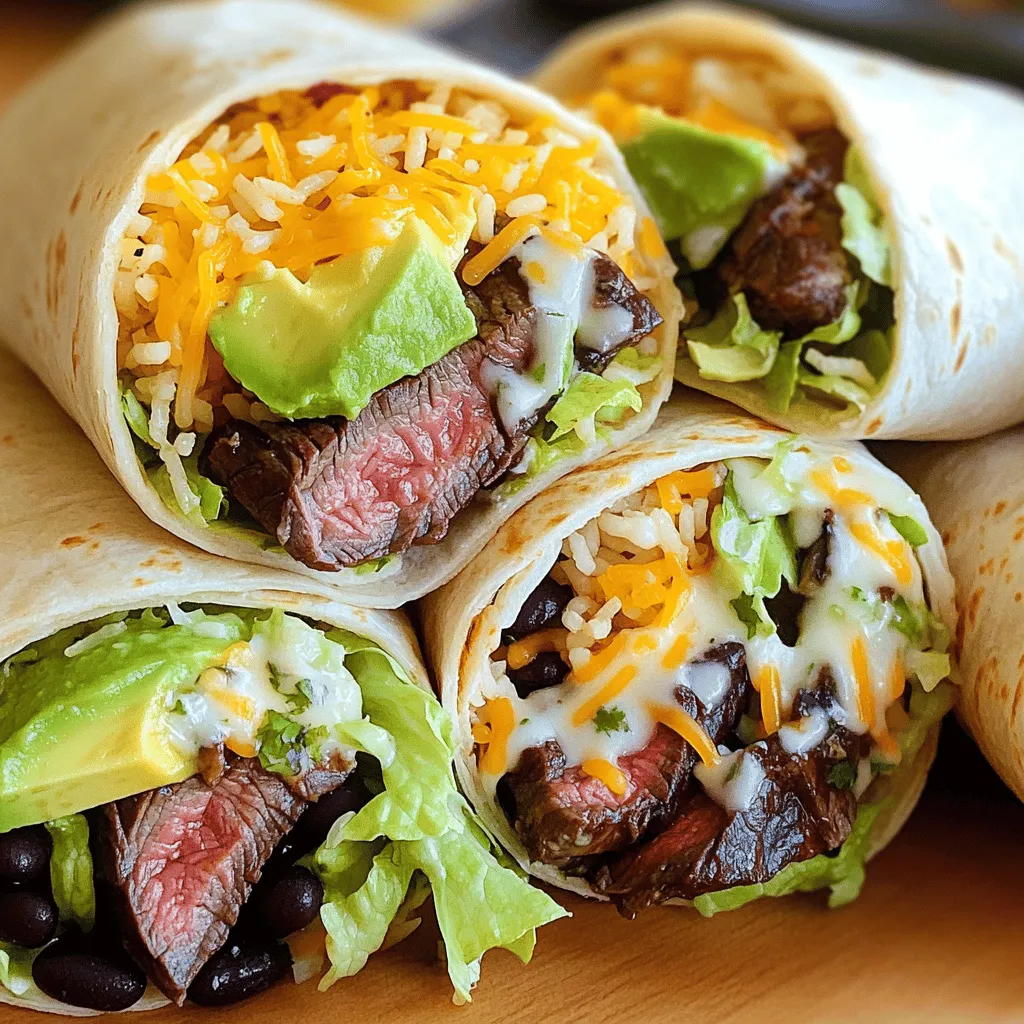
Are you ready to elevate your mealtime game with juicy steak burritos? These flavor-packed delights will not only satisfy your hunger but also impress your taste buds. In this guide, …
![To make Hawaiian Sweet Roll French Toast Bake, you need a few simple ingredients. Here’s what you’ll need: - 12 Hawaiian sweet rolls, cut into quarters - 6 large eggs - 1 cup whole milk - 1/2 cup heavy cream - 1/2 cup packed brown sugar - 1 tablespoon pure vanilla extract - 1 teaspoon ground cinnamon - 1/4 teaspoon grated nutmeg - 1/4 cup crushed pineapple, drained thoroughly - 1/2 cup shredded coconut (toasted if preferred) - 1/4 cup chopped pecans or walnuts (optional) - Maple syrup, for serving Each ingredient plays a key role in creating a soft, sweet, and flavorful dish. The Hawaiian sweet rolls give a lovely, fluffy base. The eggs, milk, and cream form a rich custard that soaks into the rolls. Brown sugar adds sweetness, while vanilla and spices bring warmth. Adding crushed pineapple and coconut gives a tropical twist. You can top this bake with nuts for crunch and serve with maple syrup for extra sweetness. You can find the full recipe to help guide your cooking journey. - Preheat your oven to 350°F (175°C). This is key for even baking. - Grease a 9x13 inch baking dish with non-stick spray or butter. This helps prevent sticking. - In a large bowl, whisk together 6 eggs, 1 cup of whole milk, and 1/2 cup of heavy cream. This mix will create a rich custard. - Add 1/2 cup of packed brown sugar, 1 tablespoon of pure vanilla extract, 1 teaspoon of ground cinnamon, and 1/4 teaspoon of grated nutmeg. Stir until smooth and well blended. - Cut 12 Hawaiian sweet rolls into quarters. Add them to the egg mix. Gently stir to coat each piece. - Fold in 1/4 cup of crushed pineapple, drained well. If you like, add 1/2 cup of shredded coconut and 1/4 cup of chopped pecans or walnuts for extra flavor. - Pour the mixture into the greased baking dish. Spread it out evenly for best results. - Cover the dish with aluminum foil. Let it rest at room temperature for about 30 minutes. This helps the rolls soak in the flavors. - After resting, bake for 25 minutes covered. Then, remove the foil and bake for another 15-20 minutes. Look for a golden brown top. The custard should be set and firm. - Once baked, take it out and let it cool for a few minutes. This will make it safer to handle. - Serve warm with maple syrup for a sweet touch. You can find the full recipe above! To make the best French toast bake, soaking time is key. Aim for at least 30 minutes. This lets the bread soak up all the yummy flavors. If you have more time, soak it overnight. The rolls will soak in even more custard. This gives a rich and creamy texture. When baking, keep an eye on the time. Bake for 25 minutes covered, then take off the foil. Bake for another 15-20 minutes. This helps the top get golden brown. If you want a softer bake, adjust the time down. If you like a crispier top, extend the baking time a little. Now, let’s talk toppings. Maple syrup is a must. It adds a sweet, sticky touch. Fresh fruit is also a great choice. Try adding slices of banana or a handful of berries. You can also sprinkle some toasted coconut on top for extra crunch. For side dishes, consider serving this bake with crispy bacon or sausage. Their salty flavor pairs well with the sweet rolls. Fresh fruit salad can also brighten up the plate. Want to change things up? You can add fun flavors! Try mixing in some chocolate chips for a sweet twist. Or, swap crushed pineapple for fresh diced apples. They add a nice crunch and sweetness. For mix-ins, consider adding nuts for texture. Chopped pecans or walnuts bring a great crunch. If you want to add spices, try a pinch of cardamom or allspice. These will add warmth and depth to the flavor. This recipe is all about creativity. Use your favorite flavors to make it your own! For the complete recipe, see the [Full Recipe]. {{image_4}} You can swap Hawaiian rolls for other breads. Use brioche or challah for a rich taste. For a twist, try cinnamon rolls. They add a warm spice flavor. If you need gluten-free options, look for gluten-free bread. Most grocery stores carry these. Choose a bread with a soft texture for the best results. To make your French toast bake exciting, add fruit. Chopped bananas, berries, or diced apples work well. Each fruit brings a unique taste. You can also use nuts or spices. Try adding walnuts or pecans for crunch. A hint of nutmeg or ginger can brighten the dish. If you follow a vegan diet, swap the eggs with a flaxseed mixture. Use plant-based milk instead of whole milk. You can also use coconut cream in place of heavy cream. For lower sugar options, reduce the brown sugar. You can replace it with applesauce for sweetness without extra sugar. This keeps the dish tasty and friendly for many diets. To store your Hawaiian Sweet Roll French Toast Bake, let it cool first. Place the leftovers in an airtight container. You can keep it in the fridge for up to three days. This way, you can enjoy the flavors later without losing taste. For reheating, the oven works best. Preheat your oven to 350°F (175°C). Place the French toast bake in an oven-safe dish. Cover it with foil to keep it moist. Heat for about 15 to 20 minutes. You can also use the microwave for quick reheating. Just heat it for about one minute. Check if it’s warm all the way through. If you want to freeze the French toast bake, do so after it cools. Wrap the dish tightly in plastic wrap, then in foil. This prevents freezer burn. You can freeze it for up to two months. To thaw, move it to the fridge overnight. Then, bake it at 350°F (175°C) for 25 to 30 minutes. Enjoy it fresh from the oven, just like the first time! For the full recipe, check out the details above. It takes about one hour to make this dish. You need 15 minutes for prep and 45 minutes for baking. Yes, you can prepare it ahead of time. Mix the ingredients and let it sit overnight in the fridge. This allows the rolls to soak up more flavor. You can use whole milk, almond milk, or coconut milk. These options will still give you a creamy texture. The bake is done when the top is golden brown. The custard should feel set and slightly firm when touched. Yes, you can use gluten-free sweet rolls. Just make sure to check the labels for any gluten content. Absolutely! Adding chocolate chips will give your bake a sweet twist. Just fold them in with the other ingredients. This article walks you through making a delicious Hawaiian Sweet Roll French Toast Bake. We covered the key ingredients, step-by-step instructions, and useful tips for the best results. You learned about storage options and variations to fit your needs. In the end, this dish is easy to prepare and a crowd-pleaser. Whether you serve it for brunch or dessert, it won’t disappoint. Enjoy all the tasty flavors and make it your own!](https://tossedflavors.com/wp-content/uploads/2025/05/5714a37f-d837-4071-988d-87c861b8d8c4.webp)
If you’re ready for a breakfast treat that combines sweet and savory, you’ll love my Hawaiian Sweet Roll French Toast Bake. This dish is simple to make and perfect for …

Hungry for a snack that’s both cheesy and easy to make? You’re in the right place! In this guide, I’ll show you how to whip up delicious cheese breadsticks that …

Are you ready to dive into the world of homemade Mexican tamales? Making these tasty treats can be fun and rewarding. In this guide, I’ll show you simple steps to …

If you love sweet treats that are both simple and delicious, you’ll adore these Blueberry Cake Donuts. They’re soft, flavorful, and packed with juicy blueberries. Best of all, you can …

Are you ready to elevate your cookie game? Cheesecake Stuffed Chocolate Chip Cookies Delight combines the gooey pleasure of sweet cookies with rich cheesecake filling. Imagine biting into a soft, …