Skip to content
tossedflavors.com
  • Home
  • Appetizers
  • Desserts
  • Salads
  • Breakfast
  • Dinner
  • Privacy Policy
  • Contact
  • About

Chef Evan

Strawberry Shortcake Overnight Oats Tasty and Easy Recipe

October 19, 2025September 8, 2025 by Chef Evan
To make Strawberry Shortcake Overnight Oats, you will need these simple ingredients: - 1 cup rolled oats - 1 cup milk of choice (dairy or non-dairy) - 1/2 cup Greek yogurt (or plant-based yogurt) - 2 tablespoons maple syrup (or honey) - 1 teaspoon vanilla extract - 1/2 teaspoon almond extract - 1 cup fresh strawberries, hulled and sliced - 1/4 cup chopped pecans or almonds - Whipped cream (for topping, optional) - Fresh mint leaves (for garnish, optional) These ingredients blend together to create a creamy and fruity breakfast. The rolled oats form the base, while the yogurt adds creaminess and protein. The maple syrup gives a touch of sweetness. The almond extract brings out the flavors. Fresh strawberries provide a juicy burst. Nuts add a nice crunch, making each bite delicious. {{ingredient_image_1}} - In a medium bowl, combine 1 cup of rolled oats, 1 cup of milk, and 1/2 cup of Greek yogurt. - Add 2 tablespoons of maple syrup, 1 teaspoon of vanilla extract, and 1/2 teaspoon of almond extract. - Stir until everything mixes well. - Now, fold in half of the sliced strawberries. - Reserve the rest of the strawberries for later. - Divide the mixture into two jars or bowls. - Seal them and place them in the fridge overnight or for 4 to 6 hours. - When ready to eat, take the jars from the fridge. - Stir the oats to mix any settled ingredients. - If the oats are thick, add a splash of milk. - Top each jar with the remaining sliced strawberries. - Sprinkle 1/4 cup of chopped pecans or almonds on top. - For a fun twist, add a dollop of whipped cream and some mint leaves if you like. To make your overnight oats, follow these steps: - Use rolled oats for the best texture. - Combine oats, milk, yogurt, and sweeteners in a bowl. - Stir well to mix all ingredients. - Add half of your sliced strawberries for flavor. - Store in jars or containers for easy access. - Seal the jars tightly to keep them fresh. - Refrigerate overnight or for at least 4-6 hours. - This soaking allows oats to soften and absorb flavors. You can easily change the flavors of your oats. - Swap maple syrup for honey, or use agave nectar. - Add spices like cinnamon for extra warmth. - Use any milk you prefer; almond or oat milk are great. - Try different yogurt types, like coconut or almond-based. - Add a splash of lemon juice for a fresh twist. - Mix in vanilla protein powder for added nutrition. Pro Tips Use Overnight Oats for Meal Prep: Prepare multiple jars at once to enjoy a quick and nutritious breakfast throughout the week. Customize Your Fruits: Feel free to swap strawberries for other berries or fruits like blueberries, peaches, or bananas for different flavor profiles. Add More Crunch: Experiment with different nuts or seeds, such as walnuts, chia seeds, or pumpkin seeds, to enhance the texture and nutritional value. Adjust Sweetness to Taste: Depending on your preference, you can modify the amount of maple syrup or honey to make it sweeter or less sweet. {{image_2}} You can easily change the fruit in this recipe. Try using blueberries, raspberries, or blackberries for a twist. You can also use tropical fruits. Think about adding diced mango or pineapple for a fun flavor. If you want something creamy, try adding banana slices. Just remember to mix them in or place them on top for a yummy look. Each fruit adds a unique taste and color to your oats. Nuts and seeds can make your oats even better. You can try different nuts like walnuts, hazelnuts, or even pistachios for a new crunch. If you want to boost nutrition, add chia seeds or flaxseed. These seeds are great for your body and add a nice texture. Just a tablespoon of either can increase the fiber and omega-3s in your meal. Enjoy mixing and matching to find your perfect combination! How long do they last in the fridge? Strawberry shortcake overnight oats last up to five days in the fridge. This makes them great for meal prep. You can enjoy them all week. Proper seal techniques for jars To keep your oats fresh, use jars with tight lids. Glass jars work best, but any container with a good seal is fine. Make sure to cool the oats to room temperature before sealing. This helps prevent moisture build-up inside the jar. Can you freeze overnight oats? Yes, you can freeze overnight oats! This is a smart way to save time. Just remember to leave some space at the top of the jar. The oats will expand as they freeze. Best practices for thawing and serving To thaw, move the oats from the freezer to the fridge. Let them sit overnight. When you’re ready to eat, give them a good stir. If they seem too thick, add a splash of milk. This will help bring the texture back. Can I use instant oats instead of rolled oats? You can use instant oats, but the texture changes. Instant oats absorb liquid faster. Your overnight oats may turn mushy. Rolled oats give a nice chewy bite. How do I make it vegan-friendly? To make it vegan, swap Greek yogurt for plant-based yogurt. Use almond milk or soy milk instead of dairy milk. Maple syrup works great as a sweetener. Can I skip the yogurt completely? Yes, you can skip yogurt. The oats will still taste good. You can add more milk if needed. This makes the dish lighter and keeps it creamy. Caloric content per serving Each serving has about 350 calories. This includes oats, milk, yogurt, and strawberries. The nuts add healthy fats and protein too. Dietary considerations (gluten-free, nut-free) To make it gluten-free, use certified gluten-free oats. For nut-free, skip the nuts or use seeds. You can substitute with pumpkin or sunflower seeds for crunch. This blog post covered how to make delicious overnight oats with simple steps. You learned the best ingredients to use, like oats, yogurt, and your choice of milk. We also discussed ways to customize your oats with different fruits and nuts. Remember, you can store your overnight oats in the fridge or even freeze them. With these easy tips, you can enjoy a healthy breakfast that suits your taste. Try making your own blend and enjoy the fun of crafting your ideal overnight oats.

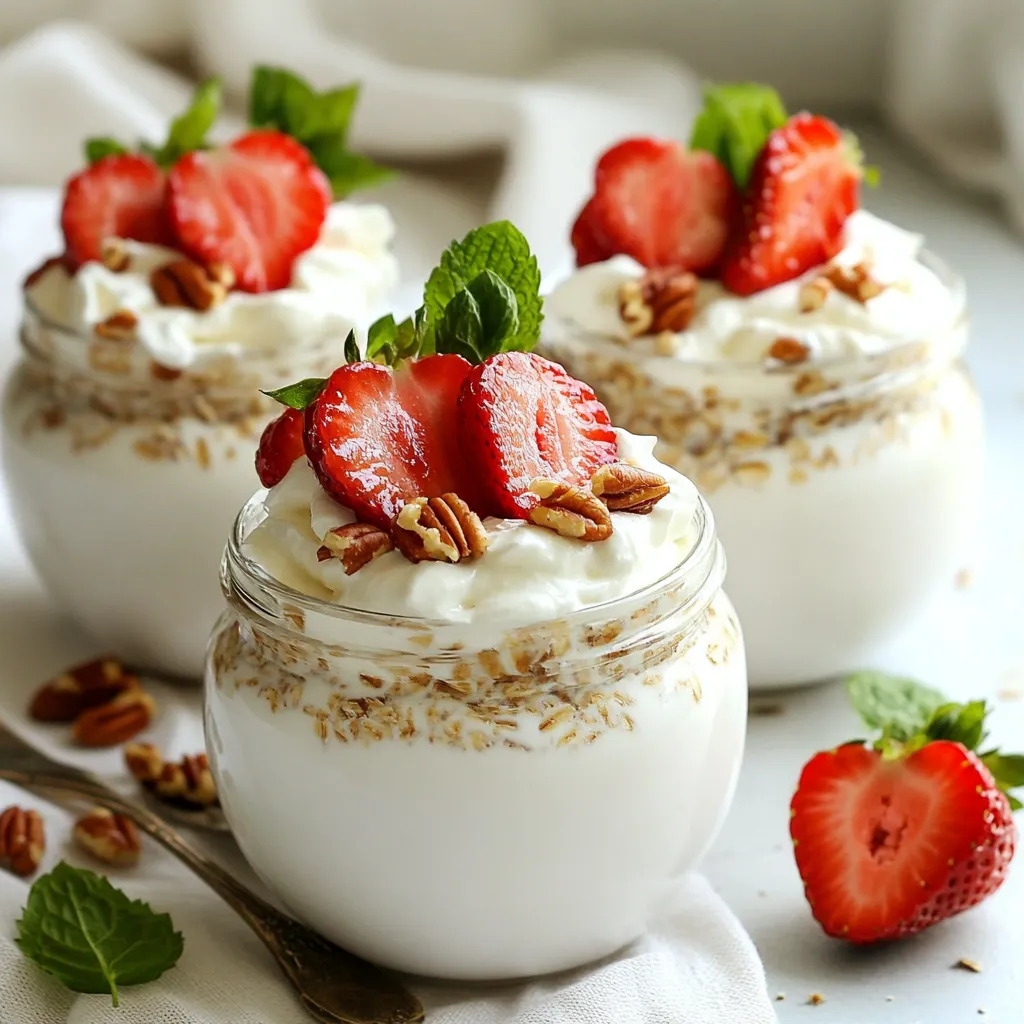
Are you ready to elevate your breakfast routine with a sweet twist? Strawberry Shortcake Overnight Oats are not just easy to make; they taste like dessert! With healthy ingredients like …

Read more

Categories Breakfast Leave a comment

Cheesy Broccoli Rice Casserole Simple and Comforting Dish

December 3, 2025September 6, 2025 by Chef Evan
For a tasty Cheesy Broccoli Rice Casserole, you need a few key ingredients: - 2 cups cooked rice (white or brown) - 3 cups fresh broccoli florets, steamed - 1 cup shredded sharp cheddar cheese - 1 cup shredded mozzarella cheese - 1 cup cream of mushroom soup (or homemade alternative) - ½ cup milk - 1 teaspoon garlic powder - 1 teaspoon onion powder - Salt and pepper to taste - ½ cup breadcrumbs (optional, for topping) - 2 tablespoons olive oil (for greasing) Using fresh broccoli is best. It stays bright and crunchy. Frozen broccoli can work, but it might get mushy. If you use frozen, make sure to thaw and drain it well. If you want a different flavor, you can swap the cream of mushroom soup. Try using cream of chicken soup or a homemade cheese sauce instead. This keeps the dish creamy and adds a new taste. With these ingredients, you’ll create a warm, cheesy dish that feels like a hug on a plate. Happy cooking! {{ingredient_image_1}} 1. First, preheat your oven to 350°F (175°C). Greasing a 9x13 inch casserole dish with olive oil makes it easy to serve later. 2. In a large bowl, mix the cooked rice, steamed broccoli, cream of mushroom soup, and milk. Stir until everything is well combined. 3. Add garlic powder, onion powder, salt, and pepper to the mix. Stir this well too. 4. Next, fold in both cheddar and mozzarella cheeses. Keep a small handful of cheese for later. 1. Pour your mixture into the greased casserole dish. Spread it evenly across the dish. 2. If you want a crunchy topping, sprinkle breadcrumbs on top. Then, add the reserved cheese. 3. Bake the casserole in the preheated oven for 25-30 minutes. You want the cheese to be bubbly and golden brown. 4. After baking, let your casserole cool for about 5 minutes. This helps it set, making it easier to serve. To get that creamy texture, use fresh ingredients. The cream of mushroom soup adds richness. You can also add more milk if it seems too thick. For even cooking, mix all ingredients well. This helps the cheese melt uniformly. When you bake, place the dish in the center of the oven. This promotes even heat distribution. Want to save time? Cook rice the day before. You can also steam your broccoli ahead of time. This way, you just mix and bake. For a beautiful presentation, garnish with fresh parsley. This adds color and freshness. You can also add tomato slices for a nice touch. Pair your casserole with a light salad. A simple green salad works well. You could also serve it with grilled chicken or fish. These options balance the dish's richness. Pro Tips Use Fresh Ingredients: Always opt for fresh broccoli and high-quality cheeses for the best flavor and texture in your casserole. Customize Your Cheese: Feel free to mix different cheeses like gouda or pepper jack for a unique twist on the classic flavor. Add Protein: For a heartier meal, consider adding cooked chicken, ham, or even chickpeas to the casserole mixture. Make it Ahead: This casserole can be assembled ahead of time and stored in the fridge. Just bake it when you're ready to serve! {{image_2}} You can switch out the broccoli if you want. Here are some great options: - Cauliflower for a milder taste - Spinach for a pop of color and nutrition - Peas for sweetness and texture - Zucchini for a light and fresh flavor For cheese, try these variations: - Pepper jack for a spicy kick - Gouda for a rich, smoky taste - Cream cheese for extra creaminess - Vegan cheese to keep it plant-based If you want a vegan version, use these swaps: - Replace cream of mushroom soup with cashew cream - Choose rice milk or almond milk instead of dairy milk - Use nutritional yeast for a cheesy flavor You can make this casserole in different ways. Try the Instant Pot for quick prep: 1. Mix all ingredients in the pot. 2. Seal the lid and cook on high for 8 minutes. 3. Quick-release the steam and enjoy! For a slow cooker, follow these steps: 1. Mix all ingredients in the slow cooker. 2. Cover and cook on low for 4 hours. 3. Serve warm and enjoy the flavors! After you enjoy your Cheesy Broccoli Rice Casserole, store the leftovers properly. First, let the casserole cool down to room temperature. Then, transfer it to an airtight container. You can also cover the dish tightly with plastic wrap or aluminum foil. This helps keep the casserole fresh. Store it in the fridge for up to 3 to 4 days. If you want to keep it longer, consider freezing it. When you're ready to enjoy the leftovers, reheating is key. The best way to reheat the casserole is in the oven. Preheat it to 350°F (175°C). Place the casserole in an oven-safe dish, covered with foil. Heat it for about 20-25 minutes. This helps keep the cheese creamy and the broccoli tender. If you want a crispy top, remove the foil for the last 5 minutes. You can also use the microwave, but this may change the texture. Heat in short bursts and check often to avoid overcooking. Can I make Cheesy Broccoli Rice Casserole ahead of time? Yes, you can make this casserole ahead. Prepare the casserole up to the baking step. Cover it tightly and store it in the fridge for up to two days. When you are ready to bake, just pop it in the oven. What type of rice works best for this recipe? You can use either white or brown rice. Both types work well, but brown rice gives a nutty flavor. Just make sure the rice is cooked before mixing it with the other ingredients. Can I freeze the casserole for future use? Yes, you can freeze it! Allow the casserole to cool completely. Cover it tightly with plastic wrap, then with aluminum foil. It can last in the freezer for about three months. How long to bake the casserole if it's cold? If your casserole is cold from the fridge, bake it for about 35-40 minutes. Check that the cheese is melted and bubbly. What if I don’t have breadcrumbs? Can I skip it? You can skip the breadcrumbs if you don’t have them. The casserole will still be tasty and cheesy without that crunchy topping. If you want some crunch, you can try crushed crackers or nuts instead. Cheesy Broccoli Rice Casserole is an easy and tasty dish. We covered its key ingredients, including fresh broccoli and substitutes for cream of mushroom soup. The step-by-step instructions guide you through mixing, baking, and serving your casserole right. For the best results, use fresh ingredients and follow the baking tips. Get creative with variations and enjoy both reheating and storing tips. I hope you feel ready to make a delicious casserole that the whole family will love!

If you crave comfort food, look no further than Cheesy Broccoli Rice Casserole. This dish combines creamy cheese, tender broccoli, and hearty rice for a warm hug on your plate. …

Read more

Categories Dinner Leave a comment

Strawberry Cheesecake Ice Cream Creamy Delight Recipe

December 3, 2025September 4, 2025 by Chef Evan
- 2 cups fresh strawberries, hulled and sliced - 1 cup cream cheese, softened - 1 cup heavy cream - 1 cup sweetened condensed milk - 1 tablespoon vanilla extract - 1/2 cup sugar - 1/4 teaspoon salt - 1/2 cup graham cracker crumbs - Extra sliced strawberries for garnish To make the best Strawberry Cheesecake Ice Cream, you need fresh ingredients. Fresh strawberries are key for flavor. Use ripe strawberries for the sweetest taste. Cream cheese gives a rich and smooth base. Heavy cream adds creaminess. Sweetened condensed milk brings sweetness and helps with texture. Vanilla extract adds warmth. Sugar balances flavors, while salt enhances the taste. Graham cracker crumbs add a nice crunch, mimicking cheesecake crust. Finally, extra sliced strawberries are great for topping. Have fun with these ingredients! Each one plays a role in creating a creamy delight. {{ingredient_image_1}} To start, wash and hull the strawberries. Slice them into small pieces. Then, place the berries in a blender. Puree the strawberries until smooth. If you want texture, leave some small chunks. This gives the ice cream a fun bite. Set the puree aside for later. Next, take a large mixing bowl. Beat the softened cream cheese with an electric mixer. Mix until it is smooth and creamy. Gradually add the sugar while mixing. This step helps to make it sweet and fluffy. Make sure you blend well until the sugar is fully mixed in. Now, it’s time to combine the creams. Slowly pour in the heavy cream and sweetened condensed milk. Keep mixing until the mixture is smooth. Add the vanilla extract and salt. These add flavor and depth to your ice cream. Drizzle the strawberry puree into the cream cheese mix. Use a spatula to gently fold it in. This creates a lovely marbled effect. Be careful not to fully mix. You want those pretty swirls to show. Next, stir in the graham cracker crumbs. This gives a hint of that cheesecake crust flavor. Make sure they are evenly spread throughout the mixture. It adds a nice crunch and flavor. Cover the bowl with plastic wrap. Place it in the fridge for about 2 hours. This lets all the flavors meld together. After chilling, pour the mixture into an ice cream maker. Follow the maker’s instructions until it reaches a soft-serve consistency. Transfer the ice cream to an airtight container. Freeze it for at least 4 hours. This helps it firm up nicely. When ready to serve, scoop the ice cream into bowls. For a fun touch, garnish with extra sliced strawberries. Enjoy your delicious strawberry cheesecake ice cream! To get smooth ice cream, start with softened cream cheese. Mix it well until it's creamy. This helps avoid lumps. When you puree the strawberries, leave some small chunks if you want texture. Adjust the sweetness based on your strawberries. If they are very sweet, reduce the sugar a bit. Taste the mixture before freezing to find the right balance. For freezing ice cream, use an airtight container. This keeps it fresh and tasty. Before sealing, press a piece of plastic wrap onto the surface. This helps keep air out and prevents ice crystals from forming. To prevent ice crystals, scoop out the ice cream with clean utensils. Do not put your fingers in the container. This keeps the ice cream smooth and creamy. Strawberry Cheesecake Ice Cream goes well with many desserts. Serve it alongside pie or cake for a treat. You can also add toppings like whipped cream, fresh strawberries, or extra graham cracker crumbs. These add flavor and make it look fancy. Enjoy your creation! Pro Tips Use Fresh Strawberries: For the best flavor and texture, use ripe, fresh strawberries. They enhance the ice cream's taste and give a vibrant color. Chill the Mixing Bowl: Place your mixing bowl in the freezer for about 15 minutes before preparing the cream cheese mixture. This helps the mixture stay cold and whip better. Avoid Overmixing: When folding in the strawberry puree, be gentle. Overmixing can lead to a less appealing texture and a uniform color rather than a marbled effect. Garnish Creatively: For an attractive presentation, serve the ice cream in clear cups or bowls, layered with additional strawberry slices and whipped cream on top. {{image_2}} You can change the fruit in this recipe. Try blueberries, raspberries, or peaches. Each fruit brings its own taste and color. This way, you can enjoy new flavors while keeping the creamy base. Using different cheeses can also change the flavor. Instead of cream cheese, you can use mascarpone or ricotta. These cheeses add a unique twist. Mascarpone gives a richer taste, while ricotta can make it lighter. If you want a vegan version, you can swap the dairy. Use vegan cream cheese and coconut cream instead of heavy cream. Look for sweetened condensed coconut milk for a creamy texture. These swaps keep the ice cream rich and tasty without dairy. Plant-based creams are easy to find now. Almond, soy, or oat cream can work well. Make sure to choose unsweetened options to control the sugar level. Mix-ins can make your ice cream fun! Add chocolate chips or chopped nuts for crunch. You can also swirl in caramel or fudge for extra sweetness. These toppings create delicious layers in your ice cream. Fresh mint or cookie crumbles can add excitement too. You can even sprinkle graham cracker crumbs on top for that classic cheesecake taste. Play around with your favorite mix-ins to make it truly yours! For each serving of Strawberry Cheesecake Ice Cream, you get around 250 calories. This includes: - Fat: 15g - Carbohydrates: 30g - Protein: 3g This ice cream is rich and creamy, thanks to the heavy cream and cream cheese. You can make this treat healthier by using low-fat cream cheese or light heavy cream. This will cut down the calories while still keeping the flavor. To help with portion control, serve this ice cream in small bowls. This way, you can enjoy the taste without overdoing it. You can also share it with friends or family, making it a fun dessert experience. Strawberry cheesecake ice cream can last about two weeks in the freezer. To keep it fresh, store it in an airtight container. This helps prevent ice crystals from forming. If you want it to last longer, you can freeze it for a month, but the taste may change. Yes, you can make this ice cream without an ice cream maker. Pour the mixture into a shallow dish and freeze it. Every 30 minutes, stir it with a fork for about 3 hours. This helps create a creamy texture. Just be sure to have patience during the freezing process. If you want a different taste, you can use mascarpone cheese or Greek yogurt. Both offer a creamy texture. They will change the flavor a bit, but they work well. For a dairy-free option, try using cashew cream. Serve this ice cream in fun bowls or sundae glasses. You can top it with whipped cream and more sliced strawberries. Adding extra graham cracker crumbs gives it a nice crunch. Arrange it nicely for a pretty presentation. Yes, you can use frozen strawberries. Just let them thaw before pureeing. This makes blending easier. If your strawberries are sweet, you may want to cut back on sugar a bit. This will help balance the flavors in your ice cream. This blog post covered how to make delicious Strawberry Cheesecake Ice Cream. We explored the key ingredients, from fresh strawberries to cream cheese. I shared step-by-step instructions, tips for perfect texture, and variations to try. In conclusion, making ice cream at home is fun and rewarding. With practice, you can craft your own perfect blend and impress friends. Enjoy creating your unique flavors, and don't be afraid to experiment.

Are you ready to indulge in a creamy delight? This Strawberry Cheesecake Ice Cream recipe combines fresh strawberries, rich cream cheese, and sweetened condensed milk for a treat you’ll love. …

Read more

Categories Desserts Leave a comment

Cajun Shrimp and Grits Flavorful Southern Delight

November 16, 2025September 3, 2025 by Chef Evan
To make Cajun shrimp and grits, you need the following: - 1 cup stone-ground grits - 4 cups water - 1 teaspoon salt - 2 tablespoons butter - 1 cup shredded sharp cheddar cheese - 1 pound large shrimp, peeled and deveined - 2 tablespoons Cajun seasoning - 1 tablespoon olive oil - 1/2 cup green bell pepper, diced - 1/2 cup celery, diced - 1/2 cup onion, finely chopped - 2 cloves garlic, minced - 1 cup cherry tomatoes, halved - 1/4 cup scallions, sliced (for garnish) - Salt and pepper to taste When choosing shrimp, look for the following: - Color: Fresh shrimp should have a nice, clear color. Avoid shrimp that look dull or discolored. - Smell: They should smell like the ocean, not like ammonia. A strong odor signals spoilage. - Texture: The shrimp should feel firm and springy. If they feel slimy, skip them. - Shell: If buying shell-on shrimp, check for a clean shell. Any black spots mean they are not fresh. For this dish, stone-ground grits are the best choice. They have a rich flavor and creamy texture. Look for these options: - White stone-ground grits: These offer a subtle taste that pairs well with shrimp. - Yellow stone-ground grits: They provide a slightly nuttier flavor and vibrant color. - Quick-cooking grits: If you’re short on time, these cook faster but may lack depth. Choosing the right ingredients makes a big difference in taste. Enjoy crafting this flavorful dish! {{ingredient_image_1}} Start by heating 4 cups of water in a medium pot. Bring it to a boil. Once boiling, add 1 teaspoon of salt. Now, slowly whisk in 1 cup of stone-ground grits. This helps prevent lumps. Lower the heat to low and let it cook. Stir often for about 20 to 25 minutes. You want the grits to be thick and creamy. When they are done, stir in 2 tablespoons of butter and 1 cup of shredded sharp cheddar cheese. Mix until melted and smooth. Set the grits aside while you cook the shrimp. Grab a large skillet and heat 1 tablespoon of olive oil over medium heat. Toss in 1/2 cup of diced green bell pepper, 1/2 cup of diced celery, and 1/2 cup of finely chopped onion. Sauté these vegetables for about 5 minutes. They should be soft and fragrant. Next, add 2 cloves of minced garlic and cook for another minute. This adds a nice aroma. Now, take 1 pound of peeled and deveined shrimp and coat them in 2 tablespoons of Cajun seasoning. Add the shrimp to the skillet and cook for about 3 to 4 minutes. Flip them once to cook evenly. They should turn pink and firm. Then, add 1 cup of halved cherry tomatoes. Cook for an additional 2 minutes. Season everything with salt and pepper to taste. To serve, spoon the creamy grits onto plates. Make a well in the center of the grits. Top with the Cajun shrimp mixture. Be sure to include the sautéed veggies and tomatoes. For a fresh touch, sprinkle some sliced scallions on top. This adds color and flavor to your dish. Enjoy your Cajun shrimp and grits! To make creamy grits, use stone-ground grits. They cook slowly and give a rich flavor. Start by boiling four cups of water with one teaspoon of salt. Slowly whisk in one cup of grits. This helps avoid lumps. Lower the heat and stir often for 20 to 25 minutes. When thickened, add two tablespoons of butter and one cup of shredded sharp cheddar cheese. Stir until melted. This adds creaminess and depth. Cooking shrimp takes just a few minutes. Heat olive oil in a large skillet over medium heat. Add your diced bell pepper, celery, and onion first. Sauté them for about five minutes. This softens the veggies. Then, add minced garlic and cook for one minute. Toss the shrimp with Cajun seasoning. Add them to the skillet, cooking for three to four minutes. Flip them halfway for even cooking. When they turn pink, they are ready! Avoid overcooking the shrimp. They can become rubbery if cooked too long. Keep an eye on the color. If the shrimp turn a bright pink, they are cooked. Also, do not skip the stirring while cooking grits. It helps them cook evenly. Lastly, taste your dish! Adjust the salt and pepper before serving. This ensures the best flavor. Pro Tips Use Fresh Shrimp: For the best flavor, opt for fresh shrimp instead of frozen. If using frozen, ensure they are completely thawed and patted dry before cooking. Adjust the Spice Level: Feel free to adjust the amount of Cajun seasoning to suit your heat preference. Start with less and add more if you like it spicier. Make Creamier Grits: For even creamier grits, substitute half of the water with chicken broth or add a splash of heavy cream when stirring in the cheese. Prep Veggies Ahead: To save time, chop the bell pepper, celery, and onion ahead of time and store them in the refrigerator until you’re ready to cook. {{image_2}} You can easily make a vegetarian version of Cajun grits. Replace shrimp with fresh veggies. Use mushrooms, zucchini, or bell peppers for a meaty texture. Sauté the veggies in olive oil with Cajun spices. This adds great flavor and keeps it hearty. Serve the seasoned veggies over creamy grits. You still get that rich taste without meat. If shrimp isn’t your favorite, try other seafood. Scallops or fish work well in this dish. Just like shrimp, season them with Cajun spices. Cook the seafood in the same way. Remember to adjust cooking times since seafood can cook faster. Both options will give you a nice twist on the classic dish. Want more heat? Add jalapeños or hot sauce to your shrimp mix. Sprinkle in some cayenne pepper while cooking. You can also use spicy sausage for an extra kick. Top your dish with fresh herbs like parsley or cilantro. These will add color and fresh flavor. Each spicy addition will elevate your Cajun shrimp and grits, making it even more tasty. To store leftovers, let the dish cool down first. Place the shrimp and grits in an airtight container. This helps keep them fresh. You can keep the leftovers in the fridge for up to three days. Make sure to separate the shrimp from the grits if possible. This keeps the texture nice. When you want to enjoy your leftovers, reheating is key. Place the grits in a pot over low heat. Add a splash of water or milk to help them loosen up. Stir often until they are warm. For the shrimp, use a skillet over medium heat. Heat them for about 3 to 5 minutes. This ensures they stay juicy and flavorful. If you want to freeze your dish, it’s best to separate the components. Cool the shrimp and grits completely. Place the grits in a freezer-safe bag or container. The shrimp can go in another bag. You can freeze them for up to two months. When you’re ready to eat, thaw them in the fridge overnight before reheating. Cajun Shrimp and Grits comes from Louisiana. It blends African, French, and Spanish food styles. This dish started as a simple meal for fishermen. They used local shrimp and corn grits. Over time, it became a popular dish in many Southern homes. Today, it showcases rich flavors and warm spices. Yes, you can prepare Cajun Shrimp and Grits ahead of time. Cook the grits and shrimp separately. Store them in the fridge in sealed containers. When you are ready to eat, reheat both. Add a splash of water to the grits to keep them creamy. This method helps save time on busy days. Many side dishes pair well with Cajun Shrimp and Grits. You might try: - Collard greens - Fried green tomatoes - A fresh garden salad - Cornbread - Pickled vegetables These sides balance the rich flavors of the shrimp and grits. They also add more textures to your meal. Enjoy experimenting with different combinations! In this article, I covered essential ingredients, step-by-step instructions, and helpful tips for making delicious Cajun shrimp and grits. You learned how to pick fresh shrimp, prepare creamy grits, and avoid common mistakes. Don't forget the variations you can try and the best ways to store leftovers. Cajun shrimp and grits is a dish full of flavor and creativity. With practice, you can make it perfect every time. Enjoy your cooking!

Are you ready to dive into the rich flavors of Cajun cuisine? This blog post on Cajun Shrimp and Grits: Flavorful Southern Delight will guide you through this classic dish. …

Read more

Categories Dinner Leave a comment

Jamaican Curry Chicken Flavorful Recipe for Home Cook

November 20, 2025September 3, 2025 by Chef Evan
- 2 lbs chicken thighs, bone-in and skinless - 3 tablespoons Jamaican curry powder - 1 teaspoon allspice - 1 teaspoon garlic powder - 1 teaspoon ginger powder - 1 large onion, chopped - 1 green bell pepper, sliced - 2 cloves garlic, minced - 1-inch piece of fresh ginger, finely minced - 2 tablespoons vegetable oil - 2 cups coconut milk - 2 medium carrots, sliced - 1-2 hot peppers (Scotch bonnet or habanero), whole - Salt and pepper to taste - Fresh cilantro or parsley for garnish - Large bowl - Large pot or Dutch oven - Wooden spoon or spatula - Knife and cutting board - Measuring spoons - Ladle If you can't find Jamaican curry powder, use a mix of turmeric, cumin, and coriander. For coconut milk, almond or cashew milk works too, but the flavor will change. Use chicken breast instead of thighs for a leaner option, though it may dry out faster. If you want less heat, replace hot peppers with bell peppers or omit them entirely. Fresh herbs can be swapped for dried ones in a pinch, just use less. {{ingredient_image_1}} Start by taking your chicken thighs. In a big bowl, mix the chicken with Jamaican curry powder, allspice, garlic powder, ginger powder, salt, and pepper. Make sure every piece is well coated. This step adds deep flavor to the chicken. Let it sit for a few minutes while you gather the other ingredients. Next, heat vegetable oil in a large pot over medium-high heat. Add the seasoned chicken thighs. Brown them on all sides for about 5 to 7 minutes. This gives a nice color and flavor. Once browned, take the chicken out and set it aside. In the same pot, toss in chopped onion, sliced green bell pepper, minced garlic, and minced fresh ginger. Sauté these for about 3 to 4 minutes. You want the onions to turn soft and the smell to become fragrant. Now, return the browned chicken to the pot. Add sliced carrots and whole hot peppers. Pour in coconut milk and bring everything to a simmer. This creamy milk makes the curry rich. Lower the heat, cover the pot, and let it cook for about 30 to 35 minutes. Stir it occasionally so it does not stick. The chicken will become very tender. Taste the curry and adjust the seasoning if needed. If you want a milder dish, remove the hot peppers before serving. Serve it hot with fresh cilantro or parsley on top, over rice or with rice and peas. To get the best flavor in your Jamaican curry chicken, use fresh spices. Freshly ground spices add depth and warmth. I suggest using Jamaican curry powder. It has a unique taste that makes this dish shine. Always coat the chicken well with the spices. Letting it marinate for even an hour can boost the flavors. To make your chicken tender, cook it slowly. Start by browning the chicken on medium-high heat for a nice crust. Then simmer it gently in coconut milk. This method keeps the chicken juicy and soft. Be sure to stir it occasionally. This helps prevent sticking and ensures even cooking. Jamaican curry chicken is best served hot. I love to pair it with steamed rice. The rice absorbs the delicious sauce. You can also serve it with rice and peas for a traditional touch. Don't forget to top your dish with fresh cilantro or parsley. This adds a nice pop of color and flavor! Pro Tips Marinate for Flavor: Allow the chicken to marinate with the spices for at least 30 minutes, or even overnight, to enhance the flavors deeply. Adjust the Heat: If you're sensitive to spice, consider removing the whole hot peppers after cooking to keep the dish flavorful but milder. Fresh Ingredients Matter: Use fresh garlic and ginger for a more vibrant flavor compared to their dried counterparts. Perfectly Cooked Chicken: Ensure the chicken is cooked through by checking that the internal temperature reaches 165°F (75°C) before serving. {{image_2}} You can swap chicken for other proteins. Try using goat, pork, or fish. Goat meat gives a rich taste and works well with curry. Pork adds a nice sweetness. Fish cooks quickly and absorbs flavors well. Adjust cooking times for each protein to ensure it's tender. To make a vegetarian or vegan version, replace chicken with chickpeas or tofu. Both options soak up the flavor of the curry. Use vegetable broth instead of coconut milk for a lighter dish. You can also add more veggies, like sweet potatoes or bell peppers, for extra color and nutrition. Adjust heat levels based on your taste. If you like it spicy, add more hot peppers. For a milder dish, remove the seeds from the peppers or use less. You can also add a dash of cayenne pepper for heat without changing the dish's base flavor. Always taste as you go to find your perfect balance. After you enjoy your Jamaican curry chicken, let the leftovers cool. Place them in an airtight container. Store the container in the fridge for up to three days. This helps keep the flavors fresh and tasty. If you want to save some curry for later, freezing works well. First, cool the chicken completely. Then, transfer it to freezer-safe bags. Remove as much air as possible before sealing. You can freeze it for up to three months. When you are ready to eat it, just thaw it in the fridge overnight. To reheat, use a pot on the stove over low heat. Stir often to warm it evenly. You can also use the microwave. Place your curry in a microwave-safe bowl and cover it. Heat for one to two minutes, checking every 30 seconds. Make sure it’s hot all the way through. If it seems dry, add a splash of coconut milk or water. Jamaican curry chicken is a dish that mixes chicken with rich spices. It uses Jamaican curry powder, allspice, and coconut milk. The curry is creamy and full of flavor. The dish often includes vegetables like onions and bell peppers. It can be served with rice or rice and peas. This meal reflects the vibrant and diverse culture of Jamaica. To add more heat, use hot peppers like Scotch bonnet or habanero. You can chop them and add during cooking. Alternatively, keep the whole peppers in the pot. The longer they cook, the spicier your dish will be. You can also add chili powder or cayenne pepper for extra kick. Always taste as you go to find your perfect spice level. Yes, you can use bone-in chicken for Jamaican curry chicken. Bone-in chicken adds flavor and moisture. It also makes the dish richer. Just adjust the cooking time as bone-in pieces may take longer to cook. Ensure the chicken reaches a safe internal temperature of 165°F. Enjoy the juicy and tender meat that falls off the bone! In this blog post, we explored Jamaican Curry Chicken. We shared the key ingredients, tools you need, and where to make swaps. The step-by-step instructions guided you through preparing the chicken and cooking the veggies. We offered tips for flavor and cooking methods, plus serving ideas. You learned about variations, storage, and answered FAQs, like what makes this dish special. Now, you have the skills to create a delicious meal. Enjoy your cooking adventure and make this dish your own!

Are you ready to spice up your dinner routine? Jamaican Curry Chicken is rich in flavor and perfect for home cooks like you. In this post, I’ll walk you through …

Read more

Categories Dinner Leave a comment

One Pot Creamy Pesto Pasta Delightful Meal Ready Fast

November 20, 2025September 3, 2025 by Chef Evan
To make this dish, gather these key items: - 12 oz (340g) pasta of choice (fusilli, penne, or farfalle) - 1 cup homemade or store-bought pesto - 1 cup heavy cream - 2 cups vegetable broth - 1 cup cherry tomatoes, halved - 1 cup spinach leaves, roughly chopped - 1/2 cup grated Parmesan cheese (plus extra for serving) - 2 tablespoons olive oil - 3 cloves garlic, minced - Salt and pepper, to taste - Red pepper flakes (optional, for heat) Each ingredient plays a big role in flavor and texture. The pasta serves as the base, while pesto provides that fresh, herb taste. Heavy cream makes the sauce rich and smooth. Feel free to enhance your dish with these extras: - Cooked chicken or shrimp for protein - Fresh basil for garnish - Sun-dried tomatoes for added sweetness - Zucchini or bell peppers for extra veggies - Nuts like pine nuts or walnuts for crunch These options let you make the dish your own. You can add what you love or have on hand. Choosing the right brands can boost your meal's flavor. Here are some trusted options: - Pesto: - Barilla Pesto Sauce - Classico Basil Pesto - Homemade pesto if you have time! - Parmesan: - Grana Padano - BelGioioso Parmesan - Locatelli Romano Using quality ingredients gives your pasta an extra touch. It helps make your dish taste like it came from a restaurant. {{ingredient_image_1}} Start by gathering all your ingredients. This makes cooking easier. You will need: - 12 oz (340g) pasta of choice (like fusilli, penne, or farfalle) - 1 cup homemade or store-bought pesto - 1 cup heavy cream - 2 cups vegetable broth - 1 cup cherry tomatoes, halved - 1 cup spinach leaves, roughly chopped - 1/2 cup grated Parmesan cheese (plus extra for serving) - 2 tablespoons olive oil - 3 cloves garlic, minced - Salt and pepper, to taste - Red pepper flakes (optional, for heat) Chop the cherry tomatoes and spinach. Mince the garlic. This helps the flavors blend well. In a large pot, heat the olive oil over medium heat. Add the minced garlic. Sauté it for about 1 minute. You want it to smell nice and fragrant. Next, pour in the vegetable broth. Bring it to a gentle boil. Once boiling, add in the pasta. Cook according to the package instructions. Stir often for about 8-12 minutes until the pasta is al dente. After the pasta cooks, reduce the heat to low. Stir in the heavy cream and pesto. Mix well to create a creamy sauce. Now, add the halved cherry tomatoes and chopped spinach. Cook for another 2-3 minutes. This will wilt the spinach and warm the tomatoes. Finally, stir in the grated Parmesan cheese. Mix until it melts and blends in. Season with salt, pepper, and red pepper flakes to taste. If the sauce is too thick, add a splash more vegetable broth or cream. Serve this lovely pasta hot. Garnish it with extra Parmesan cheese and fresh basil for a nice touch. Enjoy your one pot creamy pesto pasta! To make your pesto sauce creamy, use heavy cream. It adds richness and depth. You can also blend in a bit of extra cheese. This gives a smooth texture. If you want more flavor, stir in a bit of lemon juice. This brightens the dish nicely. For al dente pasta, cook it just until it has a slight bite. Check the package for timing. Stir the pasta often to prevent sticking. Use plenty of water and add salt. This enhances the pasta's flavor. Remember, the pasta will continue to cook in the sauce. So, don’t overcook it in the pot! Serve your creamy pesto pasta in deep bowls. Top each bowl with extra Parmesan cheese. A drizzle of olive oil adds a nice touch. Fresh basil leaves bring in a pop of green. If you like heat, sprinkle some red pepper flakes on top. This adds a fun kick to your meal. Pro Tips Perfect Pasta Texture: Make sure to cook the pasta until al dente. This ensures it retains its shape and provides a nice bite when mixed with the creamy sauce. Homemade Pesto Advantage: If possible, use homemade pesto for a fresher and more vibrant flavor. You can easily make it by blending fresh basil, garlic, pine nuts, Parmesan, and olive oil. Adjusting Creaminess: If you find the sauce too thick, gradually add more vegetable broth or cream until you reach your preferred consistency without diluting the flavor. Garnishing for Appeal: For a beautiful presentation, finish your dish with a sprinkle of extra Parmesan, a drizzle of high-quality olive oil, and fresh basil leaves. {{image_2}} You can easily adjust this recipe to fit your needs. If you want to make it gluten-free, simply use gluten-free pasta. Brown rice or quinoa pasta works well. For those watching calories, swap heavy cream for a lighter option like half-and-half or unsweetened almond milk. Just keep in mind that the flavor may change slightly. To turn this dish into a full meal, you can add protein. Chicken is a great choice. Cook it in the pot before you add the garlic. For shrimp, cook them until pink after adding the broth. Both options bring flavor and texture. If you need a quick meal, pre-cooked rotisserie chicken makes a fast and tasty addition. For a vegetarian version, leave out the cheese or use a plant-based option. Nutritional yeast is a great substitute for Parmesan. If you want a vegan option, use coconut cream instead of heavy cream. Replace the pesto with a dairy-free version or make your own using basil, nuts, and nutritional yeast. These swaps keep the dish rich and flavorful while meeting dietary needs. After enjoying your One Pot Creamy Pesto Pasta, let it cool first. Place leftovers in an airtight container. This keeps the pasta fresh. Store it in the fridge for up to three days. If you want to keep it longer, follow the freezing instructions below. When reheating, use low heat to avoid drying out the pasta. Add a splash of vegetable broth or cream. This helps restore the creamy sauce. Stir often for even heating. You can use a microwave or a stovetop for reheating. Just be gentle to keep that lovely texture. To freeze, let the pasta cool completely. Scoop it into freezer-safe bags or containers. Remove as much air as possible to prevent freezer burns. This dish can last up to three months in the freezer. When you’re ready to eat, thaw it overnight in the fridge before reheating. Yes, you can use gluten-free pasta. Look for brands that cook well. Gluten-free pasta may need a few extra minutes to cook. Check the package for the best time. This dish can last about 3 to 5 days in the fridge. Make sure to store it in an airtight container. The pasta may absorb sauce over time. Just add a splash of broth or cream when you reheat it. Yes, making your own pesto is easy! Here’s a simple method: - Ingredients: 2 cups fresh basil leaves, 1/2 cup grated Parmesan cheese, 1/3 cup nuts (like pine nuts or walnuts), 2 cloves garlic, and 1/2 cup olive oil. - Instructions: 1. Blend basil, nuts, and garlic in a food processor. 2. Slowly add olive oil while blending until smooth. 3. Stir in the cheese and season with salt and pepper. Enjoy your fresh, homemade pesto! This blog post covered everything you need for a tasty one pot creamy pesto pasta. We looked at key ingredients, like pesto and pasta, and how to customize them. I shared step-by-step instructions for cooking and creating a creamy sauce. You also learned tips for perfect pasta and fun variations for different diets. Finally, I provided smart storage and reheating advice. Now you can enjoy a quick, delicious meal that suits your needs!

Are you ready to whip up a tasty meal in no time? This One Pot Creamy Pesto Pasta is your answer! With just a few simple ingredients and one pot, …

Read more

Categories Dinner Leave a comment

Creamy Cilantro Lime Pasta Flavorful and Easy Dish

October 22, 2025September 1, 2025 by Chef Evan
For creamy cilantro lime pasta, I recommend using fettuccine or linguine. These types of pasta hold the sauce well. They create a lovely balance with the creamy texture. You need 12 ounces, which is about 340 grams. Make sure to cook it al dente for the best bite. This helps the pasta stay firm and not mushy. The sauce is what makes this dish special. Start with 1 cup of heavy cream. This gives the pasta its rich and creamy base. You’ll also need 1/2 cup of grated Parmesan cheese. This cheese adds depth and a nice salty flavor. Use 1 clove of minced garlic for a hint of warmth. Add 2 tablespoons of fresh lime juice for that zesty kick. Finally, a splash of olive oil helps sauté the garlic and adds richness. Fresh herbs brighten this dish. You need 1/4 cup of finely chopped cilantro. This herb adds a fresh, vibrant taste. Don't forget the zest of 1 lime! The zest gives an extra burst of lime flavor. Season your dish with salt and pepper to taste. Garnish with extra cilantro and lime slices for a beautiful finish. These fresh touches elevate the dish and make it visually appealing. {{ingredient_image_1}} Start by boiling water in a large pot. Add salt to the water; this adds flavor. Once the water boils, add 12 ounces of fettuccine or linguine. Cook it according to the package instructions until it is al dente. Al dente means the pasta is firm but not hard. After cooking, reserve 1 cup of the starchy pasta water. This water helps thicken the sauce later. Drain the pasta and set it aside while you make the sauce. In a large skillet, heat 1 tablespoon of olive oil over medium-low heat. Add 1 clove of minced garlic. Sauté it for about 1 minute until it smells good. Be careful not to burn the garlic. Next, pour in 1 cup of heavy cream. Stir it as you bring the cream to a gentle simmer. Add 1/2 cup of grated Parmesan cheese. Stir continuously until the cheese melts and the sauce thickens. Now, add 2 tablespoons of lime juice and the zest of 1 lime. Mix in 1/4 cup of finely chopped cilantro. Season with salt and pepper to taste. If your sauce is thick, add a bit of the reserved pasta water to thin it out. Once the sauce is ready, add the drained pasta to the skillet. Toss the pasta in the sauce until it is well coated. This step is key to ensuring every bite is creamy and flavorful. Allow the pasta and sauce to cook together for 2-3 minutes on low heat. This helps the flavors combine fully. Finally, serve the creamy cilantro lime pasta in bowls. Garnish with extra cilantro and lime slices for a bright finish. Enjoy your delicious meal! To get the sauce just right, you need to know how to adjust it. If it feels too thick, add a bit of the reserved pasta water. Start with a tablespoon and stir well. This water helps to loosen the sauce without losing flavor. If it's too thin, let it simmer longer. This will help it thickens up naturally. You want a creamy texture that coats the pasta nicely. Using fresh ingredients makes a big difference in this dish. Start with fresh cilantro for a bright taste. It adds a burst of flavor that dried herbs just can’t match. The lime juice and zest is also key. They bring a refreshing tang that lifts the whole dish. Always taste as you go. Adjust salt and pepper to make sure every bite is full of flavor. Cooking pasta to al dente means it should be firm but not hard. Follow the package instructions but start checking a minute early. You want it to have a slight bite. This helps the pasta hold its shape and texture when mixed with the sauce. Remember to salt your boiling water well. This will boost the pasta's flavor. Always reserve some pasta water before draining. It’s a handy trick for adjusting your sauce later. Pro Tips Use Fresh Ingredients: For the best flavor, use fresh cilantro and freshly squeezed lime juice. This will elevate the taste of your creamy sauce. Choose the Right Pasta: Fettuccine or linguine works well with this sauce, but feel free to experiment with your favorite pasta type for a personal touch. Adjust Creaminess: If you prefer a lighter sauce, substitute half of the heavy cream with chicken or vegetable broth for a delicious twist. Perfectly Cooked Pasta: To achieve al dente pasta, follow the package instructions carefully and taste test a minute before the time is up. {{image_2}} You can easily boost the protein in your creamy cilantro lime pasta. Chicken, shrimp, or even tofu work great. For chicken, grill or sauté it until golden. Then, slice it and mix it into the pasta. For shrimp, sauté them in olive oil until they turn pink. Add them to the creamy sauce. If you prefer tofu, press it to remove water, cube it, and sauté it until crispy. Toss it in at the end. This dish is perfect for vegetarians. Just skip the meat and enjoy the creamy sauce. For a vegan version, use coconut cream instead of heavy cream. Nutritional yeast can replace Parmesan cheese. This gives a cheesy flavor without dairy. Also, use a plant-based pasta. Make sure to check the labels to avoid eggs. You can change the taste of this dish by adding different herbs or spices. Try adding basil or parsley for a fresh twist. A pinch of red pepper flakes can add heat. If you love citrus, mix in orange juice or zest. This adds a sweet, tangy flavor. Experimenting with different flavors can make each meal special. After enjoying your creamy cilantro lime pasta, store leftovers in an airtight container. Let the pasta cool down first. Place it in your fridge. It will stay fresh for up to three days. If you notice any changes in color or smell, it’s best to toss it. When it’s time to eat leftovers, heat them gently. Use a skillet over low heat. Add a splash of water or cream to help revive the sauce. Stir often to ensure even heating. You can also microwave in short bursts. Cover the bowl to keep moisture in. Want to save some for later? You can freeze creamy cilantro lime pasta. Portion it into freezer-safe bags or containers. Make sure to remove excess air. It can last up to three months in the freezer. When ready to eat, thaw it in the fridge overnight. Reheat as mentioned above for the best taste. Yes, you can use other pasta types. Penne or spaghetti works well too. Just keep an eye on the cooking time. You want it to be al dente. This means firm but not hard. Feel free to experiment with shapes and textures you love. To thicken your sauce, add more Parmesan cheese. This cheese melts and helps create a creamy texture. If your sauce is too thick, add reserved pasta water. Start with a small amount, then mix well. Keep adding until you reach your desired creaminess. This pasta pairs great with many sides. A crisp green salad adds freshness. Grilled chicken or shrimp boosts protein. You can also serve it with warm bread for dipping. Don’t forget to offer lime wedges for extra zing! This blog post covered how to make delicious Creamy Cilantro Lime Pasta. You learned about pasta choices, key sauce elements, and using fresh flavors. I shared simple steps for cooking, making sauce, and combining them. You found tips for perfect sauce texture and ideas for fun variations. Lastly, we discussed storing leftovers and reheating. Now, you can create your own tasty meals. Enjoy your cooking adventure!

If you’re looking for a quick and tasty meal, Creamy Cilantro Lime Pasta is the answer! This dish is rich, tangy, and packed with fresh flavor. In this post, I’ll …

Read more

Categories Dinner Leave a comment

Crispy Parmesan Crusted Chicken Easy and Tasty Meal

October 7, 2025September 1, 2025 by Chef Evan
- 4 boneless, skinless chicken breasts - 1 cup breadcrumbs (panko preferred for crunch) - 1 cup grated Parmesan cheese - 2 teaspoons garlic powder - 1 teaspoon Italian seasoning - 1/2 teaspoon salt - 1/4 teaspoon black pepper - 2 large eggs - 1/4 cup all-purpose flour - Olive oil spray or cooking oil To make crispy Parmesan crusted chicken, you need a few simple ingredients. First, grab four chicken breasts. They should be boneless and skinless. This keeps the dish light and easy to eat. Next, you will need breadcrumbs. I always prefer panko because it gives a great crunch. You also need grated Parmesan cheese. This cheese adds a rich flavor that you can't miss. For seasoning, use garlic powder and Italian seasoning. These will make the chicken taste amazing. Don’t forget salt and black pepper for extra flavor. You will also need two eggs and a bit of all-purpose flour. The flour helps the coating stick better. Finally, an olive oil spray or cooking oil will help the chicken brown in the oven. With these ingredients, you are ready to create a tasty and crispy chicken dish. Using fresh and quality items will make a big difference in taste. {{ingredient_image_1}} First, preheat your oven to 400°F (200°C). This helps the chicken cook evenly. Next, prepare a baking sheet. You can line it with parchment paper or lightly grease it. In a shallow dish, mix the breadcrumbs, grated Parmesan cheese, garlic powder, Italian seasoning, salt, and black pepper. Stir until everything is well combined. In another shallow dish, beat the two large eggs. Finally, place the flour in a third dish. This setup is key for dredging the chicken. Take each chicken breast and dredge it in flour. Make sure each piece is fully coated. Shake off any excess flour. Then, dip the floured chicken into the beaten eggs. Be sure to coat it thoroughly. After that, press the chicken breast into the breadcrumb and Parmesan mix. Cover both sides completely. This coating gives the chicken its crispy texture. Now, lay the coated chicken breasts onto your prepared baking sheet. If you want extra crispiness, lightly spray the tops with olive oil. Bake in your preheated oven for 25–30 minutes. The chicken is done when it reaches an internal temperature of 165°F (74°C) and the coating is golden brown. Once you take it out, let the chicken rest for a few minutes. This step makes the meat juicier and more enjoyable to eat. - Use panko breadcrumbs. They add great crunch to your chicken. - Lightly spray the chicken with olive oil. This boosts crispiness while baking. - Rest the chicken after baking. This helps keep the juices inside. - Cook until the internal temperature is 165°F (74°C). A meat thermometer is helpful. - Garnish with fresh parsley and lemon wedges. They add color and brightness. - Serve with roasted vegetables or a fresh salad. These sides balance the meal nicely. Pro Tips Use Panko Breadcrumbs: For an extra crunch, opt for panko breadcrumbs instead of regular ones. They create a lighter, crispier texture that elevates the dish. Season the Flour: Don't forget to season the flour with a pinch of salt and pepper. This adds an additional layer of flavor to the chicken before it even hits the egg wash. Let It Rest: After baking, allow the chicken to rest for a few minutes. This helps retain the juices, resulting in tender and flavorful meat. Experiment with Cheese: Feel free to mix different cheese types into the breadcrumb mixture, such as mozzarella or cheddar, for a unique twist on flavor. {{image_2}} You can make your crispy Parmesan crust even tastier. Try adding herbs like rosemary or thyme. A pinch of paprika gives a nice kick. You can also mix different cheeses for a richer flavor. Blend in some mozzarella or cheddar with the Parmesan. This adds great depth to the taste. You can switch up how you cook the chicken too. Air frying gives you a healthier option. It still gets crispy and tastes amazing. Preheat your air fryer to 375°F (190°C) and cook for about 20 minutes. This method uses less oil but keeps the crunch. Grilling is another fun way to prepare this dish. Just coat the chicken and grill over medium heat. Cook each side for about six to eight minutes. This gives the chicken a smoky flavor that’s hard to resist. If you want to change things up, you can swap ingredients. Whole wheat or gluten-free breadcrumbs work great. They give the same crunch without the gluten. For chicken, you can use thighs or tenders instead of breasts. They are juicier and very flavorful. To keep your crispy Parmesan crusted chicken fresh, store it in the refrigerator. Place the chicken in an airtight container. This will help keep moisture out, and it will stay tasty longer. If you have a lot of chicken, you can also wrap it in plastic wrap or foil before putting it in a container. For freezing, let the chicken cool first. Then, wrap each piece in plastic wrap. Place the wrapped chicken in a freezer bag. Try to remove as much air as possible. This helps avoid freezer burn. The chicken can stay good in the freezer for about three months. When reheating crispy chicken, the goal is to keep it crispy. The best way to do this is in the oven or air fryer. Preheat your oven to 375°F (190°C). Place the chicken on a baking sheet and cover it loosely with foil. This keeps it warm without making it soggy. Heat for about 10-15 minutes, checking to avoid overcooking. If using an air fryer, set it to 350°F (175°C). Place the chicken in the basket in a single layer. Cook for around 5-8 minutes or until it’s hot and crisp. This method gives you a great crunch back. In the fridge, crispy chicken lasts about 3-4 days. Make sure to check for any signs of spoilage before eating. Look for changes in color, smell, or texture. If the chicken feels slimy or has an off smell, it is best to throw it away. Always prioritize your safety first! You can pair crispy Parmesan crusted chicken with many side dishes. Here are some tasty ideas: - Roasted vegetables: Carrots, broccoli, or bell peppers add color and nutrition. - Fresh salad: A simple green salad with vinaigrette brings a nice crunch. - Mashed potatoes: Creamy potatoes balance the crispy chicken well. - Rice pilaf: Fluffy rice with herbs complements the flavors. - Garlic bread: This adds a comforting touch to the meal. These sides will enhance your chicken dish and make a full meal. Yes, you can prepare crispy Parmesan crusted chicken ahead of time. Here is how: 1. Prep the chicken: Follow the recipe and coat the chicken. 2. Chill: Place the coated chicken on a baking sheet and cover it. Keep it in the fridge for up to 24 hours. 3. Reheat: When ready to bake, remove it from the fridge. Bake it straight from the fridge for best results. This method saves time on busy days and keeps dinner stress-free. To check if the chicken is fully cooked, use a meat thermometer. Here’s how: - Insert the thermometer into the thickest part of the chicken. - The internal temperature should reach 165°F (74°C) for safety. - Look for juices running clear, not pink, when you cut into it. These tips ensure your chicken is juicy and safe to eat. This blog post guided you through making crispy Parmesan crusted chicken. You learned the ingredients needed, the step-by-step cooking method, and how to add flavor. I shared tips for extra crispiness and keeping your chicken juicy. You can explore variations like grilling or using different crumbs. Now, you have the tools to whip up this dish and impress your family. Enjoy your delicious meal and get creative with your servings!

Are you ready to impress with dinner? My Crispy Parmesan Crusted Chicken is an easy and tasty meal that anyone can make. With just a few simple ingredients, you can …

Read more

Categories Dinner Leave a comment

Cinnamon Toast Crunch Cookies Delightful and Easy Treat

December 24, 2025August 31, 2025 by Chef Evan
You need a few simple items for these tasty cookies. Here’s a complete list of all ingredients needed: - 1 cup unsalted butter, softened - 3/4 cup brown sugar, packed - 1/2 cup granulated sugar - 1 large egg - 1 teaspoon vanilla extract - 2 cups all-purpose flour - 1 teaspoon baking soda - 1/2 teaspoon salt - 1 tablespoon ground cinnamon - 1 1/2 cups Cinnamon Toast Crunch cereal, crushed slightly - 1/2 cup mini chocolate chips (optional) These ingredients blend to make cookies that burst with flavor. Each element adds its own touch. The butter gives richness. The sugars add sweetness and depth. The egg helps bind everything together. The flour and baking soda create the cookie's structure. Ground cinnamon brings that warm, cozy flavor. Cinnamon Toast Crunch adds crunch and a hint of sweetness. Mini chocolate chips, if you choose to add them, give extra joy in every bite. With these ingredients, you are well on your way to making delicious Cinnamon Toast Crunch cookies. Remember, using fresh ingredients is key. It makes a big difference in the taste. {{ingredient_image_1}} First, set your oven to 350°F (175°C). This step makes sure your cookies bake evenly. Next, line a baking sheet with parchment paper. This keeps the cookies from sticking. It also helps with easy cleanup. In a large bowl, add 1 cup of softened unsalted butter. Then, add 3/4 cup of packed brown sugar and 1/2 cup of granulated sugar. Use a mixer or a spoon to cream these ingredients together. Beat until the mixture is light and fluffy. This usually takes about 2-3 minutes. Next, crack in 1 large egg and pour in 1 teaspoon of vanilla extract. Mix until everything is well combined. In another bowl, whisk together 2 cups of all-purpose flour, 1 teaspoon of baking soda, 1/2 teaspoon of salt, and 1 tablespoon of ground cinnamon. Make sure there are no lumps. Gradually add this dry mix to your wet ingredients. Stir until just combined. Don’t over mix; this keeps your cookies soft. Now for the fun part! Gently fold in 1 1/2 cups of slightly crushed Cinnamon Toast Crunch. If you want a chocolatey twist, add 1/2 cup of mini chocolate chips. Mix carefully, so you don’t crush the cereal too much. Using a cookie scoop or spoon, drop rounded tablespoons of dough onto the prepared baking sheet. Space them about 2 inches apart. Bake in your preheated oven for 10-12 minutes. The edges should be lightly golden, while the centers stay soft. Once done, take them out and let the cookies cool on the baking sheet for about 5 minutes. After that, transfer them to a wire rack to cool completely. Enjoy the aroma while they cool! To bake the best Cinnamon Toast Crunch cookies, follow these tips: - Use softened butter. This helps create a creamy mix. - Measure your flour correctly. Too much flour makes cookies dry. - Avoid over-mixing. Mix until just combined for soft cookies. - Bake in small batches. This ensures even cooking and prevents sogginess. These steps will help you make cookies that are soft and chewy, just like you want! You can make these cookies your own in many ways: - Add nuts: Chopped pecans or walnuts give a nice crunch. - Mix in more cereal: Add extra Cinnamon Toast Crunch for texture. - Use different chips: Try butterscotch or peanut butter chips instead of chocolate. - Spice it up: A pinch of nutmeg can add warmth. These ideas let you explore new flavors and textures! For a beautiful display, try these ideas: - Use a decorative plate. It makes cookies more inviting. - Sprinkle crushed Cinnamon Toast Crunch on top. This adds flair. - Serve with milk or coffee for a classic pairing. A great presentation makes your treat even more enjoyable! Pro Tips Chill the Dough: For thicker cookies, chill the dough for at least 30 minutes before baking. This will help prevent spreading. Use Fresh Ingredients: Ensure your baking soda and spices are fresh for the best flavor and texture in your cookies. Customize Your Mix-ins: Feel free to get creative! Try adding nuts, dried fruit, or different types of chocolate for a unique twist. Store Properly: Keep cookies in an airtight container at room temperature for up to a week to maintain their softness and flavor. {{image_2}} You can easily boost the flavor of your Cinnamon Toast Crunch cookies. Here are some fun ideas: - Nuts: Add chopped walnuts or pecans for a crunchy bite. - Dried fruit: Raisins or cranberries add sweetness and chewiness. - Spices: A pinch of nutmeg or ginger can add warmth to the cookies. - Peanut butter: Swirl in some creamy peanut butter for a nutty twist. These add-ins can make your cookies unique and exciting. Feel free to mix and match based on your taste! If you're looking for a gluten-free option, try using almond flour or a gluten-free baking blend instead of all-purpose flour. Here are some tips: - Oats: Use ground oats as a flour substitute for extra fiber. - Coconut flour: This adds a bit of sweetness and a nice texture. - Sugar alternatives: Substitute coconut sugar or maple syrup for a healthier option. These swaps make the cookies friendly for those with dietary needs while keeping them delicious. To make these cookies vegan, you can replace a few ingredients: - Butter: Use vegan butter or coconut oil. - Egg: Replace the egg with a flax egg (1 tablespoon ground flaxseed mixed with 3 tablespoons water). - Milk: Add a splash of almond or oat milk to keep the dough moist. These changes keep the spirit of the cookies alive while catering to a vegan diet. Enjoy your tasty treats guilt-free! To keep your Cinnamon Toast Crunch cookies fresh, store them in an airtight container. Place a piece of parchment paper between layers of cookies. This helps to keep them soft and prevents sticking. Store the cookies at room temperature for up to five days. You can freeze these cookies for later enjoyment. First, let the cookies cool completely. Then, place them in a single layer on a baking sheet. Freeze them for about an hour. Once they are firm, move the cookies to a freezer bag. Seal it tightly and label the bag. They will stay fresh for up to three months in the freezer. Use airtight containers made of plastic or glass. Avoid containers that let air in, as this will dry out your cookies. Keep the cookies in a cool, dark place. This will help maintain their texture and flavor. For frozen cookies, ensure the bag is sealed well to avoid freezer burn. Enjoy your treats whenever you want! Yes, you can use other cereals. Try using Fruity Pebbles or Rice Krispies. These cereals give a fun twist to the cookies. Just crush them slightly before mixing in. Keep in mind that each cereal changes the taste a bit. To make chewier cookies, add more brown sugar. Brown sugar holds moisture better than white sugar. You can also bake them for a shorter time. Take them out when the edges are set, but the centers look soft. This helps keep that chewy texture. If your dough is too dry, add a splash of milk. Start with one tablespoon. Mix it in and check the texture. If needed, add a bit more. This helps the dough come together without making it too wet. These cookies last about a week at room temperature. Store them in an airtight container. If you want them to last longer, you can freeze them. They keep well for about three months in the freezer. Just thaw before enjoying! This blog post covered how to make delicious Cinnamon Toast Crunch cookies. We discussed the ingredients you need, like butter and cinnamon. You learned step-by-step instructions for mixing and baking. We shared tips for perfecting your cookies and creative variations. Lastly, we answered common questions to help you. Enjoy making these cookies your own. They are sure to be a hit!

Get ready to indulge in a sweet treat that combines nostalgia with delight! Cinnamon Toast Crunch Cookies are not just easy to make; they’re bursting with flavor and fun. With …

Read more

Categories Desserts Leave a comment

Greek Stuffed Bell Peppers Savory and Filling Dish

December 22, 2025August 29, 2025 by Chef Evan
To make Greek stuffed bell peppers, you will need: - 4 large bell peppers (any color) - 1 cup cooked quinoa - 1 cup canned chickpeas, rinsed and drained - 1 cup diced tomatoes (fresh or canned) - ½ cup red onion, finely chopped These ingredients blend to create a colorful and nutritious dish. The bell peppers can be red, yellow, or green. Each color adds a unique flavor and makes the dish pop. You will also need these key spices and seasonings: - 2 teaspoons dried oregano - 1 teaspoon garlic powder - ½ teaspoon smoked paprika - 2 tablespoons olive oil - Salt and pepper to taste These spices bring warmth and depth to the dish. Oregano gives a classic Greek taste. Smoked paprika adds a hint of sweetness and a lovely color. For the perfect finishing touch, consider these garnishes: - 1 cup feta cheese, crumbled - Fresh parsley or basil, for garnish Feta cheese adds a creamy and salty contrast to the dish. Fresh herbs brighten the flavors and make the peppers look even more appealing. {{ingredient_image_1}} 1. Preheat your oven to 375°F (190°C). This step is key for cooking the peppers just right. 2. Next, grab 4 large bell peppers. Cut off the tops and remove the seeds. If needed, trim the bottoms so they stand up straight. This keeps them stable in the oven. 3. In a large mixing bowl, combine the filling. Use 1 cup cooked quinoa, 1 cup canned chickpeas (rinsed and drained), 1 cup diced tomatoes, and ½ cup red onion. Don't forget 1 cup crumbled feta cheese for that creamy texture! 4. Now drizzle in 2 tablespoons olive oil. Add 2 teaspoons dried oregano, 1 teaspoon garlic powder, ½ teaspoon smoked paprika, and season with salt and pepper. Mix everything until well combined. 5. Take a spoon and carefully fill each bell pepper with the mixture. Pack it in gently but make sure it's full! 6. Place the stuffed peppers upright in a baking dish. If you have extra stuffing, place it around the peppers for more flavor. 7. Cover the dish with aluminum foil. Bake in the preheated oven for 30 minutes. 8. After 30 minutes, remove the foil. Bake for an extra 15-20 minutes until the peppers are tender and the tops are golden. 9. When done, take them out and let them cool for a few minutes. This makes them easier to handle. 10. For a lovely touch, garnish with freshly chopped parsley or basil. It adds color and flavor! Serve on a rustic wooden board to impress your guests. If you want to switch things up, you can change the quinoa and chickpeas. For quinoa, use rice, couscous, or farro. Each adds a different taste and texture. If you don’t have chickpeas, white beans or lentils work well too. For a dairy-free option, swap feta cheese with a non-dairy cheese. Look for brands that make almond or coconut-based feta. These will still give you a creamy texture and flavor. Baking is a great way to cook stuffed peppers. It gives the peppers a soft texture. However, grilling adds a smoky flavor that many love. If you grill, keep an eye on them so they don't burn. You can also use a slow cooker for a set-and-forget meal. Just layer the stuffed peppers inside and cook on low for 4-6 hours. This method keeps them juicy and full of flavor. Want to make your Greek stuffed bell peppers even tastier? Add spices like crushed red pepper for heat or fresh herbs like dill or mint for a twist. You can also top them with a drizzle of balsamic glaze for a sweet finish. Consider serving with olives or a dollop of tzatziki sauce for extra flavor. These little touches make a big difference in your meal. Pro Tips Choose Colorful Peppers: Using a mix of red, yellow, and green bell peppers not only enhances the visual appeal of your dish but also adds a slight variation in flavor. Customize Your Filling: Feel free to add other ingredients like olives, spinach, or nuts to the filling for added texture and flavor. Make Ahead: You can prepare the stuffing in advance and refrigerate it. Just stuff the peppers and bake them when you're ready to serve. Use Fresh Herbs: Fresh parsley or basil not only makes for a beautiful garnish but also enhances the overall flavor profile of the dish. {{image_2}} You can change the filling for Greek stuffed bell peppers to suit your taste. For meat lovers, ground turkey or lamb adds a rich flavor. Simply brown the meat in a pan before mixing it with quinoa, chickpeas, and spices. If you prefer a meatless option, you can skip the meat and use more vegetables. Try adding sautéed mushrooms or spinach for extra nutrition. For a vegan twist, replace feta cheese with a plant-based alternative. This keeps the dish hearty and satisfying without animal products. Greek stuffed bell peppers can also reflect different regions. You can add Mediterranean ingredients like olives, capers, or sun-dried tomatoes. These add a salty, tangy flavor that brightens up the dish. You may even blend in some spices from other cuisines. For instance, a hint of cumin or coriander can give a unique flair. This mix of flavors makes your stuffed peppers exciting and delicious. The seasons can inspire your stuffed peppers too. In summer, add fresh vegetables like zucchini or corn to the filling. These ingredients create a light, fresh taste. In colder months, warming spices like cinnamon or nutmeg can enhance the dish. You can also use roasted root vegetables for a hearty filling. By adjusting the ingredients, you keep this dish fun and relevant all year round. To keep your Greek stuffed bell peppers fresh, store them in the fridge. Place them in an airtight container. They will last about 3 to 5 days. Make sure they cool down to room temperature before sealing. This helps prevent moisture build-up, which can lead to sogginess. If you want to enjoy these stuffed peppers later, freezing is a great option. Wrap each pepper in plastic wrap, then place them in a freezer-safe bag. This keeps them fresh for up to 3 months. When you’re ready to eat, thaw them in the fridge overnight. To reheat, you can bake them from frozen. Preheat your oven to 375°F (190°C) and bake for about 45 minutes. Cover with foil for the first half to keep moisture in. In the fridge, Greek stuffed bell peppers last for 3 to 5 days. In the freezer, they can stay good for about 3 months. Always check for any signs of spoilage before eating. If they smell off or look strange, it's best to toss them out. You can prepare the filling in advance. Cook your quinoa and mix it with chickpeas, tomatoes, onion, and feta. Store this mix in the fridge. You can also cut the tops off the bell peppers and clean them. Keep them in the fridge too. When you are ready to eat, stuff the peppers and bake them. This way, you save time and enjoy a hot meal. Yes, you can use many types of peppers. Sweet bell peppers are common, but you can try poblano or Anaheim peppers too. These have a mild heat and unique taste. For a spicy kick, jalapeños work well. Just remember to adjust the baking time if the peppers are larger or smaller. You can get creative with your filling. Adding black olives gives a nice salty flavor. Spinach or kale adds a healthy boost. If you want meat, ground turkey or beef can work well too. For a twist, try adding nuts for crunch. Mix in some fresh herbs like dill or mint for extra brightness. This blog post covered Greek stuffed bell peppers, focusing on tasty ingredients and flavors. You learned about using quinoa, chickpeas, and vibrant spices. I shared step-by-step instructions for easy meal prep and tasty variations. You can explore different fillings and cooking methods to suit your taste. Remember, these peppers are great for storage, making meal planning simple. I hope you enjoy making this dish as much as I do. Happy cooking!

Are you craving a dish that’s both savory and filling? Look no further than Greek stuffed bell peppers! This flavorful meal combines healthy ingredients like quinoa, chickpeas, and fresh herbs, …

Read more

Categories Dinner Leave a comment
Older posts
Newer posts
← Previous Page1 … Page7 Page8 Page9 … Page124 Next →

TOSSED FLAVORS

Where flavors are fresh, vibrant, and ready to toss! 🥗

PAGES

Home About Contact Privacy Policy Terms & Conditions Cookie Policy GDPR Policy Copyright Policy Disclaimer

CATEGORIES

Appetizers Desserts Salads Breakfast Dinner

Contact

  • Pinterest
  • Mail
Copyright © 2026 Tossed Flavors. All rights reserved.