Boat Dip Rotel Ranch Dip Tasty and Simple Recipe
![- 1 can (10 oz) diced tomatoes with green chilies (like Rotel) - 1 package (8 oz) cream cheese, softened to room temperature - 1 cup shredded cheddar cheese (or a flavorful mix of Mexican cheeses) - 1 ½ cups sour cream - 1 packet ranch seasoning mix - 1 tablespoon diced jalapeños (optional for an extra kick) - Fresh cilantro, chopped (for garnish) - Tortilla chips or crunchy veggie sticks (for serving) For this Boat Dip, you need a mix of creamy and zesty flavors. The diced tomatoes with green chilies bring a nice kick. Cream cheese adds a rich base that binds all the flavors. Sour cream makes the dip smooth and tangy. Cheddar cheese adds a sharp taste that pairs well with ranch seasoning. If you like heat, jalapeños are a great choice. They add a spicy edge to the dip. Finally, fresh cilantro gives a pop of color and fresh flavor. You can serve this dip with tortilla chips for crunch. Veggie sticks also work well for a lighter option. This dip is easy to make and is perfect for any gathering. For the complete recipe, check out Full Recipe. Enjoy making this flavorful Boat Dip! 1. Start by mixing the cream cheese and sour cream in a medium bowl. Use a whisk or mixer to make it smooth and creamy. 2. Next, incorporate the ranch seasoning mix. Blend it well until you can’t see any lumps. 3. Add the can of diced tomatoes with green chilies. Make sure to mix in the juice from the can for extra flavor. 4. Finally, stir in the shredded cheese and diced jalapeños if you like some heat. Mix gently to keep some texture. 1. Transfer the dip into a serving bowl. Smooth the top with a spatula for a nice finish. 2. Cover the bowl with plastic wrap and refrigerate for at least 30 minutes. This step lets the flavors blend well. 3. Before serving, sprinkle fresh cilantro on top. This adds color and a fresh taste. For the full recipe, check out the [Full Recipe]. Enjoy your tasty Boat Dip! To get the best texture for your Boat Dip, blend the cream cheese and sour cream well. This makes the dip creamy and smooth. Use an electric mixer or a whisk to mix until no lumps are left. When adding the cheese, gently fold it in. Over-stirring can make the dip too thick and less enjoyable. You want small bits of cheese to stay intact for that perfect bite. Letting the dip chill in the fridge is key. Refrigeration allows the flavors to blend and taste even better. Aim for at least 30 minutes, but longer is fine too. If you want a unique twist, add some extra spices. A pinch of garlic powder or some smoked paprika can boost the flavor. Customize it to your taste, and make your Boat Dip truly yours! {{image_4}} You can mix up the cheese in Boat Dip to create new flavors. Here are some tasty ideas: - Use pepper jack cheese for a spicy kick. - Try a mix of Monterey Jack and Mexican blend cheeses for a creamy texture. - Swap in crumbled feta for a tangy twist. - Blend in some Gouda for a smoky flavor. Feel free to experiment with different cheese combinations. Each one will give your dip a unique taste. Adjust the heat of your Boat Dip by changing the jalapeños. Here are some options: - Add more diced jalapeños for extra spice. - Use pickled jalapeños for a tangy heat. - Skip the jalapeños for a milder dip. - Try diced serrano or habanero peppers for bold heat. Finding the right heat level makes your dip perfect for everyone. Boat Dip tastes great with various dippers. Here are some fun ideas: - Serve with tortilla chips for a classic crunch. - Use pita chips for a different flavor and texture. - Fresh veggie sticks, like carrots and celery, add a healthy crunch. - Try pretzel crisps for a salty bite. These options make your dip even more fun to enjoy! Boat Dip stays fresh in the fridge for about 3 to 5 days. Make sure to store it in an airtight container. This keeps the dip creamy and flavorful. When you’re ready to eat it, just give it a good stir. You might want to add a touch of sour cream if it seems a bit thick. You can freeze Boat Dip, but I recommend caution. Freezing may change the texture of the dip. If you choose to freeze it, use a freezer-safe container. It can last up to 2 months in the freezer. Thaw it in the fridge overnight before serving. Reheat it gently in the microwave or on the stove, stirring often. Enjoy the full recipe for the best flavor! Boat Dip, also known as Rotel Ranch Dip, is a creamy, savory treat. It blends cream cheese, sour cream, and flavorful spices. The star ingredient is diced tomatoes with green chilies, giving it a tasty kick. This dip is great for parties and gatherings. You can serve it with tortilla chips or crunchy veggies. It’s quick to make and always a hit! Yes, you can make Boat Dip ahead of time! It's best to prepare it a few hours in advance. This allows the flavors to blend well together. After mixing, cover the dip tightly and store it in the fridge. Just remember to let it chill for at least 30 minutes before serving. This cooling step makes the dip even better! Boat Dip can be gluten-free if you choose the right ingredients. Most of the base items are naturally gluten-free. However, check the ranch seasoning packet to ensure it’s gluten-free. Some brands may add gluten. Always read the label to be safe. Enjoy this dip with gluten-free chips or veggies for a perfect snack! This blog post covered how to make a tasty Boat Dip. We listed every ingredient, from diced tomatoes to ranch seasoning. You learned how to mix and serve it perfectly. Tips on texture and flavor helped boost your skills. Variations let you customize heat and cheese types. Finally, we discussed storage and answered common questions. Enjoy making this dip for your next gathering. It's easy, fun, and sure to please everyone!](https://tossedflavors.com/wp-content/uploads/2025/05/9aadeea9-5419-482e-8788-1bc79e6e6ac1.webp)
Looking for a crowd-pleasing dip? Your search ends here with my Boat Dip recipe! This Rotel Ranch Dip is simple, tasty, and perfect for any gathering. With just a few …
Looking for a crowd-pleasing dip? Your search ends here with my Boat Dip recipe! This Rotel Ranch Dip is simple, tasty, and perfect for any gathering. With just a few …
![To make this easy Mexican coleslaw, gather these simple ingredients: - 4 cups green cabbage, finely shredded - 1 cup red cabbage, finely shredded - 1 cup carrots, freshly grated - 1 cup fresh corn kernels, cooked (you can use canned corn, drained) - 1/2 cup red onion, finely chopped - 1/2 cup fresh cilantro, chopped - 1 jalapeño pepper, finely diced (remove seeds for less heat) - 1/2 cup mayonnaise - 2 tablespoons fresh lime juice - 1 tablespoon agave nectar (or honey as a substitute) - Salt and black pepper, to taste You can easily adapt this recipe to fit what you have. Try these swaps: - Use green bell pepper instead of jalapeño for a milder taste. - Swap out mayonnaise for Greek yogurt for a lighter option. - Replace agave nectar with maple syrup for a different sweet note. - Add other veggies like bell peppers or radishes for extra crunch. Fresh ingredients make a huge difference in flavor. Crisp cabbage adds a satisfying crunch. Fresh corn gives sweetness and color. Using fresh herbs like cilantro brightens the dish. Always choose ripe and bright veggies for the best taste. When you use fresh, you create a vibrant coleslaw. This enhances every bite, making your meal more enjoyable. Remember, freshness is key to a delicious coleslaw. Check out the [Full Recipe] for more details. First, gather all your fresh veggies. You need 4 cups of green cabbage, 1 cup of red cabbage, and 1 cup of grated carrots. Also, have 1 cup of cooked corn, 1/2 cup of red onion, 1/2 cup of cilantro, and 1 jalapeño pepper ready. In a big mixing bowl, add the green cabbage, red cabbage, grated carrots, corn, red onion, cilantro, and jalapeño. Stir everything gently. Make sure each vegetable mixes well. This is key for a tasty coleslaw. Now, let’s make the dressing. In a small bowl, combine 1/2 cup of mayonnaise, 2 tablespoons of fresh lime juice, and 1 tablespoon of agave nectar. Add salt and black pepper to taste. Whisk these ingredients until the dressing is smooth. It should feel creamy and rich. Next, drizzle the creamy dressing over your vegetable mix. Toss everything together gently. Ensure the dressing coats all the veggies. Cover the bowl with plastic wrap or a lid. Place it in the fridge to chill for at least 30 minutes. This waiting time helps the flavors mix. Right before serving, stir the coleslaw again. Check if it needs more lime juice, salt, or pepper. Adjust to your taste. For the full recipe, check out the details provided earlier. Enjoy your refreshing and flavorful side! To make your coleslaw even better, try adding fruits. Diced mango or pineapple gives sweetness. You can also add nuts for crunch. Sliced almonds or chopped walnuts work well. Experiment with spices like cumin or chili powder. These add warmth and depth to your dish. Chilling your coleslaw is key. It helps the flavors blend well. After you mix the coleslaw, cover it tightly. Place it in the refrigerator for at least 30 minutes. This allows the dressing to soak into the veggies. If you can, chill it longer for even better taste. Serving is just as important as taste. Use a large, colorful bowl to show off the coleslaw. Garnish it with cilantro leaves for a pop of green. You can also add lime wedges around the bowl. This adds color and invites guests to dig in. For a fun touch, serve in small cups for individual portions. This makes your meal look fancy and fun! For the complete recipe, check out the Full Recipe section. {{image_4}} You can make your coleslaw even better by adding more veggies. Try adding bell peppers for a sweet crunch. Radishes bring a nice peppery taste. You can also use green onions for extra flavor. If you like it spicy, add some diced serrano peppers. The key is to keep the colors bright. It makes the dish more fun and appealing. While the creamy dressing is tasty, you can switch it up. Try using Greek yogurt instead of mayonnaise for a lighter version. A vinaigrette made with olive oil and vinegar gives a fresh taste. You can even mix in some salsa for added zest. This keeps the coleslaw exciting and new every time you make it. If you have dietary needs, don’t worry! Substitute mayonnaise with a plant-based option for a vegan version. You can also skip the corn if you need a low-carb dish. For gluten-free eaters, this coleslaw is already safe. Just check all your ingredients before you start. These changes let everyone enjoy this tasty dish. For the Full Recipe, check out the complete guide for preparation and tips! To keep your Easy Mexican Coleslaw fresh, use an airtight container. This will keep moisture out. Make sure the coleslaw is completely cool before sealing. If you have leftovers, store them right away. Keeping the dressing separate until you serve helps maintain the crunch of the veggies. When stored properly, this coleslaw lasts about 3 to 5 days in the fridge. The flavors will deepen over time, making it even tastier. However, if the veggies start to look wilty, it's time to toss it. Always give it a quick stir before serving to refresh the flavors. You can freeze coleslaw, but it's best to avoid the dressing. Instead, freeze just the veggies. Place them in a freezer bag, removing as much air as possible. They can last 2 to 3 months. When you're ready, thaw them overnight in the fridge. Make a fresh batch of dressing when you’re ready to eat. This way, you’ll enjoy the best texture and taste. For the full recipe, check the earlier sections. You can store Easy Mexican Coleslaw in the fridge for up to three days. It stays fresh and crunchy if you keep it in an airtight container. After three days, the veggies may become soggy. If you notice the coleslaw losing its texture, it’s time to toss it. Yes, you can make this coleslaw ahead of time! I recommend making it a day before you plan to serve it. This gives the flavors time to blend together. Just make sure to keep it covered in the fridge. When ready to serve, give it a good stir for even flavor. Mexican coleslaw pairs well with many dishes. Here are some great options: - Tacos - Grilled chicken - Pulled pork - Fish dishes - Barbecue meals This coleslaw adds a fresh and zesty touch to each meal. Absolutely! If you want a milder flavor, remove the seeds from the jalapeño. You can also use less jalapeño or skip it altogether. For more heat, add diced serrano peppers or a dash of hot sauce. Adjust the spice to fit your taste. If you’re not a fan of mayonnaise, you can substitute it with Greek yogurt. It gives a creamy texture without the heaviness. You can also try a vinaigrette made with olive oil and lime juice for a lighter option. Yes! Feel free to add more veggies to your coleslaw. Some great options include bell peppers, radishes, or even diced avocado. These additions can add more color and flavor, making your coleslaw even more delightful. To make this coleslaw vegan, replace the mayonnaise with a plant-based alternative, such as vegan mayo or tahini. Use agave nectar or maple syrup instead of honey. This way, you can enjoy the same great taste while keeping it plant-based. For the full recipe, check out the Zesty Mexican Coleslaw recipe above. This blog post covered the key parts of making Easy Mexican Coleslaw. You learned about fresh ingredients, step-by-step prep, and tips to enhance flavor. We explored variations and proper storage methods. Remember, using fresh veggies makes a big difference. Enjoy experimenting with different dressings and add-ins. Make this coleslaw your own! With simple steps, you can create a tasty side dish. Now, dive in and enjoy a quick, healthy meal.](https://tossedflavors.com/wp-content/uploads/2025/05/a12e1fd0-6bf1-4adb-bca5-fea9edb3ad2f.webp)
Are you ready to spice up your meals with a refreshing twist? This Easy Mexican Coleslaw is packed with vibrant flavors and fresh ingredients that will complement any dish. You’ll …
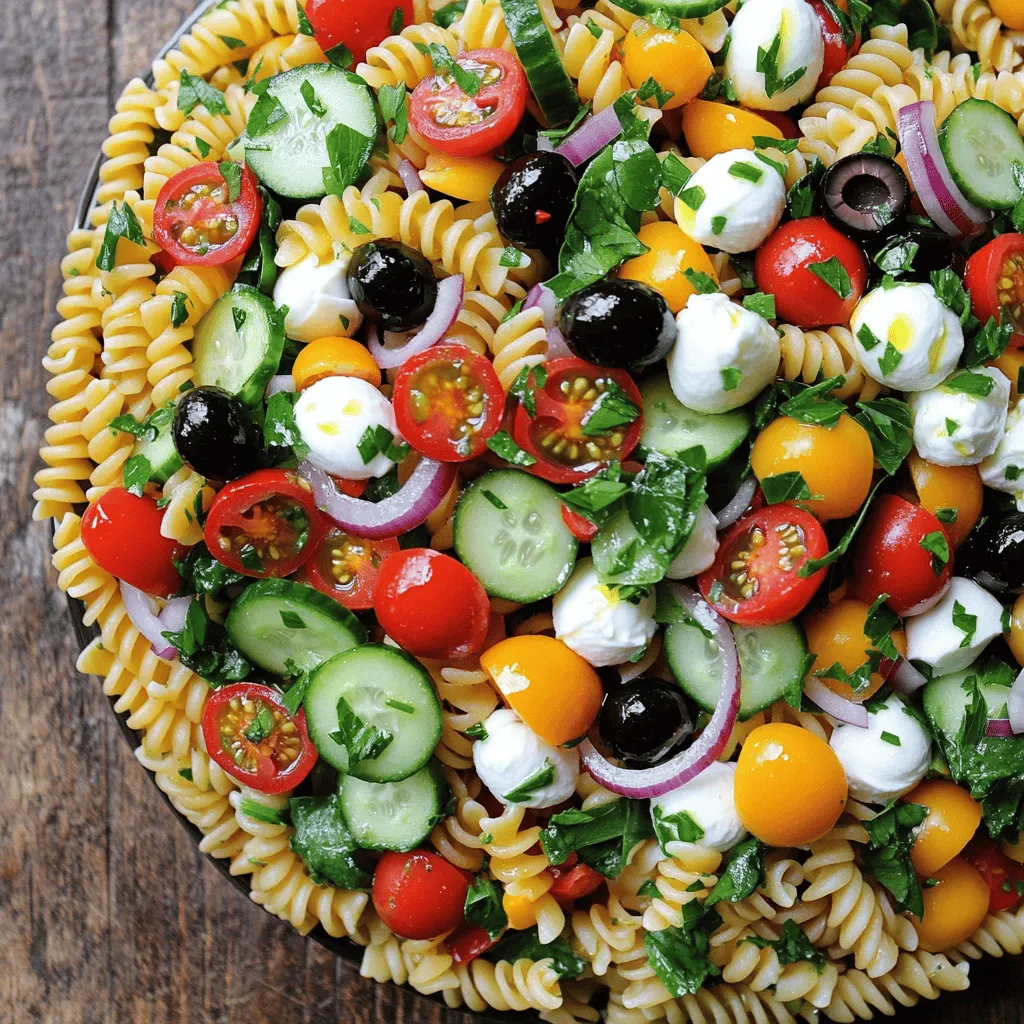
Are you ready to make a pasta salad that bursts with flavor? My Grinder Pasta Salad is the perfect dish for summer cookouts or a quick lunch. With fresh veggies, …

If you crave a tasty snack that’s crunchy and sweet, you’ve clicked on the right post! Cinnamon-Sugar Air Fryer Banana Chips are simple to make and full of flavor. Using …

Looking for a sweet treat that’s easy to make? You’ve found it! This Strawberry Brownies Recipe offers a fun twist on classic brownies, blending rich chocolatey flavor with fresh strawberries. …
![- 1 pound Brussels sprouts, cleaned, trimmed, and halved - 2 tablespoons extra virgin olive oil - 3 tablespoons sweet chili sauce - 1 tablespoon low-sodium soy sauce - 1 teaspoon garlic powder - Salt and freshly ground black pepper, to taste - 1 tablespoon toasted sesame seeds (for garnish) - 2 green onions, thinly sliced (for garnish) To make these savory sweet chili air fryer Brussels sprouts, gather the main ingredients first. Start with fresh Brussels sprouts, which are the star of this dish. Their earthy flavor pairs well with the sweet chili sauce. Next, you will need olive oil to help the sprouts crisp up nicely in the air fryer. For added depth, we mix in soy sauce and garlic powder. These ingredients enhance the flavor, making each bite a delight. Don't forget to season with salt and pepper. This will help balance the sweetness and bring out the sprouts' natural taste. Now, let's talk about garnishing. Toasted sesame seeds add a nutty crunch, while sliced green onions bring a fresh touch to the dish. This combination not only looks good but also adds layers of flavor. You can find the full recipe for these Sweet Chili Air Fryer Brussels Sprouts in the next section. Enjoy the process of making this dish; it’s simple yet rewarding! First, preheat your air fryer to 375°F (190°C). This step helps the sprouts cook evenly. Next, clean and trim your Brussels sprouts. Remove any yellow leaves and cut off the stem ends. Halve each sprout to ensure they cook well and soak up flavors. In a large bowl, combine the oil and sauces. Add 2 tablespoons of extra virgin olive oil, 3 tablespoons of sweet chili sauce, and 1 tablespoon of low-sodium soy sauce. Sprinkle in 1 teaspoon of garlic powder, along with salt and pepper to taste. Mix well, ensuring all ingredients blend together. Now, add the halved Brussels sprouts to the bowl. Toss them until each sprout gets a nice coat of the sauce mixture. Carefully spread the coated Brussels sprouts in a single layer in the air fryer basket. Avoid overcrowding; this helps them get crispy. Cook the sprouts for about 15 to 18 minutes. Remember to shake the basket halfway through. This ensures even cooking and crispiness. Keep an eye on them; they should be golden on the outside and tender inside. Once cooked, transfer the sprouts to a serving dish and enjoy your Sweet Chili Air Fryer Brussels Sprouts! For the full recipe, check out the detailed instructions above. - Spacing in the air fryer: Proper spacing is key. Make sure the Brussels sprouts are not crowded. Air needs room to flow for that crispness. A single layer works best. If you have too many, cook them in batches. - Monitoring cooking time: Keep an eye on the Brussels sprouts. Start checking them after 12 minutes. They should be golden brown and crispy. Adjust time if needed. - Additional seasoning suggestions: Want to kick it up a notch? Try adding a pinch of red pepper flakes for heat. You can also mix in some smoked paprika for a smoky twist. - Using different sauces: While sweet chili sauce shines here, you can swap it out. Try teriyaki or hoisin sauce for a different taste. Each sauce brings its own magic to the dish. For the full recipe, check out the [Full Recipe]. {{image_4}} You can easily boost the flavor and nutrition of your Brussels sprouts by adding protein. - Incorporating bacon or chicken: Cook crispy bacon and chop it into bits. Toss the bacon with the Brussels sprouts before air frying. You can also add diced chicken for a heartier dish. Season the chicken lightly with salt and pepper. Cook it until it's golden brown and safe to eat. - Vegetarian alternatives: If you want a vegetarian option, try adding chickpeas or edamame. These add protein and texture. Just mix them in with the Brussels sprouts before cooking. Don't be afraid to get creative with flavors in this recipe. - Spicy variations: If you like heat, add some red pepper flakes or sriracha to the sweet chili sauce. This adds a kick that balances the sweetness. Adjust the amount to fit your taste. - Use of other sauces: Try using teriyaki or hoisin sauce instead of sweet chili. This change will give your dish a different flair. You can also mix sauces for a unique taste. Just remember to keep the balance of flavors right. For the full recipe, check the Sweet Chili Air Fryer Brussels Sprouts section. To store leftover Sweet Chili Air Fryer Brussels Sprouts, first let them cool. Place them in an airtight container. You can keep them in the fridge for up to three days. If you want to keep them longer, freezing is an option. Just spread them on a baking sheet to freeze individually. Once frozen, transfer them to a freezer-safe bag. They can last up to three months in the freezer. When it’s time to enjoy your leftovers, the best method is to use the air fryer again. Preheat it to 350°F (175°C). Place the Brussels sprouts in the basket and heat for about 5-7 minutes. This method helps them stay crispy. You can also use an oven. Preheat it to 350°F (175°C) and spread the sprouts on a baking sheet. Heat for 10-15 minutes, checking for crispness. Avoid using a microwave as it can make them soggy. To make Sweet Chili Air Fryer Brussels Sprouts, follow these steps: 1. Preheat your air fryer to 375°F (190°C). 2. Clean and trim 1 pound of Brussels sprouts, then cut them in half. 3. In a large bowl, mix 2 tablespoons of olive oil, 3 tablespoons of sweet chili sauce, and 1 tablespoon of low-sodium soy sauce. 4. Sprinkle in 1 teaspoon of garlic powder, along with salt and pepper to taste. 5. Toss the halved Brussels sprouts in the sauce until well-coated. 6. Place the sprouts in the air fryer basket in a single layer. 7. Air fry for 15-18 minutes, shaking the basket halfway through. 8. When done, transfer to a serving dish and garnish with 1 tablespoon of toasted sesame seeds and 2 sliced green onions. This recipe is quick and very tasty! You can find the complete recipe above. Yes, you can use frozen Brussels sprouts! Just follow these steps: 1. Do not thaw the frozen Brussels sprouts. Use them straight from the freezer. 2. Increase the air frying time by a few minutes, about 20-22 minutes total. 3. Shake the basket halfway through, just like with fresh sprouts. 4. Check for crispiness and tenderness. They should turn out great! Frozen sprouts may not crisp up as much. But they still taste delicious! Brussels sprouts pair well with many dishes. Here are some great options: - Serve them alongside grilled chicken or steak. - Pair with mashed potatoes or rice for a filling meal. - Add to a salad for extra crunch and flavor. - They also work well with fish, like salmon or cod. Try these ideas to enjoy Brussels sprouts in different ways! Sweet Chili Air Fryer Brussels Sprouts are simple to make. You need just a few main ingredients, like Brussels sprouts, olive oil, and sweet chili sauce. Follow the steps to wash and prepare them, mix in flavors, and air fry for a tasty dish. Consider adding proteins or different sauces for variety. Store leftovers well, and reheat to keep them crispy. Enjoy experimenting with this fun, flavorful recipe!](https://tossedflavors.com/wp-content/uploads/2025/05/f1df7059-e624-4dc8-98f6-8ad50e5ae900.webp)
If you love crispy veggies with a sweet kick, you’ve got to try these Sweet Chili Air Fryer Brussels Sprouts! This recipe is packed with flavor and easy to make. …
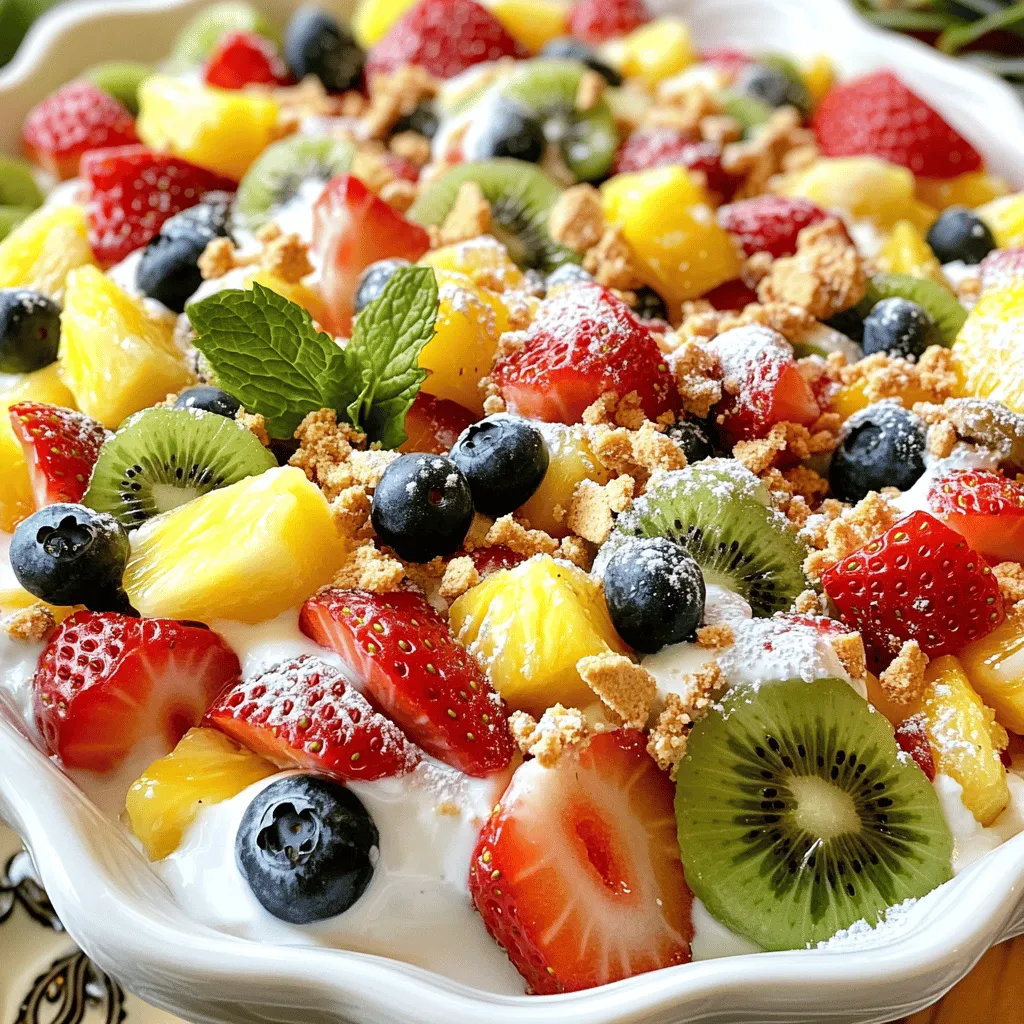
Are you ready for a refreshing twist on dessert? My Cheesecake Fruit Salad combines creamy cheesecake flavors with fresh fruits, making it a delightful treat. This simple, step-by-step guide will …
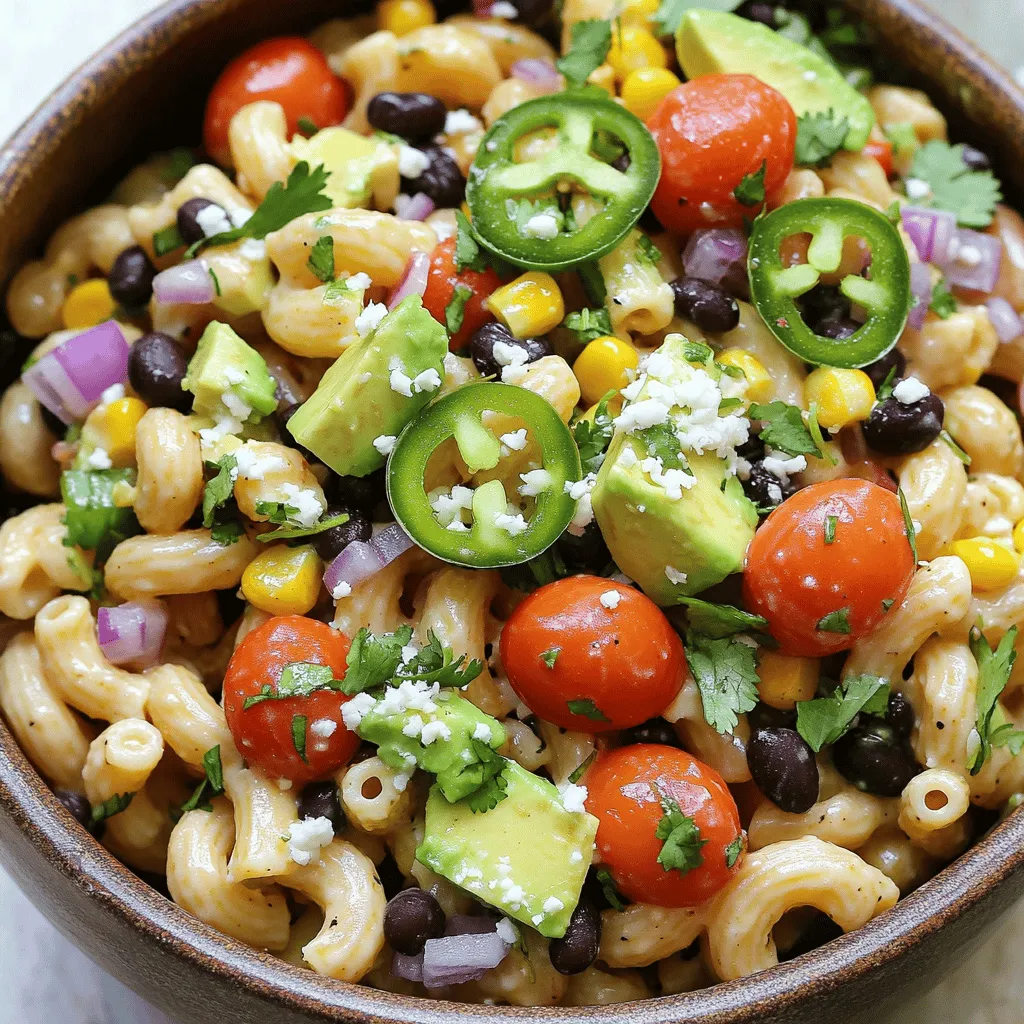
Are you ready to spice up your next potluck or family meal? This Mexican Macaroni Salad is packed with flavor and easy to make. Using fresh ingredients, you can whip …
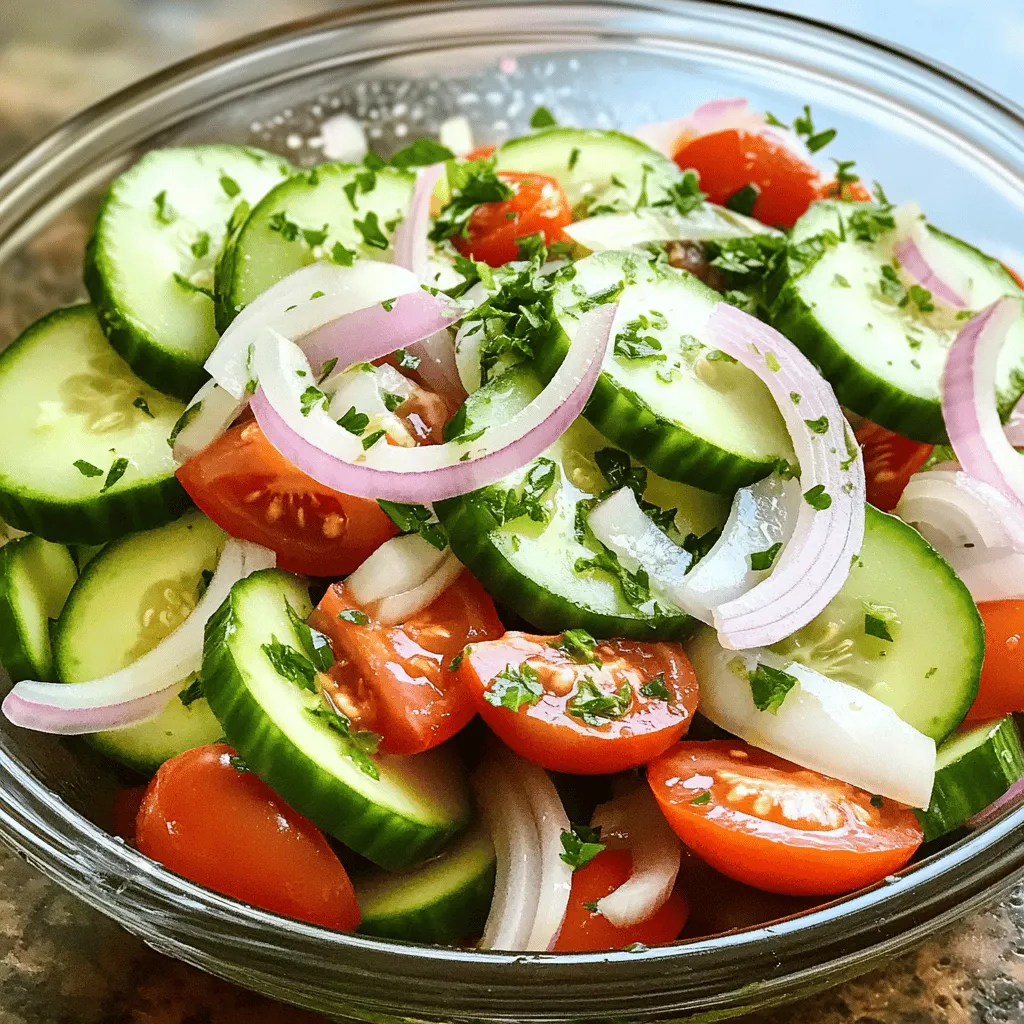
Looking to brighten up your meals? Marinated Cucumbers, Onions, and Tomatoes are the perfect fresh dish! This crunchy medley will add vibrant flavor to your table. Packed with healthy ingredients …
![- 1 can refrigerated cinnamon roll dough - 3 large eggs - 1/2 cup milk - 1 teaspoon vanilla extract - 1 teaspoon ground cinnamon - 1 tablespoon brown sugar - 1/4 cup maple syrup (for drizzling) - Powdered sugar (for dusting) - Fresh berries (for garnish, optional) To make these Cinnamon Roll French Toast Bites, you will need simple ingredients. The main star is the cinnamon roll dough. It adds a sweet and soft base. Eggs, milk, and vanilla create a rich custard. Ground cinnamon and brown sugar boost the flavor. Maple syrup brings sweetness, while powdered sugar gives a nice touch. Fresh berries are optional but add color and nutrition. - Nutmeg or cardamom for extra spice - Whipped cream as a topping - Nuts or granola for added crunch If you want to spice things up, nutmeg or cardamom works well. These spices give a warm, cozy taste. You can also add whipped cream on top for a rich finish. For crunch, sprinkle some nuts or granola. Each addition creates a unique flavor and texture. For the full recipe, you can check out the complete instructions. Enjoy making these tasty bites! 1. First, preheat your oven to 375°F (190°C). This helps the bites bake evenly. 2. Next, prepare your baking sheet. Line it with parchment paper. This keeps the bites from sticking. 3. Open the can of cinnamon roll dough. Carefully separate each roll. 4. Use a sharp knife or kitchen scissors. Cut each roll into quarters. This makes bite-sized pieces. 1. In a medium bowl, whisk together the eggs and milk. 2. Add the vanilla extract, ground cinnamon, and brown sugar. Mix well until smooth. 3. Take each piece of cinnamon roll dough. Dip it into the egg mixture. Make sure each piece is fully coated. 1. Arrange the coated pieces on the baking sheet. Give them space to bake evenly. 2. Place the baking sheet in the oven. Bake for about 15-20 minutes. 3. Watch for them to turn golden brown. They should be cooked through. 4. After baking, let the bites cool on the baking sheet for a few minutes. This helps them set before serving. 5. Drizzle warm bites with maple syrup. Dust with powdered sugar for sweetness. 6. For a fresh touch, add berries as a garnish. They make your dish colorful and tasty. [Full Recipe] To get the best results with your Cinnamon Roll French Toast Bites, focus on two key factors: baking time and temperature. Bake them at 375°F (190°C) for 15 to 20 minutes. Check for a golden brown color. This ensures they cook evenly and don’t get dry. To avoid soggy bites, don't soak the dough too long in the egg mixture. Just dip each piece quickly. You want a nice coating, not a soggy mess. This little tip helps keep the bites fluffy and soft. When serving, think about how to make the dish pop. Use a fun, colorful platter. Arrange the bites neatly and sprinkle fresh berries around them. This adds color and makes the dish more inviting. For beverages, pair these bites with a hot cup of coffee or a sweet tea. A glass of cold milk also works great. These drinks complement the sweet flavors and add a cozy touch. To take your bites to the next level, try flavored syrups. Instead of just maple syrup, use vanilla or caramel syrup for extra sweetness. Drizzle it generously over the warm bites for a delightful finish. Don't shy away from experimenting with spices. Add a pinch of nutmeg or cardamom to the egg mixture for a unique twist. These spices add warmth and depth to the flavor, making each bite exciting. {{image_4}} You can switch up the flavors to make your Cinnamon Roll French Toast Bites even better. Here are two fun ideas: - Chocolate chip cinnamon roll bites: Add chocolate chips to the dough before baking. This makes the bites rich and sweet. - Pumpkin spice version for autumn: Mix in pumpkin puree and pumpkin spice to the egg mixture. This adds warmth and makes it perfect for fall. Want to make these bites fit your diet? Here are some easy swaps: - Gluten-free cinnamon roll options: Use gluten-free cinnamon roll dough. Many brands offer tasty versions that work well. - Dairy-free substitutions for milk and eggs: Try almond milk or oat milk in place of regular milk. You can also use flax eggs instead of regular eggs. You can change how you serve these bites, making them even more fun: - Mini muffins instead of bites: Pour the egg-coated dough into a muffin tin. This creates adorable mini muffins everyone will love. - Skewered for fun finger food presentation: Thread the baked bites onto skewers. This makes for an easy and fun way to eat them at parties. For the full recipe, be sure to check out the details above! To keep your cinnamon roll French toast bites fresh, store them in an airtight container. Place parchment paper between layers to prevent sticking. You can refrigerate them for up to three days. If you want to save them longer, freeze the bites. Just make sure they cool completely before freezing. Use a freezer-safe bag or container for best results. When you're ready to enjoy your leftover bites, reheat them in the oven. Preheat the oven to 350°F (175°C) and place the bites on a baking sheet. Warm them for about 10 minutes. This method keeps their crispy texture. You can also reheat them in the microwave for about 30 seconds, but they may get soft. For the best taste, drizzle a little maple syrup on top before reheating. These delightful bites stay fresh for about three days in the fridge. In the freezer, they can last for up to three months. Be on the lookout for signs of spoilage. If they smell sour or have a strange color, it’s best to toss them. Always trust your nose and eyes when it comes to food safety. Can I make these bites ahead of time? Yes, you can prepare these bites in advance. Mix the egg mixture and cut the cinnamon roll dough. Store them in the fridge. When you're ready, just dip and bake! What can I use instead of cinnamon rolls? You can use biscuit dough or puff pastry. Both options work well and give a nice flavor. You can even try croissants for a richer taste. Why are my bites not cooking evenly? If your bites are uneven, check your oven temperature. An oven thermometer can help. Also, make sure to space the bites well on the baking sheet. This helps them bake evenly. How to fix a runny egg mixture? If your egg mixture is too runny, add another egg or a bit more milk. This will help thicken it up. Whisk well to combine all the ingredients before dipping. Can I use eggs substitutes? Yes, you can use flaxseed meal or applesauce. For each egg, use 1 tablespoon of flaxseed mixed with 2.5 tablespoons of water or 1/4 cup of applesauce. What’s a good alternative to maple syrup? Honey or agave syrup works great as a substitute. You can also use a fruit sauce for a fresh twist. This blog post covered how to make delicious cinnamon roll French toast bites. You learned the key ingredients, preparation steps, and baking tips. Remember, you can enhance this treat with spices or toppings. Variations are fun, too, allowing you to customize flavors or even adjust for diets. Store leftovers properly to enjoy later. Now, get in the kitchen, have fun, and create your own tasty bites!](https://tossedflavors.com/wp-content/uploads/2025/05/65aac2df-3428-4c50-aa9e-b7df757d73c2.webp)
Looking for a quick and tasty breakfast idea? Try making Cinnamon Roll French Toast Bites! This fun twist on classic favorites combines warm cinnamon rolls with a rich egg mixture …